Jura GIGA X3C User manual

JURA Type 727
GIGA X3c Professional Instructions for Use
KOriginal instructions for use
Before using the machine read the instructions for use.
E
Instructions for use has been awarded the seal of approval by the inde-
pendent German Technical Inspection Agency, TÜV SÜD, due to its easy-
to-understand style, its thoroughness and coverage of safety aspects.

2
Table of contents
Your GIGA X3c Professional
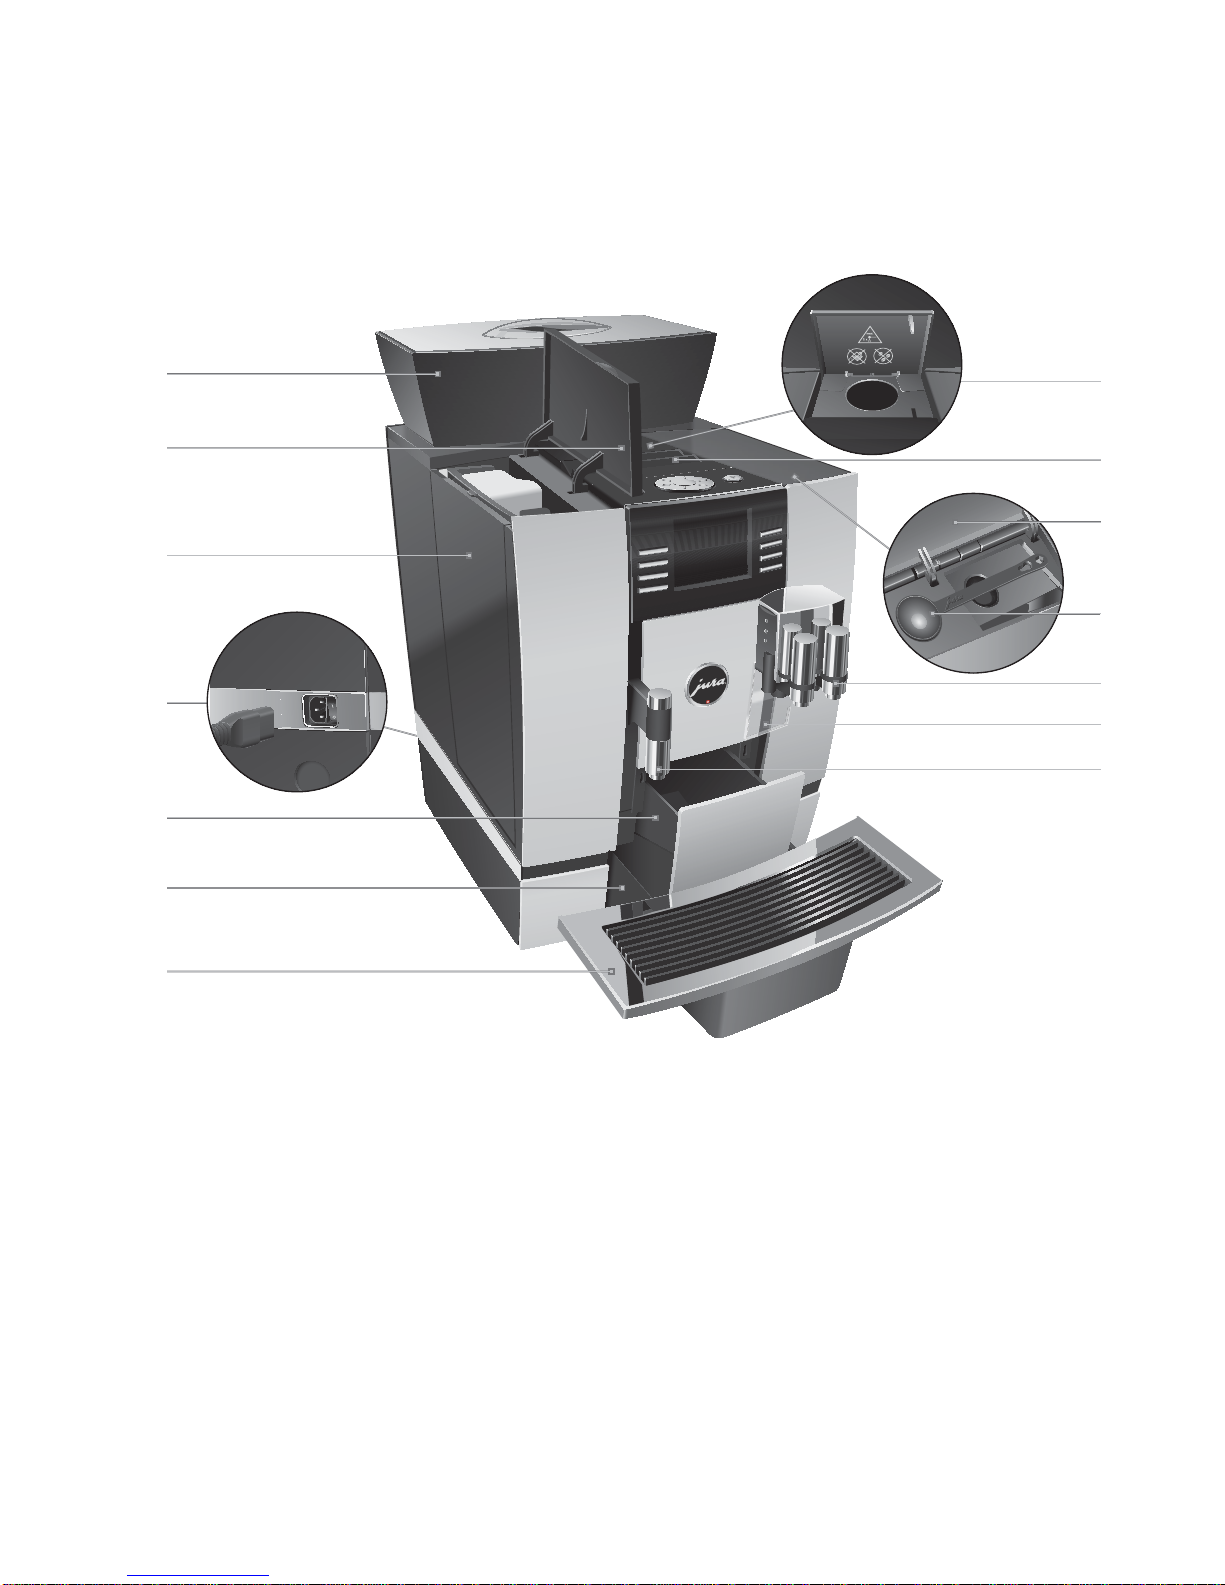
Control elements 4
Important information 6
Proper use ......................................................................................................................................................6
For your safety...............................................................................................................................................6
1 Preparing and using for the first time 10
JURA on the Internet....................................................................................................................................10
Requirements for first-time use ................................................................................................................10
Setting up the machine ..............................................................................................................................10
Filling the bean container...........................................................................................................................10
First-time use .................................................................................................................................................11
Settings by the JURA service technician...................................................................................................14
Determining the water hardness ..............................................................................................................15
Connecting milk...........................................................................................................................................15
2 Preparation 16
Coffee, latte macchiato etc.– options for preparation .........................................................................16
Preparation at the touch of a button........................................................................................................17
Preparation using the product selector ...................................................................................................18
Ground coffee...............................................................................................................................................18
Barista recipes at a glance ..........................................................................................................................19
Preparing barista recipes ...........................................................................................................................20
Permanently setting amounts for the cup size .....................................................................................20
Hot water.......................................................................................................................................................21
3 Daily operation 22
Switching on ................................................................................................................................................22
Daily maintenance ......................................................................................................................................22
Regular maintenance .................................................................................................................................23
Switching off ................................................................................................................................................23
4 Permanent settings in programming mode 24
Possible settings in programming mode ...............................................................................................24
Product settings ..........................................................................................................................................25
Adjusting the product settings.................................................................................................................25
Renaming a product...................................................................................................................................27
Adding products to the start screen........................................................................................................28
Setting the consistency of grind ..............................................................................................................29
Maintenance settings.................................................................................................................................30
Setting the water hardness ........................................................................................................................31
Energy-saving mode ...................................................................................................................................31
Time and date..............................................................................................................................................32
Timer ............................................................................................................................................................. 33
Automatic switch-off ..................................................................................................................................34
Units ..............................................................................................................................................................35
Restore factory settings .............................................................................................................................35

3
Table of contents
Warnings
J WARNING
J CAUTION
Always take note of any information marked with the words CAUTION or
WARNING and a warning sign. The signal word WARNING draws your attention
to potential serious injury, and the signal word CAUTION to potential minor
injury.
CAUTION CAUTION draws your attention to potential damage to the machine.
Symbols used
TPrompt to take action. This symbol means that you are being prompted to
perform some action.
EInformation and tips to make it even easier to use your GIGA.
‘Espresso’ Display
Symbol description
Language......................................................................................................................................................36
Display settings ...........................................................................................................................................36
Background .................................................................................................................................................. 37
Deactivating barista recipes...................................................................................................................... 37
Querying information ................................................................................................................................38
5 Maintenance 39
Rinsing the coffee system .........................................................................................................................39
Rinsing the milk system.............................................................................................................................39
Cleaning the milk system..........................................................................................................................40
Dismantling and rinsing the dual spout..................................................................................................41
Changing the filter......................................................................................................................................43
Cleaning the machine ................................................................................................................................44
Descaling the machine ..............................................................................................................................45
Cleaning the bean container.....................................................................................................................47
6 Display messages 49
7 Troubleshooting 51
8 Transport and environmentally friendly disposal 52
Transport/ Emptying the system.............................................................................................................52
Disposal.........................................................................................................................................................52
9 Technical data 53
10 Index 54
11 JURA contact details/ Legal information 60

4
Control elements
Control elements
4
5
2
7
6
9
14
13
12
8
10
11
3
1
1 Bean container with aroma preservation
cover
2 Water tank cover
3 Water tank
4 Power switch and plug-in mains cable
(back of the machine)
5 Coffee grounds container
6 Drip tray
7 Cup grille
8 Filler funnel for ground coffee
9 Ventilation slats
10 Storage compartment cover
11 Measuring spoon for ground coffee
12 Height- and width-adjustable dual spout
13 Splash guard
14 Height-adjustable hot-water spout

5
Control elements
1
4
5
32
Top of the machine
1 QOn/Off button
2 gRotary Switch
3 OP button (programming)
Front
4 Display
5 Multi-function buttons (button function
depends on what is shown in the display)
1
2
34
Back of the machine
1 Service cover
(open by pressing with your finger)
2 Locking device
3 Sliding catch
4 Service socket (underneath cover)

6
Important information
This machine is intended for use by specialist or
trained staff in businesses, light industry and
agricultural facilities or for commercial use by non-
professionals. It should only be used for coffee
preparation and to heat milk and water. Use for any
other purpose will be deemed improper. JURA
Elektroapparate AG cannot accept any responsibil-
ity for the consequences of improper use.
Before using the machine read these instructions
for use thoroughly and completely and comply
with the instructions they contain. A warranty ser-
vice is not applicable for damage or defects caused
by non-compliance with the instructions for use.
Keep these instructions for use close to the machine
and pass them on to the next user.
The GIGA may only be operated by instructed per-
sons. Non-professionals must be supervised dur-
ing use.
Please carefully read and observe the important
safety information set out below.
To avoid danger of potentially fatal electric shock:
UNever use a machine which is damaged or has
a defective mains cable.
UIn the event of signs of damage, for example if
there is a smell of burning, unplug the machine
immediately from the mains supply and con-
tact JURA service.
UIf the mains cable of this machine is damaged,
it must be repaired either directly by JURA or
by an authorised JURA service centre.
Proper use
For your safety
J

7
Important information
UMake sure that the GIGA and the mains cable
are not located close to hot surfaces.
UBe careful to ensure that the mains cable is not
trapped and does not rub against sharp edges.
UNever open and repair the machine yourself.
Do not modify the machine in any way that is
not described in these instructions for use. The
machine contains live parts. If opened, there is
a danger of potentially fatal injury. Repairs
may only be carried out by authorised JURA
service centres, using original spare parts and
accessories.
UTo completely and safely disconnect the
machine from the power supply, first switch
off the GIGA using the On/Off button and then
at the power switch. Only then should you
remove the mains plug from the power socket.
There is a risk of scalds or burns on the spouts.
UPlace the machine out of the reach of children.
UDo not touch any hot parts. Use the handles
provided.
A defective machine is not safe and could cause
injury or fire. To avoid damage and any associated
risk of injury or fire:
UOnly connect the machine to the mains volt-
age in accordance with the information on the
rating plate. The rating plate is located on the
underside of your GIGA. Further technical data
is provided in these instructions for use (see
Chapter 9 ‘Technical data’).
UConnect the GIGA directly to a domestic power
socket. Using multi-socket adapters or exten-
sion cords may cause overheating.

8
Important information
UNever allow the mains cable to loosely hang
down. The mains cable could pose a tripping
hazard or become damaged.
UProtect the GIGA from environmental influ-
ences such as rain, frost and direct sunlight.
UDo not immerse the GIGA, mains cable or con-
nections in water.
UDo not put the GIGA or any individual parts in
the dishwasher.
USwitch your GIGA off at the power switch
before any cleaning operation. Always wipe
the GIGA with a damp cloth rather than a wet
one, and protect it from prolonged exposure
to water splash.
UThe GIGA is not suitable for installation on a
surface where a jet of water can be used.
UThe machine must not be cleaned with a jet of
water.
UPlease only use original JURA maintenance
products. Use of products that are not explic-
itly recommended by JURA could damage the
GIGA.
UDo not use any coffee beans treated with addi-
tives or caramelised coffee beans.
UOnly fill the water tank with fresh, cold water.
USwitch the machine off at the power switch if
you are going to be absent for a longer period
of time.
UChildren may not clean or service the machine
unless supervised by a responsible person.
UDo not allow children to play with the machine.
UKeep children under the age of 8 away from
the machine, or supervise them constantly.

9
Important information
UChildren aged 8 and over may only operate
the machine without supervision if they have
been instructed in how to use it safely. Chil-
dren must be able to recognise and under-
stand the potential dangers arising from incor-
rect use.
People, including children, who
Udo not have the physical, sensory or mental
capabilities to use the machine safely or
Uare inexperienced or lack knowledge in how to
use the machine safely
must be supervised by a responsible person when
using it, or must be instructed in how to use it cor-
rectly.
Safety when handling the CLARIS filter cartridge:
UFilter cartridges should be kept out of the
reach of children.
UStore filter cartridges in a dry place in the
sealed packaging.
UProtect cartridges from heat and direct sun-
light.
UDo not use damaged filter cartridges.
UDo not open filter cartridges.

10
1 Preparing and using for the first time
Visit us on the Internet. On the JURA website (www.jura.com) you
will find interesting and up-to-date information on your GIGA and
on every aspect of coffee.
A few preparations are necessary before the JURA service technician
can set up your GIGA in your home. The following preparations must
be carried out by a professionally qualified person:
UThe mains connection for the GIGA must be protected by a
residual current device (RCD).
UThere must be a power switch to disconnect the power supply
to the GIGA.
UThe permanent water connection must have a shut-off valve
with a non-return valve (type EA) and filter.
UThe permanent water connection must comply with the
specified technical data (see Chapter 9 ‘Technical data’).
UThe drain hose must be connected to a siphon.
EThese preparations must be carried out by a qualified person.
EThe preparations must be carried out before the JURA service
technician sets up your GIGA in your home.
When setting up your GIGA, please note the following:
UPlace the GIGA on a horizontal surface that is not sensitive to
water.
UChoose a spot for your GIGA which protects the machine
against overheating. Ensure that the ventilation slats are not
covered.
The bean container has an aroma preservation cover. This will ensure
that your coffee beans retain their aroma for longer.
Coffee beans which have been treated with additives (e.g. sugar),
ground coffee or freeze-dried coffee will damage the grinder.
T Only use roasted, untreated coffee beans to fill the bean con-
tainer.
TRemove the aroma preservation cover.
JURA on the Internet
Requirements for
first-time use
Setting up the machine
Filling the bean container
CAUTION

11
1 Preparing and using for the first time
TRemove any dirt or foreign objects from inside the bean
container.
TFill the bean container with coffee beans and close the
aroma preservation cover.
EBefore the machine is used for the first time, the permanent
water connection must be installed by a JURA service techni-
cian.
During first-time use, you can choose between the ‘Quick
installation’ and the ‘standard installation’ (‘Programming’):
U‘Quick installation’: After setting the time and date, your GIGA
is ready for use.
U‘Standard installation’ (‘Programming’): Here, you can also
choose whether you want to operate your GIGA with or
without an external CLARIS filter cartridge.
U‘Use filter’/ ‘Active’: Here, you can set the capacity of the
external filter cartridge you are using.
U‘Use filter’/ ‘Inactive’: Here, you can set the water hardness
of the water used. This setting influences when your GIGA
prompts you to perform descaling. If you do not know the
hardness of your water, you can find this out first (see Chap-
ter 1 ‘Preparing and using for the first time – Determining
the water hardness’).
If the machine is operated with a defective mains cable, there is a
danger of potentially fatal electric shock.
T Never use a machine which is damaged or has a defective
mains cable.
Precondition:The bean containers have been filled.
TConnect the mains cable to the machine.
TInsert the mains plug into a power socket.
3 TSwitch on the GIGA using the power switch on the back of
the machine.
Q TPress the On/Off button to switch the GIGA on.
‘Welcome to JURA’ appears on the display. The display then
shows the languages you can choose from.
First-time use
JWARNING

12
1 Preparing and using for the first time
ETo display more languages, press the ‘Next’ button (bottom
right).
TPress the button that corresponds to the language you want,
e.g. ‘English’.
‘Saved’ appears briefly on the display to confirm the setting.
‘First-time use’
ENow choose between ‘Quick installation’ and ‘standard
installation’ (‘Programming’).
TPress the ‘Quick installation’ button.
‘Time’
TPress the ‘+’ or ‘–’ button to set the hours.
TPress the ‘Save’ button.
TPress the ‘+’ or ‘–’ button to set the minutes.
TPress the ‘Save’ button.
‘Saved’ appears briefly on the display.
‘Date’
TPress the ‘+’ or ‘–’ button to set the year.
TPress the ‘Save’ button.
TPress the ‘+’ or ‘–’ button to set the month.
TPress the ‘Save’ button.
TPress the ‘+’ or ‘–’ button to set the day.
TPress the ‘Save’ button.
‘Saved’ appears briefly on the display.
‘Press the Rotary Switch.’, the Rotary Switch lights up.
k TPress the Rotary Switch.
‘System is filling.’, the system fills up with water. The opera-
tion stops automatically. ‘Welcome to JURA’, ‘Machine is
heating.’ appears on the display.
‘Machine is rinsing.’, the machine rinses. Water flows out of
the dual spout. The operation stops automatically. ‘Please
select product:’ appears on the display. Your GIGA is ready
for use.
TPress the ‘Programming’ button.
‘Time’
TPress the ‘+’ or ‘–’ button to set the hours.
TPress the ‘Save’ button.
Quick installation
Standard installation

13
1 Preparing and using for the first time
TPress the ‘+’ or ‘–’ button to set the minutes.
TPress the ‘Save’ button.
‘Saved’ appears briefly on the display.
‘Date’
TPress the ‘+’ or ‘–’ button to set the year.
TPress the ‘Save’ button.
TPress the ‘+’ or ‘–’ button to set the month.
TPress the ‘Save’ button.
TPress the ‘+’ or ‘–’ button to set the day.
TPress the ‘Save’ button.
‘Saved’ appears briefly on the display.
‘Use filter’
ENow choose whether you operate your GIGA with or without
the CLARIS filter cartridge.
TPress the ‘Active’ button.
TPress the ‘Save’ button.
‘Filter’ / ‘Filter capacity in litres:’
TPress the ‘+’ or ‘–’ button to set the first digit of the filter
capacity.
EYou can also change the value by turning the Rotary Switch
f.
TPress the ‘Save’ button or the Rotary Switch kto confirm
the setting for the first digit.
TNow select the other digits for filter capacity.
‘Saved’ appears briefly once the last digit has been con-
firmed.
‘Machine is heating.’, ‘Press the Rotary Switch.’.
k TPress the Rotary Switch.
‘System is filling.’, the system fills up with water. The opera-
tion stops automatically.
‘Machine is rinsing.’, the machine rinses. Water flows out of
the dual spout. The operation stops automatically. ‘Please
select product:’ appears on the display. Your GIGA is ready
for use.
Activating the filter

14
1 Preparing and using for the first time
TPress the ‘Inactive’ button.
TPress the ‘Save’ button.
‘Water hardness’
EIf you do not know the hardness of your water, you must find
this out first (see Chapter 1 ‘Preparing and using for the first
time – Determining the water hardness’).
TPress the ‘+’ or ‘–’ button to adjust the water hardness.
TPress the ‘Save’ button.
‘Saved’ appears briefly on the display.
‘Machine is heating.’, ‘Press the Rotary Switch.’.
k TPress the Rotary Switch.
‘System is filling.’, the system fills up with water. The opera-
tion stops automatically.
‘Machine is rinsing.’, the machine rinses. Water flows out of
the dual spout. The operation stops automatically. ‘Please
select product:’ appears on the display. Your GIGA is ready
for use.
The following settings can only be made by the JURA service techni-
cian:
UDisabling the product selector view (see Chapter 2 ‘Prepara-
tion – Preparation using the product selector’)
USwitching off pre-brewing for every speciality coffee
UCodes: Four codes can be assigned. For each code, you can
define which programme items are available or disabled. Each
code corresponds to different authorisations. For instance,
you can define that initiation of the maintenance programmes
is disabled using a code.
UBlocking the ‘Permanently setting the amount of water for the
cup size’ function
UBlocking the option of preparing a double product by pressing
the appropriate single product twice
UDefining that a prompt to empty the drip tray does not appear
after cleaning
You can also obtain the following optional accessories for your GIGA
from your JURA service partner:
UCoffee grounds disposal function set
Deactivating the filter
Settings by the JURA
service technician

15
1 Preparing and using for the first time
You can find out what the water hardness is by using the Aquadur®
test strip supplied as standard.
THold the test strip briefly (for 1second) under flowing water.
Shake off the water.
TWait for about 1minute.
TYou will then be able to read the degree of water hardness
from the discolouration of the Aquadur® test strip and the
description on the packaging.
Your GIGA creates fine, creamy, feather-light milk foam with a per-
fect consistency. The most important requirement for frothing milk
is a milk temperature of 4–8°C. We would therefore recommend
using a milk cooler (e.g. the JURA Compressor Cooler Pro, which is
available as an option).
TConnect the milk pipe to the dual spout.To do this, attach
the end of the milk pipe to the connector on the right-hand
side of the dual spout.
TConnect the other end of the milk pipe to a milk cooler.
Determining the water
hardness
Connecting milk

16
2 Preparation
2 Preparation
EWhile a product is being prepared, you can stop preparation
at any time. To do this, press the Rotary Switch kor the
‘’button.
EDuring preparation, you can change the preset amounts
(e.g. amount of milk foam or water) by turning the Rotary
Switch g.
EYou can follow the current status of preparation on the display.
Coffee tastes best served hot. A cold porcelain cup cools the bever-
age – and impairs the taste. We therefore recommend prewarming
the cups. The full coffee aroma can develop only in prewarmed cups.
You can purchase a JURA cup warmer from your specialised dealer.
You can make permanent settings for all products in programming
mode (see Chapter 4 ‘Permanent settings in programming mode –
Adjusting the product settings’).
The GIGA provides you with two options for preparing a speciality
coffee, milk or hot water.
UPreparation at the touch of a button: Simply press the cor-
responding preparation button for the product shown on the
display (start screen) that you want.
UPreparation using the product selector (Rotary Selection):
Only some of the products you can prepare are shown on the
start screen. As soon as you turn the Rotary Switch, more
products are displayed in a product selector.
UTurn the Rotary Switch to bring the product you want into
focus. Start preparation by pressing the Rotary Switch or the
‘Prepare’ button.
UThe product selector view disappears automatically after
5seconds if no preparation is started.
The two preparation options will now be described in more detail in
the following sections.
Coffee, latte macchiato
etc.– options for
preparation

17
2 Preparation
On the display (start screen), you will see various products, which
you can prepare by simply pressing the corresponding button.
A speciality coffee displayed on the start screen is always prepared
following the same model.
Example:Proceed as follows to prepare one coffee.
Precondition:‘Please select product:’ is displayed.
TPlace a cup under the dual spout.
TPress the ‘Coffee’ button.
Preparation starts. ‘Coffee’ and the fill volume are displayed.
The preset amount of water for coffee flows into the cup.
Preparation stops automatically. ‘Please select product:’
appears on the display.
Two speciality coffees can always be prepared in the same way: Press
the preparation button you want twice within two seconds.
Your GIGA prepares latte macchiato, cappuccino and other speciality
coffees with milk at the touch of a button. There is no need to move
the glass or cup.
Example:Proceed as follows to prepare one latte macchiato.
Precondition:‘Please select product:’ is displayed, milk is connected
to the dual spout.
TPlace a glass under the dual spout.
TPress the ‘Latte macchiato’ button.
‘Latte macchiato’, the preset amounts of milk and milk foam
flow into the glass.
Coffee preparation starts. The preset amount of water for
espresso flows into the glass. Preparation stops automati-
cally. ‘Please select product:’ appears on the display.
To ensure that the milk system in the dual spout always works prop-
erly, you must clean it daily (see Chapter 5 ‘Maintenance – Cleaning
the milk system’).
Preparation at the touch
of a button
Speciality coffees at the
touch of a button
Two speciality coffees at the
touch of a button
Speciality coffees with milk
at the touch of a button

18
2 Preparation
As soon as you turn the Rotary Switch, more products are displayed
in a product selector.
EThe product selector view disappears automatically after
5seconds if no preparation is started.
Example: Proceed as follows to prepare a caffè latte using the
product selector.
Precondition:‘Please select product:’ is displayed, milk is connected
to the dual spout.
TPlace a cup under the dual spout.
g TTurn the Rotary Switch to view the product selector.
g TTurn the Rotary Switch until the ‘Caffè latte’ product is in
focus.
k TPress the Rotary Switch to start preparation.
The caffè latte is prepared.
Preparation stops automatically. ‘Please select product:’
appears on the display.
You can choose to use another coffee variety, for example decaffein-
ated coffee, with the filter funnel for ground coffee.
ENever add more than two level measuring spoons of ground
coffee.
EUse ground coffee which is not ground too finely. Very fine
coffee can block up the system so that the coffee only comes
out in drips.
EIf you did not fill the machine with a sufficient amount of
ground coffee, ‘Not enough ground coffee.’ is displayed and
the GIGA stops the operation.
EThe desired speciality coffee must be prepared within approx-
imately one minute after filling with the ground coffee. Oth-
erwise the GIGA stops the operation and is once more ready
for use.
All speciality coffees with ground coffee are always prepared follow-
ing the same model.
Preparation using the
product selector
Preparation of a speciality
coffee using the product
selector
Ground coffee

19
2 Preparation
Example:Proceed as follows to prepare one coffee using ground
coffee.
Precondition:‘Please select product:’ is displayed.
TPlace a cup under the dual spout.
TOpen the cover of the filler funnel for ground coffee.
‘Please add ground coffee.’
TPlace one level measuring spoon of ground coffee into the
filler funnel.
TClose the cover of the filler funnel.
‘Please select product:’, the speciality coffees you can pre-
pare with ground coffee are displayed.
TPress the ‘Coffee’ button.
Preparation starts. ‘Coffee’ and the fill volume are displayed.
The preset amount of water for coffee flows into the cup.
Preparation stops automatically. ‘Please select product:’
appears on the display.
Now you too can be a professional barista! You can select the recipes
for 12 delicious coffee creations from the product selector using the
Rotary Switch. The GIGA will guide you through each step of the
preparation process with easy-to-follow text and pictures. Choose
from:
UMarocchino
UPepresso
UWhite Cool
UFlavoured latte macchiato
UIrish coffee*
UCafé mélange
UViennese coffee
UWinter Magic
UShakerato
UMango Lassi
URed Cool*
USummer Fire
Designed to please the eye as well as the taste buds!
(Recipes marked * contain alcohol.)
Barista recipes at a
glance

20
2 Preparation
All barista recipes are always prepared following the same model.
EThe product selector view disappears automatically after
5seconds if no preparation is started.
Example:Proceed as follows to prepare a White Cool.
Precondition:‘Please select product:’ is displayed.
g TTurn the Rotary Switch to view the product selector.
g TTurn the Rotary Switch until the ‘White Cool’ product is in
focus.
k TPress the Rotary Switch to start preparation.
TFollow the instructions on the display and confirm by press-
ing the ‘Next’ button.
EYou can stop preparation at any time by pressing the ‘’but-
ton.
EYou cannot make any permanent settings for barista recipes.
During preparation, you can however change the coffee
strength and quantities by turning the Rotary Switch f.
It is easy to make permanent settings for the amounts (amount of
water, amount of milk etc.) according to the cup size for all products
except caffè latte. Adjust the amount once as shown in the following
example. Every time you prepare a drink in the future, this amount
will be dispensed.
The permanent settings for adapting the amounts to the cup size
for all products always follows the same model.
Example: Proceed as follows to permanently set the amount of
water for one coffee.
Precondition:‘Please select product:’ is displayed.
TPlace a cup under the dual spout.
TPress and hold the ‘Coffee’ button.
‘Coffee’ and the fill volume are displayed.
THold the ‘Coffee’ button down until ‘Enough coffee? Press
button.’ appears.
TRelease the ‘Coffee’ button.
Preparation starts and the coffee flows into the cup.
Preparing barista recipes
Permanently setting
amounts for the cup size
Other manuals for GIGA X3C
3
Table of contents
Other Jura Coffee Maker manuals

Jura
Jura IMPRESSA C5 User manual

Jura
Jura ENA Micro 1 User manual

Jura
Jura IMPRESSA Z7 User manual

Jura
Jura Giga X3 Professional Configuration guide

Jura
Jura S8 User manual

Jura
Jura IMPRESSA X9 Win User manual

Jura
Jura X10 User manual

Jura
Jura IMPRESSA Z9 One Touch TFT User manual

Jura
Jura J600 User manual

Jura
Jura IMPRESSA X9 Configuration guide

Jura
Jura IMPRESSA Z7 User manual

Jura
Jura ENA 4 User manual

Jura
Jura D6 User manual

Jura
Jura IMPRESSA J9 One Touch User manual

Jura
Jura ENA 8 User manual

Jura
Jura A1 User manual

Jura
Jura GIGA G2 User manual

Jura
Jura E6 User manual

Jura
Jura IMPRESSA E80 User manual

Jura
Jura IMPRESSA XJ9 OT TFT Professional Manual