Jura IMPRESSA Z7 User manual

IMPRESSA Z7 One Touch Voice
Instructions for Use
The Instructions for Use has been awarded the seal of
approval by the independent German Technical Inspection
Agency, TÜV SÜD, due to its easy-to-understand style, its
thoroughness and coverage of safety aspects.

2
Table of contents
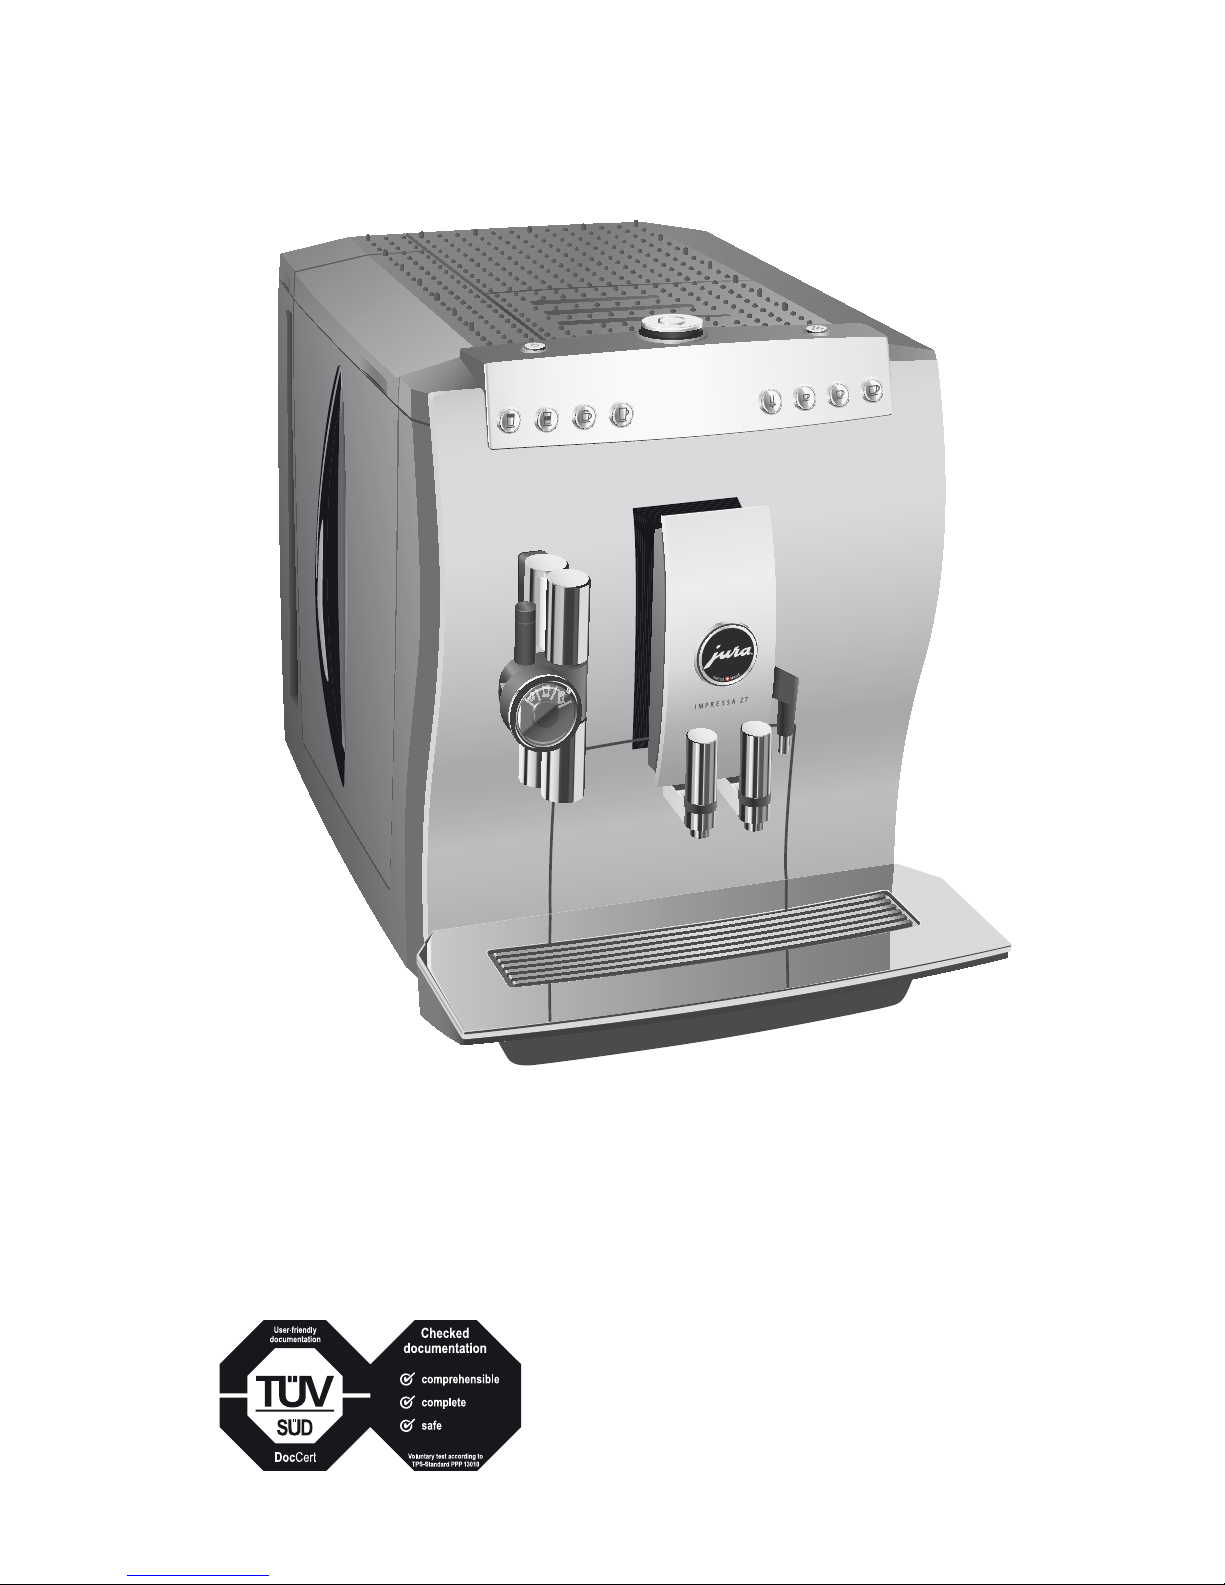
Your IMPRESSA Z7 One Touch Voice
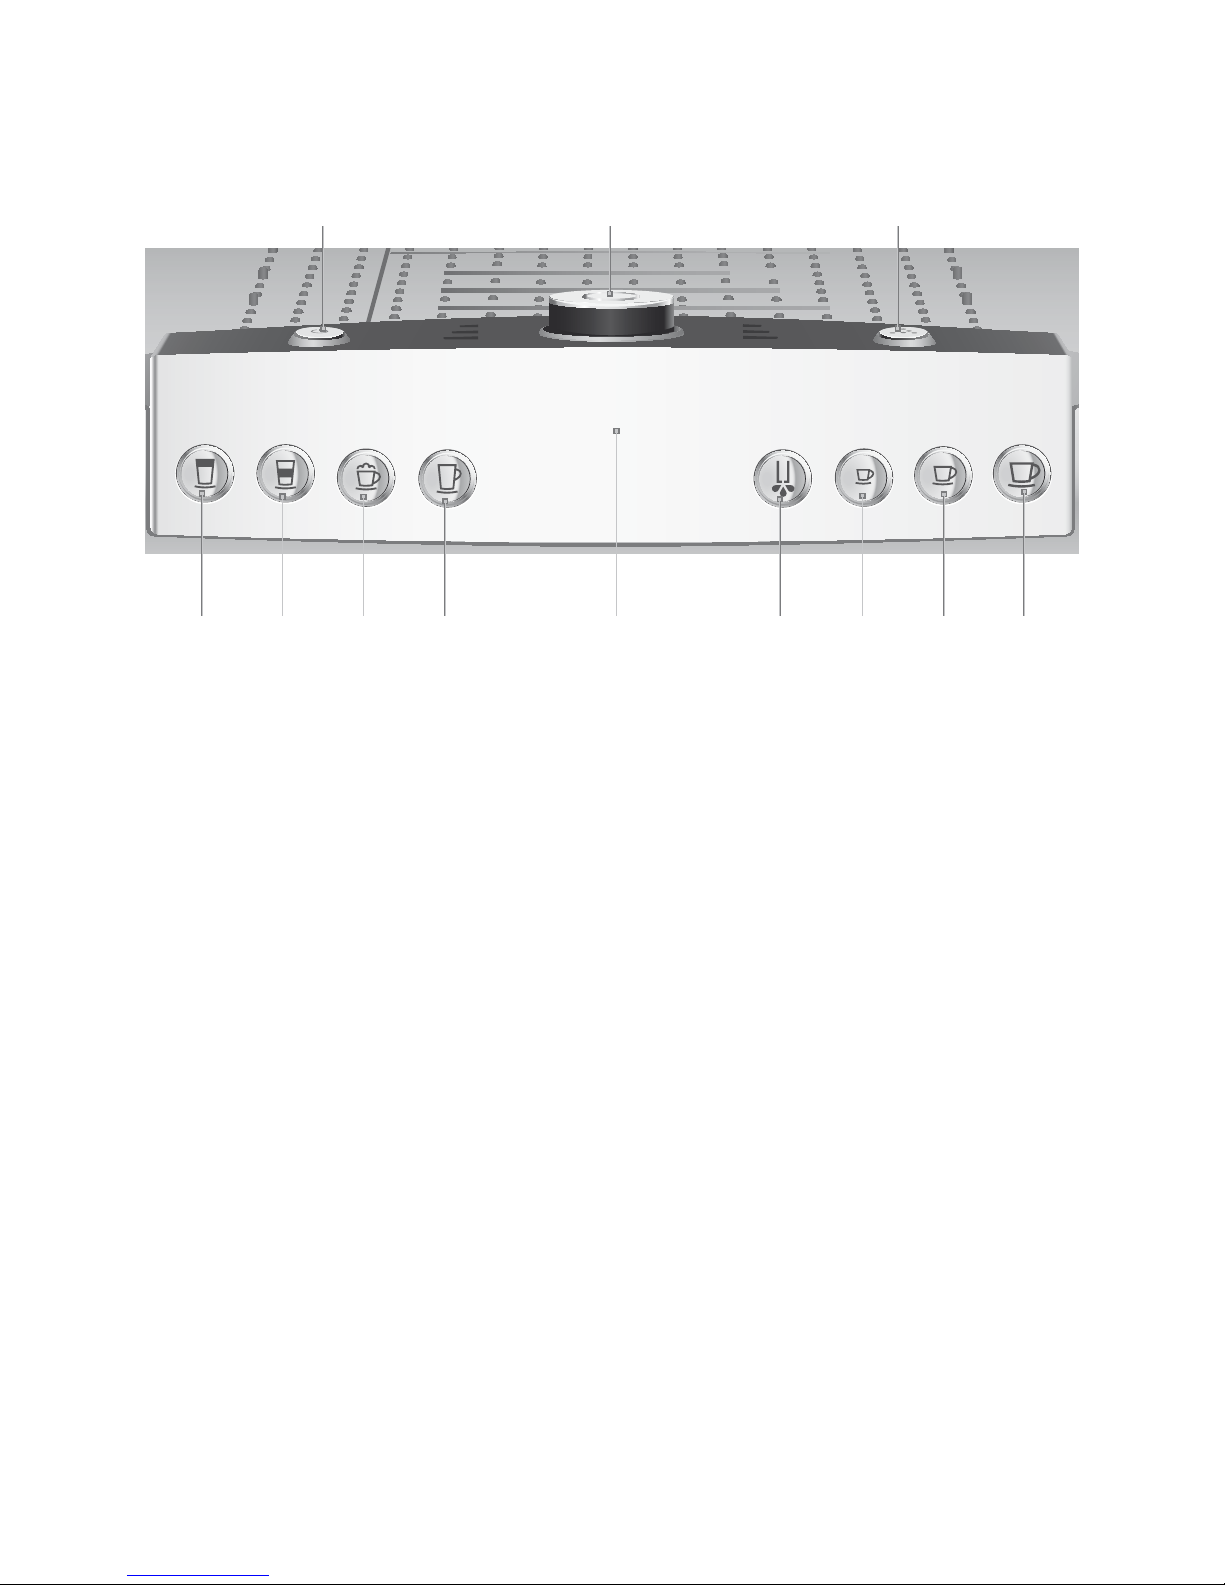
Control elements 4
Important information 6
Proper use ......................................................................................................................................................6
For your safety...............................................................................................................................................6
1 Preparing and using for the first time 9
JURA on the Internet.....................................................................................................................................9
Your IMPRESSA speaks.................................................................................................................................9
Setting up the machine ...............................................................................................................................9
Filling the bean container............................................................................................................................9
First-time use................................................................................................................................................10
Activating the filter ......................................................................................................................................10
Deactivating the filter..................................................................................................................................12
Determining the water hardness ..............................................................................................................13
Adjusting the grinder ..................................................................................................................................13
Filling the water tank...................................................................................................................................14
2 Preparation 15
Preparation using voice recognition.........................................................................................................15
Ristretto, espresso and coffee....................................................................................................................16
Preparing two speciality coffees at the touch of a button ...................................................................17
Special coffee................................................................................................................................................17
Latte macchiato, cappuccino .....................................................................................................................17
Warm milk and milk foam..........................................................................................................................18
Ground coffee...............................................................................................................................................19
Permanently setting the amount of water for the cup size ................................................................20
Hot water.......................................................................................................................................................21
3 Daily operation 22
Switching on ................................................................................................................................................22
Daily maintenance......................................................................................................................................22
Switching off ................................................................................................................................................23
4 Permanent settings in programming mode 24
Products........................................................................................................................................................25
Setting the water hardness .......................................................................................................................28
Energy-saving mode ..................................................................................................................................28
Automatic switch-off..................................................................................................................................29
Rinses ............................................................................................................................................................30
Rename..........................................................................................................................................................31
Logo...............................................................................................................................................................32
Voice recognition.........................................................................................................................................32
Voice output.................................................................................................................................................33

3
Table of contents
Warnings
JWARNING
JCAUTION
Always take note of any information marked with the words CAUTION or
WARNING and a warning sign. The signal word WARNING draws your attention to
potential serious injury, and the signal word CAUTION to potential minor injury.
CAUTION CAUTION draws your attention to potential damage to the machine.
Symbols used
TPrompt to take action. This symbol means that you are being prompted to
perform some action.
EInformation and tips to make it even easier to use your IMPRESSA.
ESPRESSO Display
Symbol description
Restore factory settings .............................................................................................................................34
Viewing information and maintenance status ......................................................................................35
Unit for amount of water...........................................................................................................................35
Language......................................................................................................................................................36
5 Maintenance 37
Rinsing the machine...................................................................................................................................37
Rinsing the cappuccino frother ................................................................................................................37
Cleaning the cappuccino frother..............................................................................................................38
Dismantling and rinsing the cappuccino frother..................................................................................39
Inserting and activating the filter.............................................................................................................39
Changing the filter......................................................................................................................................40
Cleaning the machine ................................................................................................................................42
Descaling the machine ..............................................................................................................................43
Cleaning the bean container.....................................................................................................................45
Descaling the water tank...........................................................................................................................46
6 Display messages 47
7 Troubleshooting 49
8 Transport and environmentally friendly disposal 51
Transport / Emptying the system..............................................................................................................51
Disposal..........................................................................................................................................................51
9 Technical data 52
10 Index 53
11 JURA contact details / Legal information 56

4
Control elements
Control elements
1 Bean container cover
2 Water tank cover
3 Water tank
4 Power switch and mains cable (side view)
5 Height-adjustable cappuccino frother
6 Coffee grounds container
7 Drip tray
8 Grinder adjustment switch
9 Bean container with aroma preservation
cover
10 Filler funnel for ground coffee
11 Hot-water spout
12 Height- and width-adjustable coffee spout
13 Cup grille

5
Control elements
1 QOn/Off button
2 gRotary Switch
3 cMaintenance button
4 zMilk button
5 qLatte Macchiato button
6 pCappuccino button
7 eSpecial Coffee button
8 Display
9 mHot Water button
10 uRistretto button
11 iEspresso button
12 oCoffee button

6
Important information
The machine is designed and intended for private domestic use. It
should only be used for coffee preparation and to heat milk and
water. Use for any other purpose will be deemed improper. JURA
Elektroapparate AG cannot accept any responsibility for the conse-
quences of improper use.
Before using the machine read these instructions for use thoroughly
and completely and comply with the instructions they contain. A
warranty service is not applicable for damage or defects caused by
non-compliance with the instructions for use. Keep these instruc-
tions for use close to the machine and pass them on to the next user.
Please carefully read and observe the important safety information
set out below.
To avoid danger of potentially fatal electric shock:
UNever use a machine which is damaged or has a defective
mains cable.
UIn the event of signs of damage, for example if there is a smell
of burning, unplug the machine immediately from the mains
supply and contact JURA service.
UIf the mains cable of this machine is damaged, it must be
repaired either directly by JURA or by an authorised JURA serv-
ice centre.
UMake sure that the IMPRESSA and the mains cable are not
located close to hot surfaces.
UBe careful to ensure that the mains cable is not trapped and
does not rub against sharp edges.
UNever open and repair the machine yourself. Do not modify
the machine in any way that is not described in these instruc-
tions for use. The machine contains live parts. If opened, there
is a danger of potentially fatal injury. Repairs may only be car-
ried out by authorised JURA service centres, using original
spare parts and accessories.
Proper use
For your safety
J

7
Important information
UTo completely and safely disconnect the machine from the
power supply, first switch off the IMPRESSA using the On/Off
button and then at the power switch. Only then should you
remove the mains plug from the power socket.
There is a risk of scalds or burns on the spouts and the cappuccino
frother.
UPlace the machine out of the reach of children.
UDo not touch any hot parts. Use the handles provided.
UEnsure that the cappuccino frother is correctly fitted and
clean. If incorrectly fitted or if they become blocked, the cap-
puccino frother or its parts might come off.
A defective machine is not safe and could cause injury or fire. To
avoid damage and any associated risk of injury or fire:
UNever allow the mains cable to loosely hang down. The mains
cable could pose a tripping hazard or become damaged.
UProtect the IMPRESSA from environmental influences such as
rain, frost and direct sunlight.
UDo not immerse the IMPRESSA, mains cable or connections in
water.
UDo not put the IMPRESSA or any individual parts in the dish-
washer.
USwitch your IMPRESSA off at the power switch before any
cleaning operation. Always wipe the IMPRESSA with a damp
cloth rather than a wet one, and protect it from prolonged
exposure to water splash.
UOnly connect the machine to the mains voltage in accordance
with the information on the rating plate. The rating plate is
located on the underside of your IMPRESSA. Further technical
data is provided in these instructions for use (see Chapter 9
‘Technical data’).
UPlease only use original JURA maintenance products. Use of
products that are not explicitly recommended by JURA could
damage the IMPRESSA.
UDo not use any coffee beans treated with additives or caramel-
ised coffee beans.
UOnly fill the water tank with fresh, cold water.

8
Important information
USwitch the machine off at the power switch if you are going to
be absent for a longer period of time.
People, including children, who
Udo not have the physical, sensory or mental capabilities to use
the machine safely or
Uare inexperienced or lack knowledge in how to use the
machine safely
must be supervised by a responsible person when using it, or must
be instructed in how to use it correctly.
Safety when handling the CLARIS Blue filter cartridge:
UFilter cartridges should be kept out of the reach of children.
UStore filter cartridges in a dry place in the sealed packaging.
UProtect cartridges from heat and direct sunlight.
UDo not use damaged filter cartridges.
UDo not open filter cartridges.

9
1 Preparing and using for the first time
Visit us on the Internet. You can download short operating instruc-
tions for your machine from the JURA website (www.jura.com). You
will also find interesting and up-to-date information on your
IMPRESSA and on every aspect of coffee.
Is the bean container or water tank empty? Is the drip tray full? Your
IMPRESSA tells you what to do in these situations, e.g. ‘Please fill the
bean container.’ You can choose between voice output in German or
English, regardless of the set display language. In programming
mode, you can switch voice output on or off (see Chapter 4 ‘Perma-
nent settings in programming mode – Voice output’).
When setting up your IMPRESSA, please note the following:
UPlace the IMPRESSA on a horizontal surface that is not sensi-
tive to water.
UChoose a spot for your IMPRESSA which protects the machine
against overheating. Ensure that the ventilation slots are not
covered.
The bean container has an aroma preservation cover. This will ensure
that your coffee beans retain their aroma for longer.
Coffee beans which have been treated with additives (e.g. sugar),
ground coffee or freeze-dried coffee will damage the grinder.
TOnly use untreated coffee beans to fill the bean container.
TOpen the bean container cover and remove the aroma pres-
ervation cover.
TRemove any dirt or foreign objects from inside the bean
container.
TFill the bean container with coffee beans, then close the
aroma preservation cover and the bean container cover.
JURA on the Internet
Your IMPRESSA speaks
Setting up the machine
Filling the bean container
CAUTION

10
1 Preparing and using for the first time
When using the machine for the first time, you can choose whether
you want to operate IMPRESSA with or without the CLARIS filter
cartridge Blue. If the water hardness is 10° dH or more, we recom-
mend using the filter cartridge. If you do not know the hardness of
your water, you can find this out first (see Chapter 1 ‘Preparing and
using for the first time – Determining the water hardness’).
If the machine is operated with a defective mains cable, there is a
danger of potentially fatal electric shock.
TNever use a machine which is damaged or has a defective
mains cable.
Precondition: The bean container has been filled.
TInsert the mains plug into a power socket.
3TSwitch on the IMPRESSA using the power switch on the left-
hand side of the machine.
QTPress the On/Off button to switch the IMPRESSA on.
The Rotary Switch lights up. SPRACHE DEUTSCH
appears on the display.
gTTurn the Rotary Switch until the required language is dis-
played, for example LANGUAGE ENGLISH.
kTPress the Rotary Switch to confirm the language.
CONFIRMED appears briefly on the display to confirm the
setting.
FILTER YES
ENow decide whether you want to operate your IMPRESSA with
or without a CLARIS Blue filter cartridge.
Milk, sparkling mineral water or other liquids can damage the water
tank or the machine.
TOnly fill the water tank with fresh, cold water.
kTPress the Rotary Switch to confirm the setting.
CONFIRMED appears briefly on the display.
INSERT FILTER / PRESS BUTTON, the Mainte-
nance button clights up.
First-time use
JWARNING
Activating the filter
CAUTION

11
1 Preparing and using for the first time
TRemove the water tank and rinse it with cold water.
TRemove the filter cartridge extension from the Welcome
Pack.
TFit the filter extension on top of a CLARIS Blue filter cartridge.
TOpen the filter holder and insert the filter cartridge into the
water tank, exerting slight pressure.
TClose the filter holder. It will click into place audibly.
EAfter two months, the filter will cease to work. Set the date on
the date plate on the filter holder in the water tank.
TFill the water tank with fresh, cold water and reinsert the
tank.
TPlace a receptacle (at least 500 ml) under the cappuccino
frother.
cTPress the Maintenance button.
FILTER RINS., water flows out of the cappuccino
frother.
EYou can interrupt rinsing of the filter at any time by pressing
any button. Press the Maintenance button c, to continue with
rinsing of the filter.
EThe water may be slightly discoloured. This is not harmful to
health and does not affect the taste.
Rinsing of the filter stops automatically after approximately
500 ml.
SYSTEM FILLS, the system fills up with water. The oper-
ation stops automatically. WELCOME TO JURA appears
on the display.
UNIT IS HEATING
PRESS RINSE, the Maintenance button clights up.

12
1 Preparing and using for the first time
TEmpty the receptacle and place it under the coffee spout.
cTPress the Maintenance button.
RINSING, the machine rinses. The operation stops auto-
matically.
SELECT PRODUCT appears on the display. Your
IMPRESSA is ready for use.
Milk, sparkling mineral water or other liquids can damage the water
tank or the machine.
TOnly fill the water tank with fresh, cold water.
gTTurn the Rotary Switch until FILTER NO is displayed.
kTPress the Rotary Switch to confirm the setting.
CONFIRMED appears briefly on the display.
HARDNESS 16°dH
EIf you do not know the hardness of your water, you must find
this out first (see Chapter 1 ‘Preparing and using for the first
time – Determining the water hardness’).
gTTurn the Rotary Switch to adjust the water hardness.
kTPress the Rotary Switch to confirm the setting.
CONFIRMED appears briefly on the display.
WATER TANK FILL
TRemove the water tank and rinse it with cold water.
TFill the water tank with fresh, cold water and reinsert the
tank.
PRESS RINSE, the Maintenance button clights up.
Deactivating the filter
CAUTION

13
1 Preparing and using for the first time
TPlace one receptacle under the hot-water spout and another
under the cappuccino frother.
cTPress the Maintenance button.
SYSTEM FILLS, the system fills up with water. The oper-
ation stops automatically. WELCOME TO JURA appears
on the display.
UNIT IS HEATING
PRESS RINSE, the Maintenance button clights up.
TPlace a receptacle under the coffee spout.
cTPress the Maintenance button.
RINSING, the machine rinses. The operation stops auto-
matically.
SELECT PRODUCT appears on the display. Your
IMPRESSA is ready for use.
You can find out what the water hardness is by using the Aquadur®
test strip supplied as standard.
THold the test strip briefly (for 1 second) under flowing water.
Shake off the water.
TWait for about 1 minute.
TYou will then be able to read the degree of water hardness
from the discolouration of the Aquadur® test strip and the
description on the packaging.
You can adjust the grinder on a continuous scale to suit the degree
of roast of your coffee.
If you adjust the consistency of grind when the grinder is not oper-
ating, the grinder adjustment switch could be damaged.
TOnly adjust the consistency of grind when the grinder is run-
ning.
The consistency of grind setting is correct if the coffee flows regu-
larly from the coffee spout. In addition a fine, thick crema forms.
Determining the water
hardness
Adjusting the grinder
CAUTION

14
1 Preparing and using for the first time
Example: Proceed as follows to change the consistency of grind
during the preparation of an espresso.
TOpen the cover of the bean container.
TPlace a cup under the coffee spout.
iTPress the Espresso button.
The grinder starts up. 1 ESPRESSO and the coffee
strength are displayed.
TTurn the grinder adjustment switch to the desired position
while the grinder is running.
The espresso is prepared and the consistency of grind is
adjusted.
TClose the cover of the bean container.
To enjoy the perfect cup of coffee we recommend changing the
water every day.
Milk, sparkling mineral water or other liquids can damage the water
tank or the machine.
TOnly fill the water tank with fresh, cold water.
TOpen the water tank cover.
TRemove the water tank.
TFill the water tank with fresh, cold water and reinsert the
tank.
TClose the water tank cover.
Filling the water tank
CAUTION

15
2 Preparation
2 Preparation
EYou can stop preparation of a speciality coffee, speciality cof-
fee with milk or hot water at any time. Just press any button.
EBefore and during the grinding operation you can select the
coffee strength of individual products: extra-mild (ö), mild
(öö), normal (ööö), strong (öööö) or extra-strong
(ööööö).
EDuring preparation, you can change the preset amount of
water by turning the Rotary Switch.
EYou can follow the current status of preparation on the
progress bar.
You can make permanent settings for all products in programming
mode (see Chapter 4 ‘Permanent settings in programming mode –
Products’).
You can initiate the preparation of coffee, latte macchiato and so on
simply by telling the machine what you want. Press the Rotary
Switch to activate voice recognition. As soon as the Rotary Switch
flashes blue, all you have to do is speak the name of the product and
preparation is started. In programming mode, you can switch voice
recognition on or off (see Chapter 4 ‘Permanent settings in pro-
gramming mode – Voice recognition’).
EWhen the Rotary Switch lights up blue, voice recognition is
switched on.
You can prepare the following eight products using voice recogni-
tion:
U‘Ristretto’
U‘Espresso’
U‘Kaffee’ (Coffee)
U‘Spezial’ (for special coffee)
U‘Cappuccino’
U‘Latte macchiato’
U‘Heisswasser’ (Hot water)
U‘Milch’ (Milk)
Preparation using voice
recognition

2 Preparation
16
EVoice recognition remains activated for 1 minute. If no prepa-
ration is initiated during this time, voice recognition deacti-
vates itself automatically.
EIf voice recognition is activated, you can deactivate it at any
time by pressing the Rotary Switch.
Example: Proceed as follows to prepare one espresso using voice
recognition.
Precondition: COFFEE READY is displayed and the Rotary
Switch lights up blue.
TPlace a cup under the coffee spout.
kTPress the Rotary Switch.
The Rotary Switch flashes blue and VOICE appears on the
display.
TClearly say ‘espresso’ while VOICE is displayed.
EIf the IMPRESSA did not understand the product name,
SORRY? appears on the display. Repeat the product name
as soon as VOICE is displayed again.
Preparation starts. 1ESPRESSO and the coffee strength
is displayed. The preset amount of water for espresso flows
into the cup.
Preparation stops automatically. ENJOY appears briefly on
the display. Then COFFEE READY is displayed. Voice rec-
ognition is deactivated, the Rotary Switch lights up blue.
Preparation of all speciality coffees (ristretto u, espresso iand
coffee o) follows this model.
Example: Proceed as follows to prepare one coffee.
TPlace a cup under the coffee spout.
oTPress the Coffee button.
Preparation starts. 1COFFEE and the coffee strength is
displayed. The preset amount of water for coffee flows into
the cup.
Preparation stops automatically and ENJOY appears
briefly on the display. Then COFFEE READY is displayed.
Ristretto, espresso and
coffee

17
2 Preparation
To prepare two cups of coffee: Place two cups under the coffee
spout. Press the Coffee obutton twice (within two seconds), to
start coffee preparation.
Example: Proceed as follows to prepare one special coffee.
TPlace a cup under the cappuccino frother.
eTPress the Special Coffee button.
Preparation starts. 1SPECIAL and the coffee strength is
displayed. The preset amount of water for coffee flows into
the cup. Preparation stops automatically and ENJOY
appears briefly on the display. Then COFFEE READY is
displayed.
Your IMPRESSA can prepare a latte macchiato or cappuccino at the
touch of a button. There is no need to move the glass or cup.
Example: Proceed as follows to prepare one latte macchiato.
TAttach the milk pipe to the cappuccino frother. Use the long
pipe for a milk carton and the short pipe for the milk con-
tainer.
TInsert the other end of the milk pipe into a milk carton or
connect it to a milk container.
TPlace a glass under the cappuccino frother.
TTurn the setting wheel of the cappuccino frother to the Milk
Foam 5position.
qTPress the Latte Macchiato button.
EIf an energy-saving mode is set, the machine heats up first.
Press the Latte Macchiato button once more as soon as
COFFEE READY is displayed again.
1LATTE MAC. and the coffee strength is displayed.
1LATTE MAC. / 1MILK, the milk foam is prepared.
Preparation stops automatically when the preset amount of
milk is reached.
1LATTE MAC.
Preparing two speciality
coffees at the touch of a
button
Special coffee
Latte macchiato,
cappuccino

2 Preparation
18
EThere is a short interval while the hot milk separates from the
milk foam. This allows the typical layers of a latte macchiato
to form. You can choose the length of this interval in program-
ming mode (see Chapter 4 ‘Permanent settings in program-
ming mode – Products’).
1 LATTE MAC. / COFFEE, coffee preparation starts.
The preset amount of water flows into the cup. Preparation
stops automatically and ENJOY appears briefly on the dis-
play. Then COFFEE READY is displayed.
To make sure the cappuccino frother always works properly, rinse
and clean it regularly (see Chapter 5 ‘Maintenance – Rinsing the
cappuccino frother’).
Example: Proceed as follows to prepare milk foam.
TAttach the milk pipe to the cappuccino frother. Use the long
pipe for a milk carton and the short pipe for the milk con-
tainer.
TInsert the other end of the milk pipe into a milk carton/bot-
tle or connect it to the milk container.
TPlace a cup under the cappuccino frother.
TTurn the setting wheel of the cappuccino frother to the Milk
Foam 5position.
EIf you want to heat the milk turn the setting wheel of the cap-
puccino frother to the Milk zposition.
zTPress the Milk button.
1MILK, the milk foam is prepared. Preparation stops auto-
matically and COFFEE READY appears on the display.
To make sure the cappuccino frother always works properly, rinse
and clean it regularly (see Chapter 5 ‘Maintenance – Rinsing the
cappuccino frother’).
Warm milk and milk
foam

19
2 Preparation
You can choose a second coffee variety, for example decaffeinated
coffee, with the filler funnel for ground coffee.
ENever add more than two level measuring spoons of ground
coffee.
EUse ground coffee which is not ground too finely. Very fine
coffee can block up the system so that the coffee only comes
out in drips.
EIf you did not fill the machine with a sufficient amount of
ground coffee, PRE-GROUND / NOT ENOUGH is dis-
played and the IMPRESSA stops the operation.
EThe desired speciality coffee must be prepared within approx-
imately one minute after filling with the ground coffee.
Otherwise the IMPRESSA stops the operation and is once
more ready for use.
All speciality coffees with ground coffee are prepared following this
model.
Example: Proceed as follows to prepare an espresso using ground
coffee.
TPlace an espresso cup under the coffee spout.
TOpen the cover of the bean container.
TOpen the cover of the filler funnel for ground coffee.
PRE-GROUND / FILL POWDER
TPlace one level measuring spoon of ground coffee into the
filler funnel.
TClose the cover of the filler funnel for ground coffee.
PRE-GROUND / SELECT PRODUCT
iTPress the Espresso button.
Preparation will now begin. The preset amount of water for
espresso flows into the cup. Preparation stops automatically
and ENJOY appears briefly on the display. Then COFFEE
READY is displayed.
Ground coffee

2 Preparation
20
It is easy to make permanent settings for the amount of water for all
speciality coffees and hot water according to the cup size. Adjust the
amount once as shown in the following example. Every time you
prepare a drink in the future, this amount of water will be dispensed.
The permanent settings for adapting the amount of water to the cup
size for all speciality coffees and hot water follow this model.
Example: Proceed as follows to permanently set the amount of
water for one coffee.
Precondition: COFFEE READY is displayed.
TPlace a cup under the coffee spout.
oTPress and hold the Coffee button.
1COFFEE and the coffee strength is displayed.
oTHold the Coffee button down until ENOUGH? / PRESS
BUTTON appears.
oTRelease the Coffee button.
Preparation starts and the coffee flows into the cup.
TPress any button as soon as there is sufficient coffee in the
cup.
Preparation stops. CONFIRMED and ENJOY appear
briefly on the display. The set amount of water for one cof-
fee is permanently stored. COFFEE READY appears on
the display.
EYou can alter this setting at any time by repeating the above
procedure.
EYou can also permanently set the amounts for all speciality
coffees, speciality coffees with milk and hot water in program-
ming mode in the PRODUCTS programme item.
Permanently setting the
amount of water for the
cup size
Other manuals for IMPRESSA Z7
5
Table of contents
Other Jura Coffee Maker manuals

Jura
Jura IMPRESSA F50 Classic User manual

Jura
Jura E6 User manual

Jura
Jura A9 User manual

Jura
Jura IMPRESSA J9.2 One Touch User manual

Jura
Jura IMPRESSA A9 One Touch User manual

Jura
Jura ENA 8 User manual

Jura
Jura IMPRESSA F7 User manual

Jura
Jura Z6 User manual

Jura
Jura IMPRESSA J5 User manual

Jura
Jura IMPRESSA C9 User manual

Jura
Jura Nespresso N90 User manual

Jura
Jura IMPRESSA C9 User manual

Jura
Jura IMPRESSA E30 User manual

Jura
Jura IMPRESSA C5 User manual

Jura
Jura IMPRESSA J9.4 One Touch TFT User manual

Jura
Jura IMPRESSA XS User manual

Jura
Jura impressa IMPRESSA F90/F9 User manual

Jura
Jura 734 User manual

Jura
Jura X7 Instruction Manual

Jura
Jura GIGA X8c User manual