Justec OxiEasy W60 User manual

JT-OxiEW60-UM01
OxiEasy W60
Pulse Oximeter
User Manual
Easy, Reliable and Smart

Justec Shenzhen CO., LTD. Version:2.0
OxiEasy W60 User Manual 2
Table of Contents
1. Intended Use-Warnings .........................................................................................................................................................................3
2. Parts Instruction .....................................................................................................................................................................................4
3. Operation instructions ...........................................................................................................................................................................5
4. Screen off Device ..................................................................................................................................................................................5
5. Erro Messages –Problems- Corrective Actions .....................................................................................................................................6
6. Battery and Charger ...............................................................................................................................................................................7
7. Maintenance –Cleaning.........................................................................................................................................................................7
8. Specification ..........................................................................................................................................................................................8
9. Testing Summary....................................................................................................................................................................................8
10. Warranty...............................................................................................................................................................................................8
11. Symbol Index .......................................................................................................................................................................................8
12. Packing List –Accessories and Replacement Parts..............................................................................................................................9

Justec Shenzhen CO., LTD. Version:2.0
OxiEasy W60 User Manual 3
1. Intended Use
The OxiEasy W60 pulse oximeter is intended for spot-checking
and continuous monitoring arterial oxygen saturation (SpO2) and
pulse rate of adult and pediatric patients in hospital, hospital type
facilities, transport, emergency care, mobile environments and
home care.
Warnings
Warnings are indentified by the WARNING symbol shown
above. Warnings alert the user to potential serious outcomes,
such as death, injury, or adverse events to the patient or user.
Please read the instructions carefully to ensure accurate
measurement and safe operation.
Do not make any clinical judgments based solely on the
OxiEasy W60. The monitor is intended only as an adjunct in
patient assessment. It must be used in conjunction with
clinical signs and symptoms. The interpretation of the
measurement values should be done only by trained health
care professionals.
Explosion hazard. Do not use OxiEasy W60 in the presence
of flammable anesthetics mixture with air, oxygen, or
nitrous oxide.
Routinely monitor the patient to make sure the OxiEasy
W60 is functioning and that the sensor is correctly placed.
Pulse oximetry measurements and pulse signals can be
affected by certain environmental conditions, sensor
application errors, and certain patient conditions. See the
appropriate sections of this manual for specific safety
information.
If you are uncertain about the accuracy of any measurement,
check the patient's vital signs by alternate means; then make
sure that the OxiEasy W60 is functioning correctly.
The use of accessories ,sensors, and cables other than those
specified may result in inreased emission and/or create
invalid reading of the W60.
Failure to cover the sensor site with opaque material in high
ambiernt light conditions may result in inaccurate
measurement.
Disconnect the OxiEasy W60 and sensor from the patient
throughout magnetic resonance imaging(MRI) scanning.
Induced could potentially cause burns.
The OxiEasy is not defibrillator-proof. However, it may
remain attached to the patient throughout defibrillation or
whilst an electrosurgical unit is in use. The measurements
may be inaccurate throughout the defibrillation, or use of an
electrosurgical unit, and shortly thereafter. To avoid shock,
the caregiver should not touch the OxiEasy while using a
defibrillation on a patient.
The OxiEasy W60 is a prescription device to be operated
only by trained personnel. The monitor is for attended
monitoring only.
Do not use a device that appears damaged. Do not use the
sensors where optical components lie open.
Changing lithium batteries when incorrect replacement by
inadequately trained personnel would result in an
unacceptable risk(e.g., excessive temperatures, fire or
explosion)
Do not modify this equipment without authorization of the
manufacturer.
Check the pulse oximeter sensor application site every 4
hours to determine the positioning of the sensor and the
circulation and skin sensitivity of the patient. Patient
sensitivity varies depending on medical status or skin
condition.
Carefully route patient cables and connections to reduce the
possibility of patient entanglement, strangulation, or
injury to the patient.
When using the monitor around pets,small child or baby,
avoid leaving the monitor unattended. Cables pose a
risk of injury, including strangulation. This device contains
small parts that may cause suffocation if swallowed by child
or baby.
Do not use the device when alarms are required.
When using the monitor in the home, avoid exposing the
monitor to lint and dust.

Justec Shenzhen CO., LTD. Version:2.0
OxiEasy W60 User Manual 4
2.Parts Instruction
2.1 Components Description
89
1. Watch strap
5.Power button /Confirm button
9. Fingertip sensor
2. Sensor port
6. Lock screen key /Down button
10. probe
3. Display
7. Clasp
11. Indicator light
4. Menu key /Up button
8. Sensor connector
12. USB connector
2.2 Display each icon description
No.
Symbols/Indicators
Definition
1
Indication of low battery level. The icon will flash and turn
red if the battery is low.
2
Low Bat
Low voltage alarm
3
98
SpO 2%
The SpO2 value shows the blood oxygen saturation level
expressed as a percentage. The small number shown
immediately above and below the measured value on the right
side indicate the upper and lower alarm limits.
4
75
PR bpm
Pulse rate in beats per minute.
5
The bar graph is an indicator for signal quality.
6
Poor signal
7
Pulse waveform ( plethysmogram ) The reading is
automatically adjusted to the pulse strength; therefore, a
waveform with strong amplitude should be visible at all times.
8
Bluetooth figure mark.

Justec Shenzhen CO., LTD. Version:2.0
OxiEasy W60 User Manual 5
3.Operation instructions
3.1 Preparation
·Select a suitable sensor, the finger without oppressive feeling ,
comfortable and not easy to fall off.
·The wrist pulse oximeter is worn on the wrist。
·Plug the sensor cable into the sensors port located on the top
edge of the device. The markings on the plug and port must
match and face upward.
·Press the button to switch on an it will go to measuring
mode.
3.2 Measurment
·As soon as a sensor is connected and correctly positioned on
the patient, monitoring begins automatically.
·Display shows after the measurement appears.
·Read the blood oxygen measurements and pulse rate
measurements after waiting for the value is stable.
BPM0 03:SpO %2
98 73
BPM0 03:SpO %2
3.3 Lock screen
·Press the button, after three seconds the screen turn off.
·The display can be turned on again by pressing any button. If
an alarm is triggered, the display will be turned on automati-
cally.
3.4 Turning Off Device
Press and hold the button for three seconds.
3.5 Data transmission
USB interface
Data transfer can be carried out from the pulse oximeter connect
with computer through the USB connector.
After you select USB , press the button to to turn on or turn
off the transmission.
2) Date and time
4.Screen of Device
4.1 Main Menu
All important and frequently used setting
are accessible through the main menu,
which can be opened by pressing the
button.
Navigating the Menu
Use the buttons to scroll through menu items. The currently
selected menu item is highlighted by a coloured franme. Press the
button to confirm your selection.
Entering Data
In some submenus it is possible to adjust a certain parameter. In this
case the parameter can be increased or decreased using the
buttons. The value will increase or decrease more quickly when the
respective button is held down. Press the button to confirm the
new value.
Exiting Menu and Returning to Display
Select the menu item “EXIT ”to return immediately to the
monitoring display.
4.1.1 Submenu: Data Management
Use Data Management menu to
·view remaining recording capacity
·access list of stored data sets
·delete all data in memory
4.1.2 Submenu: Device Setup
4.1.2.1 General Information
This submenu offers access to various device settings; comfirm
selection by pressing the button.
4.1.2.2 Adjusting Settings
1) Data transmission
Display OFF
3…2…1Sec
Press any key for ON
Main menu
Data management
Setup
Exit
Remaining 98.61%
Data analysis
Delete all data
Exit
Setup
Data transmission
Date and Time
Language
Setup
Language
Service
Exit
Setup
Data transmission
Date and Time
Language
Setup
USB off
Exit

Justec Shenzhen CO., LTD. Version:2.0
OxiEasy W60 User Manual 6
First, select between 12h mode 24h mode; then set date and time.
Settings for date and time are not erased when the device is
power off.
3)Language
Depending on the firmware, up to two different language options
are available here for selection. All messages and menus will be
displayed in the selected language.
Service
The Service submenu is protected by a PIN code; only authorized
service personnel can access this menu.
When the ambient temperature is 20℃, the time required for
the monitor to warm from the minimun storage temperature
between uses until it is ready for its intended use is 1 hour.
When the ambient temperature is 20℃, the time required for
the monitor to cool from the maximun storage temperature
between uses until it is ready for its intended use is 4 hours.
5.Erro Messages –Problems- Corrective Actions
5.1 General Information
Physiological conditions, medical procedures, or external agents
that may interfere with the monitor’s ability to detect and display
accurate measurements include:
·Lint,dust,light(including sunlight)
·Incorrect applications of the sensor
·Degraded sensors and electrodes, or loosened electrodes
·Placement of the senor on an extremity with a blood pressure
cuff, arterial catheter, or intravascular line
·Excessive patient activity
·Intravascular dyes
·Externally applied colouring agents, such as nail polish
·Failure to cover the sensor site with opaque material in high
ambient light conditions.
·Venous pulsation
·Dysfunctional haemoglobin
·Low perfusion
Electromagnetic interference may be preventing the monitor
5.2 Error Messages- Causes
“No sensor”
The sensor is not connected properly to the device.
–Check sensor connection
“Probe off!”
The sensor has been removed from the monitoring site. –Check
that the sensor is properly attached to the patient.
“Low battery!”, battery symbol blinking red
The battery is almost completely discharged.
-Replace batteries immediately.
“Sensor fault”
The connected sensor is either defective or not compatible with the
device –check sensor.
“Device defective”
Fatal device error, e.g. resulting from improper handling, such as
use with computed tomography. –The device must be sent in to the
Service Department.
“Too much ambient light!”
High ambient light sources near the sensor, e.g. surgical lights.
–Shield sensor more effectively from external light.
“Bad signal quality”
Poor-quality pulse signal, for example as a result of low perfusion.
–Move the sensor to a different site on the patient or provide more
effective monitoring conditions.
5.3 Failure –Cause –Corrective Action
Problem: There is no response to the Power button.
Cause –Corrective Action: Ensure that the Power button is fully
depressed.
Problem: No pulse signal found
Cause –Corrective Action: Check the patient. Check the sensor
directions for use to determine if an appropriate sensor is being
used and if it is applied properly.
Check sensor and extension cable connections. Test the sensor on
another subject. Try another sensor or extension cable.
Perfusion may be too low for the monitor to track the pulse. Check
the patient. Test the monitor on yourself. Change the sensor site.
Try another sensor.
Interference due to patient activity may be preventing the monitor
from tracking the pulse.
Keep the patient still, if possible. Verify that the sensor is securely
applied and replace it if necessary. Change the sensor site.
The sensor may be too tight, there may be interference due to
ambient light, or the sensor may be on extremity with a blood
pressure cuff, arterial catheter, or intravascular line. Reposition
sensor, as necessary.
Setup
Data transmission
Date and Time
Language
Date and Time
Data : 2015 / 01 / 01
Time:06:08
Exit
Setup
Data transmission
Date and Time
Language
Language
English
Chinese
Exit
Setup
Language
Service
Exit
Service
PIN Code:
0 0 0 0
Enter
Exit

Justec Shenzhen CO., LTD. Version:2.0
OxiEasy W60 User Manual 7
from tracking the pulse. Remove the source of interference.
Problem: After a valid measurement the pulse signal can not
be found anymore
Cause –Corrective Action: Check the patient. Check the sensor
directions for use to determine if an appropriate sensor is being
used and if it is applied properly. Check sensor and extension
cable connections. Test the sensor on another subject. Try
another sensor or extension cable.
Perfusion may be too low for the monitor to track the pulse.
Check the patient. Test the monitor on yourself. Change the
sensor site. Try another sensor.
Interference due to patient activity may be preventing the
monitor from tracking the pulse.
Keep the patient still, if possible. Verify that the sensor is
securely applied and replace it if necessary. Change the sensor
site.
The sensor may be too tight, there may be interference due to
ambient light, or the sensor may be on an extremity with a blood
pressure cuff, arterial catheter, or intravascular line. Reposition
sensor, as necessary.
Electromagnetic interference may be preventing the monitor
from tracking the pulse. Remove the source of interference.
Other problems:
EMI (Electromagnetic Interference)
Caution: This device has been tested and found to comply with
the limits for medical devices according to EN 60601-1-2,
(second edition), and the Medical Device Directive 93/94/EEC.
These limits are designed to provide reasonable protection
against harmful interference in a typical medical installation.
Due to the proliferation of radio-frequency transmitting
equipment and other sources of electrical noise in healthcare
environments, it is possible that high levels of such interference
due to close proximity, or strength of a source, may result in
disruption of performance of this device. Examples of noise
sources in healthcare environments and home care environment
that could cause electromagnetic interference are:
·Electrosurgical units
·Cellular phones
·Mobile two-way radios
·Electrical appliances
·High-definition televisions(HDTV’s)
The monitor is designed for use in environments in which the
pulse can be obscured by electromagnetic interference. During
such interference, measurements may seem inappropriate or the
monitor may not seem to operate correctly.
Disruption may be evidenced by erratic readings, cessation of
operation, or other incurred functioning. If this occurs, the site of
3) Clean up the machine carefully with a soft tower.
Use should be surveyed to determine the source of disruption, and
the following actions taken to eliminate the source.
·Turn equipment in the vicinity off and on to isolate the offending
equipment.
·Reorient or relocate the interfering equipment.
·Increase the distance between the interfering equipment and this
equipment.
The monitor generates, uses, and radiates radio frequency energy. If
it is not installed and used in accordance with these instructions.
The monitor may cause harmful interference with other devices in
the vicinity.
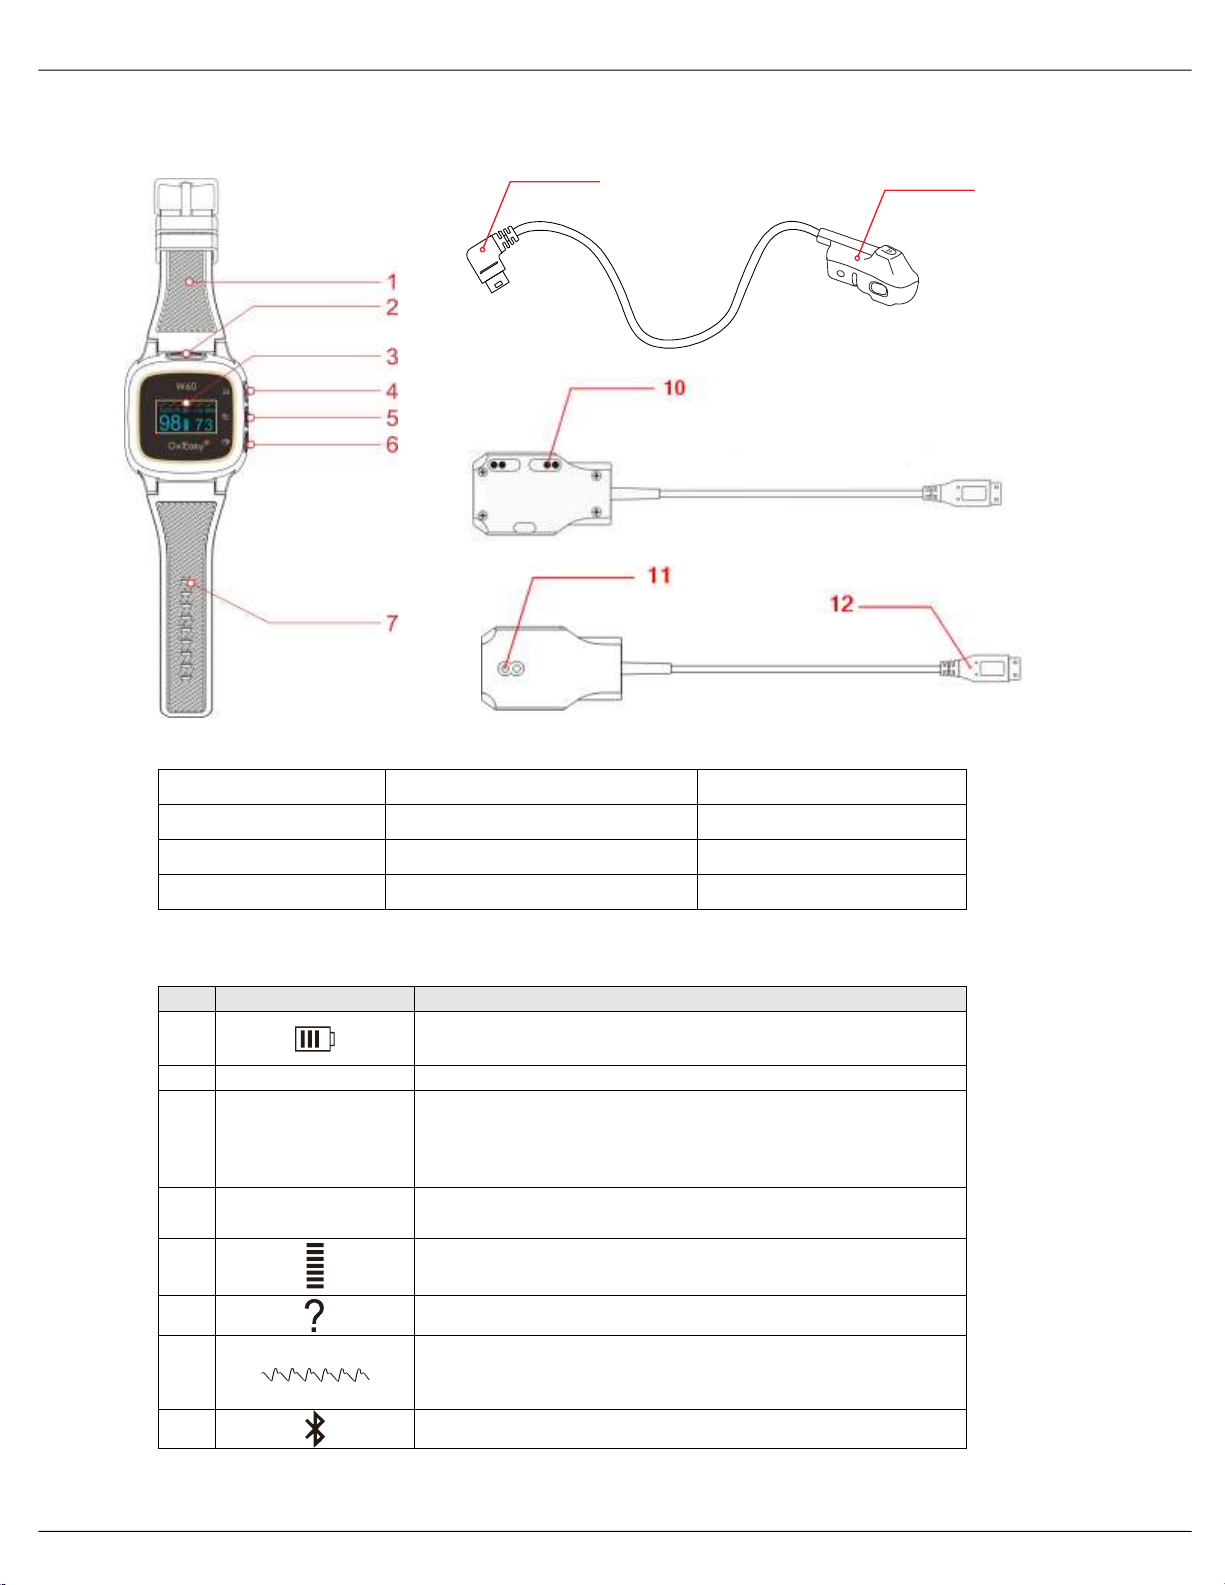
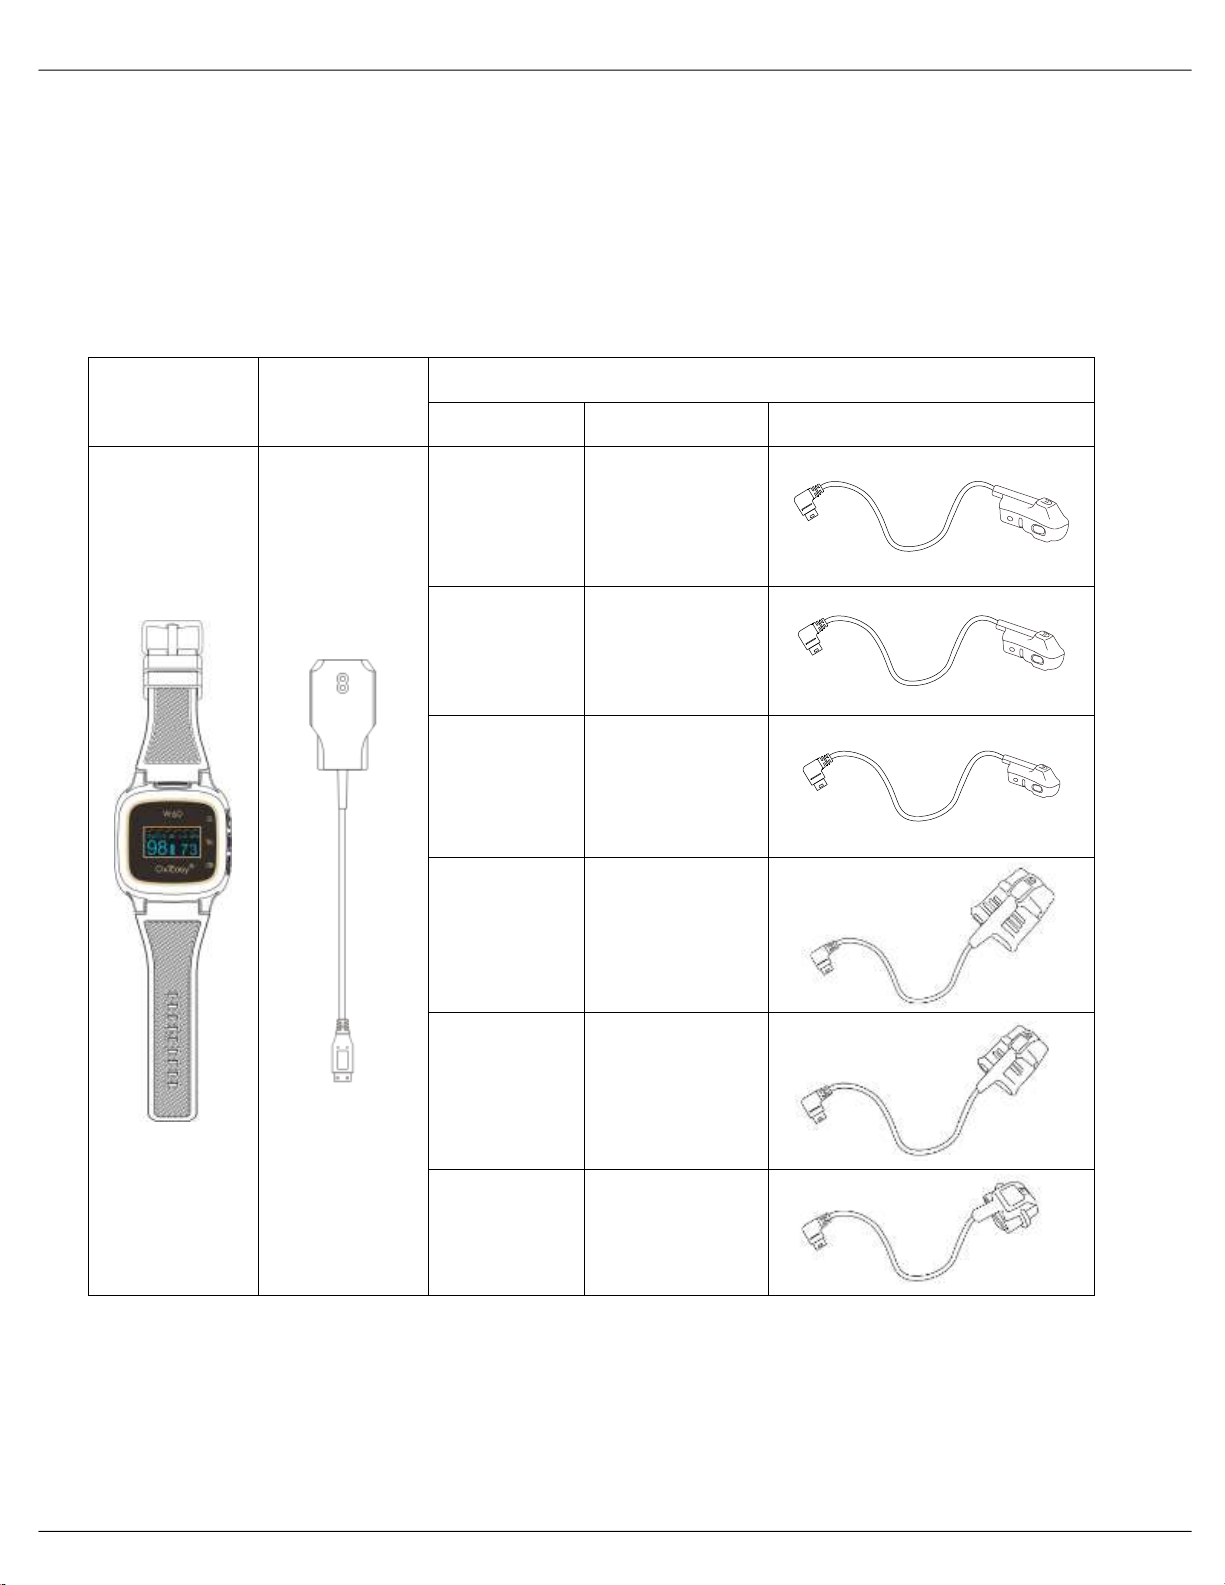
6.Battery and Charger
6.1 Battery
The OxiEasy W60 use 3.7V rechargeable lithium battery.
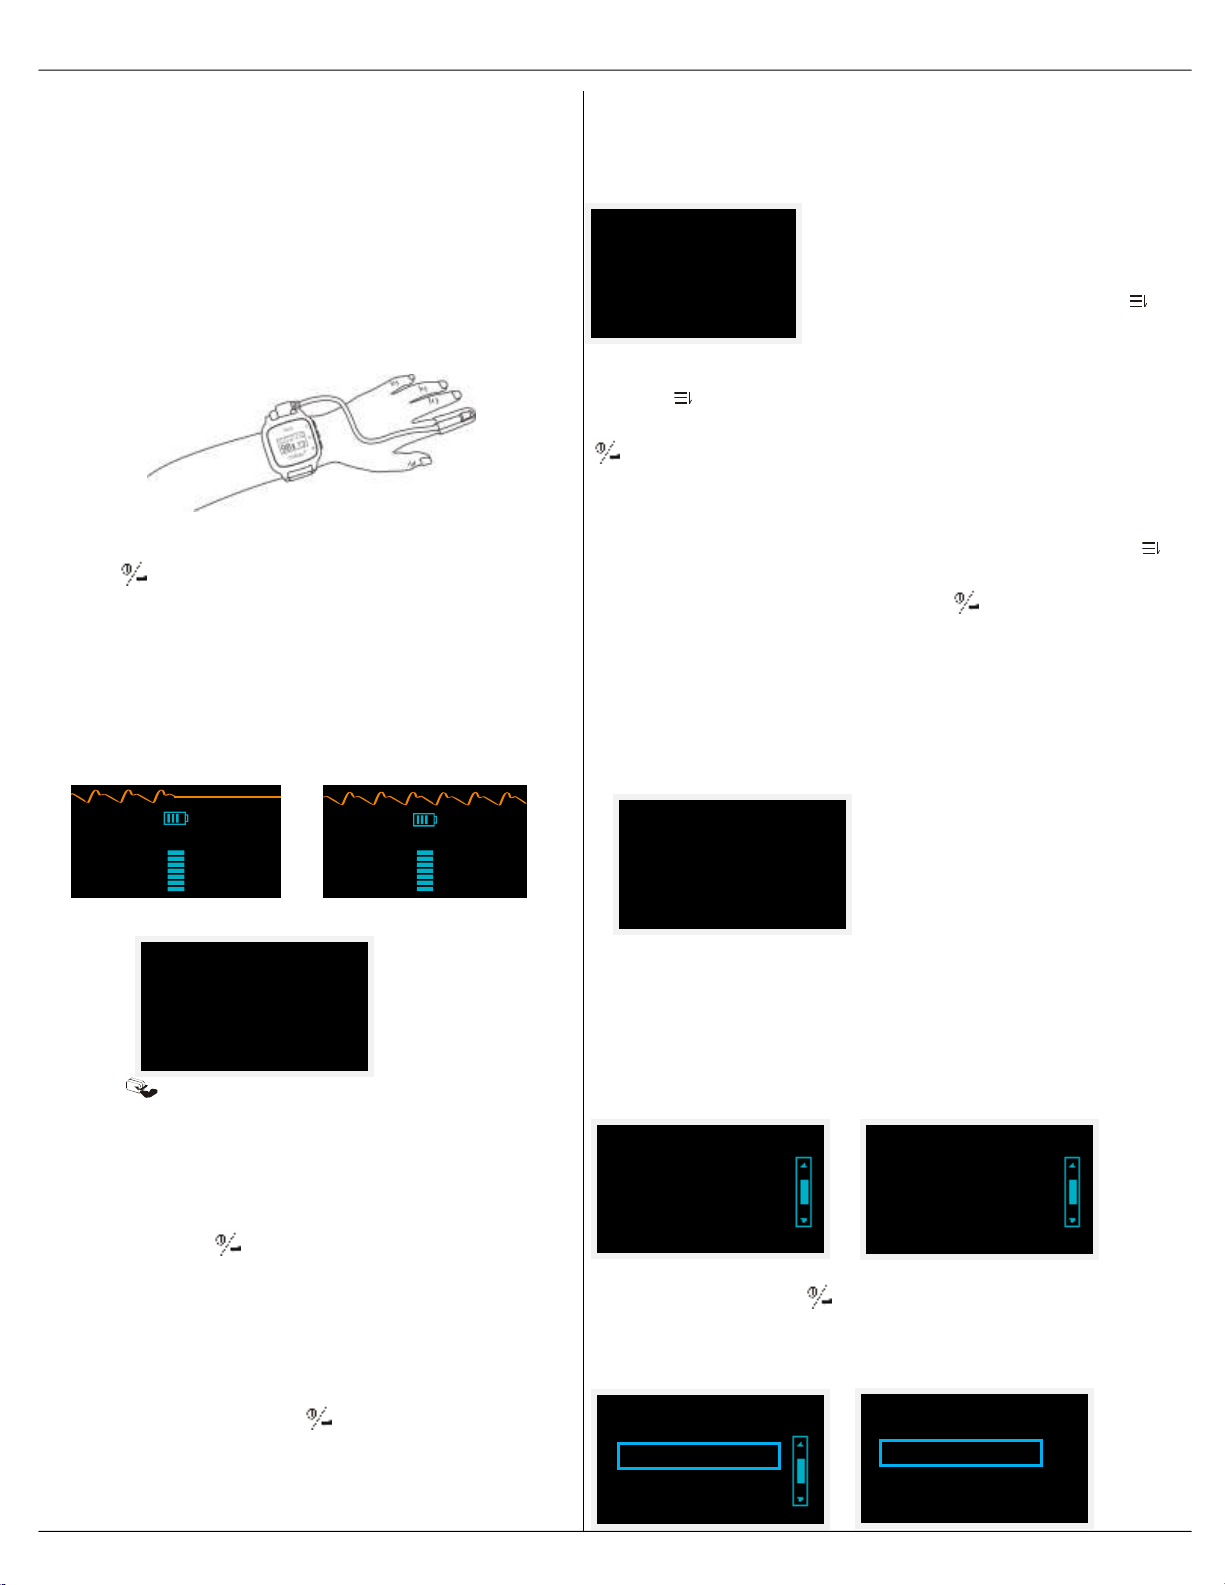
6.2 Charging method
·The metal contacts on the bottom of the instrument are connected
to the probes on the charger, See below picture:
·Put the usb connector of the charger into the power adaptor,
the indicator light will be green.
·During the charging process, the indicator of the screen can show
the charging process. When battery is full,the signal of the
power indicator will stop beating.
Please use specified charger and recommended charge methods
Don’t expose the battery in high or cold temperature, otherwise
it will affect the battery life. When charging, the current will
have a return, then the battery is with a little heat, which is
normal.
7.Maintenance –Cleaning
The device requires no calibration .
The device’s expected service life is 5 years. The sensor’s
expected service life is 3 years.
7.1 Maintenance
The device should be examined every 12 months as bellow:
1) Check if there are mechanical or function problem of device.
2) Check the label on the device and make sure it is clear.
We give no warranty if the operator has destroyed the device by

Justec Shenzhen CO., LTD. Version:2.0
OxiEasy W60 User Manual 8
7.2 Cleaning
It is recommended that you use 70% ethanol solution to clean the
device (preferably a cloth slightly moistened with water or
washing up liquid generously diluted etc). Organic solvents such
as pure alcohol, acetone, turpentine etc, should never be used for
cleaning.
Make sure no fluid penetrates the interior of the device. Pay
special attention to the sensor connector and keep the battery
contacts and USB interface dry and clean.
7.3 Frequence of cleaning
Clean once per week or more frequently if handled by multiple
users.
8.Specification
ITEM
PARAMETER
Display range
SpO2
(35~100)%
Pulse
(25~250) BPM
Measurement
range and accuracy
SpO2
(70~100)%±2%
Pulse
(25~250) BPM ±3 BPM
Resolution
SpO2
1%
Pulse
1 BMP
Battery
Type
rechargeable battery
Voltage
3.7V
Work Life
10 hours
Lifetime
5 years
Storage condition
Temperature
-20℃~70℃
Humidity
10%~95%
Pressure
500hPa~1060hPa
Operation
condition
Temperature
5℃~40℃
Humidity
10%~95%
Pressure
700hPa~1060hPa
Size
and weight
Weight
50 g
Size
167×45×16mm
9.Testing Summary
SpO2 Accuracy Testing
Accuracy data is calculated using the root-mean-squared (Arms
value) for all subjects, per ISO 80601-2-61, Medical Electrical
Equipment—Particular requirements for the basic safety and
essential performance of pulse oximeter equipment for medical
use.
Pulse Rate Accuracy Testing
This test measures pulse rate oximeter accuracy with motion
artifact simulation introduced by a pulse oximeter tester. This test
determines whether the oximeter meets the criteria of ISO 80601-
2-61 for pulse rate during simulated movement, tremor, and spike
motions.
10. Warranty
We give 1 year warranty for defects caused by material or
manufacturing faults from the date of purchase. Defects which
come under the terms of the warranty are rectified in accordance
with our terms of warranty.
ignoring these operating instructions, by improper handling, or if
the device is used for a purpose for which it was not intended or
owing to outside intervention. In such cases, liability transfers to
the operator!
The warranty expires if the device is affected by chemicals owing
to leaking batteries or if batteries are used after expiry date.
The cost for transport to or from the place of repair for repair is not
covered in the warranty. It will be borne on the customer.
For information about the device and accessories ,or to report
unexpected operation or events, contact your local sales
representative or distributor.For the sales representative or
distributor in your area, contact Justec.
Justec Shenzhen CO., LTD.
Add: Room 2018, 2nd Floor, 64th Building, Jinlong Industrial
Area, Qinlin Road, Nanshan District 518052, Shenzhen,
People’s Republic of China
Tel : 0086-755-26068930
Fax: 0086-755-26068933
Http://www.justec.cn
European Representative:
Shanghai International Holding Corp. GmbH
Eiffestrasse 80, 20537 Hamburg, Germany
11.Symbol Index
Attention! See instructions for use
Manufacturer
Date of manufacture
Observe applicable waste disposal regulations
PN
Part number
Follow Instructions for Use.
Type BF
No alarm
Serial number
European Union approval
IP22
Protected against dripping water and against access
to hazardous parts with a tool, per IEC60529

Justec Shenzhen CO., LTD. Version:2.0
OxiEasy W60 User Manual 9
12.Packing List –Accessories and Replacement Parts
12.1 Packing List:
·OxiEasy W60, main unit
·Sensor
·USB Connector
·CD
12.2 Main Accessories Description
Main unit
USB
Connector
Sensor
Model
Manufacturers
Structure
S18
(S8137)
Himed
S16
(S7137)
Himed
S14
(S9137)
Himed
S1137
(OxiSen
Series)
Himed
S4137
(OxiSen
Series)
Himed
S5137
(OxiSen
Series)
Himed

Justec Shenzhen CO., LTD. Version:2.0
OxiEasy W60 User Manual 10
JUSTEC
Justec Shenzhen CO.,LTD.
Add:Room 2018, 2nd Floor, 64th Building, Jinlong Industrial
Area, Qilin Road, Nanshan District 518052, Shenzhen,
People's Republic of China
Tel:0086-755-26068930
Fax:0086-755-26068933
Http://www.justec.cn
Table of contents
Popular Medical Equipment manuals by other brands

Cantel Medical
Cantel Medical Crosstex Twist Plus Instructions for use

Spencer
Spencer T-STRAPS user manual

Cardinal Health
Cardinal Health ALLY Clinician Quick Reference Guide

Atos Medical
Atos Medical PROVOX Vega Instructions for use

Atmos
Atmos 318.0000.0 operating instructions

HD Rehab
HD Rehab HD motion 39852 User manual & assembly instructions