JVC EXAD KW-AVX826 Guide

Connecting the parking brake lead
Connect the parking brake lead to the parking brake system built in the car.
Menghubungkan ujung rem parkir
Menghubungkan ujung rem parkir ke sistem rem parkir yang terpasang dalam mobil.
To metallic body or chassis of the car
Ke besi bodi atau casis dari mobil tersebut
Parking brake switch (inside the car)
Saklar rem parkir (di dalam mobil)
Parking brake lead (light green)
Ujung rem parkir (hijau muda)
Parking brake
Rem parkir Crimp connector
Konektor kerut
A
a
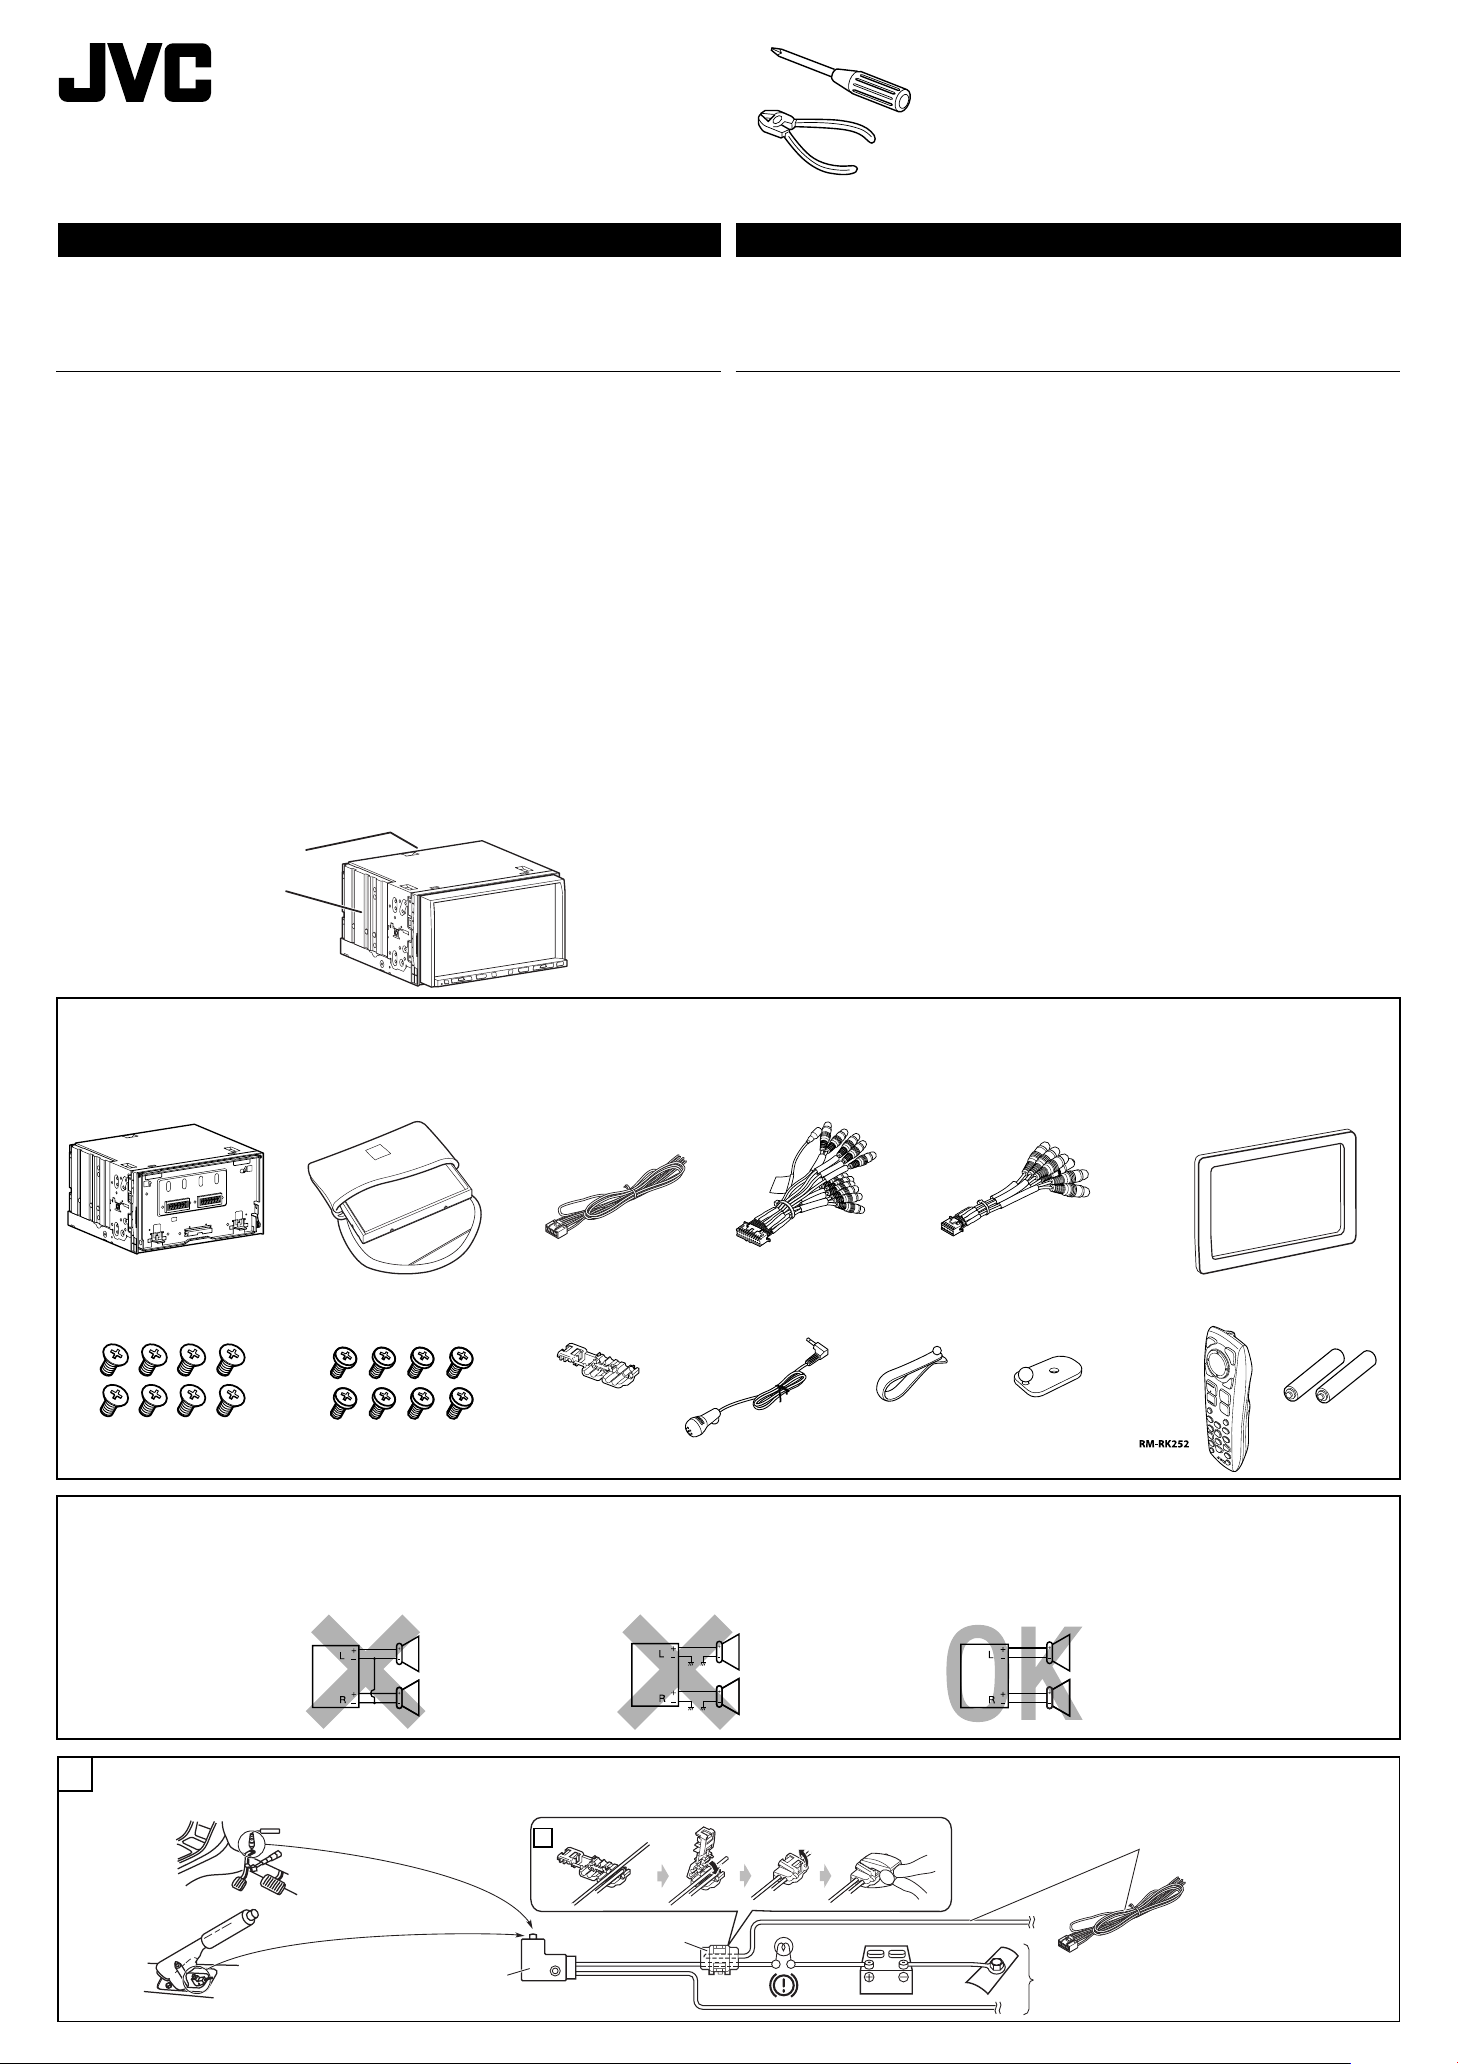
Monitor panel and soft case
Panel monitor dan soft case/tas
AV I/O cord
Kabel AV I/O
LINE OUT cord
Kabel LINE OUT
Microphone holder
Penahan mikrofon
Microphone
Mikrofon
Microphone clip
Klip mikrofon
1
KW-AVX826/KW-AVX825
Installation/Connection Manual
Manual Pemasangan/Penyambungan
0209MNMMDWJEIN
EN, IN
© 2009 Victor Company of Japan, Limited
Daftar bagian-bagian untuk pemasangan dan penyambungan
Bagian-bagian berikut disediakan untuk unit ini.
Jika ada yang hilang, segera hubungi penyalur Anda.
Parts list for installation and connection
The following parts are provided for this unit.
If anything is missing, contact your dealer immediately.
LVT1997-007A
[UN]
INDONESIA
Unit ini didesain untuk beroperasi hanya pada sistem listrik 12 V DC yang di-ground NEGATIVE. Jika
kendaraan Anda tidak dilengkapi sistem ini, maka diperlukan alat pembalik tegangan yang dapat dibeli
di penyalur-penyalur audio mobil JVC.
PERINGATAN
• JANGAN menginstal unit apa pun atau menjalin kabel apa pun pada lokasi di mana;
– unit dapat menghalangi pengoperasian roda kemudi dan tuas persneling, karena dapat
mengakibatkan kecelakaan lalu lintas.
– unit dapat menghalangi pengoperasian alat keselamatan seperti kantung udara, karena hal ini
dapat mengakibatkan kecelakaan yang fatal.
– ini dapat menghalangi pandangan.
• JANGAN mengoperasikan unit apa pun sewaktu mengendalikan roda kemudi, karena hal ini dapat
mengakibatkan kecelakaan lalu lintas.
• Pengemudi tidak boleh menonton ke monitor sewaktu mengemudi. Ini dapat mengakibatkan
kecerobohan dan menyebabkan kecelakaan.
• Jika Anda harus mengoperasikan unit selagi mengemudi, pastikan Anda melihat ke sekeliling
dengan cermat, karena kalau tidak, Anda bisa terlibat kecelakaan lalu lintas.
• Jika rem parkir tidak bekerja, terlihat tulisan “Parking Brake” berkedip pada monitor dan tidak ada
pemutaran gambar yang akan ditunjukkan.
– Peringatan ini hanya muncul apabila kabel rem parkir terhubung ke sistem rem parkir yang
terpasang dalam mobil.
Catatan mengenai sambungan listrik:
• Ganti sekring dengan voltase yang sudah ditetapkan. Jika sekring sering meledak, konsultasikan
pada penyalur audio mobil JVC anda.
• Disarankan untuk menghubungkan speaker-speaker dengan maksimum power lebih dari 50 W
(keduanya di belakang dan di depan, dengan sebuah impedansi 4 Ω sampai 8 Ω).
Jika maksimum power kurang dari 50 W, ganti pengaturan <Amplifier Gain> (“PENAMBAH
PENGUAT”) untuk mencegah speaker-speaker dari kerusakan (lihat halaman 20 dari BUKU
PETUNJUK).
• Untuk mencegah hubungan pendek, tutup ujung-ujung terminal-terminal TIDAK DIGUNAKAN
dengan pita isolasi.
• Pendingin menjadi sangat panas setelah digunakan. Hati-hati untuk tidak menyentuhnya ketika
memindahkan unit ini.
• Pada saat pemasangan, pastikan semua kabel terpasang (kabel dari unit ini dan dari mobil) dengan
baik sehingga tidak ada kabel yang mengenai logam pendingin di belakang dan di samping unit.
ENGLISH
This unit is designed to operate on 12 V DC, NEGATIVE ground electrical systems. If your vehicle does
not have this system, a voltage inverter is required, which can be purchased at JVC car audio dealers.
WARNINGS
• DO NOT install any unit or wire any cable in a location where;
– it may obstruct the steering wheel and gearshift lever operations, as this may result in a traffic accident.
– it may obstruct the operation of safety devices such as air bags, as this may result in a fatal accident.
– it may obstruct visibility.
• DO NOT operate any unit while manipulating the steering wheel, as this may result in a traffic accident.
• The driver must not watch the monitor while driving. It may lead to carelessness and cause an accident.
• If you need to operate the unit while driving, be sure to look around carefully or you may be involved in
a traffic accident.
• If the parking brake is not engaged, “Parking Brake” flashes on the monitor, and no playback picture will
be shown.
– This warning appears only when the parking brake wire is connected to the parking brake system built
in the car.
Notes on electrical connections:
•Replace the fuse with one of the specified rating. If the fuse blows frequently, consult your JVC car audio
dealer.
•It is recommended to connect speakers with maximum power of more than 50 W (both at the rear and
at the front, with an impedance of 4 to 8 Ω).
If the maximum power is less than 50 W, change <Amplifier Gain> setting to prevent the speakers from
being damaged (see page 20 of the INSTRUCTIONS).
•To prevent short circuits, cover the terminals of the UNUSED leads with insulating tape.
•The heat sink becomes very hot after use. Be careful not to touch it when removing this unit.
• At the time of installation, be sure to fix all wires (wires both from this unit and from the car itself) in a
way that any wires cannot come into contact with heat sinks on the rear and side of the unit.
Main unit
Unit utama
Power cord
Kabel listrik
Round head screws (M5 × 8 mm)
Sekrup-sekrup kepala bulat (M5
× 8 mm)
Flat head screws (M5 × 8 mm)
Sekrup-sekrup kepala datar
(M5 ×8 mm)
Crimp connector
Konektor kerut
Remote controller
Remote kontrol
Batteries
Baterai
Plate for use with a Nissan car
Pelat untuk digunakan dengan
mobil Nissan
PRECAUTIONS on power supply and speaker connections:
• DO NOT connect the speaker leads of the power cord to the car battery; otherwise, the unit
will be seriously damaged.
• BEFORE connecting the speaker leads of the power cord to the speakers, check the speaker wiring in
your car.
TINDAKAN-TINDAKAN PENCEGAHAN pada suplai power dan sambungan-sambungan speaker:
• JANGAN sambungkan ujung-ujung speaker dari kabel power ke baterai mobil; sebaliknya,
unit tersebut akan secara serius rusak.
• SEBELUM menyambung ujung-ujung speaker dari kabel power ke speaker-speaker, cek perkabelan
speaker dalam mobil Anda.
Heat sink
Endapan panas
KW-AVX826[UN]Instal.indb 1KW-AVX826[UN]Instal.indb 1 09.2.3 9:00:54 PM09.2.3 9:00:54 PM

160 91.3
100
30˚
Step 5 / Langkah 5
Dashboard
Dashboard
20
4
Monitor panel
Panel monitor
2
INSTALLATION (IN-DASH MOUNTING)
The following illustration shows a typical installation. However, you should make adjustments
corresponding to your specific car. If you have any questions or require information regarding installation
kits, consult your JVC car audio dealer or a company supplying kits.
• If you are not sure how to install this unit correctly, have it installed by a qualified technician.
Before installing the unit
• When mounting the unit, be sure to use the screws provided, as instructed. If other screws are used,
parts could become loose or damaged.
• When tightening screws or bolts, be careful not to pinch any connection cord.
• Make sure not to block the fan on the rear to maintain proper ventilation when installing the unit.
1Remove the audio system originally installed in the car, together with its mounting brackets.
Note: Be sure to keep all the screws and parts removed from your car for future use.
2Attach the mounting brackets (removed from the car) to this unit (see below).
3Do the required electrical connections.
• See pages 3 and 4.
4Install this unit using the screws removed in step 1.
5Attach the monitor panel (see below).
The following example is for installation in a Toyota car. For more details, consult your JVC car audio
dealer.
If necessary, restore the protruding tabs.
Jika perlu, pasang kembali tab yang
menonjol keluar.
Supplied screws
Sekrup-sekrup yang disediakan
Note : When installing the unit on the mounting bracket, make sure to use the supplied screws
(M5 x 8 mm). If longer screws are used, they could damage the unit.
Catatan : Apabila memasang unit pada braket montasi, pastikan Anda menggunakan sekrup-sekrup
yang disediakan (M5 x 8 mm). Jika menggunakan sekrup-sekrup yang lebih panjang, bisa
merusak unit.
PEMASANGAN (DALAM BINGKAI TEMPATNYA)
Ilustrasi berikut menunjukkan pemasangan yang khas. Namun, Anda harus melakukan penyesuaian pada
mobil tertentu. Jika ada pertanyaan atau perlu informasi mengenai kit pemasangan, tanyakan kepada
penyalur audio mobil JVC atau perusahaan yang menyediakannya.
• Jika Anda tidak tahu pasti cara memasang unit ini dengan benar, serahkan pemasangan kepada
teknisi yang memenuhi syarat.
Sebelum memasang unit
• Apabila memasang unit, pastikan Anda menggunakan sekrup-sekrup yang tersedia sebagaimana
yang diinstruksikan. Jika menggunakan sekrup lain, komponen bisa menjadi longgar atau rusak.
• Sewaktu mengencangkan sekrup-sekrup atau baut, hati-hati, jangan sampai menjepit kabel
sambungan yang manapun.
• Pastikan tidak ada yang menghalangi kipas pada panel belakang untuk menjaga aliran udara yang
baik apabila kipas ini dipasang.
1Copot sistem audio yang aslinya terpasang dalam mobil berikut braket montasi.
Catatan: Pastikan Anda menyimpan semua sekrup-sekrup dan komponen yang dilepaskan dari
mobil untuk penggunaan di kemudian hari.
2Pasangkan braket montasi (yang dilepaskan dari mobil) ke unit ini (lihat di bawah).
3Lakukan koneksi listrik yang diperlukan.
• Lihat halaman 3 dan 4.
4Pasang unit ini dengan menggunakan sekrup-sekrup yang dilepaskan pada langkah 1.
5Memasang panel monitor (lihat di bawah).
Berikut adalah contoh pemasangan pada mobil Toyota. Untuk rincian lebih lanjut, tanyakan kepada
penyalur audio mobil JVC.
TROUBLESHOOTING
• The fuse blows.
*Are the red and black leads connected correctly?
• Power cannot be turned on.
*Is the yellow lead connected?
• No sound from the speakers.
*Is the speaker output lead short-circuited?
• Sound is distorted.
*Is the speaker output lead grounded?
*Are the “–” terminals of L and R speakers grounded in common?
• Noise interfere with sounds.
*Is the rear ground terminal connected to the car’s chassis using shorter and thicker cords?
• Unit becomes hot.
*Is the speaker output lead grounded?
*Are the “–” terminals of L and R speakers grounded in common?
• This unit does not work at all.
*Have you reset your unit?
PEMECAHAN MASALAH
• Sekring meledak.
* Apakah ujung-ujung merah dan hitam tersambung dengan benar?
• Power tidak dapat dihidupkan.
* Apakah ujung kuning sudah tersambung?
• Tidak ada suara dari speaker.
* Apakah ujung keluaran speaker terhubung pendek?
• Suara terdistorsi.
* Apakah ujung keluaran speaker sudah ditanahkan?
* Apakah terminal-terminal “–” dari speaker-speaker L dan R sudah ditanahkan secara umum?
• Berisik yang mengganggu suara-suara.
* Apakah terminal tanahan belakang tersambung ke casis mobil menggunakan kabel-kabel terpendek
dan tertebal?
• Alat penerima ini menjadi panas.
* Apakah ujung keluaran speaker sudah ditanahkan?
* Apakah terminal-terminal “–” dari speaker-speaker L dan R sudah ditanahkan secara umum?
• Alat penerima ini tidak bekerja secara keseluruhan.
* Apakah anda sudah reset (memasang kembali) alat penerima anda?
When installing the unit in a Nissan car
Apabila memasang unit dalam mobil Nissan
Install the unit at an angle of less than 30˚, taking it into
account that the monitor would eject when in use.
Pasang unit tersebut pada sudut kurang dari 30˚,
perhitungkan bahwa monitor akan keluar ketika sedang
digunakan.
Required space for installation and the monitor ejection
Diperlukan ruang untuk penginstalan dan pengeluaran monitor
Unit: mm
Unit: mm
Mounting bracket removed from the car
Braket montasi dilepaskan dari mobil
Screws removed from the car in step 1
Sekrup-sekrup yang dilepaskan dari
mobil pada langkah 1
Supplied screws
Sekrup-sekrup yang disediakan
Select the appropriate type fitting to your
audio system space.
Pilih tipe sambungan yang sesuai untuk
ruang sistem audio Anda.
Mounting bracket removed from the car
Braket montasi dilepaskan dari mobil
Plate for use with a Nissan car
Pelat untuk digunakan dengan mobil Nissan
KW-AVX826[UN]Instal.indb 2KW-AVX826[UN]Instal.indb 2 09.2.3 9:00:59 PM09.2.3 9:00:59 PM

1
2
3
4
5
9
6
1
(ILLUMINATION CONTROL)
(PARKING BRAKE)
7
(TEL MUTING)
3
8
2
3
ELECTRICAL CONNECTIONS
To prevent short circuits, we recommend that you disconnect the battery’s negative terminal and make all
electrical connections before installing the unit.
• Be sure to ground this unit to the car’s chassis again after installation.
SAMBUNGAN-SAMBUNGAN LISTRIK
Untuk mencegah hubungan pendek, kami menyarankan anda memutuskan sambungan terminal negatif
baterai dan membuat semua sambungan-sambungan listrik sebelum memasang unit.
• Pastikan untuk mentanahkan unit ini ke casis mobil kembali setelah pemasangan.
INDONESIAENGLISH
Before connecting:Check the wiring in the vehicle carefully. Incorrect connection may cause serious
damage to this unit.
The leads of the power cord and those of the connector from the car body may be different in color.
1Connect the colored leads of the power cord in the order specified in the illustration below.
2Connect the antenna cord.
3Finally connect the wiring harness to the unit.
Sebelum penyambungan: Cek perkabelan dalam mobil dengan hati-hati. Penyambungan yang tidak
benar mungkin menyebabkan kerusakan serius pada unit.
Ujung dari kabel power dan beberapa konektor dari bodi mobil mungkin berbeda dalam warna.
1Sambungkan ujung berwarna dari kabel power dalam urutan spesifikasi pada ilustrasi di bawah.
2Sambungkan kabel antena.
3Akhirnya sambungkan dudukan kabel ke unit.
*1
*1
15 A fuse
Sekring 15 A
Fan
Kipas *1Not included for this unit
*1Tidak disertakan untuk unit ini Ignition switch
Saklar kontak
To a live terminal in the fuse block connecting to the car battery
(bypassing the ignition switch) (constant 12 V)
Ke terminal aktif dalam blok sekring yang menghubungkan ke
baterai mobil (tanpa melalui kunci kontak) (konstant 12 V)
To metallic body or chassis of the car
Ke besi bodi atau casis dari mobil
tersebut
To an accessory terminal in the fuse block
Ke terminal aksesori dalam blok sekring
To the remote lead of other equipment (200 mA max.)
Ke ujung jauh dari peralatan lain (maksimum 200 mA.)
To automatic antenna if any (250 mA max.)
Ke antena otomatis jika ada (maksimum 250 mA.)
Fuse block
Blok sekring
To cellular phone system
Ke sistem telepon selular
To car light control switch
Ke saklar kontrol lampu mobil
Crimp connector
Konektor kerut
To parking brake (see diagram Åon page 1).
Ke rem parkir (lihat diagram Ådi halaman 1).
Ye l l ow *2
Kuning *2
Red
Merah
Orange with white stripe
Oranye dengan strip putih
Black
Hitam
Light green
Hijau muda
Brown
Cokelat
Blue with white stripe
Biru dengan strip putih
Blue
Biru
*2Before checking the operation of this unit prior to
installation, this lead must be connected, otherwise
power cannot be turned on.
*2Sebelum pengecekan pengoperasian dari unit
ini sebelum pemasangan, ujung ini harus sudah
dihubungkan, selain itu power tidak dapat
dihidupkan.
Left speaker (rear)
Speaker kiri (belakang)
Right speaker (front)
Speaker kanan (depan)
Left speaker (front)
Speaker kiri (depan)
Right speaker (rear)
Speaker kanan
(belakang)
Gray with black stripe
Abu-abu dengan strip
hitam
White
Putih
White with black stripe
Putih dengan strip
hitam
Green with black stripe
Hijau den gan strip
hitam
Gray
Abu-abu
Green
Hijau
Purple with black stripe
Ungu dengan strip
hitam
Purple
Ungu
Rear ground terminal
Terminal tanah belakang
See each diagram on pages 3 and 4.
Lihat setiap diagram di halaman 3 dan 4.
*3Firmly attach the ground lead to the metallic body or to
the chassis of the car—to the place uncoated with paint
(if coated with paint, remove the paint before attaching
the lead). Failure to do so may cause damage to the
unit.
*3Pasangkan dengan kuat kabel tanah ke bodi besi
atau ke casis dari mobil—pada tempat yang tidak
dilapisi cat (jika dilapisi cat, hilangkan cat sebelum
memasang kabel). Kegagalan melakukan ini mungkin
menyebabkan kerusakan pada unit tersebut.
B
Anda dapat menyambungkan penguat-penguat untuk meningkatkan sistem stereo mobil anda.
• Anda dapat memasok daya ke penguat dengan menghubungkan ujung yang jauh (biru
dengan strip putih) unit ini dan penguat. (Untuk menghubungkan beberapa penguat dengan
menggunakan ujung yang jauh, konektor Y harus dibeli secara terpisah.)
• Putuskan sambungan speaker-speaker dari unit ini, sambungkan ini ke penguat. Biarkan ujung
speaker dari unit ini tidak digunakan.
• Anda dapat mematikan penguat (amplifier) yang terpasang tetap dan mengirimkan sinyal
audio hanya ke penguat (amplifier) luar untuk mendapatkan suara yang jelas dan menghindari
peningkatan panas di dalam radio. Lihat halaman 20 dari BUKU PETUNJUK.
Connecting the LINE OUT cord
LRL
L
INPUT
INPUT
R
L
INPUT
R
L
R
L
R
R
*3
*3
*3
LINE OUT (FRONT)
LINE OUT (REAR)
SUBWOOFER
Rear speakers
Speaker-speaker
belakang
JVC Amplifier
Penguat JVC
You can connect amplifiers to upgrade surround system in the car compartment.
• You can supply the power to the amplifiers by connecting the remote leads (blue with white stripe) of
this unit and amplifiers. (To connect more than one amplifier using the remote leads, Y-connectors
need to be separately purchased.)
• Disconnect the speakers from the unit, and connect them to the amplifier. Leave the speaker leads of
the unit unused.
• You can switch off the built-in amplifier and send the audio signals only to the external amplifier(s)
to get clear sounds and to prevent internal heat built-up inside the unit. See page 20 of the
INSTRUCTIONS.
Front speakers
Speaker-speaker
depan
JVC Amplifier
Penguat JVC
JVC Amplifier
Penguat JVC
Subwoofer
Subwoofer
Menghubungkan kabel LINE OUT
OE remote adapter (not supplied)
Adaptor remote OE (tidak disediakan)
Steering wheel remote controller (equipped in the car)
Remote control roda kemudi (terpasang di dalam mobil)
AConnecting to the steering wheel remote controller
If your car is equipped with the steering wheel remote controller, you can operate this unit using the
controller. For connection, an exclusive remote adapter (not supplied) which matches your car is
required. For details, consult the same car audio dealer as where the unit is purchased.
Jika mobil Anda dilengkapi dengan remote control roda kemudi, Anda dapat mengoperasikan unit ini
dengan pengontrol. Untuk koneksi, diperlukan adaptor remote ekslusif (tidak disediakan) yang sesuai
dengan mobil Anda. Untuk keterangan lebih lanjut, hubungi dealer audio mobil yang sama, tempat
Anda membeli unit ini. OE REMOTE
Steering wheel remote
Remote roda kemudi
Menghubungkan ke remote control
roda kemudi
KW-AVX826[UN]Instal.indb 3KW-AVX826[UN]Instal.indb 3 09.2.3 9:01:01 PM09.2.3 9:01:01 PM

POSITION OUT
CAMERA IN
VIDEO OUT
2nd AUDIO OUT
LINE IN
VIDEO IN
REVERSE
GEAR
SIGNAL
L
R
L
R
*4
L
R
L
R
4
Connecting the AV I/O cord
C
Bila menghubungkan komponen eksternal, rujuk juga buku petunjuk yang dibekalkan untuk komponen dan adaptor.
Peringatan:
Sebelum menyambungkan komponen eksternal, pastikan bahwa unit sudah dimatikan.
Anda dapat menghubungkan komponen JVC berikut ini ke jack CD changer.
Komponen JVC Nama model
CD changer (CD-CH) CH-X1500, dsb.
Anda juga dapat menghubungkan komponen berikut ini melalui berbagai adaptor JVC.
• Kabel koneksi mungkin harus dibeli secara terpisah.
Komponen Adaptor Nama model
iPod Adaptor interface untuk iPod KS-PD100*7
Audio player portabel dengan jack line output Adaptor line input KS-U57*7
Audio player portabel dengan jack stereo mini 3,5 mm
Adaptor AUX input KS-U58*7
Connecting external components
When connecting the external components, refer also to the manuals supplied for the components and adapter.
CAUTION:
Before connecting the external components, make sure that the unit is turned off.
You can connect the following JVC components to the CD changer jack.
JVC component Model name
CD changer (CD-CH) CH-X1500, etc.
You can also connect the following components through the various JVC adapters.
• Connection cords may need to be purchased separately.
Component Adapter Model name
iPod Interface adapter for iPod KS-PD100*7
Portable audio player with line output jacks Line input adapter KS-U57*7
Portable audio player with 3.5 mm stereo mini jack AUX input adapter KS-U58*7
To disconnect the connector / Untuk memutuskan konektor
Hold the connector top tightly (
1), then pull it out (2).
Pegang erat konektor (
1) lalu tarik keluar (2).
E
*7
To use these components, set the external input setting correctly (see page 18 of the INSTRUCTIONS).
*7 Untuk menggunakan komponen ini, lakukan pengaturan masukan eksternal yang benar (lihat
halaman 18 dari BUKU PETUNJUK).
USB devices / Perangkat USB
USB cable (approx. 1.2 m)
Kabel USB (kira-kira 1,2 m)
USB device
Perangkat USB
You cannot connect a computer to the USB ( ) terminal of the unit.
Anda tidak dapat menghubungkan komputer ke terminal USB ( ) pada
unit.
Connecting the iPod or the iPhone to the USB terminal / Menghubungkan iPod atau iPhone ke terminal
USB
iPod/iPhone
*8When using the cable, make sure <iPod (Off)> is selected for <AV Input> (see page 18 of the INSTRUCTIONS).
*8Bila menggunakan kabel, pastikan <iPod (Off)> yang dipilih untuk <AV Input> (lihat halaman 18 dari BUKU
PETUNJUK).
KS-U30
USB 2.0 cable
Kabel USB 2.0
You can connect the iPod or the iPhone to the USB terminal using the following cables:
– To listen to the music: USB 2.0 cable (supplied for the iPod and the iPhone)
– To watch the video: USB Audio and Video cable for iPod—KS-U30 (not supplied)*8
Anda dapat menghubungkan iPod atau iPhone ke terminal USB dengan menggunakan kabel berikut ini:
– Untuk mendengarkan musik: Kabel USB 2.0 (disediakan untuk iPod dan iPhone)
– Untuk menonton video: Kabel Audio dan Video USB untuk iPod—KS-U30 (tidak disediakan)*8
KW-AVX826/
KW-AVX825
Menghubungkan kabel AV I/O
Menyambung komponen eksternal
Cordless headphones
(KS-HP2)
Headphone nirkabel
(KS-HP2)
2nd monitor (KV-MR9010, etc.)
Monitor ke-2 (KV-MR9010, dsb.)
DConnecting the microphone
12
Microphone
Mikrofon
Microphone clip
Klip mikrofon
Secure the microphone cord using
cord cramps (not supplied) if
necessary.
Amankan kabel mikrofon dengan
menggunakan pengikat kabel
(tidak disediakan) jika perlu.
or
atau
• iPod adalah merek dagang dari Apple Inc., terdaftar di Amerika Serikat dan di negara-negara lain.
• iPhone adalah merek dagang dari Apple Inc.
• iPod is a trademark of Apple Inc., registered in the U.S. and other countries.
• iPhone is a trademark of Apple Inc.
KW-AVX826/
KW-AVX825 Microphone holder
Penahan mikrofon Adhesive tape
Pita perekat
iPod/iPhone
Menghubungkan mikrofon
KV-CM1
Rear view camera (not supplied)
Kamera tampilan belakang (tidak disediakan)
AV amplifier or decoder
Amplifier AV atau
decoder
Camcorder, Navigation System, etc.
Camcorder, Navigation System, dsb.
Extension lead (not supplied)
Kabel sambungan (tidak disertakan)
Video cord (not supplied)
Kabel video (tidak disediakan)
Crimp connector (not
supplied)*5
Konektor kerut (tidak
disediakan)*5
Audio/video cord (not supplied)
Kabel audio/video (tidak disediakan)
Digital optical cable
(not supplied)
Kabel optik digital
(tidak disediakan)
Reverse lamp
Lampu mundur
To reverse lamp
Ke lampu mundur
Reverse lamp lead
Ujung lampu mundur
To car battery
Ke baterai
*6
*4Required only when connecting a rear view camera to CAMERA IN plug.
*5Refer to åin diagram Åon page 1.
*6POSITION OUT terminal: This terminal is used for controlling an external device by using the
touch panel of this unit. This unit outputs the positional information detected on the touch panel
through the POSITION OUT terminal. Refer to the instruction manual of the external device for
details.
JVC does not guarantee proper operations for the external device connected to the POSITION OUT
terminal.
*6
*4Hanya diperlukan apabila menghubungkan kamera tampilan belakang ke steker CAMERA IN.
*5Lihat ådi diagram Ådi halaman 1.
*6Terminal POSITION OUT: Terminal ini digunakan untuk mengontrol perangkat eksternal dengan
menggunakan panel sentuh pada unit ini. Unit ini mengeluarkan informasi posisi yang terdeteksi
pada panel sentuh melalui terminal POSITION OUT. Baca buku petunjuk perangkat eksternal
untuk keterangan lebih lanjut.
JVC tidak menjamin perangkat eksternal yang terhubung ke terminal POSITION OUT dapat
berfungsi sebagaimana mestinya.
KW-AVX826[UN]Instal.indb 4KW-AVX826[UN]Instal.indb 4 09.2.3 9:01:03 PM09.2.3 9:01:03 PM
Other manuals for EXAD KW-AVX826
2
This manual suits for next models
1
Other JVC Automobile Accessories manuals