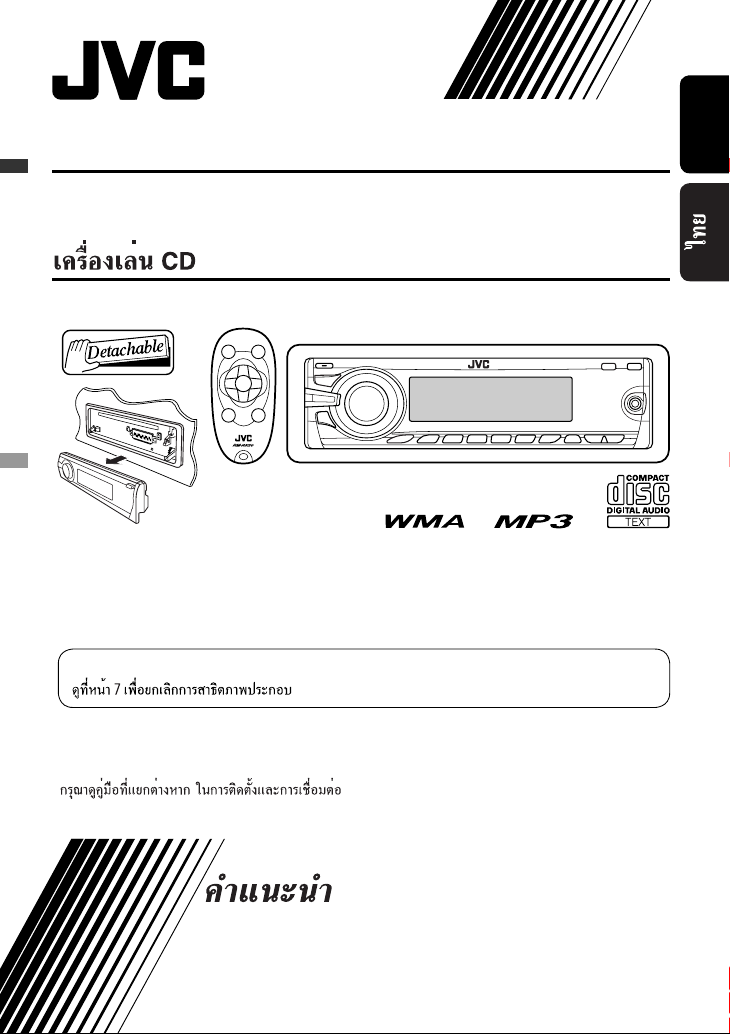
JVC KD-G545 User manual

ENGLISH
KD-G546/KD-G545
CD RECEIVER KD-G546/KD-G545
INSTRUCTIONS
GET0496-001A
[U/UH]
For canceling the display demonstration, see page 7.
For installation and connections, refer to the separate manual.
Cover_KD-G546_001A_f.indd 1Cover_KD-G546_001A_f.indd 1 11/13/07 10:55:44 AM11/13/07 10:55:44 AM

2
ENGLISH
Warning:
If you need to operate the unit while driving, be
sure to look around carefully or you may be involved
in a traffic accident.
Caution on volume setting:
Discs produce very little noise compared with other
sources. Lower the volume before playing a disc
to avoid damaging the speakers by the sudden
increase of the output level.
Thank you for purchasing a JV product.
Please read all instructions carefully before operation, to ensure your complete understanding and to obtain the best
possible performance from the unit.
IMPORTANT FOR LASER PRODUCTS
1. LASS 1 LASER PRODU T
2. CAUTION: Do not open the top cover. There are no user serviceable parts inside the unit; leave all servicing to
qualified service personnel.
3. CAUTION: Visible and/or invisible class 1M laser radiation when open. Do not view directly with optical
instruments.
4. REPRODU TION OF LABEL: AUTION LABEL, PLA ED OUTSIDE THE UNIT.
[European Union only]
Deta hing the ontrol panel
Atta hing the ontrol panel
Avoid touching the connectors.
EN02-07_KD-G546_001A_f.indd 2EN02-07_KD-G546_001A_f.indd 2 11/13/07 11:52:46 AM11/13/07 11:52:46 AM

ENGLISH
3
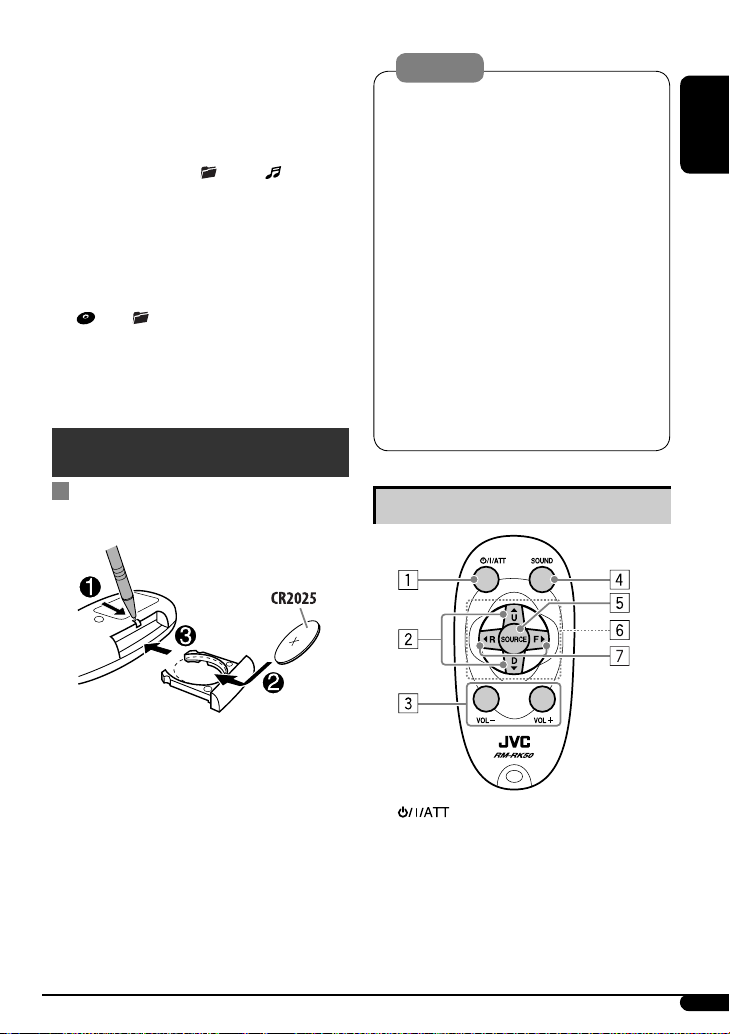
How to reset your unit
• Your preset adjustments will also be erased (except the
registered Bluetooth device, see page 14).
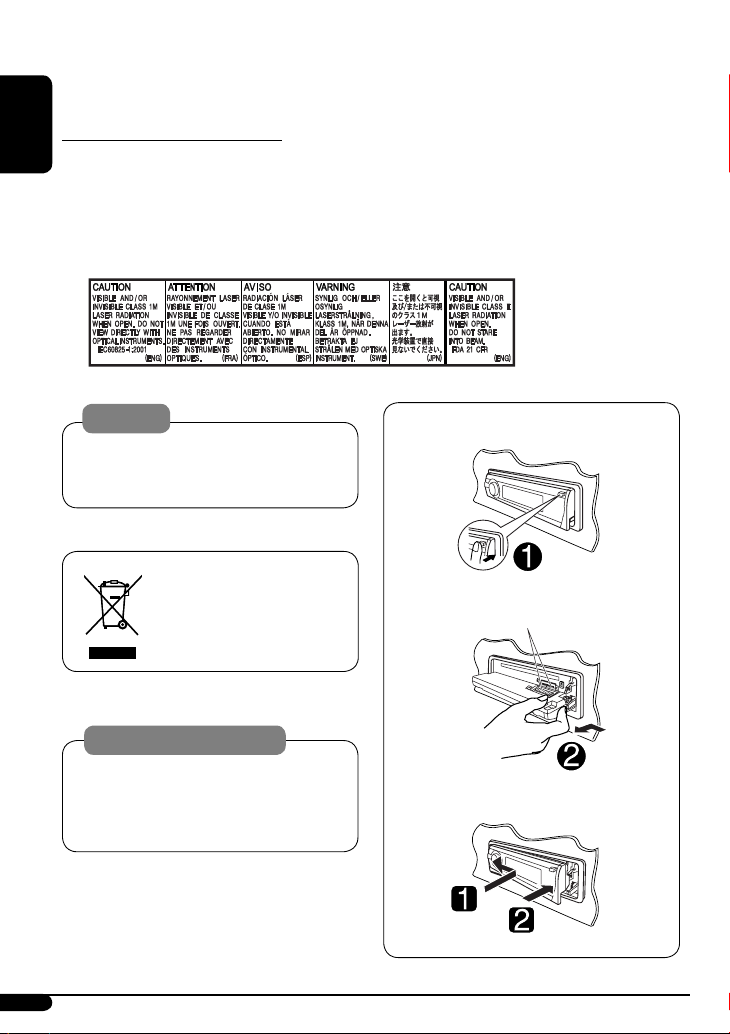
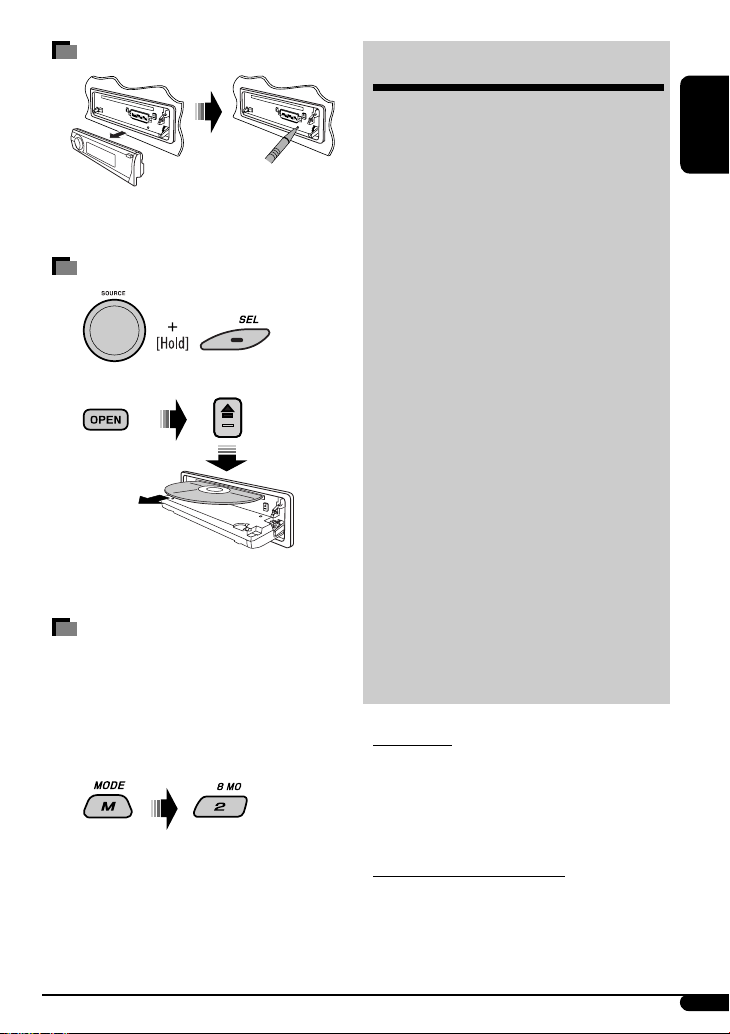
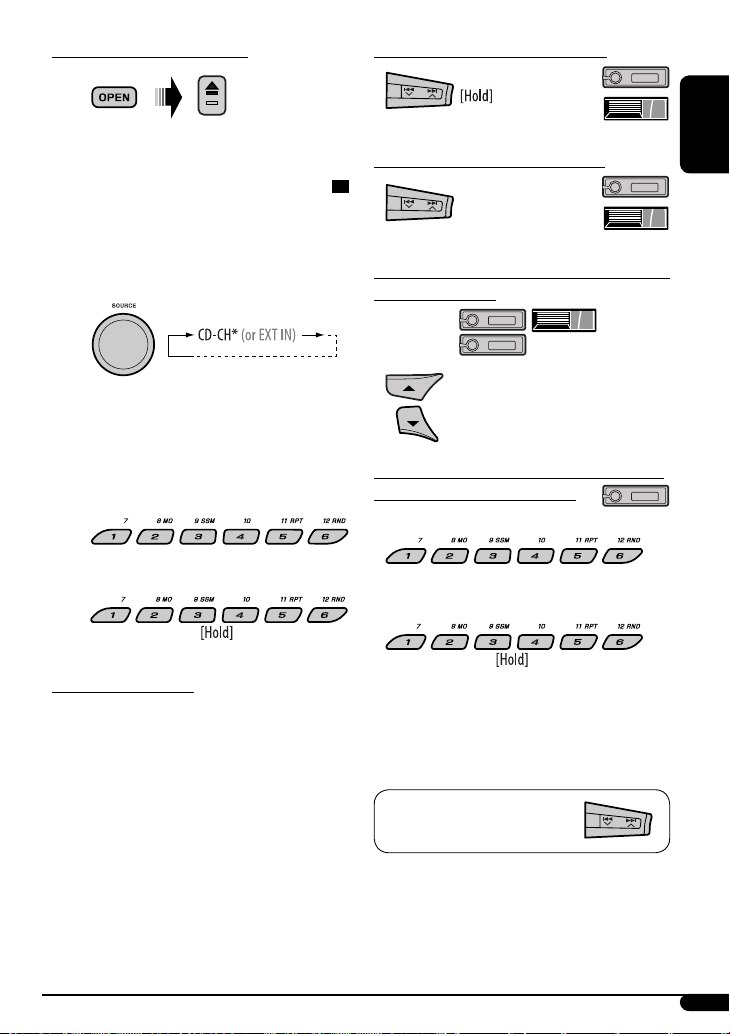
How to for ibly eje t a dis
“PLEASE” and “EJE T” appear alternately on the display.
• Be careful not to drop the disc when it ejects.
• f this does not work, reset your unit.
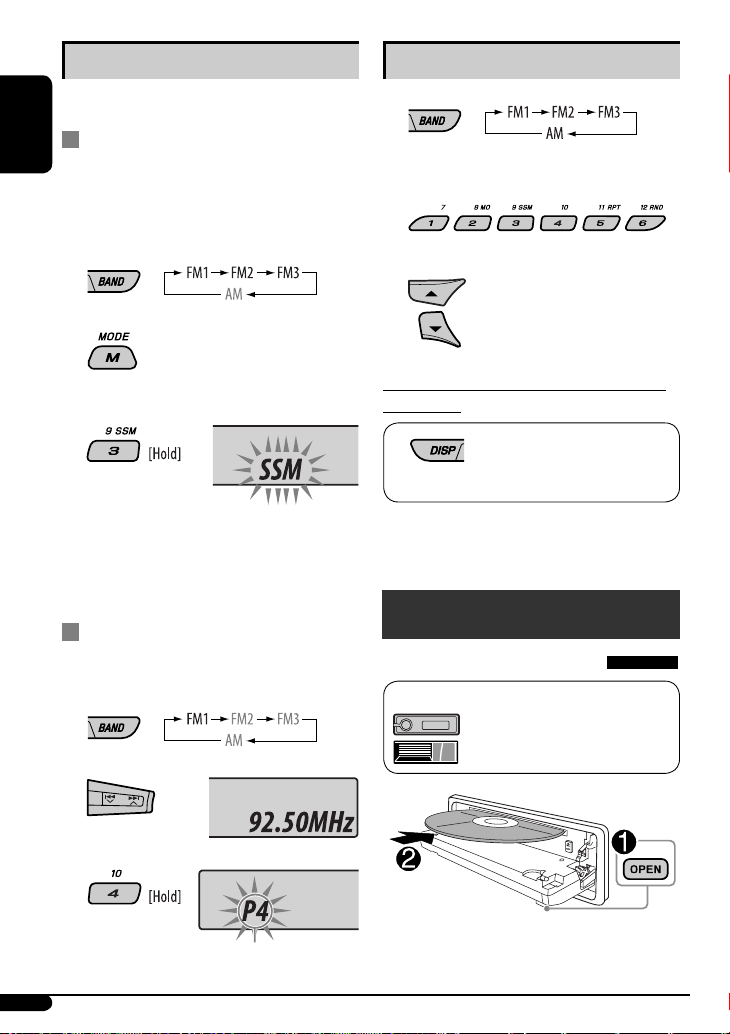
How to use the M MODE button
If you press M MODE, the unit goes into functions mode,
then the number buttons and 5/∞ buttons will work
as different function buttons.
Ex.: When number button 2 works as MO (monaural)
button.
To use these buttons for their original fun tions,
press M MODE again.
• Waiting for about 5 seconds without pressing any
of these buttons will automatically exit from the
functions mode.
CONTENTS
Control panel — KD-G546/KD-G545 ....... 4
Remote ontroller — RM-RK50 ........... 5
Getting started ................................ 6
Basic operations ................................................... 6
Radio operations ............................. 7
Dis operations ................................ 8
Playing a disc in the unit ..................................... 8
Playing discs in the D changer ............................ 9
Sound adjustments .......................... 11
General settings — PSM .................. 12
Using the Bluetooth ® devi es ........... 14
Using the Bluetooth cellular phone ..................... 16
Using the Bluetooth audio player ......................... 17
Bluetooth settings ............................................... 17
iPod operations ............................... 18
Other external omponent
operations ................................... 20
Title assignment .............................. 20
Maintenan e ................................... 21
More about this unit ........................ 22
Troubleshooting .............................. 26
Spe ifi ations .................................. 29
For safety...
• Do not raise the volume level too much, as this will
block outside sounds, making driving dangerous.
• Stop the car before performing any complicated
operations.
Temperature inside the ar...
If you have parked the car for a long time in hot or cold
weather, wait until the temperature in the car becomes
normal before operating the unit.
EN02-07_KD-G546_001A_f.indd 3EN02-07_KD-G546_001A_f.indd 3 11/13/07 10:53:31 AM11/13/07 10:53:31 AM

4
ENGLISH
Parts identifi ation
Display window
Control panel — KD-G546/KD-G545
1 4 / ¢ buttons
2 (standby/on/attenuator) button
3 5(up)/∞(down) buttons
4 Source button / ontrol dial
5 Display window
6 EQ (equalizer) button
7 OPEN button
• To flip-open the control panel.
• To eject the disc, flip-open the control panel then
press 0 on the unit.
8 SEL (select) button
9 MO (monaural) button
p SSM (Strong-station Sequential Memory) button
q Number buttons
w RPT (repeat) button
e RND (random) button
r M MODE button
t DISP (display) button
y BAND button
u Remote sensor
DO NOT expose the remote sensor to strong light
(direct sunlight or artificial lighting).
i AUX (auxiliary) input jack
o Status of Bluetooth device
(Device number, [1 – 5]; signal strength, [0 – 3]*;
battery reminder, [0 – 3]*)
* As the number increases, the signal/battery
strength becomes stronger.
; Tr (track) indicator
a Source display / Track number / Folder number /
Time countdown indicator
s Auxiliary indicator
d iPod indicator
f LOUD (loudness) indicator
EN02-07_KD-G546_001A_f.indd 4EN02-07_KD-G546_001A_f.indd 4 11/13/07 10:53:31 AM11/13/07 10:53:31 AM

ENGLISH
5
Warning:
• Do not install any battery other than R2025 or its
equivalent; otherwise, it may explode.
• Do not leave the remote controller in a place
(such as dashboards) exposed to direct sunlight
for a long time; otherwise, it may explode.
• Store the battery in a place where children cannot
reach to avoid risk of accident.
• To prevent the battery from over-heating,
cracking, or starting a fire:
– Do not recharge, short, disassemble, heat the
battery, or dispose of it in a fire.
– Do not leave the battery with other metallic
materials.
– Do not poke the battery with tweezers or
similar tools.
– Wrap the battery with tape and insulate when
throwing away or saving it.
Main elements and features
1 (standby/on/attenuator) button
• Turns the power on if pressed briefly or
attenuates the sound when the power is on.
• Turns the power off if pressed and held.
2 5 U (up) / D (down) ∞ buttons
• hanges the FM/AM bands with 5 U.
• hanges the preset stations with D ∞.
g Sound mode (iEQ: intelligent equalizer)
indicators— LASSI , HIP HOP, JAZZ, RO K, POPS,
USER
h EQ (equalizer) indicator
j Bluetooth indicator
k Disc information indicators—
TAG (Tag information), (folder), (track/file)
l Playback source indicators—
DIS : Lights up for the built-in D player.
H: Lights up only when D- H is selected as the
playback source.
/ Main display
z Playback mode / item indicators—RND (random),
(disc), (folder), RPT (repeat)
Tuner reception indicators—ST (stereo),
MO (monaural)
Remote controller — RM-RK50
Installing the lithium oin battery
(CR2025)
Aim the remote ontroller dire tly at the remote
sensor on the unit. Make sure there is no obsta le
in between.
Continued on the next page
EN02-07_KD-G546_001A_f.indd 5EN02-07_KD-G546_001A_f.indd 5 11/13/07 10:53:32 AM11/13/07 10:53:32 AM

6
ENGLISH
Getting tarted
Basi operations
~ Turn on the power.
Ÿ
FM1/FM2/FM3/AM = CD * = CD-CH */
IPOD * (or EXT IN) = BT-PHONE * (Bluetooth
Phone) = BT-AUDIO * (Bluetooth Audio) =
AUX IN = (back to the beginning)
* You cannot select these sources if they are not
ready or not connected.
! For FM/AM tuner.
⁄ Adjust the volume.
@ Adjust the sound as you want. (See
pages 11 and 12.)
To drop the volume in a
moment (ATT)
To restore the sound, press the
button again.
To turn off the power
Volume level appears.
• hanges the folder of the MP3/WMA discs.
• While playing an MP3 disc on an
MP3-compatible D changer:
– hanges the disc if pressed briefly.
– hanges the folder if pressed and held.
• While listening to an Apple iPod.
– Pauses or resumes playback with D ∞.
– Enters the main menu with 5 U.
(Now 5 U/D ∞/2 R/F 3 work as the menu
selecting buttons.)*
* 5 U : Returns to the previous menu.
D ∞ : Confirms the selection.
3 VOL – / VOL + buttons
• Adjusts the volume level.
4 SOUND button
• Selects the sound mode (iEQ: intelligent
equalizer).
5 SOUR E button
• Selects the source.
6 5 U/D ∞/2 R/F 3/ SOUR E buttons
• For Bluetooth cellular phone:
– Answers calls if pressed briefly.
– Rejects calls if pressed and held.
7 2 R/F 3 buttons
• Searches for stations if pressed briefly.
• Fast-forwards or reverses the track if pressed and
held.
• hanges the tracks if pressed briefly.
• While listening to an iPod (in menu selecting
mode):
– Selects an item if pressed briefly. (Then,
press D ∞ to confirm the selection.)
– Skips 10 items at a time if pressed and held.
• Reverse skip/forward skip for Bluetooth audio.
EN02-07_KD-G546_001A_f.indd 6EN02-07_KD-G546_001A_f.indd 6 11/13/07 10:53:33 AM11/13/07 10:53:33 AM

ENGLISH
7
! Start sear hing for a station.
When a station is received, searching stops.
To stop sear hing, press the same button
again.
To tune in to a station manually
In step ! above...
1
2 Sele t a desired station frequen y.
When an FM stereo broad ast is hard to
re eive
Reception improves, but the stereo effect will be lost.
To restore the stereo effe t, repeat the same
procedure. “MONO OFF” appears and the MO indicator
goes off.
Basi settings
• See also “General settings — PSM” on
pages 12 and 13.
1
2
1 Can eling the display demonstrations
Select “DEMO,” then “DEMO OFF.”
2 Setting the lo k
Select “ LO K HOUR”, then adjust the hour.
Select “ LO K MIN” (minute), then adjust the
minute.
3 Finish the pro edure.
To he k the urrent lo k time while the
power is turned off
lock time is shown on the display for
about 5 seconds. See also page 13.
Radio operation
~
Ÿ
Lights up when receiving an FM stereo
broadcast with sufficient signal strength.
Lights up when monaural mode is activated.
EN02-07_KD-G546_001A_f.indd 7EN02-07_KD-G546_001A_f.indd 7 11/13/07 10:53:34 AM11/13/07 10:53:34 AM

8
ENGLISH
Listening to a preset station
1
2 Select the preset station (1 – 6) you want.
or
To check other information while listening
to the radio
Fre uency = Clock =
Station name * = (back to the
beginning)
* If no title is assigned to a station, “NO NAME” appears.
To assign a title to a station, see page 20.
Disc operations
Playing a disc in the unit
The following marks are used to indicate...
: Built-in CD player operations.
: External CD changer operations...
All tracks will be playe repeate ly until you change the
source or eject the isc.
Storing stations in memory
You can preset six stations for each ban .
FM station automatic presetting —
SSM (Strong-station Se uential
Memory)
1 Select the FM band (FM1 – FM3) you want to
store into.
2
3
“SSM” flashes, then isappears when automatic
presetting is over.
Local FM stations with the strongest signals are
searche an store automatically in the FM ban .
Manual presetting
Ex.: Storing the FM station of 92.50MHz into preset
number 4 of the FM1 ban .
1
2
3
Preset number flashes for a while.
EN08-15_KD-G546_001A_f.indd 8EN08-15_KD-G546_001A_f.indd 8 11/13/07 10:54:10 AM11/13/07 10:54:10 AM

9
ENGLISH
To stop play and eject the disc
• Press SOURCE to listen to another playback source.
Playing discs in the CD changer
All iscs in the magazine will be playe repeate ly until
you change the source.
• Ejecting the magazine will also stop playback.
~
* If you have hanged the external input setting
to “EXT INPUT” (see page 13), you annot sele t
the CD hanger.
Ÿ Select a disc.
For isc number from 01 – 06:
For isc number from 07 – 12:
About the CD changer
It is recommen e to use a JVC MP3-compatible CD
changer with your unit.
• You can also connect MP3-incompatible CD changers.
However, these units are not compatible with MP3
iscs.
• You cannot use the CH-X99, CH-X100, an KD-MK
series CD changers with this unit.
• You cannot play any WMA isc in the CD changer.
• Disc text information recor e in the CD Text can be
isplaye when a JVC CD Text compatible CD changer
is connecte .
• For connection, see Installation/Connection Manual
(separate volume).
To fast-forward or reverse the track
To go to the next or previous tracks
To go to the next or previous folders (only for
MP3 or WMA discs)
For MP3 iscs:
For WMA iscs:
To locate a particular track (for CD) or folder
(for MP3 or WMA discs) directly
To select a number from 01 – 06:
To select a number from 07 – 12:
• To use irect fol er access on MP3/WMA iscs, it
is require that fol ers are assigne with 2- igit
numbers at the beginning of their fol er names—
01, 02, 03, an so on.
To select a particular track in a
fol er (for MP3 or WMA isc):
EN08-15_KD-G546_001A_f.indd 9EN08-15_KD-G546_001A_f.indd 9 11/13/07 10:54:14 AM11/13/07 10:54:14 AM

10
ENGLISH
Changing the display information
While playing an audio CD or CD Text
A = Disc title/performer *1 = Track
title *1 [ ] = B = (back to the beginning)
While playing an MP3 or a WMA track
• When “TAG DISPLAY” is set to “TAG ON”
(see page 13)
A = Album name/performer (folder
name *2) [ ] = Track title (file
name *2) [ ] = B = (back to the
beginning)
• When “TAG DISPLAY” is set to “TAG OFF”
A = Folder name [ ] = File name
[ ] = B = (back to the beginning)
A : Clock with the current track number
B : The elapse playing time with the current track
number
[ ] : Correspon ing in icator lights up on the isplay.
*1 If the urrent dis is an audio CD, “NO NAME” appears.
*2 If an MP3/WMA file does not have Tag information,
folder name and file name appear. In this ase, the
TAG indi ator will not light up.
Other main functions
Skipping tracks uickly during play
Only possible on JVC
MP3-compatible CD changer
• For MP3 or WMA iscs, you can skip tracks within the
same fol er.
Ex.: To select track 32 while playing a track whose
number is a single igit (1 to 9)
1
2
Each time you press the button, you can skip 10
tracks.
• After the last track, the first track will be selecte
an vice versa.
3
Prohibiting disc ejection
You can lock a isc in the loa ing slot.
To cancel the prohibition, repeat the same
proce ure.
EN08-15_KD-G546_001A_f.indd 10EN08-15_KD-G546_001A_f.indd 10 11/13/07 10:54:15 AM11/13/07 10:54:15 AM

11
ENGLISH
Sound adjustments
You can select a preset soun mo e suitable to the
music genre (iEQ: intelligent equalizer).
Indication (For)
BASS
MIDDLE
TREBLE
LOUD
USER
(Flat soun ) 00 00 00 OFF
ROCK
(Rock or isco music) +03 00 +02 OFF
CLASSIC
(Classical music) +01 00 +03 OFF
POPS
(Light music) +02 +01 +02 OFF
HIP HOP
(Funk or rap music) +04 –02 +01 OFF
JAZZ
(Jazz music) +03 00 +03 OFF
Adjusting the sound
You can a just the soun characteristics to your
preference.
1
2
Selecting the playback modes
You can use only one of the following playback mo es
at a time.
1
2 Select your desired playback mode.
7 Repeat play
Mode Plays repeatedly
TRACK RPT : The current track. [ ]
FOLDER RPT *1 : All tracks of the current fol er.
[ ]
DISC RPT *2 : All tracks of the current isc.
[ ]
RPT OFF : Cancels.
7 Random play
Mode Plays at random
FOLDER RND *1 : All tracks of the current fol er,
then the tracks of the next
fol er an so on. [ ]
DISC RND*2 : All tracks of the current isc.
[ ]
ALL RND : CD : All tracks of the inserte
isc. [ ]
CD-CH : All tracks of the iscs in
the magazine. [ ]
RND OFF : Cancels.
*
1 Only while playing an MP3 or a WMA dis .
*
2 Only while playing dis s in the CD hanger.
[ ] : Correspon ing in icator lights up on the
isplay.
Preset values
Continued on the next page
EN08-15_KD-G546_001A_f.indd 11EN08-15_KD-G546_001A_f.indd 11 11/13/07 10:54:17 AM11/13/07 10:54:17 AM

12
ENGLISH
General settings — PSM
You can change PSM (Preferre Setting Mo e) items
liste in the table on page 13.
1
2 Select a PSM item.
3 Adjust the PSM item selected.
4 Repeat steps 2 and 3 to adjust other PSM
items if necessary.
5 Finish the procedure.
Indication, [Range]
BASS *1, [–06 to +06]
A just the bass.
MIDDLE *1 (mi -range), [–06 to +06]
A just the mi -range frequencies soun level.
TREBLE *1, [–06 to +06]
A just the treble.
FADER *2, [R06 to F06]
A just the front an rear speaker output balance.
BALANCE *3, [L06 to R06]
A just the left an right speaker output balance.
LOUD *4 (lou ness), [LOUD ON or LOUD OFF]
Boost low an high frequencies to pro uce a
well-balance soun at a low volume level.
SUB.W (subwoofer), [00 to 08, initial: 04]
A just the subwoofer output level.
VOL ADJ (volume a just), [–05 to +05, initial: 00]
A just the volume level of each source (except FM), in
relation to the FM volume level. The volume level will
automatically increase or ecrease when you change
the source.
• Before making an a justment, select the source you
want to a just.
VOLUME, [00 to 50 or 00 to 30] *5
A just the volume.
*1 When you adjust the bass, mid-range, or treble, the
adjustment you have made is stored for the urrently
sele ted sound mode (iEQ) in luding “USER.”
*2 If you are using a two-speaker system, set the fader
level to “00.”
*3 This adjustment will not affe t the subwoofer output.
*4 The adjustment made (LOUD ON/LOUD OFF) will be
applied to all sound modes.
*5 Depending on the amplifier gain ontrol setting. (See
page 13 for details.)
EN08-15_KD-G546_001A_f.indd 12EN08-15_KD-G546_001A_f.indd 12 11/13/07 10:54:18 AM11/13/07 10:54:18 AM

13
ENGLISH
Indications Item
( : Initial)
Selectable settings, [reference page]
DEMO
Display emonstration
• DEMO ON
• DEMO OFF
: The isplay emonstration will be activate automatically if no
operation is one for about 20 secon s, [7].
: Cancels.
CLOCK DISP *1
Clock isplay
• CLOCK ON
• CLOCK OFF
: The clock time is shown on the isplay at all times when the
power is turne off.
: Cancels; pressing DISP will show the clock time for about
5 secon s when the power is turne off, [7].
CLOCK HOUR
Hour a justment
1 – 12 [Initial: 1 (1:00)], [7].
CLOCK MIN
Minute a justment
00 – 59 [Initial: 00 (1:00)], [7].
DIMMER
Dimmer
• ON
• OFF
: Dims the isplay an button illumination.
: Cancels.
KEY ILLUM
Illumination switch
• RED
• GREEN
: You can select the button illumination accor ing to your
preference.
SCROLL *2
Scroll
• ONCE
• AUTO
• OFF
: Scrolls the isplaye information once.
: Repeats scrolling (at 5-secon intervals).
: Cancels.
• Pressing DISP for more than one secon can scroll the isplay
regar less of the setting.
SUB.W FREQ
Subwoofer cutoff
frequency
• LOW
• MID
• HIGH
: Frequencies lower than 85 Hz are sent to the subwoofer.
: Frequencies lower than 125 Hz are sent to the subwoofer.
: Frequencies lower than 165 Hz are sent to the subwoofer.
EXT INPUT *3
External input
• CHANGER
• EXT INPUT
: To use a JVC CD changer, [9], an Apple iPo , [18].
: To use any other external component, [20].
TAG DISPLAY
Tag isplay
• TAG ON
• TAG OFF
: Shows the Tag information while playing MP3/WMA tracks,
[10].
: Cancels.
AMP GAIN
Amplifier gain control
• LOW POWER
• HIGH POWER
: VOLUME 00 – VOLUME 30 (Select this if the maximum power of
the speaker is less than 50 W to avoi them from amaging the
speaker.)
: VOLUME 00 – VOLUME 50
*1 If the power supply is not interrupted by turning off the ignition key of your ar, it is re ommended that you sele t
“CLOCK OFF” to save the ar’s battery.
*2 Some hara ters or symbols will not be shown orre tly (or will be blanked) on the display.
*3 Displayed only when one of the following sour es is sele ted—FM, AM, CD, Bluetooth, or AUX IN.
EN08-15_KD-G546_001A_f.indd 13EN08-15_KD-G546_001A_f.indd 13 11/13/07 10:54:19 AM11/13/07 10:54:19 AM

14
ENGLISH
Registering using “OPEN”
Preparation:
Operate the evice to turn on its Bluetooth function.
1 Select “BT-PHONE” or “BT-AUDIO.”
2 Select “NEW DEVICE.”
3 Select “OPEN.”
4 Enter a PIN (Personal Identification Number)
code to the unit.
• You can enter any number you like (1- igit to
16- igit number). [Initial: 0000]
* Some devi es have their own PIN ode. Enter the
spe ified PIN ode to the unit.
1 Move to the next (or previous) number
position.
2 Select a number or blank space.
Using the Bluetooth ® devices
For Bluetooth operations, it is require to connect the
Bluetooth Adapter (KS-BTA200) to the CD changer
jack on the rear of this unit.
• Refer also to the instructions supplie with the
Bluetooth a apter an the Bluetooth evice.
• Refer to the list (inclu e in the box) to check
the countries where you may use the Bluetooth ®
function.
To use a Bluetooth evice through the unit
(“BT-PHONE” an “BT-AUDIO”) for the first time,
you nee to establish Bluetooth wireless connection
between the unit an the evice.
• Once the connection is establishe , it is registere in
the unit even if you reset your unit. Up to five evices
can be registere in total.
• Only one evice can be connecte at a time for each
source (“BT-PHONE” an “BT-AUDIO”).
Registering a Bluetooth device
Registration (Pairing) methods
Use either of the following items in the Bluetooth menu
to register an establish the connection with a evice.
• Select “BT-PHONE” or “BT-AUDIO” as the source to
operate the Bluetooth menu.
OPEN Make the unit rea y to establish a new
Bluetooth connection.
Connection is establishe by operating the
Bluetooth evice.
SEARCH Make the unit rea y to establish a new
Bluetooth connection.
Connection is establishe by operating
the unit.
EN08-15_KD-G546_001A_f.indd 14EN08-15_KD-G546_001A_f.indd 14 11/13/07 10:54:20 AM11/13/07 10:54:20 AM

15
ENGLISH
3 • For available devices...
Enter the specific PIN co e of the evice to the
unit.
Refer to the instructions supplie with the evice
to check the PIN co e.
Use the Bluetooth evice to connect.
Now connection is establishe an you can use
the evice through the unit.
• For special device...
Use “OPEN” or “SEARCH” to connect.
Connecting/disconnecting/deleting a
registered device
1 Select “BT-PHONE” or “BT-AUDIO.”
2 Select a registered device you want to
connect/disconnect/delete.
3 • Select “CONNECT” or “DISCONNECT” to
connect/disconnect the selected device.
• Select “DELETE,” then “YES” to delete the
selected device.
You can set the unit to connect the Bluetooth evice
automatically when the unit is turne on. (See
“AUTO CNNCT” on pages 17 an 18.)
3 Repeat steps 1 and 2 until you finish
entering a PIN code.
4 Confirm the entry.
“OPEN..” flashes on the isplay.
5 Use the Bluetooth device to search and
connect.
On the evice to be connecte , enter the same
PIN co e you have just entere for this unit.
“CONNECTED” appears on the isplay.
Now connection is establishe an you can use the
evice through the unit.
The evice remains registere even after you
isconnect the evice. Use “CONNECT“ (or activate
“AUTO CNNCT”) to connect the same evice from
next time on. (See the following an pages 17
an 18.)
Connecting a device
Perform steps 1 an 2 on page 14, then...
1 • Select “SEARCH” to search for available
devices.
The unit searches an isplays the list of the
available evices.
If no available evice is etecte , “UNFOUND”
appears.
• Select “SPECIAL” to connect a special
device.
The unit isplays the list of the preset evices.
2 Select a device you want to connect.
EN08-15_KD-G546_001A_f.indd 15EN08-15_KD-G546_001A_f.indd 15 11/13/07 10:54:21 AM11/13/07 10:54:21 AM

16
ENGLISH
Using the Bluetooth cellular
phone
~
Ÿ Enter the Bluetooth menu.
! Make a call or change the settings
using the Bluetooth setting menu.
(See pages 16, 17 and 18.)
hen a call comes in....
The source is automatically changed to “BT-PHONE.”
hen “AUTO ANS ER” is activated....
The unit answers the incoming calls automatically, see
pages 7 and 8.
• When “AUTO ANSWER” is deactivated, press any
button (except ) to answer the incoming
call.
• You can adjust the microphone volume level (see
pages 7 and 8).
To end the call
Hold any button (except ).
hen a text message comes in....
If the cellular phone is compatible with text message
(notified through JVC Bluetooth adapter) and “MSG
INFO” (message info) is set to “AUTOMATIC” (see
pages 7 and 8), the unit rings to inform you of the
message arrival.
• ”RCV MESSAGE” (receiving message) appears on the
display.
Making a call
You can make a call using the following methods.
Select “BT-PHONE,” then follow the following steps to
make a call:
1 Display the Dial Menu.
2 Call history:
1 Select a call history (REDIAL *, RECEIVED *,
MISSED *).
2 Then select a name (if it is acquired) or phone
number.
Phone book:
1 Select “PHONE BOOK *.” The list of phone
number appears.
2 Select a name from the list.
Direct dialing:
1 Select “NUMBER.”
2 Enter the phone number.
* Displays only when your cellular phone is equipped
with these functions and is compatible with this unit.
EN16-19_KD-G546_001A_f.indd 16EN16-19_KD-G546_001A_f.indd 16 11/13/07 10:54:52 AM11/13/07 10:54:52 AM

ENGLISH
17
Continued on the next page
Using voice command
1
“SAY NAME” appears on the display.
2 Speak the name you want to call.
• You can also use voice command from the Dial
Menu. Select “V ICE DIAL” from the Dial Menu.
• If your cellular phone does not support the voice
recognition system, “ERR R” appears on the
display.
Using preset phone number
• See below for presetting.
Presetting the phone number
You can preset up to six phone numbers.
1 Display the Dial Menu.
2 Select “PHO E BOOK *,” “MISSED *,”
“REDIAL *,” or “RECEIVED *” whichever you
want to use. Then select a phone number.
* Displays only when your cellular phone is
equipped with these functions and is compatible
with this unit.
3
Using the Bluetooth audio
player
If playback does not start automatically, operate the
Bluetooth audio player to start playback.
• If playback does not pause when you change the
source, operate the Bluetooth audio player to pause
playback.
Reverse skip/forward skip
Pause/start playback *
* Operation may be different according
to the connected phone.
Enter setting menu (Device list)
• Refer also to page 15 for connecting/disconnecting/
deleting a registered device.
Bluetooth Information:
If you wish to receive more information about
Bluetooth, visit the following JVC web site:
<http://www.jvc-victor.co.jp/english/car/>.
Bluetooth settings
You can change the settings listed on page 18 according
to your preference.
1 Select “BT-PHO E” or “BT-AUDIO.”
2 Enter the Bluetooth menu.
EN16-19_KD-G546_001A_f.indd 17EN16-19_KD-G546_001A_f.indd 17 11/19/07 10:15:31 AM11/19/07 10:15:31 AM

18
ENGLISH
3 Select “SETTINGS.”
4 Select a setting item.
*1 Appears only when a Bluetooth phone is
connected.
*2 Appears only when a Bluetooth phone is
connected and it is compatible with text message
(notified through J C Bluetooth adapter).
*3 Bluetooth Audio: Shows only “ ERSION.”
5 Change the setting accordingly.
Setting menu ( : Initial)
AUTO CNNCT (connect)
When the unit is turned on, the connection is
established automatically with...
OFF : No Bluetooth device.
LAST : The last connected Bluetooth device.
ORDER : The available registered Bluetooth device
found at first.
AUTO ANS ER
Only for the device being connected for “BT-PHONE.”
ON : The unit answers the incoming calls
automatically.
OFF : The unit does not answer the calls
automatically. Answer the calls
manually.
REJECT : The unit rejects all incoming calls.
MSG INFO (message info)
Only for the device being connected for “BT-PHONE.”
AUTOMATIC : The unit informs you of the arrival of
a message by ringing and displaying
“RCV MESSAGE” (receiving message).
MANUAL : The unit does not inform you of the
arrival of a message.
MIC SETTING (microphone setting)
Only for the device being connected for “BT-PHONE.”
Adjust microphone volume connected to the Bluetooth
adapter, [LEVEL 0 /02/03].
VERSION
The Bluetooth software and hardware versions are
shown.
iPod operations
This unit is ready for operating an Apple iPod.
Before operating, connect the Interface adapter
for iPod, KS-PD 00 (separately purchased) to the CD
changer jack on the rear of the unit.
• For connection, see Installation/Connection Manual
(separate volume).
• For details, refer also to the manual supplied with the
interface adapter.
Preparations:
Make sure “CHANGER” is selected for the external input
setting, see page 3.
~
Playback starts automatically from where it has
been paused previously.
Ÿ Adjust the volume.
EN16-19_KD-G546_001A_f.indd 18EN16-19_KD-G546_001A_f.indd 18 11/13/07 10:54:57 AM11/13/07 10:54:57 AM

ENGLISH
19
Continued on the next page
! Adjust the sound as you want. (See
pages 11 and 12.)
• Make sure the equalizer on the iPod is
deactivated.
Pause playback
• To resume playback, press
the button again.
Fast-forward or reverse the
track
Forward skip/reverse skip
Selecting a track from the menu
1 Enter the main menu.
Now the 5/∞/4 /¢ buttons work
as the menu selecting buttons*.
* The menu selecting mode will be canceled:
– If no operations are done for about 5 seconds.
– When you confirm the selection of a track.
2 Select the desired menu.
PLAYLIST Ô ARTISTS Ô ALBUMS Ô
SONGS Ô GENRES Ô COMPOSER Ô
(back to the beginning)
3 Confirm the selection.
• To move back to the previous menu, press 5.
• If a track is selected, playback starts
automatically.
• If the selected item has another layer, you will
enter the layer. Repeat steps 2 and 3 until the
desired track is played.
• Holding 4 /¢ can skip 0 items at
a time.
Selecting the playback modes
1
2 Select your desired playback mode.
7 Repeat play
ONE RPT [ ]
Functions the same as “Repeat One” of the iPod.
ALL RPT [ ]
Functions the same as “Repeat All” of the iPod.
RPT OFF
Cancels.
7 Random play
ALBUM RND * [ ]
Functions the same as “Shuffle Albums” of the
iPod.
SONG RND [ ]
Functions the same as “Shuffle Songs” of the iPod.
RND OFF
Cancels.
* Functions only if you select “ALL” in “ALBUMS” of
the main “MENU.”
[ ] : Corresponding indicator lights up on the
display.
EN16-19_KD-G546_001A_f.indd 19EN16-19_KD-G546_001A_f.indd 19 11/13/07 10:54:58 AM11/13/07 10:54:58 AM

20
ENGLISH
To check other information while listening
to an iPod
Folder name = Track name =
Elapsed playing time with the
current track number = Clock
time with the current track
number = (back to the beginning)
Other external component
operations
You can connect an external component to...
• CD changer jack on the rear using the Line Input
Adapter—KS- 57 (not supplied) or AU Input
Adapter—KS- 58 (not supplied)
• A X (auxiliary) input jack on the control panel.
Connecting an external component to the
AU input jack
~ For selecting the external component
connected to...
• AU input jack
• CD changer jack on the rear using KS-U57
or KS-U58
If “EXT IN” does not appear, see page 13 and
select the external input (“EXT INP T”).
Ÿ Turn on the connected component and
start playing the source.
! Adjust the volume.
⁄ Adjust the sound as you want. (See
page 11 and 12.)
To check the clock time while listening to an
external component
AU IN or E T IN Ô Clock
Title assignment
You can assign names to 30 station frequencies (FM and
AM) and up to 8 characters for each station name.
~ Select FM/AM.
3.5 mm stereo mini
plug (not supplied)
Portable audio player, etc.
EN20-25_KD-G546_001A_f.indd 20EN20-25_KD-G546_001A_f.indd 20 11/13/07 10:55:12 AM11/13/07 10:55:12 AM
This manual suits for next models
1
Table of contents
Other JVC Car Receiver manuals