JVC LVT2190-006A User manual

Français English
CD PORTABLE SYSTEM
CHAINE PORTABLE A CD
NX-PB10
LVT2190-006A
[J]
INSTRUCTIONS
MANUEL D’INSTRUCTIONS
For Customer Use:
Enter below the Model No. and
Serial No. which are located
either on the rear, bottom or
side of the cabinet. Retain this
information for future reference.
Model No.
Serial No.
EN_NX-PB10[J].indb 1EN_NX-PB10[J].indb 1 10.12.8 11:08:47 AM10.12.8 11:08:47 AM

2
Introduction
Precautions
Notes on the power cord
• When you go away for an extended period of time,
remove the plug from the wall outlet.
• When unplugging the System from the wall outlet,
always pull the plug, not the power cord.
• Do not handle the power cord with wet hands.
• Disconnect the power cord before cleaning the System
or moving the System.
• Do not alter, twist or pull the power cord, or put
anything heavy on it, which may cause fire, electric
shock, or other accidents.
Avoid moisture, water, dust, and high temperatures
• Do not place the System in moist or dusty places.
• If water gets inside the System, turn off the power and
remove the plug from the wall outlet, then consult your
dealer. Using the System in this state may cause a fire or
electrical shock.
• Do not expose the System to direct sunlight or place it
near a heating device.
Notes on installation
• Select a place which is level, dry and neither too hot nor
too cold—between 5˚C and 35˚C (41˚F and 95˚F).
• Do not install the System in a place subject to vibrations.
• Do not put heavy objects on the System.
To prevent malfunction or damage to the System
• Do not insert any metallic objects, such as wires,
hairpins, coins, etc. into the System.
• Do not block the vents.
Notes on using the System
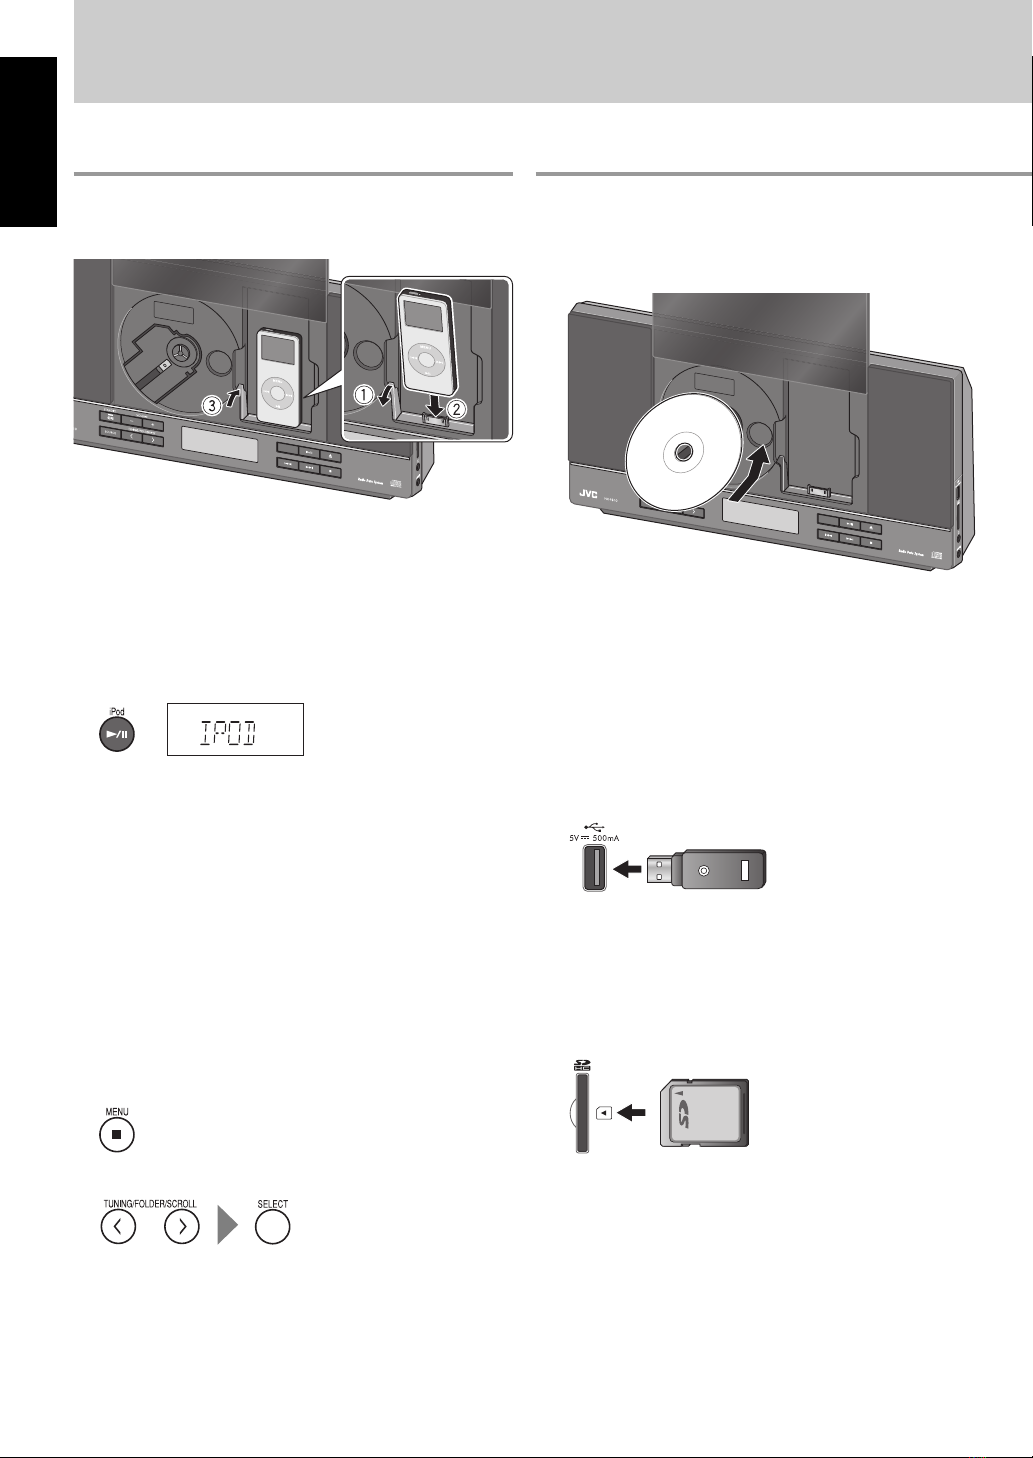
• Do not carry the System with the disc/iPod door open.
• Before moving the System, be sure to remove a disc,
iPod, USB mass storage class device, and SD card, then
disconnect the power code.
• Be sure to close the disc/iPod door before you turn off
the System.
There are no user-serviceable parts inside. If anything
goes wrong, unplug the power cord and consult your
dealer.
In this manual...
• The remote control buttons are used for explaining
the operations unless mentioned otherwise.
However, if the System has the same or similar
button names, they can also be used for the
operations.
• “File”and“track,”“group”and“folder”are used
interchangeably.
Playable disc/file types
• This System can play back...
– Audio CD and CD-R/CD-RW in Audio CD format
– MP3/WMA files on a CD-R/CD-RW (ISO 9660 format),
USB mass storage class device, or SD/SDHC card
(maximum data transfer rate: 2 Mbps)
• This System cannot play “packet write” discs.
• For MP3/WMA playback...
– Some MP3/WMA files may not be played back due to
their recording conditions.
– This System can play only discs of ISO 9660 Level 1 or
Level 2.
– This System can recognize a total of 999 tracks and 99
groups.
– This System can show the Tag data (version 1).
• For USB/SD playback...
– You cannot play back files larger than 2 GB.
– This System may not play back some USB mass
storage class devices/SD cards and does not support
DRM (Digital Rights Management).
Notes on using USB mass storage class
device
• Connect a USB mass storage class device when the
System is turned off to prevent malfunction.
• Do not use a USB hub.
• It is recommended to use the USB mass storage class
device of less than 4 GB storage capacity.
• Deactivate the security function of the USB mass storage
class device before connecting.
• When connecting with a USB cable, use a USB 2.0 cable
whose length is less than 1 m (3.3ft).
• The USB mass storage class device is charged through
the terminal when“USB”is selected as the source.
(Some USB mass storage class devices may not be
charged through the terminal even if“USB”is
selected as the source.)
• You cannot connect a computer to the terminal of
the System.
• Electrostatic shock at connecting a USB mass storage
class device may cause abnormal playback of the device.
In this case, disconnect the USB mass storage class
device then reset the System and the USB mass storage
class device.
• While playing back a file on a USB mass storage class
device, do not disconnect the device. Doing so may
cause malfunction on both the System and the device.
English
EN_NX-PB10[J].indb 2EN_NX-PB10[J].indb 2 10.12.8 11:08:49 AM10.12.8 11:08:49 AM

3
Contents
Introduction.......................................................2
Precautions.................................................................................... 2
Playable disc/file types..............................................................2
Notes on using USB mass storage class device................ 2
Notes on using iPod ...................................................................3
Notes on using SD card............................................................. 3
Getting started ..................................................4
Preparing FM antenna............................................................... 4
Connecting power cord............................................................4
Preparing remote control......................................................... 4
Basic operation.................................................. 5
Using headphones......................................................................5
Common operations..........................................6
Setting the clock.......................................................................... 6
Locking disc/iPod door .............................................................6
Sleep Timer.................................................................................... 6
Daily Timer..................................................................................... 7
Sound adjustment ...................................................................... 7
Changing display information................................................ 7
Playback operations.......................................... 8
iPod...................................................................................................8
Disc/USB/SD.................................................................................. 8
FM radio........................................................................................10
External device...........................................................................11
References........................................................12
Troubleshooting ........................................................................12
Maintenance ...............................................................................13
Specifications..............................................................................13
Notes on using iPod
• Be sure to reduce the volume on the System to the
minimum level before connecting iPod. Adjust the
volume after starting playback.
• You cannot send any data to the iPod from the System.
• Do not carry the System with iPod connected. It might
cause damage to the dock or you might drop the iPod.
• Do not touch or hit the iPod terminal pins or connector
pins in the iPod dock directly. Doing so might cause
damage to the connector pins.
• iPod is charged through the dock when the System is
turned on.
• Information shown on the display differs depending on
the type of the iPod.
• If iPod does not play correctly, update iPod software to
the latest version. For details about updating iPod, check
on the Apple web site <http://www.apple.com>.
Compatible iPod models
• iPod nano (2nd, 3rd, 4th, 5th and 6th generation)
• iPod nano
• iPod touch (2nd, 3rd and 4th generation)
• iPod touch
• iPod (4th generation)
• iPod classic
• iPod photo (4th generation)
• iPod video (5th generation)
• iPod mini (2nd generation)
• iPod mini
Notes on using SD card
• DO NOT insert any object other than an SD card into the
insertion slot.
• DO NOT use a cracked or deformed SD card.
• Make sure that SD card playback has stopped before
removing the SD card. Otherwise, the data may be
damaged.
• Never insert an SD card upside down. Otherwise, it will
not be able to be removed.
• When you play a miniSD™/microSD™ card, be sure to
attach the miniSD™/microSD™ adaptor to the card
before insertion.
• You can use an SD card of up to 32 GB.
15 cm
(5-15/16˝)
15 cm
(5-15/16˝)
15 cm
(5-15/16˝)
10 cm
(3-15/16˝)
15 cm
(5-15/16˝)
15 cm
(5-15/16˝)
10 cm
(3-15/16˝)
English
CAUTION: Proper Ventilation
To avoid risk of electric shock and fire, and to prevent
damage, locate the apparatus as follows:
1. Front: No obstructions and open spacing.
2. Sides/Top/Back: No obstructions should be placed
in the areas indicated by the dimensions in the
illustration.
3. Bottom: Place on the level surface. Maintain an
adequate air path for ventilation by placing on a
stand with a height of 10 cm or more.
Side viewFront view
EN_NX-PB10[J].indb 3EN_NX-PB10[J].indb 3 10.12.8 11:08:50 AM10.12.8 11:08:50 AM

4
Preparing remote control
When you use the remote control for the first time, pull out
the insulation sheet.
To replace the battery in the remote control
Caution
Danger of explosion if battery is incorrectly replaced.
Replace only with the same or equivalent type.
• Store the battery in a place where children cannot reach.
If a child accidentally swallows the battery, consult a
doctor immediately.
• To prevent the battery from overheating, cracking, or
starting a fire:
– Do not recharge, short, disassemble or heat the
battery or dispose of it in a fire.
– Do not leave the battery with other metallic materials.
– Wrap the battery with tape and insulate when
throwing away or saving it.
– Do not poke the battery with tweezers or similar tools.
• Dispose of battery in the proper manner, according to
federal, state, and local regulations.
• The battery (battery pack or battery installed) shall not
be exposed to excessive heat source such as sunshine,
fire or the like.
Preparing FM antenna
Extend the FM antenna so that you can obtain the best
reception.
• Make sure the antenna conductor does not touch any
other terminals, connecting cords or the power cord.
Also, keep the antenna away from metallic parts of
the System, connecting cords, and the AC power cord.
Otherwise, it could cause poor reception.
Connecting power cord
Be sure to connect the power cord to wall outlet after all
other connections have been made.
Set the clock before using this System (see page 6).
Getting started
To wall outlet
FM antenna
English
EN_NX-PB10[J].indb 4EN_NX-PB10[J].indb 4 10.12.8 11:08:51 AM10.12.8 11:08:51 AM

5
Remote sensorSTANDBY lamp
Using headphones
Connect headphones (not supplied) to the jack using a
stereo mini plug cord (not supplied).
Be sure to turn down the volume before connecting or
putting on the headphones.
1Turn on the power.
2Select a source.
3Adjust the volume.
• To turn off the power, press .
DO NOT turn off the System with the
volume set to an extremely high level;
otherwise, the sudden blast of sound
may damage your hearing, speakers,
and headphones when you turn on the
System or start playback.
• When the System is turned off with
the volume set to over “17,” the volume
level is automatically set to“16” next
time you turn on the System.
Basic operation
12 3 1
2
3
English
EN_NX-PB10[J].indb 5EN_NX-PB10[J].indb 5 10.12.8 11:08:51 AM10.12.8 11:08:51 AM

6
Setting the clock
You can set the clock only when the System is turned off
(on standby).
1Show the clock setting display.
2Adjust the hour and minute.
• The clock may gain or lose 1 to 2 minutes per
month. You may need to readjust the clock
periodically.
• To check the current time while the System is turned on,
press CLOCK/SLEEP.
• If there is a power failure, the clock loses its settings. You
need to set the clock again.
Locking disc/iPod door
You can lock the disc/iPod door to prevent it from opening
by accident.
While the disc/iPod door is closed...
On the main unit:
Sleep Timer
You can set Sleep Timer only when the System is turned
on.
1Show the Sleep Timer setting display.
2Specify the shut-off time.
• To check the remaining time until the System shuts off,
press and hold CLOCK/SLEEP.
Common operations
(Hold)(Hold)
(Canceled)
(Hold at the same time)
(Scrolled on the display)
English
EN_NX-PB10[J].indb 6EN_NX-PB10[J].indb 6 10.12.8 11:08:52 AM10.12.8 11:08:52 AM

7
Sound adjustment
Fade Muting
You can drop the volume in a moment.
• To restore the volume, press again or adjust the volume.
Hyper Bass Sound (HBS)
You can reinforce the bass sound.
Sound mode
You can select the sound mode suitable for your favorite
music.
Changing display information
You can display ID3/WMA tag information during playback
of MP3/WMA.
• When“ID3 ON”is selected, ID3/WMA tag information is
displayed.
Daily Timer
By using Daily Timer, you can wake up with your favorite
music.
• Prepare the playback source beforehand.
1Show the Daily Timer setting display.
Timer setting item is displayed.
2Set the timer contents.
You can set the following items:
ON TIME Hour and minute for the on-time
OFFTIME Hour and minute for the off-time
SOURCE Playback source
• “A-IN”is not available.
1Select the setting item.
2Start setting the selected item.
3Set the item.
• To set hour and minute: Press ¢or 4, then
TIMER.
• To set the source: Press CD 6, iPod 6, USB
6, SD 6, or FM/AUDIO IN, then TIMER.
– When you select “TUNER,” press ¢or 4to
select preset number.
• To correct a misentry, wait for a while until the
setting procedure is canceled, then repeat the
procedure from step 1to change the setting.
• When no operation is done for a while during
setting Daily Timer, the setting procedure is
canceled.
3Activate Daily Timer.
The timer indicator ( ) lights up.
4Turn off the System.
• To cancel a Daily Timer, press TIMER while the System is
turned on. The timer indicator ( ) disappears.
Canceled
(No indication)
Canceled (No indication)
(Hold)
English
EN_NX-PB10[J].indb 7EN_NX-PB10[J].indb 7 10.12.8 11:08:52 AM10.12.8 11:08:52 AM

8
iPod
Connecting an iPod device
Press 0to open the disc/iPod door, then connect an iPod.
• Take the iPod protect case off before connecting.
• Connect the iPod firmly.
• To close the disc/iPod door, press 0.
– Do not close the disc/iPod door with the iPod dock
leaning toward you.
• See page 3 for more about connecting an iPod.
Playback operations
• To play back/pause an iPod: Press iPod 6.
• To select a track: Press ¢or 4.
• To fast-forward a track: Press and hold ¢.
• To fast-reverse a track: Press and hold 4.
• To put iPod in sleep mode: Press and hold iPod 6.
• Sound distortion may occur when playing back audio
sources with high recording levels. If distortion occurs,
it is recommended to turn off the equalizer of iPod. For
information on operating the iPod, see the instruction
manual for iPod.
Menu operations
To display the menu/to go back to the previous menu
To select an item on the menu
• Depending on the type of the iPod, you can operate the
menu only on the screen of the iPod.
• Operate iPod touch itself in the following cases:
– When operating the home button.
– When selecting application icons on the home screen.
– When dragging the slider.
Disc/USB/SD
Placing a disc
Press 0to open the disc/iPod door, then put a disc into
the holder.
• When placing a disc, be sure to place a disc with the
label side facing forward.
• To close the disc/iPod door, press 0.
• When placing or removing a disc, take enough care not
to fall the System down.
Connecting a USB mass storage class
device
• See page 2 for more about connecting a USB mass
storage class device.
Inserting an SD card
• When removing the SD card, push it in and then pull it
out.
• See page 3 for more about inserting an SD card.
Playback operations
English
EN_NX-PB10[J].indb 8EN_NX-PB10[J].indb 8 10.12.8 11:08:53 AM10.12.8 11:08:53 AM

9
Playback operations
To play a disc
To play a USB mass storage
class device
To play an SD card
• To play back/pause a disc: Press CD 6.
• To play back/pause a USB mass storage class device:
Press USB 6.
• To play back/pause an SD card: Press SD 6.
• To select a track: Press ¢or 4.
• To fast-forward a track: Press and hold ¢.
• To fast-reverse a track: Press and hold 4.
• To select a group (MP3/WMA only): Press or .
• To stop playback: Press 7.
Repeat Play
REPEAT1 Repeats the current track.
REPEAT Repeats all tracks.
REPEAT
FOLDER
Repeats all tracks in the current group
(MP3/WMA only).
Random Play
Playback starts in a random order.
• Random Play ends when all tracks have been played.
Program Play
1Select a source and stop playback.
2Show the program setting display.
3Select a track number.
For audio CD:
For MP3/WMA: Select a group (1), then select a track
(2).
1
2
• You can select up to 32 tracks.
4Start program play.
• To erase the entire program, press 7while playback is
stopped.
Canceled
(No indication) (MP3/WMA only)
Canceled (No indication)
English
EN_NX-PB10[J].indb 9EN_NX-PB10[J].indb 9 10.12.8 11:08:54 AM10.12.8 11:08:54 AM

10
Searching for stations
1Press FM/AUDIO IN repeatedly to select
“FM”as the source.
2Start searching.
The station search stops when a station of sufficient
signal strength is found.
• To manually stop the search, press or .
• When you press or repeatedly, the frequency
changes step by step.
FM radio
Playback operations
(Hold)
Improving the reception
If an FM stereo broadcast is hard to listen to, you can
improve the reception by switching to monaural mode.
• When the monaural mode (FM MONO) is activated, the
reception is improved. However, the stereo effect is lost.
• To restore stereo reception, press FM/AUDIO IN
repeatedly to select“FM.”
– The ST indicator lights up when receiving stereo
broadcast.
English
EN_NX-PB10[J].indb 10EN_NX-PB10[J].indb 10 10.12.8 11:08:55 AM10.12.8 11:08:55 AM

11
Presetting stations
You can preset up to 20 FM stations.
1Show the preset number while listening
to a target station.
The preset number flashes.
2Select a preset number.
3Store the preset station.
Tuning in to a preset station
External device
Connecting an external device
Connect an external device using a stereo mini plug cord
(not supplied).
Playing an external device
Press FM/AUDIO IN repeatedly to select“A–IN”as the
source, then start playback of the connected external
device.
English
EN_NX-PB10[J].indb 11EN_NX-PB10[J].indb 11 10.12.8 11:08:56 AM10.12.8 11:08:56 AM

12
Troubleshooting
If you are having a problem with your System, check this list for a possible solution before calling for service.
Symptoms Causes/Remedies
General
Power does not come on. • Power plug is not inserted securely. Plug it in securely.
Adjustments or settings are suddenly
canceled before you finish.
• There is a time limit. Start the procedure again.
Unable to operate the System from the
remote control.
• The path between the remote control and the remote sensor on
the System is blocked.
• The battery is exhausted.
No sound is heard. • Headphones are connected.
FM radio
Hard to listen to broadcasts because of
noise.
• The FM antenna is not properly extended and positioned.
• Electrostatic discharge from your body may cause noise. If this
happens, turn the System off then on again.
iPod
The iPod does not play, but“IPOD” appears
on the display.
• The iPod battery is low or exhausted. Charge the iPod battery.
Disc/USB/SD
The disc/USB mass storage class device/SD
card does not play.
• The disc is placed incorrectly. Place the disc with the label side
facing forward.
• The disc is recorded using “packet writing (UDF file system).” It
cannot be played.
• The USB mass storage class device is not connected properly or
the SD card is not inserted properly.
• The CD-R/CD-RW is not be finalized correctly. Use finalized discs.
• The CD pickup lens is dirty (see page 13).
“ NO DISC” or “NO SONG” appears on the
display.
• MP3/WMA files are not recorded on the disc, USB mass storage
class device, or SD card.
ID3 Tag on an MP3 file cannot be shown. • There are two types of ID3 Tag—Version 1 and Version 2. This
System can only show ID3 Tag Version 1.
Groups and tracks are not played back as
you expect.
• Playing order is determined when the groups and tracks are
recorded. It depends on the writing application.
The disc/USB mass storage class device/SD
card sound is discontinuous.
• The disc is scratched or dirty.
• MP3/WMA files have not been properly recorded onto the USB
mass storage class device or SD card.
Sound from the USB mass storage class
device/SD card is interrupted.
• Noise and static electricity may stop the sound. In this case,
disconnect and connect the USB mass storage class device or
remove and insert the SD card again after turning off the System.
The disc/iPod door does not open or close. • The AC power cord is not plugged in.
• The disc/iPod door is locked. Unlock it (see page 6).
Timer
Daily Timer does not work. • The System was turned on when the on-time came. The timer
stars working only when the System is turned off.
• If the System does not work correctly, disconnect the AC power cord from the wall outlet, wait for a while, then
connect the cord again.
• JVC bears no responsibility for any loss of data in USB mass storage class device, SD card, or iPod while using this
System.
References
English
EN_NX-PB10[J].indb 12EN_NX-PB10[J].indb 12 10.12.8 11:08:56 AM10.12.8 11:08:56 AM

13
Specifications
Amplifier section
Output Power: 4 W (2 W + 2 W) at 16 Ω (10% THD)
Audio Input: AUDIO IN: Stereo mini (ø 3.5 mm)
250 mV/47 kΩ
Digital input: USB terminal
Tuner
FM tuning range: 87.5 MHz – 108.0 MHz
Disc player
Dynamic range: 80 dB
Wow and flutter: Immeasurable
USB
USB specification: Compatible with USB 2.0 Full Speed
Compatible device: Mass storage class
Compatible system: FAT16, FAT32
Output power: DC 5 V 500 mA
SD
Compatible device: SD, SDHC
Compatible system: FAT16, FAT32
iPod
Output power: DC 5 V 500 mA
General
Speaker type: Bass-Reflex type
Speaker unit: 8 cm (3-3/16˝) x 2
Speaker impedance: 16 Ω
Power requirements: AC 120 V / 60 Hz
Power consumption: 25 W (at operation)
1.00 W or less (on standby)
Dimensions (approx.): 400 mm × 215 mm × 91 mm
(15-3/4˝ × 8-1/2˝ × 3-5/8˝)
(W × H × D)
Mass (approx.): 2.3 kg (5.1 lbs)
Supplied accessories
Check to make sure that you have all the following items.
• Remote control (× 1)
• Lithium coin battery CR2025 (× 1)
The battery has been installed in the remote control
when shipped from the factory.
Design and specifications are subject to change without
notice.
Maintenance
To get the best performance of the System, keep your
discs and the mechanism clean.
Handling discs
• Remove the disc from its case by holding it at the edge
while pressing the center hole lightly.
• Do not touch the shiny surface of the disc, or bend the
disc.
• Put the disc back in its case after use.
• Be careful not to scratch the surface of the disc when
placing it back in its case.
• Avoid exposure to direct sunlight, temperature
extremes, and moisture.
To clean the disc
• Wipe the disc with a soft cloth in a straight line from
center to edge.
Cleaning the System
• Stains should be wiped off with a soft cloth. If the
System is heavily stained, wipe it with a cloth soaked in
water-diluted neutral detergent and wrung well, then
wipe clean with a dry cloth.
• Since the System may deteriorate in quality, become
damaged or get its paint peeled off, be careful about the
following:
– DO NOT wipe it hard.
– DO NOT wipe it with thinner or benzine.
– DO NOT apply any volatile substances such as
insecticides to it.
– DO NOT allow any rubber or plastic to remain in
contact for a long time.
Cleaning the CD pickup lens
Keep the CD pickup lens clean, or
the sound may be degraded. Use
a blower (available at a camera
store, etc.) to blow dust off the
lens.
English
• Microsoft and Windows Media are either registered
trademarks or trademarks of Microsoft Corporation
in the United States and/or other countries.
• “Made for iPod”means that an electronic accessory
has been designed to connect specifically to
iPod, and has been certified by the developer to
meet Apple performance standards. Apple is not
responsible for the operation of this device or its
compliance with safety and regulatory standards.
• iPod, iPod classic, iPod nano, and iPod touch are
trademarks of Apple Inc., registered in the U.S. and
other countries.
• SDHC Logo is a trademark.
EN_NX-PB10[J].indb 13EN_NX-PB10[J].indb 13 10.12.8 11:08:57 AM10.12.8 11:08:57 AM

2
Français
Introduction
Précautions
Remarques sur le cordon d’alimentation
• Quand vous vous absentez pendant une période
prolongée, retirer la fiche de la prise murale.
• Pour débrancher le système de la prise murale,
tirez toujours sur la fiche et non pas sur le cordon
d’alimentation secteur.
• Ne manipulez pas le cordon d’alimentation avec les
mains mouillées.
• Débranchez le cordon d’alimentation avant de nettoyer
ou de déplacer le système.
• Ne modifiez pas, ne tordez ni ne tirez sur le cordon
d’alimentation, et ne mettez aucun objet lourd
dessus, car cela pourrait entraîner un incendie, une
électrocution ou d’autres accidents.
Évitez l’humidité, l’eau, la poussière et les hautes
températures
• Ne placez pas le système dans un endroit humide ou
poussiéreux.
•
Si de l’eau pénétrait à l’intérieur du système, mettez-le
hors tension et débranchez la fiche de la prise murale,
puis consultez votre revendeur. Utiliser le système dans
cet état peut entraîner un incendie ou une électrocution.
• N’exposez pas le système directement aux rayons du
soleil ni ne la placez près d’un dispositif de chauffage.
Remarques sur l’installation
• Choisissez un endroit plat, sec, et ni trop chaud, ni trop
froid—entre 5˚C et 35˚C (41˚F et 95˚F).
• N’installez pas le système dans un endroit sujet aux
vibrations.
• Ne placez pas d’objet lourd sur le système.
Pour éviter tout mauvais fonctionnement ou
dommage au système
• N’insérez aucun objet métallique, tel qu’un câble, une
épingle à cheveux, une pièce de monnaie, etc. dans le
système.
• N’obstruez pas les évents d’aération.
Remarques sur l’utilisation du système
• Ne transportez pas le système la porte du disque/iPod
ouverte.
• Avant de déplacer le système assurez-vous de retirer le
disque, l’iPod, le périphérique USB à mémoire de grande
capacité et la carte SD, puis de débrancher le cordon
d’alimentation.
• Assurez-vous de fermer la porte du disque/iPod avant
de mettre le système hors tension.
Le lecteur ne contient pas d’éléments réparables par
l’utilisateur. En cas d’anomalie, débranchez le cordon
d’alimentation et consultez votre revendeur.
Dans ce manuel...
• Sauf mention contraire, les touches de la
télécommande sont utilisées pour expliquer les
opérations. Cependant, si le système possède des
noms de touches identiques ou similaires, ces
touches peuvent être utilisées pour les opérations.
• Les mots “fichier” et “plage”, “groupe” et “dossier”
sont utilisés de façon interchangeable.
Types de disques/fichiers reproductibles
• Ce système peut reproduire...
– CD Audio et CD-R/CD-RW au format CD Audio
– Fichiers MP3/WMA sur un CD-R/CD-RW (format ISO
9660), un périphérique USB à mémoire de grande
capacité ou une carte SD/SDHC (vitesse de transfert
maximum des données: 2 Mbps)
• Ce système ne peut pas reproduire les disques à
“écriture par paquets”.
• Pour la lecture MP3/WMA...
– Certains fichiers MP3/WMA ne peuvent pas
être reproduits à cause de leurs conditions
d’enregistrement.
– Ce système peut uniquement reproduire les disques
au format ISO 9660 Niveau 1 ou Niveau 2.
– Ce système peut reconnaître un maximum de
999 plages et de 99 groupes.
– Ce système peut afficher les données des balises
(version 1).
• Pour la lecture USB/SD...
– Vous ne pouvez pas reproduire des fichiers dont la
taille fait plus de 2 Go.
– Il se peut que ce système ne puisse pas reproduire
certains périphériques USB à mémoire de grande
capacité/cartes SD et elle ne prend pas en charge la
gestion des droits numériques DRM (Digital Rights
Management).
Remarques sur l’utilisation de périphériques
USB à mémoire de grande capacité
• Connectez un périphérique USB à mémoire de grande
capacité quand le système est hors tension pour éviter
tout mauvais fonctionnement.
• N’utilisez pas de nœud de raccordement USB.
• Il est recommandé d’utiliser un périphérique USB à
mémoire de grande capacité d’une capacité de moins
de 4 Gigaoctets.
• Mettez hors service la fonction de sécurité du
périphérique USB à mémoire de grande capacité avant
de la connecter.
• Lors de l’utilisation d’un câble USB pour la connexion du
périphérique, utilisez un câble USB 2.0 d’une longueur
de moins d’un mètre.
• Le périphériques USB à mémoire de grande capacité est
chargé par la prise quand “USB” est choisi comme
source. (Certains périphériques USB à mémoire de
grande capacité peuvent ne pas être chargés par la prise
quand “USB” est choisi comme source.)
• Vous ne pouvez pas connecter un ordinateur à la prise
de ce système.
• Un choc électrostatique à la connexion d’un
périphérique USB à mémoire de grande capacité peut
causer une lecture anormale du périphérique. Dans
ce cas, déconnectez le périphérique USB à mémoire
de grande capacité puis réinitialiser cet appareil et le
périphérique USB à mémoire de grande capacité.
• Pendant la lecture d’un fichier d’un périphérique USB
à mémoire de grande capacité, ne déconnectez pas
le périphérique. Cela pourrait entraîner un mauvais
fonctionnement du système et du périphérique.
EN_NX-PB10[J].indb 2EN_NX-PB10[J].indb 2 10.12.8 11:08:57 AM10.12.8 11:08:57 AM

3
Français
Table des matières
Introduction.......................................................2
Précautions.................................................................................... 2
Types de disques/fichiers reproductibles ..........................2
Remarques sur l’utilisation de périphériques USB à
mémoire de grande capacité..................................................2
Remarques sur l’utilisation d’un iPod ..................................3
Remarques sur l’utilisation d’une carte SD ........................3
Pour commencer ...............................................4
Préparation de l’antenne FM ..................................................4
Connexion du cordon d’alimentation ................................. 4
Préparation de la télécommande.......................................... 4
Opérations de base ...........................................5
Utilisation du casque .................................................................5
Fonctionnement commun ................................ 6
Réglage de l’horloge.................................................................. 6
Pour fermer la porte du disque/iPod ...................................6
Minuterie d’arrêt..........................................................................6
Minuterie quotidienne .............................................................. 7
Ajustements du son ...................................................................7
Changement des informations sur l’affichage ................. 7
Opérations de lecture .......................................8
iPod ..................................................................................................8
Disque/USB/SD ............................................................................8
Radio FM.......................................................................................10
Appareil extérieur .....................................................................11
Références........................................................12
Guide de dépannage ...............................................................12
Entretien.......................................................................................13
Spécifications..............................................................................13
Remarques sur l’utilisation d’un iPod
• Assurez-vous de réduire le volume sur le système au
niveau minimum avant de connecter un iPod. Ajustez le
volume après avoir démarré la lecture.
• Vous ne pouvez envoyer aucunes données sur l’iPod à
partir de ce système.
• Ne transportez pas le système avec iPod connecté. Cela
pourrait endommager le dock ou causer la chute de
l’iPod.
• Ne touchez pas et ne heurtez pas les broches de la prise
de l’iPod, ni celles du connecteur dans le dock de iPod.
Cela pourrait endommager les broches du connecteur.
• L’iPod est chargé par le dock quand le système est sous
tension.
• Les informations apparaissant sur l’affichage diffèrent
en fonction du type d’iPod.
• Si la lecture sur iPod ne se fait pas correctement, mettez
à jour le logiciel de iPod à la dernière version. Pour en
savoir plus sur la mise à jour de iPod, consultez le site
Web de Apple <http://www.apple.com>.
Modèles d’iPod compatibles
• iPod nano (2ème, 3ème, 4ème, 5ème et 6ème
génération)
• iPod nano
• iPod touch (2ème, 3ème et 4ème génération)
• iPod touch
• iPod (4ème génération)
• iPod classic
• iPod photo (4ème génération)
• iPod video (5ème génération)
• iPod mini (2ème génération)
• iPod mini
Remarques sur l’utilisation d’une carte SD
• N’insérez AUCUN objet autre qu’une carte SD dans la
fente d’insertion.
• N’utilisez PAS une carte SD endommagée ou déformée.
• Assurez-vous que la lecture de la carte SD est arrêtée
avant de retirer la carte SD. Sinon, les données risquent
d’être endommagées.
• N’insérez jamais la carte SD à l’envers. Sinon, vous ne
pourrez plus la retirer.
• Lors de la lecture d’une carte miniSD™/microSD™,
assurez-vous de fixer l’adaptateur miniSD™/microSD™
avant d’insérer la carte.
• Vous pouvez utiliser une carte SD d’une capacité
maximale de 32 Go.
15 cm
(5-15/16˝)
15 cm
(5-15/16˝)
15 cm
(5-15/16˝)
10 cm
(3-15/16˝)
15 cm
(5-15/16˝)
15 cm
(5-15/16˝)
10 cm
(3-15/16˝)
ATTENTION: Aération correcte
Pour prévenir tout risque de décharge électrique
ou d’incendie et éviter toute détérioration, installez
l’appareil de la manière suivante:
1. Avant: Bien dégagé de tout objet.
2. Flancs/Dessus/Arrière: Aucun obstacle ne doit être
placé dans les zones indiquées par les dimensions
dans l’illustration.
3. Dessous: Posez l’appareil sur une surface plane et
horizontale. Veillez à ce que sa ventilation correcte
puisse se faire en le plaçant sur un support d’au
moins dix centimètres de hauteur.
CôtéFace
EN_NX-PB10[J].indb 3EN_NX-PB10[J].indb 3 10.12.8 11:08:58 AM10.12.8 11:08:58 AM

4
Français
Pour commencer
Préparation de la télécommande
Quand vous utilisez la télécommande pour la première
fois, retirez la feuille isolante.
Pour remplacer la pile dans de la télécommande
Attention
Danger d’explosion si la pile est remplacée de façon
incorrecte. Remplacez-la uniquement avec le même type
de pile ou un type équivalent.
• Rangez la pile dans un endroit hors d’atteinte des
enfants. Si un enfant avale accidentellement la pile,
consultez immédiatement un médecin.
• Pour éviter que la pile ne chauffe, ne se fissure ou cause
un incendie:
– Ne rechargez pas, ne court-circuitez pas, ne chauffer
pas la pile ni ne la jeter dans un feu.
– Ne laissez pas la pile avec d’autres objets métalliques.
– Enveloppez la pile de ruban isolant avant de la mettre
au rebut ou de la ranger.
– Ne piquez pas la pile avec des ciseaux ou d’autres
objets similaires.
• Mettez de la pile au rebut correctement en respectant la
régulation fédérale, régionale ou locale.
• Les piles (blocs-piles ou pile installée) ne doivent pas
être exposées à une source de chaleur excessive telle
que la lumière du soleil, un feu ou quelque chose de
similaire.
Préparation de l’antenne FM
Étendez l’antenne FM de façon à obtenir la meilleure
réception possible.
• Assurez-vous que le conducteur d’antenne ne touche
aucunes autres prises, cordons de connexion ou cordon
d’alimentation. De plus, gardez l’antenne à l’écart
des parties métalliques du système, des cordons de
connexion et du cordon d’alimentation secteur. Sinon,
la réception pourrait en être affectée.
Connexion du cordon d’alimentation
Assurez-vous de brancher le cordon d’alimentation à
une prise murale uniquement après que toutes les autres
connexions ont été faites.
Réglez l’horloge avant d’utiliser ce système (voir
page 6).
À une prise murale
Antenne FM
EN_NX-PB10[J].indb 4EN_NX-PB10[J].indb 4 10.12.8 11:08:59 AM10.12.8 11:08:59 AM

5
Français
Capteur de télécommandeTémoin STANDBY
Utilisation du casque
Connectez un casque d’écoute (non fourni) à la prise en
utilisant un cordon à fiche stéréo mini (non fourni).
Assurez-vous de réduire le volume avant de connecter
un casque ou de vous le mettre sur les oreilles.
1Mettez le système sous
tension.
2Choisissez une source.
3Ajustez le volume.
• Pour mettre l’appareil hors tension,
appuyez sur .
NE METTEZ PAS le système hors
tension quand son niveau de volume
est réglé extrêmement haut; sinon
la déflagration soudaine du son
pourrait endommager votre ouïe, les
enceintes et le casque d’écoute lors de
la mise sous tension du système ou le
démarrage de la lecture.
• Quand le système est mise hors
tension avec le volume réglé sur plus
de “17”, le niveau de volume est réglé
automatiquement sur “16” la prochaine
fois que vous mettez le système sous
tension.
Opérations de base
12 3 1
2
3
EN_NX-PB10[J].indb 5EN_NX-PB10[J].indb 5 10.12.8 11:08:59 AM10.12.8 11:08:59 AM

6
Français
Réglage de l’horloge
Vous pouvez régler l’horloge uniquement quand le
système est hors tension (en attente).
1Affichez le réglage de l’horloge.
2Ajustez les heures et minutes.
• L’horloge peut avancer ou retarder d’une ou deux
minutes par mois. Vous aurez peut-être besoin de
réajuster l’horloge périodiquement.
• Pour vérifier l’heure actuelle pendant que le système est
sous tension, appuyez sur CLOCK/SLEEP.
• En cas de panne de courant, les réglages de l’horloge
sont perdus. Vous devez régler l’horloge à nouveau.
Pour fermer la porte du disque/iPod
Vous pouvez verrouiller la porte du disque/iPod pour
éviter qu’elle s’ouvre accidentellement.
Quand la porte du disque/iPod est fermée...
Sur l’appareil:
Minuterie d’arrêt
Vous pouvez régler la minuterie d’arrêt uniquement
quand le système est sous tension.
1Affichez le réglage de la minuterie
d’arrêt.
2Spécifiez l’heure de mise hors tension.
• Pour vérifier la durée restante jusqu’à la mise hors
tension, maintenez pressée CLOCK/SLEEP.
Fonctionnement commun
(Maintenez
pressée)
(Maintenez
pressée)
(Annulé)
(Tenez en même temps)
(Défile sur l’affichage)
EN_NX-PB10[J].indb 6EN_NX-PB10[J].indb 6 10.12.8 11:09:00 AM10.12.8 11:09:00 AM

7
Français
Ajustements du son
Sourdine
Vous pouvez baisser le volume instantanément.
• Pour rétablir le volume, appuyez de nouveau sur la
touche ou ajuster le volume.
Hyper Bass Sound (HBS)
Vous pouvez renforcer les sons graves.
Mode sonore
Vous pouvez choisir le mode sonore qui convient à votre
musique préférée.
Changement des informations sur l’affichage
Vous pouvez afficher les informations des balises ID3/WMA
pendant la lecture d’un fichier MP3/WMA.
• Quand “ID3 ON” est choisi, les informations des balises
ID3/WMA sont affichées.
Annulé
(Pas d’indication)
Annulé (Pas d’indication)
Minuterie quotidienne
En utilisant la minuterie quotidienne, vous pouvez vous
réveiller au son de votre musique préférée.
• Préparez en avance la source de lecture.
1
Affichez le réglage de la minuterie quotidienne.
Les options de réglage de la minuterie sont affichées.
2Réglez le contenu de la minuterie.
Vous pouvez régler les éléments suivants:
ON TIME Heures et minutes pour l’heure de
début de la minuterie
OFFTIME Heures et minutes pour l’heure de fin
de la minuterie
SOURCE Source de lecture
• “A-IN” n’est pas disponible.
1Choisissez une option de réglage.
2Réglez l’option choisie.
3Validez le réglage.
• Pour régler les heures/minutes: Appuyez sur
¢ou 4, puis sur TIMER.
•
Pour régler la source: Appuyez sur CD 6, iPod 6,
USB 6, SD 6ou FM/AUDIO IN puis sur TIMER.
–
Quand “TUNER”, est choisi, appuyez sur ¢
ou 4pour choisir un numéro de préréglage.
• Pour corriger une entrée incorrecte, attendez un
moment que la procédure de réglage soit annulée,
puis répétez la procédure à partir de l’étape 1pour
changer le réglage.
• Quand aucune opération n’est réalisée pendant un
certain temps pendant le réglage de la minuterie
quotidienne, la procédure de réglage est annulée.
3
Mettez en service la minuterie quotidienne.
L’indicateur de minuterie ( ) s’allume.
4Mettez le système hors tension.
• Pour annuler une minuterie quotidienne, appuyez
sur TIMER pendant que le système est sous tension.
L’indicateur de minuterie ( ) disparaît.
(Maintenez
pressée)
EN_NX-PB10[J].indb 7EN_NX-PB10[J].indb 7 10.12.8 11:09:00 AM10.12.8 11:09:00 AM

8
Français
iPod
Connexion d’un iPod
Appuyez sur 0pour ouvrir la porte du disque/iPod, puis
connectez un iPod.
•
Retirez l’étui de protection de l’iPod avant de le connecter.
• Connectez l’iPod solidement.
• Pour fermer la porte du disque/iPod, appuyez sur 0.
– Ne fermez pas la porte du disque/iPod alors que le
dock iPod est penché vers vous.
• Référez-vous à la page 3 pour en savoir plus sur la
connexion d’un iPod.
Opérations de lecture
• Pour reproduire/mettre en pause un iPod: Appuyez sur
iPod 6.
• Pour choisir une plage: Appuyez sur ¢ou 4.
• Pour faire avancer rapidement la plage: Maintenez
pressée ¢.
•
Pour reculer rapidement la plage: Maintenez pressée 4.
• Pour mettre l’iPod en mode de veille: Maintenez
iPod 6pressée.
• Une déformation du son peut se produire lors de la
lecture des sources audio avec des signaux enregistrés à
des niveaux élevés. Si une déformation se produit, il est
recommande de mettre hors service l’égaliseur de iPod.
Pour les informations sur l’utilisation de iPod, référez-
vous au manuel d’instruction de iPod.
Utilisation des menus
Pour afficher le menu/retourner au menu précédent
Pour choisir un élément sur le menu
• Selon le type d’iPod, vous pouvez utiliser le menu
uniquement sur l’écran de celui-ci.
• Utilisez l’iPod touch directement dans les cas suivants:
– Quand vous souhaitez utiliser la touche Home.
– Lors de la sélection d’icônes d’application sur l’écran
Home.
– Pour faire défiler le curseur.
Disque/USB/SD
Mise en place d’un disque
Appuyez sur 0pour ouvrir la porte du disque/iPod, puis
mettez un disque dans le support.
• Lors de la mise en place d’un disque, assurez-vous de le
placer avec la face de l’étiquette dirigée vers l’avant.
• Pour fermer la porte du disque/iPod, appuyez sur 0.
• Lors de la mise en place ou du retrait d’un disque, faites
bien attention de ne pas faire tomber le système.
Connexion d’un périphérique USB à
mémoire de grande capacité
• Référez-vous à la page 2 pour en savoir plus sur la
connexion d’un périphérique USB à mémoire de grande
capacité.
Insertion d’une carte SD
• Pour retirer la carte SD, poussez-la vers l’intérieur puis
tirez-la vers l’extérieur.
• Référez-vous à la page 3 pour en savoir plus sur
l’insertion d’une carte SD.
Opérations de lecture
EN_NX-PB10[J].indb 8EN_NX-PB10[J].indb 8 10.12.8 11:09:01 AM10.12.8 11:09:01 AM
This manual suits for next models
1
Table of contents
Languages:
Other JVC CD Player manuals