JVC KS-K6012J User manual

LVT1262-001A
[J]
INSTALLATIONS
KS-K6012
Car Docking Kit
KS-K6012_Cover.p65 04.7.16, 13:393

○○○○○○○○○○○○○○○○○○○○○○○○○○○○○○○○○○○○○○○○○○○○○○○○○○○○○○○○○
2
○○○○○○○○○○○○○○○○○○○○○○○○○○○○○○○○○○○○○○○○○○○○○○○○○○○○○○○○○
INFORMATION
This device complies with Part 15 of the FCC Rules. Operation is subject to the following two conditions:
(1) This device may not cause harmful interference, and (2) this device must accept any interference
received, including interference that may cause undesired operation.
Changes or modifications not expressly approved by the manufacturer for compliance could void the user’s
authority to operate the equipment.
KS-K6012_02-11.p65 04.7.15, 11:462

3
○○○○○○○○○○○○○○○○○○○○○○○○○○○○○○○○○○○○○○○○○○○○○○○○○○○○○○○○○
○○○○○○○○○○○○○○○○○○○○○○○○○○○○○○○○○○○○○○○○○○○○○○○○○○○○○○○○○
Safety Precautions
WARNINGS:
Take the following precautions to prevent traffic
accidents and avoid personal injury:
• Installation must be performed according to this
installation manual. JVC is not responsible for
issues arising from installations not performed
according to the procedures in this manual.
• Do not install the unit where it may obstruct your
view through the windshield or of your vehicle’s
indicator displays.
• Do not install the unit where it may hinder the
function of safety devices such as an airbag.
Doing so may prevent the airbag from functioning
properly in the event of an accident.
• The installation and use suggestions contained in
this manual are subject to any restrictions or
limitations that may be imposed by applicable
law—the purchaser should check applicable law for
any restrictions or limitations before installing and/
or operating this unit.
• Failure to follow these safety instructions and
warnings may result in a serious accident.
CAUTIONS:
Take the following precautions to keep the unit in
proper working order:
• Be sure the unit is connected to a 12 V DC power
supply with a negative ground connection.
• Do not install the unit where it will be exposed to
high levels of humidity, moisture, or dust.
• When replacing a fuse in the cigarette lighter
adapter, use only a new one with the proper rating.
Using a fuse with the wrong rating may cause the
unit to malfunction.
• To prevent a short circuit when replacing a fuse,
first unplug the cigarette lighter adapter from the
cigarette lighter.
• When drilling holes to mount the unit, make sure
not to damage wiring or other systems.
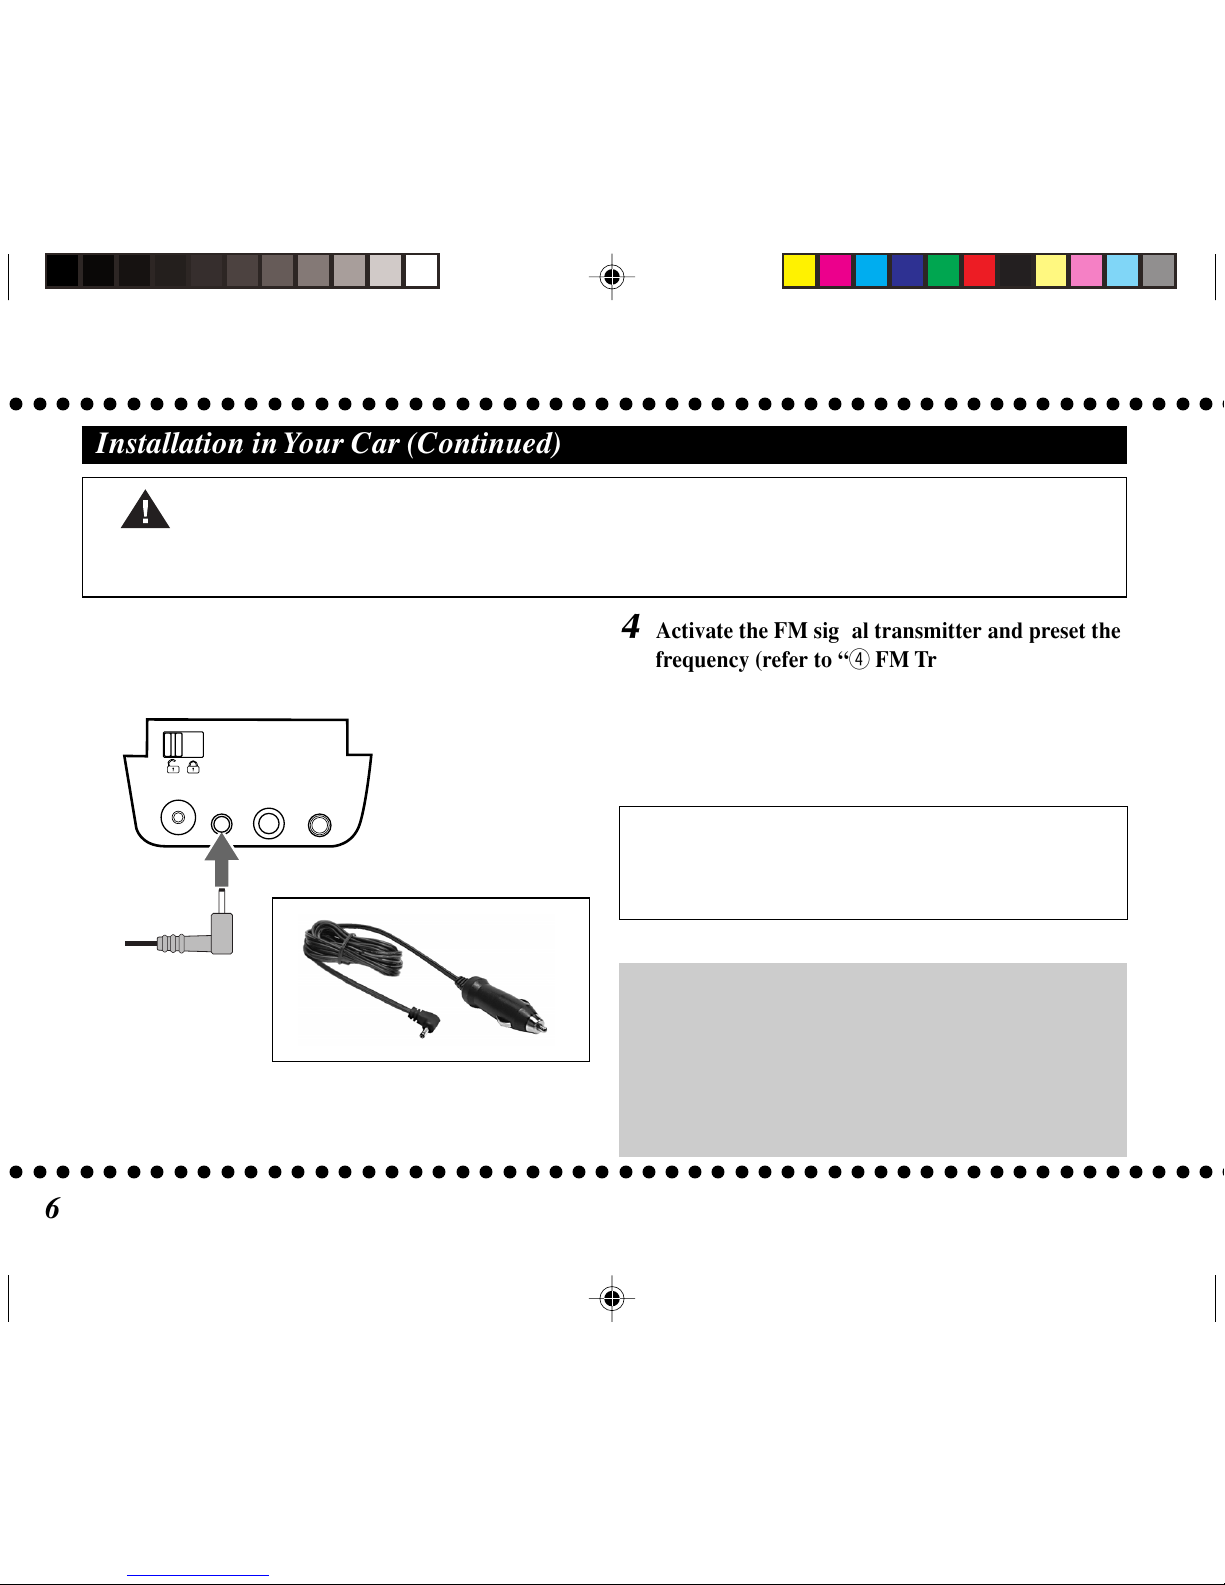
Cigarette lighter
adapter Fuse
KS-K6012_02-11.p65 04.7.15, 11:463

○○○○○○○○○○○○○○○○○○○○○○○○○○○○○○○○○○○○○○○○○○○○○○○○○○○○○○○○○
4
○○○○○○○○○○○○○○○○○○○○○○○○○○○○○○○○○○○○○○○○○○○○○○○○○○○○○○○○○
Box Contents
After you unpack your Car Docking Kit, make sure everything here is included:
For the latest information about this and other JVC PnP products, visit the JVC Web site at
<http://www.jvcmobile.com>. If anything is missing or damaged, or if your Car Docking Kit fails to operate,
notify your shipper immediately. It is recommended that you keep the original packaging in case you need to
ship your Car Docking Kit in the future.
Car Docking Cradle
Cigarette Lighter
Adapter
Magnetic Roof-mount SIRIUS Antenna
Suction Cup Mount
Screws
M4 x 8 mm
(M3/16 x 3/8 inch)
Fuse
(250 V/3A)
KS-K6012_02-11.p65 04.7.15, 11:464

5
○○○○○○○○○○○○○○○○○○○○○○○○○○○○○○○○○○○○○○○○○○○○○○○○○○○○○○○○○
○○○○○○○○○○○○○○○○○○○○○○○○○○○○○○○○○○○○○○○○○○○○○○○○○○○○○○○○○
Installation in Your Car
1
Determine where you want to mount JVC PnP.
• Do not install JVC PnP where it may obstruct
your view through the windshield or your view
of your car’s indicator displays.
• Do not install JVC PnP where it will hinder your
access to the car’s controls.
• Do not install JVC PnP where it may hinder the
function of safety devices such as an airbag.
Doing so may prevent the airbag from
functioning properly in the event of an accident.
• Find a location that provides good visibility of
and access to JVC PnP’s front panel.
2
Assemble the supplied suction cup mount to
JVC PnP using the supplied screws.
• When using other screws, use the screws of less
than 8 mm (3/8 inch) long with a diameter of
4 mm (3/16 inch).
CAUTION:
Do not put JVC PnP in the car docking cradle until you have completed the installation.
To be continued...
KS-K6012_02-11.p65 04.7.15, 11:465

○○○○○○○○○○○○○○○○○○○○○○○○○○○○○○○○○○○○○○○○○○○○○○○○○○○○○○○○○
6
○○○○○○○○○○○○○○○○○○○○○○○○○○○○○○○○○○○○○○○○○○○○○○○○○○○○○○○○○
Installation in Your Car (Continued)
4
Activate the FM signal transmitter and preset the
frequency (refer to “4FM Transmitter Options”
on page 24 of KT-SR2000 Instructions).
• It is recommended to preset the same frequency
into your car stereo as you have selected so you
can easily tune in to the frequency.
Note: You can also connect a cassette adapter or
an audio cord (both not supplied) to the AUDIO
jack to send the signals to your car stereo.
An optional hard-wired FM transmitter—FM
Switching Box Assembly (Parts No. 112C3159) is
available. By connecting this Assembly between
the FM OUT terminal of the cradle and the
antenna input terminal of your car stereo, you can
obtain stable and reliable transmission/reception.
3
Plug the cigarette lighter adapter into the back
of the cradle—DC 12 V.
CAUTION:
Do not plug the cigarette lighter adapter into the cigarette lighter until you have completed the installation.
ANT. DC
12V FM
OUT AUDIO
Back of the cradle
KS-K6012_02-11.p65 04.7.15, 11:466

7
○○○○○○○○○○○○○○○○○○○○○○○○○○○○○○○○○○○○○○○○○○○○○○○○○○○○○○○○○
○○○○○○○○○○○○○○○○○○○○○○○○○○○○○○○○○○○○○○○○○○○○○○○○○○○○○○○○○
Finding the Best Antenna Mounting Location
1
Temporarily plug the antenna into the back of
the cradle—ANT. until it is firmly seated.
2
Find an antenna location on a metal surface of
your car—at least 30 cm ×30 cm (12 inches ×
12 inches), and at least 15 cm (6 inches) from a
window.
• The antenna’s powerful magnet will secure it to
the metal surface.
• Best reception is achieved with the antenna
mounted on the roof or trunk for convertibles.
• If your car has a roof rack or skid ribs, it may be
necessary to mount the antenna off-center.
3
Temporarily plug the cigarette lighter adapter
into the cigarette lighter.
4
Slide JVC PnP all the way into the cradle so
that the connector at the bottom of the unit
makes proper contact in the cradle.
To be continued...
ANT. DC
12V FM
OUT AUDIO
Back of the cradle
KS-K6012_02-11.p65 04.7.15, 11:467

○○○○○○○○○○○○○○○○○○○○○○○○○○○○○○○○○○○○○○○○○○○○○○○○○○○○○○○○○
8
○○○○○○○○○○○○○○○○○○○○○○○○○○○○○○○○○○○○○○○○○○○○○○○○○○○○○○○○○
6
Press the (POWER) button to turn on your
JVC PnP.
• If your JVC PnP has been properly connected
and the antenna is receiving the SIRIUS signal,
you will hear audio.
•If your JVC PnP has not been properly
connected, “Antenna Error” will appear on the
display of your JVC PnP.
Re-orient the antenna until you hear audio (refer
to “8Antenna Aiming” on page 27 of the KT-
SR2000 Instructions).
– Make sure your car is not in garage, or
somewhere the satellite signal could be
blocked.
5
Slide the locking knob into lock position on the
back of the cradle.
Finding the Best Antenna Mounting Location (Continued)
ANT. DC
12V FM
OUT AUDIO
Back of the cradle
KS-K6012_02-11.p65 04.7.15, 11:468

9
○○○○○○○○○○○○○○○○○○○○○○○○○○○○○○○○○○○○○○○○○○○○○○○○○○○○○○○○○
○○○○○○○○○○○○○○○○○○○○○○○○○○○○○○○○○○○○○○○○○○○○○○○○○○○○○○○○○
Before routing the antenna cable, confirm that the
antenna is mounted in a good location.
1
Press the (POWER) button to turn off your
JVC PnP.
2
Slide the locking knob into unlock position.
Running the Antenna Cable
To be continued...
3
Remove your JVC PnP from the cradle.
4
Unplug the cigarette lighter adapter from the
back of the cradle—DC 12 V.
ANT. DC
12V FM
OUT AUDIO
Back of the cradle
KS-K6012_02-11.p65 04.7.15, 11:469

○○○○○○○○○○○○○○○○○○○○○○○○○○○○○○○○○○○○○○○○○○○○○○○○○○○○○○○○○
10
○○○○○○○○○○○○○○○○○○○○○○○○○○○○○○○○○○○○○○○○○○○○○○○○○○○○○○○○○
• Route the cable from the lowest point of the rear
window. Take advantage of any existing cable
channels or wiring conduits.
• For SUVs, minivans & 5-door vehicles, bring
the cable into the car under the rubber molding
for the tailgate, and continue under the interior
trim.
6
From the trunk, route the cable around the
passenger compartment and to the back of the
cradle.
CAUTION:
• Do not pull the cable across sharp edges that
could damage it.
• Do not route the cable nearby areas where it
could become tangled in driver’s and
passenger’s feet.
Running the Antenna Cable (Continued)
5
Route the cable from the antenna into the
trunk by tucking it underneath the rubber
molding around rear window.
KS-K6012_02-11.p65 04.7.15, 11:4610

11
○○○○○○○○○○○○○○○○○○○○○○○○○○○○○○○○○○○○○○○○○○○○○○○○○○○○○○○○○
○○○○○○○○○○○○○○○○○○○○○○○○○○○○○○○○○○○○○○○○○○○○○○○○○○○○○○○○○
9
Attach the SIRIUS antenna to the metal
surface of the car, such as roof of your car.
Note: It is strongly recommended to unplug the
cigarette lighter adapter after you turn off the car
ignition.
7
Plug the antenna into the antenna into the back
of the cradle—ANT. until it is firmly secured.
8
Plug the cigarette lighter adapter into the
cigarette lighter.
ANT. DC
12V FM
OUT AUDIO
Back of the cradle
KS-K6012_02-11.p65 04.7.15, 11:4611

Having TROUBLE with operation?
USA ONLY
Call 1-800-252-5722
http://www.jvc.com
We can help you!
http://www
.
j
v
cmobile.c
om
Visit us on-line for
Technical Support & Customer Satisfaction Survey.
US RESIDENTS ONLY
EN
© 2004 Victor Company of Japan, Limited 0704MNMMDWKRI
Car Docking Kit
KS-K6012
KS-K6012_Cover.p65 04.7.15, 11:462
This manual suits for next models
1
Table of contents
Other JVC Docking Station manuals
Popular Docking Station manuals by other brands

Unitech
Unitech HT730 quick start guide

Sonic Impact Technologies
Sonic Impact Technologies i-Fusion user manual

Denon
Denon ASD-3W - Digital Player Docking Station owner's manual

PEEKTON
PEEKTON PEEKBALL manual

Gamber Johnson
Gamber Johnson GETAC V110 installation instructions

TDK
TDK Sound Cube V513 user guide