JVC XV-D9000 User manual

DVD AUDIO/VIDEO PLAYER
For Customer Use:
Enter below the Model No. and Serial
No. which are located either on the rear,
bottom or side of the cabinet. Retain this
information for future reference.
Model No.
Serial No.
LVT0454-003A
[E]
XV-D9000
INSTRUCTIONS
DVD AUDIO
EXTENDED K2
PROCESSING VIDEO
/
DISP.
ON
/
OFF
DISPLAY
OFF
XV
-
D9000
DVD AUDIO
/
VIDEO PLAYER
STANDBY
PAGE
RETURN
REPEAT
A
-
B
THEATER
POSITION
TIME
DISPLAY
fs/RATE
DISPLAY
REPEAT
PLAYMODE
AUDIOSUBTITLEANGLE
SET UP
TOP MENU
GROUP(
-
)SELECT GROUP(+)
SLOW(
-
)SLOW(+)
OPEN
/
CLOSE EX K2
DISPLAY
OFF
MENU
ENTER
8765
4321
+1010/0
9
CLEAR
CANCELRESUMEGROUP
CHAP./
INDEX
DVD
STANDBY/ON
RM
-
SXVD9000A REMOTE CONTROL
DOLBY
D
I
G
I
T
A
L
XVD9000E_Cover1to4.p65 2/27/01, 2:35 PM1

2
Warnung, Achtung und sostige Hinweise
Mises en garde, précautions et indications diverses
Waarschuwingen, voorzorgen en andere mededelingen
ACHTUNG
Zur Verhinderung von elektrischen Schlägen, Brandgefahr, usw:
1. Keine Schrauben lösen oder Abdeckungen enternen und
nicht das Gehäuse öffnen.
2. Dieses Gerät weder Regen noch Feuchtigkeit aussetzen.
ATTENTION
Afin d’éviter tout risque d’électrocution, d’incendie, etc.:
1. Ne pas enlever les vis ni les panneaux et ne pas ouvrir le
coffret de l’appareil.
2. Ne pas exposer l’appareil à la pluie ni à l’humidité.
VOORZICHTIG
Ter vermindering van gevaar voor brand, elektrische schokken, enz.:
1. Verwijder geen schroeven, panelen of de behuizing.
2. Stel dit toestel niet bloot aan regen of vocht.
Achtung — -Schalter!
DenNetzsteckerausder Steckdoseziehen, umdie Stromversorgung
vollkommen zu unterbrechen. Der Schalter unterbrichet in keiner
Stellungdie Stromversorgungvollkommen.Die Stromversorgungkann
mit der Fernbedienung ein- und ausgeschaltet werden.
Attention — Commutateur !
Déconnecter la fiche de secteur pour couper complètement le
courant. Le commutateur ne coupe jamais complètement la
ligne de secteur, quelle que soit sa position. Le courant peut être
télécommandé.
Voorzichtig — schakelaar!
Om de stroomtoevoer geheel uit te schakelen, trekt u de stekker uit
het stopkontakt.Anders zal er altijd een geringe hoeveelheid stroom
naar het apparaat lopen, ongeacht de stand van de schakelaar.
U kunt het apparaat ook met de afstandsbediening aan- en
uitschakelen.
ACHTUNG
• Blockieren Sie keine Belüftungsschlitze oder -bohrungen.
(Wenn die Belüftungsöffnungen oder -löcher durch eine Zeitung
oder ein Tuch etc. blockiert werden, kann die entstehende Hitze
nicht abgeführt werden.)
• Stellen Sie keine offenen Flammen, beispielsweise angezündete
Kerzen, auf das Gerät.
• Wenn Sie Batterien entsorgen, denken Sie an den Umweltschutz.
Batterien müssen entsprechend den geltenden örtlichen
Vorschriften oder Gesetzen entsorgt werden.
• Setzen Sie die Anlage nicht in einem Badezimmer oder an Orten
ein, an denen Wasser verwendet wird. Stellen Sie auch keine
Behälter, die mit Wasser oder anderen Flüssigkeiten gefüllt sind
(beispielsweise Kosmetik- oder Medikamentenbehälter, Blumen-
vasen, Topfpflanzen, Tassen etc) auf diese Anlage.
VOORZICHTIG
• Zorg dat u de ventilatieopeningen en -gaten niet afsluit.
(Als de ventilatieopeningen en -gaten worden afgesloten door
bijvoorbeeld papier of een doek, kan er hitte in het apparaat
worden opgebouwd.)
• Zet geen bronnen met open vuur, zoals brandende kaarsen, op
het apparaat.
• Wees milieubewust en gooi lege batterijen niet bij het huishoude-
lijk afval. Lege batterijen dient u in te leveren met het KCA of bij
een innamepunt voor batterijen.
• Gebruik dit apparaat niet in een badkamer of in andere natte
ruimten.
Zet ook geen voorwerpen op het apparaat die zijn gevuld met
water of andere vloeistoffen (zoals cosmetica, medicijnen,
bloemenvazen, bloempotten, kopjes enz.).
Warnings, Cautions and Others
Caution –– switch!
Disconnect the mains plug to shut the power off completely.
The switch in any position does not disconnect the mains
line. The power can be remote controlled.
CAUTION
To reduce the risk of electrical shocks, fire, etc.:
1. Do not remove screws, covers or cabinet.
2. Do not expose this appliance to rain or moisture.
CAUTION:
• Do not block the ventilation openings or holes.
(If the ventilation openings or holes are blocked by a newspaper
or cloth, etc., the heat may not be able to get out.)
• Do not place any naked flame sources, such as lighted candles,
on the apparatus.
• When discarding batteries, environmental problems must be
considered and local rules or laws governing the disposal of these
batteries must be followed strictly.
• Do not use this apparatus in a bathroom or places with water.
Also do not place any containers filled with water or liquids (such
as cosmetics or medicines, flower vases, potted plants, cups, etc.)
on top of this apparatus.
ATTENTION
• Ne bloquez pas les orifices ou les trous de ventilation.
(Si les orifices ou les trous de ventilation sont bloqués par un
journal un tissu, etc., la chaleur peut ne pas être évacuée
correctement de l’appareil.)
• Ne placez aucune source de flamme nue, telle qu’une bougie,
sur l’appareil.
• Lors de la mise au rebut des piles, veuillez prendre en
considération les problèmes de l’environnement et suivre
strictement les règles et les lois locales sur la mise au rebut
des piles.
• N’utilisez pas cet appareil dans une salle de bain ou un autre
endroit avec de l’eau.
Ne placez aucun récipient contenant de l’eau (tel que des
cosmétiques ou des médicaments, un vase de fleurs, un pot
de fleurs, une tasse, etc.) sur cet appareil.
XVD9000E_p02-04.p65 2/27/01, 2:35 PM2

3
Achtung: Angemessene Ventilation
Stellen Sie das Gerät zur Verhütung von elektrischem Schlag und
Feuer und zum Schutz gegen Beschädigung wie folgt auf:
Vorderseite: Offener Platz ohne Hindernisse.
Seiten: Keine Hindernisse innerhalb 3 cm von den Seiten.
Oberseite: Keine Hindernisse innerhalb 5 cm von der Oberseite.
Rückseite: Keine Hindernisse innerhalb 15 cm von der Rückseite.
Unterseite: Keine Hindernisse. Auf eine ebene Oberfläche stellen.
Attention: Ventilation Correcte
Pour éviter les chocs électriques, l’incendie et tout autre dégât.
Disposer l’appareil en tenant compte des impératifs suivants
Avant: Rien ne doit gêner le dégagement
Flancs: Laisser 3 cm de dégagement latéral
Dessus: Laisser 5 cm de dégagement supérieur
Arrière: Laisser 15 cm de dégagement arrière
Dessous: Rien ne doit obstruer par dessous; poser l’appareil sur
une surface plate.
Voorzichtig: Zorg Voor Goede Ventilatie
Om gevaar voor brand of een elektrische schok te voorkomen, dient
u bij opstelling van het apparaat op de volgende punten te letten:
Voorkant: Voldoende ruimte vrij houden.
Zijkanten: Minstens 3 cm aan weerszijden vrij houden.
Bovenkant: Niets bovenop plaatsen; 5 cm speling geven.
Achterkant: Minstens 15 cm ruimte achteraan vrij houden.
Onderkant: Opstellen op een egaal horizontaal oppervlak.
Abstand von 15 cm oder mehr
Dégagementde 15 cm ou plus
Minstens 15 cm tussenruimte
Vorderseite
Avant
Voorkant
Boden
Plancher
Vloer
Wand oder Hindernisse
Mur, ou obstruction
Wand of meubilair
XV-D9000
Caution: ProperVentilation
To avoid risk of electric shock and fire and to protect from damage.
Locate the apparatus as follows:
Front: No obstructions open spacing.
Sides: No obstructions in 3 cm from the sides.
Top: No obstructions in 5 cm from the top.
Back: No obstructions in 15 cm from the back
Bottom: No obstructions, place on the level surface.
Floor
Spacing 15 cm or more
Wall or obstructions
Front
Standhöhe 5 cm oder mehr
Hauteur du socle: 5 cm ou plus
Standard op minstens 5 cm van de vloer
Stand height 5 cm or more
XVD9000E_p02-04.p65 2/27/01, 2:35 PM3

4
WICHTIGER HINWEIS FÜR LASER-PRODUKTE / IMPORTANT POUR LES PRODUITS LASER / BELANGRIJKE INFORMATIE VOOR
LASERPRODUKTEN
ANBRINGUNGSORTE FÜR LASER-PRODUKTE / REPRODUCTION DES ETIQUETTES / VERLARING VAN DE LABELS
1KLASSIFIKATIONSETIKETTE AN DER RÜCKSEITE
1ETIQUETTE DE CLASSIFICATION, PLACÉE A L'ARRIÈRE
DU COFFRET
1KLASSIFIKATIELABEL, OP DE ACHTERZIJDE VAN HET
APPARAAT
2WARNETIKETTE IM GERÄTEINNEREN
2ETIQUETTE D’AVERTISSEMENT PLACÉE À L’INTERIEUR
DE L’APPAREIL
2WAARSCHUWINGSLABEL, IN HET APPARAAT
1. LASER-PRODUKT DER KLASSE 1
2. GEFAHR: Sichtbare Laserstrahlung bei Öffnung und
fehlerhafter oder beschädigter Spre. Direkten Kontakt mit dem
Strahl vermeiden!
3. ACHTUNG:Das Gehäuse nicht öffnen. Das Gerät enthält
keinerlei Teile, die vom Benutzer gewartet werden können.
Überlassen Sie Wartungsarbeiten bitte qualifizierten
Kundendienst-Fachleuten.
1. PRODUIT LASER CLASSE 1
2. ATTENTION:Radiation laser visible quand l’appareil est ouvert
ou que le verrouillage est en panne ou désactivé. Eviter une
exposition directe au rayon.
3. ATTENTION:Ne pas ouvrir le couvercle du dessus. Il n’y a
aucune pièce utilisable à l’intérieur. Laisser à un personnel
qualifié le soin de réparer votre appareil.
1. KLAS 1 LASERPRODUKT
2. GEVAARLIJK: Zichtbaar laserstraling wanneer open en de
beveiliging faalt of uitgeschakeld is. Voorkom het direkt
blootstaan aan de straal.
3. VOORZICHTIG: De bovenkap niet openen. Binnenin het
toestel bevinden zich geen door de gebruiker te repareren
onderdelen: laat onderhoud over aan bekwaam vakpersoneel.
CAUTION: Invisible laser
radiation when open and
interlock failed or defeated.
AVOID DIRECT EXPOSURE
TO BEAM. (e)
ADVARSEL: Usynlig laser-
stråling ved åbning, når
sikkerhedsafbrydere er ude
af funktion. Undgå udsæt-
telse for stråling (d)
VARNING: Osynlig laser-
strålning när denna del är
öppnad och spärren är
urkopplad. Betrakta ej
strålen. (s)
VARO: Avattaessa ja suo-
jalukitus ohitettaessa olet
alttiina näkymättömälle
lasersäteilylle. Älä katso
säteeseen. (f)
CLASS 1
LASER PRODUCT
IMPORTANT FOR LASER PRODUCTS
REPRODUCTION OF LABELS
1CLASSIFICATION LABEL, PLACED ON REAR ENCLOSURE 2WARNING LABEL, PLACED INSIDETHE UNIT
1. CLASS 1 LASER PRODUCT
2. DANGER: Invisible laser radiation when open and interlock
failed or defeated.Avoid direct exposure to beam.
3. CAUTION: Do not open the top cover.There are no user
serviceable parts inside the Unit; leave all servicing to qualified
service personnel.
XVD9000E_p02-04.p65 2/27/01, 2:35 PM4

5
Contents
Warnings, Cautions and Others...................................................2
Features ......................................................................................... 6
Usage Precautions ........................................................................ 7
Connections .................................................................................. 8
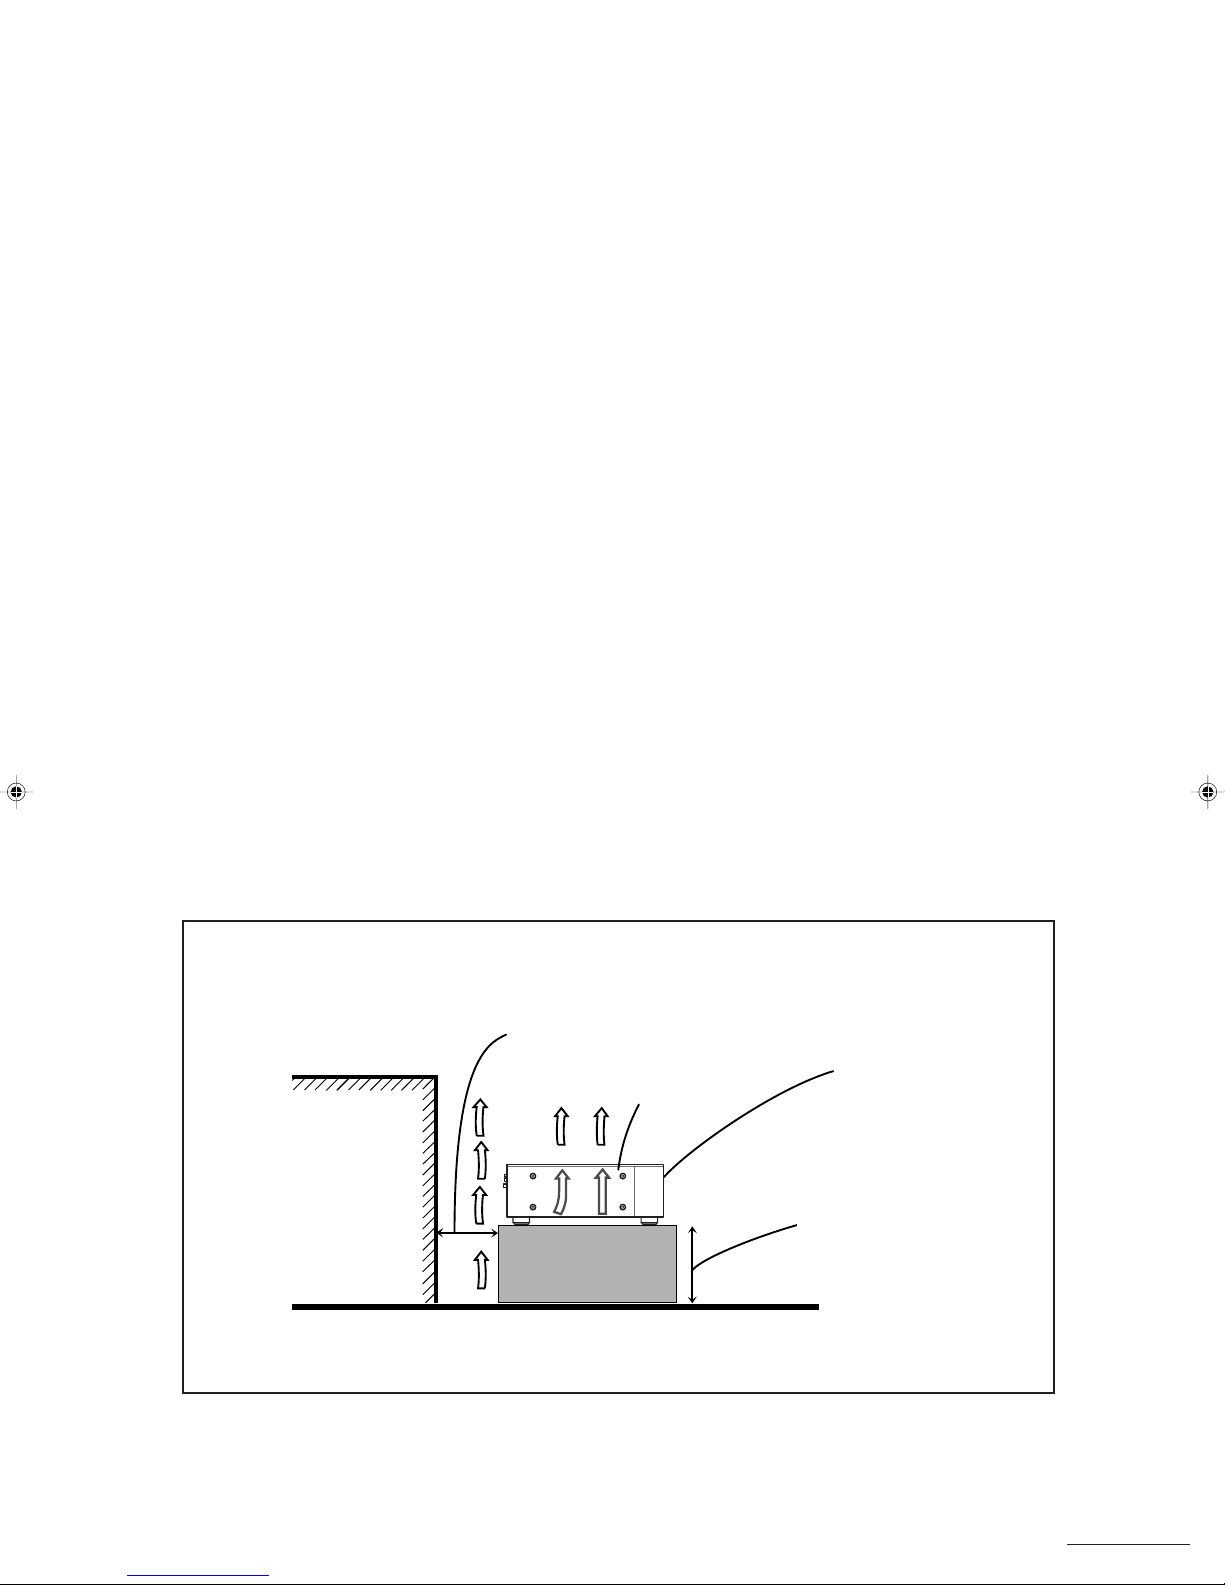
Precautions to ObserveWhen Setting Up the Connections ...............8
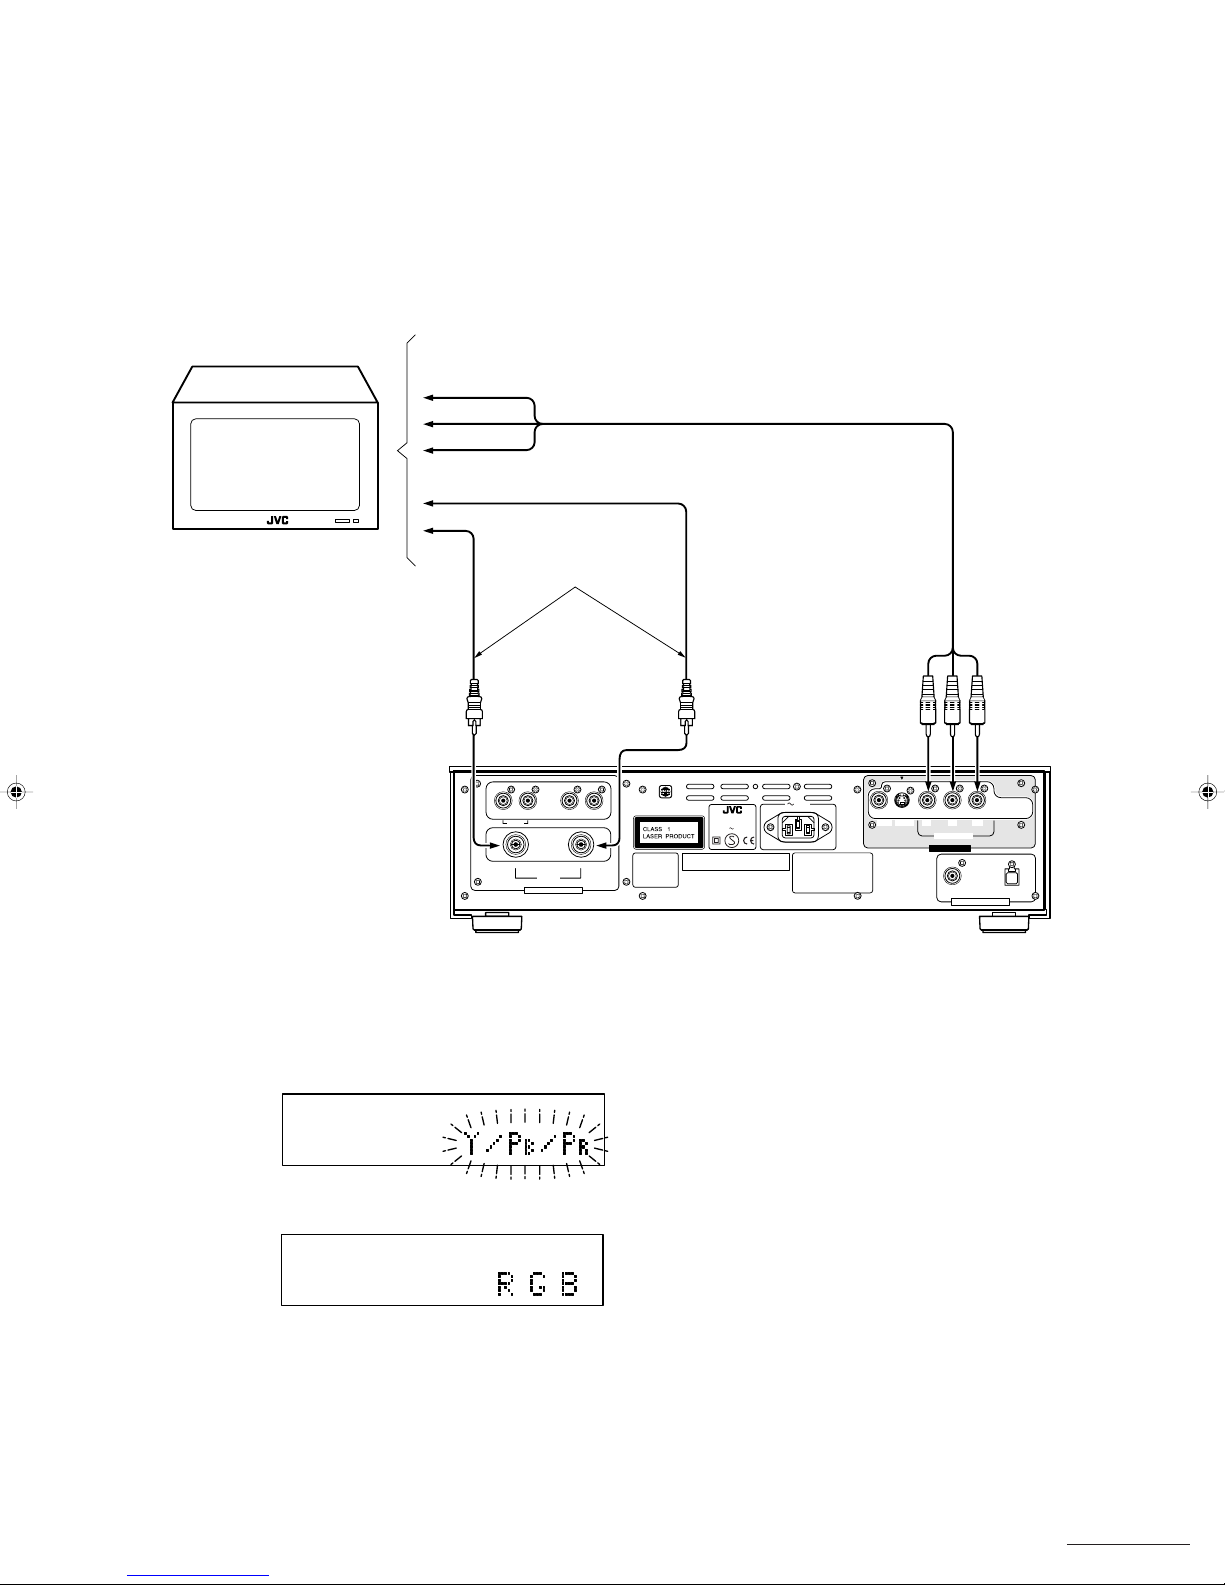
Connecting to a TV with a DVD Component Video
Input Terminal .......................................................................... 9
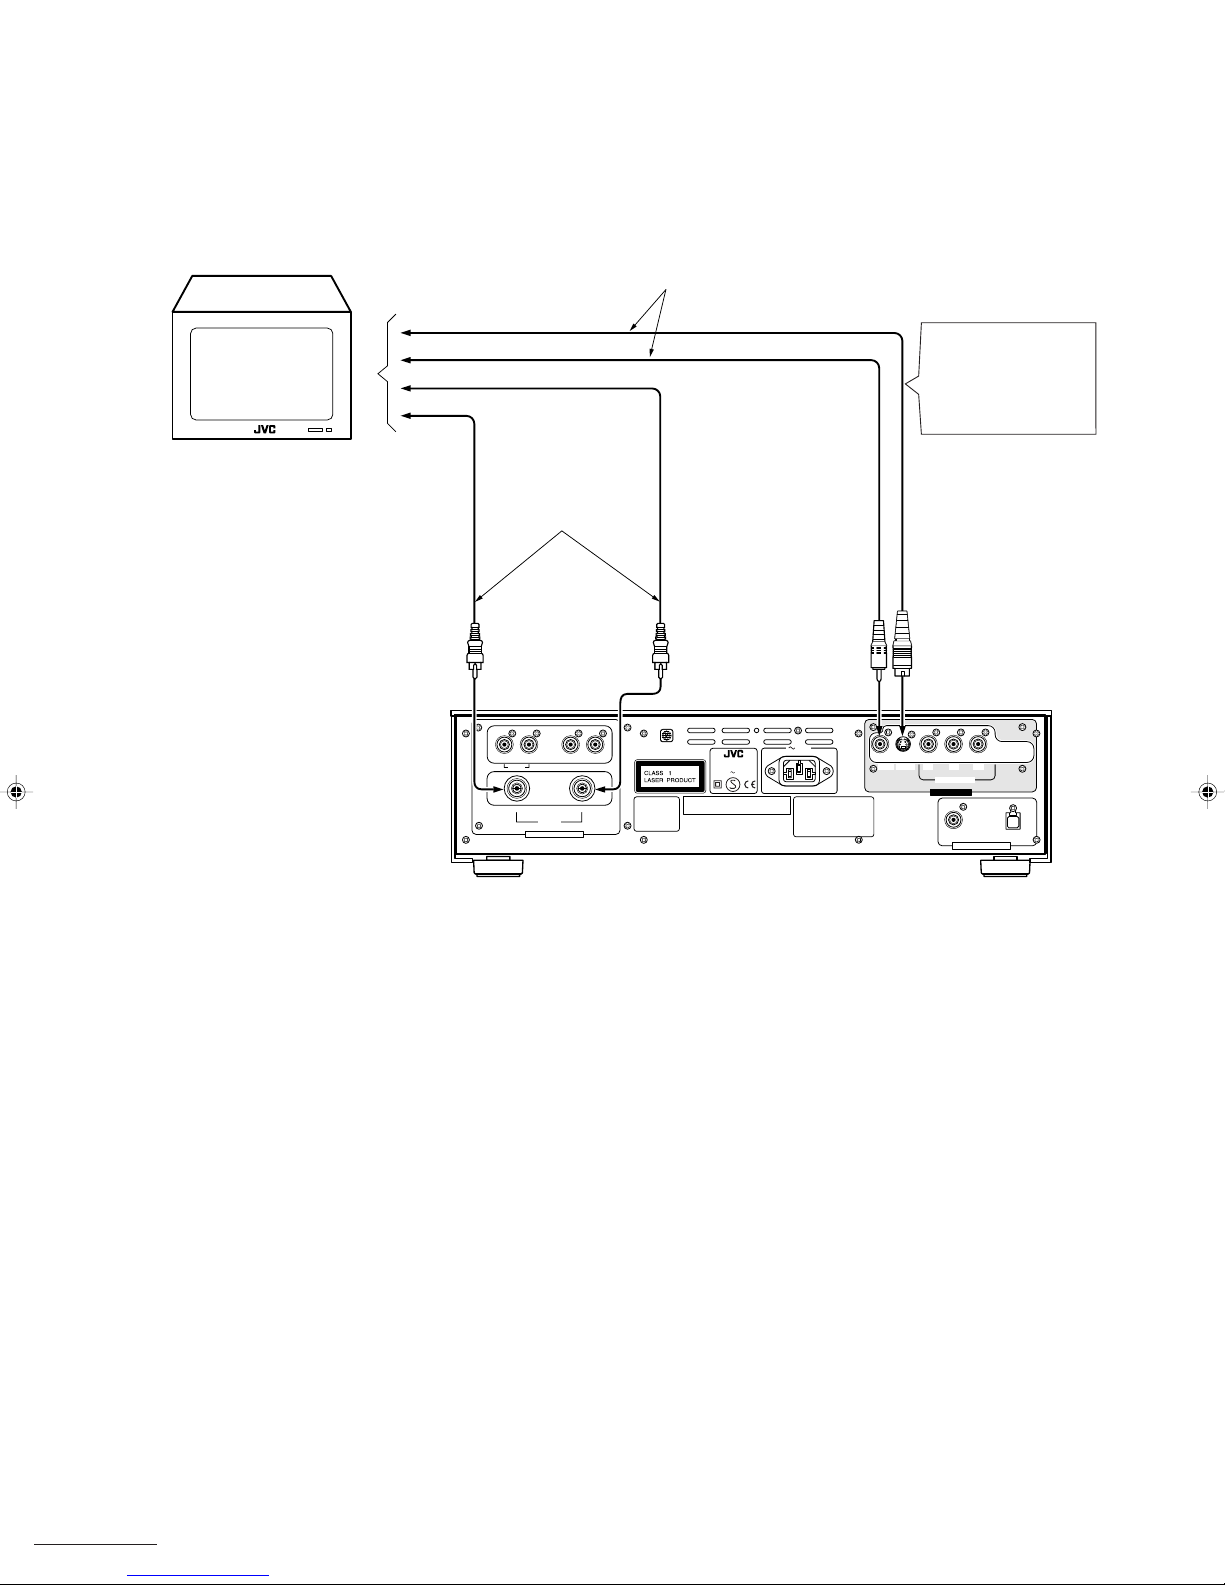
Connecting to a TV....................................................................10
Connecting to an Amplifier or Receiver..................................... 11
Connecting to an Amplifier with a 5.1 Channel Input Terminal..12
Connecting to a Device with a Digital InputTerminal ................ 13
Connecting to the Power Supply ...............................................14
Preparing the Remote Control ...................................................15
Parts andTheir Functions .......................................................... 16
Front Panel ................................................................................16
Display Section..........................................................................17
Rear Panel ................................................................................18
Remote Control .........................................................................19
BeforeYou Start .......................................................................... 21
Opening Screen ........................................................................21
Preventing Screen Burn-in [Screen Saver]................................ 21
On-screen guide icons ..............................................................21
Types of Disc Supported by this Player..................................... 22
Disc Composition ......................................................................23
Switching the Power On ............................................................. 24
Initial Settings ............................................................................. 25
Setting Up the Initial Settings ....................................................25
PREFERENCE 1 Settings......................................................... 26
PREFERENCE 2 Settings......................................................... 28
SPK. SETTING Screen Settings ............................................... 30
Basic Operations ........................................................................ 33
Loading a Disc ..........................................................................33
Playing a Disc............................................................................34
Step-by-Step Procedure for Playing a Disc ...........................34
Stopping a Disc .....................................................................34
Pausing a Disc....................................................................... 34
Skipping Through a Disc ....................................................... 34
Fast Forward/Backward Through a Disc................................35
Resume Playback [RESUME] ...................................................35
Storing the resume position................................................... 35
Resuming Playback............................................................... 35
Viewing One Frame at a Time................................................... 36
Slow Motion Playback ...............................................................36
PlayingTime Display [TIME DISPLAY]...................................... 37
Using time display during playback .......................................37
Using time display while a disc is stopped
(using [TIME DISPLAY]) ....................................................37
Using time display while a disc is stopped ............................38
Turning the Display Off to Get Better Sound Quality
[DISPLAY OFF] ..................................................................... 39
Adjusting the Image Brightness [THEATER POSITION] ...........40
fs/RATE Display [fs/RATE]......................................................... 40
Enjoying DVD Audio ...................................................................42
Using the menu to select an item to play .................................. 42
Selecting a Track ....................................................................... 43
Selecting an Index Item............................................................. 44
Still image display operations ....................................................44
Advancing/replaying still images [PAGE +/–]......................... 44
Jumping to specified still images on a disc [RETURN] .........44
Program Playback .....................................................................45
Random Playback .....................................................................46
Repeat Playback .......................................................................46
A-B Repeat Playback ................................................................47
Changing the Angle [ANGLE] ...................................................47
Changing the Subtitles [SUBTITLE] ..........................................48
Changing the Audio Setting [AUDIO] ........................................49
Playing a Bonus Group .............................................................49
Playing DVD Video Discs............................................................ 51
Selecting the SectionYou Want to Watch ..................................51
Using the menu to select an item to play............................... 51
Specifying the title number to begin playback .......................52
Specifying the chapter number to begin playback
(Chapter search)................................................................52
Repeat Playback .......................................................................52
A-B Repeat Playback ................................................................53
Changing the Angle [ANGLE] ...................................................53
Changing the Subtitles [SUBTITLE] ..........................................54
Changing the Audio Language [AUDIO].................................... 54
Parental Lock Setting ................................................................55
Setting Parental Lock ............................................................55
Changing Parental Lock ........................................................ 56
Temporarily Cancelling Parental Lock ................................... 57
Playing Audio CD and Video CD Discs ..................................... 58
Selecting a Song from a Menu ..................................................59
Selecting a Track ....................................................................... 59
Selecting an Index Item............................................................. 59
Program Playback .....................................................................60
Random Playback .....................................................................61
Repeat Playback .......................................................................61
A-B Repeat Playback ................................................................62
Changing the Audio Channel [AUDIO] ...................................... 62
Extended K2 ProcessingVersion 2.0 Function ........................ 63
Handling Discs ............................................................................ 64
Troubleshooting .......................................................................... 65
Specifications.............................................................................. 66
Dimensions.................................................................................. 67
Table of Languages andTheir Abbreviations ...........................68
Country Code List for Parental Lock......................................... 70
Glossary....................................................................................... 71
XVD9000E_p05-07.p65 2/27/01, 2:36 PM5

6
Features
High-end DVD player for playback of Audio DVDs and Video DVDs.The machine
makes full use of the latest advances in DVD technology.
Extended K2 Processing Version 2.0
Extended K2 processing takes the music signal before any band limitation is presumed and the digital signal is
expanded for the high bit and high sampling.Version 2.0 strengthens this frequency by as much as four times and is
carried by the front two channels. 44.1 kHz and 48 kHz are expanded and reformed as 24 bit 176.4 kHz and 192 kHz
signals respectively.The means that the playback quality of the digital source is one level closer to the original master.
PEM • DD Converter with 192 kHz/24 bit Support
This model includes our recently developed PEM • DD converter that supports the 192 kHz/24 bit signal that is top
specification for Audio DVD voice format.The front two channels use separate DAC configurations for the left and right
channels.With a dynamic range of 112 dB, it achieves a high frequency distortion factor of less than 0.001 %.
In addition, all channels use the same D/A converter which provides a jitter-free fine clock generator and the use of
dedicated audio R core power transformer and other features deliver excellent sound quality.
Interference-free,Vibration-free, Resonance-free Construction
Each circuit is isolated to exclude mutual interference between the circuits, with each five block structure being
independent. Analog related circuits are completely isolated from the sub-chassis with the digital elements such as
thededicated audio powertransformer.Furthermore,theoccurrence ofunnecessaryoscillation andoutside influences
are excluded by the 3.2 mm steel base plate and the solid aluminum casing. The airtightness of the unit has been
dramatically improved with the use of an airtight disc tray to shut out external vibration and option of completely
turning off the video circuitry to achieve the maximum sound quality possible.
XVD9000E_p05-07.p65 2/27/01, 2:36 PM6

7
Usage Precautions
Installing the player
Install the player in a location where the temperature is between 5 °C to 35 °C (41 °F to 95 °F).If the player is exposed
toa highertemperature,itmaycauseit tomalfunction, orcause damage.In particular,avoid installingit inthe following
locations.
• Locations where it is exposed to direct sunlight
• Locations that become hot, such as on top of a receiver
IfTV or radio reception deteriorates...
• Keep distance between the TV or radio and this player. If this player is installed near equipment that receives
electromagnetic waves, it may effect reception.
Moving the Player
• Ifyoumove the player from a cold locationto a warmlocation, do not usethe playerimmediately after movingit.This
is because condensation can form inside the player. If you allow the player to stand with the power on for a few
hours, you can then use it normally.
• Always remove discs from the player before moving it. If you move the player while a disc is inside, the disc can
become lodged inside the player and will be difficult to remove, and can also cause damage.
Do not insert warped or irregular shaped discs
• Do not insert cracked or warped discs into the player, or discs that have been repaired with adhesive, or heart-
shaped discs, octagonal discs, or other irregular shaped discs.These can cause damage.
Cleaning the exterior of the player
• To clean the cover and other exterior parts of the player, wipe them with soft, dry cloth.For persistent stains or dirt,
wipe them with a cloth moistened with a mild detergent. Never use thinner, benzine, or other inflammable agents.
This can cause cloudiness or discoloring of the exterior.
Trademark and Copyright Information
• This player is based on technology licensed from Dolby Laboratories Inc. Dolby, Pro Logic, MLP Lossless, and the
DolbyDlogo aretrademarks ofDolbyLaboratoriesInc.(Confidential copyright.) ©1992-1998 DolbyLaboratories
Inc. All rights reserved.
• This player is based on technology licensed from Digital Theater Systems Inc. DTS and DTS Digital Surround are
trademarks of Digital Theater Systems Inc.
©1996 Digital Theater Systems, Inc.All Right Reserved.
• This player uses copy protection technology.This copy protection technology is licensed by Macrovision Inc.for use
in the United States and other countries.To use this technology a license is required from Macrovision Inc.Without
a license form Macrovision Inc., you may not use this technology outside the limited range of home use. The
disassembly or reverse engineering of this technology is also prohibited.
• Theunauthorized copying, broadcast,presentation, andrental ofDVD discs,withoutthe permission of the copyright
owner is prohibited.
• The DVD logo is a registered trademark.
XVD9000E_p05-07.p65 2/27/01, 2:36 PM7

8
Connections
●The sound quality can be subtly effected depending on the material and con-
struction of the connection cables and cords.Connection cables or cords are not
supplied with this player.These must be purchased separately.We recommend
that you compare several types and choose cables/cords best suited to your
needs.
In order to use this model, it must be connected to aTV or monitor.
* Toavoidrepetitionofthevariousprocedures,thefollowingdescriptionsexplaintheproceduresassumingaconnection
to a TV.However, you can also connect the player to a monitor or projector instead of a TV.
Precautions to Observe When Setting Up the Connections
• Before connecting any cables, make sure that power to player itself and the other devices is switched off.
• Depending on the device used, the labels for the terminals may differ.Refer to the manual provided with your device
when making connections.
• Make sure you insert all plugs firmly.A loose connection can cause noise or the loss of sound.
• Connect the video output from the player directly to a TV (or monitor). If the video output is connected via a video
player, the picture quality during playback will deteriorate.
Main unit Video player
Direct connection
TV
XVD9000E_p08-15.p65 2/27/01, 2:36 PM8

9
Connections
ConnectingtoaTVwithaDVDComponent orRGBVideoInputTerminal
By using the component/RGB video output terminal to connect the player to the TV you can enjoy high-quality video
performance.
FRONT
REAR CENTER SUBWOOFER
AUDIO ANALOG OUTPUT
VICTOR COMPANY OF JAPAN,LIMITED MADE IN JAPAN
Apparatus Claims of
U.S. Patent Nos.
4,631,603, 4,577,216,
4,819,098, and
4,907,093 licensed
for limited viewing
uses only.
Manufactured under license from Dolby
Laboratories."Dolby", "MLP Lossless",
and the double-D symbol are
trademarks of Dolby Laboratories.
Confidential Unpublished Works.
Copyrights 1992-1998 Dolby
Laboratories. All rights reserved.
Manufactured under license from Digital Theeter Systemes,Inc. US Pat.
No.5,451,942 and other world-wide paterts lssued and pending. "DTS"
and "DTS Digital Surround" are trademarks of Digital Theater Systems,
Inc. Copyrlght 1996 DigitalTheater Systems,Inc.All rights reeerved.
LEFT
AUDIO DIGITAL OUTPUT
PCM
/
STREAM
COAXIAL OPTICAL
RIGHT LEFT
RIGHT
AC IN
VIDEO
S-VIDEO
VIDEO OUTPUT
WARNING: SHOCK HAZARD - DO NOT OPEN
AVIS:RISQUE DE CHOC ELECTRIQUE - NE PAS OUVRIR
DVD PLAYER
MODEL NO. XV-D9000
AC 230V 50Hz 35W
P
R
/R
P
B
/B
Y/G
COMPONENT/RGB
Y
/
B
P
B
/
G
P
R
/
R
TV
Sound is output from
the TV speakers.
To DVD component or RGB video input terminal
Component or RGB cable
To AUDIO LEFT input terminal
To AUDIO RIGHT input terminal
Audio cable
Main unit
• The output of the COMPONENT/RGB terminal can be changed between “COMPONENT” and “RGB”. If the 7
(STOP) key of the main unit is kept pressed for 3 seconds or longer, the current setting is displayed flashing.
If it is kept pressed for another 2 seconds or longer, the output setting is changed.
XVD9000E_p08-15.p65 2/27/01, 2:36 PM9

10
Connections
Connecting to aTV
You can also use the player by simply connecting it to a normalTV.To enjoy the advanced sound quality, connect the
audio output to specialist audio equipment. See pages 11, 12 and 13.
S-Video Signal
S-Video separates the luminance signal (Y) and color signal (C) of previous video signals.It achieves vivid images in
which color blur is rare.
<CAUTION>
When using S-Video Signal, set the OUTPUT FORMAT to [Y/PB/PR]. Refer to page 9.
FRONT
REAR CENTER SUBWOOFER
AUDIO ANALOG OUTPUT
VICTOR COMPANY OF JAPAN,LIMITED MADE IN JAPAN
Apparatus Claims of
U.S. Patent Nos.
4,631,603, 4,577,216,
4,819,098, and
4,907,093 licensed
for limited viewing
uses only.
Manufactured under license frufactured under license from Dolby
Laboratories."Dolby", "MLP Lossless",
and the double-D symbol are
trademarks of Dolby Laboratories.
Confidential Unpublished Works.
Copyrights 1992-1998 Dolby
Laboratories. All rights reserved.
Manufactured under license from Digital Theeter Systemes,Inc. US Pat.
No.5,451,942 and other world-wide paterts lssued and pending. "DTS"
and "DTS Digital Surround" are trademarks of Digital Theater Systems,
Inc. Copyrlght 1996 DigitalTheater Systems,Inc.All rights reeerved.
LEFT
AUDIO DIGITAL OUTPUT
PCM
/
STREAM
COAXIAL OPTICAL
RIGHT LEFT
RIGHT
AC IN
VIDEO
S-VIDEO
VIDEO OUTPUT
WARNING: SHOCK HAZARD - DO NOT OPEN
AVIS:RISQUE DE CHOC ELECTRIQUE - NE PAS OUVRIR
DVD PLAYER
MODEL NO. XV-D9000
AC 230V 50Hz 35W
P
R
/R
P
B
/B
Y/G
COMPONENT/RGB
Sound is output from
the TV speakers.
To S-Video input terminals S Video cable
To video input terminals video cable
Connect one of these
Audio cable
Main unit
To AUDIO LEFT input terminal
To AUDIO RIGHT input terminal
TV
ConnectthisifyourTV
has a S-Video input
terminal. You will get
better picture quality.
XVD9000E_p08-15.p65 2/27/01, 2:36 PM10

11
Connections
Connecting to an Amplifier or Receiver
By connecting the output from the player to speakers via a receiver or receiver you can enjoy realistic sound.
Audio cable
Amplifier or Receiver
Main unit
To RIGHT input terminal
To LEFT input terminal
FRONT
REAR CENTER SUBWOOFER
AUDIO ANALOG OUTPUT
Apparatus Claim
s
U.S. Patent Nos.
4,631,603, 4,577,2
4,819,098, and
4,907,093 license
d
for limited viewin
g
uses only.
LEFT
RIGHT LEFT
RIGHT
WARNING: SHOCK HAZARD - DO NOT OPEN
AVIS: RISQUE DE CHOC ELECTRIQUE - NE PAS OUVRIR
Connect the player output to
theamplifierlineinputterminal
(AUX, DVD, CD, etc.) See
pages 9 and 10 for details for
the video signal connection.
After you have setup the connection...
●Downmix Settings
WhenplayingDVDAudio, DolbyDigital,and DTS multi-channeldiscsthe downmixsettingsare used.These settings
mean that even when multi-channel discs are played back in two stereo channels, they use not only the front left
and right channels, but also use the other channel information. Set [DOWNMIX] in Initial Settings 2 of the Initial
Settings screen to [Lt/Rt] or [Lo/Ro]. See page 29.
• If [DOWNMIX] is set to [OFF], you can hear only front left and right channel sound.
• Some multi-channel DVD Audio discs prohibit downmixing.In these cases sound will only be output of the front
left and right channels.
XVD9000E_p08-15.p65 2/27/01, 2:36 PM11

12
Connections
Connecting to a Receiver with a 5.1 Channel InputTerminal
The player has a built-in DVD Audio decoder, Dolby Digital decoder and DTS decoder, which means that external
decoders are unnecessary. By connecting the 5.1 ch output terminal of the player to the 5.1 ch input terminal of the
receiver, you can enjoy realistic multiochannel playback.
See pages 9 and 10 for details for the video signal connection.
After you have setup the connection...
●Speaker Settings
Set Speaker Settings of the Initial Settings screen to [5.1 CHANNEL] or [EXPERT]. See page 30.
●Downmix Settings
Set [DOWNMIX] in Initial Settings 2 of the Initial Settings screen to [OFF]. See page 29.
FRONT
REAR CENTER SUBWOOFER
AUDIO ANALOG OUTPUT
Apparatus Claim
s
U.S. Patent Nos.
4,631,603, 4,577,2
4,819,098, and
4,907,093 license
d
for limited viewin
g
uses only.
LEFT
RIGHT LEFT
RIGHT
WARNING: SHOCK HAZARD - DO NOT OPEN
AVIS: RISQUE DE CHOC ELECTRIQUE - NE PAS OUVRIR
To SUBWOOFER input terminal
To CENTER input terminal
To REAR LEFT input terminal
To FRONT LEFT input terminal
To REAR RIGHT input terminal
To FRONT RIGHT input terminal
Audio cable
Audio cable
Main unit
Amplifier or receiver
(with 5.1 channel input terminal)
XVD9000E_p08-15.p65 2/27/01, 2:36 PM12

13
Connections
R
COMPANY OF JAPAN,LIMITED MADE IN JAPAN
u
nder license fr
u
nder license from Dolby
D
olb
D
olby", "MLP Lossless",
-D symbol are-D symbol are
D
olb
D
olby Laboratories.
n
pub
n
publishedWorks.
9
2-1998 Dolb
9
2-1998 Dolby
A
ll rights reser
A
ll rights reserved.
AUDIO DIGITAL OUTPUT
PCM
/
STREAM
COAXIAL OPTICAL
VIDEO
S-VIDEO
VIDEO OUTPUT
P
R
/R
P
B
/B
Y/G
COMPONENT/RGB
Connect one of these
Remove the protective cap
before connecting
the digital optical
cable.
Main unit
Digital device To DIGITAL COAXIAL input terminal Coaxial cable
To DIGITAL OPTICAL input terminal Digital optical cable
See pages 9 and 10 for details for the video signal
connection to a TV.
Connecting to a Device with a Digital InputTerminal
By connecting the digital output from this player to the digital input terminal of a receiver etc., you can send the digital
audio signal from discs to external devices without changing the signal. Also, by connecting to Dolby Digital or DTS
decoders (or amplifiers with built-in decoders), you can enjoy high-quality surround audio.
After you have setup the connection...
●Digital OUT Settings
Set [DIGITAL] OUT in Initial Settings 2 of the Initial Settings screen to match the connection to the external device.
See page 28.
Note:
●When connecting to devices with Dolby Digital or DTS decoder functions
The [COMPRESSION] and [DOWNMIX] settings in Initial Settings 2 of the Initial Settings screen will not be applied
to the digital output from the player. Make any adjustments for these settings with the external decoder.
●DVD Audio digital output
When recording the DVD Audio multi-channel digital output, the digital output is downmixed to two channels.
What is DTS (DigitalTheater System)?
DTS is a new surround format that has better data compression to Dolby Digital that delivers superior quality surround
playback of audio. It uses the same 5.1 channel that Dolby Digital uses, but due to lower audio compression during
recording it produces audio with more depth and high S/N playback. It's wide dynamic range allows it to produce
magnificent sound with excellent audio separation.
XVD9000E_p08-15.p65 2/27/01, 2:36 PM13

14
Connections
Connecting to the Power Supply
Use the power cord provided to connect the player to the power supply.
Insert the connector of the power cord into the power connector slot on the rear panel before inserting the power plug
into the power outlet.
• The AC power cord of this unit has certain one-way direction connections to prevent electric shock.
• Always connect the player directly to a wall power outlet.
CAUTION
Only use the power cord provided with the
player.
If you use a different cable, it may cause a
malfunction or a fire hazard.
FRONT
REAR CENTER SUBWOOFER
AUDIO ANALOG OUTPUT
VICTOR COMPANY OF JAPAN,LIMITED MADE IN JAPAN
Apparatus Claims of
U.S. Patent Nos.
4,631,603, 4,577,216,
4,819,098, and
4,907,093 licensed
for limited viewing
uses only.
Manufactured under license frufactured under license from Dolby
Laboratories."Dolby", "MLP Lossless",
and the double-D symbol are
trademarks of Dolbtrademarks of Dolby Laboratories.
Confidential Unpublished Works.
Copyrights 1992-1998 Dolbyrights 1992-1998 Dolby
Laboratories. All rights reserved.
Manufactured under license from Digital Theeter Systemes,Inc. US Pat.
No.5,451,942 and other world-wide paterts lssued and pending. "DTS"
and "DTS Digital Surround" are trademarks of Digital Theater Systems,
Inc. Copyrlght 1996 DigitalTheater Systems,Inc.All rights reeerved.
LEFT
AUDIO DIGITAL OUTPUT
PCM
/
STREAM
COAXIAL OPTICAL
RIGHT LEFT
RIGHT
AC IN
VIDEO
S-VIDEO
VIDEO OUTPUT
WARNING: SHOCK HAZARD - DO NOT OPEN
AVIS:RISQUE DE CHOC ELECTRIQUE - NE PAS OUVRIR
DVD PLAYER
MODEL NO. XV-D9000
AC 230V 50Hz 35W
P
R
/R
P
B
/B
Y/G
COMPONENT/RGB
AC230V 50Hz
Main unit
XVD9000E_p08-15.p65 2/27/01, 2:36 PM14

15
Preparing the Remote Control
●You can use the remote control to control the player.
The rear of the remote control includes a compartment for batteries.
1 While pressing the upper section of the battery compartment cover, lift off the cover.
2 Insert AAA dry-cell batteries.
Make sure that the + and - poles of the batteries are the same as indicated inside the battery compartment.
3 Close the battery compartment cover.
Note:
●When the operation range of the remote control is reduced, or if you can only use it when very close to the main unit,
it is time to replace the batteries. Replace both batteries with new AAA batteries. Although the battery life will vary
depending on amount of use and operating conditions, the batteries should last for six months, or so.
●If you will not be using the player for an extended period, remove the batteries from the remote control.
AAA dry-cell batteries
XVD9000E_p08-15.p65 2/27/01, 2:36 PM15

16
Parts andTheir Functions
Front Panel
This allows you to perform basic operations for the player. The buttons on the front panel are all available on the
remote control and the functions of both buttons are the same.
1DVD AUDIO Indicator (blue)
This lights when you insert a DVD Audio disc.
2POWER STANDBY Indicator (red)
This lights when the player is switched off.When the player
is switched on, this indicator goes out.
3
POWER/STANDBY Switch
Switches the power on and off.
4Remote Control Optical Sensor
Receives the control signals from the remote control.
5
EXTENDED K2 PROCESSING Indicator (orange)
This lights when Extended K2 Processing function is on.
6EXTENDED K2 PROCESSING Button
Switches the Extended K2 Processing function on and off.
See page 63.
7VIDEO/DISP.ON/OFF Button
Each press of this button switches the video output from
the main unit on or off, and switches the display mode.See
page 39.
8DISPLAY OFF Indicator (orange)
This lights when the display mode is off.
90(Open/Close) Button
This opens or closes the disc tray. It can also be used to
turn the power on.
07(Stop) Button
This stops playback of a disc that is playing.
-8(Pause) Button
This pauses playback of a disc that is playing.
=3(Play) Button
This starts playback of a disc in the disc tray.It can also be
used to turn the power on.
~4/¢(Skip) Buttons
Use these to jump to the next/previous scene, or to jump to
the next/previous track.
By pressing this button continuously during playback, you
can fast forward/backward through the disc. Playback
returns to normal mode when you release the button.
DVD AUDIO
STANDBY EXTENDED K2
PROCESSING VIDEO
/
DISP.
ON
/
OFF
DISPLAY
OFF
XV
-
D9000
DVD AUDIO
/
VIDEO PLAYER
12111098652 743
1 13
Disc tray
Display
XVD9000E_p16-20.p65 2/27/01, 2:37 PM16

17
Parts and Their Functions
Display Section
1 2 3 4 6 8 10 11
5 7 129
1TITLE/CHAP./GROUP/TRACK Display
For DVD Audio, this displays the Group number and Track
(song) number.
For DVD Video, this displays theTitle number and Chapter
(song) number.
For Audio CD or Video CD, this displays theTrack number.
2STEP/INDEX Display
STEP : Displays the program step number for
programmed tracks.
INDEX : Displays the index number recordedon the disc.
• Displayed for DVD Audio and Audio CD discs.
3
Signal Format Display
When you play a disc, this displays the audio signal format
used by the disc.
LPCM : Linear PCM format
MPEG : MPEG format
DOLBY DIGITAL : Dolby Digital format
DTS : Digital Theater System format
MLP : Meridian Lossless Packing format (lossless
compression for DVD Audio)
4B.S.P. (Browsable Still Pictures) Display (red)
Thisindicatesifyoucanfreely select the still imagesstored
on a DVD Audio disc.When this is lit you press the PAGE +/
- buttons on the remote control to select a still image.
5BONUS Display
This lights when there is a bonus group in a DVD Audio
disc.
• Not all discs include bonus groups.
6DiscType Display
Displays DVD, CD, or VCD (Video CD) as appropriate for
the disc.
7Audio Channel Display
Displays the audio channel information stored on a disc.
• For stereo two channel audio
lights.
• For 5.1 multi-channel format audio
lights.
L,R : Front left/right
C : Center
LS,RS : Rear left/right
LFE : Subwoofer low frequency signal
8V.OFF Display (red)
WhenV.OFF is lit, you can switch off the video output when
playing DVD Audio or Audio CD discs. By pressing the
DISPLAY OFF button on the remote control or theVIDEO/
DISP.OFF on the player, you can turn the V.OFF display
on.
See page 39.
9Play Mode Display
Displays the function being used.
0Repeat Display
Displays the function being used.
-Time Display Mode
Displays the selected time display mode.
=Message/Time Display
Displaysanymessagesfromtheplayerorplaybacktimeof
the disc.
XVD9000E_p16-20.p65 2/27/01, 2:37 PM17

18
Parts and Their Functions
Rear Panel
●Analog Audio OutputTerminals
Use these terminals to connect the analog output from the
player to a TV or analog amplifier.
1FRONTTerminals
Theseterminalsareforconnectingthe analog audio output
for the front left/right channels.
2REAR/CENTER/SUBWOOFERTerminals
Theseterminalsareforconnectingthe analog audio output
for the rear left/right, center, and subwoofer channels.
They are used for multi-channel format configurations.
●Video OutputTerminals
Use these terminals to connect the video output from the
player to a TV etc.
3
VIDEOTerminal
Outputs the video signal (composite signal.)
4S-VIDEOTerminal
Outputs the S-video signal.
5COMPONENT/RGBTerminal
Outputs the component or RGB video signals.
• The output of these terminals can be changed between
“COMPONENT” and “RGB”.See page 9.
●Digital Audio OutputTerminals
Usetheseterminals toconnectthedigitalaudio output from
the player to a device with digital input terminals.
6COAXIALTerminal
Outputs the digital audio signal.
7OPTICALTerminals
Outputs the digital audio signal.
●Power Connector
8Power Connector
Connects to the power cord provided with the player.
FRONT
REAR CENTER SUBWOOFER
AUDIO ANALOG OUTPUT
VICTOR COMPANY OF JAPAN,LIMITED MADE IN JAPAN
Apparatus Claims of
U.S. Patent Nos.
4,631,603, 4,577,216,
4,819,098, and
4,907,093 licensed
for limited viewing
uses only.
Manufactured under license from Dolby
Laboratories."Dolby", "MLP Lossless",
and the double-D symbol are
trademarks of Dolby Laboratories.
Confidential UnpublishedWorks.
Copyrights 1992-1998 Dolby
Laboratories. All rights reserved.
Manufactured under license from DigitalTheeter Systemes, Inc. US Pat.
No.5,451,942 and other world-wide paterts lssued and pending. "DTS"
and "DTS Digital Surround" are trademarks of DigitalTheater Systems,
Inc. Copyrlght 1996 DigitalTheater Systems,Inc.All rights reeerved.
LEFT
AUDIO DIGITAL OUTPUT
PCM
/
STREAM
COAXIAL OPTICAL
RIGHT LEFT
RIGHT
AC IN
VIDEO
S-VIDEO
VIDEO OUTPUT
WARNING: SHOCK HAZARD - DO NOT OPEN
AVIS: RISQUE DE CHOC ELECTRIQUE - NE PAS OUVRIR
DVD PLAYER
MODEL NO. XV-D9000
AC 230V 50Hz 35W
43
7
8 61
52
P
R
/R
P
B
/B
Y/G
COMPONENT/RGB
XVD9000E_p16-20.p65 2/27/01, 2:37 PM18

19
Parts and Their Functions
Remote Control
The buttons on the front panel are all available on the
remote control.
The functions of the buttons are the same.
RM
-
SXVD9000A REMOTE CONTROL
PAGE
RETURN
REPEAT
A
-
B
THEATER
POSITION
TIME
DISPLAY
fs/RATE
DISPLAY
REPEAT
PLAY MODE
AUDIOSUBTITLEANGLE
SET UP
TOP MENU
GROUP(
-
)SELECT GROUP(+)
SLOW(
-
)SLOW(+)
OPEN
/
CLOSE EX K2 DISPLAY
OFF
STANDBY/ON
MENU
ENTER
8765
4321
+1010/0
9
CLEAR
CANCELRESUMEGROUP
CHAP./
INDEX
DVD
5
234
6
7
11
10
12
16
17
18
24
25
26
27 31
30
28
23
22
21
15
14
13
9
1
8
20
29
19
1STANDBY/ON Switch
Switches the power on and off.
2DISPLAY OFF Button
Each press of this button toggles the video output from the
main unit on or off, and switches the display mode. See
page 39.
3EX K2 Button
Switches the Extended K2 Processing function on and off.
See page 63.
4OPEN/CLOSE Button
This opens or closes the disc tray. It can also be used to
turn the power on.
57(Stop) Button
This stops playback of a disc that is playing.
61/¡(Fast Forward/Backward) Buttons
These can be used to play the disc faster than normal.
They can also be used to play in slow motion.
74/¢(Skip) Buttons
Use these to jump to the next/previous scene, or to jump to
the next/previous track.With pressing [GROUP] or [CHAP/
INDEX] you can skip the group or index titles.
88(Pause) Button
This pauses playback of a disc that is playing.
9#(Play) Button
This starts playback of a disc in the disc tray.It can also be
used to turn the power on.
0TOP MENU Button
DVD AUDIO
DVDVIDEO
Press this to display the top menu of DVD Audio discs or
thetitlemenu of DVDVideo discs on thescreen.Seepages
42 and 51.
-ENTER Button
Press this to confirm a menu selection made from the on
screen menus of DVD Audio or DVD Video discs.
=SET UP Button
Press this to display the Initial Settings screen. See page
25.
~MENU Button
DVDVIDEO
Press this to display the menu screen for DVDVideo discs.
See page 51.
!5/∞/3/2(Cursor) Buttons
Press these to select items in the menu screens or on-
screen displays for DVD Audio and DVD Video discs.
XVD9000E_p16-20.p65 2/27/01, 2:37 PM19

20
Parts and Their Functions
@PLAY MODE Button
DVD AUDIO
AUDIO CD
VIDEO CD
Use this button to select the Play mode (Random play,
Program play.)
• You can use this button while a DVD Audio, Audio CD,
or Video CD is stopped.
#ANGLE Button
DVD AUDIO
DVDVIDEO
Use this button to change the angle when playing DVD
Audio/Videodiscs that include multi-angleinformation.See
page 47 and 53.
$SUBTITLE Button
DVD AUDIO
DVDVIDEO
Use this button to switch of subtitles, when playing DVD
Audio/Video discs that include subtitle information.You can
also use it to hide subtitles.See pages 48 and 54.
%fs/RATE DISPLAY Button
Use this button to display the fs (sampling frequency) or
transmissionbit rateofeachchannelforadiscthatisplaying.
See page 39.
^TIME DISPLAY Button
DVD AUDIO
AUDIO CD
VIDEO CD
Use this button to display the playing time of a track or disc.
See page 37.
&REPEAT Button
Use this button to repeat a title, chapter, or repeat all the
tracks or a single track on a disc. See pages 46, 47, and
52.
*AUDIO Button
DVD AUDIO
DVDVIDEO
VIDEO CD
Use this button to change the audio output when playing
DVD Audio discs with audio selection information, or DVD
Video and Video CD discs that include multi-audio
information.See page 54.
(REPEAT A-B Button
Use this button to repeat a specified section of a disc.See
pages 47, 53, and 62.
)THEATER POSITION Button
DVD AUDIO
DVDVIDEO
VIDEO CD
Usethisbuttonto changethebrightnessof the videoimage.
See page 40.
_Number Buttons
Use these buttons to select a group, track, index item, title,
chapter or items in the on-screen menus.
• Using the number buttons
To specify numbers 1 to 10, simply press the
corresponding button.
To specify numbers for 11 up, use the [+10] and [10/0]
buttons.
Example: To specify number 24, press [+10] twice,
then press [4].
To specify number 30, press [+10] twice,
then press [10/0].
+GROUP Button
DVD AUDIO
Use this button to select groups on DVD Audio discs.
Enterthegroup numberwiththe numberkeyswhilepressing
this button.
See pages 38, 43, and 49.
¡CHAP/INDEX Button
DVD AUDIO
DVDVIDEO
AUDIO CD
Use this button to select chapters in DVD Video discs, or
index items on DVD Audio and Audio CD discs. Enter the
number with the number keys while pressing this button.
See pages 44, 52, and 59.
™RESUME Button
Use this button to resume play from a paused or stopped
position.
You can resume play from a position where the 7(Stop)
button was pressed or the position when the power was
switched off. See page 34.
£RETURN Button
DVD AUDIO
VIDEO CD
Use this button to return to the previous menu screen.
If B.S.P.is lit while playing a DVD Audio disc, this returns to
the specified still image on the disc.
Note:
●Even when B.S.P. is lit, some discs do not include a
specified still image.
¢CANCEL Button
Use this button to cancel a track in a program.
∞PAGE +/- Buttons
DVD AUDIO
If B.S.P. is displayed when playing a DVD Audio disc, use
these buttons to browse forward/backward through the still
images.See page 44.
§CLEAR Button
Use this button to clear all the contents of a program.
XVD9000E_p16-20.p65 2/27/01, 2:37 PM20
Other manuals for XV-D9000
1
Table of contents
Other JVC DVD Player manuals

JVC
JVC JY-VS200U - Professional Dv 1-ccd Camcorder User manual

JVC
JVC XL-MV7000GD User manual

JVC
JVC XV-M556TN User manual

JVC
JVC XV-E111SL User manual

JVC
JVC XV-FA900BKJ User manual

JVC
JVC XV-E111SL Quick start guide

JVC
JVC XV-N350B User manual

JVC
JVC XV-N410B User manual

JVC
JVC XV-S302SL Manual

JVC
JVC HR-XVC30US User manual