JVC MX-KC4 User manual

JVC
COMPACT COMPONENT SYSTEM
MX-KC4
Consists of CA-MXKC4 and SP-MXKC4
SP-MXKC4 CA-MXKC4 SP-MXKC4
DIGITAL AUDIO
INSTRUCTIONS
For Customer Use:
Enter below the Model No. and Serial No.
which are located either on the rear, bot-
tom or side of the cabinet. Retain this
information for future reference.
Model No.
Serial No.
LVT1343-001 B
[d]

Warnings, Cautions and Others
CAUTION: TO REDUCE THE RISK OF ELECTRIC SHOCK
DO NOT REMOVE COVER (OR BACK)
NO USER SERVICEABLE PARTS INSIDE
REFER SERVICING TO QUALIFIED SERVICE PERSONNEL.
The lightning flash with arrowhead symbol, within an
equilateral triangle is intended to alert the user to the
presence of uninsulated "dangerous voltage" within the
product's enclosure that may be of sufficient magnitude
to constitute a risk of electric shock to persons.
The exclamation point within an equilateral triangle is
intended to alert the user to the presence of important
operating and maintenance (servicing) instructions in the
literature accompanying the appliance.
WARNING: TO REDUCE THE RISK OF FIRE OR
ELECTRIC SHOCK, DO NOT EXPOSE THIS APPLI-
ANCE TO RAIN OR MOISTURE.
Note to CATV system installer:
This reminder is provided to call the CATV system installer's atten-
tion to section 820-40 of the NEC which provides guidelines for
proper grounding and, in particular, specifies that the cable ground
shall be connected to the grounding system of the building, as close
to the point of cable entry as practical.
For U.S.A.
This equipment has been tested and found to
comply with the limits for a Class B digital
device, pursuant to Part 15 of the FCC Rules.
These limits are designed to provide reasona-
ble protection against harmful interference in a
residential installation. This equipment gener-
ates, uses, and can radiate radio frequency
energy and, if not installed and used in accord-
ance with the instructions, may cause harmful
interference to radio communications. How-
ever, there is no guarantee that interference
will not occur in a particular installation. If this
equipment does cause harmful interference to
radio or television reception, which can be
determined by turning the equipment off and
on, the user is encouraged to try to correct the
interference by one or more of the following
measures:
- Reorient or relocate the receiving
antenna.
-Increase the separation between the
equipment and receiver.
- Connect the equipment into an outlet on
a circuit different from that to which the
receiver is connected.
-Consult the dealer or an experienced
radio/TV technician for help.
G-1

CLASS 1 LASER PRODUCT
DANGER
1. Invisible laser radiation when open and interlock failed or
defeated. Avoid direct exposure to beam.
CAUTION
1. Do net open the top cover. There are no user
serviceable parts inside the unit; leave all servicing to
qualified service personnel.
2. Use of controls, adjustments or performance of proce-
dures other than those specified herein may result in haz-
ardous radiation exposure.
CAUTION
To reduce the risk of electric shocks, fire, etc.:
1. Do not remove screws, covers or cabinets.
2. De not expose this appliance to rain or moisture.
3.To prevent electric shock, match wide blade of plug to
wide slot, fully insert.
CAUTION
1. Do not block the ventilation openings or holes.
(If the ventilation openings or holes are blocked by a
newspaper or cloth, etc., the heat may net be able to get
out.)
2. Do not place any naked flame sources, such as lighted
candles, on the apparatus.
3.When discarding batteries, environmental problems must
be considered and local rules or laws governing the dis-
posal of these batteries must be followed strictly.
4. Do not expose this apparatus to rain, moisture, dripping
or splashing and that no objects filled with liquids, such as
vases, shall be placed on the apparatus.
CAUTION -- (b/I STANDBWON button !
Disconnect the mains plug to shut the power off com-
pletely (all lamps and indications go off). The (b/I
STANDBY/ON button in any position does not disconnect
the mains line.
• When the unit is on standby, the STANDBY lamp lights
red.
• When the unit is turned on, the STANDBY lamp goes
off.
The power can be remote controlled.
Caution: Proper Ventilation
To avoid risk of electric shock and fire, and to prevent damage, locate
the apparatus as follows:
1. Front:
No obstructions and open spacing.
2. Sides/Top/Back:
No obstructions should be placed in the areas shown by the
dimensions below,
3. Bottom:
Place on the level surface, Maintain an adequate air path for
ventilation by placing on a stand with a height of 10cm (315/16 in.)
or more.
Front view 15crn Side view 15crn
G-2

Thank you for purchasing the JVC Compact Component System.
We hope it will be a valued addition to your home, giving you years of enjoyment.
Be sure to read this instruction manual carefully before operating your new stereo system.
In it you will find all the information you need to set up and use the system.
If you have a query that is not answered by the manual, please contact your dealer.
Features
Here are some of the things that make your System both powerful and simple to use.
The controls and operations have been redesigned to make them very easy to use, freeing you to just enjoy the
music.
• With JVC's COMPU PLAY you can turn on the System and automatically start the Radio, Cassette Deck, or
CD Player with a single touch.
The great SEA (Sound Effect Amplifier) effects Rock, Pop and Classics are provided.
[71The RHYTHM AX provides rich sound even at low sound levels.
A 45-station preset capability (30 FM and 15 AM) in addition to auto-seek and manual tuning.
[71CD changer )'unction can operate 3 discs.
• Discs can be changed during play using the Carrousel tray (rotational tray).
• Continuous, random or program play of 3 discs.
Two Decks enabling tape dubbing.
[71Timer fimctions; Daily Tinier, REC (Recording) Timer, and Sleep Tinier.
You can connect various external units, such as an MD recorder.
[71The CD Player can play back a CD-R and CD-RW.
How This Manual Is Organized
• Basic information that is the same for many different functions - e.g. setting the volume - is given in the section "Basic Operations",
and not repeated under each fimction.
• The names of buttons/controls and display messages are written in all capital letters: e.g. FM/AM, "NO DISC".
• If the button names on the Unit and the Remote Control are the same, the description on where the button is used will be omitted.
• System functions are written with an initial capital letter only: e.g. Normal Play.
Use the table of contents to look up specific inl\>rmation you require.
We have enjoyed making this manual for you, and hope it serves you in enjoying the many features built into your System.
IMPORTANT CAUTIONS
1Installation of the System
• Select a place which is level, dry and neither too hot nor too cold. (Between 5%" and 35°C or 41°F and 95°F.)
• Leave sufficient distance between the System and a TV.
• Do not use the System in a place subject to vibrations.
2Power cord
•Do not handle the power cord with wet hands!
•Some power is always consumed as long as the power cord is connected to the wall outlet.
• When unplugging the System from the wall outlet, always pull the plug, not the power cord.
3Malfunctions, etc.
• There are no user serviceable parts inside. In case of system failure, unplug the power cord and consult your dealer.
• Do not insert any metallic object into the System.

Introduction ................................................................................................................... 1
Features .................................................................................................................................................... l
How This Manual Is Organized ............................................................................................................... 1
IMPORTANT CAUTIONS ..................................................................................................................... 1
Table of Contents .......................................................................................................... 2
Getting Started .............................................................................................................. a
Accessories .............................................................................................................................................. 3
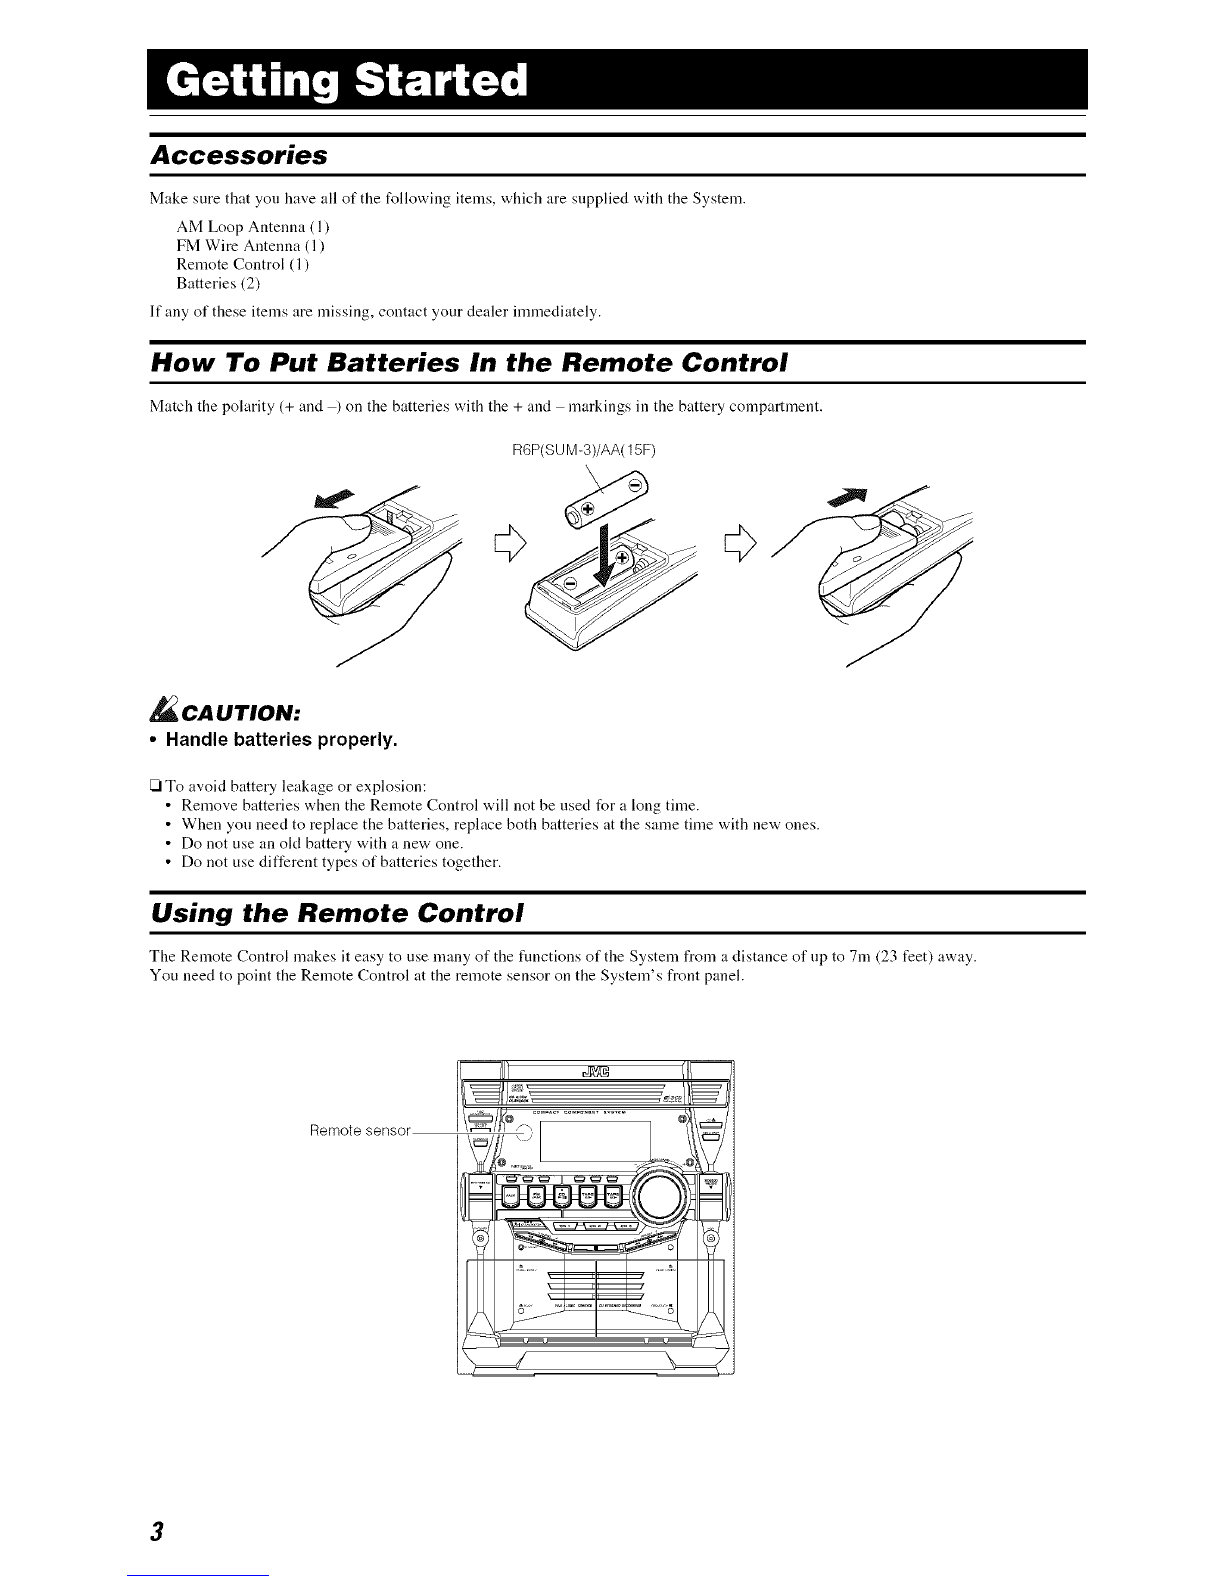
How To Put Batteries In the Remote Control .......................................................................................... 3
Using the Remote Control ....................................................................................................................... 3
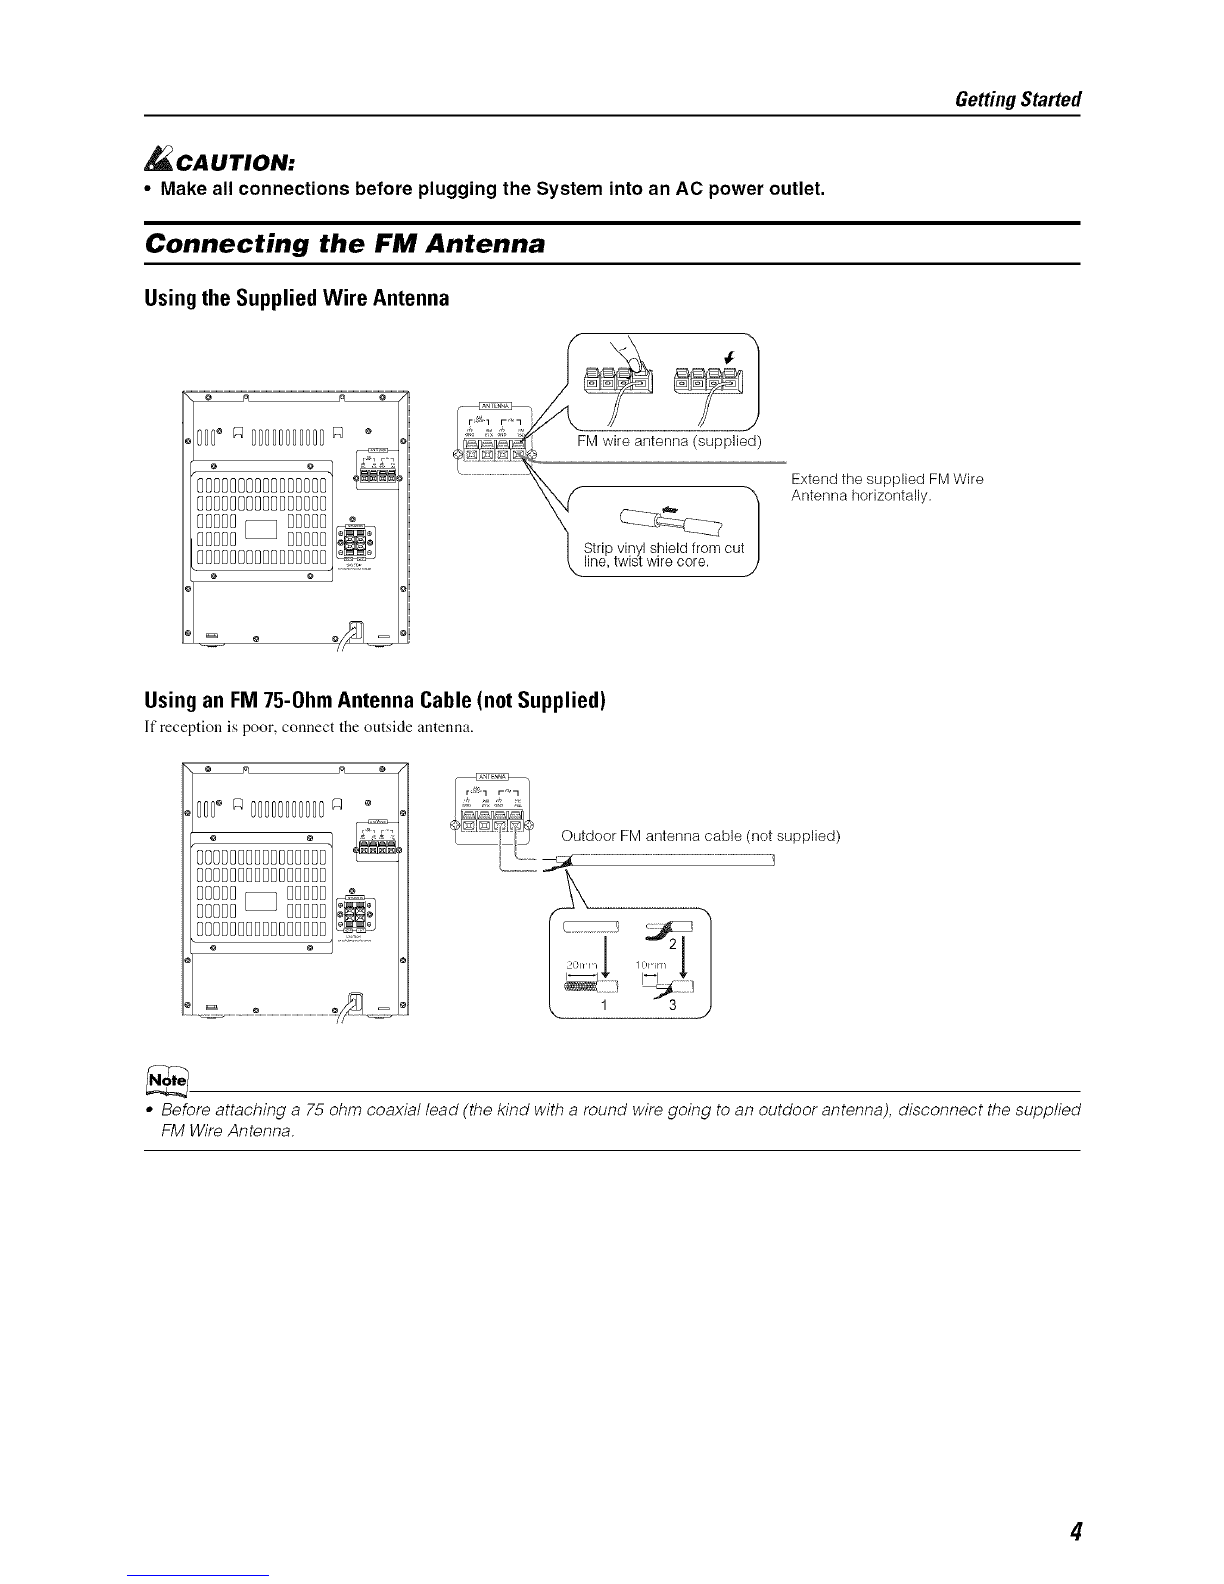
Connecting the FM Antenna .................................................................................................................... 4
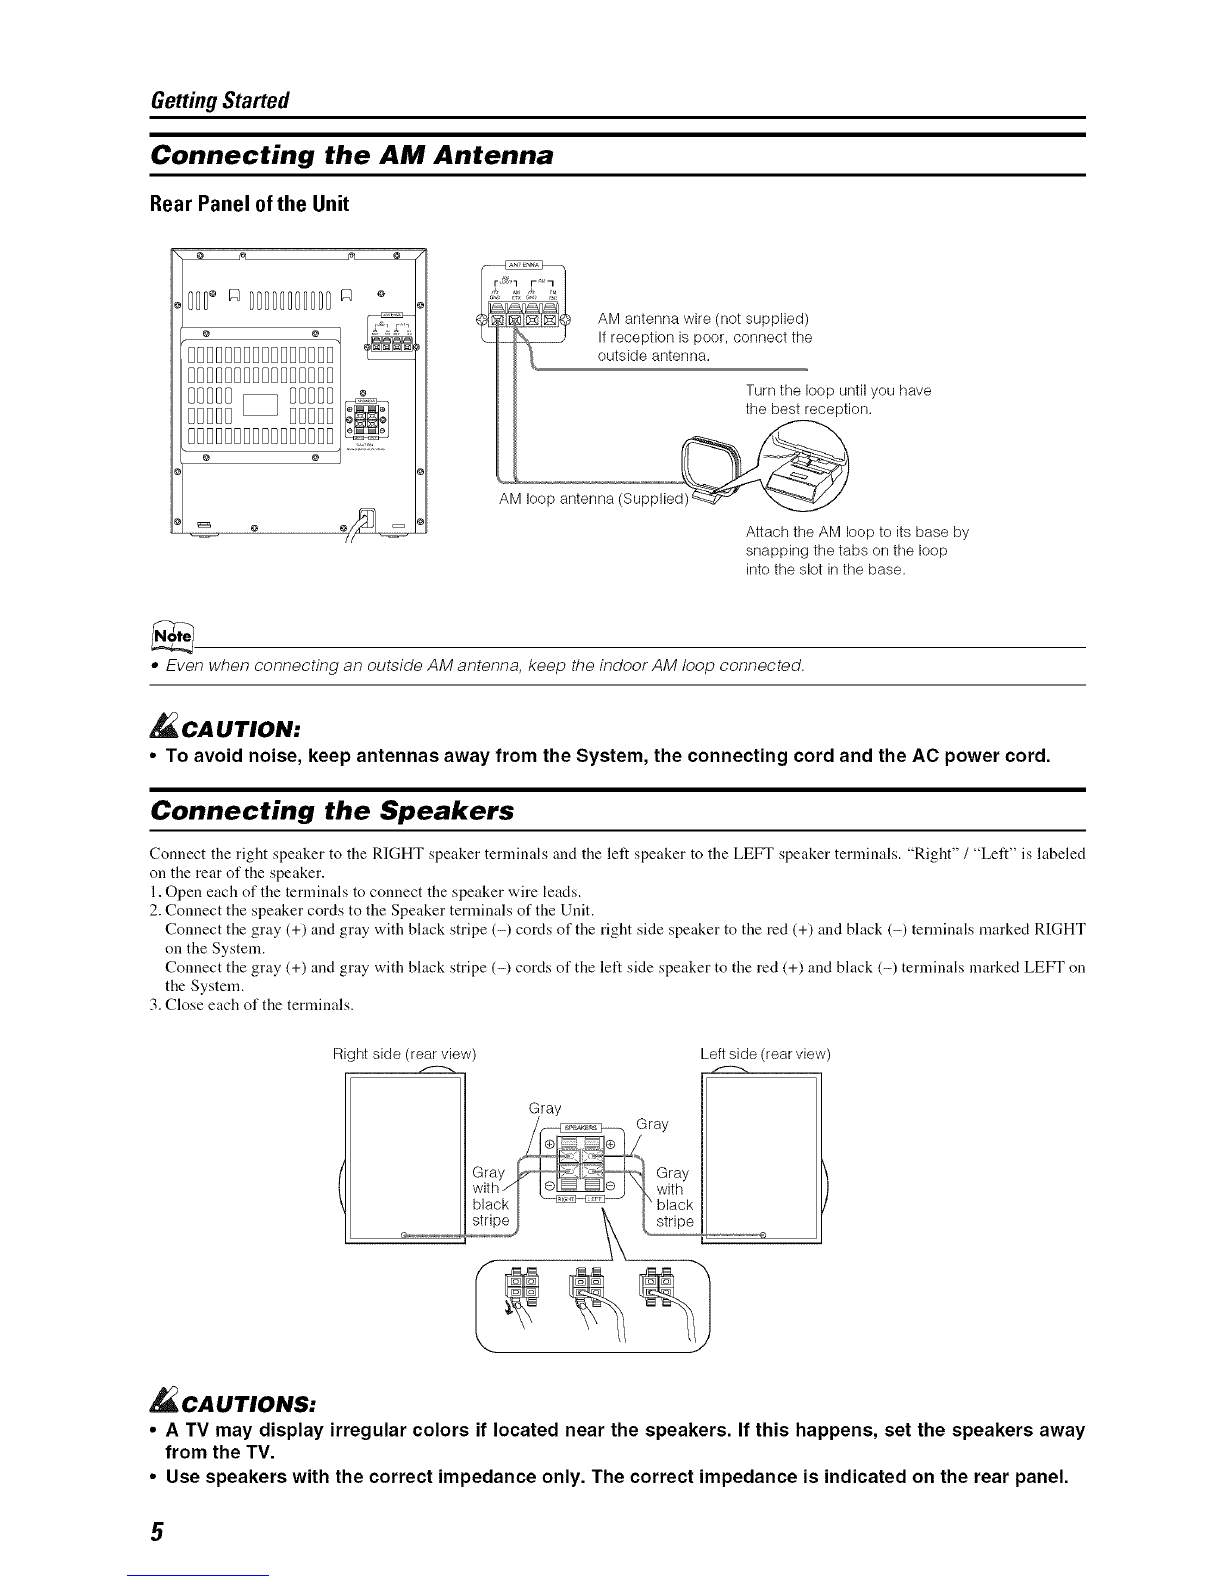
Connecting the AM Antenna ................................................................................................................... 5
Connecting the Speakers ......................................................................................................................... 5
Connecting External Equipment .............................................................................................................. 6
Connecting to the Wall Outlet ................................................................................................................. 6
DEMO Mode ........................................................................................................................................... 6
COMPU Play ........................................................................................................................................... 6
Basic Operations ........................................................................................................... 7
Turning the Power On and Off ................................................................................................................ 7
Adjusting the Volume .............................................................................................................................. 7
Fade-out Muting (FADE MUTING) ....................................................................................................... 8
Enjoying the Powerful Sound (RHYTHM AX) ...................................................................................... 8
Selecting the Sound Mode (SOUND MODE) ......................................................................................... 8
Entering the Number with the Remote Control (Numeric Keys) ............................................................ 8
Using the Tuner ............................................................................................................. 9
Tuning In a Station .................................................................................................................................. 9
Presetting Stations ................................................................................................................................. 10
To Change the FM Reception Mode ..................................................................................................... 10
Using the CD Player .................................................................................................... 11
To Load CDs ......................................................................................................................................... 12
To Unload CDs ...................................................................................................................................... 12
Changing the MP3 Playback Mode ....................................................................................................... 12
Basics of Using the CD Player-Normal Play ......................................................................................... 13
Programming the Playing Order of the Tracks ...................................................................................... 14
Random Play .......................................................................................................................................... 15
Repeating Tracks ................................................................................................................................... 15
Tray Lock Function ............................................................................................................................... 15
Using the Cassette Deck (Listening to a Tape) ........................................................ 16
Playing a Tape ....................................................................................................................................... 16
Using the Cassette Deck (Recording) ...................................................................... 17
Standard Recording ............................................................................................................................... 18
CD Synchro Recording .......................................................................................................................... 18
Tape to Tape Recording (DUBBING) ................................................................................................... 18
Using an External Equipment .................................................................................... 19
Listening to the External Equipment ..................................................................................................... 19
Using the Timers ......................................................................................................... 20
Setting the Clock ................................................................................................................................... 20
Fixing the Clock .................................................................................................................................... 20
Setting the Daily Timer. ........................................................................................................................ 21
Setting the REC (Recording) Timer. ..................................................................................................... 22
Setting the SLEEP Timer. ..................................................................................................................... 24
Timer Priority ........................................................................................................................................ 24
Care And Maintenance ................................................................................................ 25
Troubleshooting .......................................................................................................... 26
Specifications ............................................................................................... Back cover
2

Accessories
Make sure that you have all of the following items, which are supplied with the System.
AM Loop Antenna (1)
FM Wire Antenna (1)
Remote Control (1)
Batteries (2)
If any of these items are missing, contact your dealer immediately.
How To Put Batteries In the Remote Control
Match the polarity (+ and ) on the batteries with the + and markings in the battery compartment.
R6P(S UM-3)/AA(15F)
\
CA UTION:
•Handle batteries properly.
[3 To avoid battery leakage or explosion:
•Remove batteries when the Remote Control will not be used for a long time.
• When you need to replace the batteries, replace both batteries at the same time with new ones.
• Do not use an old battery with a new one.
• Do not use different types of batteries together.
Using the Remote Control
The Remote Control makes it easy to use many of the fnnctions of the System from a distance of up to 7in (23 feet) away.
You need to point the Remote Control at the remote sensor on the System's front panel.
Remote sensor
3

Getting Started
_CAUTION:
• Make all connections before plugging the System into an AC power outlet.
Connecting the FM Antenna
Using the Supplied Wire Antenna
Z
BBBB BBBBBDDDDDDt
BBBBBBBBBBDDDDDDI_I
BBBBB_ DDDDDi_I
BBBBB_ DDDDD/;_;i
FM wire antenna (supplied)
Strip vinyl shield from cut /
,. line. twist wire core. j/
Extend the supplied FM Wire
Antenna horizontally.
Using an FM 75-Ohm Antenna Cable (not Supplied)
If reception is poor, connect the outside antenna.
Outdoor FM antenna cable (not supplied)
•Before attaching a 75 ohm coaxial lead (the kind with a round wire going to an outdoor antenna), disconnect the supplied
FM Wire Antenna.
4

Getting Started
Connecting the AM Antenna
Rear Panel ofthe Unit
AM loop antenna (Supplied
Turnthe loop until you have
the best reception.
Attach the AM loop to its base by
snapping the tabs on the loop
into the slot in the base.
•Even when connecting an outside AM antenna, keep the indoor AM loop connected.
CA UTION:
• To avoid noise, keep antennas away from the System, the connecting cord and the AC power cord.
Connecting the Speakers
Connect the right speaker to the RIGHT speaker terminals and the left speaker to the LEFT speaker terminals. "Right" /"Left" is labeled
on the rear of the speaker.
1. Open each of the terminals to connect the speaker wire leads.
2. Connect the speaker cords to the Speaker terminals of the Unit.
Connect the gray (+) and gray with black stripe (-) cords of the right side speaker to the red (+) and black (-) terminals marked RIGHT
on the System.
Connect the gray (+) and gray with black stripe (-) cords of the left side speaker to the red (+) and black (-) terminals marked LEFT on
the System.
3. Close each of the terminals.
Right side (rear view) Left side (rear view)
Gray
CA UTIONS:
•A TV may display irregular colors if located near the speakers. If this happens, set the speakers away
from the TV.
•Use speakers with the correct impedance only. The correct impedance is indicated on the rear panel.

Getting Started
Connecting External Equipment
Connect a signal cord with stereo mini plugs (not supplied) between the System's AUX jack on the front panel and the audio output jack
or output terminals of the external portable CD, MD player, STB, etc.
You can then listen to the external source through the System.
Signal cord (not supplied) White
Lch
Rch To audio output of
Red external equipment.
Connecting to the Wall Outlet
Plug the AC power cord into tile wall outlet.
Now, your System is at your conamand!
DEMO Mode
When tile System is conuected to tile wall outlet, a DEMO mode displaying some of the system's features automatically starts.
To turn the DEMO display off, press any of the operation buttons. The DEMO display automatically stops.
To turn the DEMO display on, press the DEMO button on the Unit for more than 2 seconds.
CANCEL/DEMO
(For2 seconds)
•While the System is turned on, the DEMO display will automatically starts if no operation is made for 2 minutes. To cancel
this auto DEMO display function, press the CANCEL button on the Unit during DEMO display.
COMPU Play
JVC's COMPU PLAY feature lets you control the most frequently used System functions with a single touch.
With One Touch Operation you can play a CD, a tape, turn on the radio, or listen to an external equipment with a single press of the play
button for that function. One Touch Operation turns the power on for you, then starts the function you have specified. If the System is not
ready (no CD or tape in place), the System still powers on so you can insert a CD or tape.
How One Touch Operation works in each case is explained in the section dealing with that function.
The COMPU PLAY buttons are:
On the Unit
CD I_/11button
FM/AM button
TAPE A I_, TAPE B I_ buttons
AUX button
CDI, CD2 and CD 3 buttons
CD Open/Close --_button
On the Remote Control
CD I_/11button
FM/AM button
TAPE A I_, TAPE B I_ buttons
AUX button
CDI, CD2 and CD 3 buttons
6

Numeric
keys
SOUND
MODE
RHYTHM
AX
ooo 1
cDl cD2 cD3 c D
I .............1
STANDBY/ON d)/I
RHYTHM AX
_/I STANDBY/ON
STANDBY indicatol
VOLUME +,
FADE MUTING Various information
I
!!!!!!!i!!i!!!!!!!!!!iiini
/_ I--I I I I I',;I I-- I I--
I_ LI I_._L__I I I I-" I -'1
[""'N'T.-"_ ....
I I
I
Status bar (Indicates various statuses.)
Display
SOUND MODE
VOLUME
Sound Mode indicator
Level bar
*When the System is in use. the display shows other items as well.
For simplicity, we show here only the items described in this section.
Turning the Power On and Off
Turning the System On
1Press the (_IISTANDBY/ON button.
STANDBYION
©/;
er
The display comes on and "POWER ON" is displayed once.
The STANDBY indicator goes out.
The System comes on ready to continue in the mode it was in
when the power was last turned oft'.
• For example, if the last thing you were doing was listening
to a CD, you are now ready to listen to a CD again. If you
wish, you can change to another source.
• ]f you were listening to the Tuner last, the Tuner comes on
playing the station it was last set to.
Turning the System Off
1Press the _/I STANDBY/ON button again.
,STANDBY/ON
©/;
or
"GOOD BYE" is displayed and the display goes out, except
for the clock display. The STANDBY indicator lights up. (The
display is dinnned.)
• Some power is always consumed even though power is
turned off (called Standby mode).
•To switch offthe System completely, unplug the AC power
cord from the wall outlet. When you unplug the AC power
cord, the clock will be reset to AM 12:00 immediately.
Adjusting the Volume
Turn the VOLUME control on the Unit clockwise to increase the
volume or turn it counterclockwise to decrease the volume.
Press the VOLUME + button on the Remote Control to increase
the volume or press the VOLUME - button on the Remote Control
to decrease the volume.
II nI I I I_II-j I C
It I_1LI_I t t L I _I
You can set the volume level to MIN, 1-31, or MAX.
•When you turn the power off at a volume level of over 19,
the volume level is automatically set to 18 when the power
is turned back on.
CA UTION:
• DO NOT turn on the System and/or start playing
any source without first setting the VOLUME
control to minimum, as a sudden blast of sound
could damage your hearing, speakers and/or
headphones.
Forprivate listening
Connect a pair of headphones to the PHONES jack. No sound
comes out of the speakers.
Be sure to turn clown the volume before connecting or putting on
headphones.

Basic Operations
Entering the Number with the
Remote Control (Numeric Keys)
Fade.out Muting (FADE MUTING)
You can mute the output with one touch operation.
To muting the output, press the FADE MUTING button on the
Remote Control. The output is faded out.
To release muting, press the FADE MUTING button once
again. The output is faded in to the previous level.
• After Fade-out Muting, turning the VOLUME control on the
unit or pressing the VOLUME button on the Remote Control
will increase the vohnne from the previous level.
Enjoying the Powerful Sound
(RHYTHM AX)
Using RHYTHM AX, harder-hitting beats intensify your listening
experience even at low sound levels.
RHYTHM AX also works even when the song has no "beat," such
as classical music, so that you can listen to the rich sound even at
low sound levels.
This function only affects the playback sound, not your recording.
You will use the number keys on the Remote Control to enter num-
bers for presetting stations, recalling the preset stations, or pro-
gramming the playing tracks on CDs.
How to enter the number with the number keys is explained here.
Examples:
•To enter number 5, press 5.
• To enter number 15, press +10, then 5.
• To enter number 20, press +10, then 10.
• To enter number 25, press +10, +10, then 5.
Press down the RHYTHM AX control. .\ _/_
"RHYTHM AX" appears and the display return to ,3_..,0_,2.
the Music Source Selecting mode.
• Each time you press down the control, RHYTHM
AX turns on and off alternately.
• The RHYTHM AX lamp also lights up.
When using the remote control, press RHYTHM AX.
• Each time you press the button, RHYTHM AX turns on and off
alternately.
•Each time you turn the RHYTHM AX on or off, you will hear
a gap in the playback.
Selecting the Sound Mode
(SOUND MODE)
You can select one of 3 SEA (Sound Effect Amplifier) modes.
You can use this effect only for playback.
To get the effect, press the SOUND MODE button until Sound
Mode you want appears on the display.
The "SOUND MODE" indicator lights up in the display.
Each time you press the button, the Sound Mode changes as tUl-
lows:
ROCK _ POP _" CLASSIC _ FLAT _" (back to the beginniug)
To cancel the effect, press the SOUND MODE button until
"FLAT" appears on the display.
The "SOUND MODE" indicator goes off.
ROCK
POP
CLASSIC
FLAT
Boosts low and high frequencies. Good l\)r
acoustic nmsic.
Good for vocal music.
Set for wide and dynamic sound stereo
systems.
No sound effect applies.
8

Numeric --
keys
®®I@
® ® @/o
eD
eDl cD2 eDs _,
©<D
O0
-- FM/AM
iFM MODE
JVC
_E_TEeONmOL
SET
FM/AM
Band display, Frequency display, Preset channel
I
I I
I-_ I',tl I t?1_t L-_
I I I I LI_t._I
FM mode indicators
*When the System is in use, the display shows other items as well.
For simplicity, we show here only the items described in this section.
You can listen to FM and AM stations. Stations can be tuned in
manually, automatically, or from preset memory storage.
[21Before listening to the radio:
• Make sure that both the FM and AM antennas are correctly
connected. (See pages 4 and 5.)
One Touch Radio
Just press the FM/AM button to turn on the System and start play-
ing the station you were last tuned to.
[21You can switch from any other sound source to the radio by
pressing the FM/AM button.
Tuning In a Station
1Press the FM/AM button.
The Band and Frequency you were last tuned to appear on the
display.
(If the last station was selected using the preset number, the
preset number appears first.)
Each time you press the button, the band alternates between
FM and AM.
!.--_I_dI
I I "*" or ..,. i--Ibll
II--II I
on the Unit on theRemote Control
2Select a station using one of the following
methods.
•Manual Tuning
Briefly press the 41_1 or I_D,- button to move from frequency
to frequency until you find the station you want.
OR
•Auto Tuning
If you hold down the -,I1_1or _ button for 1 second or
more and then release it, the frequency changes clown, or up,
automatically until a station is found.
OR
•Preset Tuning (Possible only after presetting sta-
tions)
Preset tuning using the Unit:
Select the preset number you want, using the _ or I_,,-I
button.
Example:
Press the _ button until the preset number "P12" appears
on the display. Then, the display will show the preset
number's band and frequency.
+I II__
,L_a I I _"" I\lJ I--J I J'i_l --I IJ
_,, F'II IU ILIL3."I
Preset tuning using the Remote Control:
Enter the preset number you w:mt to recall using the numer-
ic keys. See "Entering the Number with the Remote Con-
trol" on page 8.
Example:
Press +10, then 2 to recall the preset number 12. Then, the
display will show the preset number's band and frequency.

•tn AM broadcast, reception sensitivity will be changed by
turning the AM loop antenna. Turn the AM loop antenna
for best reception.
Presetting Stations
You can preset up to 30 FM stations :rodup to 15 AM stations.
°Preset numbers may have been set to factory test fre-
quencies prior to shipmenL This is not a malfunction. You
can preset the stations you want into memory by following
one of the presetting methods below.
• During presetting stations, ffno button operation is made
for 5 seconds, the display returns to the band/frequency
display, tn this case, repeat steps from the beginning.
f
L................ I FM=30, AM=15
Whenchanging the Band
Using the Unit
1Select a band by pressing the FM/AM button.
2Press the _1_1 or I_1_ button to tune in a sta-
tion.
3Press the SET button.
"SET" will blink for 5 seconds.
4While "SET" is blinking, press the I_1_1or IIH_I
button to select the preset number.
!_),-I: Increases the preset number by I.
I-,(41: Decreases the preset number by 1.
5Press the SET button.
"STORED" appears and, after 2 seconds, tile display returns to
the band/frequency display.
6Repeat above steps 2 to 5 for each station
you want to store in memory with a preset
number.
To change the preset stations, repeat tile same steps as
above.
Using the Tuner
_CAUTION:
•Even if the System is unplugged or if the power
failure occurs, the preset stations will be stored
for afew days. However, in case the preset sta-
tions are erased, you will need to preset the sta-
tions again.
To Change the FM Reception
Mode
When you are tuned in to an FM stereo broadcast, the "ST (Ster-
eo)" indicator lights up and yon can hear stereo effects.
]f an FM stereo broadcast is hard to receive or noisy, you can select
Monaural mode. Reception improves, but you lose stereo effect.
Press the FM MODE button on the Remote Control so
that the "MONO" indicator lights up on the display.
FM I_'_0 D E
ST *" _7_'* MONO
TO restore the stereo effect, press the FM MODE button on
the Remote Control so that the "MONO" indicator goes off.
Selecting other station will also cancel the FM Mono mode and re-
store the stereo effect.
• tn step 4, you can select the preset number using the nu-
meric keys on the Remote Control. See "Entering the
Number with the Remote Control" on page 8.
10

Numeric --
keys
CD1-CD3
REPEAT --
PROGRAM
/RANDOM _UND V_UME
.IVC
REMOTECONTROL
--CDI,>/II
CD I,>/II
SET
CANCEL
/
REPEAT
PROGRAM
RANDOM
pen/
Close _A
I
IIIII
CD1-CD3
Track number, Playing time,
Program number, etc. Program indicator
MP3 indicator s / _ Disc indicators
E3 --'U" 'E -T-3_ N
Random Repeat
indicator indicator
*When the System is in use, the display shows other items as well.
For simplicity, we show here only the items described in this section.
This unit has been designed to playback the following CDs:
• Audio CD
• CD-R (CD-Recordable)
• CD-RW (CD-ReWritable)
• MP3 disc (MP3 files recorded on a CD-R or CD-RWy:
When playing a CD-R or CD-RW
• User-edited CD-Rs (CD-Recordable) and CD-RWs (CD-ReWri-
table) can be played back when they are already "finalized."
• Before playing back CD-Rs or CD-RWs, read their instructions
or cautions carefully.
• Some CD-Rs or CD-RWs may not be played back on this unit
because of their disc characteristics, damage or stain on them,
or if the player's lens is dirty.
•CD-RWs may require a longer readout time since the reflect-
ance of CD-RWs is lower than l\_r regular CDs.
*For MP3 discs
•This unit manages files and folders on MP3 discs as "tracks"
and "albums."
• Playback order of the MP3 files (tracks) recorded on a disc are
determined by the writing (or encoding) application; therefore,
playback order may be different from the one you have
intended while recording the files and the folders.
• This unit shows the file (track) names and ID3v2 tags (only
"Title", "Artist" and "Album") on the display after starts play;
however, there is a limitation on available characters and some
file names and ID3 tags are not shown correctly.
More about MP3 discs
oMP3 discs (either CD-R or CD-RW) require a longer read-
out time. (It varies due to the complexity of the recording
configuration.)
•When making an MP3 disc, select tSO 9660 Level 1 or
Level 2 as the disc format.
• This unit does not support multisession recording.
• This unit can play MP3 files only with the following file ex-
tensions- ".MP3," ".Mp3," ".raP3," and ".mp3."
°Non-MP3 files are ignored, lfnon-MP3 files are recorded
together with MP3 files, this unit will take a longer time to
scan the disc. tt may also cause the unit to malfunction.
• Some MP3 discs may not be played back because of
their disc characteristics or recorded conditions.
11

About Disc Indicator:
Disc Rotation
indicator
The Disc indicator consists of the following three kinds of indica-
tors:
Disc Number indicator: Lights all tile time.
Selected Disc indicator:Lights tUr the currently selected
disc number.
Disc Rotation indicator:Runs when the selected CD is
playing or paused. This indicator
goes out if a CD is not loaded for
the selected disc number.
OneTouch Play
Tile power comes on, and operations are done automatically.
[71By pressing the CD _-/11 button, the System will come on, and if
a CD is loaded for the disc nmnber that was lastly selected, it
will start playing from the first track.
[71By pressing the CDI -CD3 button, the System will come on, and
if a CD is already loaded for the selected disc number, it will
start play from the first track.
To Load CDs
1/ Press the CD Open/Close Abutton on the
Unit to open the tray.
2Place one or two CDs, with its label side up,
onto the tray.
Be sure that the CD is securely seated inside the recess on the
disc tray.
With the label side up
3Press the DISC SKIP button on the Unit and
place the next CD.
When you press tile button, the tray turns for tile next CD.
4Press the CD Open/Close A. button on the
Unit.
The tray is closed.
Using the CD Player
[71When you use an 8 cm (3") CD, place it on the inner circle of the
tray.
[71You can load CDs while listening to the other source or while
listening to the CD being played back.
[71When power is turned oft"with the tray opened, the tray is auto-
matically closed.
[71If the CD cannot be read correctly (because it is scratched, for
example), " NO DISC" appears on the display.
To Unload CDs
Take out the CD as shown below.
1While the CD Player is stopped, press the CD
Open/Close Abutton on the Unit to open the
tray.
2Remove the CD, then press the DISC SKIP
button on the Unit.
Tile tray turns for tile next CD.
3Repeat step 2 to remove all the CDs.
4Press the CD Open/Close Abutton on the
Unit to close the tray.
[71You can remove CDs while listening to the other source.
Tips:
•Removing/changing the CDs during playback
While playing back a CD (e.g. CDI), you can remove or change
the other CDs (e.g. CD2 and CD3) by pressing the CD Open/Close
--_ button. After removing or changing, press the same button to
close the tray.
Changing the MP3 Playback Mode
When playing an MP3 disc, you can choose the playback mode of
the MP3 disc as l\qlows:
TRACK mode:
The unit recognizes only tracks (files). You can play an MP3 disc
like an Audio CD.
GROUP mode:
The unit recognizes tracks (files) and albums (folders) on an MP3
disc. You can play an MP3 disc according to the way how they are
grouped.
Onthe remote control ONLY:
Press MP3 bet_re or during playing an MP3 disc.
GROUP indicator appears when the MP3
playback mode is the GROUP mode.
I
._ I-- I-'11--I I I I--I
OF;uUF-
FM MODE
•Each time you press the button, the MP3 playback mode
changes between "GROUP" and "TRACK" alternately.
12

Using the CD Player
Basics of Using the CD Player.
Normal Play
To Play CDs
1Load CDs.
2Press one of the Disc button (CD1-CD3) you
want to play.
The selected disc nmnber (e.g. "CD DISC 1") appears on the
display.
The first track of the selected CD begins playing. When the
first CD finishes playing, the next and the third CDs are con-
tinuously played back.
When the last CD has finished playing, the CD Player auto-
matically stops.
[71You can start to play the currently selected disc by simply press-
ing the CD I_/1! button.
While playing the CD, the following will appear on the display.
For Audio CD
,. ]
..... •., _'-3_
I"-71 I 1-711-71.I-'71-- '_"-" '
Limb llJ__lILl'ILlL-I'" 17; CD is
I --I " payng
Track number Elapsed playing time
For MP3 disc
TRACK mode
1-711-71 I 1-711-71.77t IL_.':"
I III ILl I I ILIILI'ILI I !al
I
Track number
•After the display above is shown, if the tracks include ID3
tags, the display will scroll in the order of file name title, art-
ist, and album, then returns to the original display.
GROUP mode
77t rTI I 1"711"71.77t 1_7" "
ILl ILl I ILI ILl' IL_I i"" i_
I I
I
Track number of the current group
• After the display above is shown, if the tracks include ID3
tags, the display will scroll in the order of file name, title, art-
ist, and album, then returns to the original display.
When the Disc button (CDI-CD3) is pressed with the tray opened,
the tray is closed and the selected CD automatically begins play-
ing.
To stop playing the CD, press the •button. The following in-
formation for the CD is displayed.
For Audio CD
__ 1"71-ti I
I!,zj.,
III____ ill ILJ',--I--lI ial
Totaltracknumber Totalplayingtime
For MP3 disc
TRACK mode
I--IF I-- T I--I .....
Total track number
GROUP mode
q
..... _ i';_/
i F'7t__ t.-3L-7 L_)::_
/
Total track number
Total group number
To pause, press the CD )-/11 button. The playing time indication
blinks on the display.
To cancel pause, press the CD I_/II button again. Play continues
from the point where it was paused.
Tips:
•Playing back the CD using the DISC SKIP button
You can also play the CDs using the DISC SKIP button. During
playback, each time you press the button, the next CD is automat-
ically played back. If the next disc tray is empty, the disc tray is
automatically skipped.
To Select a Track
During playback (using the 141_1 or I_l_l button):
Briefly press the 141_Ior I_I_Ibutton to select the track you want to
play, except for MP3 group mode.
By pressing the button, you can skip to the next track or skip back
to the previous track.
• The selected track starts playing.
• Press the _ button once to skip to the beginning of the next
track.
• Press the I-._1 button to skip to the beginning of the current
track. Press twice quickly to skip to the beginning of the previ-
ous track.
In Stop mode (using the 141_1or _1 button):
By briefly pressing the I-,_I or _ button, the CD Player operates
in the same way as during playback, except for MP3 group mode.
Using the numeric keys on the Remote Control:
Using the numeric keys, you can directly select the track on the
currently selected CD.
• The selected track starts playing.
For example, press +10, then 5 to play hack the track number 15.
See "Entering the Number with the Remote Control" on page 8.
In MP3 group mode:
The selected track of the current group starts playing.
Tips:
•For MP3 discs
When the selected track starts playing, information of that track
scrolls on the display, in the order of file name, title, artist, and al-
bun].
In the STOP mode, the file name (TRACK mode), the group name
and the file name (GROUP mode) scroll on the display.
To Select a Group(For MP3 GROUPmode only)
During playback (using the 14141 or I=_l_l button):
Briefly press the 1414or _ button to select the group you want
to play.
• The first track of the selected group starts playing.
In Stop mode (using the I<1<1 or I_1_1 button):
Briefly press the 1414or _ button to select the group you want
to play. The group number, the group name and the file name scroll
on the display.
Search Play
Holding down the t_llowing buttons, during playback, will fast
forward/backwards the CD so you can quickly find a particular
passage in the track you are listening to.
• 41_1 or I_ button on the Unit
• 141_ or _P,,-I button on the Remote Control
13

Programming the Playing Order
of the Tracks
You can program the playing order of the tracks on all the CDs. Note
that you can only make a program when the CD Player is stopped.
[3 You can program up to 32 tracks in any desired order including
the same tracks.
For MP3 discs
•tfyou try to select a MP3 disc that has once been read or
played, "MP3 DISC" appears on the display and it can not
be programmed.
•MP3 disc that has not ever been read can be selected in
a program mode. But when playback starts, "MP3 DISC"
appears on the display, the program is deleted and
switched to a next program.
To Make a Program
1Load CDs.
2In Stop mode, set the CD Player in Program
Play mode,
On the Unit
Press the PROGRAM button to light the "PRGM" indicator on the
display.
At the same time, "PROGRAM" appears on the display.
On the Remote Control
Press tire PROGRAM/RANDOM button until "PROGRAM" ap-
pears on the display.
The "PRGM" indicator also lights up on the display.
Each time you press the button, the display changes as follows:
PROGRAM -_ RANDOM _" Normal display (Normal Play) -_
(back to the beginning)
• If a program is already made, the last step of the program will
be displayed.
3Press one of the Disc button (CDI-CD3) to
select the CD you want to program.
The display will clmnge to the Program Entry ctisplay.
CD1 k I I I I I/
or /-- ILl I _- ....
/tIIJ J\
Disc number Track number
4Select the track you want to program.
Using the Unit
While the display is blinking, press tire I_1_1or I_1_ button on tire
Unit to select the track, then press the SET button within 5 seconds.
The program order number will be assigned from P-I.
\ 1t I ! !/
+ _.
- l-- i='
/ti t t
Disc number Track number
SET
i r' i-Tt
I -- ILl I_._1 ILl
Program order number
Using the CD Player
Using the Remote Control
Press the numeric keys to directly enter the track number. Then,
the program order number will be assigned from P-I.
• To delete the current program step, press the CANCEL button
on the Unit.
5Repeat steps 3 and 4 to program other tracks
on the same CD or the other CD.
6To play the program, Press the CD I_/11 but-
ton.
For details, see "To Play the Program You Have Made" men-
tioned below.
To confirm the programmed contents, while the CD player
is stopped, select Progrmn mode by pressing the PROGRAM but-
ton and press the I-<14 or _ button on the Remote Control.
To delete all the tracks in the program, while the CD Player
is stopped, press the •button or open the tray by pressing the CD
Open/Close A button.
To Modify the Program, while the CD Player is stopped and the
program mode is selected, press the CANCEL button, the last track
in the program is deleted. To acid new tracks to the end of the pro-
grain, repeat above steps 3 and 4.
• tfyou try to program a track number that does not exists
on the CD, your entry will be ignored.
°If you try to program the 33rd track, "FULL" appears on
the display.
To Play the Program You Have Made
Press the CD I_/11 button.
The System plays the tracks in the order you have programmed
them.
• To use Repeat Play for Program Play, press the REPEAT but-
ton to select "REPEAT" before starting playback. For details,
see "Repeating Tracks" on page 15.
[3 You can skip to a particular program track by pressing the I-<1_
or I,,'I_1button during Program Play.
[3 To stop playing, press the • button once. If you press the • but-
ton, while the CD Player is stopped, the program is deleted.
To Exit and Re-enter Program Play
Tire program you have made is stored in memory. So, you can exit
Program Play temporarily or re-enter Program Play unless you de-
lete the program.
To exit the program mode once, press the • button to stop
playing. The "PROG" indicator goes off and the Program mode
will be canceled. The program is stored in the memory.
To re-enter Program Play mode, press the PROGRAM or
PROGRAM/RANDOM button until the "PRGM" indicator lights
up again.
• When the power is tumed off (standby mode), the pro-
grammed tracks are deleted.
°Tray will not open during the program playback.
14

Using the CD Player
Random Play
The tracks of the selected CD will play in no special order when
you use this mode.
1In Stop mode, set the CD Player in Random
Play mode.
On the Unit
Press the RANDOM button to light the "RNDM" and "l DISC"
indicator.
At the same time, "RANDOM" appears on the display.
On the Remote Control
Press tile PROGRAM/RANDOM bntton until tile "RANDOM"
appears on the display.
The "RNDM" and "1 DISC" indicator also lights up on the display.
Each time you press the button, the display changes as follows:
PROGRAM _" RANDOM _" Normal display (Normal Play) _"
(back to the beginning)
2Press the CD I_/11 button.
The tracks on all the CDs are played in random order.
To stop playing, press the • button. The Random mode is can-
celed and the "RNDM" and "1 DISC" indicator goes off.
To skip a track during playback, press the I_1_1 button to
jump to the next track in the random sequence.
Repeating Tracks
You can repeat all tracks or individual track, as many times as you
like.
Press the REPEAT button.
The Repeat indicator changes with each press of the button, as fol-
lows:
REPEAT ALL-" REPEAT 1DISC-" REPEAT 1_" Blank display
(back to the beginning)
REPEAT ALL: In Normal Play mode, repeats all the tracks on
all the CDs.
REPEAT1DISC:Repeats all tracks on one CD. (Selectable in
Normal Play only)
REPEAT 1: Repeats one track.
In Program Play mode, the Repeat indicator changes with each
press of the REPEAT button, as follows:
REPEAT _'* Blank display
It repeats all the tracks in the program.
To stop playing, press the • button. Changing the source to the
other (e.g. Tuner) will also stop playing. The Repeat mode is can-
celed and the Repeat indicator goes off.
Tray Lock Function
In order to safely keep the CD in the CD Player, the tray can be
electronically locked.
When the electronic lock is on, the tray cannot be opened even if
the CD Open/Close A button on the Unit is pressed.
Locking the Tray
1[ Turn on the System and enter CD mode.
2While pressing down the •button, press the
CD Open/Close Abutton on the Unit.
"LOCKED" appears on tile display.
CD__.
I_ I_l I_ 17_ )kl
• If you try to open the tray by pressing the CD Open/Close
button, "LOCKED" appears on the display to let you know that
the tray has been locked.
Unlocking the Tray
Repeat abo,_e steps 1 and 2.
"UNLOCKED" appears on the display.
+_ I Ib iI I--II-- I_ I-- TI
I_11 qI_ I_1 I_ I% I_ _1
Now, you can use the tray normally.
•Even after the System is unplugged, the tray lock condi-
tion will be retained for a few days. To unlock the tray after
powering up, you need to perform the unlocking opera-
tion.
15

® ® ®IQ
® ®
5oo
JVC
REMOTECONTROL
44
A PUSH OPEN
(Deck A)
-- TAPE B P,-
TAPE A
Tnnr
t I II L
Deck indicators
n
ii
_: Tape indicator
*When the System is in use, the disp/ay shows other items as we//.
For simplicity, we show here only the items described in this section.
TAPE A
TAPE B
• PUSH OPEN
(Deck B)
The Cassette Deck allows you to play, record, and dub audio tapes.
[21Listening to type I tape is suitable for this Cassette Deck.
The use of tapes longer than 120minutes (including
120 minute tapes) is not recommended, since char-
acteristic deterioration may occur and these tapes
easily jam in the pinch-rollers and the capstans.
OneTouch Play
By pressing the TAPE A I_ or TAPE B I_- button, the System will
come on, and ifa tape is in the deck, it will start to play. If no tape
is loaded, "NO TAPE" appears on the display, the System will
come on and wait for you to insert a tape, or select another function.
Playing a Tape
You can use either Deck A or Deck B at a time for playback.
IPress the A. PUSH OPEN part for the deck
you want to use.
2When the cassette holder opens, put a cas-
sette in, with the exposed part of the tape
down, toward the base of the Unit.
The tape will travel from tile left to right.
Tape travelling direction
•If the cassette holder does not open, turn the System off,
then back on and press the _A PUSH OPEN part again.
3Close the cassette holder gently.
When both Deck A and Deck B contain a tape, the last deck to
have a tape inserted is selected.
4Press the TAPE A I_ or TAPE B I_ button.
The selected Deck appears (for example, TAPE-A) and tile
Deck indicator "A" or "B" lights up on the display.
The Tape indicator (1_) blinks on the display and the tape is
played back.
The Cassette Deck automatically stops when one side of the
tape has finished playing.
To stop playing, press the • button.
To remove the tape, stop the tape, and press the --_ PUSH
OPEN part to open the Cassette Hokter.
To Fast-Wind a Tape
During playback or in Stop mode, press the _ (FF) button on the
Unit to fast-wind the tape onto the right side of the cassette without
playing. (You can also use the I,,,-t_1button on the Remote Control.)
During playback or in Stop mode, press the << (REW) button on
the Unit to fast-wind the tape onto the left side of the cassette with-
out playing. (You can also use the _ button on the Remote Con-
trol.)
During fast-winding the tape, the Tape indicator (1_) goes out.
During fast-winding, the status bar illumination at the bottom of
the display moves counterclockwise.
During rewinding, it moves clockwise.
• The Cassette Deck automatically stops when one side of the
tape has finished playing.
[21During fast-winding the tape, you can change the tape travelling
direction by pressing the _ (FF) or << (REW) button.
16

TAPE A
TAPE B
col c02 ca c_,
nEWESTP_A.a_M
0_
II
RED
CD RED START --
A PUSH OPEN
(Deck A) "_
TNNr il
I III LI'_1
Deck indicators RED indicator
_: Tape indicator
*When the System is in use. the display shows other items as well.
For simplicity, we show here only the items described in this section.
PROGRAM
TAPE B
TAPE A
A PUSH OPEN
(Deck B)
Recording onto a cassette from any of the sound sources is simple.
Just place a tape in Deck B, have the source ready, make one or
two settings, and you're ready to record. For each source, the pro-
cedure is a little bit different so we explain each separately. But
first, here are a few things to make your recordings better.
Things To Know Before You Start Recording
It should be noted that it may be unlawful to re-record
pre-recorded tapes, records, or discs without the con-
sent of the owner of copyright in the sound or video
recording, broadcast or cable program and in any lit-
erary, dramatic, musical, or artistic content embodied
therein.
The recording level, which is the volume at which the new tape
is being made, is automatically set correctly, so it is not affected
by the VOLUME Control on the System. Also, it is not affected
by adjusting the sound effects. Thus, during recording, you can
adjust the sound yon are actually listening to without affecting
the recording level.
Two small tabs on the back of the cassette tape, one for side A
and one for side B, can be removed to prevent accidental erasnre
or recording.
Adhesive tape
To record on a cassette with the tabs removed, you must cover
the holes with adhesive tape first.
Type I tape can be used for recording.
"At the startand end of cassette tapes, there is leader tape
which cannot be recorded onto. Thus, when recording
CDs, radio broadcasts, etc., wind on the leader tape first
to ensure getting the beginning of the recording.
_CAUTION:
•If a recording you make has excessive noise or
static, the Unit may have been too close to a TV
which was on during the recording. Either turn
off the TV or increase the distance between the
TV and the Unit.
17
Other manuals for MX-KC4
2
This manual suits for next models
2
Table of contents
Other JVC Speakers System manuals

JVC
JVC TH-LB2-B User manual

JVC
JVC FS-X5 Administrator Guide

JVC
JVC TH-WL707H User manual

JVC
JVC Dolby Atmos TH-D689B User manual

JVC
JVC CA-MXJ530R User manual

JVC
JVC SX-LC33 User manual

JVC
JVC HX-C6 - Twin GIGA Tube Audio System User manual

JVC
JVC MX-KA6 Series User manual

JVC
JVC MX-DK1 User manual

JVC
JVC DX-T9 User manual