JVCKENWOOD TK-90 User manual

HF Transceiver
TK-90
ALE FEATURE OPERATION MANUAL © B62-2001-10
09 08 07 06 05 04 03 02 01
CONTENTS
INTRODUCTION.................................................................................................................................................................. 1
FEATURES.......................................................................................................................................................................... 1
BASIC OPERATIONS......................................................................................................................................................... 1
ALE OPERATION MODE.................................................................................................................................................... 2
INDIVIDUAL CALLS............................................................................................................................................................ 2
NET CALLS......................................................................................................................................................................... 3
ALL CALLS......................................................................................................................................................................... 4
TERMINATING A LINK....................................................................................................................................................... 4
DIRECT CALLS................................................................................................................................................................... 4
GPS CALLS......................................................................................................................................................................... 4
EMERGENCY CALLS......................................................................................................................................................... 5
AMD MESSAGES................................................................................................................................................................ 5
SOUNDING.......................................................................................................................................................................... 6
EXCHANGING THE LQA SCORE...................................................................................................................................... 6
ALE MONITOR.................................................................................................................................................................... 7
ALE SCRAMBLER.............................................................................................................................................................. 7
CLOCK ................................................................................................................................................................................ 7
APPENDIX: KEY FUNCTIONS.......................................................................................................................................... 8
INTRODUCTION
When using an HF transceiver, the operator must continuously
adjust the frequency and/or change the operating channel in
order to create an optimal communications environment. Now,
the ALE (Automatic Link Establishment) feature performs these
operations automatically.
FEATURES
With the KPE-2 unit attached to the transceiver, you can both
transmit and receive the following:
• Individual calls
• Net calls
• All calls
• AMD messages
• GPS data * (requires a GPS receiver)
• Emergency calls *
• Soundings
* ALE is in accordance to the MIL-STD-188/141A protocol, thus the ALE
features of this transceiver are compatible with other brand transceivers.
However, the GPS data and emergency call features are KENWOOD
specific features, and are therefor incompatible with transceivers other
than KENWOOD transceivers.
BASIC OPERATIONS
Switching the Transceiver Power ON/OFF
Press and hold the switch to turn the transceiver ON.
• A beep sounds and the power-on message momentarily
appears. After approximately 1 second, “WAIT...” appears on
the display. When a network is found, the transceiver enters
standby mode.
Press and hold the switch again to switch the transceiver OFF.
Adjusting the Transceiver Volume
Press the VOL key to increase the volume and the VOL
key to decrease the volume.
• Additionally, you can press and hold the VOL / keys to
continuously change the volume level, rather than adjusting it
by only 1 step at a time.
Switching the ALE Function ON/OFF
The call type may have been preset by your dealer.
1Access the transceiver Menu (refer to the transceiver
instruction manual) and select Menu number 10, “CALL
TYP”.
2Press the <C and D> keys to change the setting between
“OFF” and “ALE”.
3Press the key to save the selection and exit Menu mode.

2
Menu Configuration
Menus 11 and 12 appear only if the Call Type (Menu 10) is set
to ALE.
Menu
Number Menu
Name Full Function Name
1 SQL LVL Squelch Level adjustment
2 CLARI Clarifier
3 NB Noise Blanker
4 BRIGHT LCD Brightness
5 DISP Display: channel name or frequency
6 VOX VOX ON/OFF
7 VOX DLY VOX Delay Time
8 VOX GAIN VOX Gain
9 ANTI VOX Anti-VOX Gain
10 CALL TYP Call Type
11 ALE MONI ALE Monitor
12 TIME DISP Time Display
ALE Call Menu
ALE Call menu allows you to start various ALE calls.
1Press the key programmed as ALE to enter the ALE Call
menu.
2Press the CH / keys to select your desired ALE Call
menu item.
ALE Call Menu
Item Description
Reference
Page
CALL 1,2 Individual calls, Network calls,
AMD message calls, and All
calls 2 ~ 4
GPS CALL 1,2,3 Manually transmit the GPS data 4
SOUNDING 1,4 Manually transmit a Sounding 6
TERMINATION 5Terminate an established link 4
BI-DIRECT 1,4 Exchange the LQA score 6
3Press the key to exit the ALE Call menu.
1These menus cannot be selected when a link has been made.
2These menus cannot be selected when ALE operation mode is set to
Channel mode and Net number 1 has not been selected.
3 The COM Port must be set by your dealer to GPS Data Input, to select
GPS CALL.
4These menus cannot be selected when ALE operation mode is set to
Channel mode.
5TERMINATION can be selected only when a link has been made.
ALE OPERATION MODE
There are 3 modes of operation when using ALE: Net mode,
Channel mode, and VFO mode.
Net mode automatically scans the ALE channels configured as
the scan list of the chosen network. You cannot transmit on a
channel in this mode unless a link has been established. You
can select an ALE network by pressing the CH / keys.
(If the automatically selected link does not provide a good
connection, you can manually select a channel or frequency
using Channel mode or VFO mode.)
Channel mode does not scan the ALE channels. You can
manually select an ALE channel by pressing the CH /
keys, and you can transmit on the selected channel without first
establishing a link. Additionally, the TK-90 can transmit and
receive each type of ALE call using this mode.
VFO mode does not scan the ALE channels. You can manually
select a transmit frequency by pressing the CH / keys,
and you can transmit on the selected frequency without first
establishing a link. However, the TK-90 cannot transmit or
receive ALE calls (excluding emergency calls) using this mode.
To select an operation mode:
• Press the key programmed as ALE Operation Mode to
toggle between Net mode and Channel mode.
• Press and hold the key programmed as ALE Operation
Mode for 1 second to toggle between VFO mode and either
Net mode or Channel mode.
• When a link is established, it is possible to change from Net
mode to VFO mode.
INDIVIDUAL CALLS
An Individual call is a call to a single member.
Receiving an Individual Call
When the TK-90 receives an Individual call, the icon flashes.
When a link is established, the ALE Link Tone sounds and the
caller ALE address appears on the display.
• If an AMD message is received, the icon flashes.
• If the caller address has more than 12 characters, the
address will automatically scroll across the display.
• While the link is engaged, the Transmit/Busy/Call indicator
flashes orange.
• While the link is engaged, the audio mute is canceled.
• While the link is engaged, you can transmit by pressing the
PTT switch.
Making an Individual Call
1Press the key programmed as ALE to enter the ALE Call
menu.
• You can press the key at any time to exit the ALE Call
menu.
2Press the CH / keys to select “CALL”.
3Press the D> key to move to the called station selection
mode.
• The last called address appears on the display.
4Press the CH / keys to select the address of the station
you want to call.

3
5Optional: If you want to send an AMD message, press the A
key to enter the TX Message Selection mode, then press the
CH / keys to select your desired message.
• List numbers m1 to m10 are pre-programmed messages.
• You can enter your own message {page 5} by pressing
and holding the Akey for 1 second.
• If a message has more than 12 characters, the message
will automatically scroll across the display. You can also
manually scroll the message by using the <C and D>
keys.
• To return to the address selection mode without sending a
message, press the Akey.
6Optional: If you want to select a specific channel, rather than
being assigned one automatically by the LQA, press the D>
key, then press the CH / keys to select your desired
channel.
• The LQA score appears on the right side of the display.
Press the Bkey to toggle the score display ON and OFF.
• The LQA score value is approximated, based on the
continuous changing of the radio signals.
7Press the ■key or the PTT switch to start the call and/or
send the message.
• The icon flashes and the called ALE address appears
on the display.
• When sending an AMD message, the ALE address and
the icon flash.
• When a link is established, the ALE Link Tone sounds, the
Transmit/Busy/Call indicator flashes orange, and
“<< LINKED>>” appears on the display.
• When a link cannot be established, “<< NO REPLY >>”
appears on the display.
NET CALLS
A Net call is a call to all members within the defined network.
Receiving a Net Call
When the TK-90 receives a Net call, the icon flashes.
While receiving the signal, “NET CALL” appears on the display.
When a link is established, the ALE Link Tone sounds, the caller
address appears on the display, and “NET” appears on the
sub-display.
• If an AMD message is received, the icon flashes.
• If the caller address has more than 12 characters, the
address will automatically scroll across the display.
• While the link is engaged, the Transmit/Busy/Call indicator
flashes orange.
• While the link is engaged, the audio mute is canceled.
• While the link is engaged, you can transmit by pressing the
PTT switch.
Making a Net Call
1Press the key programmed as ALE to enter the ALE Call
menu.
• You can press the key at any time to exit the ALE Call
menu.
2Press the CH / keys to select “CALL”.
3Press the D> key to move to the called station selection
mode.
• The last called address appears on the display.
4Press the CH / keys to select “NET CALL”.
5Optional: If you want to send an AMD message, press the A
key to enter the TX Message Selection mode, then press the
CH / keys to select your desired message.
• List numbers m1 to m10 are pre-programmed messages.
• You can enter your own message {page 5} by pressing
and holding the Akey for 1 second.
• If a message has more than 12 characters, the message
will automatically scroll across the display. You can also
manually scroll the message by using the <C and D>
keys.
• To return to the address selection mode without sending a
message, press the Akey.
6Optional: If you want to select a specific channel, rather than
being assigned one automatically by the LQA, press the D>
key, then press the CH / keys to select your desired
channel.
• The LQA score appears on the right side of the display.
Press the Bkey to toggle the score display ON and OFF.
• The LQA score value is approximated, based on the
continuous changing of the radio signals.
7Press the ■key or the PTT switch to start the call and/or
send the message.
• The icon and “NET CALL” flash.
• When sending an AMD message, “NET CALL” and the
icon flash.
• When a link is established, the ALE Link Tone sounds, the
Transmit/Busy/Call indicator flashes orange, and
“<< LINKED>>” appears on the display.
• When a link cannot be established, “<< NO REPLY >>”
appears on the display.

4
ALL CALLS
An All call is a call to all stations using ALE, that are on the same
frequency.
Receiving an All Call
When the TK-90 receives an All call, the icon flashes.
When a link is established, the ALE Link Tone sounds, the caller
address appears on the display, and “ALL” appears on the
sub-display.
• If the caller address has more than 12 characters, the
address will automatically scroll across the display.
• While the link is engaged, the Transmit/Busy/Call indicator
flashes orange.
• While the link is engaged, the audio mute is canceled.
• While the link is engaged, you can transmit by pressing the
PTT switch.
Making an All Call
1Press the key programmed as ALE to enter the ALE Call
menu.
• You can press the key at any time to exit the ALE Call
menu.
2Press the CH / keys to select “CALL”.
3Press the D> key to move to the called station selection
mode.
• The last called address appears on the display.
4Press the CH / keys to select “ALL CALL”.
5Optional: If you want to send an AMD message, press the A
key to enter the TX Message Selection mode, then press the
CH / keys to select your desired message.
• List numbers m1 to m10 are pre-programmed messages.
• You can enter your own message {page 5} by pressing
and holding the Akey for 1 second.
• If a message has more than 12 characters, the message
will automatically scroll across the display. You can also
manually scroll the message by using the <C and D>
keys.
• To return to the address selection mode without sending a
message, press the Akey.
6Press the ■key or the PTT switch to start the call and/or
send the message.
• The icon and “ALL CALL” flash.
• When a link is established, the ALE Link Tone sounds, the
Transmit/Busy/Call indicator flashes orange, and
“<< LINKED>>” appears on the display.
TERMINATING A LINK
There are 2 methods in which a link can be terminated:
automatically and manually.
When a link is terminated automatically, the transceiver waits for
a preset time of non-activity (not pressing the PTT switch), and
then will automatically terminate the link.
To manually terminate a link:
1During a link, press the key programmed as ALE to enter the
ALE Call menu.
• “TERMINATION” appears on the display.
2Press the ■key or the PTT switch to terminate the link.
DIRECT CALLS
Up to 4 keys can be programmed with the Direct Call feature,
allowing you to easily make individual calls to those stations
which you make frequent calls. To make the call, press the key
programmed as ALE Direct Call 1 ~ 4.
• The icon and the called ALE address flash.
• When a link is established, the ALE Link Tone sounds, the
Transmit/Busy/Call indicator flashes orange, and
“<< LINKED>>” appears on the display.
GPS CALLS
To transmit GPS data, you must first have the GPS unit
(NMEA-0183) installed in your transceiver.
Auto GPS Transmission
Auto GPS transmission automatically transmits your GPS
location data at a pre-programmed time interval. When the
programmed GPS report interval time passes, the TK-90
automatically transmits the GPS data.
• The icon and “<< SEND DATA >>” flash while
transmitting the GPS data.
• To cancel the transmission, press the key during the data
transmission.
Additionally, when a request is received, the transceiver will
automatically transmit the GPS data.
Manual GPS Transmission
Manual GPS transmission can be performed without waiting for
the programmed GPS report interval time.
1Press the key programmed as ALE to enter the ALE Call
menu.
• You can press the key at any time to exit the ALE Call
menu.
2Press the CH / keys to select “GPS CALL”.
3Press the ■key or the PTT switch to begin the transmission.
• The icon and “<< SEND DATA >>” flash while
transmitting the GPS data.
• To cancel the transmission, press the key during the
data transmission.

5
Receiving GPS Data
1When an ALE signal is received, the icon appears on the
display and flashes.
2When the GPS data reception is complete, the display
returns to normal and the GPS data is output through the
transceiver COM port.
• Your dealer must first set the transceiver COM port to
either PC command or GPS Data Output.
EMERGENCY CALLS
1Press and hold the key programmed as Emergency for the
pre-programmed time duration to enter Emergency mode.
• Depending on the delay time programmed into your
transceiver, the length of time you must hold the
Emergency key will vary.
• When the transceiver enters Emergency mode, the
transceiver will change to the Emergency channel and
begin transmitting based on how the transceiver is set
up by your dealer. Transmit periods are also set by your
dealer.
2To exit Emergency mode, press and hold the Emergency
key again, for the pre-programmed time duration.
• If the Emergency mode completes the preset number
of cycles, Emergency mode will automatically end and
the transceiver will return to the channel that was in use
before Emergency mode was entered.
AMD MESSAGES
Editing the Transmit AMD Message
1Proceed to step 5 of making a call (Individual, Net, or All call),
then press the Akey to enter TX Message Selection mode.
2Press the CH / keys to select a message from m1 to
m10.
• List numbers m1 to m10 are pre-programmed messages.
3Press and hold the Akey for 1 second to enter Message Edit
mode (m0).
• A cursor will appear on the display.
• Text messages can have a maximum of 90 characters. If
a message has more than 12 characters, the message
will automatically scroll across the display. You can also
manually scroll the message by using the <C and D>
keys.
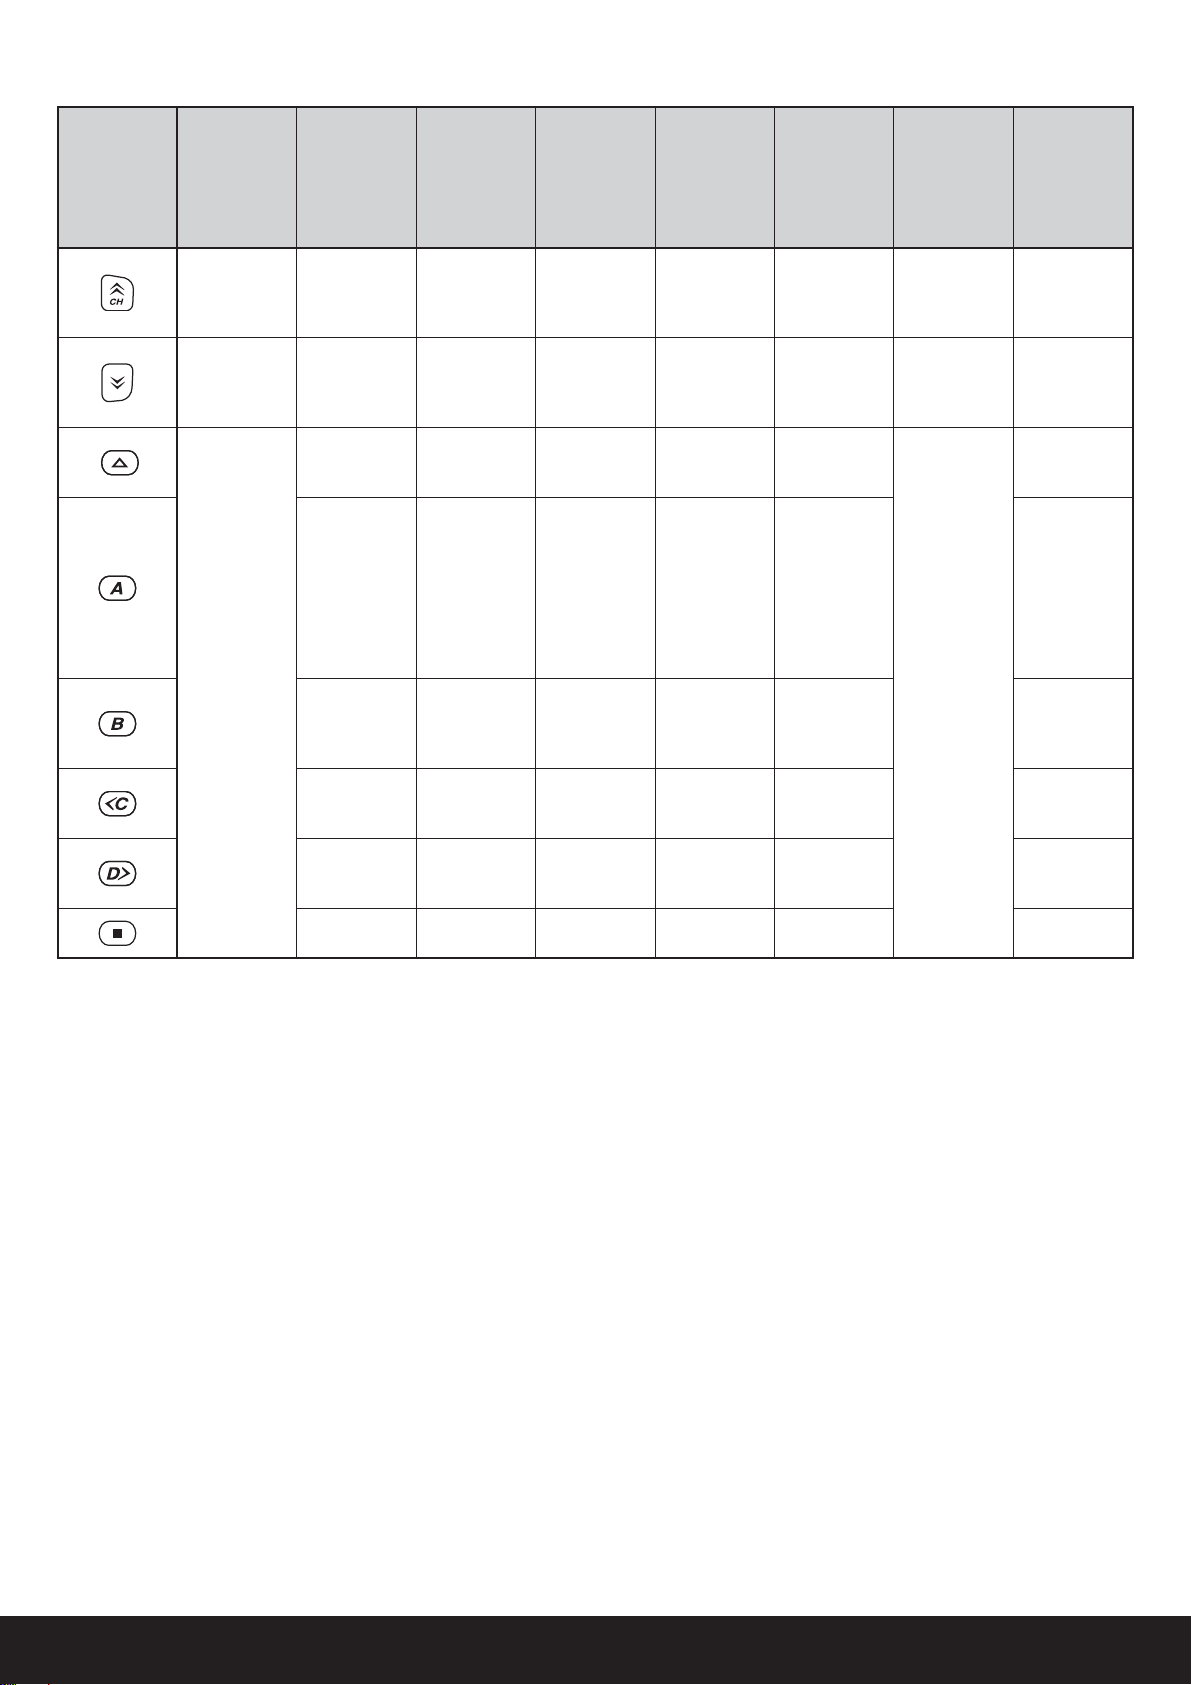
• Use the table below to edit the text message:
Transceiver Key Operation
Front panel
Complete editing the message
APress to delete the selected character
Press and hold to delete all characters
<C Shift the cursor to the left
D> Shift the cursor to the right
■Complete editing the message and
begin the call
CH
/Scroll through and select a character
Transceiver Key Operation
Microphone
1Select a character: 1
2Select a character: A / B / C / 2
3Select a character: D / E / F / 3
4Select a character: G / H / I / 4
5Select a character: J / K / L / 5
6Select a character: M / N / O / 6
7Select a character: P / Q / R / S / 7
8Select a character: T / U / V / 8
9Select a character: W / X / Y / Z / 9
0Select a character: Space / 0 / / #
Shift the cursor to the right
#Press to delete the selected character
Press and hold to delete all characters
3Continue making your call as normal.
Reading a Received AMD Message
Received AMD messages are stored in the transceiver stack
memory. A maximum number of 10 messages can be stored in
the stack.
1When a new message is received, the icon flashes.
• If all messages in the stack have been read, the icon
remains on the display but does not flash.
2Press and hold the key programmed as ALE for 1 second to
view the last received message in the stack.
3Press the CH / keys to scroll through all the messages
in the stack.
• If a message has more than 12 characters, the message
will automatically scroll across the display. You can also
manually scroll the message by using the <C and D>
keys.
• To view the time stamp of the message, press the Bkey.
Press the Bkey again to return to the message.
4Press the key to exit.
Deleting a Received AMD Message
1Press and hold the key programmed as ALE for 1 second to
view the last received message in the stack.
2Press the CH / keys to select the message you want to
delete.
3Press the Akey to select the message for deletion.
• A confirmation message appears on the display.
• To cancel the operation, press the key.
4Press the ■key to delete the message.
• If there are no message remaining in the stack after
deleting a message, “EMPTY” momentarily appears on
the display.

6
Deleting All Received AMD Messages
1Press and hold the key programmed as ALE for 1 second to
view the last received message in the stack.
2Press and hold the Akey for 1 second to select all messages
in the stack for deletion.
• A confirmation message appears on the display.
• To cancel the operation, press the key.
3Press the ■key to clear the stack memory.
• “EMPTY” momentarily appears on the display.
SOUNDING
Sounding cannot be used in ALE Channel mode; it can be used
only in ALE Net mode.
Auto Sounding
Auto Sounding automatically transmits a sounding signal
on each scan channel at regular intervals. Intervals are
programmed for 30, 60, 90, or 120 minutes by your dealer.
• When the programmed interval passes, the TK-90
automatically transmits the sound signal.
• The icon and “SOUNDING” flash while transmitting the
Sounding.
• When Sounding begins, the TK-90 performs the sound
transmission on each channel configured in the network’s
scan list. After transmission is completed on one channel,
the transceiver moves to the next channel in the scan
sequence after a fixed time period.
• To cancel the Sounding, press the key during the sound
transmission.
Manual Sounding
Manual Sounding can be performed without waiting for the
programmed Auto Sounding time interval.
1Press the key programmed as ALE to enter the ALE Call
menu.
• You can press the key at any time to exit the ALE Call
menu.
2Press the CH / keys to select “SOUNDING”.
3Press the ■key to begin the Sounding.
• The icon and “SOUNDING” flash while transmitting
the Sounding.
• When Sounding begins, the TK-90 performs the sound
transmission on each channel configured in the network’s
scan list. After transmission is completed on one
channel, the transceiver moves to the next channel in the
scan sequence after a fixed time period.
• To cancel the Sounding, press the key during the
sound transmission.
Receiving a Sounding Signal
1When an ALE signal is received, the icon appears on the
display and flashes.
2When a Sounding signal is received, the caller’s ALE address
appears on the display.
3When the Sounding is complete, the display returns to
normal.
EXCHANGING THE LQA SCORE
1Press the key programmed as ALE to enter the ALE Call
menu.
• You can press the key at any time to exit the ALE Call
menu.
2Press the CH / keys to select “BI-DIRECT”.
3Press the D> key to move to the called station selection
mode.
• The last called address appears on the display.
4Press the CH / keys to select the address of the station
you want to call or to make a Net call.
5Optional: If you want to send an AMD message, press the A
key to enter the TX Message Selection mode, then press the
CH / keys to select your desired message.
• List numbers m1 to m10 are pre-programmed messages.
• You can enter your own message {page 5} by pressing
and holding the Akey for 1 second.
• If a message has more than 12 characters, the message
will automatically scroll across the display. You can also
manually scroll the message by using the <C and D>
keys.
• To return to the address selection mode without sending a
message, press the Akey.
6Optional: If you want to select a specific channel, rather than
being assigned one automatically by the LQA, press the D>
key, then press the CH / keys to select your desired
channel.
• The LQA score appears on the right side of the display.
Press the Bkey to toggle the score display ON and OFF.
• The LQA score value is approximated, based on the
continuous changing of the radio signals.
7Press the ■key or the PTT switch to start the LQA score
exchange and/or send the message.
• The icon flashes and the called ALE address appears
on the display.
• When sending an AMD message, the icon flashes.
• When making a Net call, the LQA exchange is performed
on all channels in the scan list.
• When no connection is made, the LQA will not refresh.

7
ALE MONITOR
If the ALE Monitor is OFF, the speaker is muted while no link
is present. If the ALE Monitor is ON, you will hear background
noise while no link is established. To turn the ALE Monitor ON
or OFF:
1Press the key programmed as Menu.
• You can press the key at any time to exit the Menu
mode.
2Press the CH / keys to select “ALE MONI”.
3Press the <C and D> keys to select “ON” or “OFF”.
4Press the key to save the setting and exit.
ALE SCRAMBLER
The transceiver Scrambler function can also be used in ALE
mode.
To toggle the Scrambler function ON and OFF, press the key
programmed as Scrambler.
• The icon appears on the display when the Scrambler is
ON.
• Ensure that all units are using the same scrambler code
when using the Scrambler function. If a unit is using a
different code than the one you have set on your transceiver,
they will be unable to hear your calls. Refer to the TK-90
instruction manual for details on how to set up a Scrambler
code.
CLOCK
Time Display
1You can display the time on your screen by accessing the
transceiver Menu and selecting Menu number 12, “TIME
DISP”.
• Depending on your transceiver settings, the time will be
displayed as either 12 or 24 hour time.
2Press the key to exit.
Time Setup
You can set the time and date on the ALE board.
1With the transceiver power OFF, press and hold the <C key
while turning the transceiver power ON.
• “YEAR” appears on the display.
2Press the CH / keys to select the current year (from
2000 to 2099).
3Press the D> key to save the setting and move to the month
setup.
• “MONTH” appears on the display.
4Press the CH / keys to select the current month (from
01 to 12).
5Press the D> key to save the setting and move to the day
setup.
• “DAY” appears on the display.
6Press the CH / keys to select the current day (from 01
to 31).
7Press the D> key to save the setting and move to the hour
setup.
• “HOUR” appears on the display.
8Press the CH / keys to select the current hour (from 00
to 23).
9Press the D> key to save the setting and move to the minute
setup.
• “MINUTE” appears on the display.
10 Press the CH / keys to select the current minute (from
00 to 59).
11 Press the ■key to save the setting.
12 Turn the transceiver power OFF and then back ON to return
to normal operation.

8
APPENDIX: KEY FUNCTIONS
Transceiver
Key
Standby
(Net
Address
Display)
“CALL >”
Display
(Call Menu)
Address
Selection
Display
AMD
Message
Selection
Display
Message
Compilation
Display
Call Channel
Selection
Display Link Display
“TERMINATE”
Display
(Call Menu)
Change the
Net Change the
Call menu
item Change the
address
Select the
programmed
AMD
message
Select a
character Select a Call
channel —— ——
Change the
Net Change the
Call menu
item Change the
address
Select the
programmed
AMD
message
Select a
character Select a Call
channel —— ——
Press
the key
programmed
as ALE to
enter the
ALE Call
menu
Cancel the
Call menu Cancel the
message
compilation Cancel the
Call menu
Press
the key
programmed
as ALE
to begin
the link
termination
Cancel
the link
termination
Move to
message
selection
Move to
message
selection
Press to
return to
address
selection
Hold to
begin
composing a
message
Press to
delete a
character
Hold to
delete all
characters
Move to
message
selection ——
—— —— —— —— Toggle the
LQA score
display on
and off ——
—— Return to
the Call
menu
Scroll the
message to
the left
Move the
cursor to the
left
Return to
address
selection ——
Move to
address
selection
Move to
call channel
selection
Scroll the
message to
the right
Move the
cursor to the
right —— ——
Begin the
call Begin the
call Begin the
call Begin the
call Begin the
call Terminate
the link
Table of contents
Other JVCKENWOOD Transceiver manuals