Jya Fjord Pro User manual

Jya Fjord Pro Air Purifier User Manual
Руководство пользователя к фильтру очистителя
воздуха Jya Fjord Pro
Instrucciones del Purificador de Aire de Jya Fiordo Pro
Manuale dell’Utente per il Purificatore dell’Aria Jya Fiordo Pro
Jya Fjord Pro Luftreiniger Bedienungsanleitung
Mode d’emploi du Purificateur d'air Jya Fjord Pro
Instrukcja obsługi oczyszczacza powietrza Jya Fjord Pro
1-12
13-24
25-36
37-48
49-60
61-72
73-84

01 02
WARNING
· When the power cord is damaged, it must be replaced with a
genuine power cord purchased from the manufacturer or after-
sales service department.
· This appliance can be used by children aged from 8 years and
above and persons with reduced physical, sensory or mental
capabilities or lack of experience and knowledge if they have
been given supervision or instruction concerning use of the
appliance in a safe way and understand the hazards involved.
· Children shall not play with the appliance. Cleaning and user
maintenance shall not be made by children without supervision.
· Make sure the purifier is turned off and unplugged before
performing the maintenance.
Precautions
· Turn o and unplug the purifier before moving it.
· The purifier cannot turn on when the fan grille and the filter compartment cover are not installed properly.
· Maintain a distance of at least 20 cm between the air inlets and walls or other objects.
· The purifier must be placed on firm and flat floor.
· Prior to cleaning or other maintenance, the appliance must be disconnected from the supply mains.
· Frequently remove dust, hair, and other particles from the outer mesh screen of the filter, so as to reduce the
chance of bacteria growth.
· Remove dust, hair, and particles from the purifier's air inlets to prevent a reduction of air intake.
· Cover the air outlet to prevent dust, hair, and other particles from falling in when the purifier is left unused for a
long time.
To avoid fire, electric shocks, or other damage, use the power cord and electrical outlet as instructed below:
· Do not excessively pull, twist or bend the power cord, as this may expose or break the cord's core.
· The power cord must be plugged into a suitable electrical outlet.
· Use the power cord that is provided with the purifier, do not use any third party power cords.
· Always unplug the purifier before carrying out maintenance to or moving the air purifier.
· Immediately stop using the purifier when it makes unusual sounds, gives off bad odors, overheats, or its fan
rotates irregularly.
· Do not stick your fingers or foreign objects into the protective parts, movable parts, air inlets, or air outlets.
· Keep objects such as hairs or fabrics away from the purifier to avoid blocking the air inlets or air outlets.
· Do not sit on, lean on or tilt the purifier.
· When using in conjunction with gas-fueled appliances (such as gas stoves, gas heaters), please ventilate
suciently to avoid carbon monoxide poisoning.
· Do not pour liquids, nor throw powders or other small substances into the purifier's air outlet.
Do not use the purifier in the following circumstances, as they may result in electric shocks, fire, or other damage:
· Near open flames, such as candles, incense burners, stoves, fireplaces, cigarettes, firecrackers, lighters,
multipurpose torches, candle lighters, or fire pans.
· Near appliances that generate high temperatures, such as electric heaters, fan heaters, electric foot warmers,
electric stoves, electric irons.
· Make sure no inflammable objects get into the purifier.
· In unstable locations where the purifier can easily fall over.
· In environments that are extremely hot, humid, or damp, such as bathrooms.

03 04
Fan Grille
Air Inlets
Air Quality Indicator
Filter
Compartment
Cover
Release Button
Laser Particle Sensor
Gas Sensor
Power Switch Power Port
Touch Display
Screen
Note: Illustrations of product, accessories, and
user interface in the user manual are for reference
purposes only. Actual product and functions may
vary due to product enhancements.
Front View Rear View
Product Overview
Air Quality Indicator
The indicator will display green, yellow, orange or red
according the worst value of PM2.5、TVOC、PM10.
Read this manual carefully before use, and retain it for future reference.
Green
Yellow
Orange
Red
Excellent
Good
Moderate
Unhealthy
For optimal performance, make sure the distances
between purifier's air inlets and other objects such
as walls meet the requirements as suggested below.
Connect the power cord to the power
port at the bottom of the purifier and
then plug it into an electrical outlet.
Note: For optimal air purification, keep doors and windows
closed during use.
Placing
the purifier
Connecting
to an
electrical
outlet.
Installation
>20cm
>20cm
Remove the filter packaging
before turning on the purifier.

05 06
After connecting the power
cord, turn on the power switch
on the back of the device.
Automatic: Automatically switch modes according to
the indoor air quality.
Sleep: Ultra-low noise for a comfortable sleeping
environment.
Favorite: Set and save the coverage area and the
purifying efficiency in the app.
After the power switch is turned on, the starting
screen will be displayed and the main unit will enter
standby mode. Touch the icon to turn on the device.
How to Use
Note: After the main unit has been in standby mode for 1 minute,
the temperature and humidity will be shown on the display. You
can touch the display to return to the starting screen.
Power On/o
Power On/o Interface Temperature &
Humidity Interface
PM10 Interface PM2.5 Interface
PM2.5 Value
Operation
Modes
Wi-Fi Indicator
POLLEN and
TVOC indicator
Tip: The main screen interface can be switched by swipe left and right
Note: PM10 refers to coarse particles have an aerodynamic diameter ranging from 2.5 to 10μm (PM10–PM2.5).
Examples of coarse particles include dust, pollen, spores, and fly ash.
How to Use
Excellent 1-20 μg/m3
Good 21-35 μg/m3
Moderate 35-55 μg/m3
Unhealthy >55 μg/m3
Green
Yellow
Orange
Red
Excellent
Good
Moderate
Unhealthy

07 08
Press on main screen
Tap the mode icon to cycle through 3
operation modes: Automatic、Sleep、
Favorite.
Swipe down to enter the Power
On/O interface
Tip: After the screen is o, click to wake up the screen.
Swipe left
and right
Operation Modes Interface
Settings Interface
1
3
2
4
Touch it to switch
between the three
dierent air outlet angles
Click to adjust 4 levels of
screen brightness.
Displaying filter
remaining life
Air outlet angle
1
Resetting Wi-Fi
Perform Wi-Fi resetting、
disable and enable.
3
Screen brightness
adjustment
2
Filter lifespan
4
Swipe left and right to switch each setting interface,
click on the corresponding interface to set.
Filter instructions
Filter installation notification
The purifier does not detect the filter or the
filter installed is not genuine one.
Filter status notification
Filter replacement notification
When the filter life is less than 10%, the
screen will prompt to replace the filter after
power-on, and after 5 seconds, it will jump
to the interface of filter replacement.
Note: The filter may produce odors when it absorbs excessive
harmful gases. It is recommended to store the filter in a place
with good lighting and ventilation to improve the activity
of the activated carbon and restore its particle adsorption
capacity. Please replace the filter when its recommended
service life is due.
Filter and Filter Replcement Instructions
How to buy a new filter
Scan the QR code or visit smartmi official store
https://www.smartmiglobal.com/filters/jya-fjord-
filter-pro for more information.
Filter
It is recommended
to replace the filter
every 6–12 months.
Resetting Wi-Fi
Resetting Wi-Fi
When unable to connect the purifier to the app, swipe right
on the main screen to enter the Wi-Fi setting interface,
click "Reset" to confirm. When the Wi-Fi icon on the
screen flashes, the reset is successful.
Enabling/Disabling Wi-Fi
Swipe right on the main screen to enter the Wi-Fi
setting interface, click "Disable" / "Enable", and then
click "Confirm" to disable or enable Wi-Fi function.
How to Use How to Use

1009
Warning: Make sure to turn o the air purifier and disconnect power before replacing the filter.
Opening the filter compartment
Press and hold the release
buttons to open the filter
compartment cover.
Notes:
Replace the filter in time according to the filter life notification.
Please purchase genuine and compatible filters from ocial channels
01 Removing the old filter
Pull the strap and remove the filter.
02 Installing the new filter
Remove the packaging bag.
Place the new filter, and close
the filter compartment cover.
03
Filter replacement
* If you need more detailed instruction, please visit:
https://www.smartmiglobal.com/pages/helpcenter
Intelligent Control with Apple HomeKit
Open the Home app on your iPhone/iPad.
Tap "Add Accessory" and then scan the HomeKit setup code on the
product sticker (two stickers on the device unit, see illustration), or enter the
eight-digit setup code above the HomeKit Setup Code. The device will then
be linked to the Apple Home app.
The device can be linked to
Smartmi Link after linking to
HomeKit. Go to the Personal
Info page on Smartmi Link.
Tap "HomeKit Info" and then
link the HomeKit device as
prompted.
Devices linked to Smartmi Link
can also be added to HomeKit.
Go to the Device Control page
on Smartmi Link. Tap "Add
to HomeKit" in "Settings" and
then link the device to HomeKit
as prompted.
Note:
Please ensure that your Wi-Fi network is both
available and has Internet access. Place your
phone as close to this product as possible.
(This product does not support 5G networks).
To control this accessory which is compatible
with HomeKit, it is recommended to use iOS
13.0 or a later version.
Please keep the HomeKit setup code, as you
will need to scan the code to link the device to
HomeKit after a factory reset.
iPad and iPhone are trademarks of Apple Inc.,
registered in the U.S. and other countries.
Controlling this HomeKit-enabled accessory
automatically and away from home requires a
HomePod, Apple TV, or iPad set up as a home
hub. It is recommended that you update to the
latest software and operating system.
1
2
HomeKit Setup Code
Linking the Device to
Smartmi Link
This product has been linked to the
Smartmi Link and can be controlled
using the app.
Scan the QR code or search for
"Smartmi Link" on the app store to
download and install the app. Go
to the app's homepage, click "+" in
the middle of the page, then add the
device as prompted.
Note:
Please ensure that your Wi-Fi network is both
available and has Internet access. Place your
phone as close to this product as possible. (This
product does not support 5G networks)
This product will be listed as "Jya Fjord Pro Air
Purifier " in the app's device listing.

11 12
Cleaning the filter compartment
Cleaning the laser particle sensor
Use a non-sharp tool to open the cover
of the laser particle sensor, then use an
air blow gun or hair dryer to clean the
filter on the cover and the sensor, as
illustrated in the figure.
Warning: Make sure the purifier is turned o and
unplugged before performing the following operations.
Note: Do not use hot air.
Note: To avoid damaging the purifier, do not rinse
or spray the filter compartment directly with water,
or wipe it with a soaking wet cloth.
To ensure optimal ventilation and
purification, use a vacuum cleaner to
remove any dust from the air inlets and
the filter compartment, or wipe these
areas gently with a soft cloth.
Care & Maintenance
For detailed e-manual, please go to https://www.
smartmiglobal.com/pages/manual
For more information, please visit: https://www.
smartmiglobal.com/
Need support? Please contact smartmi customer service:
onlinesupport@smartmiglobal.com
Product Name Jya Fjord Pro Air Purifier
Model JYKQJHQPR1
Rated Voltage 100-240 V~
Rated Frequency 50/60Hz
Rated Power 65 W
Color Silver
Net Weight Approx. 10.0 kg
Item Dimensions 310 x 300 x 716.5 mm
Eective Coverage 38~66m2 *
Noise Level ≤67 dB(A)
Particle's Clean Air Delivery Rate 550m3/h
TVOC's Clean Air Delivery Rate 250m3/h
Particle Purification Eciency High
Network Standby Power
Consumption
< 2.0 W
Wireless Connectivity Wi-Fi IEEE 802.11 b/g/n 2.4 GHz
Storage Temperature -10℃to 40℃
Storage Humidity 5%–90%
*Calculated according to standard GB/T 18801-2015
(CADR Particle)
(CADR TVOC)
Hereby, Jya Smart Home (tianjin) Limited
declares that the radio equipment - Jya
Fjord Pro Air Purifier, type JYKQJHQPR1 is in
compliance with Directive 2014/53/EU. The
full text of the EU declaration of conformity
is available at the following internet
address: https://www.smartmiglobal.com/
doc.html
All products bearing this symbol are waste
electrical and electronic equipment (WEEE
as in directive 2012/19/EU) which should not
be mixed with unsorted household waste.
Instead, you should protect human health
and the environment by handing over
your waste equipment to a designated
collection point for the recycling of waste
electrical and electronic equipment,
appointed by the government or local
authorities. Correct disposal and recycling
will help prevent potential negative
consequences to the environment and
human health. Please contact the installer
or local authorities for more information
about the location as well as terms and
conditions of such collection points.
RF Specification:
Wi-Fi 2.4 G (2400–2483.5 MHz), Max. RF Output Power: <20 dBm
Under normal use of condition, this equipment should be kept a separation
distance of at least 20cm between the antenna and the body of the user.
Note: Air outlet was set to 90° during all performance testing
Regulatory Compliance Information
Europe — EU declaration of conformity
Specifications

13 14
Предупреждение
Если шнур электропитания поврежден, замените его оригинальным
шнуром, приобретенным у производителя или в соответствующем
сервисном центре.
Дети в возрасте от 8 лет и лица с ограниченными физическими,
сенсорными или умственными способностями или недостаточным
опытом и знаниями могут использовать это устройство под
наблюдением или после получения инструкций по технике
безопасности и осознания возможных рисков.
Дети не должны играть с устройством. Не разрешайте детям чистить
устройство и выполнять другие мероприятия по уходу за ним без
присмотра взрослых.
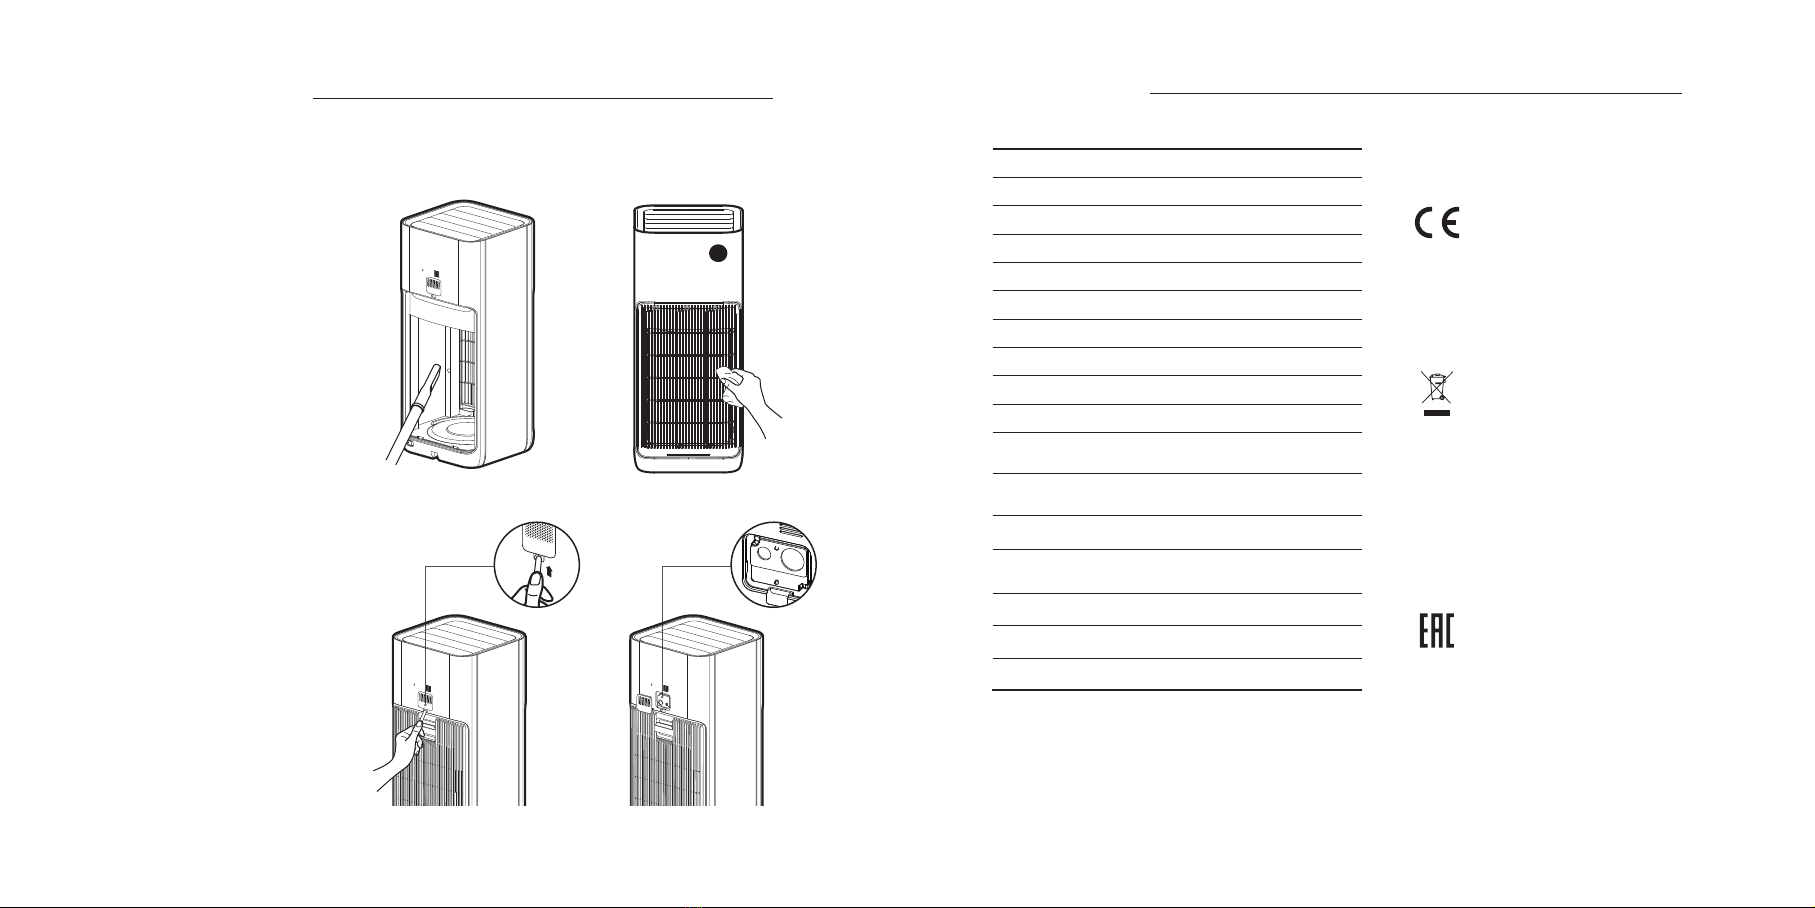
Перед проведением технического обслуживания убедитесь, что
очиститель выключен и отсоединен от сети.
Перед перемещением выключите
очиститель воздуха и выньте штепсель из
розетки.
Очиститель воздуха не включится
при неправильной установке решетки
вентилятора и крышки отсека для фильтра.
Между воздухозаборными отверстиями и
стенами или другими предметами должно
оставаться расстояние минимум 20см.
Перед чисткой или техническим
обслуживанием устройство следует
отключить от питающей сети.
Часто удаляйте пыль, волосы и другие
частицы с внешнего сетчатого экрана
фильтра, чтобы снизить вероятность роста
бактерий.
Удаляйте пыль, волосы и частицы из
воздухозаборных отверстий очистителя
воздуха, чтобы не допустить снижения
забора воздуха.
Накройте выпускное отверстие воздуха,
чтобы не допустить попадания пыли, волос
и других частиц, когда очиститель воздуха
не используется в течение длительного
времени.
Во избежание пожара, поражения
электрическим током и другого ущерба
используйте шнур питания и электрические
розетки согласно приведенной ниже
инструкции:
Не прилагайте чрезмерное усилие для
вытягивания шнура питания, не скручивайте
и не сгибайте его, поскольку это может
привести к оголению или разлому
электрического провода шнура питания.
Шнур питания должен вставляться в
током, пожару или другому ущербу:
Около источников открытого пламени,
например, свечей, кадильниц, плит,
каминов, сигарет, хлопушек, зажигалок,
универсальных горелок, аколитов или
жаровен.
Около приборов, производящих высокую
температуру, например, электрических
нагревателей, вентиляторных
воздухонагревателей, электрических грелок
для ног, электроплит и электрических
утюгов.
Примите меры, чтобы в очиститель воздуха
не попадали воспламеняемые предметы.
В неустойчивом положении, когда
очиститель воздуха легко может
перевернуться.
В среде с чрезвычайно высокой
температурой, влажностью или сыростью,
например, в ванной.
В случае опрокидывания продукта под
воздействием внешних сил или его
выхода из рабочего состояния по другим
причинам перед тем, как продолжить его
использование, следует убедиться в его
надлежащем внешнем состоянии, а также
в том, что все компоненты установлены
на свои места (например, после падения
следует установить на место верхнюю
решетку). В случае невозможности
дальнейшего использования
продукта следует обратиться в отдел
послепродажного обслуживания или к
дилеру за заменой.
подходящий электрический разъем.
Используйте шнур питания, который
поставляется с очистителем воздуха, не
используйте какие-либо сторонние шнуры
питания.
Всегда вынимайте шнур электропитания
очистителя воздуха из розетки при
выполнении технического обслуживания или
перемещении очистителя воздуха.
Немедленно прекратите использование
очистителя воздуха при появлении
необычных шумов, неприятного запаха,
перегреве или неравномерном вращении
вентилятора.
Не вставляйте пальцы или инородные
предметы в защитные детали, подвижные
детали, воздухозаборные отверстия или
выпускные отверстия воздуха.
Не допускайте попадание в очиститель
воздуха таких предметов, как волосы или
ткань, чтобы избежать закупоривания
воздухозаборных отверстий или выпускных
отверстий воздуха.
Не сидите на очистителе, не опирайтесь на
него и не наклоняйте его.
При использовании вместе с газовым
оборудованием (например, газовыми
печами или водонагревателями) обеспечьте
достаточную вентиляцию, чтобы избежать
отравления угарным газом.
Не наливайте какую-либо жидкость, не
насыпайте порошки или какие-либо другие
вещества и выпускное отверстие воздуха
очистителя воздуха.
Не используйте очиститель воздуха при
следующих обстоятельствах, поскольку это
может привести к поражению электрическим
Меры предосторожности

15 16
Примечание: в настоящем руководстве
изображения изделия и его аксессуаров, а также
пользовательского интерфейса являются только
схематическими и служат для справки. Фактическое
изделие может отличаться от изображений из-за
обновлений и усовершенствований изделия. См.
фактическое изделие.
Описание продукта
Световой индикатор качества воздуха
PM2.5, PM10, TVOC.
Зелёный
Жёлтый
Оранжевый
Красный
отличное
хорошее
среднее
плохое
Для лучшего функционирования очистителя воздуха
во время его использования отверстие входа
воздуха основного корпуса должно располагаться
на определенном расстоянии от стен и других
препятствий (подробнее см. на рис. выше).
Подключите кабель питания к разъему
источника питания, расположенному
в нижней части устройства. Включите
кабель в розетку.
Рекомендация: Для повышения эффективности
рекомендуется во время использования очистителя
воздухе держать двери и окна закрытыми.
Установка
на месте
Подключение
к источнику
питания
Установка
>20cм
>20cм
Перед включением
очистителя обязательно
снимите упаковку с фильтра!
.

17 18
После подключения к источнику
питания нажмите на кнопку
включения питания в нижней
задней части корпуса очистителя
воздуха.
Автоматический: автоматически регулирует эффективность
очистки в зависимости от качества воздуха в помещении
Сон: работает со сверхнизким уровнем шума
Выбранный: по умолчанию использует самый мощный
режим; при помощи приложения позволяет установить
область использования, отрегулировать эффективность
очистки и сохранить настройки.
После включения питания на дисплее отображается
интерфейс включения/выключения, основной блок
входит в режим ожидания и для его включения
необходимо нажать на значок на дисплее.
Использование Использование
:
1
. ,
/.
/
PM10 PM2.5
Числовое значение PM2.5
Режимы
работы
Световой индикатор Wi-Fi
Световой
индикатор
пыльцы и TVOC
: .
: PM10 2,5 10 (PM10-PM2.5).
, , , , .
1-20 μg/m3
21-35 μg/m3
35-55 μg/m3
>55 μg/m3
Зелёный
Жёлтый
Оранжевый
Красный
отличное
хорошее
среднее
плохое

19 20
Основной дисплей аппарата
Для переключения между автоматическим,
ночным и настраиваемым режимами
работы нажимите на соответствующий
значок на дисплее.
Смахните вниз для входа в
интерфейс включения/выключения
: , ,
.
Переместить
влево/вправо
1
3
2
4
Коснитесь, чтобы
последовательно сменить
три угла выхода воздуха
Коснитесь, чтобы
последовательно установить
четыре степени яркости экрана
Отображение
оставшегося срока
службы фильтра
Угол выхода воздуха
1
Сброс Wi-Fi
Сброс, отключение/
включение настроек Wi-Fi.
3
Регулирование яркости экрана
2
Срок службы фильтра
4
Для переключения между интерфейсами настроек
проведите пальцем влево или вправо и нажимите
на необходимый интерфейс для осуществления
настройки.
Инструкция к фильтру
Указания по установке фильтра
Очиститель не находит фильтр или
установлен не оригинальный фильтр.
Напоминание о состоянии фильтра
Указания по замене фильтра
Если до конца срока службы фильтра
осталось менее 10%, то после включения на
дисплее отобразится рекомендация заменить
фильтр, а через 5 секунд будет выполнен
переход к интерфейсу замены фильтра.
:
,
,
. ,
.
Инструкция к фильтру и его замена
Как приобрести фильтр
Отсканируйте QR-код или посетите официальный
магазин smartmi
Подробнее на https://www.smartmiglobal.com/
filters/jya-fjordfilter-pro
Фильтр
Замена производится
каждые 6-12 месяцев
Сброс настроек Wi-Fi
Если не удается подключить очиститель к приложению,
проведите пальцем по главному экрану вправо,
чтобы войти в интерфейс настройки Wi-Fi, и нажмите
«Сброс» для подтверждения. Когда значок Wi-Fi на
экране замигает, это будет означать, что сброс
выполнен успешно.
Включение/выключение Wi-Fi
Для входа в интерфейс настройки Wi-Fi проведите
пальцем вправо по главному экрану, нажмите
«Отключить» / «Включить» и затем «ОК» для
отключения или включения функции Wi-Fi.
Использование Использование

21 22
Предупреждение: перед заменой фильтра выключите очиститель воздуха и отключите его от
источника питания.
Откройте отсек фильтра
Для этого нажмите на защёлку
на отсеке фильтра.
:
.
.
01 Удаление старого фильтра
Потяните за ручку и вытащите
старый фильтр.
02 Установка нового фильтра
Снимите с фильтра упаковку.
Установите новый фильтр на
место и закройте отсек фильтра.
03
Замена фильтра
Интеллектуальное управление с помощью
Apple HomeKit
Откройте домашнее приложение на iPhone или iPad.
Нажмите «Add Accessory» (Добавить аксессуар), затем отсканируйте
код настройки HomeKit на наклейке изделия (две наклейки на блоке
устройства, см. рисунок) или введите восьмизначный код настройки,
расположенный над кодом настройки HomeKit. После этого
устройство будет привязано к домашнему приложению Apple.
После привязки к HomeKit устройство
можно привязать к приложению
Smartmi Link. В приложении Smartmi
Link перейдите на страницу «Personal
Info» (Личная информация). Нажмите
«HomeKit Info» (Информация
о HomeKit), затем с помощью
подсказок привяжите устройство
HomeKit. Устройства, привязанные
к приложению Smartmi Link, также
можно добавить в HomeKit. В
приложении Smartmi Link перейдите
на страницу «Device Control»
(Управление устройством). В разделе
«Settings» (Настройки) нажмите «Add
to HomeKit» (Добавить в HomeKit),
затем с помощью подсказок
привяжите устройство к HomeKit.
Внимание:
Убедитесь, что ваша сеть Wi-Fi доступна и
имеет доступ в Интернет. Держите телефон
как можно ближе к устройству. (Данное
устройство не поддерживает сеть 5G).
Для управления этим устройством,
совместимым с HomeKit, рекомендуется
использовать версию iOS 13.0 или выше.
Не теряйте код настройки HomeKit!
После сброса к заводским настройкам
для подключения устройства к HomeKit
потребуется снова отсканировать код
настройки.
Компания Apple Inc. является владельцем
товарных знаков iPad и iPhone,
зарегистрированных в США и других странах.
Чтобы получить возможность автоматически
управлять этим устройством с поддержкой
HomeKit и использовать его вне дома,
нужно настроить HomePod, Apple TV или
iPad в качестве домашнего концентратора.
Рекомендуется обновить программное
обеспечение и операционную систему до
последней версии.
1
2
Код настройки HomeKit
Подключение
устройства к
Smartmi Link
Данное устройство уже привязано
к приложению Smartmi Link, с
помощью которого им можно
управлять. Отсканируйте QR-
код или найдите «Smartmi Link»
в магазине приложений, чтобы
загрузить и установить его.
Перейдите на главную страницу
Smartmi Link, нажмите «+» в
середине страницы, затем с
помощью подсказок добавьте
ваше устройство.
Внимание:
Убедитесь, что ваша сеть Wi-Fi доступна и
имеет доступ в Интернет. Держите телефон
как можно ближе к устройству.
Данное устройство не поддерживает сеть
5G. В списке устройств приложения данное
изделие называется очистителем воздуха
Jya Fjord Pro
* Более подробную инструкцию см. на сайте: https://
www.smartmiglobal.com/pages/helpcenter

23 24
Чистка отсека фильтра
Чистка лазерного датчика частиц
Как показано на рисунке, откройте
отсек лазерного датчика частиц
неострым инструментом и очистите
фильтрующую сетку отсека и
датчик с помощью воздушного
пульверизатора или фена.
Предупреждение: перед выполнением следующих
действий выключите очиститель воздуха и
отключите его от источника питания.
Внимание: запрещается использовать
горячий воздух.
Внимание: во избежание повреждения
аппарата не лейте и не распыляйте на него
воду, а также не протирайте корпус влажной
тряпкой.
Для обеспечения вентиляции и
эффективного очищения убрать
накопившуюся пыль из решетки входа
воздуха и со стен отсека можно при
помощи пылесоса или аккуратно
протерев поверхности мягкой тканью.
Техническое
обслуживание и уход
Подробное электронное руководство см. по адресу
https://www.smartmiglobal.com/pages/manual
Для получения дополнительной информации см: https://
www.smartmiglobal.com/
Нужна поддержка? Обратитесь в службу поддержки
клиентов Smartmi по адресу: onlinesupport@
smartmiglobal.com
Технические характеристики
Название Jya Fjord Pro
Модель JYKQJHQPR1
Номинальное напряжение 100-240
Номинальная частота 50/60
Номинальная мощность 65
Цвет
Вес нетто . 10,0
Размеры изделия 310 x 300 x 716.5 mm
Эффективная зона действия 38~66m2 *
Уровень шума ≤67 (A)
Скорость подачи чистого воздуха 550m3/h
Скорость подачи чистого воздуха
TVOC
250m3/h
Эффективность очистки частиц
Энергопотребление в режиме
ожидания сети
< 2,0
Беспроводное подключение Wi-Fi IEEE 802.11 b/g/n, 2,4
Температура хранения -10℃ 40℃
Влажность при хранении 5%–90%
Дата изготовления: см. на упаковке
Сведения об импортере указаны на упаковке.
Сделано в Китае
(частицы CADR)
(TVOC CADR)
Настоящим компания Jya Smart Home (tianjin)
Limited заявляет, что тип радиооборудования -
Очиститель воздуха Jya Fjord Pro, JYKQJHQPR1
соответствует требованиям Директивы 2014/53/
EU. Полный текст декларации о соответствии
нормативным требованиям ЕС доступен по
следующему адресу: https://www.smartmiglobal.
com/doc.html
Все изделия, обозначенные символом
раздельного сбора отработанного
электрического и электронного оборудования
(WEEE, директива 2012/19/EU), следует
утилизировать отдельно от несортируемых
бытовых отходов. С целью охраны здоровья и
защиты окружающей среды такое оборудование
необходимо сдавать на переработку в
специальные пункты приема электрического
и электронного оборудования, определенные
правительством или местными органами
власти. Правильная утилизация и переработка
помогут предотвратить возможные негативные
последствия для окружающей среды и здоровья
человека. Чтобы узнать, где находятся такие
пункты сбора и как они работают, обратитесь
в компанию, занимающуюся установкой
оборудования, или в местные органы власти.
Информация о соответствии
требованиям
Декларация о соответствии нормативным
требованиям ЕС
Информация об утилизации и переработке
отходов электрического и электронного
оборудования
RF :
Wi-Fi 2,4 (2400-2483,5 MHz), : <20
20 .
:
90°.

25 26
Advertencia
Si se ha dañado el cable de corriente, deberá reemplazarlo por un recambio
especial del fabricante o su departamento de servicios.
Este aparato puede ser utilizado por niños de 8 años en adelante y por
personas con capacidades sensoriales, mentales o físicas reducidas siempre
y cuando estén bajo la supervisión de un adulto, se les hayan proporcionado
instrucciones sobre el uso del producto y se les haya advertido de los riesgos
implícitos.
Los niños no deben jugar con el aparato. La limpieza y el mantenimiento por
parte del usuario no debe realizarse por niños sin supervisión de un adulto.
Asegúrese de que el purificador está apagado y desenchufado antes de realizar
el mantenimiento.
Apague y desenchufe el purificador antes de
moverlo.
El purificador no puede encenderse cuando la
rejilla del ventilador y la tapa del compartimiento
del filtro no están correctamente instaladas.
Mantenga una distancia de más de 20cm
entre las entradas de aire y las paredes u otros
objetos.
Antes de la limpieza u otro mantenimiento, el
aparato debe estar desconectado de la corriente
eléctrica.
Elimine con frecuencia el polvo, el cabello y otras
partículas de la malla exterior del filtro, para
reducir la posibilidad de crecimiento bacteriano.
Quite el polvo, el cabello y las partículas de las
entradas de aire del purificador para evitar una
reducción del flujo de entrada de aire.
Cubra la salida de aire para evitar que el polvo,
el cabello y otras partículas se caigan cuando el
purificador no se use durante mucho tiempo.
Con el fin de evitar incendios, descargas eléctricas
u otros daños, use el cable de alimentación y las
tomas eléctricas como se indica a continuación:
No tire, retuerza ni doble excesivamente el cable
de alimentación, ya que podría exponer o romper
el núcleo del cable.
El cable de alimentación debe estar enchufado a
una toma de corriente adecuada.
Use el cable de alimentación que se suministró
Cerca de los aparatos que generen altas
temperaturas, como calentadores eléctricos,
ventiladores calefactores, calentadores de
pie eléctricos, estufas eléctricas o planchas
eléctricas.
Asegúrate de que no entren objetos inflamables
en el purificador.
En lugares inestables el purificador puede caerse
fácilmente.
En ambientes extremadamente calurosos,
húmedos o mojados, como los baños.
En caso de daños causados por fuerzas
externas u otras razones, asegúrese de que el
producto está en buenas condiciones/reajustado
(por ejemplo, la rejilla superior necesita ser
reajustada después de caerse) antes de usarlo;
de lo contrario, póngase en contacto con el
servicio post-venta o el distribuidor para su
reemplazo.
con el purificador, no use cables de alimentación
de terceros.
Desenchufe siempre el purificador antes de
realizar tareas de mantenimiento o mover el
purificador de aire.
Deje de usar el purificador inmediatamente
cuando emita sonidos inusuales, malos olores,
se sobrecaliente o su ventilador gire de forma
irregular.
No ponga los dedos u objetos extraños en las
piezas de protección, piezas móviles, entradas o
salidas de aire.
Mantenga los objetos tales como pelos o telas
alejados del purificador para evitar el bloqueo de
las entradas o salidas de aire.
No se siente, recueste ni se incline sobre el
purificador.
Ventile para evitar la intoxicación por monóxido
de carbono cuando se use junto con aparatos
de gas (como estufas de gas, calentadores de
agua a gas).
No vierta líquidos ni tire polvo u otras sustancias
pequeñas en la salida de aire del purificador.
No use el purificador en las siguientes
circunstancias, ya que pueden provocar descargas
eléctricas, incendios u otros daños:
Cerca de llamas encendidas, como velas,
quemadores de incienso, estufas, chimeneas,
cigarrillos, petardos, encendedores, antorchas
multiuso, encendedores de velas o sartenes.
Precauciones

27 28
Rejilla de salida de aire
Rejilla de entrada de aire
Indicador de
calidad del aire
Puerta del
compartimiento
de filtro
Hebilla de apertura
de la puerta
Sensor láser de
partículas
Sensor de gas
Interruptor
de poder Conector de
poder
Pantalla de visualización
Nota: Las ilustraciones del producto, los accesorios y la
interfaz de usuario del manual de usuario son solo para
fines de referencia. El producto y las funciones actuales
pueden variar debido a mejoras del producto.
Frente Revés
Descripción General
del Producto
Indicador de calidad del aire
Según la concentración de PM2,5, PM10 y TVOC, se
muestra la calidad del aire integral.
Verde
Amarillo
Naranja
Rojo
muy buena
buena
media
insalubre
Para ejercer mejor el rendimiento del purificador
de aire, la entrada de aire del host debe mantener
una cierta distancia con las paredes y otras
obstrucciones durante el uso (consulte la imagen de
arriba para obtener más detalles).
Conecte el cable de alimentación al
puerto de alimentación en la parte
inferior del host y luego conecte la
fuente de alimentación.
Atención: Al utilizar el depurador, se recomienda cerrar
las puertas y ventanas para obtener un mejor efecto de
purificación.
Colocación Conexión
con la
fuente de
alimentación
Instalación
>20cm
>20cm
¡Asegúrese de que haya quitado la
bolsa de embalaje del filtro antes
de encender el purificador!
Lea detenidamente este manual antes de usar el producto y consérvelo para futuras consultas.

29 30
Después de conectar la fuente
de alimentación, encienda el
interruptor de poder en la parte
inferior del revés de la máquina.
Automático: ajusta automáticamente la eficiencia de
purificación de acuerdo con la calidad del aire interior
Sueño: funcionamiento con un ruido ultrabajo
Favorite: Set and save the coverage area and the Favorito:
es el valor predeterminado máximo, el área de uso se puede
configurar a través de la aplicación, la eficiencia de purificación
se puede ajustar y la configuración se puede guardar
Después de conectar la fuente de alimentación,
la pantalla muestra la interfaz de encendido y
apagado, el host entra en el estado de espera,
toque el icono para encender la máquina.
Uso
Atención: Después de que el host esté en espera durante 1
minuto, la pantalla ingresará a la interfaz de temperatura y
humedad, toque la pantalla para regresar a la interfaz de
encendido y apagado.
Interfaz de temperatura
y humedad
Interfaz de encendido
y apagado
Interfaz principal
de PM10
Interfaz principal
de PM2,5
Valor de PM2.5
Modos de
funcionamiento Luz indicadora de Wi-Fi
Luces indicadoras
POLLEN y TVOC
Atención: la interfaz principal se puede cambiar deslizando hacia la izquierda y hacia la derecha
Nota: PM10 se refiere a partículas gruesas que tienen un diámetro aerodinámico que varía de 2,5 a 10 μm (PM10
– PM2,5). Los ejemplos de partículas gruesas incluyen polvo, polen, esporas y cenizas volantes.
Uso
Muy bueno 1-20 μg/m3
Bueno 21-35 μg/m3
Medio 35-55 μg/m3
Insalubre >55 μg/m3
Verde
Amarillo
Naranja
Rojo
muy buena
buena
media
insalubre

31 32
Pantalla del motor
Haga clic en el icono para cambiar entre los
modos de funcionamiento: el automático, el
sueño y el favorito
Deslice hacia abajo para ingresar a
la interfaz de encendido y apagado
Atención: después de que la pantalla esté apagada, haga clic
para activar la pantalla
Deslice hacia la
izquierda y hacia
la derecha
Interfaz de los modos de
funcionamiento
Interfaz de configuración
1
3
2
4
Haga clic para cambiar
entre los 3 ángulos de
salida de aire
Haga clic para ajustar 4
niveles de brillo
Muestra la vida
restante del filtro
Ángulo de salida de aire
1
Reinicio de Wi-Fi
Sirve para restablecer,
deshabilitar / habilitar la
configuración de Wi-Fi.
3
Ajuste del brillo de la
pantalla
2
Vida útil del filtro
4
Deslice hacia la izquierda y hacia la derecha para
cambiar las interfaces de configuración y haga clic en
la interfaz correspondiente para configurar.
Descripción del filtro
Consejo de la instalación del filtro
El purificador no detecta el filtro o el filtro
original no está instalado.
Aviso del estado del filtro
Recordatorio de reemplazo del filtro
Cuando la vida útil del filtro es inferior al 10%,
la pantalla recordará que se reemplace el
filtro después del arranque, y saltará a la
interfaz de reemplazo del filtro después de 5
segundos.
Atención: El filtro que contiene carbón activado puede tener
un olor peculiar cuando el gas nocivo adsorbido alcanza el
estado de saturación. Se recomienda colocar el filtro en un
lugar bien iluminado y ventilado durante un cierto período
de tiempo para mejorar la actividad del carbón activado y
restaurar de manera parcial su capacidad de adsorción. Si el
filtro alcanza la vida útil recomendada, reemplácelo a tiempo.
Descripción y reemplazo del filtro
Cómo comprar el filtro
Escanee el código QR o visite la tienda oficial de
smartmi
https://www.smartmiglobal.com/filters/jya-fjordfilter-
pro para obtener más información.
Filtro
Se reemplaza cada
6-12 meses
Reinicio de Wi-Fi
Reinicio de Wi-Fi
En caso de no poder conectar el purificador de aire a
la aplicación: Deslice hacia la derecha en la pantalla
principal para ingresar a la interface de configuración de
WiFi y seleccione “Restaurar”. Cuando el ícono WiFi
parpadea en la pantalla quiere decir que se ha
restaurado con éxito
Encendido / apagado de Wi-Fi
Deslice el dedo hacia la derecha en la pantalla principal
para ingresar a la interfaz de configuración de Wi-Fi,
haga clic en "Desactivar" / "Activar" y luego haga clic en
"Aceptar" para desactivar o activar la función de Wi-Fi.
Uso Uso

33 34
Advertencia: Apague el purificador y desconecte la fuente de alimentación antes de reemplazar el filtro.
Abra la puerta del
compartimento del filtro
Presione hacia abajo la hebilla
de la puerta del compartimiento
del filtro para abrir la puerta.
Atención:
Reemplace el filtro a tiempo de acuerdo con su vida útil.
Compre el filtro original aplicable de los canales oficiales.
01 Retire el filtro viejo
Extraiga la manija del filtro y saque
el filtro viejo.
02 Instale un nuevo filtro
Retire la bolsa de embalaje
del filtro.Instale el nuevo filtro
en su lugar y cierre la puerta
del compartimiento del filtro.
03
Reemplazo del filtro
Control inteligente con Apple HomeKit
Abra la aplicación Home en su iPhone / iPad.
Toque "Agregar accesorio" y luego escanee el código de configuración
de HomeKit en la etiqueta del producto (dos etiquetas en la unidad del
dispositivo, vea la ilustración), o ingrese el código de configuración de ocho
dígitos sobre el Código de configuración de HomeKit. El dispositivo se
vinculará a la aplicación Apple Home.
El dispositivo se puede vincular
a Smartmi Link después de
vincularlo a HomeKit. Vaya a la
página de Información Personal en
Smartmi Link. Toque "Información
de HomeKit" y luego vincule el
dispositivo HomeKit como se le
solicite. Los dispositivos vinculados
a Smartmi Link también se pueden
agregar a HomeKit. Vaya a la
página de Control de dispositivos
en Smartmi Link. Toque "Agregar a
HomeKit" en "Configuración" y luego
vincule el dispositivo a HomeKit
como se le solicite.
Nota:
Asegúrese de que su red Wi-Fi esté disponible
y tenga acceso a Internet. Coloque su teléfono
lo más cerca posible de este producto. (Este
producto no es compatible con la red de 5G).
Para controlar este accesorio que es compatible
con HomeKit, se recomienda utilizar iOS 13.0 o
una versión superior.
Conserve el código de configuración de
HomeKit, ya que deberá escanear el código
para vincular el dispositivo a HomeKit después
de un restablecimiento de fábrica.
iPad y iPhone son marcas comerciales de Apple
Inc., registradas en EE. UU. y otros países.
Controlar este accesorio habilitado para
HomeKit automáticamente y fuera de casa
requiere un HomePod, Apple TV o iPad
configurado como un centro doméstico. Se
recomienda que actualice al software y al
sistema operativo más recientes.
1
2
Código de configuración de
HomeKit
Vinculación del
dispositivo a Smartmi Link
Este producto se ha vinculado a
Smartmi Link y se puede controlar
mediante la aplicación. Escanee el
código QR o busque "Smartmi Link"
en la tienda de aplicaciones para
descargar e instalar la aplicación.
Vaya a la página de inicio de la
aplicación, haga clic en "+" en el
medio de la página, luego agregue el
dispositivo cuando se le solicite.
Nota:
Asegúrese de que su red Wi-Fi esté
disponible y tenga acceso a Internet.
Coloque su teléfono lo más cerca posible
de este producto.
Este producto no es compatible con la
red de 5G Este producto aparecerá como
"Purificador de Aire de Jya Fiordo Pro" en la
lista de dispositivos de la
* Si necesita instrucciones más detalladas, visite: https://
www.smartmiglobal.com/pages/helpcenter

35 36
Para obtener un manual electrónico detallado, vaya a
https://www.smartmiglobal.com/pages/manual
Para obtener más información, visite: https://www.
smartmiglobal.com/
¿Necesita ayuda? Contacte el servicio al cliente de
smartmi:onlinesupport@smartmiglobal.com
Limpieza del
compartimiento del filtro
Limpieza del sensor de
partículas láser
Como se muestra en la figura, use una
herramienta no afilada para abrir la
puerta del compartimiento del sensor
y use una pistola de aire o un soplador
para limpiar el filtro de la puerta del
compartimiento y el sensor.
Advertencia: ¡Asegúrese de que haya apagado el purificador
y haya desconectado la fuente de alimentación antes de
realizar las siguientes operaciones!
Nota: No utilice el aire caliente.
Nota: No enjuague directamente con agua, rocíe
o limpie el cuerpo de la máquina con un paño
húmedo que gotee, para no dañar la máquina.
Para garantizar el efecto de ventilación
y purificación, puede utilizar una
aspiradora para quitar el polvo en
la rejilla de entrada de aire y en las
paredes del compartimiento, o límpielo
suavemente con un paño suave.
Mantenimiento y
cuidado
Nombre Purificador de Aire de Jya Fiordo Pro
Modelo JYKQJHQPR1
Tensión nominal 100-240 V~
Frecuencia nominal 50/60 Hz
Potencia nominal 65 W
Color Plateado
Peso neto 10,0 kg aprox.
Dimensiones del artículo 310 x 300 x 716.5 mm
Alcance eficaz 38~66m2 *
Nivel de ruido ≤67 dB(A)
Tasa de entrega de aire limpio de la
partícula
550m3/h
Tasa de entrega de aire limpio de la
TVOC
250m3/h
Eficiencia de Purificación
de Partículas
Alta
Consumo de energía en
espera de la red
< 2.0 W
Conexión inalámbrica Wi-Fi IEEE 802.11 b/g/n 2.4GHz
*Calculado en base a la norma GB/T 18801-2015
(partícula CADR)
(TVOC CADR)
Por la presente, Jya Smart Home (tianjin)
Limited declara que el tipo de equipo
radioeléctrico - Purificador de Aire de Jya
Fiordo Pro, JYKQJHQPR1 cumple con la
Directiva 2014/53/UE. Encontrará el texto
completo de la declaración de conformidad
de la UE en esta dirección de Internet: https://
www.smartmiglobal.com/doc.html
Todos los productos que llevan este símbolo
son residuos de aparatos eléctricos y
electrónicos (RAEE según la directiva 2012/19/
UE) que no deben mezclarse con residuos
domésticos sin clasificar. En su lugar, debe
proteger la salud humana y el medio
ambiente entregando sus equipos de desecho
a un punto de recogida para el reciclaje de
residuos de equipos eléctricos y electrónicos,
designado por el gobierno o las autoridades
locales. La eliminación y el reciclado correctos
ayudarán a evitar posibles consecuencias
negativas para el medio ambiente y la
salud humana. Póngase en contacto con el
instalador o con las autoridades locales para
obtener más información sobre la ubicación y
las condiciones de dichos puntos de recogida.
RF Especificaciones:
Wi-Fi 2,4G (2400-2483,5 MHz), Potencia máxima de salida: <20 dBm
En condiciones normales de uso, este equipo debe mantenerse a una
distancia de, al menos, 20 cm entre la antena y el cuerpo del usuario.
Advertencia: Los datos de rendimiento han sido comprobados como
válidos cuando la salida de aire está a 90 grados
Información sobre el cumplimiento de
la normativa
Declaración de conformidad de la UE
Directiva RAEE de información de
eliminación y reciclaje
Especificaciones

37 38
Avvertenza
Se il cavo di alimentazione è danneggiato, è necessario sostituirlo acquistando
un cavo di ricambio dedicato dal produttore o dal relativo reparto di assistenza.
L’apparecchio può essere utilizzato da bambini con età superiore agli 8 anni e
da persone con capacità mentali, fisiche o sensoriali ridotte oppure da persone
prive di esperienza o conoscenza dell’apparecchio, purché siano sorvegliati o
siano stati istruiti sull’uso sicuro dell’apparecchio e comprendano i rischi che ne
possono derivare.
Non consentire ai bambini di giocare con l’apparecchio. Le operazioni di pulizia
e manutenzione non devono essere effettuate da bambini, a meno che non
siano sorvegliati.
Assicurarsi che il purificatore sia spento e scollegato prima di eseguire la
manutenzione.
Spegnere e scollegare il purificatore prima di
spostarlo.
Il purificatore non può accendersi quando la
griglia della ventola e il coperchio del vano filtro
non sono installati correttamente.
Tenere una distanza di almeno 20 cm tra le
prese d’aria e le pareti o altri oggetti.
Prima della pulizia e della manutenzione, è
necessario scollegare l’apparecchio dalla rete
elettrica
Rimuovere frequentemente polvere, capelli e
altre particelle dallo schermo esterno del filtro,
in modo da ridurre la possibilità di crescita dei
batteri.
Rimuovere polvere, capelli e particelle dalle prese
d'aria del purificatore per evitare una riduzione
della presa d'aria.
Coprire l'uscita dell'aria per evitare che polvere,
capelli e altre particelle cadano quando il
purificatore viene lasciato inutilizzato per un
lungo periodo.
Per evitare incendi, scosse elettriche o altri danni,
utilizzare il cavo di alimentazione e la presa
elettrica come indicato di
seguito:
Non tirare eccessivamente, torcere o piegare il
cavo di alimentazione, in quanto ciò potrebbe
esporre o rompere il nucleo del cavo.
Il cavo di alimentazione deve essere inserito in
di incenso, stufe, caminetti, sigarette, petardi,
accendini, torce multiuso, accenditori di candele
o bracieri.
Vicino a apparecchi che generano alte
temperature, come stufe elettriche,
termoventilatori, scaldapiedi elettrici, stufe
elettriche, ferri da stiro elettrici.
Assicurarsi che nessun oggetto infiammabile
entri nel purificatore.
In luoghi instabili dove il purificatore può
facilmente cadere.
In ambienti estremamente caldi, umidi o umidi,
come i bagni.
Quando il prodotto è danneggiato da forza
esterna o altri motivi, si prega di verificare se
l'aspetto del prodotto sia buono o di riposizionare
le parti (ad esempio, la griglia superiore deve
essere riposizionata dopo la caduta) prima
dell'uso; in caso contrario, si prega di contattare
il servizio post-vendita o il rivenditore per la
sostituzione.
una presa elettrica adeguata.
Utilizzare il cavo di alimentazione fornito con il
purificatore, non utilizzare cavi di alimentazione
di terze parti.
Scollegare sempre il purificatore prima
di eseguire la manutenzione o spostare il
purificatore d'aria.
Interrompere immediatamente l'uso del
purificatore quando emette suoni insoliti, emette
cattivi odori, si surriscalda o la sua ventola ruota
irregolarmente.
Non infilare le dita o oggetti estranei nelle parti
protettive, nelle parti mobili, nelle prese d'aria o
nelle prese d'aria.
Tenere oggetti come capelli o tessuti lontano dal
purificatore per evitare di bloccare le prese d'aria
o le uscite d'aria.
Non sedersi o appoggiarsi sul purificatore e non
inclinarlo.
Quando si utilizza il prodotto unitamente ad
apparecchi a gas in funzione (come stufe a
gas, scaldabagni a gas), ventilare l’ambiente per
evitare intossicazione da monossido di carbonio.
Non versare liquidi, né gettare polveri o altre
piccole sostanze nell'uscita dell'aria del
purificatore.
Non utilizzare il purificatore nelle seguenti
circostanze, poiché potrebbero provocare scosse
elettriche, incendi o altri danni:
Vicino a fiamme aperte, come candele, bruciatori
Precauzioni
Other manuals for Fjord Pro
1
Table of contents
Languages:
Other Jya Air Cleaner manuals