JYDELAND BOBMAN FL User manual

BOBMAN FL
INSTRUCTIONS
READ BEFORE USE!
UK 40-2011

INTRODUCTION
Thank you for your interest
in the Jydeland Bobman. We
trust you will gain a lot of sat-
isfaction from your purchase
for many years and that your
Bobman will fulfil your expec-
tations.
Please read these instruc-
tions before using the
machine.
The primary functions, main-
tenance and safety will be cov-
ered in the following pages.
This is a product for profes-
sional use only. Instructions
in use of the machine comply
with the checklist enclosed,
which can also be used for a
service agreement. If further
training or a follow-up visit
are required, please contact
Jydeland A/S .
Enjoy!
2

3

WARNING
A Bobman can only be used outdoors or in
a well-ventilated room, as the exhaust gas
contains highly toxic CO².
The machine can only be operated by the
driver sitting in the driver’s seat with at least
one hand always on the steering wheel and
both feet resting on the foot rests or pedals.
Do not start machine if any covers are
removed or defective.
Not suitable for use on very hilly terrain due
to risk of tipping over. That risk is increased
significantly when appliances are attached.
Noise level for normal use exceeds 80db. The
use of ear protectors is recommended.
We recommend that the operator wears a
dust mask for spreading work.
The Bobman is for professional use by trained
personnel only.
WARNING
4

WARNING SYMBOLS
There are yellow warning stickers on the
machine indicating where extra caution
must be exercised. These are instructions.
Always use the machine with care.
Caution! Always accompanied by another
pictogram.
Read in instruction book.
Large rotating screw conveyor. Risk of
crushing. Keep arms and legs clear. Machine
must be switched off when working on the
parts referred to by this pictogram.
Small rotating screw conveyor. Risk of trap-
ping hands. Machine must be switched off
when working on the parts referred to by
this pictogram.
Rotating blower. Machine must be switched
off when working on the parts covered by this
pictogram.
Crushing function. Risk of crushing. Keep
arms and legs clear. Exercise caution when
using this function.
Hearing protectors and goggles. Recom-
mended when operating the machine.
5

Operation
1 WD / 3 WD
Switch between 1 and
3 wheel drive
Tipping
Handle for
unloading
hopper.
Brush
Pedal for brush start and stop.
Rotation right/left. Stop in
centre position. Swing brush
out.
Brush swings in when rotating
anticlockwise.
Dosing
Handle for
adjusting the
dosing of
spread
material.
6

Drive
Press pedal on right
for forwards and lift
pedal for reverse.
Spreadmachine
and brush
Starts and stops the
hydraulic motors for
the brush and spreader
Fuel
Fuel filler cap under seat.
Scraper
Handle for raising, lowering
and adjustment of scraper
height.
Shaker
Shakes material loose in the
event of clumping.
Solid wheel
Available with solid wheel.
Throttle
Engine RPM
Extra weight for back wheel
A weight can be fitted to the back
wheel.
Starting diesel
engine
Turn key under seat to
start diesel engine.
Steering
Back wheel is turned
by chains from steering
wheel passing under
seat.
Remove seat and top
panel to adjust.
Battery
12 V sealed battery. Keep
terminals clean.
7

Brush
Brush weighs approx. 80 cm and can be replaced.
19 mm spanner required to adjust up and down on swing arm.
Engine arm can be turned further.
Rear of brush must be approx. 5 cm clear of ground when brushing
Accessories for different box heights can be ordered (parallelogram).
Blower
The blower nozzle can be turned downwards to direct spreading upwards or
downwards.
Baffle opening and engine RPMs determine how much material is spread!
Never put fingers, arms or objects in blower nozzle, conveyor screw and
brush if engine and hydraulics are running.
STOP machine if any foreign object blocks blower!!!
Adjusting brush Blower housing
8

Adjustment of scraper height using 19
mm spanner
Rubber on scraper can be replaced.
Using the Bobman spreader
1Fill hopper with sawdust or chopped straw, 3-8 cm pieces, by lowering and
driving into sawdust/straw pile.
2Lower scraper onto ribbed floor.
3Start hydraulics on right side of steering wheel. (on/off)
4Start brush using left pedal. The brush will automatically deploy. Release pedal
to stop brush and return it to transport position.
5Open baffle in hopper for quantity to be spread..
6Shake hopper by hand if necessary to loosen material.
Working in barn - important!
• Floor must be scraped clean twice (or more) times daily
• Bed must be swept clean and dry
• Thin layer of sawdust or chopped straw spread over bed
9

Cleaning
Always keep engine clean - use com-
pressed air if necessary. Avoid blow-
ing directly into air filter. Replace air
filter often to avoid reducing engine
power due to dust in air. The machine
can also be cleaned by high pressure
washer, but never aim jet directly at
air filter, breather pipe for hydraulics
under seat, diesel filler cap, wiring
and electronics.
Tightening up and damage
Tightening up screws and bolts must
be done regularly.
Always repair any damage immedi-
ately after discovery.
Weekly check
Check there is sufficient oil in engine
(W15-40).
Monthly check
Check level of hydraulic oil in sight
glass on right side of machine (HV32
/ HV46).
Lubrication
Lubricate steering chain with oil
(spray-on chain oil is recommended).
Lubricate ball joints with no grease
nipple and universal joint on steering
column with oil. kugleled som ikke har
nipler smøres også med olie.
Hydraulic oil
Hydraulic oil level must be in centre
of sight glass.
Replace hydraulic oil after analysis or
2000 hours.
Fill hydraulic oil (HV32 / HV46) at
filter on right side of hydraulic oil
tank.
Hydraulic oil filter
Change hydraulic oil filter first time
after 50 hours and thereafter every
500 hours or once annually. NB: if oil
colour is milky white, there is water
in the system. Change oil.
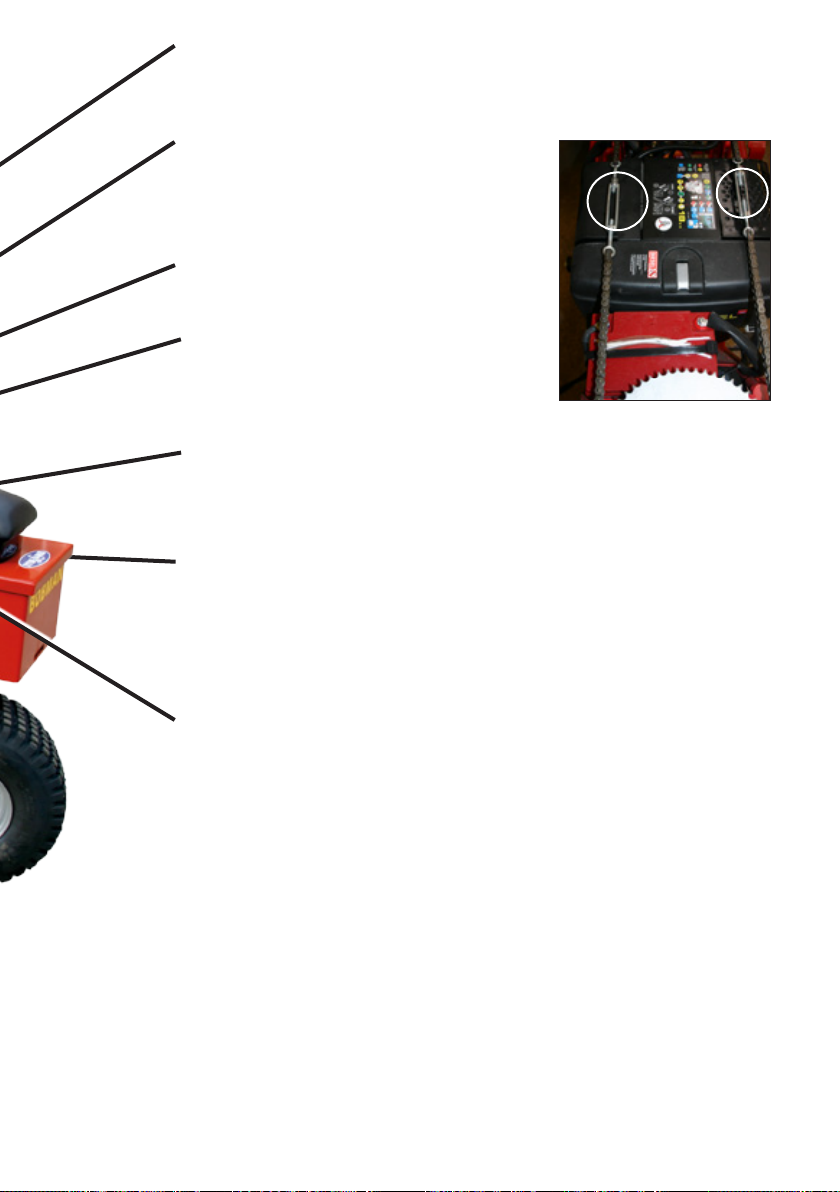
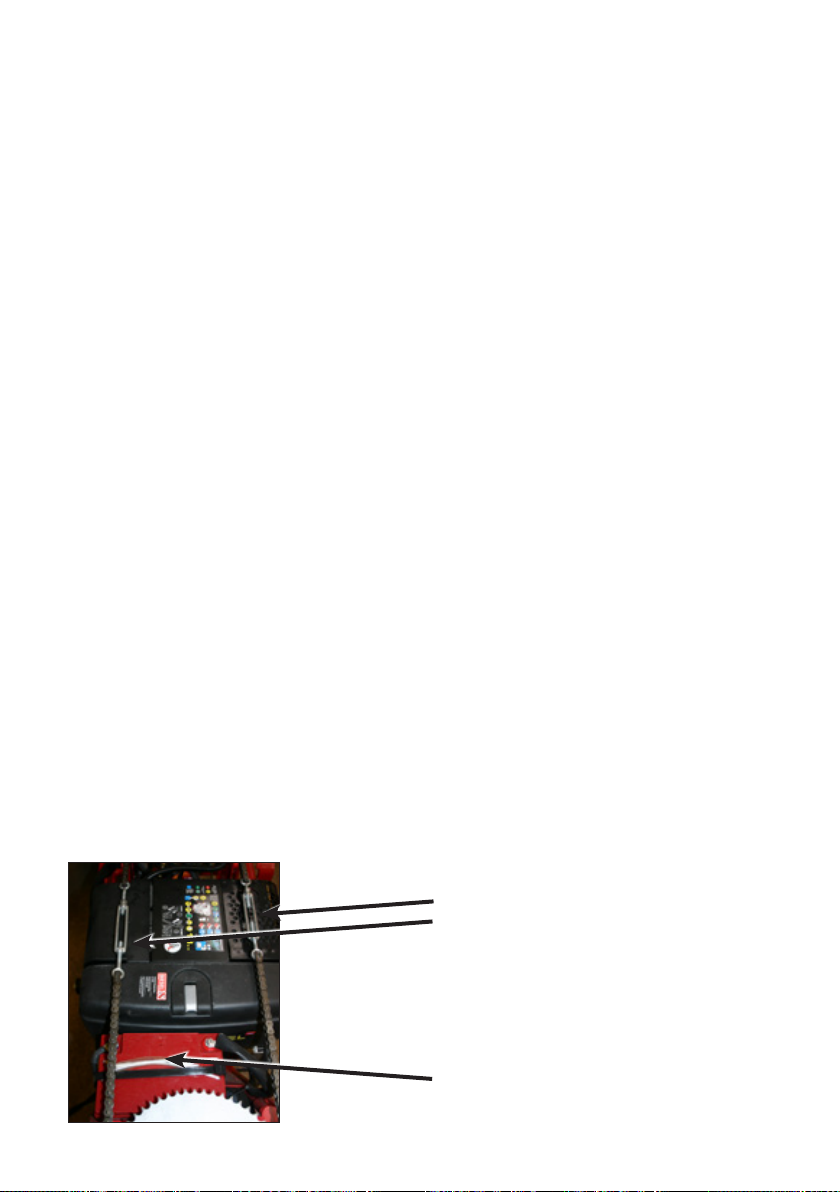
Steering
Back wheel is turned by chains from
steering wheel passing under seat.
Remove seat and top panel to adjust.
Battery
12 V sealed battery.
Keep terminals clean.
Maintenance
10

Hatz
Air filter
Change air filter if blocked.
Blow filter clean from inside
out. Engine will overheat if
filter is blocked, reducing air
intake. It will produce a lot
of smoke, traction power
will be reduced and fuel con-
sumption increase.
Fuel filter
Change fuel filter before it
becomes blocked or once
annually to avoid problems
starting. Fuel filter is in
bottom of tank via sus-
pended by a cord from the
lid.
Engine oil
Check oil level. Change
engine oil (W15-40) first
time after 50 hours and
thereafter every 200 hours
or once annually. Check
engine oil and refill on left
side of engine.
Fuel
Diesel fuel filler cap under
sear. Open seat access
tank.
11

Bobman FL frame
12

Nr. Varenr Navn Engelsk
1 790000 Bobman Pro chassis Bobman Pro chassis
2 790001 Sædeskjold Bobman Pro/Strø Siettopplait Bobman Pro/speed
3 790002 Sædeholder til Bobman Pro/Strø Sietplait for Bobman Pro/spreed
4 790003 Sæde til Bobman Pro/Strø Siet for Bobman Pro/spreed
5 790128 Hatz 1B40U-X 10HK diesel motor
6 790068 Flexrør for udstødning til Hatz Flexpipe for Muffert for Hatz
7 795001 Hyd. pumpe Cassappa 4,8 ccm
8 790051 Sideskærm diesel højre side Sidegarth diesel right
9 790053 Sideskærm diesel venstre side Sidegart diesel left
10 790020 Dækplade ved styrekonsol Gard plaid for steringkonsol
11 795002 Komplet tændingsmondul Hatz
12 790098 3-vejshane for strøkasse 3way ventil for spreederbox
13 795003 Kuglehane
14 790019 Styrekonsol Bobman Pro/Strø Steringkonsol Bobman Pro/Spreeder
15 780098 Rat aksel Steringshaft
16 790023 Topleje for rataksel Topbearring for steringshaft
17 790040 Ventilblok Q35 Ventilblok
18 795004 Sikkerhedsventil
19 790017 Batteri bobman Pro/Strø Battery for Bobman Pro/Spreeder
20 790039 Bobman filter elementhus Bobman filterelementhous
21 780112 Gummi for fodhviler Rober for footrest
22 790040 Ventilblok Q35 Ventilblok
23 790040 Ventilblok Q35 Ventilblok
24 790021 Gashåndtag Spreeder
25 790025 Kæde komplet Bobman Pro/Strø Chains komplit Bobman Pro/Spreeder
26 790045 Motorplade Motorbuttomplait
27 790045 Motorplade Motorbuttomplait
28 790033 Hjulgaffel bagende Pro/Strø Weelfork bagend Pro/SPreeder
29 790034 Komplet baghjul til Pro/Strø Komplit bagweel for Pro/spreeder
30 790032 Kugleleje 6207 2RS Bearring 6207 2RS
31 790037 Hjulflange Bobman Pro/Strø Weelbase Bobman Pro/Spreeder
32 780114 Hyd. motor 160 ccm Danfoss Hydr. engine Weit 160 ccm
33 790022 Gaskabel 750 mm Diesel Spreederkabel 750 mm Diesel
34 795005 Hjulbolt
13

Bobman FL
brush and scraper
14

Nr. Varenr Navn Engelsk
1 795007 FL Understel
2 780067 Skrabegummi, Bobman S, FL Schraberrober, Bobman S, FL
3 780068 Skinne f. skrabegummi Rail for schraberrober
4 790108 Glideskinne 12x100x180 mm Sleiderrail 12x100x180mm plast
5 795008 Kostearm svingbar FL
6 791025 Hyd. cylinder 100mm BOBMAN SL hydr. cylinder 100L
7 790083 Kostearm Sweeparm
8 780060 Motorbeslag f. dobbeltkost Motorbasis for dobbelt sweep
9 400862 Hyd. motor GMR 100, Hydr. 8 HK Hydr. motor GMR 100 Hydr. 8 HP
10 780061 Kosteskive f. dobbeltkost Sweeperdisk f. dubb. sweeperdisk
11 790085 Kost Ø750 mm Sweep Ø750mm
12 795009 Cylinder Ø50 400L
13 790091 Gummihåndtag Rober handel
14 795010 Stopplade FL
15 790076 Stop for skraber Stop for schraberrober
16 795011 Hyd. motor 100 ccm
17 790037 Hjulflange Bobman Pro/Strø Weelbase Bobman Pro/Spreeder
18 795012 FL Forhjul 16650-8
15

Bobman FL box
16

Nr. Varenr Navn Engelsk
19 795013 Endestopventil
1 795006 Strøkasse for Bobman FL
2 790078 Blæsehus Blowerhaus
3 790080 Blæsemølle Blowermill
4 790079 Hyd. motor 12,5 ccm Hydr. Motor 12,5ccm
5 790111 Hyd. motor 160 ccm Hydr. motor 160 ccm
6 792004 Snegl for strøkasse bobman SL Scru for spreedmaschine Bobman SL
7 790088 Flangeleje 25 mm FL205 (UC205) Bearring 25mm FL205 (UC205)
8 790086 Dækplade Gardplaid
9 790092 Doseringsspjæld Ajustinglook
10 790094 Håndtag for doseringsspjæld Stop for Ajustinglook
17

Mini spread
Mini spreader box for disinfectant
The box can be mounted on the left side
of Bobman S and FL
Attach hydraulic hoses on return side
from screw conveyor in the bottom of
the Bobman spreader box
Obtain diagram from Jydeland.
1Fill box with lime/disinfectant
10 litres = 15 kg
2Start spreading using the ball-topped
handle on the box
3Dosing can be adjusted in the box
under the lid.
Cleaning
Do not wash the mini spreader box,
unless cleaning it 100%.
Moisture and lime will coagulate, and the
screw conveyor can sieze.
Spreader hatch
Disinfectant is spread by
rotating brush bristles
Filling
Disinfectant is poured in here. Do not
compress in the box.
Lubrication
Spay oil using a thin pipe. There are no
grease nipples.
Safety
Never put your fingers or any other
object into the screw conveyor or
blower unless the machine is stopped
The grille in front of the exhaust must
not be damaged or removed
18

Nr. Varenr Navn Engelsk
11 790089 Ryster for strøkasse Schaker for spreedmachin
12 790090 Rystearm for strøkasse Schakerarm for spreedermachin
1 780701 MS15 Kasse
2 780702 Låg for kasse
3 780703 Snegl med blæser
4 780704 Kugleleje for snegl
5 780705 Juster spjæld
6 780706 Sikkerhedsgitter
7 780707 Beslag til kasse
8 780708 Blæsehus
9 780709 Lille sikkerhedsgitter
10 780710 Kuglehane
11 780038 Håndtag
12 780712 Spec. bolt for fodhviler
19

Technical Data
Motor............... 1 cylindret diesel HATZ
Fueltank..........................................5 l
Speed....................................... 8 km/h
Drive ......................................... 3 WD
Weight .................................... 400 kg
Height .......................................1,2 m
Length.......................................2,4 m
Width ........................................1,0 m
Sweep diameter .........................0,7 m
Scrape width .............................1,0 m
Spread distance .........................0-3 m
Capacity .....................................500 l
20
Table of contents
Other JYDELAND Spreader manuals