Kärcher KA 5 User manual

2

3

4

– 5
Dear Customer,
Please read and comply with these origi-
nal instructions prior to the initial opera-
tion of your appliance and store them for
later use or subsequent owners.
In accordance with the descriptions and the safety infor-
mation in these operating instructions the device is in-
tended for use as an air purifier.
This appliance has been designed for use in private
households and is not intended for commercial use.
– This unit is only to be used indoors.
– Protect the unit from rain. Do not store outside.
The manufacturer is not responsible for any damages
that may occur on account of improper use or wrong op-
erations.
The packaging material can be recycled. Please
do not place the packaging into the ordinary re-
fuse for disposal, but arrange for the proper re-
cycling.
Old appliances contain valuable materials that
can be recycled. Please arrange for the proper
recycling of old appliances. Please dispose your
old appliances using appropriate collection sys-
tems.
Electrical and electronic devices often contain compo-
nents which could potentially pose a danger to human
health and the environment if handled or disposed of in-
correctly. However, these components are necessary
for the proper operation of the device. Devices marked
with this symbol must not be disposed of with regular
household rubbish.
The used filter can be disposed of along with regular
household waste.
Please wash your hands after you have disposed of the
used filter.
The warranty terms published by the relevant sales
company are applicable in each country. We will repair
potential failures of your appliance within the warranty
period free of charge, provided that such failure is
caused by faulty material or defects in manufacturing. In
the event of a warranty claim please contact your dealer
or the nearest authorized Customer Service centre.
Please submit the proof of purchase.
Our KÄRCHER branch will be pleased to help you fur-
ther in the case of questions or faults.
You can procure the spare parts and the attachments
from your dealer or your KÄRCHER branch office.
DANGER
–The appliance may only be
connected to alternating cur-
rent. The voltage must corre-
spond with the type plate on
the appliance.
–Never touch the mains plug
and the socket with wet
hands.
–Do not pull the plug from the
socket by pulling on the con-
necting cable.
–Check the power cord with
mains plug for damage be-
fore every use. To avoid risks,
arrange immediately the ex-
change by an authorized cus-
tomer service or a skilled
electrician, if the power cord
is damaged.
–To avoid accidents due to
electrical faults we recom-
mend the use of sockets with
a line-side current-limiting cir-
cuit breaker (max. 30 mA
nominal tripping current).
–Turn off the appliance and re-
move the mains plug prior to
any care and maintenance
work.
–Repair works may only be
performed by the authorised
customer service.
Contents
General notes EN 5
Safety instructions EN 5
Description of the Appliance EN 7
Commissioning and operation EN 7
Care and maintenance EN 8
Troubleshooting EN 8
Special accessories EN 8
Technical specifications EN 8
General notes
Proper use
Environmental protection
Disposal of filters
Warranty
Customer Service
Ordering spare parts and special
attachments
Safety instructions
5EN

– 6
WARNING
–This appliance is not intended
for use by persons with limit-
ed physical, sensory or men-
tal capacities or lacking expe-
rience and/or skills, unless
such persons are accompa-
nied and supervised by a per-
son in charge of their safety
or they have received precise
instructions on the use of this
appliance and have under-
stood the resulting risks.
–Children may only use this
appliance if they are over the
age of 8 and supervised by a
person in charge of their safe-
ty, or if they have received in-
structions on the use of this
appliance and have under-
stood the resulting risks.
–Children must not play with
this appliance.
–Supervise children to prevent
them from playing with the
appliance.
–Cleaning and user mainte-
nance must not be performed
by children without supervi-
sion.
–It is prohibited to cover the air
inlet and outlet.
–Keep packaging film away
from children - risk of suffoca-
tion!
–Switch the appliance off after
every use and prior to every
cleaning/maintenance proce-
dure.
–The appliance may not be
used in areas where a risk of
explosion is present.
–Do not install the device near
a heat source.
CAUTION
–The device is not a replace-
ment for appropriate ventila-
tion.
–Park the device on even, sta-
ble ground and align it.
–Use only original KÄRCHER
spare parts.
–Do not use the device in
damp conditions or in rooms
with high ambient tempera-
tures, e.g. bathroom, kitchen.
DANGER
Pointer to immediate danger,
which leads to severe injuries or
death.
몇WARNING
Pointer to a possibly dangerous
situation, which can lead to se-
vere injuries or death.
몇CAUTION
Pointer to a possibly dangerous
situation, which can lead to mi-
nor injuries.
ATTENTION
Pointer to a possibly dangerous
situation, which can lead to
property damage.
Hazard levels
6 EN

– 7
When unpacking the product, make sure that no acces-
sories are missing and that none of the package con-
tents have been damaged. If you detect any transport
damages please contact your dealer.
Illustrations on fold-out page!
1 Filter cover, front
2 Pre-filter
3 Fine filter
4 Filter cover, rear
5 Air outlet
6 Operating field
7 Air quality display
8 Filter cover handle
9 Air quality sensor cover
10 Main Supply
11 On/off operation button
12 Manual mode operation button
13 Automatic mode operation button
14 WIFI status display
15 Night mode operation button
16 Change filter indicator
ATTENTION
Always operate the device with pre-filters and fine filters
installed.
Plug the mains connection into the device
Insert the mains plug into a socket.
All operation buttons on the control panel and the
air quality display light up briefly and go out again.
Press the on/off operation button in order to switch
the device on.
Note
– When the device is switched on, the integrated air
quality sensor automatically measures the air qual-
ity in the room.
– Set the desired mode by pressing the appropriate
operation button on the control panel.
When automatic mode is activated, the device selects
the appropriate fan speed for the measured air quality.
Press the on/off operation button in order to switch
the device on.
Press the automatic mode operation button.
The corresponding button lights up.
Note
– The integrated air quality sensor measures the air
quality and automatically selects the right speed
level to ensure the best possible air quality in the
room.
– As soon the air is clean, the device switches to low
fan speed.
When manual mode is activated, you can manually set
the fan speed.
Press the on/off operation button in order to switch
the device on.
Press the manual mode operation button.
The corresponding button lights up.
Note
– By pressing the button several times, the fan speed
can be set in three speeds.
When night mode is activated, the control panel lighting
goes out, but the device remains in operation.
The control panel lighting is re-activated by touching the
control panel.
Press the on/off operation button in order to switch
the device on.
Press the night mode operation button.
The corresponding button lights up.
If the filter change indicator lights up:
see care and service.
Note
– The filter change indicator flashes at 2 Hz if the fil-
ter service life is less than 72 hours.
– The filter change indicator lights up continuously
when the end of the filter service life is reached.
The appliance continues to work.
– In order to reset the filter change indicator following
a filter change, press it for 5 seconds in standby
mode.
– The filter change indicator only flashes/lights up
when the filter service life is less than 72 hours.
– The filter will have to be replaced after 6 months if
the appliance is operated daily at stage 1 for 12
hours.
If WIFI indicator is off:
no connection
If WIFI indicator flashes slowly:
Preparing connection
If WIFI indicator flashes quickly:
Link connection
If WIFI indicator shines constant:
Connection established
More details see Kärcher App
Note
– If there is a WIFI connection you can connect the
device to the Kärcher app.
– You can control the device with the Kärcher app if
there is a WIFI connection.
– If the router supports 2.4G and 5G, the two fre-
quencies must be given different names.
Press the on/off operation button in order to switch
the device on.
Air quality display is lit:
Blue: Very good air quality
Yellow: Mediocre air quality
Red: Poor air quality
Description of the Appliance
Commissioning and operation
Start up
Operating field
Automatic mode
Manual mode
Display Fan speed
One fan blade low
Two fan blades medium
Three fan blades high
Night mode
Change filter indicator
WIFI status display
Air quality display
7EN

– 8
Press the on/off operation button to switch the de-
vice off.
Stow away the mains cable and accessory at the
machine. Store the appliance in a dry room.
Regularly dry clean the machine casing so that no dust
can collect on it.
First remove the mains plug before doing any job
on the device
Wipe off the device with a dry soft cloth.
Wipe the filter covers and air outlet with a dry soft
cloth.
If the filter change indicator lights up:
Illustration
Open and remove the filter covers with the handles.
Unlock and remove the pre-filter.
Clean pre-filter.
Remove the fine filter at the label from the device.
Note
– Both pre-filters always have to be cleaned.
– The pre-filter is washable.
– Both fine filters always have to be renewed.
Illustration
Remove packaging from the filters.
Insert the fine filter in the device. The label should
be visible from the outside.
Insert the guide noses of the pre-filter in the lower
recesses.
Carefully lock the pre-filter at the top and ensure
correct positioning at the sides.
Insert the guide noses of the filter cover in the lower
recesses.
Close the filter cover from above.
The air quality sensor should be cleaned every two
months in order ensure ideal functioning. If the device is
to be operated in a dusty environment, it should be
cleaned more often.
Note
If the humidity is very high, condensation may form on
the air quality sensor. Due to this, the air quality LED
display may indicate poor air quality, even if it is good. If
this occurs, clean the air quality sensor or select manual
mode.
Illustration
Press the air quality sensor cover in the middle and
open it.
Clean the air quality sensor and the air openings
with a damp cotton swab.
Dry the air quality sensor with a dry cotton swab.
Press the air quality sensor cover in the middle and
close it.
Plug in the power cord.
Close the filter cover.
Clean the air quality sensor.
Make sure that all filters have been inserted cor-
rectly.
Clean pre-filter.
Subject to technical modifications!
Finish operation
Storing the appliance
Care and maintenance
Filter replacement
Air quality sensor
Troubleshooting
Appliance is not running
Air quality sensor display lights up red
continuously.
Air quality does not improve
Airflow from the air outlet is no longer so
strong
Special accessories
Filter type Part number Application
Universal filter 2.863-246.0 for air pollution, especially for fine dust (PM2.5), formaldehyde
Smog filter 2.863-247.0 for air pollution, especially for fine dust (PM2.5)
TVOC filter 2.863-248.0 For volatile organic compounds (TVOC), especially for formaldehyde
Pet Pure filter 2.863-249.0 For hair and volatile organic compounds (TVOC), especially for ammonia
Technical specifications
Mains voltage 220 - 240 V
Frequency 50/60 Hz
Intake performance
Level 1
Level 2
Level 3
11
26
56
W
W
W
Dimensions
Depth
Width
Height
380
380
713
mm
mm
mm
Area 42 - 72 m2
Weight (without accesso-
ries)
11,2 kg
Sound power level LWA 62 dB(A)
8 EN

– 5
Estimado cliente:
Antes del primer uso de su aparato, lea
este manual original, actúe de acuerdo a
sus indicaciones y guárdelo para un uso
posterior o para otro propietario posterior.
Según las descripciones e indicaciones de seguridad
especificadas en este manual de instrucciones, el apa-
rato está previsto para su uso como purificador de aire.
Este aparato ha sido diseñado para el uso particular y
no para los esfuerzos del uso industrial.
– Este aparato solo está destinado para usar en inte-
riores.
– Proteger el aparato de la lluvia. No depositarlo a la
intemperie.
El fabricante no asume responsabilidad alguna por los
daños que pudieran derivarse de un uso inadecuado o
incorrecto.
Los materiales de embalaje son reciclables. Por
favor, no tire el embalaje a la basura doméstica;
en vez de ello, entréguelo en los puntos oficiales
de recogida para su reciclaje o recuperación.
Los aparatos viejos contienen materiales valio-
sos reciclables que deberían ser entregados
para su aprovechamiento posterior. Por este
motivo, entregue los aparatos usados en los
puntos de recogida previstos para su reciclaje.
Los equipos eléctricos y electrónicos contienen a me-
nudo componentes que pueden representar un peligro
potencial para la salud de las personas y para el medio
ambiente en caso de que se manipulen o se eliminen de
forma errónea. Estos componentes son necesarios
para el correcto funcionamiento del equipo. Los equi-
pos marcados con este símbolo no pueden eliminarse
con la basura doméstica.
El filtro usado se puede eliminar con la basura domés-
tica.
Lávese las manos después de desechar los filtros usa-
dos.
En todos los países rigen las condiciones de garantía
establecidas por nuestra empresa distribuidora. Las
averías del aparato serán subsanadas gratuitamente
dentro del periodo de garantía, siempre que se deban a
defectos de material o de fabricación. En un caso de ga-
rantía, le rogamos que se dirija con el comprobante de
compra al distribuidor donde adquirió el aparato o al
servicio al cliente autorizado más próximo a su domici-
lio.
En caso de dudas o alteraciones, la sucursal de KÄR-
CHER estará encantada de ayudarle.
En su distribuidor o en la sucursal de KÄRCHER podrá
adquirir piezas de repuesto y accesorios.
PELIGRO
–Conecte el aparato única-
mente a corriente alterna. La
tensión tiene que correspon-
der a la indicada en la placa
de características del apara-
to.
–No toque nunca el enchufe de
red o la toma de corriente con
las manos mojadas.
–No saque el enchufe de la
toma de corriente tirando del
cable.
–Antes de cada puesta en ser-
vicio, compruebe si el cable
de conexión y el enchufe de
red presentan daños. Si el ca-
ble de conexión estuviera de-
teriorado, debe solicitar sin
demora a un electricista es-
pecializado del servicio de
atención al cliente autorizado
que lo sustituya.
–Para evitar accidentes de ori-
gen eléctrico, recomendamos
utilizar tomas de corriente
Índice de contenidos
Indicaciones generales ES 5
Indicaciones de seguridad ES 5
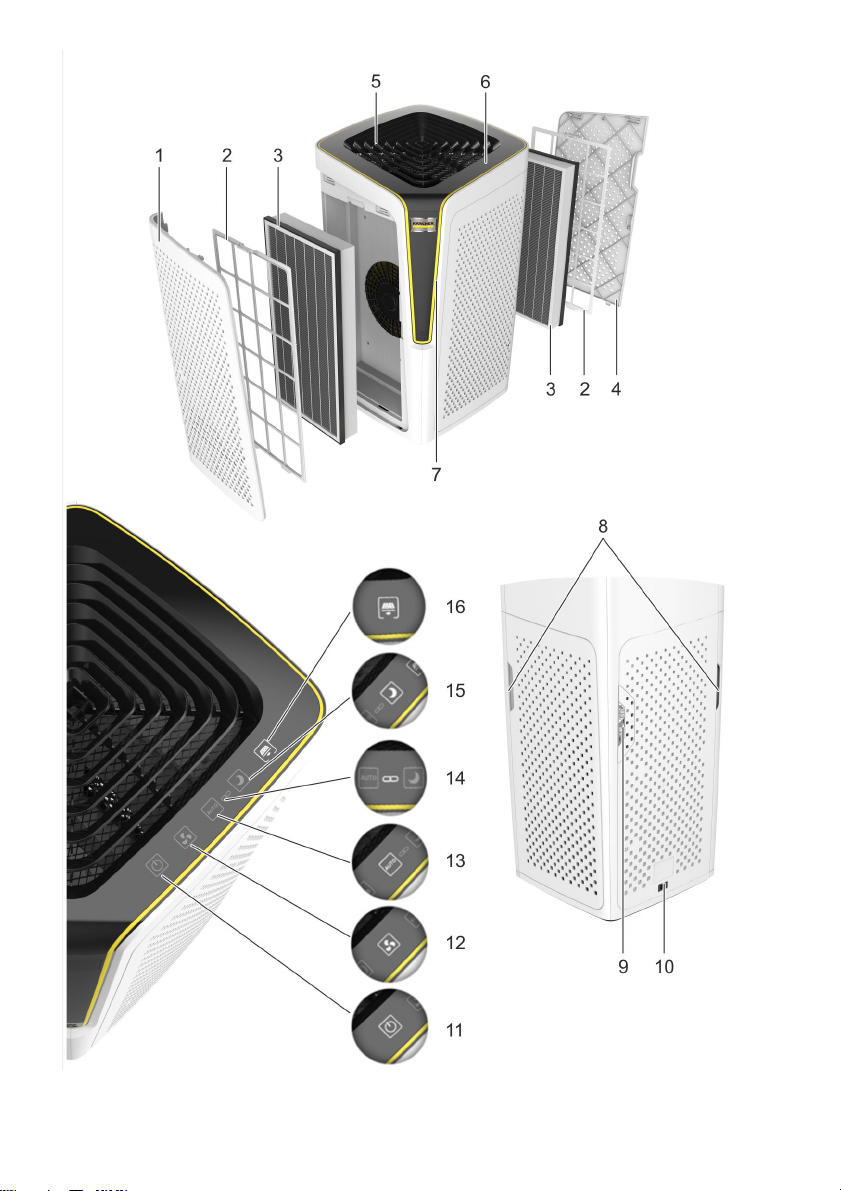
Descripción del aparato ES 7
Puesta en servicio/manejo ES 7
Cuidados y mantenimiento ES 8
Ayuda en caso de avería ES 9
Accesorios especiales ES 9
Datos técnicos ES 9
Indicaciones generales
Uso previsto
Protección del medio ambiente
Eliminación de residuos de filtros
Garantía
Servicio de atención al cliente
Pedido de piezas de repuesto y accesorios
especiales
Indicaciones de
seguridad
9ES

– 6
con un interruptor protector
de corriente de defecto pre-
conectado (intensidad de co-
rriente de liberación nominal:
máx. 30 mA).
–Apague el aparato y desen-
chufe la clavija de red antes
de efectuar los trabajos de
cuidado y mantenimiento.
–Los trabajos de reparación y
trabajos en componentes
eléctricos sólo los puede rea-
lizar el Servicio técnico auto-
rizado.
ADVERTENCIA
–Este aparato no es apto para
ser manejado por personas
con incapacidades físicas,
sensoriales o intelectuales o
falta de experiencia y/o cono-
cimientos, a no ser que sean
supervisados por una perso-
na encargada o hayan recibi-
do instrucciones de esta so-
bre como usar el aparato y
qué peligros conlleva.
–Los niños solo podrán utilizar
el aparato si tienen más de 8
años y siempre que haya una
persona supervisando su se-
guridad o les hayan instruido
sobre como manejar el apa-
rato y los peligros que conlle-
va.
–Los niños no pueden jugar
con el aparato.
–Supervisar a los niños para
asegurarse de que no jue-
guen con el aparato.
–Los niños no pueden realizar
la limpieza ni el mantenimien-
to sin supervisión.
–La entrada y la salida de aire
no deben obstruirse.
–Mantener alejado el plástico
del embalaje de los niños, se
pueden ahogar.
–Apagar el aparato después
de cada uso y antes de cada
limpieza/mantenimiento.
–Está prohibido usar el apara-
to en zonas en las que exista
riesgo de explosiones.
–No colocar el aparato en las
inmediaciones de una fuente
de calor.
PRECAUCIÓN
–El aparato no sustituye una
ventilación adecuada.
–Apoyar bien el aparato sobre
una base llana y colocarlo.
–Emplee únicamente repues-
tos originales de KÄRCHER.
–No utilice el aparato en entor-
nos húmedos o en habitacio-
nes con una elevada tempe-
ratura ambiente, p. ej. en el
baño o la cocina.
PELIGRO
Aviso sobre un riesgo de peligro
inmediato que puede provocar
lesiones corporales graves o la
muerte.
몇ADVERTENCIA
Aviso sobre una situación pro-
pablemente peligrosa que pue-
de provocar lesiones corporales
graves o la muerte.
몇PRECAUCIÓN
Niveles de peligro
10 ES

– 7
Indicación sobre una situación
que puede ser peligrosa, que
puede acarrear lesiones leves.
CUIDADO
Aviso sobre una situación pro-
bablemente peligrosa que pue-
de provocar daños materiales.
Cuando desempaque el contenido del paquete, com-
pruebe si faltan accesorios o si el aparato presenta da-
ños. Informe a su distribuidor en caso de detectar daños
ocasionados durante el transporte.
Ilustraciones, véase la contraportada.
1 Cubierta del filtro delantera
2 filtro previo
3 filtro de depuración fina
4 Cubierta del filtro trasera
5 Salida de aire
6 Panel de control
7 Indicador de calidad del aire
8 Empuñaduras de las cubiertas de filtro
9 Cubierta del sensor de calidad de aire
10 Conexión de red
11 Tecla de mando On/Off
12 Tecla de mando de modo manual
13 Tecla de mando de modo automático
14 Indicador del estado WIFI
15 Tecla de mando de modo nocturno
16 Indicador de cambio de filtro
CUIDADO
Utilizar el aparato siempre con los filtros previos y filtros
finos montados.
Insertar el cable de conexión de red en el aparato.
Enchufar el conector de red a una toma de corrien-
te.
Todas las teclas de mando del panel de mando y
la indicación de calidad del aire se iluminan un ins-
tante y se vuelven a apagar.
Accionar la tecla de mando On/Off para conectar el
aparato.
Nota
– En cuanto se conecta el aparato, el sensor de cali-
dad del aire integrado mide automáticamente la ca-
lidad del aire de la habitación.
– Ajustar el modo deseado mediante el acciona-
miento de la correspondiente tecla de mando en el
campo de mando.
Si se activa el modo automático, el aparato selecciona
la velocidad de ventilación adecuada para la calidad del
aire medida.
Accionar la tecla de mando On/Off para conectar el
aparato.
Accionar la tecla de mando del modo automático.
Se ilumina la tecla correspondiente.
Nota
– El sensor integrado de calidad del aire mide la ca-
lidad del aire y selecciona automáticamente el nivel
de velocidad correcto para garantizar la mejor cali-
dad del aire posible en la habitación.
– En cuanto el aire está limpio, el aparato conmuta a
una velocidad de ventilación más baja.
Si el modo manual está activado, puede ajustar la velo-
cidad de ventilación manualmente.
Accionar la tecla de mando On/Off para conectar el
aparato.
Accionar la tecla de mando del modo manual.
Se ilumina la tecla correspondiente.
Nota
– Si se acciona varias veces, se puede ajustar la ve-
locidad de ventilación en 3 etapas.
Si el modo nocturno está activado, solo se apaga la ilu-
minación del campo de mando, el aparato sigue funcio-
nando.
Al tocar el campo de mando, se vuelve a encender la
iluminación.
Accionar la tecla de mando On/Off para conectar el
aparato.
Accionar la tecla de mando del modo nocturno.
Se ilumina la tecla correspondiente.
Si se ilumina el indicador de cambio de filtro:
véase el apartado Cuidado y mantenimiento.
Nota
– En caso de que la vida útil del filtro sea menor a 72
horas, el indicador de cambio de filtro parpadea
con 2 Hz.
– Si se llega al final de la vida útil del filtro, se encien-
de el indicador de cambio de filtro de forma perma-
nente. El equipo sigue funcionando.
– Para restablecer el indicador de cambio de filtro
tras el cambio, se debe pulsar en modo standby 5
segundos.
– El indicador de cambio de filtro parpadea/se ilumi-
na solo cuando la vida útil del filtro es menor a 72
horas.
– Si el equipo funciona diariamente 12 horas con ni-
vel 1, después de 6 meses se debe cambiar el fil-
tro.
Descripción del aparato
Puesta en servicio/manejo
Puesta en marcha
Panel de control
Modo automático
Modo manual
Ver Velocidad de ventilación
Una aleta de ventilador baja
Dos aletas de ventila-
dor
medio
Tres aletas de ventila-
dor
alta
Modo nocturno
Indicador de cambio de filtro
11ES

– 8
Si el indicador de estado WIFI no se ilumina:
no hay conexión
Si el indicador de estado WIFI parpadea lentamente:
buscando conexión
Si el indicador de estado WIFI parpadea rápidamen-
te:
estableciendo conexión
Si el indicador de estado WIFI se ilumina de forma
permanente:
conexión establecida
Información adicional en la aplicación de Kärcher
Nota
– Si hay conexión WIFI, puede conectar el aparato
con la aplicación Kärcher.
– La aplicación Kärcher le permite controlar el apara-
to si hay conexión.
– Si el rúter es compatible con 2,4 G y 5 G, ambas
frecuencias deben contar con denominaciones dis-
tintas.
Accionar la tecla de mando On/Off para conectar el
aparato.
El indicador de calidad del aire se ilumina:
Azul: calidad del aire muy buena
Amarillo: calidad del aire media
Rojo: calidad del aire mala
Accionar la tecla de mando On/Off para desconec-
tar el aparato.
Guardar la conexión a la red y los accesorios en el
aparato. Guarde el aparato en un lugar seco.
Limpiar la carcasa del aparato en seco de forma regular
para que no se pueda acumular polvo.
Antes de efectuar trabajos en el aparato, desenc-
húfelo.
Limpiar el aparato con un paño seco y suave.
Limpiar las cubiertas de filtro y la salida de aire con
un paño seco y suave.
Si se ilumina el indicador de cambio de filtro:
Figura
Abrir las cubiertas de filtro por las empuñaduras y
retirarlas.
Desbloquear y extraer el filtro previo en la parte su-
perior.
Limpiar el filtro previo.
Extraer el filtro fino del aparato por la etiqueta y
sustituirlo.
Nota
– Siempre hay que limpiar ambos filtros previos.
– El filtro previo se puede lavar.
– Siempre hay que sustituir ambos filtros finos.
Figura
Eliminar el embalaje de los filtros.
Colocar el filtro fino en el aparato. La etiqueta debe
quedar visible desde fuera.
Insertar las pestañas del filtro previo en las ranuras
inferiores.
Encajar el filtro previo en la parte superior con cui-
dado y asegurarse de su posición correcta en los
laterales.
Insertar las pestañas de la cubierta de filtro en las
ranuras inferiores.
Cerrar la cubierta de filtro en la parte superior.
El sensor de calidad del aire debe limpiarse cada 2 me-
ses para garantizar un funcionamiento óptimo. Si el
aparato se usa en un entorno muy pulverulento, debe
limpiarse más a menudo.
Nota
En caso de una humedad del aire muy elevada, puede
formarse condensación en el sensor de calidad del aire.
En estos casos, el indicador led de calidad del aire pue-
de indicar una calidad mala cuando en realidad es bue-
na. En esta situación, limpiar el sensor de calidad del
aire o seleccionar el modo manual.
Figura
Presionar la cubierta del sensor de calidad del aire
en la parte central y abrirla.
Limpiar el sensor de calidad del aire y las aberturas
de aire con un bastoncillo de algodón ligeramente
humedecido.
Secar el sensor de calidad del aire con un baston-
cillo de algodón seco.
Presionar la cubierta del sensor de calidad del aire
en la parte central y cerrarla.
Indicador del estado WIFI
Indicador de calidad del aire
Finalización del funcionamiento
Almacenamiento del aparato
Cuidados y mantenimiento
Cambio de filtro
Sensor de calidad del aire
12 ES

– 9
Insertar el cable de red.
Cerrar la cubierta de filtro.
Limpiar el sensor de calidad del aire.
Asegurarse de que todos los filtros están correcta-
mente insertados.
Limpiar el filtro previo.
Reservado el derecho a realizar modificaciones téc-
nicas.
Ayuda en caso de avería
El aparato no funciona
El indicador de calidad de aire muestra rojo
de forma continua.
La calidad del aire no mejora.
La corriente de aire en la salida de aire es
más débil.
Accesorios especiales
Tipo de filtro Número de
pieza
Empleo
Filtros multiusos 2.863-246.0 para contaminación del aire, específico para polvo fino (PM2,5), formaldehído
Filtro Anti-Smog 2.863-247.0 para contaminación del aire, específico para polvo fino (PM2,5)
Filtro TVOC 2.863-248.0 para compuestos orgánicos volátiles (TVOC), específico para formaldehído
Filtro Pet Pure 2.863-249.0 para pelo y compuestos orgánicos volátiles (TVOC), específico para amoniaco
Datos técnicos
Tensión de red 220 - 240 V
Frecuencia 50/60 Hz
Potencia de absorción
Nivel 1
Nivel 2
Nivel 3
11
26
56
W
W
W
Dimensiones
Profundidad
Anchura
Altura
380
380
713
mm
mm
mm
Superficie de la habitación 42 - 72 m2
Peso sin accesorios 11,2 kg
Nivel de potencia acústica
LWA
62 dB(A)
13ES

– 5
Pelanggan yang terhormat,
Bacalah panduan pengoperasian asli
sebelum menggunakan perangkat ini
untuk pertama kalinya, lakukan seperti
yang tercantum dan jagalah tetap seperti itu untuk
penggunaan selanjutnya atau kepada pemilik
berikutnya.
Perangkat ini dirancang berdasarkan deskripsi yang
tercantum dalam panduan pengoperasian ini dan
petunjuk keselamatan untuk penggunaan sebagai
perangkat pembersih udara.
Perangkat ini dibuat untuk penggunaan perseorangan,
bukan untuk keperluan aplikasi industri.
– Perangkat ini ditujukan hanya untuk penggunaan
di dalam ruangan.
– Lindungi perangkat dari hujan. Jangan simpan di
luar ruangan.
Produsen tidak bertanggung jawab atas segala
kerusakan yang disebabkan oleh penggunaan yang
tidak benar atau operasi yang salah.
Kemasan perangkat dapat didaur ulang. Harap
buang kemasan tidak ke dalam sampah rumah
tangga, melainkan bawa kemasan ini ke tempat
pendaurulangan.
Perangkat ini mengandung bahan-bahan
berharga yang dapat didaur ulang dan harus
ditangani dengan baik. Maka, harap buang
perangkat yang lama dengan cara yang benar.
Perangkat elektrik dan elektronik sering berisi
komponen yang dapat menimbulkan potensi bahaya
terhadap kesehatan manusia dan lingkungan jika
ditangani atau dibuang dengan salah. Namun
komponen tersebut penting untuk pengoperasian
perangkat yang baik. Perangkat yang ditandai dengan
simbol ini tidak boleh dibuang bersama sampah rumah
tangga.
Filter bekas dapat dibuang sebagai limbah rumah
tangga.
Cuci tangan Anda setelah membuang filter bekas.
Garansi yang kami berikan berlaku di setiap
perusahaan penjualan yang resmi di setiap negara.
Kami memperbaiki kerusakan perangkat Anda tanpa
biaya sama sekali jika masih dalam jangka waktu
garansi bila penyebab kerusakan adalah kecacatan
perangkat atau kesalahan pembuatan. Dalam kasus
garansi, harap hubungi penjual dengan menyertakan
nota pembelian atau hubungi pusat pelayanan resmi
kami.
Jika Anda memiliki pertanyaan atau masalah, kantor
cabang KÄRCHER akan senang membantu Anda.
Komponen pengganti dan aksesori tersedia dari dealer
Anda atau kantor cabang KÄRCHER.
BAHAYA
–Perangkat ini hanya boleh
menggunakan listrik
pengganti yang sesuai.
Tegangan listrik harus sama
dengan yang tercantum di
perangkat.
–Jangan pernah menyentuh
steker dan stopkontak dalam
kondisi tangan basah.
–Jangan cabut konektor listrik
dengan menarik kabel
sambungan dari stopkontak.
–Periksa apakah terdapat
kerusakan pada kabel
sambungan dan konektor
sebelum digunakan. Kabel
sambungan yang rusak harus
segera diganti oleh pusat
servis resmi/teknisi listrik
yang berkompeten untuk
menghindari bahaya.
–Untuk menghindari
kecelakaan listrik, sebaiknya
gunakan stopkontak dengan
pemutus arus residu yang
terpasang di hulu (kuat arus
Daftar Isi
Petunjuk umum ID 5
Petunjuk Keamanan ID 5
Penjelasan tentang perangkat ID 7
Pengaktifan awal/pengoperasian ID 7
Pemeliharaan dan perawatan ID 8
Pemecahan Masalah ID 9
Aksesori khusus ID 9
Data Teknis ID 9
Petunjuk umum
Penggunaan yang Benar
Perlindungan lingkungan
Pembuangan filter
Garansi
Layanan pelanggan
Memesan komponen pengganti dan aksesori
khusus
Petunjuk Keamanan
14 ID

– 6
pemicu nominal maks. 30
mA).
–Untuk perawatan secara
umum- dan pemeliharaan,
perangkat harus dimatikan
dan steker harus dicabut.
–Pekerjaan mereparasi dan
merakit alat-alat elektronik
hanya boleh dilakukan oleh
pusat layanan yang resmi.
PERINGATAN
–Perangkat ini tidak ditujukan
untuk digunakan oleh orang
yang memiliki keterbatasan
fisik, panca indera, atau
mental maupun kurang
pengalaman dan/atau
pengetahuan, kecuali jika
berada di bawah
pengawasan orang yang
bertanggung-jawab terhadap
keselamatan mereka atau
memperoleh petunjuk dari
orang tersebut tentang cara
menggunakan perangkat ini
dan memahami bahaya yang
dapat diakibatkan oleh
perangkat ini.
–Anak hanya boleh
menggunakan perangkat jika
telah berusia lebih dari 8
tahun dan jika diawasi oleh
orang yang bertanggung
jawab atas keselamatannya
atau telah memperoleh
petunjuk dari orang tersebut
tentang cara menggunakan
perangkat dan memahami
bahaya yang dihasilkannya.
–Anak-anak dilarang bermain
dengan alat
–Pastikan anak-anak diawasi
sehingga tidak bermain-main
dengan perangkat ini.
–Pembersihan dan
pemeliharaan tidak boleh
dilakukan oleh anak-anak
tanpa pengawasan.
–Inlet dan outlet udara tidak
boleh tertutupi.
–Jauhkan kemasan foil dari
jangkauan anak kecil karena
dapat mengakibatkan sesak
nafas!
–Matikan perangkat setelah
digunakan dan sebelum
dibersihkan/dirawat.
–Dilarang mengoperasikan
perangkat di tempat-tempat
yang mudah menimbulkan
ledakan.
–Jangan letakkan perangkat di
dekat sumber panas.
HATI-HATI
–Perangkat ini bukan
pengganti untuk ventilasi
yang memadai.
–Tempatkan dan arahkan
perangkat pada permukaan
yang kuat.
–Gunakan hanya komponen
pengganti yang asli dari
KÄRCHER.
–Jangan gunakan perangkat di
lingkungan lembap atau di
kamar dengan suhu
lingkungan yang tinggi,
misalnya, di kamar mandi,
dapur.
15ID

– 7
BAHAYA
Petunjuk tentang situasi
berbahaya yang segera
mengancam yang dapat
menyebabkan terluka parah
atau kematian.
몇PERINGATAN
Petunjuk tentang situasi yang
mungkin berbahaya yang dapat
menyebabkan terluka parah
atau kematian.
몇HATI-HATI
Petunjuk tentang situasi yang
mungkin berbahaya yang dapat
menyebabkan cedera ringan.
PERHATIAN
Petunjuk tentang situasi yang
mungkin berbahaya yang dapat
menyebabkan kerusakan
properti.
Saat membuka kemasan, pastikan tidak ada aksesori
yang hilang ataupun komponen yang rusak. Jika Anda
menemukan kerusakan akibat pengiriman, hubungi
dealer Anda.
Gambar lihat dalam lipatan!
1 Penutup filter awal
2 Filter awal
3 Filter halus
4 Penutup filter belakang
5 Outlet udara
6 Panel kontrol
7 Indikator kualitas udara
8 Gagang penutup filter
9 Penutup sensor kualitas udara
10 Catu daya
11 Tombol operasi aktif/nonaktif
12 Tombol operasi mode manual
13 Tombol operasi mode otomatis
14 Indikator status WIFI
15 Tombol operasi mode malam
16 Indikator penggantian filter
PERHATIAN
Operasikan perangkat selalu dengan filter awal dan
filter halus terpasang.
Pasang kabel catu daya ke perangkat.
Pasang konektor ke dalam stopkontak.
Semua tombol operasi pada panel kontrol dan
indikator kualitas udara menyala sesaat dan
padam kembali.
Tekan tombol operasi Aktif/Nonaktif untuk
mengaktifkan perangkat.
Petunjuk
– Saat perangkat diaktifkan, sensor kualitas udara
yang terintegrasi secara otomatis mengukur
kualitas udara dalam ruangan.
– Atur mode yang diinginkan dengan menekan
tombol operasi yang sesuai pada panel kontrol.
Jika mode otomatis diaktifkan, perangkat akan memilih
kecepatan kipas yang tepat untuk kualitas udara yang
terukur.
Tekan tombol operasi Aktif/Nonaktif untuk
mengaktifkan perangkat.
Tekan tombol operasi mode otomatis.
Tombol yang sesuai menyala.
Petunjuk
– Sensor kualitas udara yang terintegrasi mengukur
kualitas udara dan secara otomatis memilih tingkat
kecepatan yang benar untuk memastikan kualitas
udara terbaik di dalam ruangan.
– Setelah udara bersih, perangkat beralih ke
kecepatan kipas rendah.
Saat mode manual diaktifkan, Anda dapat
menyesuaikan kecepatan kipas secara manual.
Tekan tombol operasi Aktif/Nonaktif untuk
mengaktifkan perangkat.
Tekan tombol operasi mode manual.
Tombol yang sesuai menyala.
Petunjuk
– Dengan menekan berulang kali, kecepatan kipas
dapat disesuaikan dalam 3 tingkat.
Tingkat bahaya
Penjelasan tentang perangkat
Pengaktifan awal/pengoperasian
Pengaktifan awal
Panel kontrol
Mode otomatis
Mode manual
Indikator Kecepatan kipas
satu bilah kipas rendah
dua bilah kipas sedang
tiga bilah kipas tinggi
16 ID

– 8
Saat mode malam diaktifkan, hanya lampu panel
kontrol yang nonaktif, perangkat tetap beroperasi.
Dengan menyentuh panel kontrol, lampu panel kontrol
diaktifkan kembali.
Tekan tombol operasi Aktif/Nonaktif untuk
mengaktifkan perangkat.
Tekan tombol operasi mode malam.
Tombol yang sesuai menyala.
Jika indikator penggantian filter menyala:
lihat Pemeliharaan dan Perawatan.
Petunjuk
– Jika masa pakai filter lebih cepat dari 72 jam,
indikator penggantian filter akan berkedip dengan
frekuensi 2 Hz.
– Jika masa pakai filter berakhir, indikator
penggantian filter akan menyala terus. Perangkat
masih beroperasi.
– Untuk mengatur ulang indikator penggantian filter
setelah mengganti filter, indikator ini harus ditekan
selama 5 detik dalam mode siaga.
– Indikator penggantian filter hanya berkedip/
menyala jika masa pakai filter lebih cepat dari 72
jam.
– Jika perangkat dioperasikan setiap hari selama 12
jam dengan tingkat 1, filter harus diganti setelah 6
bulan.
Jika indikator status WIFI tidak menyala:
Tidak ada sambungan
Jika indikator status WIFI berkedip perlahan:
Percobaan sambungan
Jika indikator status WIFI berkedip cepat:
Pembuatan sambungan
Jika indikator status WIFI menyala terus:
Sambungan dibuat
Informasi lainnya dalam Kärcher App
Petunjuk
– Jika sambungan WIFI tersedia, Anda dapat
menghubungkan perangkat ke aplikasi Kärcher.
– Jika sambungan tersedia, aplikasi Kärcher
memungkinkan Anda mengontrol perangkat.
– Jika router mendukung 2.4G dan 5G, dua frekuensi
ini harus diberi nama berbeda.
Tekan tombol operasi Aktif/Nonaktif untuk
mengaktifkan perangkat.
Indikator kualitas udara menyala:
Biru: Kualitas udara sangat baik
Kuning: Kualitas udara sedang
Merah: Kualitas udara buruk
Tekan tombol operasi Aktif/Nonaktif untuk
menonaktifkan perangkat.
Simpan kabel daya dan aksesori pada perangkat.
Simpan perangkat di dalam ruang yang kering.
Bersihkan dan keringkan rumahan perangkat secara
teratur untuk mencegah debu menumpuk.
Sebelum memperbaiki atau membersihkan, selalu
matikan perangkat dan cabut konektor.
Seka perangkat dengan kain kering yang lembut.
Seka penutup filter dan outlet udara dengan kain
kering yang lembut.
Jika indikator penggantian filter menyala:
Gambar
Buka dan lepas penutup filter pada gagang.
Buka dan lepas filter awal.
Bersihkan filter awal.
Tarik dan ganti filter halus pada label dari
perangkat.
Petunjuk
– Kedua filter awal harus dibersihkan.
– Filter awal dapat dicuci.
– Kedua filter halus harus diganti.
Gambar
Lepas kemasan filter.
Masukkan filter halus ke dalam perangkat. Label
harus terlihat dari luar.
Masukkan pengarah filter awal ke dalam celah
bawah.
Kunci filter awal perlahan ke atas dan perhatikan
sisinya apakah terpasang dengan benar.
Masukkan pengarah penutup filter ke dalam celah
bawah.
Tutup penutup filter ke atas.
Sensor kualitas udara harus dibersihkan setiap 2 bulan
untuk memastikan fungsi yang ideal. Jika perangkat
dioperasikan di lingkungan berdebu, sensor ini harus
dibersihkan lebih sering.
Petunjuk
Pada kelembapan yang sangat tinggi, air kondensasi
dapat terbentuk pada sensor kualitas udara. Layar LED
kualitas udara dapat menunjukkan kualitas udara yang
buruk, padahal udara berkualitas baik. Jika demikian,
bersihkan sensor kualitas udara atau pilih mode
manual.
Gambar
Tekan dan buka bagian tengah penutup sensor
kualitas udara.
Bersihkan sensor kualitas udara dan bukaan udara
dengan kapas basah.
Keringkan sensor kualitas udara dengan kapas
kering.
Tekan dan tutup bagian tengah penutup sensor
kualitas udara.
Mode malam
Indikator penggantian filter
Indikator status WIFI
Indikator kualitas udara
Menghentikan pengoperasian
Menyimpan perangkat
Pemeliharaan dan perawatan
Penggantian filter
Sensor kualitas udara
17ID

– 9
Pasang kabel listrik.
Tutup penutup filter.
Bersihkan sensor kualitas udara.
Pastikan bahwa semua filter dimasukkan dengan
benar.
Bersihkan filter awal.
Tergantung dari modifikasi teknis!
Pemecahan Masalah
Perangkat tidak berjalan
Indikator kualitas udara menunjukkan merah
konstan
Kualitas udara tidak membaik
Aliran udara di outlet udara melemah
Aksesori khusus
Jenis filter Nomor
komponen
Petunjuk penggunaan
Filter serbaguna 2.863-246.0 untuk polusi udara, terutama untuk debu halus (PM2.5), formaldehida
Filter antiasap 2.863-247.0 untuk polusi udara, terutama untuk debu halus (PM2.5)
Filter TVOC 2.863-248.0 untuk senyawa organik volatil (TVOC), khusus untuk formaldehida
Filter Pet Pure 2.863-249.0 untuk rambut dan senyawa organik volatil (TVOC), khusus untuk Amonia
Data Teknis
Tegangan listrik 220 - 240 V
Frekuensi 50/60 Hz
Daya input
Tingkat 1
Tingkat 2
Tingkat 3
11
26
56
W
W
W
Dimensi
Lebar
Lebar
Tinggi
380
380
713
mm
mm
mm
Permukaan ruang 42 - 72 m2
Bobot tanpa aksesori 11,2 kg
Tingkat daya suara LWA 62 dB(A)
18 ID

– 5
고객님 ,
장비를 처음 사용할 때에는 우선 본 사용
설명서 원본을 잘 읽고 , 지시 사항에 따라
조심스럽게 다루고 , 나중에 또 보거나 다
음 장비 주인이 참고할 수 있도록 설명서를 잘 보관해
두시기 바랍니다 .
본 장비는 본 사용설명서에 명시된 설명 및 안전지침에
따라 에어 클리너로 사용하는 용도로 설계되었습니다 .
본 장비는 개인적으로 사용하는 용도로 개발되었으며
상업적 용도에는 적합하지 않습니다 .
–본 장비는 실내 전용입니다 .
–장비가 비에 젖지 않도록 합니다 . 바깥에 보관하지
않습니다 .
제조사는 규정된 용도에 따르지 않은 사용 또는 잘못된
조작으로 발생하는 손해에 대해서는 책임지지 않습니다
.
포장 재료는 재활용할 수 있습니다 . 포장지는 집
안 쓰레기통에 버리지 말고 재활용하시기 바랍
니다 .
헌 장비들에는 유용한 재활용 재료들이 들어 있
습니다. 그러므로 적합한 수거 시스템을 통해 헌
장비들을 처분하시기 바랍니다 .
일반적으로 전기장치 및 전자장치에는 , 잘못 취
급하거나 또는 잘못 폐기할 경우 건강 및 환경에 잠재적
위험이 될 수 있는 구성요소가 포함되어 있습니다 . 하
지만 이런 구성요소는 장치의 원활한 가동에 필수적인
요소입니다 . 이 심벌이 표시된 장치는 가정용 쓰레기로
폐기하지 말아야 합니다 .
사용된 필터는 가정용 쓰레기로 폐기할 수 있습니다 .
사용된 필터를 폐기한 후에는 손을 깨끗하게 씻으십시
오.
어느 나라에서나 당사의 공인 마케팅 회사들이 발표한
보증 조건이 적용됩니다 . 장비에 고장이 생기면 보증 기
간 내에는 , 재료나 제조 상의 결함이 그 원인인 한 , 무
료로 수리해 드립니다 . 보증 건이 생긴 경우 구매 영수
증을 판매점이나 가장 가까운 공인 고객 서비스 센터에
제시하시기 바랍니다 .
질문 또는 장애 시 KÄRCHER 지사에서 여러분들에게
도움을 제공할 것입니다 .
예비품 및 부대 용품은 가까운 KÄRCHER 지사 또는 판
매점에서 구매할 수 있습니다 .
위험
–
제품은 교류에만 연결합니다.
전압은 장비의 라벨과 일치해
야 합니다 .
–
전원 플러그와 소켓은 절대로
젖은 손으로 만지면 안됩니다
.
–
연결 케이블을 당기는 방식으
로 전원 플러그를 소켓에서
뽑으면 안됩니다 .
–
사용 전에는 매번 전원 플러
그가 달린 연결 회선의 손상
여부를 살핍니다 . 위험을 방
지하기 위해 , 손상된 연결 회
선은 즉시 공인 고객 서비스
센터 / 전기 전문 인력에게 의
뢰하여 교체해야 합니다 .
–
전기 사고를 방지하기 위해 ,
전단에 누전차단기 ( 최대
30 mA 정격트립 전류세기 )
가 설치된 소켓을 사용할 것
을 권장합니다 .
–
간수 및 정비 작업 전에는 매
번 장비를 끄고 플러그를 뺍
니다 .
–
전기 부품 수리 작업과 작업
은 공인 서비스 센터에서만
해야 합니다 .
경고
–
안전 담당자의 감독을 받거나
안전 담당자에게서 장비 사용
지침을 입수하여 위험성을 이
해한 경우가 아닌 한 , 본 장비
는 신체적 , 감각적 또는 정신
적 능력이 제한되거나 체험과
/ 이나 지식이 부족한 사람들
차례
일반 지시 사항 KO 5
안전 지침 KO 5
장비 설명 KO 6
작동 / 조작 KO 6
보관 및 정비 KO 7
고장 시 해법 KO 8
특수 부가 용품 KO 8
기술 자료 KO 8
일반 지시 사항
규정에 따른 사용
환경 보호
필터의 폐기
보증
고객 서비스
예비품 및 특수 부대 용품의 주문
안전 지침
19KO

– 6
( 어린이 포함 ) 이 쓸 수 없습
니다 .
–
어린이들은 나이가 8 세를 넘
고 안전 담당자의 감독을 받
고 있거나 감독의 장비 사용
법 지시를 받아 장비 사용에
따르는 위험성을 이해한 경우
에만 장비를 사용해야 합니 .
–
어린이들은 장비를 가지고 놀
면 안됩니다 .
–
아이들은 장비를 가지고 장난
치지 못하도록 감독해야 합니
다.
–
청소와 사용자 정비는 감독을
받지 않고 어린이가 하면 안
됩니다 .
–
공기 입구 및 출구는 가리지
말아야 합니다 .
–
포장 포일은 아이들 눈에 띄
지 않도록 치워 두어야 합니
다 . 질식 위험이 있습니다 !
–
사용 후에 그리고 청소 / 정비
작업 전에 매번 장비를 끄십
시오 .
–
폭발 위험이 있는 구역에서는
사용을 금합니다 .
–
장비는 열원 근처에 세워두면
안됩니다 .
주의
–
장비는 적합한 통풍을 위한
용도로 사용하면 안됩니다 .
–
장비는 평탄한 바닥에 움직이
지 않게 세우고 정렬합니다 .
–
전적으로 오리지널
KÄRCHER 예비 부품만을 사
용합니다 .
–
본 장지는 예를 들어 욕실이
나 부엌과 같은 습한 환경 또
는 주변온도가 높은 공간에서
사용하면 안됩니다 .
위험
신체에 중상을 입거나 사망에 이
르는 직접적인 위험 .
몇
경고
신체에 중상을 입거나 사망에 이
를 수 있는 위험스러운 상황 .
몇
주의
경상에 이를 수 있는 위험스러운
상황 .
유의
물적 손상에 이를 수 있는 위험
스러운 상황 .
제품 개봉시 포장 내용물에 부속품이 빠졌거나 손상이
있는지 검사하시기 바랍니다 . 배송중 파손이 있는 경우
판매점에 연락하시기 바랍니다 .
도해 접어 넣은 페이지 참조 !
1 앞 필터커버
2일차 필터
3미세 필터
4 뒤 필터커버
5공기 출구
6 조작패널
7 공기품질 표시창
8 필터커버 손잡이
9 공기품질센서 커버
10 본선
11 On/Off 조작버튼
12 수동 모드 조작버튼
13 자동 모드 조작버튼
14 WIFI 상태표시창
15 야간모드 조작버튼
16 필터교체 표시창
유의
장비는 항상 일차 필터 및 미세 필터를 상태에서 가동하
십시오 .
장비에 전원 연결 케이블 꽂기
전원 플러그를 소켓에 꽂습니다 .
조작패널에 있는 모든 조작버튼 및 공기품질 표시
창이 짧게 켜지고 다시 꺼집니다 .
장비를 켜기 위해 On/Off 조작버튼을 누릅니다 .
참고
–장비가 켜지면 , 내장된 공기품질센서가 공간 내 공
기품질을 자동으로 측정합니다 .
–조작패널에서 해당 조작버튼을 눌러 원하는 모드로
조절합니다 .
위험 단계
장비 설명
작동 / 조작
작동
20 KO
Table of contents
Languages:
Other Kärcher Air Cleaner manuals