Kabuto VITT User manual

VITT系取扱説明書 保存用
ヴ ィット
この取扱説明書は、ご使用になる前に必ずお読みください。
また、お読みの後は保管してくださいますようお願いいたします。
BE SURE TO READ THIS MANUAL BEFORE USING THE HELMET.
KEEP THE MANUAL IN A SAFE PLACE FOR FUTURE REFERENCE.
ご使用になる前に/NOTESBEFOREUSE
VITT INSTRUCTION MANUAL
2019年06月版

ご使用になる前に
このたびは、弊社製品を お 買 い 上 げ い た だ き 、誠 に あ り が と う ご ざ い ま す 。
この取扱説明書は、ヘルメットの正しい取扱方法について説明しております。
ご使用前には必ず最後までこの説明書をお読みいただき、
お読みの後は、当説明書を大切に保管していただきますよう、お願いいたします。
ヘルメットは、いかなる事故にも絶対という訳ではなく、万一の際に危険の度合いを
減らす装備の一つで、安全の一要素としてご理解のうえご使用ください。
安全快適なバイシクルライフを楽しむためにも、以下の注意事項を
よくご理解いただきますようお願いいたします。
●このヘルメットは「自転車専用」です。
オートバイやその他の用途には絶対に使用しないでください。
●国で定められている交通規則に必ず従ってください。

ワンタッチバックルの取扱方法
1
あごひもおよびアジャストロックの調整
2
XF-8アジャスターの調整
3
シ ー ルド に つ い て
4
A.I.ネットの交換方法
5
正しい位置でヘルメットを装着する
6
部位名称ともくじ
シ ー ルド
シェル
XF-8アジャスター
ライナー
2
ライナー
シェル
ワン タッチ バック ル
あごひも
XF-8アジャスター
ア ジャスト ロ ック

3
ワンタッチバックルの取扱方法
1
ワンタッチバックルは、あなたの頭にしっかりヘルメットを固定するための重要な装置です。
あごひもの両先端に付いている「ワンタッチバックル」を確実にとめましょう。
●あごひもは正し くしっか り締 めてくだ さ い 。締めないままの走行は、万一転倒した際に大
変危険ですので、絶対におやめください。
●
ワンタッチバックルは、必ず最後まで(カチッと音がするまで)きっちり押し込んでください。
押し込みが不完全ですと、万一転倒した際にワンタッチバックルが外れてしまい、大変危険です。
ワン タッチ バック ル
リリー ス
ボタン
ワンタッチバックルの留め方
ワンタッチバックル の外し方:リリースボタンを押すと、ワンタッチバックルが外れます。
ワ ンタッ チ バック ル
押す
押す
外れる
ワ ンタッチ バック ルをと めると き は 、
お肌を挟まないようご注意ください。
顔などケガをするおそれがあります。
警告
警告:
ご 使 用 前 に 必 ず 試 着 し ま し ょ う!
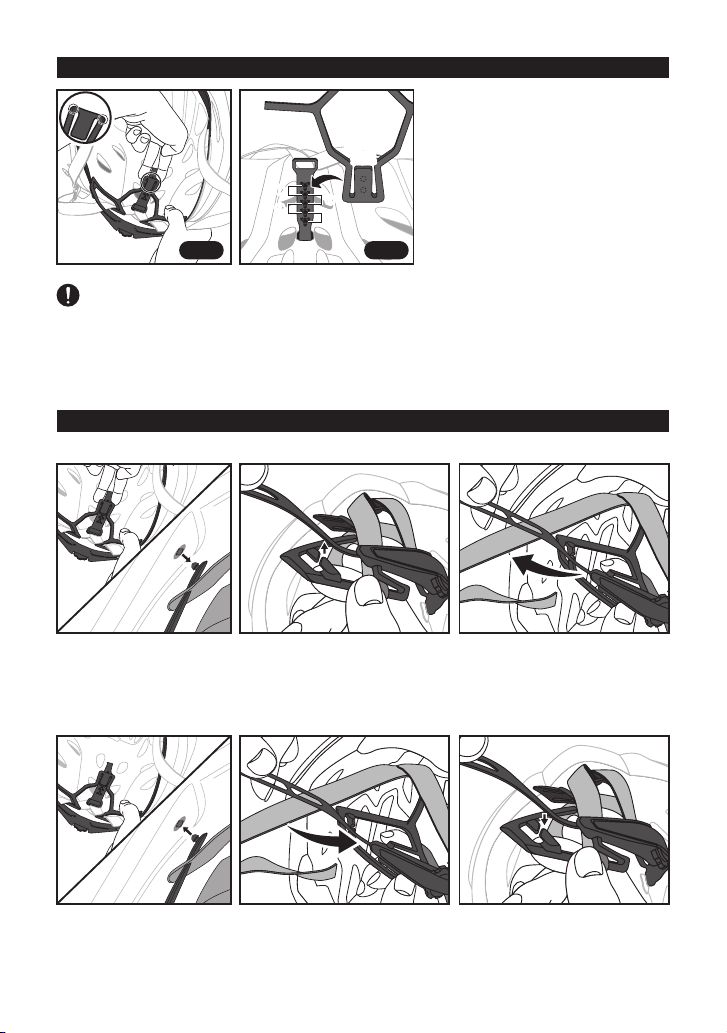
あごひもおよびアジャストロックの調整
2
あごひもの長さなど、あなたの頭にぴったりフィットするよう必ず調整しましょう。
あごひもの長さは、ワンタッチバックルを締めたとき、指が2〜3本入る程度が一般的です。
ご使用前に必ず試着を行い、「あごひも」の長さや「アジャストロック」のロック位置、
「 X F - 8 ア ジャス タ ー」の締め具合などを適 度に調整し、あなたの頭にぴったりフィットする
よう にしてく だ さ い 。 ※「 X F - 8 ア ジャス タ ー」の調整については「3XF-8アジャスターの調整」を参照。
警告:
●あ ご ひ も は 、左 記 以 外 の 通 し 方 を す る
と、あごひも自体が滑り固定できずに抜
けてしまい、ヘルメットが脱げてしまうお
それがありますので、正確に通してくだ
さい。
●ワンタッチバックル(差し込む側)の表裏
を間違えると、あごひもが緩んで固定が
出来なくなりますの で 、も し ワ ン タ ッ チ バ
ックルを完全にあごひもより取り外した
場 合 は 、取 り 付 け る 際 、ワ ン タ ッ チ バ ッ ク
ルの方向にご注意ください。
最後にあごひもの先端を
「Oリング」と「ストラップホルダー」で留めてください。
あごひもの長さ調整
ワン タッチ バック ル
リリ ー ス ボ タ ン
Oリング
あごひも
スト ラップ
ホルダー
ワ ン タ ッ チ バ ッ ク ル( 差 し 込 む 側 )の
向きにご注意ください。

4
ワンタッチバックルをとめ、しっかり顔の側面に合うように「アジャストロック」の高さを調
整 し ま す 。ヘ ル メ ッ ト を 被 り 、あ ご ひ も の Aの部分がすっきり納まっているか確認し、耳の部
分が緩いまたは、キツい場合、「アジャストロック」を移動させて高さを調整します。
ア ジャスト ロッ ク 移 動 後、ゆるませたあごひもをしっかり引っ張ってゆるみ
を完全に取り除いてください。あごひもがゆるんだままの状態で走行する
と 、あ ご ひ も が 正 し い 長 さ で 固 定 さ れ ず、ヘルメットが脱落するおそれがあ
ります。
アジャストロックの調整
XF-8アジャスターダイヤルの調整方法
XF-8アジャスターの調整
3
「XF-8アジャスター」は、ヘルメットのズレやブレを抑えるために、ヘルメット後頭部に装備されたロック
機構の事です。あなたの頭にピッタリフィットさせ、しっかりホールドするように、XF-8アジャスターを
調 整しましょう。
ダイヤルを左へ 回す
緩めるとき 締めるとき
ア ジャス タ ー が 広 が る
ダイヤルを右へ回す
ア ジャス タ ー が 締 ま る
XF-8アジャスターをご使用の際、
アジャスターに毛髪が絡まないようご注意ください。
はじめにXF-8アジャスターのダイヤルを適度に緩めてからヘルメットをかぶり、ヘルメットの前部を
押さえながら、適度に締めてください。(下図参照)
ご 注 意:
ヘルメット前部を押さえながら、
ダイヤルを回して適度に締めます。
ダイヤル
●アジャストロックの移動方法
①ア ジ ャ スト ロ ック の カ バ ー を 矢
印の方向に開きます。
②ア ジ ャ スト ロ ック を 正 し い 高 さ
に調整します。
③高 さ が 決 ま っ た ら 、ア ジ ャ ス ト
ロックのカバーを元の通りに
閉じたら完了です。
②①
③
正しい あごひも
の状態
ア ジャ スト ロック
前を押さえながらダイヤルを回す
ア ジ ャ スト ロ ック
カバー
警告:

5
① X F - 8 アジ ャス タ ー 後 側 の 固 定 部
にある▲印の部分を指に引っかけ
て 、手 前 に 引 っ 張 っ て 外 し ま す 。
( 図1)
②外した固定部をお好みの高さに付
け 替 え る こ と に よ り 、角 度 が 4 段
階に変えられます。(図2)
※調 整時、前側の固定部は外す必 要はありません。
XF-8アジャスターの角度を変える(上下4段階)
XF-8アジャスターの脱着
●取り外し方
図1 図2
① ア ジャス タ ー
後側と前
側の固定部を取り外し
ます。
②アジャスターアーム部をアジ
ャス タ ー 本 体 より 外 し ま す。
③ アーム と本 体 に 挟 まって い た
あ ご ひ も を 外 し ま す 。( 両 側
とも外します)
●取り付け方
(作業の前にあごひもをヘルメット内側の中央に寄せておくと、スムーズに作業ができます)
① ア ジャス タ ー 後 側 と 前
側の固定部を取り付け
ます。
②あごひもをアーム部とアジャ
スター本体の間に通します。
③最 後 に ア ーム 部 を ア ジャス タ
ー本体の溝に差し込みます。
ご注意
固定部を取り外す際は、必ず▲印部分よりゆっくり外してください。
ねじったり無理に引っ張ったりすると破損の原因となりますのでご注意ください。
▲印
○部分の▲印を
持ち上げる
①① ②
③④
②
③④
裏側に
突起
裏側に
突起

ご 注 意:
シールドについて
4
このヘルメットはシールドを標準装備しており、一般
的な眼鏡の上からお使いいただけるよう設計されて
おります。
※眼鏡の形状によっては、ご使用になれない場合が
あります。
シールドは磁力で固定されていますので、
シールドをしっかり持って引っ張ると取り外せます。
また、シールドは状況に合わせて上下180度回転さ
せて取り付ける事も可能です。
(別売)「XF-8アジャスター」について
「別売・XF-8アジャスター」について詳しくは、当製品掲載のカタログ
もしくはホームページに掲載のパーツリストをご覧ください。
Kabuto 検索
「(別売)補修用/オプションシールド」について
詳しくは、当製品掲載のカタログもしくはホーム
ページに掲載のパーツリストをご覧ください。
Kabuto 検索
「X F - 8 アジャス ター」は 、補 修 用としてもご 用 意して おりま す。
弊社製品のアジャスター各種は、各モデルの専用設計となっております。
補修用をお買い求めの際には、ご使用のヘルメットに適合した部品をお買い求めください。
シールドを取り付けた後は正しく取り付けられているか必ず確認してください。取り付けが不完
全ですと、走行中にシールドが脱落するおそれがあり、大変危険です。
またシールドは消耗品です。傷の付いたシールドは視界を妨げる原因となり大変危険ですので速
やかに新しいシールドに交換してください。
別売・補修用
AR-3シールド
警告:
シールドは磁力で取り付けられています。シールドに
強い力がかかると、シールドが脱落しますので、十分
にご注意ください。
ご 注 意:
6
シ ー ルド
シ ー ルド

7
フロントスペーサー*裏側は黒い生地
マ ジックテ ー プ
フロントスペーサーの取り付け方
別売オプションの「フロントスペーサー」を使用することで、
顔や眼鏡へのシールドの干渉をさらに改善させることができます。
(別売オプション)「フロントスペーサー」について
●
「(別売オプション)フロントスペーサーについて詳しくは、
当製品掲載のカタログもしくはホームページに掲載のパーツリ
ストをご覧ください。
Kabuto 検索
別売オプションフロントスペーサー
(フロントスペーサーについてのご注意)
フロントスペーサーを装着しても、眼鏡の形状によっては、
ご使用になれない場合があります。
フロントスペーサー
マ ジックテ ー プ
(ヘルメット内側)
A.I.ネット

8
A.I.ネット(Anti Insect Net)の交換方法
5
●取り外し方
上 図 の ○ 印 部 分 に あ る 、X F - 8 ア ジ ャス タ ー 固 定 部( 前 側 )を 手 前 に 引 っ 張 っ て 取 り 外 し 、
「A . I . ネット」を ゆっくり取り 外すと、取り外し 完 了 で す。
●取り付け方
①(図1)のようにXF-8アジャスターの固定部(前側)をA.I.ネット両端にある穴に通してか
ら取り付けます。
②(図2)の位置にA.I.ネットを取り付けます。
( 図1)
XF-8アジャスター固定部
(前側)
XF-8アジャスター
あごひも
XF-8アジャスター
(アーム部)
XF-8アジャスター固定部
(前側)
(図2)
※差し込み穴にXF-8アジャスター
「アーム部」の突起を差し込む(左右とも)
差し込み穴
ご注意
●XF-8アジャスターを取り外す際は、必ず取付部の根元付近を持ってゆっくり外してくだ
さい。無理に引っ張ると、ヘルメット側の固定部が破損するおそれがあります。
●A.I.ネットを取り外す際は、A.I.ネットをゆっくり引っ張ってください。
無理に取り外すと、A.I.ネットの破損やマジックテープの脱落の原因となります。
●A.I.ネットを取り付ける際、上図通りに正確に取り付けてください。
シワになったままのご使用は、装着感を損ねる原因となります。
A.I. Net

(別売)「VITT・補修用パッド」について
インナーパッドのお手入れについて
別売のインナーパッドをお買い求めの際は、お使いのヘルメットのモデルをよ
くご確認のうえ、販売店などへご注文ください。
汗などで汚れたインナーパッドは、取り外して洗うことができますので、定期的にお手入れする
ことでインナーパッドを清潔に保てます。インナーパッドを洗う場合は、水もしくはぬるま湯
(35℃以下)にごく少量の洗髪用シャンプーもしくは家庭用中性洗剤を入れ、やさしく手もみ洗
いを行ってからよくすすいでください。洗い終わったら乾いた布などで水気をやさしく取り除き、
直射日光の当たらない風通しのよい場所で陰干しを行ってください。
つね日ごろよりご使用いただいているヘルメット内部のインナーパッドは、消耗品です。傷んだ
インナーパッドをそのまま、使い続けると破れてしまい、フィット感などに悪影響をおよぼしかね
ません。古くなったインナーパッドは、早期に交換される事をお薦めします。
ご 注 意:
インナーパッドは消耗品です!
補修用パッド各種について詳しくは、弊社カタログもしくはホームページに掲載の
パ ー ツ リ スト を ご 覧 く だ さ い 。 Kabuto 検索
正しい位置でヘルメットを装着する
6
ヘルメットの正しい装着方法
ヘルメットは正しい位置で正しく装着し、あごひもを正確に締める事で、
はじめてヘルメット本来の安全性能を発揮します。
ヘルメットは走行前にしっかり正しく装着しましょう。
ご 注 意:
正しい装着例
ヘルメットを前から後にかけて水平になるように着用してください。このときにヘルメットの先端
がまゆ毛のすぐ上にない場合は、正しく装着できていません。(装着の際は鏡を見ながら調整し
てください)また、あごひもの長さやアジャストロックの調整もヘルメットを正しく装着するうえ
で大変重要な部分です。当説明書の該当項目をよくお読みのうえ、正しくかぶってください。
前から後ろにかけて水平になるように
装着します。
誤った装着例
ヘルメットの先
が上を向き、前
頭部が見えて
いる
9
ヘルメットの先が
眉毛のすぐ上にある

下記の内容は必ずお読みください。
あごひもを締めなかったり、締め方が緩かったりすると、万一転倒した時などに脱げてしま
い、頭を守ることができず非常に危険です。また、ヘルメットの下に、帽子・フード・バイザー・
ヘッドフォン等を着用しないでください。ヘルメットがずれたり、落ちるおそれがあります。
警告:
「あごひもは必ずしっかり締めてください。」
ヘルメットはシェル及び 衝撃吸収ライナーが潰れることで、衝撃エネルギーを吸収します。大きな
衝撃を受けたヘルメットは、既にライナーが潰れていることが多く、そのまま使用すると、再度衝
撃エネルギーを吸収できず非常に危険です。外観に傷がなくても、使用しないでください。
「大きな衝撃を受けたヘルメットは外観上に損傷がなくても、ご使用にならないでください。」
ヘルメットに穴を開けたり、内部の衝撃吸収材を削ったり、また、あごひもなどは絶対に改造
しないでください。ヘルメット本来の性能が発揮できなくなり非常に危険です。
「ヘルメットの改造および分解は絶対にしないでください。」
衝撃吸収ライナーは、塗料や熱の影響により材質が侵され衝撃吸収力が低下する場合があり
ま す の で 、ペ イ ン ト は 絶 対 に お や め く だ さ い 。
「ヘルメットのペイントは絶対にしないでください。」
ヘルメットは丈夫だからといって、床等に放り投げたり、上に座ったりしないでください。
その度に衝撃を吸収するため、衝撃吸収力が低下します。万一のために大切に取り扱ってく
ださい。また、乗車時に頭を保護する目的以外には使用しないでください。
「ヘルメットは大切に取り扱ってください。」
ヘルメットは直射日光の当たる場所への長時間の放置や、車の中および、暖房機のそばな
ど、高温(50℃以上)の場所に長時間放置しないでください。
ヘルメットに使われている材質 等が 変 質して、性能が低下します。
「ヘルメットの保管について」
ヘルメットのカラーによっては、長期間日光を浴びることにより、シェル表面の色調が変色す
る 場 合 が ありま す。
「長期間の日光照射によるシェルの 変色について」
ガ ソ リ ン・シ ン ナ ー・ベ ン ジ ン・熱 湯( 50 ℃ 以 上 )や 、塩 水 等 は 絶 対 に 使 用 し な い で くだ さ い 。
「ヘルメットのお手入れは薄めた中性洗剤でふき取るようにしてください。」
ご 注 意:
マットカラーは表面処理の都合上、あらかじめ貼付されているステッカーをはがすと、表面の
マット(つや消し)処理がはがれる事がありますので、ステッカーは絶対にはがさないでくだ
さい。またお客 様がご購入後にご自身で貼付したステッカーを再度はがし取る場合も、同様
のことが考えられますので、ステッカーを貼付される際は十分にご注意ください。
「マット(つや消し)カラーについて」
10

11

BE SURE TO READ THIS MANUAL BEFORE
USING THE HELMET.
KEEP THE MANUAL IN A SAFE PLACE FOR
FUTURE REFERENCE.
NOTES BEFORE USE
VITT
INSTRUCTIONMANUAL
12

NOTES BEFORE USE:
Thank you for purchasing the Kabuto helmet. This manual explains how to use your
Kabuto helmet correctly. Please take time to read this instruction manual before using
the helmet, and keep the manual in a safe place for future reference. No helmet can
protect the user 100% in any case of accidents, but it can reduce the risk of injury.
Please make sure you understand the following warnings and enjoy riding your bicycle
safely.
●This helmet is for bicycle use only.
Do not use this helmet for motorcycle riding or any other activities.
●Please obey all traffic rules.
WARNING!
13

Chinstrap
Liner
Shield
Shell
Shell
XF-8 Adjuster
XF-8 Adjuster
Liner
Fastening the strap buckle
1
Adjusting the strap and
adjustment locks
2
Adjusting the XF-8 Adjuster
3
Shield
4
Replacing theA.I.Net (Anti Insect Net) 6
5
How to wear helmet properly 6
6
Part Names
14
Strap buckle
Adjustment Lock

15
Fastening the strap buckle
1
The strap buckle is important for secure fitting.
Make sure to fasten the strap buckle firmly.
Strap buckle
Release
button
How to fasten the strap buckle
How to release the strap buckle: Push the release button
Strap buckle
Push
Push
Release
Be careful not to pinch your
skin when fastening the
strap buckle.
WARNING!
●Make sure to fasten the strap rmly. It is dangerous to ride a bicycle without fastening
the strap.
●If the strap buckle is not fastened (ie, you don't hear it click), or if it is fastened loosely,
the helmet may come o in an accident, leading to death or serious injury.
WARNING!
Try on the helmet before use
Adjusting the strap and adjustment locks
2
Adjust the strap to t your head. It generally should be just long enough to leave
space for 2 to 3 ngers horizontally when fastening the strap.
Try on your helmet before riding, and adjust the length of the strap, the position of the
adjustment locks and the fit of the XF-8 Adjuster to fit the helmet to your head.
See: 3Adjusting the XF-8 Adjuster for how to adjust the XF-8 Adjuster
WARNING!
●
Make sure to follow these
instructions for adjusting the strap.
Otherwise, the strap may become
loose and the helmet may come o.
●
If the strap buckle is inserted upside
down, the strap will be loose and the
helmet will not t your head rmly. If
the strap buckle is removed from the
strap completely, make sure to place
it back in the correct direction.
Adjusting the length of the strap
Strap buckle
Release
button
O-ring
Strap
Strap holder
Bind the strap with the “O-ring” and “Strap
holder” at the end.
Shorten Lengthen
Make sure the strap buckle is
facing the correct direction.

①
③
16
Ajusting the XF-8 Adjuster
Put on the helmet, fasten the strap buckle and adjust the adjustment locks so they can be
placed firmly on the side of your face. Check that the Apart is placed correctly. If the strap
around your ears is loose or tight, change the position of the adjustment lock.
How to adjust the adjustment locks
Correct
positions of the
straps
Adjustment lock
How to change the Adjustment lock position
①Open the cover of the
Adjustment-lock in the
direction shown by the
arrow.
②Move the Adjustment-lock
up or down to change the
position.
③When the Adjustment-lock
is placed properly, close
the cover securely.
Cover
②
Adjustment lock
XF-8 Adjuster is a mechanism at the rear of the helmet to keep the helmet from moving.
Adjust the XF-8 Adjuster so it keeps the helmet on your head securely.
First, loosen the XF-8 Adjuster dial, and then put on the helmet. Then, hold the front side of
the helmet against your head and tighten the adjuster dial. (See below)
CAUTION!
How to adjust the XF-8 Adjuster
Hold the front side of the helmet
and tighten the XF-8 Adjuster using
the adjuster dial.
Be careful with your hair, especially long hair, so it does not get
tangled in the XF-8 Adjuster.
Turn the dial to the left
Loosen Tighten
Turn the dial to the right
Adjuster Dial
WARNING!
After you moved the adjustment locks, please make sure the strap is not loosen on the
adjustment lock. It is dangerous to use the helmet with the part kept loosen, as the chinstrap
cannot be fixed at the right length, resulting the helmet to fall off from your head.
Hold the front part and turn the dial.

17
CAUTION!
①Firmly hold the spots indicated by
▲ marks on the part attached at
the back of the Adjuster, and pull
the part toward you to detach it
(Fig.1).
②The angle of the adjuster is
changeable at any of four levels
by switching the positions (Fig.2).
To adjust the angle of the XF-8 Adjuster
Detach/Attach the XF-8 Adjuster
●To detach
Fig.1 Fig.2
①
Detach the parts
attached to the front and
back of the Adjuster.
②Detach the Adjuster arm
from the Adjuster body.
③Remove the straps from the
adjuster arm and the body.
(Remove both sides)
●To attach (To attach XF-8 Adjuster easier, gather the chinstraps in the helmet in advance.)
①
Attach the parts
detached from the front
and back of the Adjuster.
②Run the strap between the
Adjuster arm and the body
③Finaly insert the arm into the
groove on the Adjuster body.
When detaching the mounting part, be sure to hold the ▲ marks and
detach the part slowly. Twisting and forcefully moving the adjuster
may cause its breakage. Please pay due caution in adjustment.
▲mark
:Mountingpart
①① ②
③④
②
③④
Buttonson
theback
Buttonson
theback
*When adjusting the angle, it is not necessary to detach anything
attached to the front.

WARNING!
Kabuto’s helmet adjusters are developed exclusively to each model.
Please confirm the model at purchasing the replacement.
Shield
4
The shield comes with the helmet as standard.
The shape of the shield is also considered to use
with general shape of an eye wear.
*According to the shape, some eye wears may
not fit to use with the shield.
The shield is fixed on the helmet with magnets,
and it is detachable by firmly holding the shield
and pulling it off. The shield can also be attached
upside down on the helmet as illustrated.
ReplacementXF-8Adjuster
Replacement XF-8 Adjuster
Please refer to Parts List on our website for more information about
replacement.
Replacement / Optional AR-3 shield
Please refer to Parts List on our website for more information about
replacement and optional AR-3 shield.
XF-8 Adjuster is available as a replacement part.
Replacement
XF-8Adjuster
Please confirm the shield is attached correctly. When the attachment is incorrect, the
shield may fall off while riding a bicycle, which can be very dangerous.
Shield is an expendable item. It is very dangerous to use the shield with scratches, which
will hinder your vision. Please replace the shield with a new one once it is scratched.
The shield is attached on the helmet with magnets.
Do not make strong force on the shield. Shield
may detached.
CAUTION!
CAUTION!
http://www.ogkkabuto.com/
18
Shield
Shield

19
By using the front spacer interference between your
face/eye wear and the shield can be made smaller.
Attaching the Front spacer
Front spacer *Backsidecolorisblack
hook-and-loopfastener
(Optional accessory)
Front spacer
hook-and-loopfastener
(insidethehelmet)
Front spacer
A.I.net
•The interference between the shield and some glasses, depending on their shapes,
cannot be removed even with the front spacer attached.
http://www.ogkkabuto.com/
Read more about the front spacer either in the
catalogue that carries VITT series or inthe parts
list posted at our company home page.
Frontspacer(Optionalaccessory)
WARNING!
Table of contents
Other Kabuto Bicycle Accessories manuals