manuals.online logo
Brands
  1. Home
  2. •
  3. Brands
  4. •
  5. Kaito
  6. •
  7. Receiver
  8. •
  9. Kaito KA009R User manual

Kaito KA009R User manual

Other Kaito Receiver manuals

Kaito KA600 User manual

Kaito

Kaito KA600 User manual

Kaito KA550 User manual

Kaito

Kaito KA550 User manual

Kaito KA600L User manual

Kaito

Kaito KA600L User manual

Kaito KA600 User manual

Kaito

Kaito KA600 User manual

Kaito KA1121 User manual

Kaito

Kaito KA1121 User manual

Kaito KA11 Use and maintenance manual

Kaito

Kaito KA11 Use and maintenance manual

Popular Receiver manuals by other brands

Televes ZAS HD SAT user manual

Televes

Televes ZAS HD SAT user manual

Realistic DX-75 Operating and service instructions

Realistic

Realistic DX-75 Operating and service instructions

Saris 4620 Assembly instructions

Saris

Saris 4620 Assembly instructions

Mini DTR 206C PVR user manual

Mini

Mini DTR 206C PVR user manual

RF Elements TwistPort manual

RF Elements

RF Elements TwistPort manual

Denon DN-200WS user guide

Denon

Denon DN-200WS user guide

Yamaha RX-V467 owner's manual

Yamaha

Yamaha RX-V467 owner's manual

Russound SaphIR 858 instruction manual

Russound

Russound SaphIR 858 instruction manual

Quasonix RDMS Firmware update procedure

Quasonix

Quasonix RDMS Firmware update procedure

Pioneer XV-HTD1 Service manual

Pioneer

Pioneer XV-HTD1 Service manual

ATZ HDMI-V2-44HE150 manual

ATZ

ATZ HDMI-V2-44HE150 manual

Sony XNV-770BT MyTomTom Specifications

Sony

Sony XNV-770BT MyTomTom Specifications

Grundig STR 7122 TWIN Service manual

Grundig

Grundig STR 7122 TWIN Service manual

Creative Blaster Modem user guide

Creative

Creative Blaster Modem user guide

Panduit ATLONA AT-OME-RX11 installation guide

Panduit

Panduit ATLONA AT-OME-RX11 installation guide

VOLTCRAFT UTPS-40 operating instructions

VOLTCRAFT

VOLTCRAFT UTPS-40 operating instructions

JVC KW-ADV794 instructions

JVC

JVC KW-ADV794 instructions

Litelink VT-1001 operating instructions

Litelink

Litelink VT-1001 operating instructions

manuals.online logo
manuals.online logoBrands
  • About & Mission
  • Contact us
  • Privacy Policy
  • Terms and Conditions

Copyright 2025 Manuals.Online. All Rights Reserved.

KA009R is manufactured for
Electronics Inc(USA)by Kaito Enterprises Corp.in China
KAITO
KAITO
KA009R
SELF-POWERED MULTIBAND
WORLD RECEIVER WITH EMERGENCY
CELLPHONE CHARGER AND FLASHLIGHT
KAITO
KA009R Kaito KA009R Kaito
12
Thank You:
Thank you for purchasing the KA009R super portable receiver. Please
read the manual thoroughly before operating and keep this book in a
safe place for future reference. With proper care, you will receive many
years of trouble-free service from your new radio.
The KA009R portable radio is perfect for emergency situations and is
also ideal for anyone who does not have access to a reliable AC power
source. The radio can be powered by solar energy, batteries, AC adapter
and hand-crank generator (magneto). With coverage of the AM/FM/TV/
AIR/Weather broadcast bands, plus 4 shortwave bands, you'll never run
out of things to listen to!
Description:
Features:
1. Ten Bands: Receives AM/FM/TV1/TV2/AIR/Weather broadcast
bands and four shortwave bands (SW1-SW4).
2. Built-in power generator: Under emergency conditions where
AC power, batteries and sunlight sources are unavailable, you can
crank-up the radio to charge the internal batteries.
3. Solar power: The built-in solar panel is powerful enough to run the
radio in direct sunlight.* It charges the batteries even in weak light
conditions.
4. Rechargeable pack: It provides reliable, renewable internal power
for everyday use. The high quality Ni-MH rechargeable batteries are
installed inside the radio and will last for many years without needing
replacement.
KA009R Kaito KA009R Kaito
34
5. 2 1/2 diameter speaker: The high quality speaker provides clear
dynamic audio.
6. AC/DC power adapter: You can use this adapter to charge the built-in
battery or to directly power the radio.
7. DC jack: A built-in 6V DC jack is provided for external power connection.
8. Earphone: Stereo Earphones are provided for private listening.
9. Antennas: The telescopic antenna can be positioned to improve reception
of FM/TV/AIR/Weather and shortwave stations. A built-in AM ferrite
antenna provides good sensitivity for AM reception. Also included with
the radio is a portable wire antenna that can be used to further improve
shortwave reception by plugging it into the earphone jack.
10. Cellphone charger tips. We include the adaptors for the popular
cellphones on the market for self-charging. See the info on the separate
page.
*Important Notice Regarding Solar Operation:
The built-in solar panel can be used to directly power the radio even
if the internal batteries are dead! The solar panel must face direct
sunlight to get enough energy to operate the radio's speaker. If you
cannot position the radio in direct sunlight, try to use the earphones.
Earphones require less energy to operate than the speaker does.
When switching to solar power always start with the volume control
at the minimum position. The higher you turn the volume the more
light you will need.
11. Super bright LED Flashlight: Long life super bright LED is
convenient flashlight to use in the dark.
12. Battery compartment: Operates on 3 x "AA" size batteries.
(Batteries not included)
KA009R Kaito KA009R Kaito
56
Operation at a Glance (see diagram for location of controls)
7
8
9
10
SOLAR
1. Power source selector: Down for battery or external power source, up
for the built-in rechargeable batteries, the middle is for solar power.
(This radio uses three Nickel-Metal Hydride rechargeable batteries,
which have no memory effect and can be fully recharged over 1000
times.)
2. Band selector: Switch 2A selects AM/FM/TV1/TV2/AIR/WB.
Switch 2B selects AM bands for AM/SW1/SW2/SW3/SW4. (Switch
2B only works when Switch 2A is in the AM position.)
3. Volume control with main power off switch: To adjust the speaker
volume or earphone volume, or power off the radio. The off position
will turn off all power sources.
4. Tuner: Rotate the tuner control to select the station you want to listen
to.
5. Tuner/Charge light: this LED is a two-color LED. It will light up in RED
when you have optimized the tuning, it turns to GREEN if you crank
charge the radio.
1
2
A
B
3
5
6
KA009R
LO HI TUN/CH
TUNING
F
F
O
U
L
M
O
E
V
AM
SW1SW2SW3
SW4
AM/SW
TV1
FM
WB
TV2
AIR
BATT/DC
DYN
SOL
162.55
530 600 700 800 1200 14001000 1710
2
3
4
5
6
7
8
9
10
11
12
13
4.0 4.5 5.0 6.0
7.0
8.0 9.0
9.0 9.5 10.0 11.0 12.0 13.0 14.0
14.0 14.5 15.0 16.0 17.0 18.0 19.0
19.0 19.5 20.0 21.0 26.0
22.0 24.0
88 92 95 102
98 105 108
118 123 127 130 134120 137
162.40
FM/TV/AIR/WB/AM/SW1-4PORTABLE RECEIVER
DYNAMO & SOLAR POWER
FM
TV1
WB
TV2
SW1
2
3
4
AM
AIR
KHz
MHz
MHz
4
KA009R Kaito KA009R Kaito
78
6. Battery level: The green (HI) LED indicates the battery level is OK
to use.
The red (LO) LED indicates it is time to charge the internal battery.
7. Battery compartment: for 3 "AA" batteries. (Alkaline batteries are
recommended.)
8. Dynamo cranking handle: Turn the crank handle to charge the
built-in batteries.
9. Solar Panel: Works as a power source when using the radio in the
sun. The solar panel charges the batteries whenever the radio is
exposed to daylight.
10. Antenna: Telescopic with 360 degrees rotation for FM/TV/AIR/WB
/SW reception. (You have to rotate the radio for optimum AM
reception.)
11
12
DC 6V jack: The external power source is plugged in via this jack
for radio operation or to charge the built-in batteries by DC
adapter.
Earphone jack: To hear the radio privately,
plug the earphone into the jack. The speaker
will automatically shut off. The earphone jack
also works as a jack for the included wire
shortwave antenna.
14
13
12. Super bright LED.
13. LED light switch Set the switch to ON position, the bright LED
will light. Set the switch to OFF to turn off the LED light.
11.
KA009R Kaito KA009R Kaito
910
Radio Operation (see diagram for location of controls)
Set the power switch 1 to the desired power source: AC/DC adapter,
external batteries, internal rechargeable "AA" batteries or solar power.
Band selection:
There are two band selector switches which work in conjunction with
each other to allow the selection of FM/TV/AIR/WB/AM/SW1/SW2/
SW3/SW4.
To receive :
Medium Wave: (AM Broadcast Band) 2 A should be in AM/SW
position and 2 B should be in AM position
FM : set 2 A to FM, 2 B can be on any position.
TV1:set 2 A to TV1, 2 B can be on any position.
TV2:set 2 A to TV2, 2 B can be on any position.
15. Cellphone Charger Jack
1. Connect the Cellphone to the Jack
Use the included cable to connect the cellphone and
the charger. Insert one end of the cable to jack, find
a proper tip to connect the cable and cellphone.
Method 1: Crank the Dynamo Cranking Handle smoothly to charge the
cellphone.
Method 2: Use theAC adaptor to charge the cellphone. Plug the AC adaptor
to the power outlet, the radio will charge the cellphone.
Note: If you want to charge the built-in Ni-MH batteries with the AC adaptor,
please pull out the phone cable. When the phone is connected with
the Radio, it would not charge the built-in Ni-MH batteries.
15
2. Charging the Cellphone (Two ways to charge)
KA009R Kaito KA009R Kaito
11 12
Four- Way Power Source
1. Battery Power: Insert 3 x "AA" batteries in the battery compartment.
Make sure you have the correct polarity. Put the power switch to
BATT/DC.
2. Solar: The built-in solar panel can be used to directly power the radio
even if the batteries are dead! The solar panel must face direct sunlight
to get enough energy to operate the radio's speaker. If you cannot
position the radio in direct sunlight try using the earphones.
Earphones require less energy to operate than the speaker does.
When switching to solar power always start with the volume control
at the minimum position. The higher you turn the volume the more
light you will need. Even when the main power is switched off, the
solar panel will still charge the built-in rechargeable batteries as
long as the solar panel is exposed to bright light.
The telescopic antenna 10 is for FM/TV/AIR/WB/SW stations. A wire
antenna is included which can be plugged into the earphone jack to
improve shortwave reception. The AM band uses an internal ferrite bar
antenna. Rotate or reposition the radio for best reception on the AM
(MW medium wave) band.
Station can be tuned in with rotary knob 4 . If a station is accurately
tuned in, the Tuning LED lights up unless the signal is very weak.
Shortwave: 2 Amust be on AM/SW position, 2 B to choose from
SW1/SW2/SW3/SW4
WB(Weather): set 2 A to WB, 2 B can be on any position.
AIR: set 2 A to AIR, 2 B can be on any position.
Tuning a Station:
Antennas:
KA009R Kaito KA009R Kaito
13 14
Power when turning the main power switch on. The first time you
charge the internal battery, it is recommended that you charge the
battery for no less than 4 hours, but no more than 6 hours. Knob 1
can be in any position while the battery is charging. If fully charged
for at least 5 hours, it will produce 10 hours or more of continuous
playing on all bands.
3. Solar Panel: If the main power switch is in the Off position, the solar
panel will charge the built-in batteries whenever there is enough light.
4. Regular batteries: it is recommended that you use alkaline "AA"
batteries for best performance. It depends on battery capacity for
listening time, from weeks to months. If you store your radio for an
extended period of time, we strongly recommend that you remove
the "AA" batteries from the radio.
3. Dynamo: Put power switch to DYN, the radio will work on the internal
built-in battery. You can crank it to charge the battery while the main
power is switched off. For improved charge efficiency, we recommended
that you switch off the radio while cranking the generator.
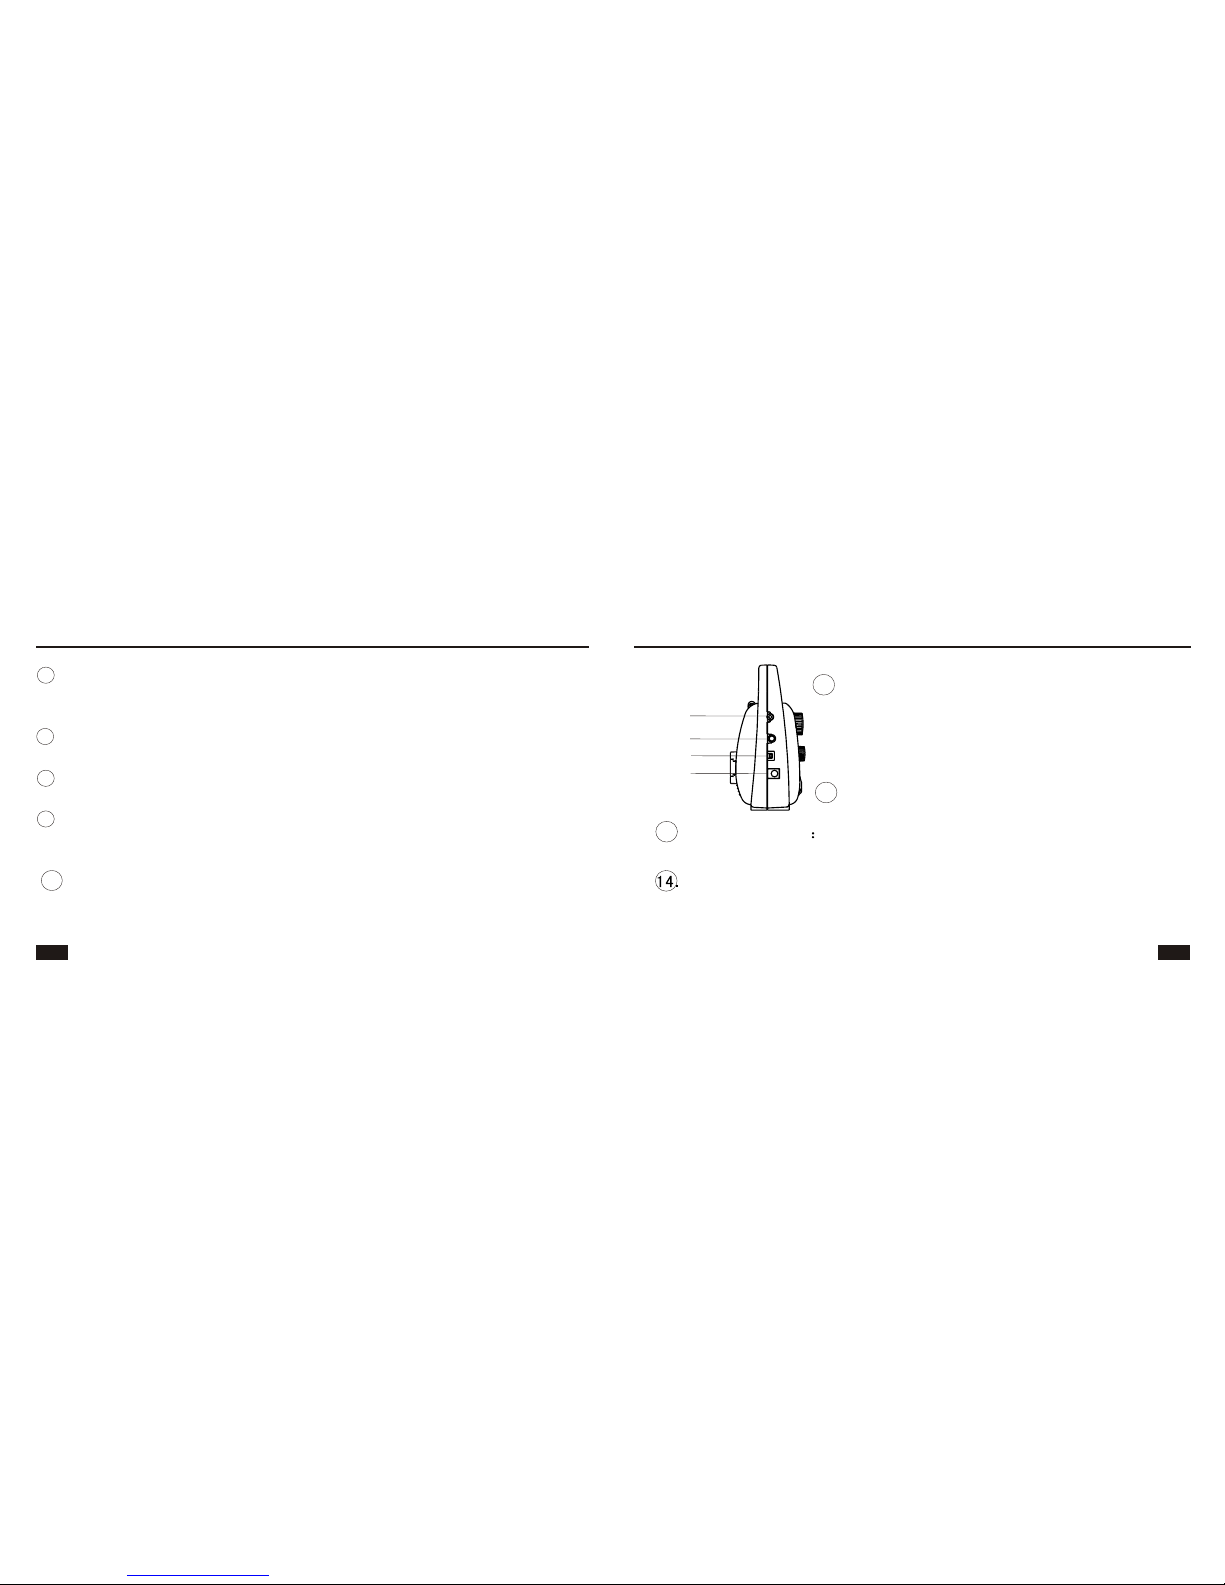
4. Adapter: Plug the AC adapter to a power outlet on selector 13 . This
adapter can be used to power the radio and charge the internal battery.
1. Dynamo: Switch main power off, then use crank handle 8 , at 2 turns
per second, cranking for 90 seconds, you will get about 30 minutes
radio play time.
2. Adapter (110V or 220V): The internal battery will begin charging as
soon as the adapter is plugged in. The radio will work on the adapter
Charging the built-in Ni-MH rechargeable batteries
KA009R Kaito KA009R Kaito
15 16
Sensitivity
FM < 20uV
MW: <2.5mV
SW: <30uV
Rechargeable batteries: 3 NI-MH batteries 600mAh
Size: 165 x 137 x 70 mm
Weight : 460g (battery not included)
Caution: On the VHF andAIR bands, if there is a strong FM station
near you, you might receive interference from thatstrong station, but
when you tune in a used frequency in the VHF/AIR band, youwill hear
the tuned in station.
FM : 88 - 108 MHz
TV1: Channel 2-6
AIR: 118-137MHz
NOAA Weather: 162.400/162.425/162.475/162.50/162.525/162.55
(continuous band)
TV2: Channel 7-13
AM (MW): 530 -1710 KHz
SW1: 4.00- 9.00 Mhz
SW2: 9.00- 14.00 MHz
SW3: 14.00 - 19.00 Mhz
SW4: 19.00- 26.00 MHz
Output power: 200 MW peak power using built-in speaker.
Headset jack socket: 3.5 mm
External DC supply socket: 6 mm (positive center)
Specifications
KA009R Kaito KA009R Kaito
17 18
Frequently Asked Questions:
Q: How long will the radio play when you use the Dynamo cranking to
charge the batteries?
A: There are several factors to be taken into consideration to answer
this question:
1. When using the crank as your source of power, we recommend
that you charge the batteries as soon as the low battery indicator
illuminates. If you use the dynamo when the batteries are almost
completely dead, your play time will be dramatically shorter.
Important: if the battery is completely exhausted, we recommend
that you use the AC adapter to rejuvenate the battery pack.
2. If you crank from a low battery, it will take approximately 2 minutes
of cranking to get 10 minutes play time.
3. The longer you crank, the longer time it will play. Turn the crank
1. Use soft cloth to clean the radio. Do not use aggressive polish or
cleaners.
2. Do not expose to moisture or temperature above 130 F
3. Take "AA" batteries out of the radio when you do not use the radio for
a long period of time.
Care and Maintenance