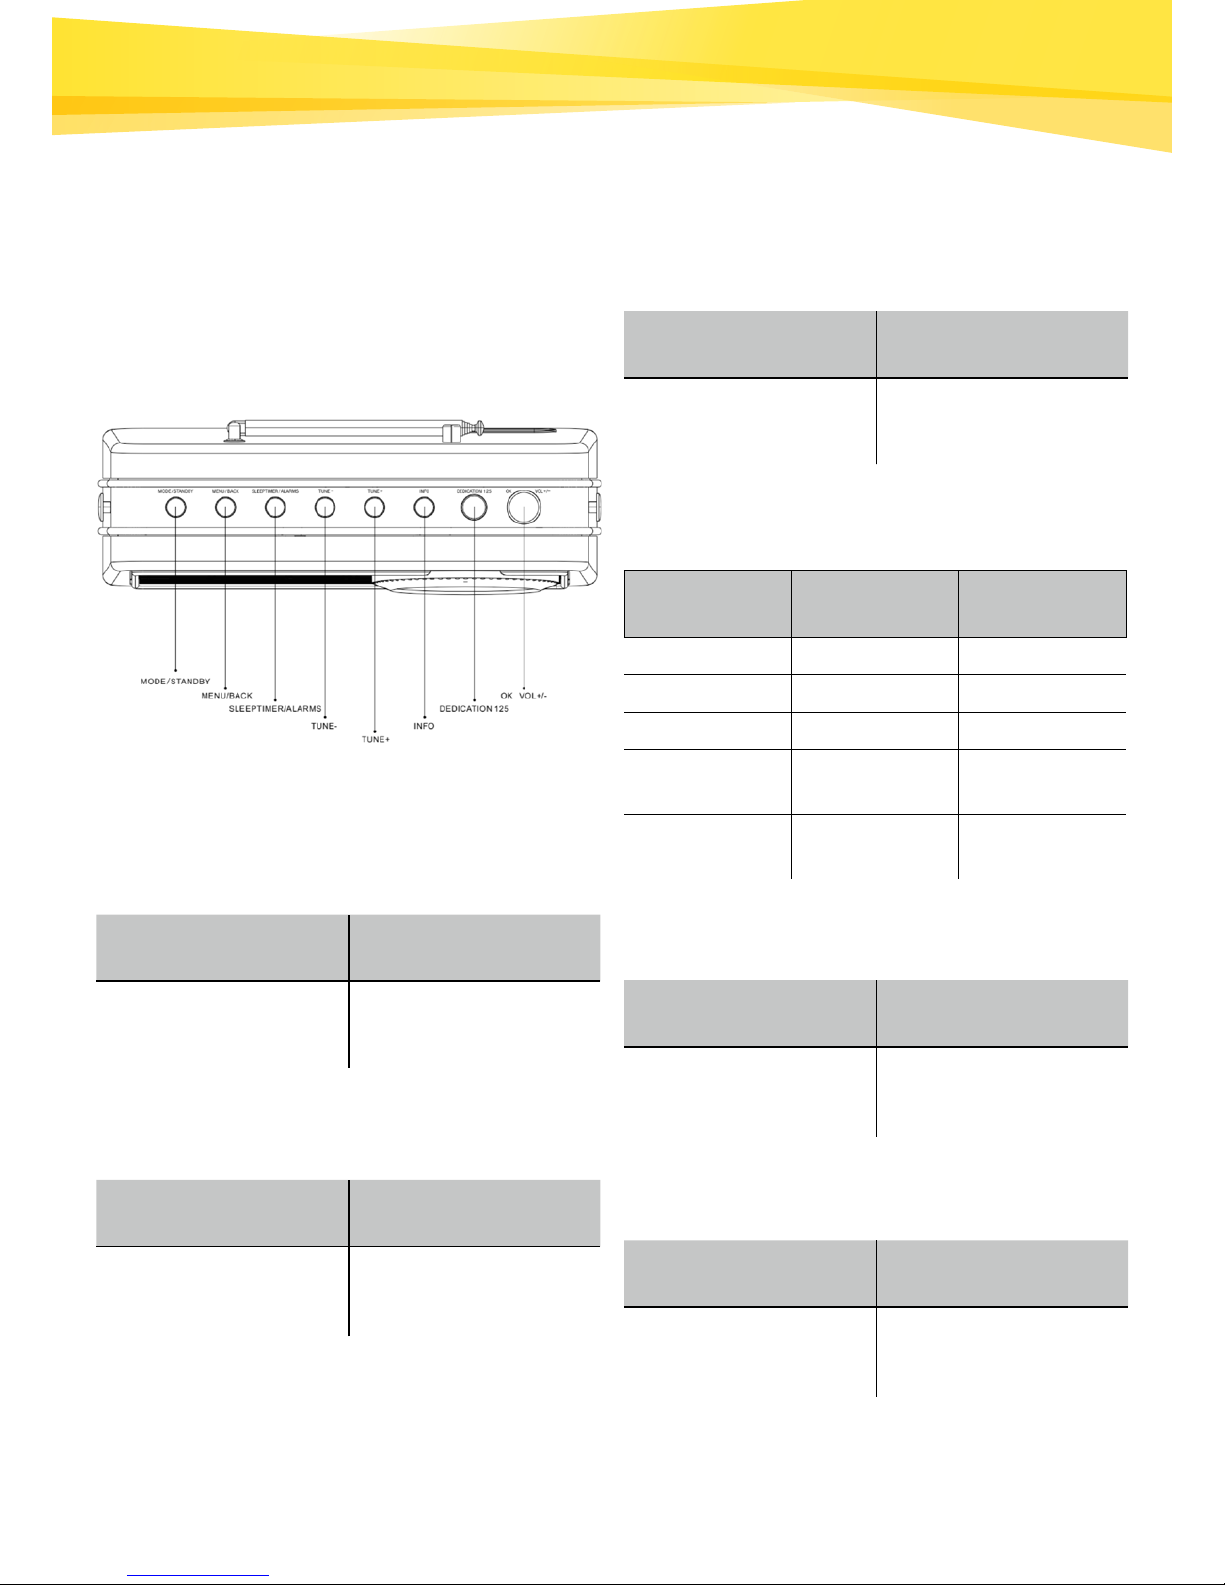
KAPSCH Capri125 User manual

Capri125
User Manual
This user manual contains important notes as
well as instructions on the use of the product.
Read the user manual carefully and keep it in
a safe place.

2
Table of Contents
1. Important Notes
2. Scope of Delivery
3. Overview of Features
4. Charging the Battery
5. System Settings
6. Music Playback
7. Alarm and Sleep Timer
8. Troubleshooting
9. Technical Specifications
- 3 -
- 4 -
- 4 -
- 6 -
- 6 -
- 7 -
- 8 -
- 9 -
- 10 -

3
1. Important Notes
Read and observe all warnings and explanations
before using this product. Damage that is caused
due to improper use is not covered by the warranty.
CAUTION
Risk of Shock or Fire
• Keep the product and its accessories away from
rain and water. Do not place any containers with
liquid (e.g., vases) on or near the product. If liquid
gets inside the product, turn it off immediately
and contact customer service.
• Keep the product and its accessories away from
fire and sources of heat as well as direct sunlight.
• In the event of a thunderstorm, turn the device off
and unplug it.
Short circuit and fire hazard
• Before you plug in the device, please ensure
that the power supply corresponds to the values
specified on the back of the device. If the voltage
supply differs from this, do not plug it into the
outlet.
Risk of Property Damage
• Do not place the product or other objects on the
electrical cord or on other electronic devices.
• If the temperature is below 40° F (5° C) upon
receipt of the product, unpack it and wait until it
reaches room temperature before plugging it in.
• Some components of the product are made out
of glass. Therefore, please handle it with care so
that the glass does not break and cause injury or
damage to property.
Danger of Overheating
• Make sure that there are at least 4 inches (10 cm)
of space around the unit for ventilation.
Cleaning
• Turn the device off prior to cleaning.
• Do not use organic solvents such as rubbing
alcohol or paint thinner for cleaning. Otherwise,
this will damage the device.
• Only use cotton or microfiber cleaning cloths.
• Do not spray or drip water on the housing or the
speakers. Otherwise, this can damage the device.
Environmental Protection
• This product was manufactured from high-quality
and reusable materials. They may not be dispo-
sed of with household waste. Please familiarize
yourself with the regulations regarding the dispo-
sal of electronic and electrical devices as well as
batteries. Proper disposal of your electronic waste
protects the environment and public health. This
product contains a battery that may not be dis-
posed of with household waste. Please familiarize
yourself about the regulations regarding the dis-
posal of old batteries. Proper disposal of the bat-
tery protects the environment and public health.

4
POWER: Power switch, 1 means ON,
0 means OFF
ADAPTER: Power supply
USB: 5V/1A
AUX-IN: Analog audio input with 3.5 mm jack
EARPHONE OUT: 3.5 mm earphone jack
Batteries/Rechargeable Batteries
• Risk of battery explosion if improperly handled.
Replace the rechargeable batteries only with the
same or an equivalent type. Please contact a
specialist workshop to have this carried out.
• Batteries and rechargeable batteries may not be
exposed to excessive heat as caused by direct
sunlight, fire, or similar.
Adapter
• Please only use the power adapter that is listed in
the operating instructions.
<BRAND: Flypower>,
<Model: PS30D180K1000ED>,
<Input: 100–240 V~, 50/60 Hz>
<Output: 18.0V =, 1000 mA>
• Only use the accessories specified by the manu-
facturer.
• The device must be unplugged in order to dis-
connect it from the power supply grid. Therefore,
the outlet needs to be within reach and freely
accessible.
1 KAPSCH Capri125 audio system
1 User Manual
1 Power adapter (18V = 1A)
1. Important
Notes
3. Overview of
Features
2. Scope
of Delivery

5
3. Overview of
Features
Button Functions
1. MODE/STANDBY
2. MENU/BACK
3. SLEEP TIMER/ALARMS
4. TUNE+, TUNE–
Press and hold Press briefly
Standby mode
On/O
To select the
operating mode
Press and hold Press briefly
/
Shows the current
mode / goes back
one step
Press and hold Press briefly
To set the alarm
feature To set the sleep timer
MODE Press and
hold
Press
briefly
FM Search Set frequency
Bluetooth Search Switch songs
DAB Search Switch stations
AUX-IN
Input Search /
MENU Scroll through
the menu
Menu
navigation
5. INFO
Press and hold Press briefly
/
Information about
the current station
or title
6. DEDICATION 125
Press and hold Press briefly
Save the current
station
Listen to the saved
station or recall your
favorite station

6
3. Overview of
Features
4. Charge
7. VOL–/VOL+
OK
MODE Turn the knob
Playback
Mode
Turn clockwise to
increase the volume;
turn counterclockwise
to lower the volume.
MENU Menu navigtion
MODE Press and
hold Press briefly
FM / Mute ON/OFF
Bluetooth Connect/
Disconnect
Playback/
Pause
DAB / Mute ON/OFF
AUX-IN
Input / Mute ON/OFF
MENU / Confirm
1. Before the first use, please use the adapter for
at least 12 hours in standby mode to charge the
machine fully.
2. When charging, the Power Display icon flashes.
3. Low power warning
When battery power is insucient,the screen will
display “Battery Low”
4. Do not leave the battery for too long without
charging, this will damage your battery.
5. System
Settings
The KAPSCH Capri125 audio system can be
configured in the System Settings menu.
Available options:
• Equalizer
• Date/Time (Time/Date Wizard)
• Language
• Factory Reset
• Info
• Backlight
• Clock Style
5.1 Equalizer
There are several equalizer presets available. There
is also a user-defined setting option: My EQ.
5.2 Time/Date Settings
5.2.1 Time/Date Settings Assistant
For manually setting the time.

7
5. System
Settings
5.2.2 Automatic Update
Time synchronization via DAB, FM
The data from the DAB or FM station is used for the
automatic update. The time is only synchronized
if you have selected the corresponding operating
mode.
5.2.3 Set Format
This option is used to switch between a 12-hour
and 24-hour time display.
5.3 Language
The default language is English. There are 13
languages to choose from: English, German,
Italian, French, Dutch, Polish, Spanish, Turkish,
and many more.
5.4 Factory Reset
The Factory Reset option enables you to reset all
parameters to the default factory settings. Date,
time, and saved stations will be lost.
5.5 Info
Displays the details of the current system configura-
tion, for example:
SW Version: Version number of the software
5.6 Backlight
This feature enables you to specify when and how
the radio dims in standby.
• On level (in operation)
• Dim level (in standby)
5.7 Clock Style
This enables you to select the design of the
displayed clock in standby mode. Please select
between an analog and digital display.
6. Music
Playback
6.1 DAB Radio Reception
Press the MODE button and select the DAB ope-
rating mode. When you select the DAB operating
mode for the first time, or if the station list is empty,
your radio will automatically begin a scan to search
for available stations.
6.1.1 Station list
The list of radio stations found.
6.1.2 Scan
Select the Scan option and press the OK button to
perform a complete search of radio stations.
6.1.3 Manual Tune
Turn the knob to select the desired DAB station
from 5A to 13F and press OK to switch to the
frequency or channel in question.
6.1.4 Prune Invalid
This feature enables you to remove all invalid
stations from the list that are marked with a
question mark before the station name.
6.1.5 Dynamic Range Compression (DRC)
Select either DRC high, DRC low or DRC off.
6.2 FM Radio Reception
Press the MODE button to switch to FM radio
reception. Press and hold the Tune+/Tune–
buttons to display the list of stations found. Press
the Tune+/Tune– button briefly in order to change
the reception frequency.
6.3 Bluetooth Mode
Press the MODE button to switch to Bluetooth
operation.

8
6. Music
Playback
6.3.1 Pair Bluetooth
When the Bluetooth feature is enabled, you can
search for the Bluetooth name KAPSCH Capri125
with your smartphone, tablet, PC, notebook, or
another device, pair it, and play music.
6.3.2 Switch Songs
Press TUNE+/TUNE– to switch songs.
6.3.3 Disconnect Bluetooth
If you want to pair another device and play music
with it over Bluetooth, press and hold the OK but-
ton to disconnect Bluetooth. Afterwards, you will be
able to pair with other devices via Bluetooth.
6.4 AUX-IN Signal Feed
Press the MODE button to switch to AUX input. In
the AUX mode, you can connect any audio device
to the speaker and use it as an external speaker.
In addition to the clock and the calendar, there are
two practical alarms with a snooze feature as well
as a sleep timer, which switches the device off after
a specified time. Here, each alarm can be program-
med independently.
7.1 Alarm
To set or program an alarm, either press and hold
the Sleep/Alarm button or select Menu > Main
Menu > Alarms. Select the number of the alarm
(1 or 2) and set the following parameters:
Enable: Off, Daily, Once, Weekends, or Weekdays.
Time: 12:00 AM (change this value as desired)
Date: 01-01-2007 change this value as desired –
this option is normally not visible and is only shown
if you select the Once option in the Enable field).
Mode: Buzzer, DAB oder FM
Preset: Last station listened to.
Volume: To save and activate these settings, scroll
down and select save.
In the playback screen, the activated alarms are
shown with a symbol.
In the standby screen, the activated alarms are
shown with a symbol.
When the alarm sounds, press Standby or Alarm
to turn it off.
7.2 Sleep Timer
To program the sleep timer, press the button Sleep/
Alarm repeatedly to switch between the available
intervals: Sleep OFF, 15 MIN, 30 MIN, 45 MIN or
60 MIN. The remaining time until the device turns off
is displayed at the bottom of the playback screen.
Note: If no input signal is detected, the device will
switch to standby mode after 15 minutes regardless
of operating mode.
7. Alarm and
Sleep Timer

9
8. Trouble-
shooting
In the following table, you will find the most
common problems and their solutions. Please
read them through carefully.
Problem Solution
Bluetooth signal transmission interrupted
The maximum range between the device and
other Bluetooth devices may not exceed 30
feet.
Furthermore, no obstructions may be located
between the device and the Bluetooth device.
You may need to use another Bluetooth de-
vice for playback.
Buzzing
Ensure that all cables are connected correctly.
Use a dierent audio cable.
Ensure that the buzzing is not coming from
the device that is connected via the audio
cable.
No power or the battery will not charge
Ensure that the power adapter and the device
are correctly connected to each other.
Check the supply voltage and the specifica-
tions of the power adapter.
No stations were found during the DAB or FM
station scan
Ensure that the antenna is functioning
correctly or reset the device.
No sound
Increase the volume.
Select another signal source.
Ensure that all cables are connected correctly.
No sound when connected via the
AUX-IN input
Check that the audio cable is connected
correctly.

10
9. Technical
Specifications
Model KAPSCH Capri125
Speaker 1 broadband speaker,
3 inches
Frequency response 80 Hz–16 KHz
(–10 dB)
Amplifier Class D,
5 W × 1 channel
Harmonic distortion < 10 %
Signal-to-noise ratio > 75 dB(A)
FM Frequency Range 87,5 MHz to 108 MHz
DAB Frequency Range 174 MHz to 240 MHz
Playback Mode Bluetooth/AUX-IN/FM/
DAB
Adapter 18 V = 0.1 A
Battery Lithium battery,
2200 mAh, 11.1 V
Power consumption
at standby < 1 W
Dimensions 222.7 mm × 155.4 mm
× 73 mm
Bluetooth
Version V2.1+ EDR
Maximum HF
transmission power <
15 dBm
Frequency bands
2,402 MHz–2,480 MHz
Kapsch TracCom AG hereby declares that this
device complies with the fundamental requirements
and other relevant provisions of Directive 2014/53/
EU. The complete text of the EU conformity declara-
tion can be found at the following address:
www.kapsch.net/capri125
This device complies with Part 15 of the FCC regu-
lations. Its operation is subject to the following two
conditions:
(1) This device may not cause harmful interference.
(2) This device must accept any interference
received, including interference that may cause
undesired operation. Changes or modifications
not expressly approved by the party responsible
for compliance could void the user’s permission
to operate the device. This device was tested and
complies with the limits for Class B digital devices
pursuant to Part 15 of the FCC regulations. These
limits are designed to provide reasonable protection
against harmful interference in a residential com-
plex. This device generates, uses, and can radiate
high frequency energy and, if not installed and used
in accordance with the instructions, may cause
harmful interference to radio communications.
However, there is no guarantee that no interference
will occur in a particular installation. If this device
does cause harmful interference to radio or televisi-
on reception, which can be determined by turning
the equipment o and on, the user is encouraged to
try to correct the interference through one or more
of the following measures:

11
9. Technical
Specifications
- Reorient or relocate the receiving antenna.
- Increase the distance between the equipment and
the receiver.
- Connect the equipment to an outlet on a circuit
that is not connected to the same one as the
receiver.
- Consult the dealer or an experienced radio/TV
technician for help.
This symbol on the product or on its packaging indi-
cates that this product may not be disposed of with
household waste. It must be brought to an electrical
and electronic waste collection facility for recycling
and disposal. By ensuring the adequate disposal of
this product, you are also helping to prevent poten-
tial negative consequences for the environment and
public health. Recycling materials helps to preserve
our natural resources. For additional information
about recycling this product, please contact your
local authority, your local disposal center, or the
seller of the product.
Warranty Conditions
The warranty period begins as of the date that you
turn on the device for the first time. If a material or
manufacturing defect with the device occurs within
24 months of this date, the product will be repaired
or replaced free of charge at our discretion. If the
defect is covered by our warranty, you will receive
the repaired product or a new product. No new
warranty period begins upon the repair or replace-
ment of the product.
Processing for Warranty Claimsl
Please contact our support (see our website). Our
support may be able to help you with troubleshoo-
ting. If not, you will receive additional instructions
regarding where you can send the device.
Support (German/English):
Importer:
Kapsch TracCom AG
Am Europlatz 2
1120 Vienna, Austria
Manufactured in China
Table of contents
Other KAPSCH Radio manuals
Popular Radio manuals by other brands

Retekess
Retekess TR627 user manual

Telestar
Telestar DIRA M 1 A operating instructions

Advanced Global Technology
Advanced Global Technology Sportscaster XM101VK Instructional manual

Denver Electronics
Denver Electronics DAB-56C operating instructions

JVC
JVC RA-E431B instruction manual

Sirius Satellite Radio
Sirius Satellite Radio XS097 instruction manual