Kassel Sanitar SINTRA Product manual

ALVA BESALÚ MIRANDA
ÁLAMO NUEVA MIRANDA R INCA
SINTRA
INSTALLATION AND MAINTENANCE GUIDEINSTALLATION AND MAINTENANCE GUIDE
GUÍA DE INSTALACIÓN Y MANTENIMIENTOGUÍA DE INSTALACIÓN Y MANTENIMIENTO
KURULUM VE BAKIM KILAVUZUKURULUM VE BAKIM KILAVUZU
TOUCH FREE DECK MOUNTED SOAP DISPENSERS
DISPENSADORES DE JABÓN, SIN CONTACTO, PARA ENCIMERA
TEZGAH ÜSTÜ SENSÖRLÜ SABUN DİSPENSERLERİ

ALVA
SOAP DISPENSER
KSL
MIRANDA
SOAP DISPENSER
KSL
MIRANDA
R
SOAP DISPENSER
KSL
INCA
SOAP DISPENSER
KSL
BESALÚ
SOAP DISPENSER
KSL
NUEVA
SOAP DISPENSER
KSL
ÁLAMO
SOAP DISPENSER
KSL
SINTRA
SOAP DISPENSER
KSL
INDEX / ÍNDICE / İÇİNDEKİLER
ES
INFORMACIÓN TÉCNICA
INFORMACIÓN PREVIA A LA INSTALACIÓN
CONTENIDO DEL EMBALAJE
INSTALACIÓN
LLENADO DEL DEPÓSITO DE JABÓN
CONFIGURACIÓN DE PARÁMETROS
SUSTITUCIÓN DE LAS PILAS
MANTENIMIENTO
GARANTÍA LIMITADA
SOLUCIÓN DE PROBLEMAS
TR
TEKNİK BİLGİ
KURULUM ÖNCESİ
KUTU İÇERİĞİ
KURULUM
SABUNLUĞUN DOLDURULMASI
UZAKTAN KUMANDA
FONKSİYONLARI
PİLLERİN TAKILMASI
BAKIM
GARANTİ KOŞULLARI
SORUN GİDERME
EN
TECHNICAL DATA
PREINSTALLATION INFO
PACK CONTENTS
INSTALLATION
FILLING THE SOAP TANK
SETTINGS ADJUSTMENT
BATTERY REPLACEMENT
MAINTENANCE
LIMITED WARRANTY
TROUBLESHOOTING
(EN) The information in this document reflects products at the date of printing. Kassel Sanitar, S.L. reserves the right, subject to all applicable laws, at any time, at its sole discretion, and
without notice, to discontinue or change the features, designs, materials and other specications of its products, and to either permanently or temporarily withdraw any of the forgoing from
the market. All information in this document is provided “as is” without warranty of any kind, either expressed or implied, including but not limited to any implied warranties of merchantability,
tness for a particular purpose, or non-infringement. Kassel Sanitar, S.L. assumes no responsibility for errors or omissions in the information presented in this document. In no event shall
KasselSanitar, S .L. be liable for any special, incidental, indirect or consequential damages of any kind, or any damages whatsoever arising out of or in connection with the use or performance
of this information. The trade names, trademarks, logos and service marks presented in this document, including their design, are the property of KasselSanitar, S.L. or other third parties and
you are not permitted to use them without the prior written consent of Kassel Sanitar, S.L. or such third party as may own them.
(ES) La información contenida en este documento refleja productos existentes en la fecha de impresión. Kassel Sanitar, S.L. se reserva el derecho, sujeto a la legislación vigente, de discon-
tinuar o modicar, en cualquier momento, a su sola discreción y sin previo aviso, las características, diseños, materiales y demás especicaciones de sus productos, así como de retirar del
mercado, de forma permanente o temporal, cualquiera de los productos aquí recogidos. Toda la información contenida en este documento se proporciona “tal cual”, sin garantía de ninguna
clase, expresa a implícita, lo que incluye, aunque no se limita a, garantía de comercialización e idoneidad para un n particular o no incumplimiento de los derechos de propiedad intelectual.
Kassel Sanitar, S.L. no asume ninguna responsabilidad sobre los errores u omisiones que pudiera haber en la información presentada en este documento. En ninguna circunstancia será Kas-
sel Sanitar, S.L. responsable de daños especiales, fortuitos, indirectos o derivados de ninguna clase, ni de ningún daño en absoluto derivado o relacionado con el uso o interpretación de la
presente información. Los nombres comerciales, marcas registradas y logos presentados en este documento, incluido su diseño, son propiedad de Kassel Sanitar, S.L. u otras terceras partes
y su uso está prohibido sin el previo consentimiento escrito de su propietario, ya sea Kassel Sanitar, S.L. o dichas terceras partes.
(TR) Bu belgedeki bilgiler, baskı tarihindeki ürünleri yansıtmaktadır. Kassel Sanitär, S.L. tüm ilgili yasalara tabi olmak kaydıyla, istediği zaman, kendi takdirine bağlı olarak ve bildirimde
bulunmaksızın, ürünlerinin özelliklerini, tasarımlarını, malzemelerini ve diğer özelliklerini iptal etmek veya değiştirmek, ya da kalıcı veya geçici olarak herhangi birini geri çekmek hakkını saklı
tutar. Bu belgede yer alan tüm bilgiler, satılabilirlik, belirli bir amaca uygunluk veya ihlal etmeme gibi zımni garantiler de dahil ancakbunlarla sınırlı olmamak kaydıyla, örtülü veya açık herhangi
bir garanti verilmeksizin “olduğu gibi” sağlanır. Kassel Sanitär, S.L. bu belgede sunulan bilgilerdeki hatalar veya eksiklikler için sorumluluk kabul etmez. Hiçbir durumda Kassel Sanitär, S.L.
Herhangi bir özel, tesadü, dolaylı veya sonuçsal zararlardan veya bu bilgilerin kullanılması veya kullanılmasından kaynaklı ortaya çıkabilecek herhangi bir zarardan sorumlu olmaz. Bu bel-
gede sunulan ticari isimler, ticari markalar, logolar ve hizmet markaları, tasarımları da dahil olmaküzere KasselSanitär, S.L. ‘ye aittir ve diğer üçüncü şahısların Kassel Sanitär, S.L.’nin önceden
yazılı izni olmaksızın bunları kullanma izniniz yoktur buna sahibi olabileceğimiz 3. şahıslar da dahildir.
TECHNICAL DATA / INFORMACIÓN TÉCNICA / TEKNİK BİLGİ
EN CAPACITY Liter / . oz.
ES CAPACIDAD litro / , oz.
TR KAPASITE Litre / . oz.
EN POWER SUPPLY Battery Box for 6xD Alkaline batteries or V transformer
ES FUENTE DE ALIMENTACIÓN Caja portapilas para 6 pilas alcalinas tipo D, o transformador de V
TR GÜÇ ÜNITESI 6xD alkaline pil için pil kutusu yada 12V adaptör
EN SOAP VISCOSITY cPs
ES VISCOSIDAD DEL JABÓN cPs
TR SABUN VISKOZITESI cPs
EN STANDARD DISCHARGE .cc (customizable by optional remote control)
ES DESCARGA ESTÁNDAR .cc (se puede modicar con el mando a distancia opcional)
TR STANDART SABUN AKIŞ MIKTARI .cc (uzaktan kumanda ile ayarlanabilir)
EN SENSOR RANGE mm +/ MM /..” (customizable by optional remote control)
ES RANGO DEL SENSOR mm ,,” +/ mm (se puede modicar con el mando a
distancia opcional)
TR SENSÖR ARALIĞI mm +/- mm /..” (uzaktan kumanda ile ayarlanabilir)

Liquid soap dispensers, with proper care, will provide long term trouble free service. Quality liquid soap of recommended viscosity and pH
levels are the main factors for smooth operation of your dispenser. If needed, use a viscometer to verify the viscosity of your soap to ensure
maximum benet. The recommended range for liquid soap viscosity is cPs. Thicker liquid soap flows slower and inhibits the pump
valve, causing strain and damage.
Liquid soap dispensers are suitable for use with any generic liquid soap of the correct viscosity and pH. The pH level of all soap used in
Kassel liquid soap dispensers should be between . to .. Lower levels will cause corrosion to the metal dispenser and even the rubber
and plastic components. Higher pH levels will cause swelling to rubber parts and degradation of plastic components over time.
Los dispensadores de jabón líquido, si reciben los cuidados adecuados, proporcionarán un servicio sin problemas a largo plazo. El
principal factor necesario para un buen funcionamiento de su dispensador es el uso de un jabón de calidad con la viscosidad y el nivel
de pH recomendados. En caso necesario, utilice un viscosímetro para comprobar la viscosidad de su jabón, para garantizar un máximo
beneficio. El rango de viscosidad recomendado para el jabón líquido es cPs. Un jabón líquido más espeso fluye más lentamente
y atasca la válvula de la bomba, causándole tensión y dañándola.
Los dispensadores de jabón líquido pueden utilizarse con cualquier marca de jabón líquido, siempre que tenga la viscosidad y el pH
adecuados. El nivel de pH del jabón utilizado en nuestros dispensadores de jabón líquido debe encontrarse entre , y ,. Un pH más bajo
causaría la corrosión del metal e incluso de los componentes de goma y plástico. Un pH más alto causaría la deformación de las partes de
goma y la degradación de los componentes de plástico con el paso del tiempo.
Kassel sıvı sabun dispenserleri, gerekli özen gösterildiği takdirde, uzun süreli sorunsuz hizmet sağlayacaktır. Tavsiye edilen viskozite ve pH
seviyelerinden oluşan kaliteli sıvı sabun, dağıtıcınızın düzgün çalışması için temel faktörlerdir. Gerekirse, maksimum fayda sağlamak için
sabununuzun viskozitesini doğrulamak için bir viskometre kullanın. Sıvı sabun viskozitesi için önerilen aralık cP’dur. Daha yoğun
sıvı sabun daha yavaş akar ve pompa valni engeller, bu da gerilmeye ve hasara neden olur.
Kassel sıvı sabun dispenseri, doğru viskozite ve pH’lı herhangi bir genel sıvı sabun ile kullanıma uygundur.
Kassel sıvı sabun dispenseri içinde kullanılan tüm sabunların pH seviyesi . ila . arasında olmalıdır. Alt seviyeler metal ağızda ve hatta
lastik ve plastik bileşenlerde korozyona neden olur. Daha yüksek pH seviyeleri kauçuk parçalarda şişmeye ve zamanla plastik bileşenlerin
bozulmasına neden olur.
IMPORTANT: Keep in mind that when using the faucet installed next to the soap dispenser, the user hands should not interfere with
the soap dispenser sensor detection area.
IMPORTANTE: Tenga en cuenta que al utilizar un grifo instalado al lado del dispensador de jabón, las manos del usuario no
deben invadir el área de detección del sensor del dispensador de jabón.
ÖNEMLİ: Sabun dispenserinin yanında bulunan musluğu kullanırken, kullanıcı ellerinin sabun dispenseri sensörü algılama alanına
müdahale etmemesi gerektiğini unutmayın.
EN CHECK CONTENTS: Separate all parts from the packaging and check each part with the “Pack contents” section. Make sure all parts are
accounted for before discarding any packaging material.
If any parts are missing, do not attempt to install your touch free soap dispenser until you obtain the missing parts.
WARNINGS: Do not install the system facing a mirror or any other electronic system operated by an infrared sensor. To prevent reflection
problems, it is recommended to keep a minimum distance of . meters between the soap dispenser and any other objects.
ES Comprobación del contenido: Separe todas las piezas del embalaje y verique cada pieza con el capítulo “Contenido del embalaje”.
Asegúrese de que cuenta con todas las piezas antes de desechar cualquier material de embalaje.
Si falta alguna de las piezas, no intente instalar el dispensador de jabón hasta que haya obtenido las piezas faltantes.
ADVERTENCIAS
No instalar de frente a un espejo o a otro sistema electrónico operado por sensor de infrarrojos. Para evitar problemas de reflejos, se
recomienda mantener una distancia mínima de , metros entre el dispensador de jabón y cualquier otro objeto.
TR Kutu içeriğini kontrol edin: Tüm parçaları ambalajından ayırın ve her parçayı “Paket Içeriği” bölümü ile kontrol edin.
Herhangi bir ambalaj malzemesini atmadan önce içinde parça olup olmadığını kontrol edin. Eğer herhangi bir parça eksikse, eksik parçaları
elde edene kadar kuruluma başlamayın.
Uyarılar: Musluğu, bir aynaya veya bir kızılötesi sensör tarafından çalıştırılan başka bir elektronik sisteme bakacak şekilde kurmayın.
Yansıma problemlerini önlemek için sabunluk ve diğer nesneler arasında en az , metre mesafe bırakılması önerilir.
PREINSTALLATION INFORMATION / INFORMACIÓN PREVIA A LA INSTALACIÓN /
KURULUM ÖNCESİ PACK CONTENTS / CONTENIDO DEL EMBALAJE / KUTU İÇERİĞİ
(EN) Familiarize yourself with the part names and conrm that the parts are included.
(ES) Familiarícese con los nombres de las piezas y verique que están todas incluidas.
(TK) Parça isimlerini kontrol edin ve tüm parçaların paketinize dahil edildiğinden emin olun.
X SOAP TANK WITH BOTTLE SUPPORT AND PUMP ASSEMBLY
X DEPÓSITO DE JABÓN CON SOPORTE Y KIT DE BOMBA
X SABUN HAZNESI, HAZNE DESTEĞI VE POMPA MONTAJI ILE BİRLİKTE
X BATTERY BOX FOR XD ALKALINE BATTERIES / V TRANSFORMER
X CAJA PORTAPILAS PARA PILAS ALCALINAS TIPO D /
TRANSFORMADOR DE V
X XD ALKALINE PİL İÇİN PİL KUTUSU / V ADAPTÖR
X BODY AND FIXING ACCESSORIES
X CUERPO Y ACCESORIOS DE FIJACIÓN
X GÖVDE VE MONTAJ PARÇALARI

STEP REMOVE ALL MOUNTING HARDWARE / PASO RETIRAR LOS ACCESORIOS DE MONTAJE /
ADIM TÜM MONTAJ AKSESUARLARINI ÇIKARTIN
EN
RECOMMENDED HOLE SIZE:
Drill a hole in the deck or lavatory
according to the recommended hole size.
Remove the nut, the disk and the gasket from the base of the soap
dispenser body.
RECOMMENDED HOLE SIZE
ES
TAMAÑO RECOMENDADO DEL ORIFICIO:
Taladre en la encimera o
lavabo un oricio del tamaño recomendado. Retire la tuerca, el disco y la
junta de la base del cuerpo del dispensador de jabón.
TR
ÖNERİLEN ÖLÇÜLER:
Tezgahta / lavaboda önerilen boyutlarda bir
delik açın. Somunu, diski ve contayı sabunuk gövdesinin tabanından çıkarın.
EN If your dispenser is supplied with anti-rotation solution, drill an
additional hole for anti-rotation pin.
ES Si su dispensador está provisto de sistema para evitar la rotación, haga
un agujero adicional para la clavija antirrotación.
TR Eğer dispenseriniz bir anti rotasyonu pimi ile geldiyse onun için de bir
delik açın.
EN
RECOMMENDED HOLE SIZE:
For SINTRA Soap Dispenser
ES
TAMAÑO RECOMENDADO DEL ORIFICIO:
Para SINTRA Soap
Dispenser
TR
ÖNERİLEN ÖLÇÜLER:
SINTRA Sabun dispenseri için
SIDE VIEW FRONT VIEW
EN For SINTRA Soap Dispenser: Remove the hexagonal nut, disk and
washer. Do not remove the O-ring from the base of the faucet.
NUT
DISC
WASHER
O-RING
ES Para SINTRA Soap Dispenser: Retire la tuerca hexagonal, el disco y la
arandela. No retire el aro tórico de la base del grifo.
TR SINTRA Sabun dispenseri için: Altıgen somun, dısk ve rondelayı sökün.
O-ringi ürünün tabanından çıkarmayın.
STEP INSTALLING THE SOAP DISPENSER / PASO INSTALACIÓN DEL DISPENSADOR DE JABÓN /
ADIM SABUNLUĞUN KURULUMU
A
EN Place the soap dispenser body along with the bottom ring
into the hole in the deck or lavatory.
Slide the gasket, disk and nut over the soap dispenser body
nipple and secure it.
ES Introduzca el cuerpo del dispensador de jabón, junto con el
aro inferior. en el oricio de la encimera o lavabo.
Deslice la junta, el disco y la tuerca sobre el tubo roscado que sale
del cuerpo del dispensador y enrósquelos.
TR Sabunluk gövdesini alt halka ile birlikte tezgahtaki /
lavabodaki deliğe yerleştirin.
Contayı, diski ve somunu sabunluk gövdesi nipeline kaydırın ve
sabitleyin.
B
EN For SINTRA Soap Dispenser: Slide the washer, disk and
hexagonal nut over the flexible hose and secure the faucet into
place.
NUT
DISC
WASHER
O-RING
ES Para SINTRA SOAP DISPENSER: Deslice la arandela, el disco
y la tuerca hexgonal sobre el tubo flexible y asegure el grifo en su
lugar.
TR SINTRA Sabun dispenseri için: Altıgen somun, dısk ve
rondelayı sökün. O-ringi ürünün tabanından çıkarmayın.
EN Fix the bottle with bottle support to the desired location.
ES Coloque el depósito, junto con su soporte, en la ubicación
elegida.
TR Hazneyi hazne desteğiyle istenilen yere sabitleyin.
EN Snap the soap pipe from the dispenser body into the quick
connection tting of the pump.
ES Conecte el tubo del jabón, que sale del cuerpo del
dispensador de jabón, encajándolo en el conector rápido de la
parte superior de la bomba.
TR Dispenser gövdesinden gelen sabun hortumunu pompanın
hızlı bağlantı parçasına takın.
STEP CONNECTING THE POWER SOURCE / PASO CONEXIÓN DE LA FUENTE DE ALIMENTACIÓN /
ADIM GÜÇ ÜNİTESİNİN BAĞLANMASI
EN Remove the protective sticker covering the sensor. Keep away
from the sensor range.
ES Retire la pegatina protectora que cubre el sensor.
Manténgase fuera del rango del sensor.
TR Sensörü kapatan koruyucu etiketi çıkarın. Sensör menzilinden
uzak durun.
EN Connect the motor connector to its matching connector
coming from the electronic unit. Please note that since the
connector is water proof, some friction might apply.
O-RING VISIBLE – NOT CONNECTED PROPERLY ANILLO
TÓRICO VISIBLE - NO CONECTADO CORRECTAMENTE
O-RING AÇIKTA-DOĞRU BAĞLANMAMIŞ
ONLY THE GROOVES ARE VISIBLE – CONNECTED PROPERLY
SOLO SE VEN LAS RANURAS - CONECTADO CORRECTAMENTE
SADECE ÇIKINTILAR GÖRÜNÜYOR- DOĞRU BAĞLANMIŞ
ES Conecte el conector del motor al que sale del sensor y es
del mismo tipo. Tenga en cuenta que, puesto que el conector es
resistente al agua, puede existir cierta fricción.
TR Sabun pompası konnektörünü sensörden gelen konektöre
bağlayın. Konektör su geçirmez olduğundan, tam bağlantının biraz
güç gerektirebileceğini lütfen unutmayın.
INSTALLATION / INSTALACIÓN / KURULUM INSTALLATION / INSTALACIÓN / KURULUM

EN IMPORTANT: the contacts connector should be connected properly so that the white o-ring is not visible and a clicking
sound is heard.
PAY ATTENTION: If the contacts connectors is not connected properly, the motor will work continuously.
ES IMPORTANTE: El conector de contactos debe conectarse correctamente, de modo que se oiga un clic y el anillo tórico blanco no
quede visible.
ATENCIÓN: Si los conectores de cuatro contactos no se conectan adecuadamente, la bomba estará en funcionamiento continuo.
TR ÖNEMLİ: bağlantı konnektörü doğru şekilde bağlandığında, beyaz o-ring görülmez ve bir tıklama sesi duyulur.
DİKKAT: bağlantı konektörü düzgün bağlanmamışsa, motor sürekli çalışır.
a
EN For battery versions: install the battery box on the wall
underneath the sink and connect the battery connector.
Caution: make sure to connect the connectors according to the
indication on the battery box sticker.
FROM THE SOAP DISPENSER
DEL DISPENSADOR DE JABÓN
SABUN DİSPENSERİNDEN
GELEN
TO THE BATTERY BOX
A LA CAJA PORTAPILAS
PİL KUTUSUNA GİDEN
ES Para versiones a pilas: instale la caja portapilas en la pared,
bajo el lavabo, y conecte el conector de la caja.
Atención: asegúrese de realizar la conexión de los conectores de
acuerdo con las indicaciones de la etiqueta de la caja de baterías.
TR Pilli modelleri için: Pil kutusunu evyenin altındaki duvara
sabitleyin ve pil konnektörünü takın.
Dikkat: Konnektörleri pil kutusu etiketindeki göstergeye göre
bağladığınızdan emin olun.
b
EN For transformer versions: plug the transformer into the
electricity socket and connect the transformer connector
FROM THE TRANSFORMER
DEL TRANSFORMADOR
ADAPTÖRDEN GELEN
TO THE SOAP DISPENSER
AL DISPENSADOR DE JABÓN
SABUN DİSPENSERİNE GİDEN
ES Para versiones con transformador: enchufe el transformador
a la toma de red y conecte el conector.
TR Adaptörlü versiyonlar için: Adaptörü elektrik prizine takın ve
adaptör konnektörünü bağlayın
EN Wait about seconds before you put your hands within the
sensor range.
SECONDS
ABOUT
10
APROX. SEGUNDOS
YAKLAŞIK SANİYE
ES Espere unos segundos antes de situar las manos en el
rango del sensor, para evitar entrar en modo de ajuste.
TR Ellerinizi sensör menziline koymadan önce yaklaşık saniye
bekleyin.
FILLING THE SOAP TANK / RELLENADO DEL DEPÓSITO DE JABÓN /
SABUN HAZNESİNİN DOLDURULMASI
EN Unscrew the soap tank from the pump assembly and pull it out of the bottle support.
ES Desenrosque el depósito de jabón y tire para sacarlo del soporte.
TR Sabun haznesini pompa tertibatından sökün ve desteğinden dışarı çıkarın.
EN Fill in the liquid soap up to the top line.
ES Llene el depósito con jabón líquido hasta la línea superior.
TR Sıvı sabunu haznedeki üst çizgiye kadar doldurun.
EN Insert the bottle inside the bottle support.
ES Coloque el depósito en el soporte.
TR Hazneyi hazne desteğinin içine yerleştirin.
EN Screw the soap tank back to the pump assembly. Make sure the tank is rmly secured into
place.
ES Enrosque el depósito de nuevo al kit de bombeo. Asegúrese de que queda rmemente
sujeto.
TR Sabun haznesini pompa tertibatına geri vidalayın. Haznenin yerine sıkıca sabitlendiğinden
emin olun.
EN Press the rell button located at the back of the pump assembly until soap starts coming
out of the soap dispenser spout. This operation can also be done using the soap dispenser
remote control Rell function.
ES Pulse el botón de rellenado situado en la parte trasera del kit de bombeo hasta que que el
jabón comience a salir por la boquilla del dispensador. También puede realizar esta operación
con la función “Rell” del mando a distancia.
TR Sabun dağıtıcı ağzından sabun çıkmaya başlayana kadar arkada bulunan rell düğmesine
basın. Bu işlem sabun dispenseri uzaktan kumandası rell fonksiyonu kullanılarak da
yapılabilir.
EN NOTE: Once the soap in the soap tank has reached the bottom line the soap tank should
be relled. To rell the soap tank please refer to steps .
ES NOTA: El depósito de jabón debe rellenarse cuando el nivel de jabón alcanza la línea
inferior. Para rellenar el depósito de jabón, consulte los pasos .
TR NOT: Sabun haznesindeki sabun taban çizgisine ulaştığında sabun haznesi tekrar
doldurulmalıdır. Sabun haznesini tekrar doldurmak için lütfen adımlara bakın.
EN If your model is for multifeed application, please refer to the Multifeed installation guide.
ES Si su modelo es para instalación con alimentación múltiple, consulte el manual de instalación con Professional System
.
TR Eğer ürününüz çoklu beslemeli ise lütfen Çoklu besleme ürün kurulum kılavuzunu inceleyiniz.
INSTALLATION / INSTALACIÓN / KURULUM

REMOTE CONTROL FUNCTIONS
If you acquired the remote control together with your soap dispenser, you may adjust the dispenser settings if required. To
use the remote control hold it straight in front of the sensor at a distance of about cm (”).
Attention: The remote control held out of the recommended range (too close or too far) will not operate.
The remote control can be used to adjust the following functions:
SOAP QUANTITY
The 1-4 drop keys allow the user to choose the desired soap quantity. *
. to .
. to .
. to .
. to .
Indication: continuous blinking of the LED in the sensor eye.
*The exact dosage depends on soap viscosity.
2
3
1
4
ADJ
This function resets the sensor back to factory settings.
Indication: 2 blinks of the LED in the sensor eye.
TEMPORARY OFF FUNCTION
This function is ideal to perform any kind of activity in front of the sensor
without operating the system (for example, cleaning). The soap dispenser
will remain shut for one minute when this button is pressed once.
To cancel this function and to return to normal operation press the On/O
button again or wait for one minute.
Indication: OFF – fast blinks, ON – fast blinks
FILL THE SOAP TANK
Once the soap tank has been lled / re-lled, press the FILL button. The
pump will run for one minute for priming the soap to the soap dispenser
spout.
To stop this activity press the FILL button again. If the soap has not started
coming out of the spout, press the Fill button again.
FUNCIONES DEL MANDO A DISTANCIA
En caso de tener uno, con el mando a distancia para dispensadores de jabón se pueden modicar los parámetros del
dispensador. Para usar el mando a distancia, sujételo delante del sensor a una distancia de cm (”).
Atención: el mando a distancia no funciona fuera del rango recomendado (ni demasiado cerca ni demasiado lejos).
El mando a distancia puede utilizarse para modicar las siguientes funciones:
CANTIDAD DE JABÓN
Los botones con dibujo de gotas, de. al , permiten al usuario escoger la cantidad deseada de jabón.*
, a , cc
, a , cc
, a , cc
, a , cc
Indication: continuous blinking of the light in the sensor eye.
* The exact dosage depends on soap viscosity.
2
3
1
4
ADJ
Esta función devuelve al sensor las especicaciones de fábrica.
Indicativo: 2 parpadeos de la luz del sensor.
FUNCIÓN DE DESCONEXIÓN TEMPORAL
Esta función desconecta el dispensador de forma temporal. Utilice
esta función para realizar actividades de mantenimiento delante
del sensor sin activar el sistema (por ejemplo, la limpieza). El
dispensador de jabón se apagará durante un minuto desde que pulse
el botón.
Para volver al funcionamiento normal antes de que transcurra el
minuto, pulse de nuevo el botón On/O.
Indicativo: Apagado: 2 parpadeos rápidos. Encendido: 4 parpadeos
rápidos.
LLENADO DEL DEPÓSITO DE JABÓN
Una vez (re)llenado el depósito de jabón, pulse el botón FILL. La
bomba se pondrá en funcionamiento durante un minuto, rellenando
los tubos de jabón. Este proceso termina una vez que el jabón
comience a salir por la boquilla. Pulse de nuevo el botón FILL para
detener el proceso si el minuto no ha transcurrido completo.
Indicativo: luz del sensor ja.

BATTERY REPLACEMENT / SUSTITUCIÓN DE LAS PILAS /
PİLLERİN TAKILMASI
(EN) Battery models only
When the battery weakens, the red indicator light will blink at a constant rate when the user’s hands are within the
sensor range. The battery must be replaced within two weeks.
To replace the battery in battery models:
. Carefully open the battery box, use a . mm Allen key
. Remove the old batteries
. Replace the used batteries with new D batteries
. Close the box.
(EN) NOTE: Do not mix used batteries with new ones.
(ES) NOTA: No mezcle pilas usadas con nuevas.
(TR) NOT: Kullanılmış pilleri yenileriyle karıştırmayın.
EN IMPORTANT: Spent batteries should not be disposed of with normal household waste.
Contact your local authority for information on waste disposal and recycling.
ES IMPORTANTE: Las pilas usadas no deben desecharse con los residuos domésticos.
Pida información a las autoridades locales sobre eliminación de residuos y reciclaje.
TR ÖNEMLI: Kullanılmış piller normal evsel atıklarla birlikte atılmamalıdır. Atık bertarafı ve
geri dönüşümü hakkında bilgi için yerel yetkilinize başvurun.
Istenirse, sabun dispenseri ayarlarını yapmak için uzaktan kumandayı kullanabilirsiniz. Uzaktan kumandayı sensörün
önünde doğrudan yaklaşık ”( cm) mesafede tutun.
Dikkat: Sabun dispenseri uzaktan kumandasını önerilen aralıkta tutmamak (çok yakın veya çok uzak) kumandanın
işlevini görmesini engelleyebilir.
Ayarlamak istediğiniz fonksiyonu seçin.
SABUN MİKTARI
damla tuşları, kullanıcının istenen sabun miktarını seçmesine izin verir. *
4
2.1 ile 2.3 cc arası
3
1.6 ile 1.9 cc arası
2
1.2 ile 1.6 cc arası
1
0.7 ile 0.9 cc arası
Gösterge: Sensör gözündeki ışığın sürekli yanıp sönmesi.
* Tam dozaj sabun viskozitesine bağlıdır.
2
3
1
4
ADJ
Bu işlev sensörü tekrar fabrika ayarlarına sıfırlar.
Gösterge: Sensör gözünde 2 adet ışık yanıp söner.
GEÇİCİ KAPAMA FONKSİYONU
Bu işlev geçici olarak dispenseri devre dışı bırakır. Sistemi
etkinleştirmeden sensörün önünde bakım yapmak için bu işlevi
kullanın (örneğin: temizleme). Bu düğmeye bir kez basıldıktan
sonra sabun dağıtıcısı bir dakika için kapanacaktır.
dakika bitmeden normal çalışmaya dönmek için tekrar Aç / Kapat
düğmesine basın. Gösterge: KAPALI - hızlı yanıp sönme, AÇIK -
hızlı yanıp sönme
SABUN HAZNESİNİN DOLDURULMASI
Sabun deposu doldurulduktan sonra FiLL tuşuna basın. Sabunun
sabun dispenseri ağzından çıkmaya başlaması için pompa bir
dakika çalışacaktır.
Bu aktiviteyi durdurmak için FiLL düğmesine tekrar basın. Sabun
dispenser ağzından çıkmaya başlamamışsa, Fill düğmesine tekrar
basın.
UZAKTAN KUMANDA FONKSİYONLARI
(ES) Solo modelos a pilas
Cuando las pilas se están agotando, la luz LED indicadora parpadeará a un ritmo constante cuando el usuario
sitúe las manos en el rango del sensor. Las pilas deben sustituirse en un plazo de dos semanas.
Para reemplazar las pilas:
. Abra cuidadosamente la caja portapilas con una llave Allen de . mm.
. Retire las pilas usadas.
. Sustituya las pilas usadas con pilas nuevas tipo D.
. Cierre la caja.
(TR) Sadece pilli modeller için
Batarya zayıfladığında, kırmızı gösterge ışığı kullanıcının elleri sensör aralığında olduğunda sabit bir hızda yanıp
söner. Batarya iki haa içinde değiştirilmelidir.
Pilli modellerde pillerin değişimi
. Pil kutusunu dikkatlice açın, , mm’lik bir alyan anahtarı kullanın
. Eski pilleri çıkarın
. Kullanılmış pilleri yeni D pilleriyle değiştirin
. Kutuyu kapatın.

MAINTENANCE / MANTENIMIENTO / BAKIM
(EN) Care and cleaning of chrome and special nishes
DO NOT use steel wool or cleansing agents containing alcohol, acid, abrasives, or the like.Use of any prohibited
cleaning or maintenance products or substances could damage the surface of the soap dispenser. For surface
cleaning use ONLY soap and water, then wipe dry with a clean cloth or towel. When cleaning bathroom tiles, the soap
dispenser should be protected from any splattering of harsh cleansers.
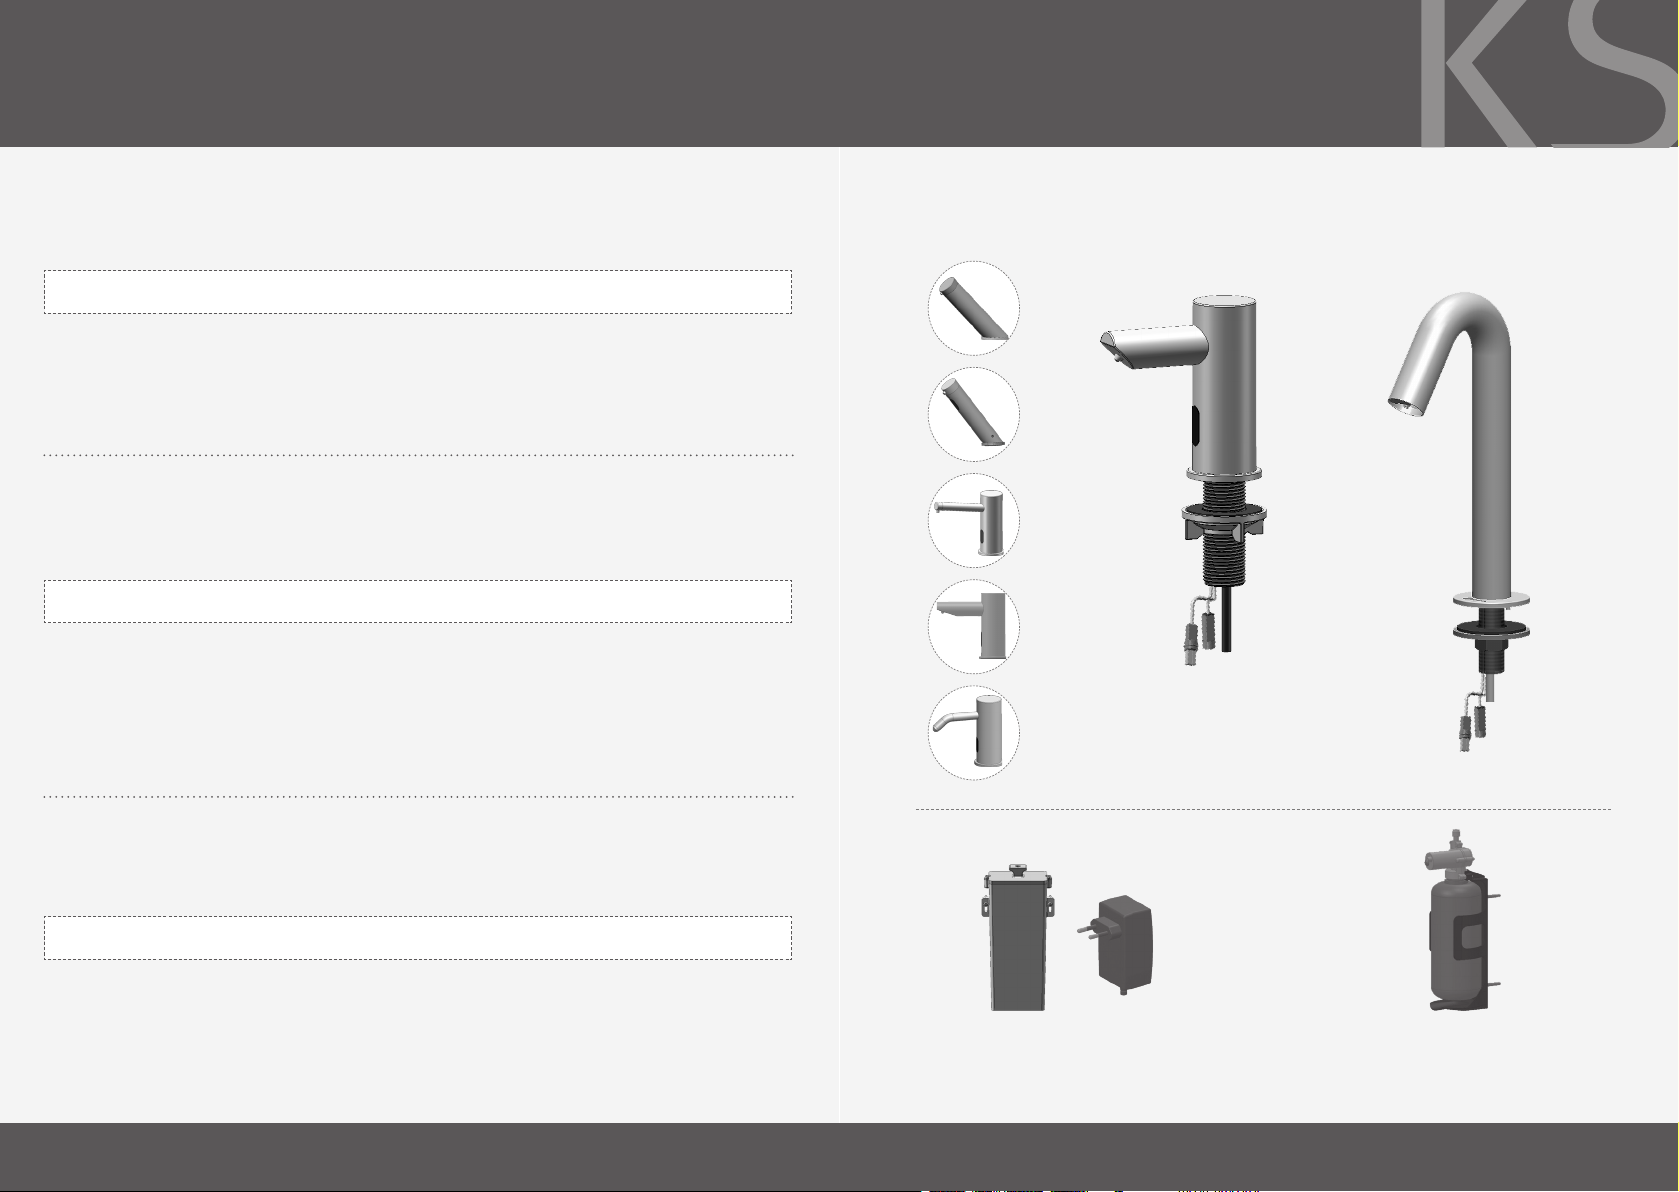
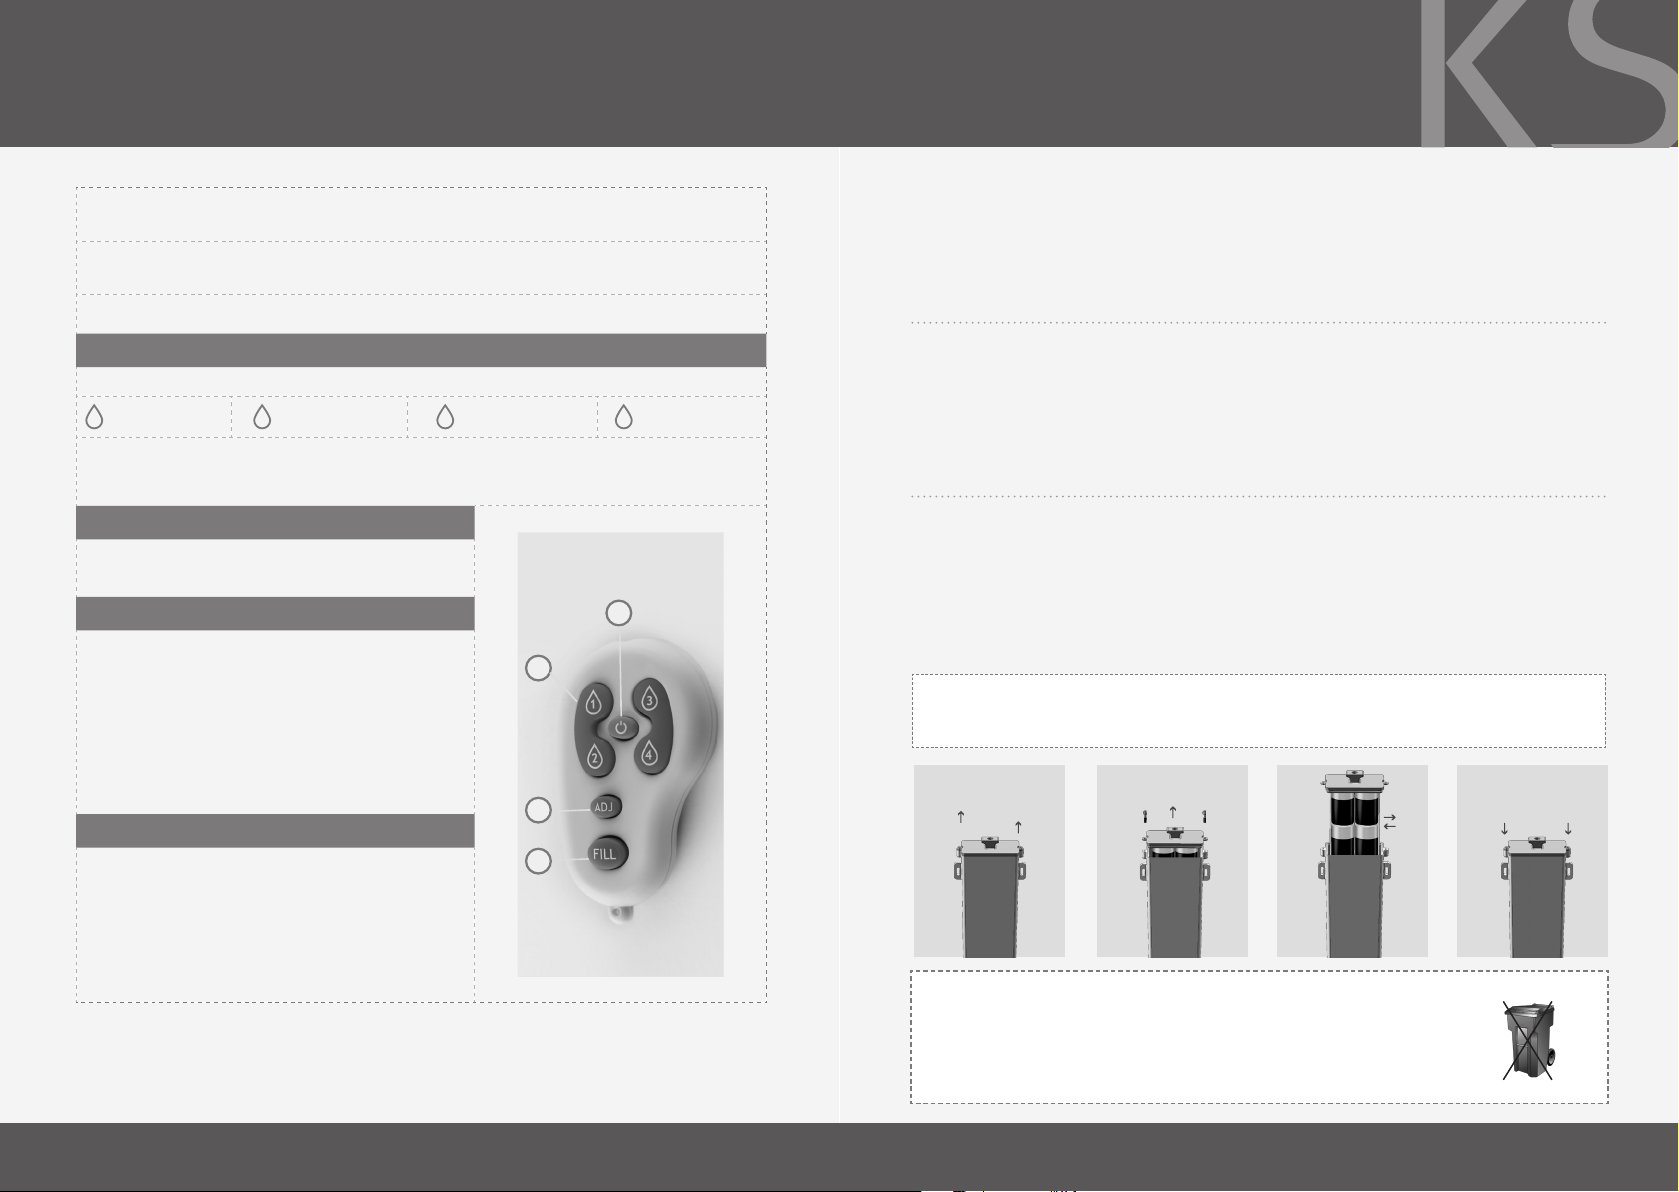
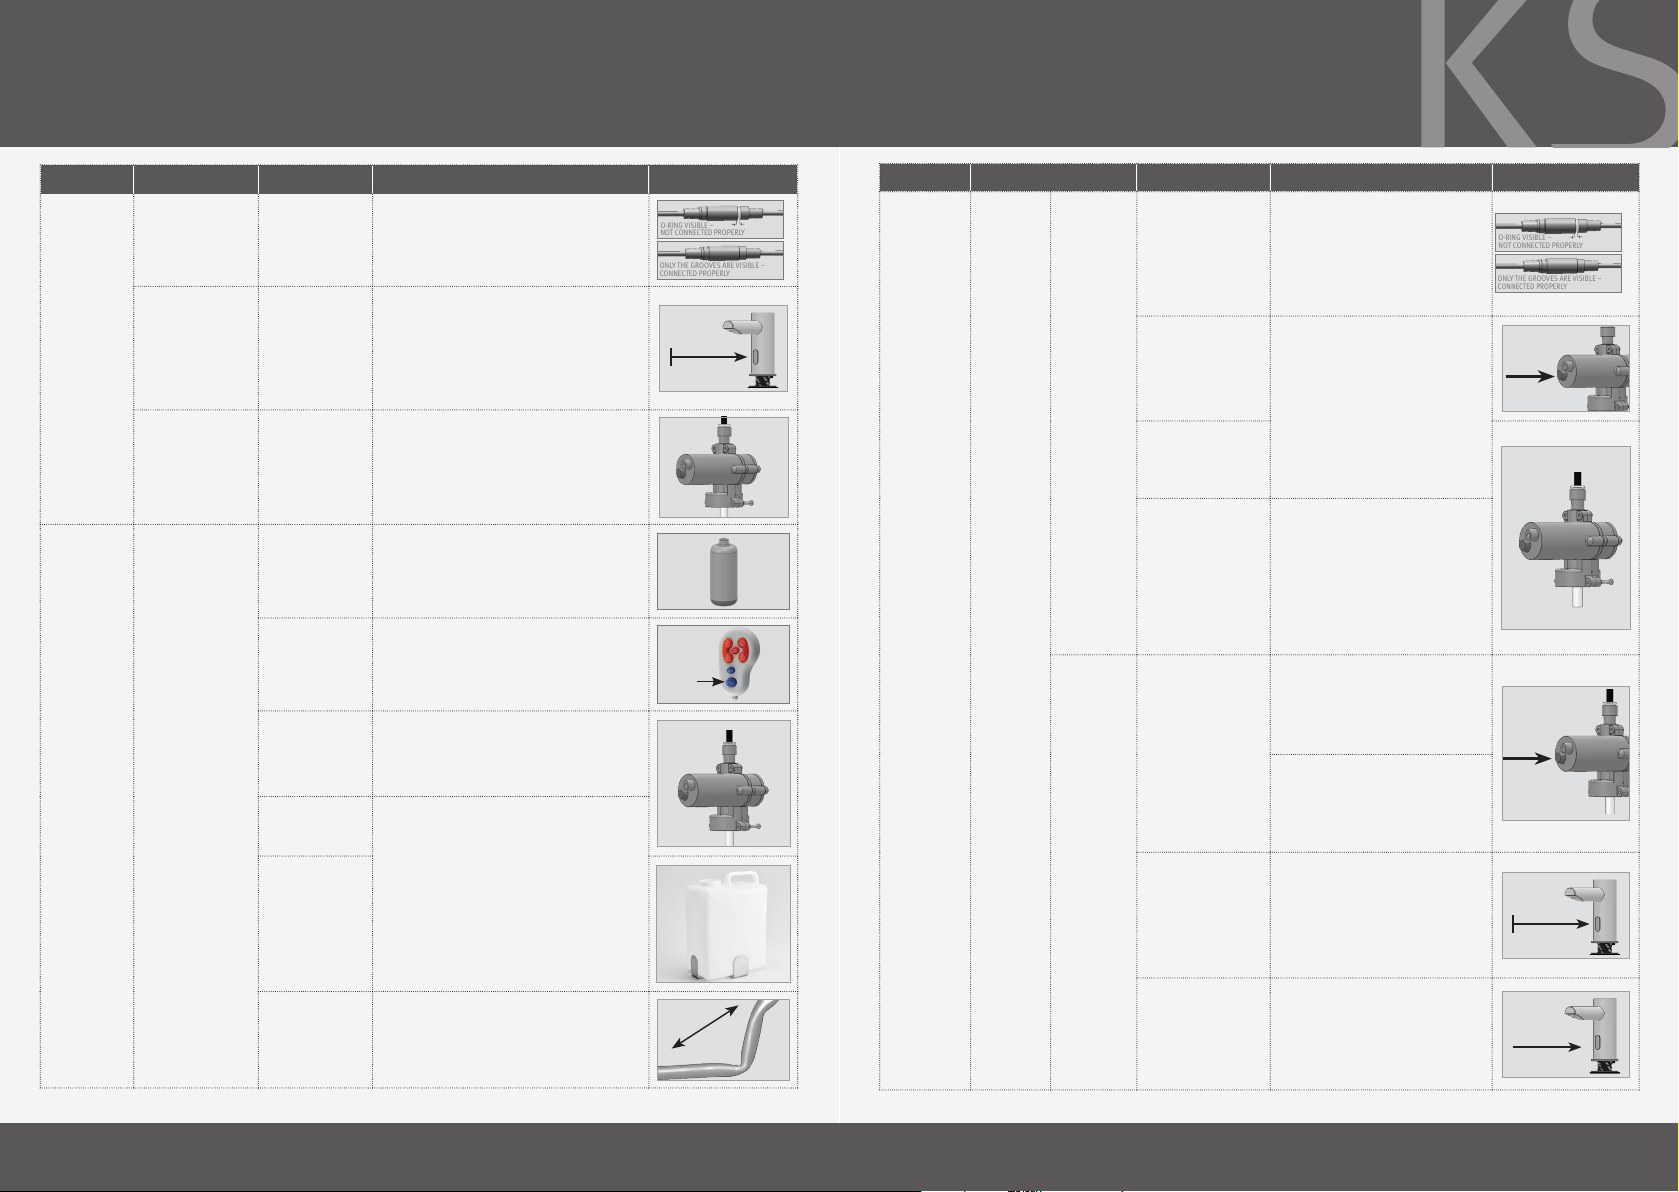
Disassemble of the soap pipe from the pump
The soap pipe can be disconnected from the soap pump by a simple slide & pull action. The sliding ring of the quick
connection xation nipple on the pump should be pulled down. It releases the open end of the soap pipe which can
then be easily pulled out.
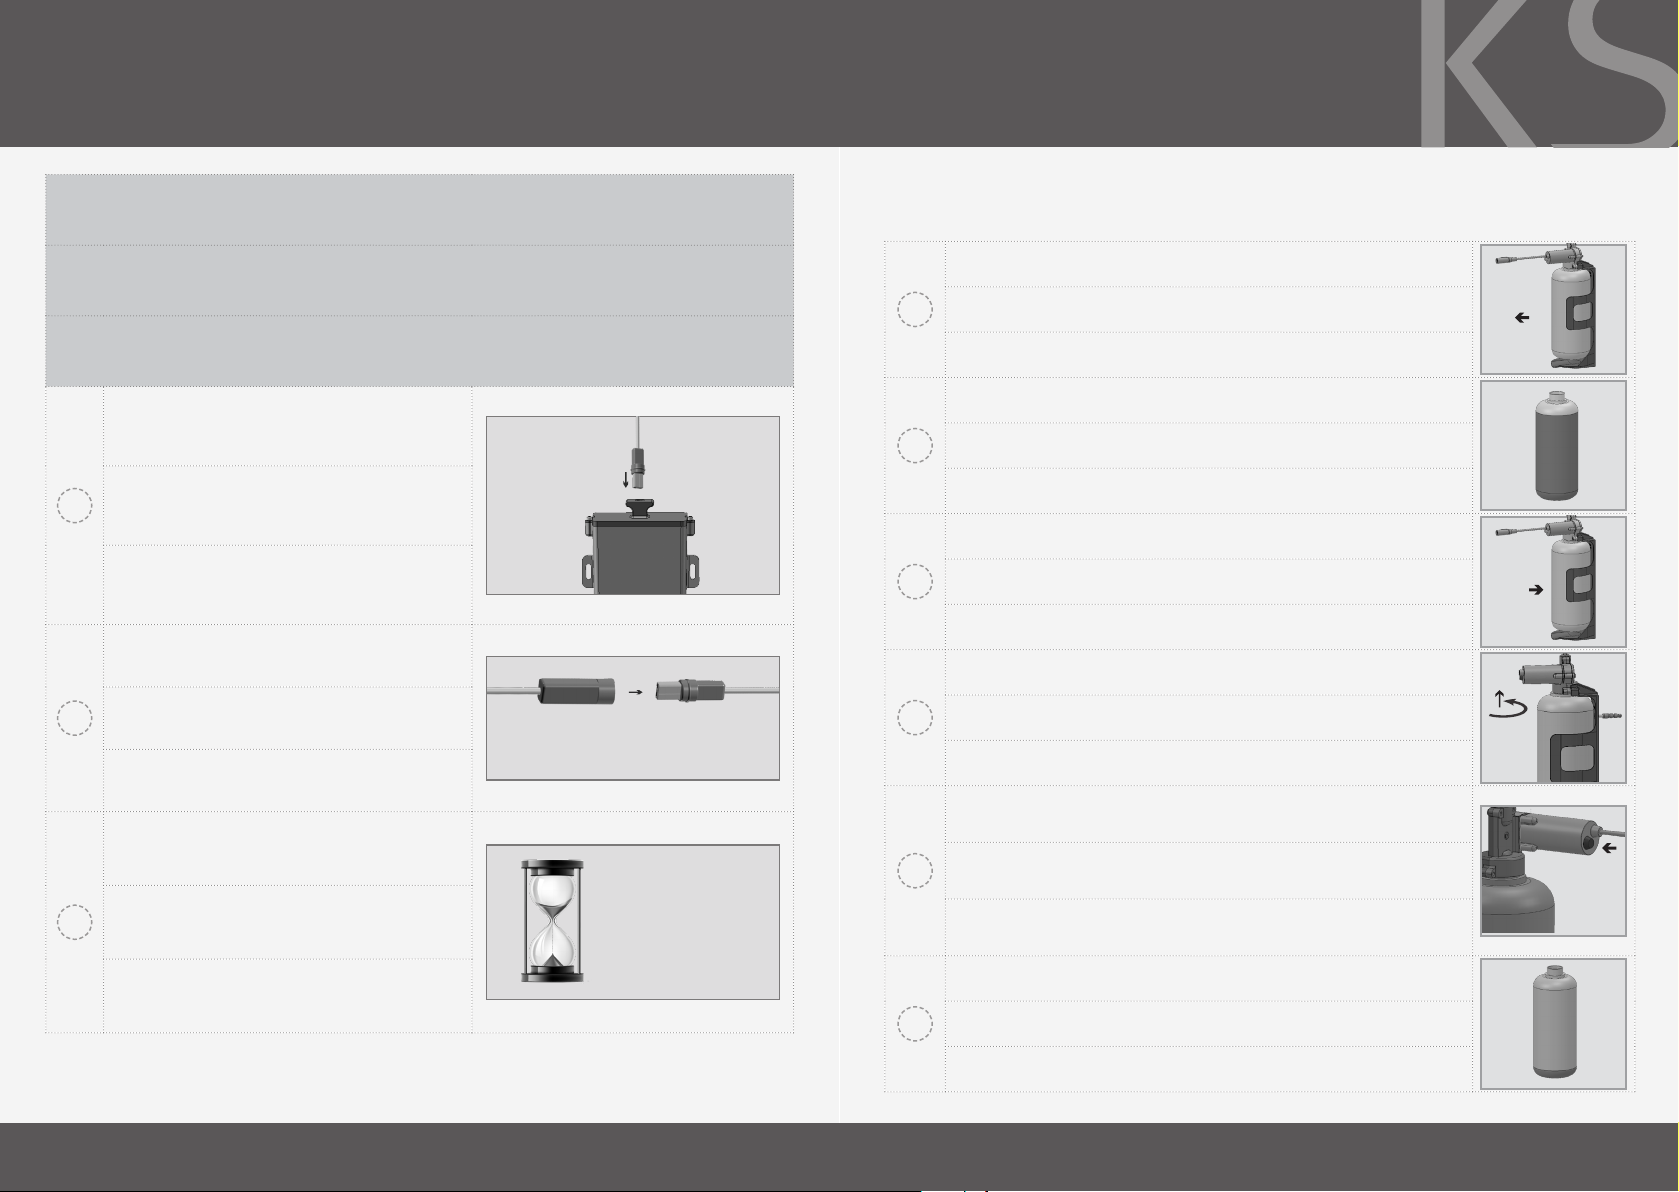
Clean the soap tank
Clean out the tank prior to rell by flushing warm water through the hoses and pump until clean water is released
from the spout. TIP: Keeping a spare tank will enable this process to be completed in a speedy and hygienic manner
with minimal downtime.
(ES) Cuidados y limpieza del cromo y acabados especiales
NO UTILICE lana de acero o productos de limpieza que contengan alcohol, ácido, ingredientes abrasivos o
similares. El uso de cualquier sustancia o producto prohibido para la limpieza o el mantenimiento puede dañar la
supercie del dispensador de jabón. Para la limpieza de la supercie utilice SOLO agua y jabón, y aclare y seque
con un paño o toalla limpia. Cuando se lleve a cabo la limpieza de los azulejos, el dispensador de jabón debe
protegerse de las salpicaduras de los productos de limpieza.
Desmontaje del tubo de jabón de la bomba
Se puede desconectar el tubo de jabón de la bomba mediante una acción consistente en deslizar y tirar. Se debe
empujar hacia abajo el anillo deslizante del conector rápido de la bomba. De este modo se libera el extremo
abierto del tubo de jabón y puede quitarse fácilmente.
Limpieza del depósito de jabón
Limpie el depósito antes de rellenarlo haciendo circular agua tibia por los tubos y la bomba hasta que salga agua
limpia por la boquilla. CONSEJO: tener un depósito de sobra permitirá completar este proceso de forma rápida e
higiénica, minimizando el tiempo de inoperatividad.
(TR) Krom ve özel yüzeylerin bakımı ve temizliği
Alkol, asit, aşındırıcı maddeler veya benzerleri içeren çelik yünü veya temizlik maddelerini KULLANMAYIN. Herhangi
bir yasaklanmış temizlik veya bakım ürününün veya maddenin sabunluk yüzeyine zarar verebileceğini unutmayın.
Yüzey temizliği için SADECE sabun ve su kullanın, sonra temiz bir bez veya havlu ile kurulayın. Banyo fayanslarını
temizlerken, sabun dispenseri, sert temizleyicilerin herhangi bir şekilde sıçramasına karşı korunmalıdır.
Sabun hortumunun pompadan sökülmesi
Sabun hortumu, basit bir sürgü ve çekme eylemiyle sabun pompasından ayrılabilir. Pompadaki hızlı bağlantı
sabitleme halkası aşağı çekilmelidir. Sabun hortumunun açık ucunu serbest bırakır, daha sonra kolayca dışarı
çekilebilir.
Sabun haznesinin temizlenmesi
Tekrar dolum yapmadan önce hazneyi temizleyin ve sabunluk ağzından temiz su çıkana kadar hortumlara ılık su
pompalayın. Ipucu: Yedekte bir haznenizin bulunması, bu işlemin minimum kesinti süresiyle hızlı ve hijyenik bir
şekilde tamamlanmasını sağlayacaktır.
LIMITED WARANTY
KASSEL SANITÄR S.L. warrants that its electronic products will be free of defects in material and workmanship
during normal use for two years from the date the product is purchased.
If a defect is found in normal use, KASSEL SANITÄR S.L. will, at its discretion, repair, provide a replacement part
or product, or make appropriate adjustments. Damage caused by accident, misuse, or abuse is not covered by
this warranty. Improper care and cleaning will void the warranty. Proof of purchase (original sales receipt) must be
provided to KASSEL SANITÄR S.L. with all warranty claims.
KASSEL SANITÄR S.L. is not responsible for labor charges, installation, or other incidental or consequential costs
other than those noted above. In no event shall the liability of KASSEL SANITÄR S.L. exceed the purchase price of
the product.
If you believe that you have a warranty claim, contact your Kassel Distributor, Dealer or Plumbing Contractor. Please
be sure to provide all pertinent information regarding your claim, including a complete description of the problem,
the product, model number, the date the product was purchased, from whom the product was purchased and the
installation date. Also include your original invoice.
KASSEL SANITÄR S.L. AND/OR SELLER DISCLAIM ANY LIABILITY FOR SPECIAL, INCIDENTAL OR CONSEQUENTIAL
DAMAGES. This warranty excludes product damage due to installation error, incorrect maintenance, wear and tear,
battery, product abuse, or product misuse, whether performed by a contractor, service company, or the consumer.
This warranty does not cover product damage caused by the following:
- Incorrect installation.
- Inversions of supply pipes.
- Pressures or temperatures exceeding recommended limits.
- Improper manipulation, tampering, bad or lapsed maintenance.
- Foreign bodies, dirt or scale introduced by the water supply or sanitizer tank.
- Use of the soap or sanitizer outside of viscosity specications.
- Alteration of the original soap/foam/sanitizer dispenser components (including pipes).
Failure to adhere to the safety precautions and/or installation recommendations outlined in this Installation Guide
will void the warranty.

GARANTÍA LIMITADA
KASSELSANITÄR S.L. garantiza que sus productos electrónicos estarán libres de defectos, tanto en material
como en mano de obra, con un uso normal, durante dos años a partir de la fecha de compra del producto. Si
con el uso normal se detecta un defecto, KASSEL SANITÄR, S.L., a su propio criterio, reparará o sustituirá la
pieza o producto, o realizará los ajustes pertinentes. Los daños causados por accidente, mal uso o abuso no
se encuentran bajo la cobertura de esta garantía. El cuidado y la limpieza indebidos anularán la garantía. En
todas las reclamaciones de garantía debe aportarse a KASSEL SANITÄR, S.L. la prueba de compra original.
KASSEL SANITÄR, S.L. no es responsable de los gastos de mano de obra, instalación u otros gastos
incidentales o indirectos, aparte de los anteriormente mencionados. En ningún caso la responsabilidad de
KASSEL SANITÁR, S.L. excederá el precio de compra del producto.
Si cree que tiene una reclamación de garantía, póngase en contacto con su distribuidor, vendedor o
contratista de fontanería. Por favor, asegúrese de aportar toda la información pertinente relacionada con
su reclamación, incluida una descripción completa del problema, el producto, el número de modelo, la
fecha de compra del producto, a quién se le compró el producto y la fecha de instalación. Incluya también
su factura original. KASSEL SANITÄR, S.L. Y/O EL VENDEDOR DECLINAN CUALQUIER RESPONSABILIDAD POR
DAÑOS ESPECIALES, INCIDENTALES O INDIRECTOS. Esta garantía no incluye daños al producto debidos a un
error de instalación, mantenimiento incorrecto, uso y desgaste,
batería, composición del agua ni abuso o mal uso del producto, ya sea por parte de un contratista, una
compañía de servicios o el consumidor. Esta garantía no cubre daños al producto causados por:
- Instalación incorrecta.
- Inversión de las tuberías de suministro.
- Presiones o temperaturas que excedan los límites recomendados.
- Manipulación inadecuada, forzamiento, mantenimiento deciente o incorrecto.
- Cuerpos extraños, suciedad o sarro introducidos a través del suministro de agua o desde el depósito
de jabón.
- Uso de jabón con viscosidad diferente a la especicada.
- Alteración de los componentes originales del dispensador de jabón líquido o en espuma
(incluidos los tubos).
El incumplimiento de las medidas de seguridad y/o recomendaciones de instalación descritas en este
Manual de instalación invalidará la garantía.
GARANTİ KOŞULLARI
Kassel Sanitär, S.L. Elektronik ürünlerinin, ürünün satın alındığı tarihten itibaren iki yıl boyunca normal
kullanım sırasında malzeme ve işçilik açısından problem olmayacağını garanti eder.
Normal kullanımda bir kusur bulunursa, Kassel Sanitär, S.L. kendi takdirine bağlı olarak, onarım, yedek
parça veya ürün tedarik edecek veya uygun ayarlamalar yapacaktır. Kaza, yanlış kullanım veya kötüye
kullanımdan kaynaklanan hasarlar bu garanti kapsamında değildir. Uygunsuz bakım ve temizlik garantiyi
geçersiz kılar. Satın alma belgesi (orijinal satış makbuzu) tüm garanti talepleri ile, Kassel Sanitär S.L.’ye
verilmelidir.
Kassel Sanitär, S.L. İşçilik ücretleri, kurulum veya yukarıda belirtilenler dışındaki diğer arızi masraflardan
sorumlu değildir. Hiçbir durumda Kassel Sanitär, S.L.’nin yükümlülüğü ürünün satın alım yatını aşmaz.
Garanti talebinde bulunmak için, Kassel Distribütörünüze, Satıcınıza veya Tesisat Yüklenicinize başvurun.
Sorunun eksiksiz bir tanımı, ürün, model numarası, ürünün satın alındığı tarih, ürünün satın alındığı tarih ve
kurulum tarihi de dahil olmak üzere, talebinizle ilgili tüm bilgileri sağladığınızdan emin olun. Ayrıca orijinal
faturanızı da ekleyin.
KASSEL SANITAR VE/VEYA SATICI ÖZEL, ARIZİ VEYA DOLAYLI ZARARLAR İÇİN HERHANGİ BİR SORUMLULUK
KABUL ETMEMEKTEDİR.
Bu garanti, kurulum hatası, yanlış bakım, aşınma ve yıpranma, batarya, ürün suistimali veya ürün yanlış
kullanımından kaynaklanan, bir yüklenici, hizmet şirketi veya tüketici tarafından gerçekleştirilen ürün
hasarlarını kapsamaz. Bu garanti, aşağıdakilerden kaynaklanan ürün hasarlarını kapsamaz. :
- Yanlış kurulum.
- Tedarik hortumlarının yanlış bağlanması.
- Tavsiye edilen limitleri aşan basınçlar veya sıcaklıklar.
- Uygun olmayan müdahale, kurcalama, kötü veya gecikmeli bakım.
- Su kaynağı veya sabun tankı tarafından getirilen yabancı cisimlerveya kir.
- Sabunun viskozite özelliklerinin önerilenin dışında olması.
- Orijinal sabun / köpük dağıtıcı bileşenlerinin (hortum dahil) değiştirilmesi.
Bu kurulum kılavuzunda belirtilen güvenlik önlemlerine ve/veya kurulum tavsiyelerine uyulmaması, ürün
garantisini geçersiz kılacaktır.

TROUBLESHOOTING TROUBLESHOOTING
IllustrationSolutionCauseInvestigationIndication
O-RING VISIBLE –
NOT CONNECTED PROPERLY
ONLY THE GROOVES ARE VISIBLE –
CONNECTED PROPERLY
The connector should be inserted fully until
white o-ring is not visible. Remove the o-ring if
necessary
AUX connector not
fully inserted
Continuous
discharge from the
nozzle
False
activation:
Soap
dispensing
Min . M
Eliminate any cause of reflection and if
necessary use appropriate remote control to
shorten detection range.
Reflection issue
from other object
Random discharge
from the nozzle
Replace the Pump. Rinse warm water through
the pipe and the body of the soap dispenser all
the way to the nozzle.
Damaged pump
due to high
viscosity or debris
in pipes
Soap discharging
from pump housing.
Fill with soap with correct viscosity (
cPs) and prime pipes using the ll button on
remote control.
Soap tank is
empty
Pump is making
sounds when sensor
is activated
Soap not
dispensing
Press
FILL
Button
Prime the soap dispenser by pressing the ll
button on the remote or by pressing the rell
button located at the bottom of the pump, until
soap exits the nozzle.
Soap dispenser
has not been
primed
Replace the PumpDamaged pump
(discharge from
housing)
Run warm water through pipe, pump, and body
all the way to the nozzle. Replace with soap of
correct viscosity.
NOTE: Using the soap dispenser with high
viscosity soap may cause permanent damage to
the pump and shorten the lifecycle.
Debris or dried
soap in the pipe
or tank
Soap Viscosity
cPs)
High viscosity
soap
(> cPs)
Unbend or straighten pipes.Bent pipes
IllustrationSolutionCauseInvestigationIndication
O-RING VISIBLE –
NOT CONNECTED PROPERLY
ONLY THE GROOVES ARE VISIBLE –
CONNECTED PROPERLY
The connector should be inserted fully
until the white o-ring is not visible.
Remove the o-ring if necessary
AUX connector not
fully inserted
Sensor is
blinking
when hand
is placed in
front
Pump is
not making
sound when
the sensor is
activated
Soap not
dispensing
Press
Replace the Pump. Rinse warm water
through the pipe and the body of the
soap dispenser all the way to the
nozzle.
Rell button on pump
does not activate the
pump.
Damaged pump
(discharge from
housing).
Run warm water through pipe, pump,
and body all the way to the nozzle.
Replace with soap of correct viscosity.
NOTE: Using the soap dispenser
with high viscosity soap may cause
permanent damage to the pump and
shorten the lifecycle.
Debris or dried soap in
the tank or tubing
Rell
button
Transformer: Check operation with
functioning transformer. Where
necessary replace with appropriate
transformer. For part numbers see
spare parts list.
Rell button on pump
does not activate the
pump.
Sensor is
not blinking
when hand
is placed in
front
Battery: Check operation with
functioning battery pack. Where
necessary, replace batteries or replace
the battery pack: Battery pack (without
batteries)
Min . M
Eliminate any cause of reflection and
use appropriate remote control to
shorten detection range.
Reflection issue from
other object
Replace
sensor
If the above two solutions have not
resolved this issue replace with
appropriate sensor. For part numbers
see spare parts list.
Damaged sensor

SOLUCIÓN DE PROBLEMAS SOLUCIÓN DE PROBLEMAS
IlustraciónSoluciónCausaSíntomaIndicador
ARO TÓRICO VISIBLE
CONEXIÓN INCORRENTA
SOLO SE VEN LAS RANURAS
CONEXIÓN CORRECTA
Debe insertarse el conector completamente
hasta que deje de verse el aro tórico blanco. En
caso necesario, retire el aro tórico.
El conector AUX no
está insertado del
todo.
Descarga continua
por la boquilla
Falsa
activación:
salida de
jabón
Mín. m
Elimine cualquier fuente de reflejos y, en caso
necesario, utilice el mando a distancia para
acortar el rango del sensor.
Problema de
reflejos del lavabo
u otro objeto
Descarga aleatoria
por la boquilla
Sustituya la bomba. Acalare con agua templada
el tubo y el cuerpo del dispensador de jabón
hasta la boquilla.
Bomba dañada
debido a la alta
viscosidad o a
residuos en las
tuberías
Salida de jabón
por la carcasa de la
bomba
Rellene el depósito con jabón de la viscosidad
adecuada (100-3800 cPs) y rellene las tuberías
utilizando el botón FILL o el mando a distancia.
El depósito de
jabón está vacío
La bomba suena
cuando se activa el
sensor
No sale jabón
Pulse el
botón
FILL
Rellene las tuberías pulsando el botón FILL
del mando a distancia o pulsando el botón
de rellenado situado en la parte inferior de la
bomba, hasta que el salga jabón por la boquilla.
No se han
rellenado las
tuberías del
dispensador de
jabón
Sustituya la bombaBomba averiada
(salida de jabón
por la carcasa)
Haga circular agua templada por la tubería,
bomba y cuerpo, hasta la boquilla. Sustituya el
jabón por otro de viscosidad adecuada.
NOTA: El uso del dispensador con jabón de alta
viscosidad puede causar daños permanentes a
la bomba y reducir su vida útil.
Residuos o jabón
seco en la tubería
o en el depósito
Viscosidad del jabón:
cPs
Jabón de alta
viscosidad (>
cPs)
Enderece los tubosTubos doblados
IlustraciónSoluciónCausaSíntomaIndicador
ARO TÓRICO VISIBLE
CONEXIÓN INCORRENTA
SOLO SE VEN LAS RANURAS
CONEXIÓN CORRECTA
Debe insertarse el conector
completamente hasta que deje de
verse el aro tórico blanco. En caso
necesario, retire el aro tórico.
El conector AUX no
está insertado del
todo
El sensor
parpadea
cuando se
sitúa la mano
delante
La bomba
no suena
cuando se
activa el
sensor
No sale jabón
Pulse
Sustituya la bomba. Aclare con
agua tibia la tubería y el cuerpo del
dispensador de jabón hasta la boquilla.
El botón de rellenado
de la bomba no activa
la bomba
Bomba dañada
(salida de jabón por la
carcasa)
Haga circular agua templada por la
tubería, bomba y cuerpo, hasta la
boquilla. Sustituya el jabón por otro de
viscosidad adecuada.
NOTA: El uso del dispensador con jabón
de alta viscosidad puede causar daños
permanentes a la bomba y reducir su
vida útil.
Residuos o jabón seco
en el depósito o las
tuberías
Botón
REFILL
Transformador: Compruebe el
funcionamiento con un transformador
en buen estado. En caso necesario,
sustituya el transformador con uno
nuevo. Puede consultar el código en la
lista de repuestos.
El botón de rellenado
de la bomba no activa
la bomba.
El sensor no
parpadea
cuando se
sitúa la mano
delante
Pilas: compruebe el funcionamiento
con una caja portapilas en buen
estado. En caso necesario, sustituya las
pilas o la caja portapilas (sin pilas).
Mín. , m
Elimine la fuente de reflejos y utilice el
mando a distancia para acortar el rango
del sensor
Problema de reflejos
del lavabo u otro
objeto
Sustituya
el sensor
Si las dos soluciones anteriores no
han resuelto el problema, sustituya el
sensor. Puede consultar el código en la
lista de repuestos.
Sensor averiado

SORUN GİDERME SORUN GİDERME
ResimÇözümSebepGözlemBelirti
O-ring açıkta-
Doğru bağlanmamış
Sadece çıkıntılar görülüyor -
Doğru bağlanmış
Beyaz o-ring görünmeyene kadar konnektör
tamamen yerleştirilmelidir. Gerekirse halka
contayı çıkarın
AUX konnektörü
tam bağlanmamış
Sürekli sabun
akıtma
Hatalı çalışma:
Sabun
dispenseri
Min . M
Tüm yansıma etkenlerini ortadan kaldırın ve
gerekirse tespit aralığını kısaltmak için uygun
uzaktan kumanda kullanın.
Evye veya başka
bir nesneden
yansıma sorunu
Rastgele sabun
verme
Pompayı çıkarın.
Sıcak suyu borunun içinden ve sabun
dağıtıcısının gövdesinden nozüle kadar akıtarak
iyice durulayın.
Yüksek viskozite
veya inşaat
döküntüsü
sebebiyle hasar
görmüş pompa
Pompa gövdesinden
sabun akması
Doğru viskoziteli sabunla doldurun
(Sıvı sabun için cPs) ve uzaktan
kumandadaki doldurma düğmesini kullanarak
ilk beslemeyi yapın.
Sabun haznesi
boş
Pompa ve /
veya sensör
etkinleştirildiğinde
kompresör ses
çıkarıyor
Sabun
gelmiyor
Fill
düğmesine
basın
Sabun dispenserini, uzaktan kumandadaki
dolum düğmesine basarak veya pompanın
tabanındaki sabun, nozuldan çıkana kadar
besleyin.
Sabun
doldurulduktan
sonra ilk besleme
yapılmamış.
Pompayı değiştirinHasarlı pompa
(mahfazadan
akıtma)
Hortuma, pompaya ve gövdeye kadar ılık su
doldurun. Doğru viskozitede sabunla değiştirin.
NOT: Sabun dispenserini yüksek viskoziteli
sabun ile kullanmak pompanın kalıcı şekilde
hasar görmesine sebep olur ve kullanım ömrünü
kısaltabilir.
Hortumda veya
haznede döküntü
veya kurumuş
sabun
sabun Viskozitesi
( cPs
sıvı sabun)
Yüksek viskoziteli
sabun
(> cPs)
Hortumların bükülmesini engelleyinbükülmüş
hortumlar
ResimÇözümSebepGözlem
Belirti
O-ring açıkta-
Doğru bağlanmamış
Sadece çıkıntılar görülüyor -
Doğru bağlanmış
Beyaz o-ring görünmeyene
kadar konnektör tamamen
yerleştirilmelidir. Gerekirse halka
contayı çıkarın
AUX konnektörü tam
bağlanmamış
El algılandığında
sensör ışığı yanıp
sönüyor.
Sensör
etkinleştiril-
diğinde
pompa
ses çıkarmıyor
Hatalı
çalışma:
Sabun
dispenseri
Besleme
düğmesi
Pompayı çıkarın.
Sıcak suyu borunun içinden ve
sabun dağıtıcısının gövdesinden
nozüle kadar akıtarak iyice
durulayın.
Pompadaki doldurma
düğmesi, pompayı
etkinleştirmiyor.
Hasarlı pompa
(mahfazadan akıtma).
Hortuma, pompaya ve gövdeye kadar
ılık su doldurup durulayın. Doğru
viskozitede sabunla değiştirin.
NOT: Sabun dispenserini yüksek
viskoziteli sabun ile kullanmak
pompanın kalıcı şekilde hasar
görmesine sebep olur ve kullanım
ömrünü kısaltabilir.
Hortumda veya
haznede döküntü veya
kurumuş sabun
Rell
button
TRAFO: Trafonun doğru çalışıp
çalışmadığını kontrol edin.
Gerektiğinde uygun trafo ile
değiştirin.
Parça numaraları için yedek parça
listesine bakınız.
Pompadaki doldurma
düğmesi, pompayı
etkinleştirmiyor.
El algılandığında
sensör ışığı yanıp
sönüyor.
PİL: Pillerin doğru çalışıp
çalışmadığını kontrol edin.
Gerektiğinde, pilleri veya pil
kutusunu değiştirin: pil kutusu
(pilsiz)
Min . M
Tüm yansıma etkenlerini ortadan
kaldırın ve gerekirse tespit aralığını
kısaltmak için uygun uzaktan
kumanda kullanın.
Evye veya başka bir
nesneden yansıma
sorunu
Replace
sensor
Yukarıdaki iki çözüm bu sorunu
çözmezse uygun sensörle
değiştirin.
Hasarlı sensör

KSL /
Kassel Sanitär S.L.
•Avda. de Castilla, - Polígono Industrial, San Fernando de Henares, Madrid, Spain
•
Daimlerstraße , D- Burglengenfeld, Germany
This manual suits for next models
7
Table of contents
Other Kassel Sanitar Dispenser manuals
Popular Dispenser manuals by other brands

DR.SCHUMACHER
DR.SCHUMACHER 00-911-TL005 Quick installation guide

Sanela
Sanela SLZN 66 Mounting instructions

Elkay
Elkay Smartwell DSSW1808FSC Installation & maintenance

Henkel
Henkel Loctite 97631 operating manual

Graco
Graco PR70 Series Operation and maintenance manual

Veneer
Veneer Tape Dispenser instructions