Kassel Sanitar KSL00930 Quick start guide

TOUCH FREE wall MOUNTED SOaP DISPENSERS
DISPENSaDORES DE JaBÓN MURalES SIN CONTaCTO
DUVaRa MONTE FOTOSEllİ SaBUN DİSPENSERİ
RONDA SOAP DISPENSER SERIES
SERIE RONDA SOAP DISPENSER
RONDA SABUN DİSPENSERİ SERİSİ
PETRA SOAP DISPENSER SERIES
SERIE PETRA SOAP DISPENSER
PETRA SABUN DİSPENSERİ SERİSİ
OPERATION AND INSTALLATION
GUIDE
MANUAL DE INSTALACIÓN Y FUNCIONAMIENTO
KURULUM VE BAKIM KILAVUZU

TECHNICal DaTa
RONDA WM SOAP DISPENSER
KSL
RONDA SOAP DISPENSER
KSL
PETRA WM SOAP DISPENSER
KSL
PETRA SOAP DISPENSER
KSL
Capacity Liter / . oz
Power Supply Battery models: Battery Box for xD Alkaline batteries
Mains models: V transformer
Soap viscosity cPs
Standard discharge .cc (customizable by optional remote control)
Sensor range mm +/- mm /..” (customizable by optional remote
control)
Preset sensor range mm +/- mm /.” +/- .
INDEX
TECHNICAL DATA
PREINSTALLATION INFORMATION
PACK CONTENTS
INSTALLATION
FILLING THE SOAP TANK
SETTINGS ADJUSTMENT WITH A REMOTE CONTROL
BATTERY REPLACEMENT
MAINTENANCE
TROUBLESHOOTING
LIMITED WARRANTY

PRE-INSTallaTION INFO PaCk CONTENTS - RONDa wM / PETRa wM
Familiarize yourself with the part names and conrm that the parts are included.
1 X SOaP TaNk wITH BOTTlE SUPPORT
aND PUMP aSSEMBly
1 X BODy aSSEMBly FOR RONDa wM
SOaPDISPENSER
1 X BODy aSSEMBly FOR PETRa wM
SOaPDISPENSER
1 X BaTTERy BOX FOR 6XD alkalINE
BaTTERIES /12V TRaNSFORMER
BaTTERy
VERSIONS
TRaNSFORMER
VERSIONS
X M X
SET SCREW
X M X
SET SCREW
X QUICK
CONNECTION
FITTING
X SCREW
.X /”
Check contents
Separate all parts from the packaging and check each part with the “Pack contents”
section.
Make sure all parts are accounted for before discarding any packaging material.
If any parts are missing, do not attempt to install your touch free soap dispenser until you
obtain the missing parts.
Warnings
Do not install the system facing a mirror or any other electronic system operated by an
infra-red sensor.
To prevent reflection problems, it is recommended to keep a minimum distance of
mm between the soap dispenser and any other objects.
Liquid soap dispensers, with proper care, will provide long term trouble free service.
Quality liquid soap of recommended viscosity and pH levels are the main factors for
smooth operation of your dispenser. If needed, use a viscometer to verify the viscosity
of your soap to ensure maximum benet. The recommended range for liquid soap
viscosity is cPs. Thicker liquid soap flows slower and inhibits the pump valve,
causing strain and damage.
Liquid soap dispensers are suitable for use with any generic liquid soap of the correct
viscosity and pH. The pH level of all soap used in our liquid soap dispensers should be
between . to .. Lower levels will cause corrosion to the metal dispenser and even the
rubber and plastic components. Higher pH levels will cause swelling to rubber parts and
degradation of plastic components over time.
IMPORTANT: Keep in mind that when using the faucet installed next to the soap
dispenser, the user hands should not interfere with the soap dispenser sensor
detection area.

PaCk CONTENTS - RONDa / PETRa
Familiarize yourself with the part names and confirm that the parts are included.
1 X BaTTERy BOX FOR 6XD alkalINE
BaTTERIES / 12V TRaNSFORMER
BaTTERy
VERSIONS
TRaNSFORMER
VERSIONS
1 X SOaP TaNk wITH BOTTlE SUPPORT
aND PUMP aSSEMBly
1 X ElBOw aND
CORRUgaTED TUBE 1X wall ROSETTE
1 X BODy aSSEMBly FOR RONDa
SOaPDISPENSER
1 X BODy aSSEMBly FOR PETRa
SOaPDISPENSER
X TEMPORARY
BASE COVER
X M X
SET SCREW
X M X
SET SCREW
X QUICK
CONNECTION
FITTING
X SCREW
.X /”
INSTallaTION - RONDa wM / PETRa wM
STEP PREPARATION FOR INSTALLATION
Drill a hole ( to mm) at the desired
location for the soap dispenser spout
installation.
Drill a small hole ( to mm) just above
the previous one for the anti-rotation pin,
according to the diagram.
Remove the hexagonal nut and the disk from
the base of the soap dispenser spout. Recommended hole size
mm
.”
mm
..”
STEP INSTALLING THE SOAP DISPENSER
Insert the Soap dispenser base and
the anti-rotation pin into the holes
drilled.
Fix the base behind the wall with the
hexagonal nut and the disk.
SOAP DISPENSER BASE
DISK
ANTIROTATION PIN
HEXAGONAL NUT
Fix the bottle with bottle support to
the desired location.
Connect the soap tube that is coming
out of the soap dispenser body to
the quick connector at the top of the
soap dispenser pump assembly by
snapping it in.

INSTallaTION - RONDa wM / PETRa wM
STEP CONNECTING THE POWER SOURCE
Remove the protective sticker
covering the sensor. Keep away from
the sensor range and check that no
objects are in front of the sensor.
Connect the soap pump
connector to the matching
connector from the sensor.
Please note that since the
connector is waterproof, some
friction might apply.
O-RING VISIBLE –
NOT CONNECTED PROPERLY
ONLY THE GROOVES ARE VISIBLE –
CONNECTED PROPERLY
IMPORTANT: the contacts connector should be connected properly so that the white
o-ring is not visible and a clicking sound is heard.
PAY ATTENTION: If the contacts connectors will not be connected properly, the pump
will work continuously.
a
For battery versions: install the
battery box on the wall underneath
the sink and connect the battery
connector
FROM THE SOAP DISPENSER
TO THE BATTERY BOX
b
For transformer versions: plug the
transformer into the electricity
socket and connect the transformer
connector FROM THE TRANSFORMER TO THE SOAP DISPENSER
Wait about 10 seconds before
you put your hands within the
sensor range to avoid entering the
adjustment mode.
SECONDS
ABOUT
INSTallaTION - RONDa / PETRa
STEP INSTALLING THE SOAP DISPENSER
Cut an adequate opening in the wall for
the dimensions of the soap dispenser
base (where you want to install the
spout) and the corrugated tube.
Disconnect the soap dispenser body with
the rosette from the base by unscrewing
the set screw.
SET SCREW
Mount the soap dispenser base into the
opening in the wall and secure it using
the two anchors provided in the package.
Important: The soap dispenser base
should be installed so that the outside
surface of the nished wall falls between
the minimum and maximum lines marked
at the base.
Assemble the temporary protective soap
dispenser base cover.
Assemble the corrugated tube to the
soap dispenser base and make sure it
stays outside the wall when you do the
tiling.

INSTallaTION - RONDa / PETRa
Once the works on electricity,
plumbing and tiles have been
nished, insert the wall rosette
through the soap dispenser
base, and cut the temporary soap
dispenser base cover.
Fix the soap dispenser spout by
inserting the nipple into the soap
dispenser base and tighten the
screw.
Pull the four way connector and the
power supply connector out of the
soap dispenser base, and lead it
through the corrugated tube.
INSTallaTION - RONDa / PETRa
STEP CONNECTING THE POWER SOURCE
Remove the protective sticker
covering the sensor. Keep away from
the sensor range and check that no
objects are in front of the sensor.
Connect the soap pump
connector to the matching
connector from the sensor.
Please note that since the
connector is waterproof, some
friction might apply.
O-RING VISIBLE –
NOT CONNECTED PROPERLY
ONLY THE GROOVES ARE VISIBLE –
CONNECTED PROPERLY
IMPORTANT: the contacts connector should be connected properly so that the white
o-ring is not visible and a clicking sound is heard.
PAY ATTENTION: If the contacts connectors will not be connected properly, the pump
will work continuously.
2a
For battery versions: install the
battery box on the wall underneath
the sink and connect the battery
connector
FROM THE SOAP DISPENSER
TO THE BATTERY BOX
2b
For transformer versions: plug the
transformer into the electricity socket
and connect the transformer connector
FROM THE TRANSFORMER TO THE SOAP DISPENSER
Wait about seconds before
you put your hands within the
sensor range to avoid entering the
adjustment mode. 10
SECONDS
ABOUT

FIllINg THE SOaP TaNk
1Unscrew the soap tank from the pump assembly
and pull it out of the bottle support.
2Fill in the liquid soap up to the top line.
3Insert the bottle inside the bottle support.
4Screw the soap tank back to the pump assembly.
Make sure the tank is rmly secured into place.
5
Press the rell button located at the back of the
pump assembly until soap starts coming out of
the soap dispenser spout. This operation can also
be done using the soap dispenser remote control
Rell function.
6NOTE: Once the soap in the soap tank has reached
the bottom line the soap tank should be relled. To
rell the soap tank please refer to steps 1-5.
SETTINgS aDJUSTMENT wITH a REMOTE CONTROl
If available, the soap dispenser remote control can adjust the dispenser’s settings.
To use the remote control hold it in front of the sensor at a distance of cm (”).
Attention: The remote control will not operate out of the recommended range (too close
or too far).
The remote control can be used to adjust the following functions:
1-SOaP QUaNTITy
The drop keys allow the user to choose the desired soap quantity. *
. to . cc
. to . cc
. to . cc
. to .cc
Indication: continuous blinking of the light in the sensor eye.
* The exact dosage depends on soap viscosity.
2
3
1
4
2-aDJ
This function resets the sensor back to factory
settings.
Indication: blinks of the light in the sensor eye.
3-TEMPORaRy OFF FUNCTION
This function temporary disables the
dispenser. Use this function to preform
maintenance in front of the sensor without
activating the system (for example: cleaning).
The soap dispenser will shut o for one minute
aer this button is pressed once.
To return to normal operation before the
minute is over, press the On/O button again.
Indication: OFF – fast blinks, ON – fast blinks
4-FIll THE SOaP TaNk
Once the soap tank has been lled \ relled,
press the FILL button. The pump will run for one
minute, priming the piping with soap. Once soap
begins dispensing from the spout, priming is
complete. press the FILL button again to stop the
priming before the minute is over.
Indication: continuous solid light in the sensor
eye.

BaTTERy REPlaCEMENT
Battery models only
When the batteries weaken, the LED indicator light will blink at a constant rate when
the user’s hands are within the sensor range. The batteries must be replaced within two
weeks.
To replace the batteries in battery models:
. Carefully open the battery box, use a . mm Allen key
. Remove the old batteries
. Replace the used batteries with new D batteries
. Close the box.
NOTE: Do not mix used batteries with new ones.
Important: Spent batteries should not be disposed of with normal
household waste. Contact your local authority for information on waste
disposal and recycling.
MaINTENaNCE
Care and cleaning of chrome and special nishes
DO NOT use steel wool or cleansing agents containing alcohol, acid, abrasives, or the like.
Use of any prohibited cleaning or maintenance products or substances could damage the
surface of the soap dispenser. For surface cleaning use ONLY soap and water, then wipe
dry with a clean cloth or towel. When cleaning bathroom tiles, the soap dispenser should
be protected from any splattering of harsh cleansers.
Disassemble of the soap pipe from the pump
The soap pipe can be disconnected from the soap pump by a simple slide & pull action.
The sliding ring of the quick connection xation nipple on the pump should be pulled
down. It releases the open end of the soap pipe which can then be easily pulled out.
Clean the soap tank
Clean out the tank prior to rell by flushing warm water through the hoses and pump until
clean water is released from the spout. TIP: Keeping a spare tank will enable this process
to be completed in a speedy and hygienic manner with minimal downtime.

TROUBlESHOOTINg
IllustrationSolutionCauseInvestigationIndication
O-RING VISIBLE –
NOT CONNECTED PROPERLY
ONLY THE GROOVES ARE VISIBLE –
CONNECTED PROPERLY
The connector should be inserted fully until
white o-ring is not visible. Remove the o-ring if
necessary
AUX connector not
fully inserted
Continuous
discharge from the
nozzle
False
activation:
Soap
dispensing
Min mm.
Bottom of the washbasin
Eliminate any cause of reflection and if
necessary use appropriate remote control to
shorten detection range.
Reflection issue
from basin or
other object
Random discharge
from the nozzle
Replace the Pump. Rinse warm water through
the pipe and the body of the soap dispenser all
the way to the nozzle.
Damaged pump
due to high
viscosity or debris
in pipes
Soap discharging
from pump housing.
Fill with soap with correct viscosity (
cPs) and prime pipes using the ll button on
remote control.
Soap tank is
empty
Pump is making
sounds when sensor
is activated
Soap not
dispensing
Press
FILL
Button
Prime the soap dispenser by pressing the ll
button on the remote or by pressing the rell
button located at the bottom of the pump, until
soap exits the nozzle.
Soap dispenser
has not been
primed
Replace the PumpDamaged pump
(discharge from
housing)
Run warm water through pipe, pump, and body
all the way to the nozzle. Replace with soap of
correct viscosity.
NOTE: Using the soap dispenser with high
viscosity soap may cause permanent damage to
the pump and shorten the lifecycle.
Debris or dried
soap in the pipe
or tank
Soap Viscosity
cPs)
High viscosity
soap
(> cPs)
Unbend or straighten pipes.Bent pipes
TROUBlESHOOTINg
IllustrationSolutionCauseInvestigationIndication
O-RING VISIBLE –
NOT CONNECTED PROPERLY
ONLY THE GROOVES ARE VISIBLE –
CONNECTED PROPERLY
The connector should be inserted fully
until the white o-ring is not visible.
Remove the o-ring if necessary
AUX connector not
fully inserted
Sensor is
blinking
when hand
is placed in
front
Pump is
not making
sound when
the sensor is
activated
Soap not
dispensing
Press
Replace the Pump. Rinse warm water
through the pipe and the body of the
soap dispenser all the way to the
nozzle.
Rell button on pump
does not activate the
pump.
Damaged pump
(discharge from
housing).
Run warm water through pipe, pump,
and body all the way to the nozzle.
Replace with soap of correct viscosity.
NOTE: Using the soap dispenser
with high viscosity soap may cause
permanent damage to the pump and
shorten the lifecycle.
Debris or dried soap in
the tank or tubing
Rell
button
Transformer: Check operation with
functioning transformer. Where
necessary replace with appropriate
transformer. For part numbers see
spare parts list.
Rell button on pump
does not activate the
pump.
Sensor is
not blinking
when hand
is placed in
front
Battery: Check operation with
functioning battery pack. Where
necessary, replace batteries or replace
the battery pack: Battery pack (without
batteries)
Min mm.
Bottom of the washbasin
Eliminate any cause of reflection and
use appropriate remote control to
shorten detection range.
Reflection issue from
basin or other object
Replace
sensor
If the above two solutions have not
resolved this issue replace with
appropriate sensor. For part numbers
see spare parts list.
Damaged sensor

lIMITED waRRaNTy
Kassel Sanitar, S.L. warrants that its electronic products will be free of defects in material
and workmanship during normal use for two years from the date the product is purchased.
If a defect is found in normal use, Kassel Sanitar, S.L. will, at its discretion, repair, provide
a replacement part or product, or make appropriate adjustments. Damage caused by
accident, misuse, or abuse is not covered by this warranty. Improper care and cleaning
will void the warranty. Proof of purchase (original sales receipt) must be provided to
Kassel Sanitar, S.L. with all warranty claims.
Kassel Sanitar, S.L. is not responsible for labor charges, installation, or other incidental or
consequential costs other than those noted above. In no event shall the liability of Kassel
Sanitar, S.L. exceed the purchase price of the product.
If you believe that you have a warranty claim, contact your Kassel distributor, dealer or
plumbing contractor. Please be sure to provide all pertinent information regarding your
claim, including a complete description of the problem, the product, model number,
the date the product was purchased, from whom the product was purchased and the
installation date. Also include your original invoice.
KASSEL SANITAR, S.L. AND/OR SELLER DISCLAIM ANY LIABILITY FOR SPECIAL, INCIDENTAL
OR CONSEQUENTIAL DAMAGES.This warranty excludesproduct damage due to installation
error, incorrect maintenance, wear and tear, battery, product abuse, or product misuse,
whether performed by a contractor, service company, or the consumer. This warranty does
not cover product damage caused by the following:
- Incorrect installation.
- inversions of supply pipes.
- Pressures or temperatures exceeding recommended limits.
- Improper manipulation, tampering, bad or lapsed maintenance.
- Foreign bodies, dirt or scale introduced by the water supply or soap tank.
- Use of the soap outside of viscosity specications.
- Alteration of the original soap/foam dispenser components (including pipes).
ÍNDICE
INFORMACIÓN TÉCNICA
INFORMACIÓN PREVIA A LA INSTALACIÓN
CONTENIDO DEL EMBALAJE
INSTALACIÓN
LLENADO DEL DEPÓSITO DE JABÓN
MODIFICACIÓN DE PARÁMETROS CON MANDO A DISTANCIA
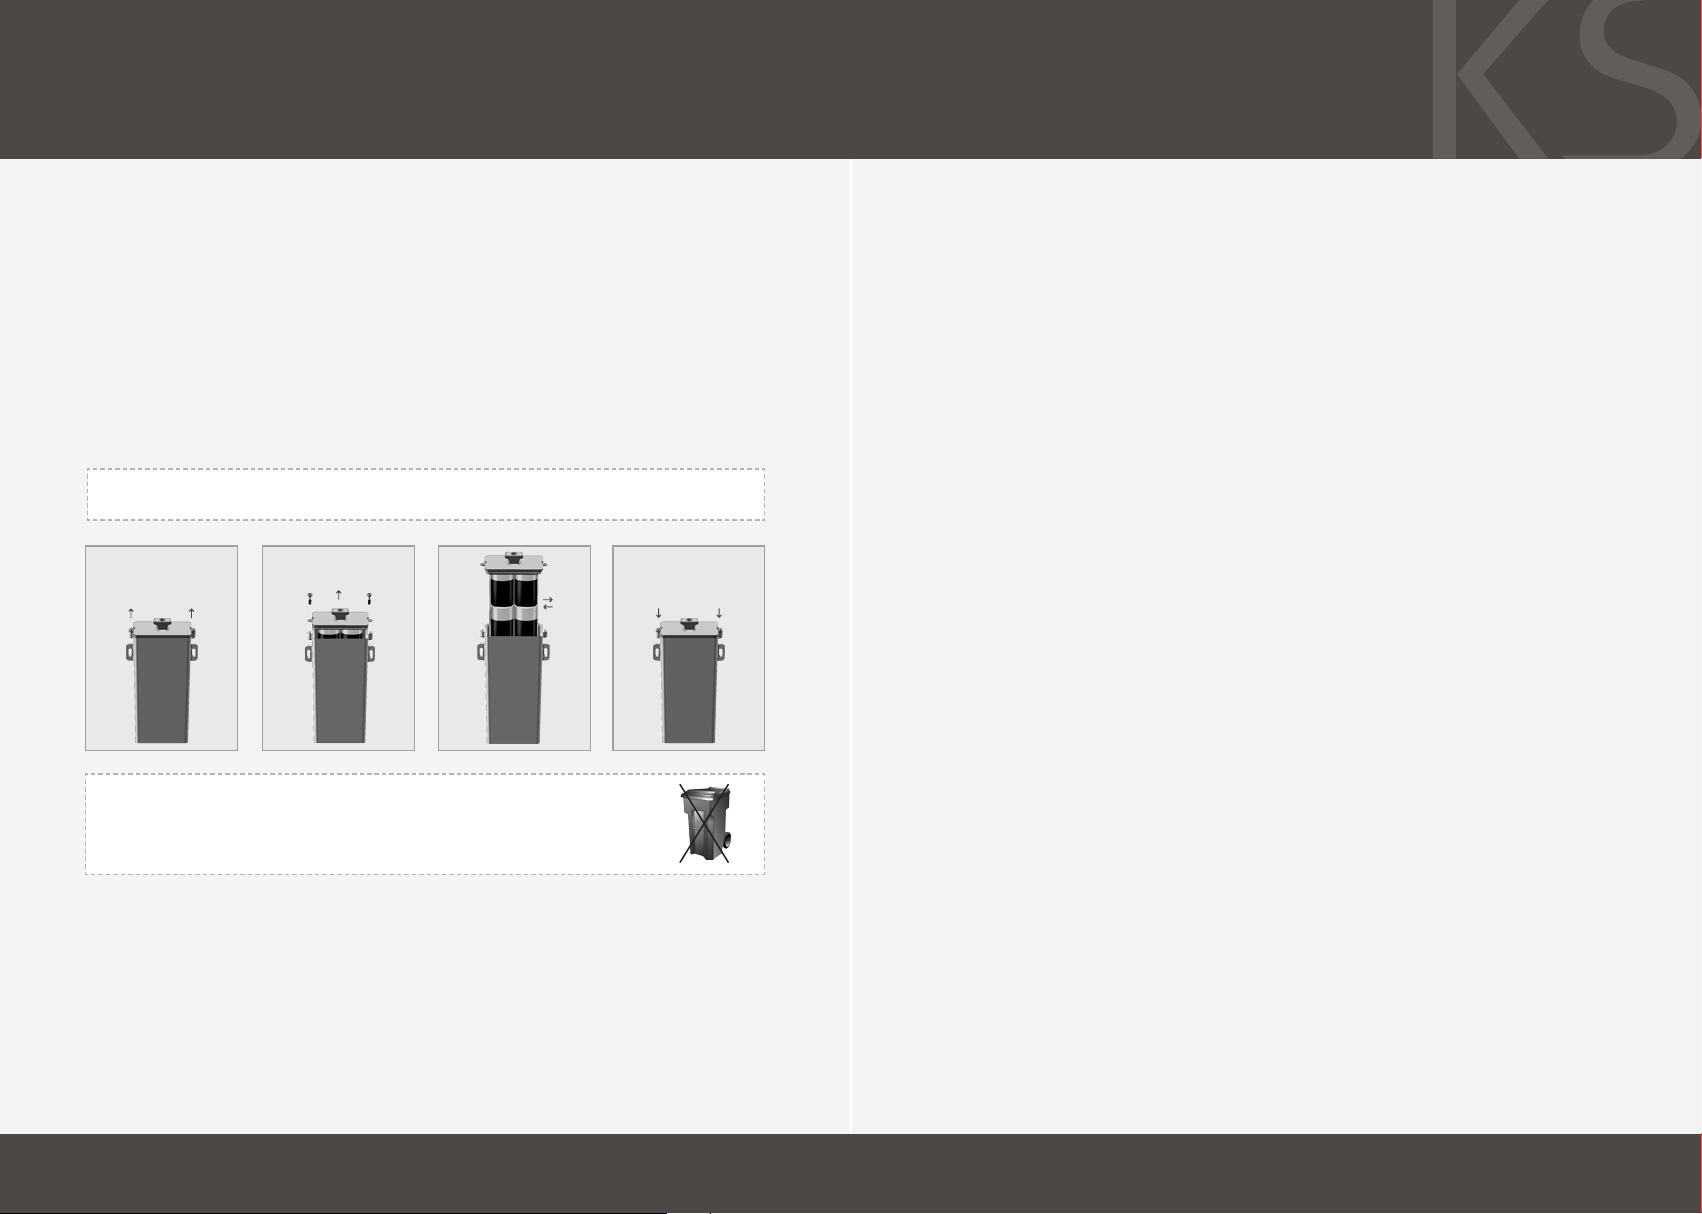
SUSTITUCIÓN DE LAS PILAS
MANTENIMIENTO
GARANTÍA LIMITADA
SOLUCIÓN DE PROBLEMAS

INFORMaCIÓN TÉCNICa
RONDA WM SOAP DISPENSER
KSL
RONDA SOAP DISPENSER
KSL
PETRA WM SOAP DISPENSER
KSL
PETRA SOAP DISPENSER
KSL
Capacidad Litro / , oz
F, Alimentación Modelos a pilas: Caja portapilas para 6 pilas alcalinas tipo D
Modelos a red: Transformador de 12 V
Viscosidad del jabón cPs
Descarga estándar , cc (puede modicarse con el mando a distancia opcional)
Rago del sensor mm +/ mm ,,”. Puede modicarse con el mando a
distancia opcional.
Rango del sensor
predeterminado mm +/ mm , +/ ,”
INFORMaCIÓN PREVIa a la INSTalaCIÓN
Comprobación del contenido
Saque todas las piezas del embalaje y verifíquelas consultando la sección “Contenido del
embalaje”.
Asegúrese de que cuenta con todas las piezas antes de desechar cualquier material de
embalaje.
Si falta alguna de las piezas, no intente instalar su dispensador de jabón electrónico
hasta que obtenga las piezas faltantes.
Advertencias
No instale el sistema delante de un espejo ni de ningún sistema electrónico que funcione
con sensor de infrarrojos.
Para evitar problemas de reflejos, se recomienda mantener una distancia de mm
entre el dispensador de jabón y cualquier otro objeto.
Los dispensadores de jabón líquido, si reciben los cuidados adecuados, proporcionarán
un servicio sin problemas a largo plazo. El principal factor necesario para un buen
funcionamiento de su dispensador es el uso de un jabón de calidad con la viscosidad y
el nivel de pH recomendados. En caso necesario, utilice un viscosímetro para comprobar
la viscosidad de su jabón, para garantizar un máximo benecio. El rango de viscosidad
recomendado para el jabón líquido es cPs. Un jabón líquido más espeso fluye
más lentamente y atasca la válvula de la bomba, causándole tensión y dañándola.
Los dispensadores de jabón líquido pueden utilizarse con cualquier marca de jabón
líquido, siempre que tenga la viscosidad y el pH adecuados. El nivel de pH del jabón
utilizado en nuestros dispensadores de jabón líquido debe encontrarse entre , y ,.
Un pH más bajo causaría la corrosión del metal e incluso de los componentes de goma y
plástico. Un pH más alto causaría la deformación de las partes de goma y la degradación
de los componentes de plástico con el paso del tiempo.
IMPORTANTE: Tenga en cuenta que al utilizar el grifo instalado al lado del
dispensador de jabón, las manos del usuario no deben invadir el área de detección
del sensor del dispensador de jabón.

CONTENIDO DEl EMBalaJE -
RONDa wM SD / PETRa wM SD CONTENIDO DEl EMBalaJE -
RONDa SD / PETRa SD
Familiarícese con los nombres de las partes y asegúrese de que todas ellas
están incluidas.
Familiarícese con los nombres de las partes y asegúrese de que todas ellas
están incluidas.
1 X DEPÓSITO DE JaBÓN CON SOPORTE DE
DEPÓSITO y kIT DE BOMBa
1 X kIT DE CUERPO PaRa DISPENSaDOR DE
JaBÓN RONDawM
1 X kIT DE CUERPO PaRa DISPENSaDOR DE
JaBÓN PETRa wM
1 X CaJa PORTaPIlaS PaRa 4 PIlaS alCalINaS
TIPO D / TRaNSFORMaDOR 12 V
a PIlaSa
VERSIONES
TRaNSFORMaDOR
VERSIONES
1 X CaJa PORTaPIlaS PaRa 4 PIlaS
alCalINaS TIPO D / TRaNSFORMaDOR 12 V
a PIlaSa
VERSIONES
TRaNSFORMaDOR
VERSIONES
X TORNILLO
PRISIONERO MX
X ACCESORIO
PARA
CONECTOR
RÁPIDO
X TORNILLOS
, X /”
1 X DEPÓSITO DE JaBÓN CON SOPORTE
DE DEPÓSITO y kIT DE BOMBa
1 X CODO y TUBO
CORRUgaDO
1 X ROSETa PaRa
la PaRED
1 X kIT DE CUERPO PaRa DISPENSaDOR DE
JaBÓN RONDa
1 X kIT DE CUERPO PaRa DISPENSaDOR DE
JaBÓN PETRa
X CUBIERTA TEMPORAL
PARA LA BASE
X ACCESORIO
PARA
CONECTOR
RÁPIDO
X TORNILLO
PRISIONERO MX
X TORNILLO
PRISIONERO MX
X TORNILLO
PRISIONERO MX
X TORNILLOS
, X /”

INSTalaCIÓN - RONDa wM SD / PETRa wM SD
PASO PREPARACIÓN PARA LA INSTALACIÓN
Taladre un oricio ( a mm) en el lugar
deseado para la instalación del caño del
dispensador de jabón.
Taladre un pequeño oricio ( a mm)
justo encima del anterior para la clavija
antirrotación, de acuerdo con el dibujo.
Retire la tuerca hexagonal y el disco de la
base del caño del dispensador de jabón. TAmAÑo RecomendAdo del oRiFicio
mm
,”
mm
,,”
PASO INSTALACIÓN DEL DISPENSADOR DE JABÓN
Inserte la base del dispensador de
jabón y la clavija antirrotación en los
oricios que ha taladrado.
Fije la base tras la pared con la
tuerca hexagonal y el disco.
BASE DEL DISPENSADOR
DE JABÓN
DISCO
CLAVIJA ANTIRROTACIÓN
TUERCA HEXAGONAL
Fije el depósito junto con su soporte
en la ubicación deseada.
Conecte el tubo del jabón, que sale
del cuerpo del dispensador de jabón,
encajándolo en el conector rápido de
la parte superior de la bomba.
INSTalaCIÓN - RONDa wM SD / PETRa wM SD
PASO CONECTAR LA FUENTE DE ALIMENTACIÓN
Retire la pegatina protectora que
cubre el sensor. Manténgase fuera
del rango del sensor y compruebe
que no hay ningún objeto delante
del sensor.
Conecte el conector de la bomba de
jabón al que sale del sensor y es del
mismo tipo. Tenga en cuenta que,
puesto que el conector es resistente
al agua, puede existir cierta fricción.
ANILLO TÓRICO VISIBLE -
NO CONECTADO CORRECTAMENTE
SOLO SE VEN LAS RANURAS -
CONECTADO CORRECTAMENTE
IMPORTANTE: El conector de 4 contactos debe conectarse correctamente, de modo que
se oiga un clic y el anillo tórico blanco no quede visible.
ATENCIÓN: Si los conectores de cuatro contactos no se conectan adecuadamente, la
bomba estará en funcionamiento continuo.
a
Para versiones a pilas: instale la
caja portapilas en la pared, bajo el
lavabo, y conecte el conector de la
caja.
DEL DISPENSADOR DE JABÓN
A LA CAJA PORTAPILAS
b
Para versiones con transformador:
enchufe el transformador a la toma
de red y conecte el conector. DEL TRANSFORMADOR AL DISPENSADOR DE JABÓN
Espere unos segundos antes de
situar las manos en el rango del
sensor, para evitar entrar en modo
de ajuste.
SEGUNDOS
APROX.

INSTalaCIÓN - RONDa SD / PETRa SD
PASO INSTALACIÓN DEL DISPENSADOR DE JABÓN
Taladre un oricio en la pared, adecuado
para las dimensiones de la base del
dispensador de jabón (en el lugar donde
quiera instalar el caño) y para el tubo
corrugado.
Separe de la base el cuerpo del
dispensador de jabón junto con la roseta,
aflojando el tornillo prisionero.
SET SCREW
Instale la base del dispensador de
jabón en el oricio de la pared y
fíjela utilizando los dos tacos que se
proporcionan en el embalaje.
Importante: la base del dispensador de
jabón debe instalarse de forma que la
supercie externa del pared terminada
quede entre las líneas de mínimo y
máximo marcadas en la base.
Coloque la cubierta protectora temporal
sobre la base del dispensador de jabón.
Acople el tubo corrugado a la base del
dispensador de jabón y cerciórese de
que que sobresale de la pared cuando se
proceda al alicatado.
INSTalaCIÓN - RONDa SD / PETRa SD
Una vez nalizados los trabajos de
electricidad, fontanería y alicatado,
inserte la roseta de pared a través
de la base del dispensador de jabón
y corte la cubierta provisional.
Fije el caño del dispensador
insertando la boquilla en la
base del dispensador de jabón y
atornillando.
Saque de la base del dispensador
de jabón el conector de cuatro
contactos y el de la fuente de
alimentación y páselos por el tubo
corrugado.

llENaDO DEl DEPÓSITO DE JaBÓNINSTalaCIÓN - RONDa SD / PETRa SD
PASO CONEXIÓN DE LA FUENTE DE ALIMENTACIÓN
Retire la pegatina protectora que
cubre el sensor. Manténgase fuera
del rango del sensor y verique que
no haya objetos delante del sensor.
Conecte el conector de la bomba al
equivalente del sensor. Tenga en
cuenta que, al ser un conector resis-
tente al agua, puede existir cierta
fricción.
ARO TÓRICO VISIBLE
CONECTADO INCORRECTAMENTE
SOLO SE VEN LAS RANURAS
CONECTADO CORRECTAMENTE
IMPORTANTE: Para conectar correctamente el conector de contactos, el aro tórico
debe quedar oculto y debe oírse un clic.
ATENCIÓN: Si los conectores de contactos no están conectados correctamente, la
bomba estará en funcionamiento continuo
2a
Versiones a pilas: instale la caja
portapilas en la pared debajo del
lavabo y conecte el conector.
DEL DISPENSADOR DE JABÓN
A LA CAJA PORTAPILAS
2b
Versiones con transformador: enchufe
el transformador a la toma de corriente
y conecte el conector.
DEL TRANSFORMADOR AL DISPENSADOR DE JABÓN
Espere alrededor de segundos
antes de situar las manos en el rango
del sensor, para evitar que entre en
modo de ajuste.
SEGUNDOS
APROX.
Desenrosque el depósito de jabón y tire para
sacarlo del soporte.
Llene el depósito con jabón líquido hasta la línea
superior.
3Coloque el depósito en el soporte.
Enrosque el depósito de nuevo al kit de bombeo.
Asegúrese de que queda rmemente sujeto.
5
Pulse el botón de rellenado situado en la parte
trasera del kit de bombeo hasta que que el jabón
comience a salir por la boquilla del dispensador.
También puede realizar esta operación con la
función “Rell” del mando a distancia.
6
NOTA: El depósito de jabón debe rellenarse
cuando el nivel de jabón alcanza la línea inferior.
Para rellenar el depósito de jabón, consulte los
pasos .

SUSTITUCIÓN DE laS PIlaS
MODIFICaCIÓN DE PaRÁMETROS CON MaNDO
a DISTaNCIa
En caso de tener uno, con el mando a distancia para dispensadores de jabón se
pueden modicar los parámetros del dispensador. Para usar el mando a distancia,
sujételo delante del sensor a una distancia de cm (”).
Atención: el mando a distancia no funciona fuera del rango recomendado (ni
demasiado cerca ni demasiado lejos).
El mando a distancia puede utilizarse para modicar las siguientes funciones:
1-CaNTIDaD DE JaBÓN
Los botones con dibujo de gotas, de. al , permiten al usuario escoger la cantidad
deseada de jabón.*
, a , cc
, a , cc
, a , cc
, a , cc
Indication: continuous blinking of the light in the sensor eye.
* The exact dosage depends on soap viscosity.
2
3
1
4
2-aDJ
Esta función devuelve al sensor las
especicaciones de fábrica.
Indicativo: parpadeos de la luz del sensor.
3-FUNCIÓN DE DESCONEXIÓN TEMPORal
Esta función desconecta el dispensador de
forma temporal. Utilice esta función para
realizar actividades de mantenimiento delante
del sensor sin activar el sistema (por ejemplo, la
limpieza). El dispensador de jabón se apagará
durante un minuto desde que pulse el botón.
Para volver al funcionamiento normal antes de
que transcurra el minuto, pulse de nuevo el
botón On/O.
Indicativo: Apagado: 2 parpadeos rápidos.
Encendido: 4 parpadeos rápidos.
4-llENaDO DEl DEPÓSITO DE JaBÓN
Una vez (re)llenado el depósito de jabón,
pulse el botón FILL. La bomba se pondrá en
funcionamiento durante un minuto, rellenando
los tubos de jabón. Este proceso termina una
vez que el jabón comience a salir por la boquilla.
Pulse de nuevo el botón FILL para detener
el proceso si el minuto no ha transcurrido
completo.
Indicativo: luz del sensor ja.
Solo modelos a pilas
Cuando las pilas se están agotando, la luz LED indicadora parpadeará a un ritmo
constante cuando el usuario sitúe las manos en el rango del sensor. Las pilas deben
sustituirse en un plazo de dos semanas.
Para reemplazar las pilas:
. Abra cuidadosamente la caja portapilas con una llave Allen de . mm.
. Retire las pilas usadas.
3. Sustituya las pilas usadas con pilas nuevas tipo D.
4. Cierre la caja.
NOTA: No mezcle pilas usadas con nuevas.
Importante: Las pilas usadas no deben desecharse con los residuos
domésticos. Pida información a las autoridades locales sobre
eliminación de residuos y reciclaje.

gaRaNTÍa lIMITaDa
KASSEL SANITÄR S.L. garantiza que sus productos electrónicos estarán libres de defectos,
tanto en material como en mano de obra, con un uso normal, durante dos años a partir de
la fecha de compra del producto.
Si con el uso normal se detecta un defecto, KASSEL SANITÄR, S.L., a su propio criterio,
reparará o sustituirá la pieza o producto, o realizará los ajustes pertinentes. Los daños
causados por accidente, mal uso o abuso no se encuentran bajo la cobertura de esta
garantía. El cuidado y la limpieza indebidos anularán la garantía.
En todas las reclamaciones de garantía debe aportarse a KASSEL SANITÄR, S.L. la prueba
de compra original. KASSEL SANITÄR, S.L. no es responsable de los gastos de mano de
obra, instalación u otros gastos incidentales o indirectos, aparte de los anteriormente
mencionados. En ningún caso la responsabilidad de KASSEL SANITÁR, S.L. excederá el
precio de compra del producto.
Si cree que tiene una reclamación de garantía, póngase en contacto con su distribuidor,
vendedor o contratista de fontanería. Por favor, asegúrese de aportar toda la información
pertinente relacionada con su reclamación, incluida una descripción completa del
problema, el producto, el número de modelo, la fecha de compra del producto, a quién se
le compró el producto y la fecha de instalación. Incluya también su factura original.
KASSEL SANITÄR, S.L. Y/O EL VENDEDOR DECLINAN CUALQUIER RESPONSABILIDAD POR
DAÑOS ESPECIALES, INCIDENTALES O INDIRECTOS. Esta garantía no incluye daños al
producto debidos a un error de instalación, mantenimiento incorrecto, uso y desgaste,
batería, composición del agua ni abuso o mal uso del producto, ya sea por parte de un
contratista, una compañía de servicios o el consumidor. Esta garantía no cubre daños al
producto causados por:
- Instalación incorrecta.
- Inversión de las tuberías de suministro.
- Presiones o temperaturas que excedan los límites recomendados.
- Manipulación inadecuada, forzamiento, mantenimiento deciente o incorrecto.
- Cuerpos extraños, suciedad o sarro introducidos a través del suministro de agua o desde
el depósito de jabón.
- Uso de jabón con viscosidad diferente a la especicada.
- Alteración de los componentes originales del dispensador de jabón líquido o en espuma
(incluidos los tubos).
MaNTENIMIENTO
Cuidados y limpieza del cromo y acabados especiales
NO UTILICE lana de acero o productos de limpieza que contengan alcohol, ácido,
ingredientes abrasivos o similares. El uso de cualquier sustancia o producto prohibido
para la limpieza o el mantenimiento puede dañar la supercie del dispensador de jabón.
Para la limpieza de la supercie utilice SOLO agua y jabón, y aclare y seque con un paño o
toalla limpia. Cuando se lleve a cabo la limpieza de los azulejos, el dispensador de jabón
debe protegerse de las salpicaduras de los productos de limpieza.
Desmontaje del tubo de jabón de la bomba
Se puede desconectar el tubo de jabón de la bomba mediante una acción consistente en
deslizar y tirar. Se debe empujar hacia abajo el anillo deslizante del conector rápido de
la bomba. De este modo se libera el extremo abierto del tubo de jabón y puede quitarse
fácilmente.
Limpieza del depósito de jabón
Limpie el depósito antes de rellenarlo haciendo circular agua tibia por los tubos y la
bomba hasta que salga agua limpia por la boquilla. CONSEJO: tener un depósito de sobra
permitirá completar este proceso de forma rápida e higiénica, minimizando el tiempo de
inoperatividad.

SOlUCIÓN DE PROBlEMaS
IlustraciónSoluciónCausaSíntomaIndicador
ARO TÓRICO VISIBLE
CONEXIÓN INCORRENTA
SOLO SE VEN LAS RANURAS
CONEXIÓN CORRECTA
Debe insertarse el conector
completamente hasta que deje de
verse el aro tórico blanco. En caso
necesario, retire el aro tórico.
El conector AUX no
está insertado del
todo
El sensor
parpadea
cuando se
sitúa la mano
delante
La bomba
no suena
cuando se
activa el
sensor
No sale jabón
Pulse
Sustituya la bomba. Aclare con
agua tibia la tubería y el cuerpo del
dispensador de jabón hasta la boquilla.
El botón de rellenado
de la bomba no activa
la bomba
Bomba dañada
(salida de jabón por la
carcasa)
Haga circular agua templada por la
tubería, bomba y cuerpo, hasta la
boquilla. Sustituya el jabón por otro de
viscosidad adecuada.
NOTA: El uso del dispensador con jabón
de alta viscosidad puede causar daños
permanentes a la bomba y reducir su
vida útil.
Residuos o jabón seco
en el depósito o las
tuberías
Rell
button
Transformador: Compruebe el
funcionamiento con un transformador
en buen estado. En caso necesario,
sustituya el transformador con uno
nuevo. Puede consultar el código en la
lista de repuestos.
El botón de rellenado
de la bomba no activa
la bomba.
El sensor no
parpadea
cuando se
sitúa la mano
delante
Pilas: compruebe el funcionamiento
con una caja portapilas en buen
estado. En caso necesario, sustituya las
pilas o la caja portapilas (sin pilas).
Mín. mm
Fondo del lavabo
Elimine la fuente de reflejos y utilice el
mando a distancia para acortar el rango
del sensor
Problema de reflejos
del lavabo u otro
objeto
Sustituya
el sensor
Si las dos soluciones anteriores no
han resuelto el problema, sustituya el
sensor. Puede consultar el código en la
lista de repuestos.
Sensor averiado
SOlUCIÓN DE PROBlEMaS
IlustraciónSoluciónCausaSíntomaIndicador
ARO TÓRICO VISIBLE
CONEXIÓN INCORRENTA
SOLO SE VEN LAS RANURAS
CONEXIÓN CORRECTA
Debe insertarse el conector completamente
hasta que deje de verse el aro tórico blanco. En
caso necesario, retire el aro tórico.
El conector AUX no
está insertado del
todo.
Descarga continua
por la boquilla
Falsa
activación:
salida de
jabón
Mín. mm
Fondo del lavabo
Elimine cualquier fuente de reflejos y, en caso
necesario, utilice el mando a distancia para
acortar el rango del sensor.
Problema de
reflejos del lavabo
u otro objeto
Descarga aleatoria
por la boquilla
Sustituya la bomba. Acalare con agua templada
el tubo y el cuerpo del dispensador de jabón
hasta la boquilla.
Bomba dañada
debido a la alta
viscosidad o a
residuos en las
tuberías
Salida de jabón
por la carcasa de la
bomba
Rellene el depósito con jabón de la viscosidad
adecuada (100-3800 cPs) y rellene las tuberías
utilizando el botón FILL o el mando a distancia.
El depósito de
jabón está vacío
La bomba suena
cuando se activa el
sensor
No sale jabón
Pulse el
botón
FILL
Rellene las tuberías pulsando el botón FILL
del mando a distancia o pulsando el botón
de rellenado situado en la parte inferior de la
bomba, hasta que el salga jabón por la boquilla.
No se han
rellenado las
tuberías del
dispensador de
jabón
Sustituya la bombaBomba averiada
(salida de jabón
por la carcasa)
Haga circular agua templada por la tubería,
bomba y cuerpo, hasta la boquilla. Sustituya el
jabón por otro de viscosidad adecuada.
NOTA: El uso del dispensador con jabón de alta
viscosidad puede causar daños permanentes a
la bomba y reducir su vida útil.
Residuos o jabón
seco en la tubería
o en el depósito
Viscosidad del jabón:
cPs
Jabón de alta
viscosidad (> 3800
cPs)
Enderece los tubosTubos doblados

TEkNİk Bİlgİ
İÇİNDEkİlER
RONDA WM SABUN DİSPENSERİ
KSL
RONDA SABUN DİSPENSERİ
KSL
PETRA WM SABUN DİSPENSERİ
KSL
PETRA SABUN DİSPENSERİ
KSL
KAPASİTE litre\ . oz., yada 6 litre /, galon
GÜÇ ÜNİTESİ Pil kutusu (6xD) Alkalin pil yada V adaptör.
SABUN VİSKOZİTESİ cPs
STANDART SABUN AKIŞ MİKTARI .cc (isteğe bağlı kumanda ile değiştirilebilir)
SENSÖR ARALIĞI mm +/- mm /.. ”(isteğe bağlı uzaktan kuman-
dayla değiştirilebilir)
SENSÖR ARALIĞI
FABRIKA AYARI mm +/ mm /.” +/ .
TEKNİK BİLGİ
KURULUM ÖNCESİ
KUTU İÇERİĞİ
KURULUM
SABUN HAZNESİNİN DOLDURULMASI
45 UZAKTAN KUMANDA FONKSİYONLARI
PİLLERİN TAKILMASI
BAKIM
GARANTİ KOŞULLARI
SORUN GİDERME

kUTU İÇERİĞİ - RONDa wM / PETRa wM
kURUlUM ÖNCESİ
Kutu içeriğini kontrol edin
Tüm parçaları ambalajından ayırın ve her parçayı “Paket İçeriği” bölümü ile kontrol edin.
Herhangi bir ambalaj malzemesini atmadan önce içinde parça olup olmadığını kontrol
edin.Eğer herhangi bir parça eksikse, eksik parçaları elde edene kadar kuruluma
başlamayın.
Uyarılar
Sistemi, bir aynaya veya bir kızılötesi sensör tarafından çalıştırılan başka bir elektronik
sisteme bakacak şekilde kurmayın.
Yansıma problemlerini önlemek için sabunluk ve diğer nesneler arasında en az mm
mesafe bırakılması önerilir.
Kassel sıvı sabun dispenserleri, gerekli özen gösterildiği takdirde, uzun süreli sorunsuz
hizmet sağlayacaktır. Tavsiye edilen viskozite ve pH seviyelerinden oluşan kaliteli sıvı
sabun, dağıtıcınızın düzgün çalışması için temel faktörlerdir. Gerekirse, maksimum
fayda sağlamak için sabununuzun viskozitesini doğrulamak için bir viskometre kullanın.
Sıvı sabun viskozitesi için önerilen aralık cP’dur. Daha kalın sıvı sabun daha
yavaş akar ve pompa valni engeller, bu da gerilmeye ve hasara neden olur.
Kassel sıvı sabun dispenseri, doğru viskozite ve pH’lı herhangi bir genel sıvı sabun
ile kullanıma uygundur. Kassel sıvı sabun dispenseri içinde kullanılan tüm sabunların
pH seviyesi . ila . arasında olmalıdır. Alt seviyeler metal ağızda ve hatta lastik ve
plastik bileşenlerde korozyona neden olur. Daha yüksek pH seviyeleri kauçukparçalarda
şişmeye ve zamanla plastik bileşenlerin bozulmasına neden olur.
ÖNEMLİ: Sabun dispenserinin yanında bir musluk varsa kullanıcının elinin
musluğu kullanırken sabun dispenserinin sensör algı alanına girebileceğini
hatırlatırız.
1 X SaBUN HaZNESİ, HaZNE DESTEĞİ VE
POMPa MONTaJI İlE BİRlİkTE
1 X gÖVDE VE MONTaJ akSESUaRlaRI-
RONDA WM SABUN DİSPENSERİ
1 X gÖVDE VE MONTaJ akSESUaRlaRI-
PETRA WM SABUN DİSPENSERİ
1XPİl kUTUSU, 6XD alkalINE Pİl İÇİN /
12V aDaPTÖR
Pİllİ MODEl aDaPTÖRlÜ
MODEl
X M X
AYAR VİDASI
X M X
AYAR VİDASI
X HIZLI
BAĞLANTI
KONNEKTÖRÜ
X VİDA
. X /”
Parça isimlerini kontrol edin ve tüm parçaların paketinize dahil edildiğinden emin olun.
This manual suits for next models
3
Table of contents
Languages:
Other Kassel Sanitar Dispenser manuals