Kayoba 008786 User manual

Tremannatält
Tremannstelt
Namiot trzyosobowy
Three-man tent
Item no. 008786
Operating instructions
Bruksanvisning
Bruksanvisning
Instrukcja obsługi
Important! Read the user instructions carefully
before use. Save them for future reference. (Translation
of the original instructions)
Viktig! Les bruksanvisningen nøye før bruk.
Ta vare på den for fremtidig bruk. (Overseelse av
original bruksanvisning)
Viktig! Läs bruksanvisningen före användning.
Spara den för framtida bruk. (Overseelse av original
bruksanvisning)
Ważne! Przed użyciem uważnie przeczytaj instrukcję
obsługi! Zachowaj ją naprzyszłość. (Tłumaczenie
oryginalnej instrukcji)
En
Se
N
Pl

Rätten till ändringar förbehålles.
Vid eventuella problem, kontakta vår kundservice på telefon
0511-34 20 00.
www.jula.se
Med forbehold om endringer.
Ved eventuelle problemer kan du kontakte vår kundeservice
på telefon 67 90 01 34.
www.jula.no
Z zastrzeżeniem prawa do zmian.
W razie ewentualnych problemów skontaktuj się
telefonicznie z naszym działem obsługi klienta pod
numerem: 22 338 88 88.
www.jula.pl
Jula reserves the right to make changes. In the event of
problems, please contact our customer service.
www.jula.com
Tillverkare/Produsent/Producenci/Manufacturer
Jula AB, Box 363, 532 24 SKARA
Distributör/Distributør/Dystrybutor/Distributor
Jula Poland Sp. z o.o., ul.
Malborska 49, 03-286 Warszawa, Polska
Jula Norge AS, Solheimsveien 30,
1473 LØRENSKOG
För senaste version av bruksanvisningen se
www.jula.com
Nyeste versjon av bruksanvisningen nner du på
www.jula.com
Najnowsza wersja instrukcji obsługi znajduje się na
www.jula.com
For latest version of operating instructions, see
www.jula.com
2019-08-07
© Jula AB

1
2
3
4

5

SE
5
Innertält 1
Tältstänger 3
Tältsnören 6
Tältpinnar 20
MONTERING
1. Bred ut yttertältet plant med golvsidan
nedåt. För in de två längre tältstängerna i
hylsorna och korsa dem över varandra.
BILD 1
2. Res tältet. Placera tältstängernas ändar
i ringarna i PP-plasten i innertältets fyra
hörn. Fäst PP-plastöglorna i innertältets
fyra hörn i marken med tältpinnarna.
Lägg yttertältet över innertältet och fäst
dem i varandra.
BILD 2
3. För in den kortaste tältstången i hylsan
på framsidan och placera tältstångens
ändar i ringarna i PP-plasten i botten av
yttertältet. Fäst PP-plastöglorna i marken
med tältpinnarna. Sätt ihop yttertältet
och innertältet med spännena i de fyra
hörnen.
BILD 3
4. Fäst de elastiska öglorna kring yttertältets
botten i marken med tältpinnarna. Spänn
tältsnörena jämnt och fäst dem i marken
med tältpinnar. Snörenas längd kan
justeras.
BILD 4
5. Tältet ska nu se ut så här.
BILD 5
SÄKERHETSANVISNINGAR
Nedanstående säkerhetsåtgärder ska vidtas
vid tältning.
• Använd inte ljus, tändstickor eller annan
öppen låga i eller i närheten av tältet.
• Laga inte mat i tältet.
• Tänd eventuella lägereldar era meter
från tältet i vindriktningen och se till att
elden släckts ordentligt innan tältplatsen
lämnas och innan du går in i tältet.
• Var extremt försiktig vid användning av
bränslefyllda lampor eller värmare i tältet.
Använd om möjligt batteridrivna lyktor.
• Fyll inte på lampor, värmare eller kaminer
i tältet.
• Stäng eller släck alla lyktor innan du
somnar.
• Rök inte i tältet.
• Förvara inga brandfarliga vätskor i tältet.
SYMBOLER
Läs bruksanvisningen.
TEKNISKA DATA
Mått 210x180+80+80+30x120 cm
Vikt 5 kg
Vattenpelare 2000 m
BESKRIVNING
FÖRPACKNINGENS INNEHÅLL
Benämning Antal
Tältpåse 1
Påse för tältstänger 1
Påse för tältpinnar 1
Yttertält 1

NO
6
Innertelt 1
Teltstenger 3
Barduner 6
Teltplugger 20
MONTERING
1. Legg innerteltet att ut med gulvsiden
nedover. Før de to lange teltstengene inn
hylsene og kryss dem over hverandre.
BILDE 1
2. Reis teltet. Plasser endene på teltstengene
i ringene i PP-plasten i de re hjørnene
på innerteltet. Fest PP-plastringene i
de re hjørnene på innerteltet i bakken
med teltpluggene. Legg ytterteltet
over innerteltet og fest de to teltene i
hverandre.
BILDE 2
3. Før den korteste teltstangen inn i
hylsen på forsiden og plasser endene
på teltstangen i ringene i PP-plasten
i bunnen av ytterteltet. Fest PP-
plastringene i bakken med teltpluggene.
Sett sammen ytterteltet og innerteltet
med spennene i de re hjørnene.
BILDE 3
4. Fest de elastiske ringene rundt bunnen
på ytterteltet i bakken med teltpluggene.
Spenn bardunene jevnt og fest dem i
bakken med teltplugger. Lengden på
bardunene kan justeres.
BILDE 4
5. Teltet bør se slik ut.
BILDE 5
SIKKERHETSANVISNINGER
Følg sikkerhetsanvisningene nedenfor ved
bruk av teltet.
• Ikke bruk lys, fyrstikker eller annen åpen
ild i eller i nærheten av teltet.
• Ikke lag mat i teltet.
• Eventuelle leirbål må tennes ere meter
fra teltet i vindretningen. Pass på at ilden
er ordentlig slukket før du forlater
teltplassen, og før du går inn i teltet.
• Vær ekstremt forsiktig ved bruk av
paran-/propanlamper eller varmeovner i
teltet. Bruk batteridrevne lykter hvis det er
mulig.
• Ikke fyll på lamper, varmeovner eller
kaminer i teltet.
• Slå av eller slukk alle lykter før du sovner.
• Ikke røyk i teltet.
• Ikke oppbevar brannfarlige væsker i teltet.
SYMBOLER
Les bruksanvisningen.
TEKNISKE DATA
Mål 210x180+80+80+30x120 cm
Vekt 5 kg
Vannsøyle 2000 m
BESKRIVELSE
INNHOLD
Benevnelse Antal
Teltpose 1
Pose til teltstenger 1
Pose til teltplugger 1
Yttertelt 1

PL
7
Torebka na pałąki 1
Torebka na szpilki 1
Tropik 1
Namiot wewnętrzny 1
Zamek 3
Linka 6
Szpilki 20
MONTAŻ
1. Rozłóż namiot wewnętrzny podłogą do
dołu. Włóż dwa dłuższe pałąki w tunele i
skrzyżuj je ze sobą.
RYS. 1
2. Podnieś namiot. Włóż końcówki pałąków
do kółek z plastiku PP w czterech
narożnikach wewnętrznego namiotu.
Zamocuj oczka plastikowe PP w czterech
narożnikach namiotu wewnętrznego do
ziemi za pomocą szpilek. Załóż i zamocuj
tropik na namiocie wewnętrznym.
RYS. 2
3. Włóż najkrótszy pałąk do tunelu z
przedniej strony i zamocuj końcówki
pałąka w kółkach z plastiku PP na dnie
tropiku. Zamocuj oczka plastikowe PP do
ziemi za pomocą szpilek. Zwiąż tropik i
namiot wewnętrzny za pomocą klamer w
czterech narożnikach.
RYS. 3
4. Zamocuj elastyczne oczka do ziemi za
pomocą szpilek dookoła dna tropiku.
Naciągnij równo linki i przymocuj je do
ziemi za pomocą szpilek. Długość linek
może być regulowana.
RYS. 4
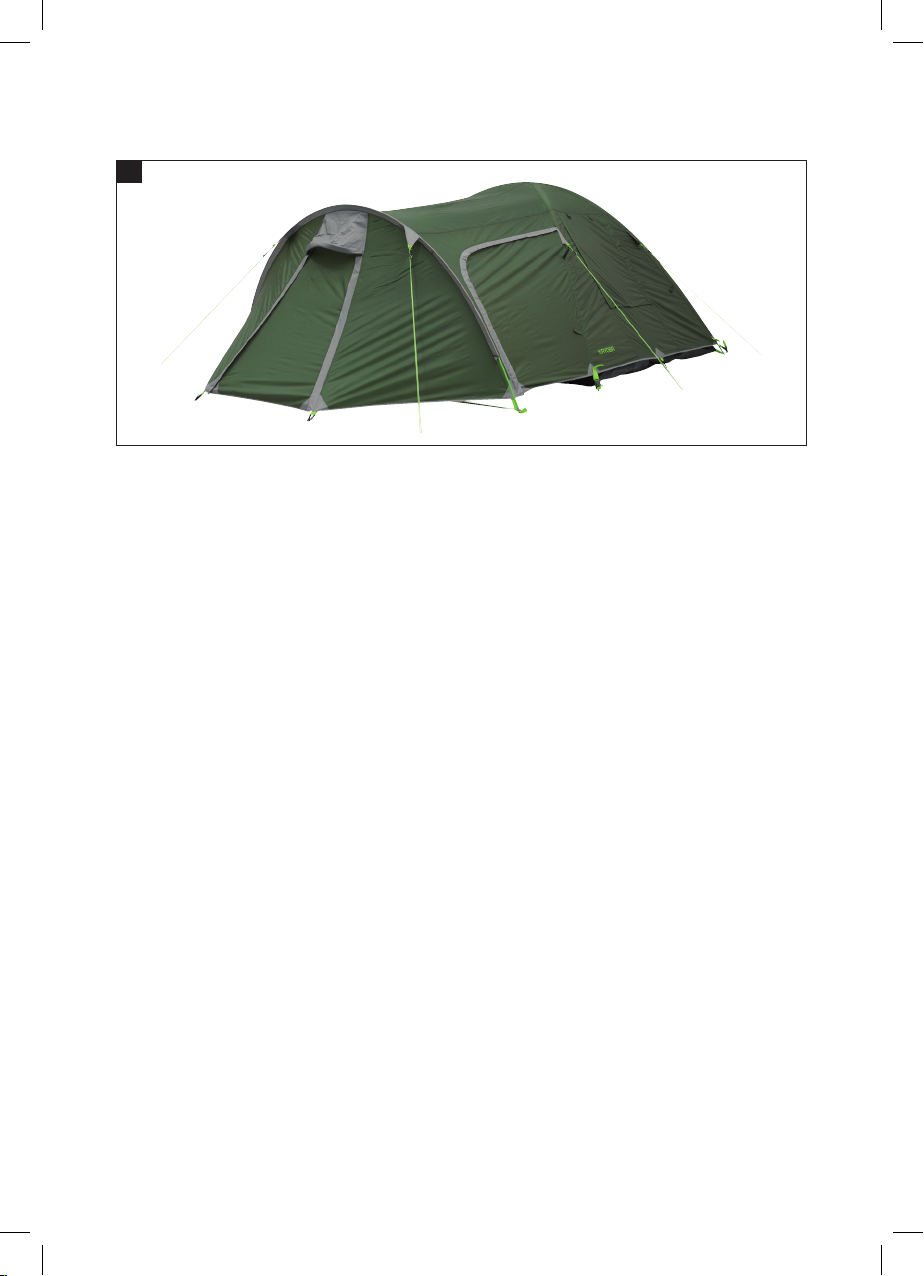
5. Namiot powinien wyglądać tak.
RYS. 5
ZASADY BEZPIECZEŃSTWA
Podczas obozowania pod namiotem należy
zastosować poniższe środki ostrożności.
• W namiocie lub w jego pobliżu nie używaj
świeczek, zapałek i innych otwartych
źródeł ognia.
• Nie przygotowuj jedzenia w namiocie.
• Ewentualne ogniska rozpalaj kilka metrów
od namiotu zgodnie z kierunkiem wiatru.
Przed opuszczeniem miejsca obozowania,
a także przed wejściem do namiotu,
upewnij się, że ogień został porządnie
zgaszony.
• Zachowuj daleko idącą ostrożność,
używając w namiocie lamp i ogrzewaczy
na paliwo. Jeśli to możliwe, korzystaj z
lamp zasilanych bateriami.
• Przebywając w namiocie, nie napełniaj
lamp, ogrzewaczy ani piecyków.
• Przed zaśnięciem wyłącz lub zgaś wszystkie
lampy.
• Nie pal w namiocie.
• Nie przechowuj w namiocie łatwopalnych
cieczy.
SYMBOLE
Przeczytaj instrukcję obsługi.
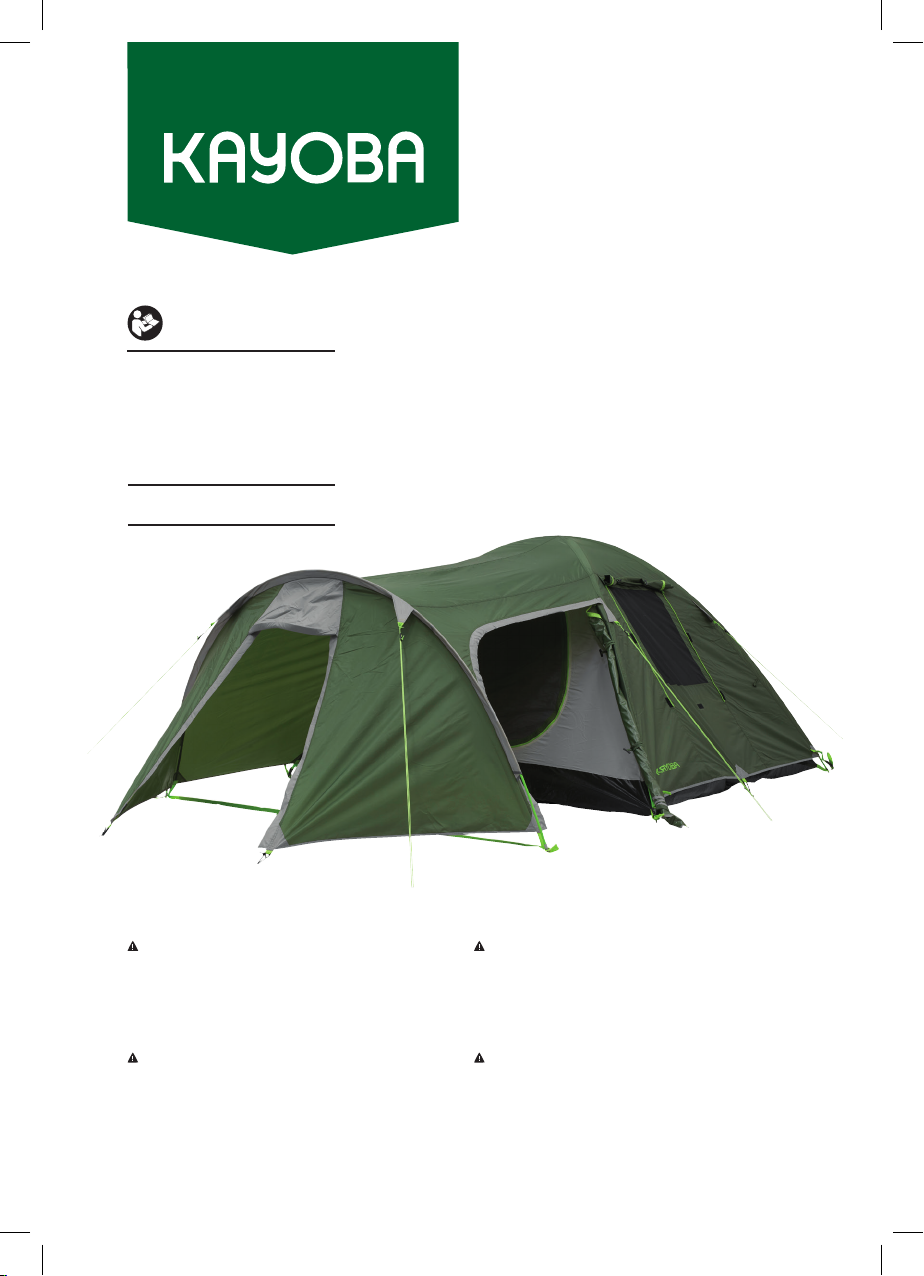
DANE TECHNICZNE
Wymiary 210x180+80+80+30x120 cm
Waga 5 kg
Słup wody 2000 m
OPIS
ZAWARTOŚĆ OPAKOWANIA
Nazwa Liczba
Pokrowiec na namiot 1

EN
8
Peg bag 1
Outer tent 1
Innter tent 1
Tent poles 3
Guy ropes 6
Tent pegs 20
INSTALLATION
1. Spread out the inner tent with the oor
side facing down. Insert the two longer
tent poles in the sleeves and cross them
over one another.
FIG. 1
2. Erect the tent. Place the ends of the tent
poles in the rings in the PP plastic in the
four corners of the inner tent. Secure the
plastic PP loops in the four corners of the
inner tent to the ground using the tent
pegs. Place the outer tent over the inner
tent and attach them to one another.
FIG. 2
3. Insert the shortest tent pole in the sleeve
on the front, then place the ends of the
tent pole in the rings in the PP plastic at
the bottom of the outer tent. Secure the
plastic PP loops to the ground using the
tent pegs. Put together the outer tent and
inner tent using the fasteners at the four
corners.
FIG. 3
4. Secure the elastic loops around the
bottom of the outer tent to the ground
using the tent pegs. Tension the guy ropes
evenly and secure them to the ground
using tent pegs. The length of the ropes
can be adjusted.
FIG. 4
5. The tent should now look like this.
FIG. 5
SAFETY INSTRUCTIONS
The following safety precautions must be
implemented when camping.
• Do not use candles, matches or any other
naked ames in the vicinity of the tent.
• Do not cook food in the tent.
• Light any campres several metres
downwind of the tent, and make sure that
the re is properly extinguished before
leaving the campsite, or before going into
the tent.
• Take great care when using lamps or
heaters lled with fuel in the tent. If
possible, use
• battery-powered lights.
• Do not ll up lamps, heaters or stoves in
the tent.
• Turn o, or extinguish, all lights before
going to sleep.
• Do not smoke in the tent.
• Do not store any ammable liquids in the
tent.
SYMBOLS
Read the instructions.
TECHNICAL DATA
Size 210x180+80+80+30x120 cm
Weight 5 kg
Water column 2000 m
DESCRIPTION
PACKAGE CONTENTS
Item Qty.
Tent bag 1
Pole bag 1
Table of contents
Languages:
Other Kayoba Tent manuals

Kayoba
Kayoba 008787 User manual

Kayoba
Kayoba 014180 User manual

Kayoba
Kayoba 955-043 User manual

Kayoba
Kayoba 010571 User manual

Kayoba
Kayoba 955-029 User manual

Kayoba
Kayoba 955-035 User manual

Kayoba
Kayoba 008785 User manual

Kayoba
Kayoba 955-025 Operating instructions

Kayoba
Kayoba 008787 User manual

Kayoba
Kayoba 008785 User manual
Popular Tent manuals by other brands

MSR
MSR Mutha Hubba NX Assembly instructions

Chinook
Chinook Tornado 6 Assembly instructions

skandika outdoor
skandika outdoor HAMMERFEST 6 Setup Instruction

Snow Peak
Snow Peak Amenity Dome M instruction manual

Coleman
Coleman Tent 9273-012 instructions

Eureka! Tents
Eureka! Tents 10'x10' Technical instruction manual