KC Vizziq User manual

USER GUIDE
SAFETY NOTE
The Vizziq™is recommended for use with supervision and / or instruction from clinician or trained personnel.
Follow all directives from your physician / health professional for any movements that should be avoided.
Read All Instructions Before Use
Follow All Instructions and Train Often!
•Designed to improve your waking, posture and gait mechanics.
• Use often for general tness, pre and /or post rehabilitation.
Train 2-7 times per week for best results.
• Proven to enhance gait speed, symmetry and hip/trunk rotation.1
1 Moua, Kirkeide & Szyszka, Posters on the Hill, Washington DC, A Novel Gait Trainer Facilitates More Natual Walking Patterns in Adults 65 Years and Older.
Supervised by: Szymanski PhD, Myers PhD, Norton PhD, Brueggemann PhD, St. Catherine University, St. Paul, MN 2017.
1Front Frame
2Front Crossbar
3Tie Rod with Springs
4Quick Connector
5Side Frames
6Detent Pin
7Non-Pivoting Locking Feature
8Left Handlebar
9Right Handlebar
10 Brake Cable
11 Ball Stud
12 Right Leg
13 Left Leg
14 Handlebar Adjustment Knob
15 Back Plate
16 Cable Tie
17 Upper Handgrip
18 Lower Handgrip
19 Brake (Squeeze)
20 Wheel Locking Mechanism (Pull)
21 Rear Vertical Frame Tube
21 10
14
12
11
5
16
15
9
18
17
20
19
8
14 1
2
4
3
13
5
6
7
4
16

How to Assemble
•Stand the Vizziq™with four wheels in contact with
the ground.
•The Vizziq™comes mostly assembled. Stand the Vizziq™
with four wheels in contact with the ground. Swing the
left leg out followed by the right (leg with Vizziq™label)
so that the tie rod with springs is positioned parallel,
along the inside of the front crossbar.
•Insert the detent pin through
the non-pivoting locking feature
located near the center of the
crossbar. Squeeze the middle bars
together for ease of insertion.
•Standing outside and in front of
the front crossbar, locate the quick connector (found on
each end of the tie rod) and slide the outer sleeve back
until the socket is fully open (ensure the sleeve opening
is facing downward by centering the black line), then
place the open socket on the
ball stud (located on each of
the side frames) pressing down
until the ball is in the socket.
•Release the outer sleeve and
the connector should lock onto
the ball stud (if sleeve does
not lock, rotate the sleeve or
the side frame back and forth
until it locks). This will align
both side frames, keep the
rear wheels in line, and create
a 90-degree angle at the two
front corners of the Vizziq™
.
•The up-right handlebars are designed to allow for
maximum postural positioning. If the unit was shipped
to you, it will arrive in a semi unassembled form.
•Insert the right and left handlebars into the rear vertical
tubes of the frame by unscrewing the handlebar
adjustment knobs and removing the backing plate as
pictured below.
•Position the brake cables along the frame and anchor
with cable ties as seen in the photos.
Adjusting & Setting
Handlebar Height
•Adjust the handlebars according to user height while
user is standing inside the Vizziq™
.
•To position, secure and tighten the handle bars,
align the holes on the handlebars with the holes
on the Vizziq™’s rear vertical frame tube.
•Place the backing plate for the
retention knob through both
tubes and tighten the retention
knob until secure. Secure both
right & left retention knobs by
hand (do not over tighten).
Getting Started
For safety have attendant close by for optimal
security while getting started and/or as long as
needed for condence and safety.
SAFETY NOTE
Vizziq™is recommended for use with supervision and/or
instruction from clinician or trained personnel.
2

Lower PlacementUpper Placement
•Begin with the wheels locked and keep the Vizziq™ in
non-pivoting/locked position. Walk into the Vizziq™and
grasp the handlebars: Elbows bent at 90 degrees to
grasp up-right. Elbows slightly bent with arms at your
sides to grasp lower handgrips.
•The lower handgrips will provide some lower body/joint
unloading/less weight bearing, if recommended
by your health provider. If unloading is desired, position
the handle bars lower so the user’s arms are slightly
bent while holding and slightly pushing down on the
lower handgrips.
•Position the height of the handgrips so the user is
relaxed through the neck, upper trunk and shoulders,
and can stand comfortably.
•Position wrists at the most comfortable level.
Hand Brakes
•Brakes are designed to stop
or slow the rear wheels by
squeezing the loop handle.
•To lock the wheels on the
Vizziq™
, pull out/down on the
loop of the handle.
Positioning
For safety, have attendant close by for optimal
security while getting started and/or as long as
needed for condence and safety.
Alignment
1 Stand tall inside the frame close to the handlebars.
2 Position your shoulders over your hips.
3 Relax your shoulders and keep your head level
Non-pivoting / Locked
Position
•For safety, keep the Vizziq™in the
non-pivoting/locked position for
greater stability. Lock the pivoting
mechanism in the center of the
front crossbar by inserting the
detent pin through the locking
feature located in the front center
crossbar. Squeeze the crossbars
together for easier pin insertion.
The spring loaded resistive pivoting
will be locked out and the Vizziq™
will operate as a static 4-wheel device.
SAFETY NOTE
Follow all directives from your physician / health professional
for any movements that should be avoided.
Pivoting / Articulating
•Unlock the device and store the
pin in the center hole of the top
center crossbar. While becoming
accustomed to the pivoting
feature of the Vizziq™, stand
inside the device and position
your elbows at 90 degrees for
upper hand grips or with arms at
sides elbows relaxed, for lower horizontal hand grips.
•Grasp the handlebars and move your trunk naturally in a
pivoting motion (rotating left to right) while standing in
place. The Vizziq™will provide support while you rotate
your trunk.
3

Begin Walking
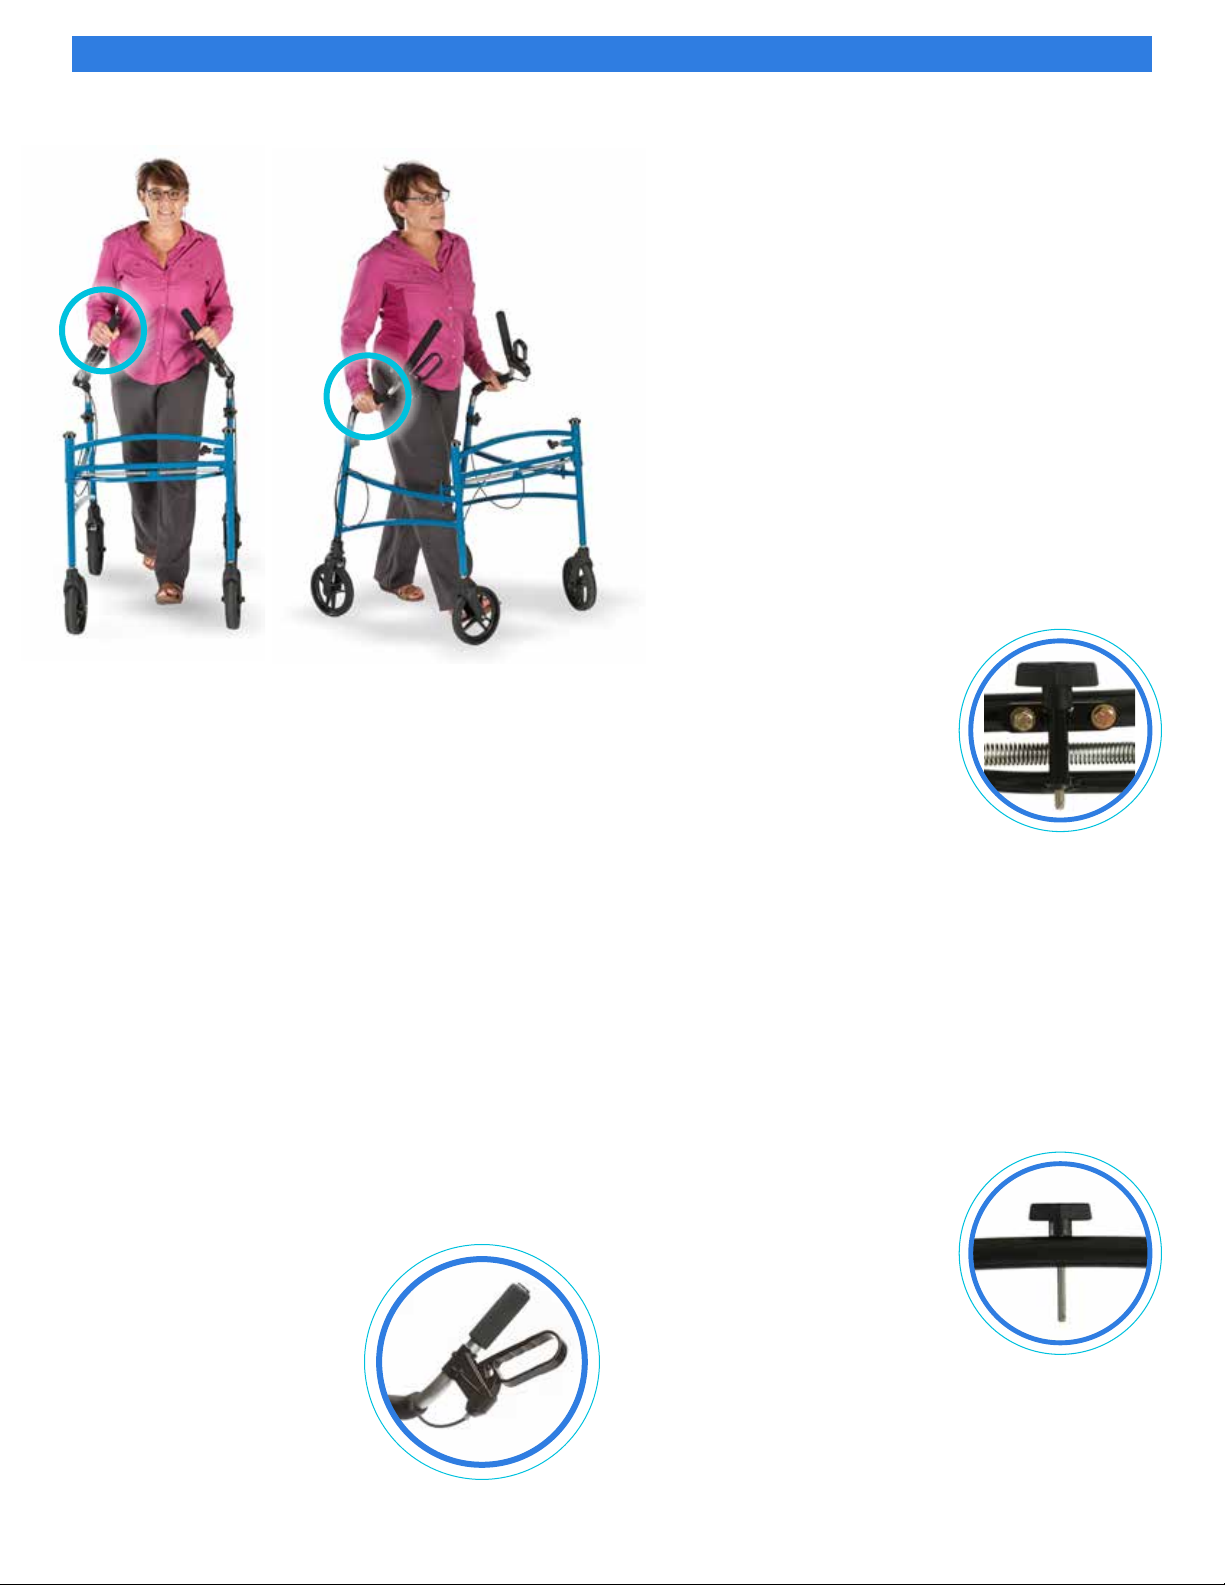
•Position your body inside the Vizziq™; it will surround
you and move with you. Move naturally with your arms
comfortably near your sides and allow your body to
experience the dynamic stability of the Vizziq™
.
You should feel supported while allowing for natural
movements through your torso and hips.
•The lower handgrips will provide some lower-body
unloading for less weight bearing, if recommended by
your health provider. If unloading is desired, position the
handle bars lower so that the user’s elbows are slightly
bent while holding and slightly pushing down on the
lower handgrips. Position the height of the handgrips
so the user is relaxed through the neck, upper trunk and
shoulders, and can stand comfortably. Position wrists at
the most comfortable level.
QUICK REVIEW
1 Lock the wheels - pull hand loop out/down.
2 Non-pivoting/locked Method: Insert pin
through the center cross bars.
3 Grasp the handlebars.
4 Stand tall inside the Vizziq™ frame.
5 Keep arms close to your body.
6 Squeeze brake handle to unlock wheels.
7 Walk naturally staying inside the frame.
Stand tall. Look straight ahead.
8 Pivoting Method: Remove pin to engage
the pivoting feature and repeat 3-7.
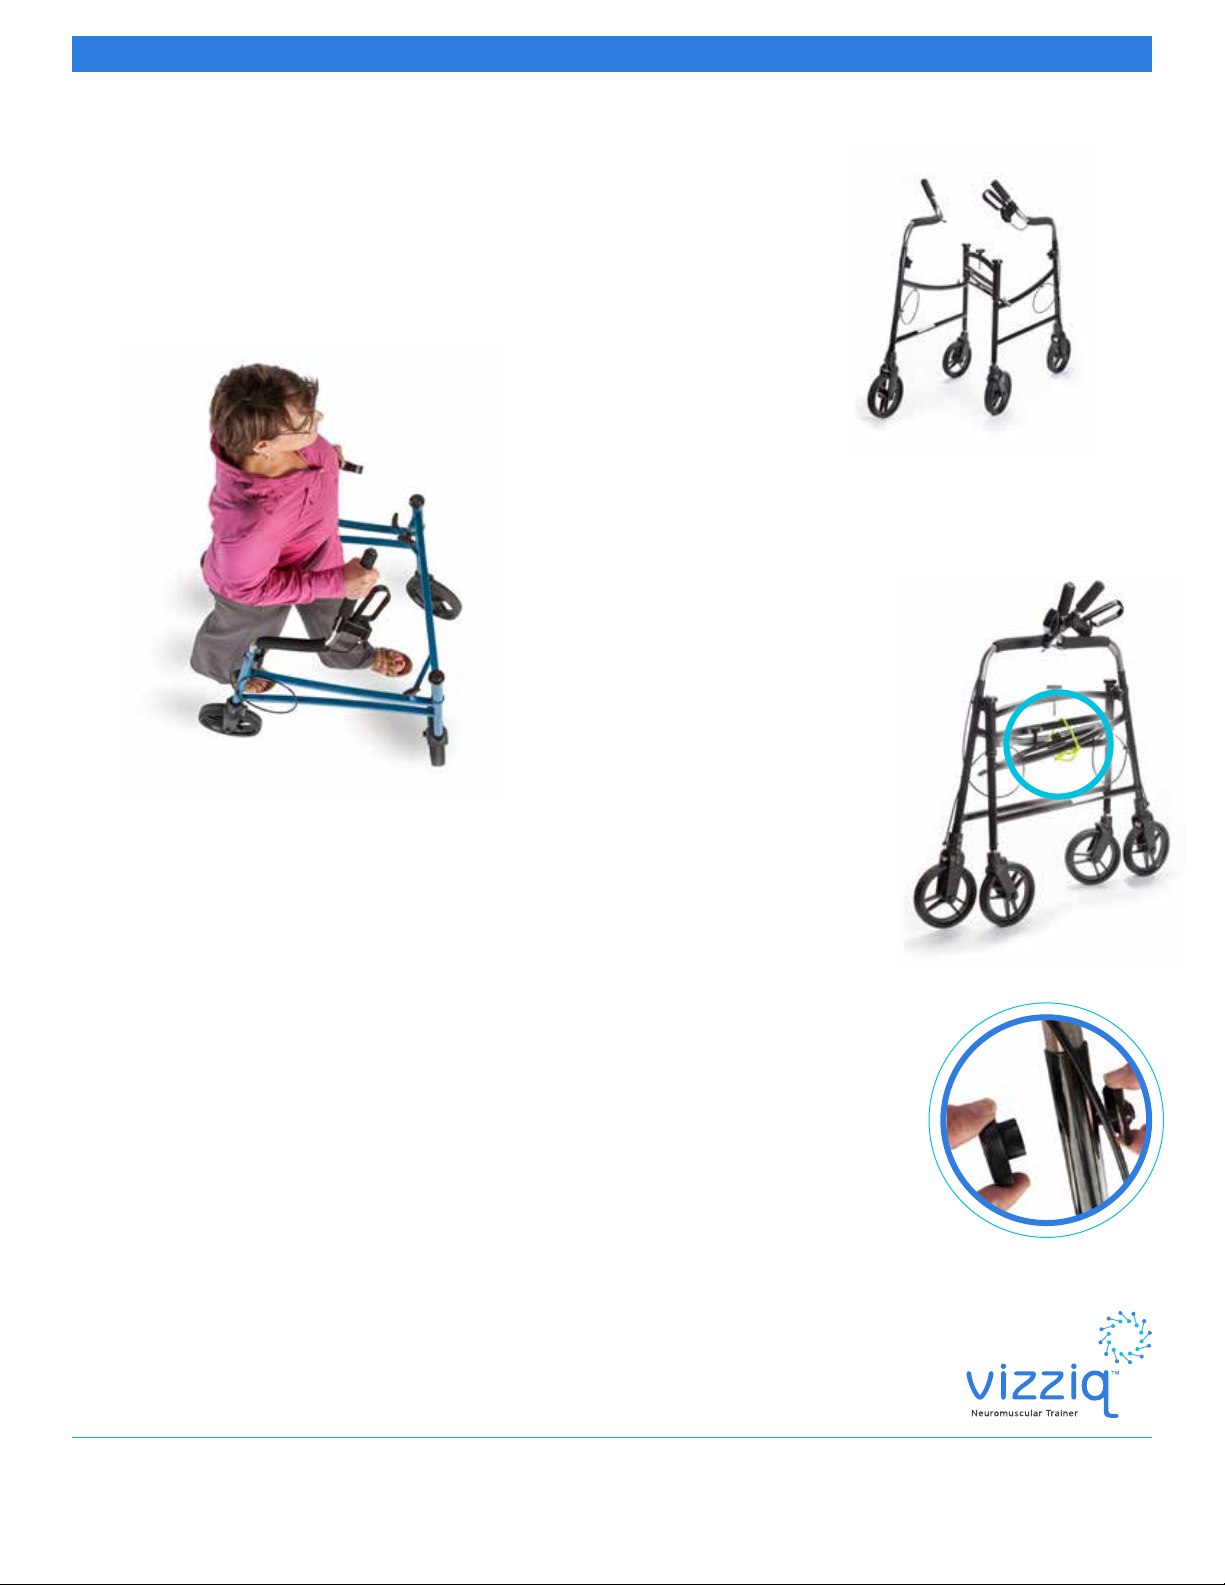
Folding / Storing the Vizziq™
•Stand inside the Vizziq™
with four wheels in contact
with the ground.
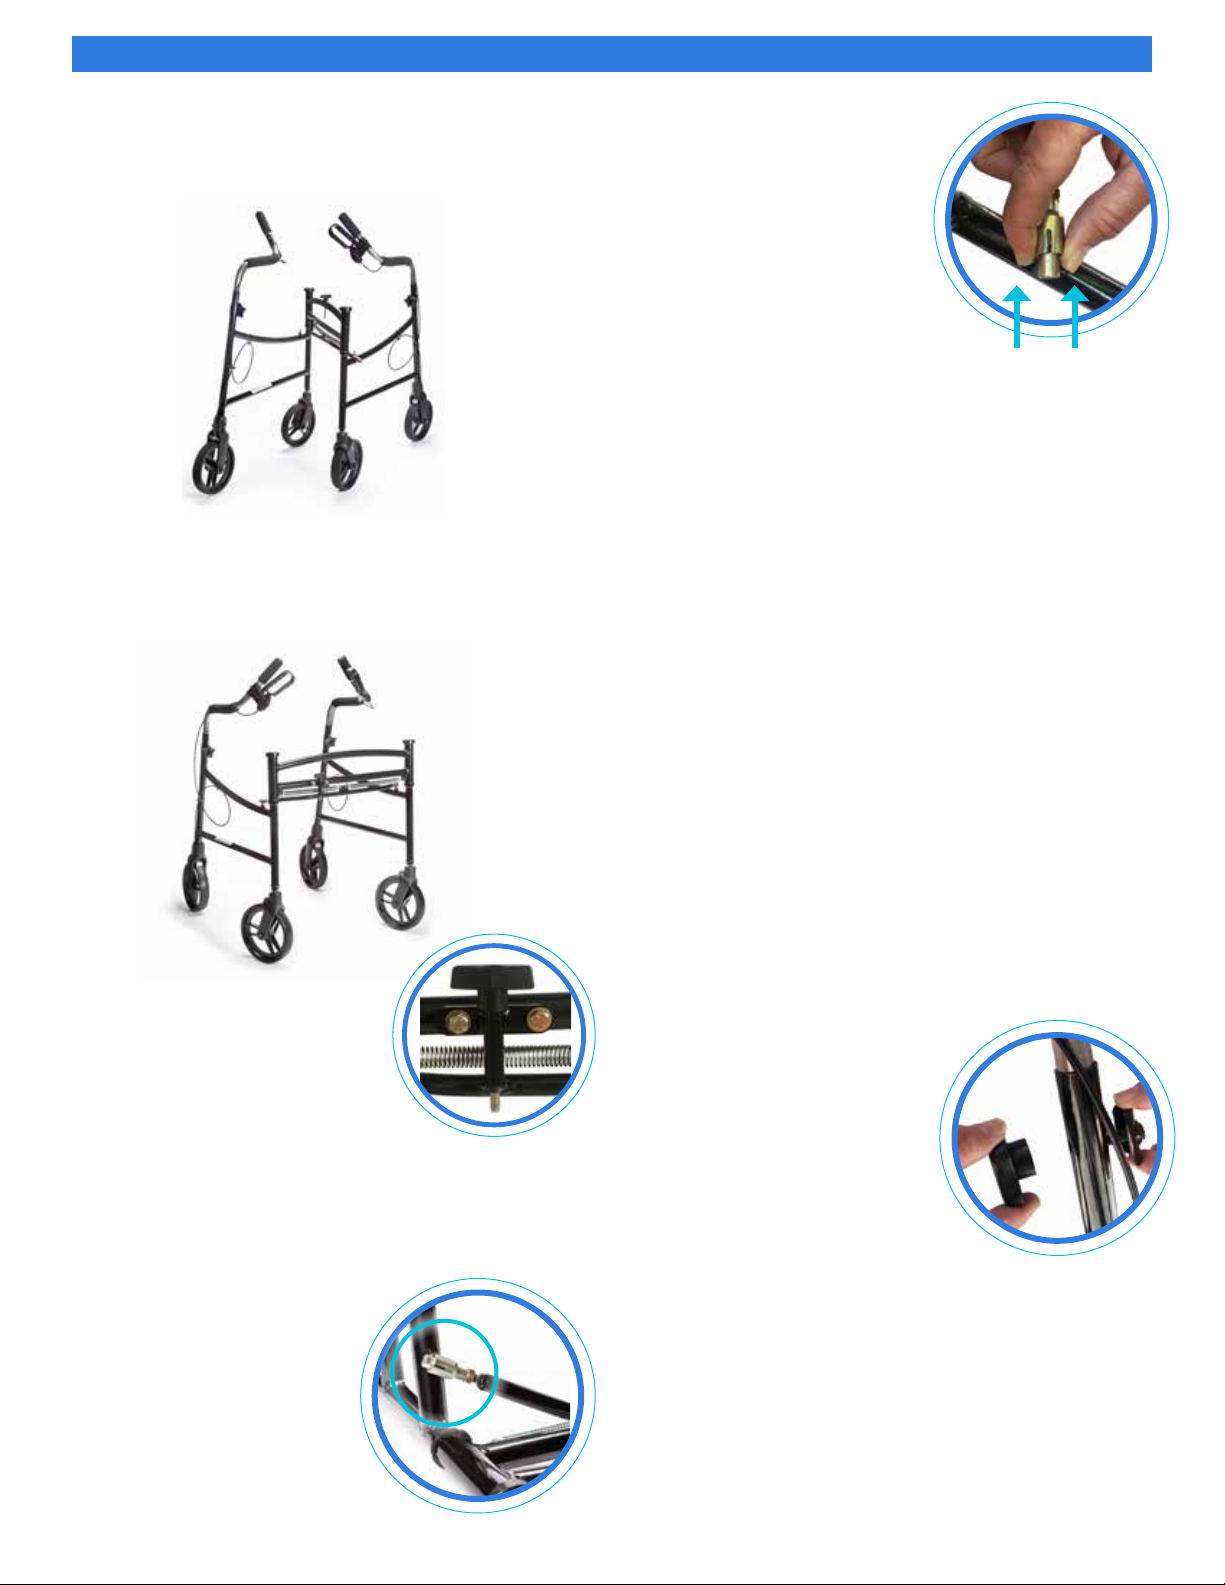
•Unlock the device by removing the center detent pin
and place it in the storage hole on the center front
crossbar. Disconnect the side frames by releasing the
quick connector. Slide the outer sleeve back until the
socket is fully open and lift off the ball stud.
•To position the Vizziq™for
folding/storage, swing the
left leg out (clockwise)
followed by swinging the
right (leg with Vizziq™
label) counterclockwise so
the tie rod with springs is
positioned parallel, along
the inside of front crossbar.
Secure with rubber twist
tie looping through center
and tighten.
•If needed for storage or
transit, shorten or remove
handlebars by disassembling
from frame: Loosen the
retention knob and remove
the back plate. Remove total
adjustment assembly so
that handlebars move freely
up, down or if necessary,
handlebars may be completely
removed from rear frame.
Store the adjustment assembly
parts in the frame if removing
handlebars.
DISCLAIMER
KC Product Development is not responsible for any injuries, product failure or any injury or malfunctioning during use of Vizziq™.
Contact KC Product Development, L.L.C. 2916 Hilldale Ave NE Mpls, MN 55418 or call 612.598.1702, if you have any questions or concerns regarding your Vizziq™ .
Copyright © 2018 by KC Product Development, L.L.C.
4
Popular Mobility Aid manuals by other brands

CareCo
CareCo Sanandres Owner's handbook

TOPRO
TOPRO Taurus user manual

Invacare
Invacare 6252 Assembly, installation and operating instructions

HartMobility
HartMobility KRATOS CAPTO V Assembly/installation instructions

Moretti
Moretti SKEMA FORM instruction manual

Camtec
Camtec Joerns CareChair RCCC550B User & service manual