KC N901 User manual

Smart Helmet
N901 User Manual
Release Version: V1.09

Table Of Content
1. INTRODUCTION....................................................................... 3
2. PRODUCT OVERVIEW ............................................................ 4
2.1. PRODUCT DEFINITION................................................................ 4
2.2. PRODUCT FEATURES .................................................................. 4
2.3. PRODUCT SPECIFICATION........................................................... 6
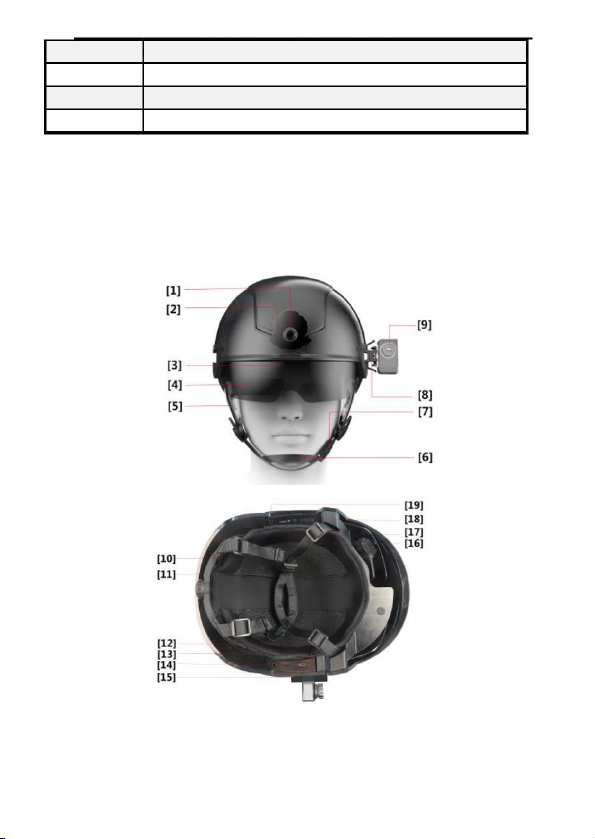
2.4. PRODUCT COMPOSITION ........................................................... 7
3. WEAR AND ADJUST ................................................................. 9
3.1. WEAR THE SMART HELMET....................................................... 9
3.2. RETRACT AND EXTEND THE SAFETY GOGGLES .......................... 9
3.3. ADJUST THE AR GLASSES........................................................... 9
4. USER GUIDE ........................................................................... 11
4.1. POWER ON............................................................................... 11
4.2. BLUETOOTH CONNECTION....................................................... 11
4.3. ONE-CLICK CALIBRATION ....................................................... 12
4.4. MANUAL CALIBRATION............................................................ 13
4.5. SELECTION OF COLOR PALETTE .............................................. 14
4.6. WORKING MODES .................................................................... 14
4.6.1. SINGLE-PERSON TEMPERATURE MEASUREMENT MODE ............... 15
4.6.2. LARGE-CROWD TEMPERATURE MEASUREMENT MODE ................ 16
4.6.3. QR CODE &TEMPERATURE MEASUREMENT MODE...................... 17
4.6.4. QR CODE RECOGNITION MODE ................................................... 18
4.6.5. LICENSE PLATE RECOGNITION MODE .......................................... 18
4.6.6. LICENSE PLATE RECOGNITION &TEMPERATURE MEASUREMENT
MODE ................................................................................................... 22
4.6.7. THERMOGRAPHIC DIAGNOSTIC IMAGING MODE.......................... 22
4.6.8. NIGHT-VISION/FACILITY INSPECTION MODE................................ 23
4.6.9. FACE RECOGNITION MODE .......................................................... 23
4.7. PROJECTION DISPLAY............................................................... 25
4.8. SCREEN RECORDING................................................................ 25
4.8.1. SCREEN RECORDING................................................................... 25
4.8.2. EXPORT VIDEO ........................................................................... 25
4.9. POWER DOWN .......................................................................... 26

5. CAUTIONS............................................................................... 27
5.1. BATTERY USAGE ...................................................................... 27
5.2. MAINTENANCE......................................................................... 27
6. FREQUENTLYASKED QUESTIONS ..................................... 28
6.1. HARDWARE FAQ...................................................................... 28
6.1.1. UNABLE TO BOOT ....................................................................... 28
6.1.2. NOAR DISPLAY.......................................................................... 28
6.1.3. ONLY SYSTEM INTERFACE SHOWN OF THE AR DISPLAY .............. 28
6.1.4. THERMAL IMAGING SCREEN IS STUCK OR GHOSTING OR
SMEARING ............................................................................................ 28
6.1.5. SHORT BATTERY LIFE .................................................................. 28
6.1.6. NO HEADPHONES OUTPUT........................................................... 29
6.2. FUNCTIONALAND OPERATIONAL FAQ ..................................... 29
6.2.1. QUESTIONS ABOUT BATTERY ...................................................... 29
6.2.2. QUESTIONS ABOUT STARTING THE HELMET................................. 29
6.2.3. QUESTIONS ABOUT WEARING ADJUSTMENT ................................ 30
7. NOTICES AND AFTER-SALES SERVICE.............................. 31
7.1. AFTER-SALE SERVICE TERMS AND CONDITIONS ...................... 31
7.2. CUSTOMER SERVICE POLICY UNDER WARRANTY ...................... 31

1. Introduction
⚫Please read this manual carefully to learn the functions, operations
and precautions before using the KC Smart Helmet N901.
⚫All illustrations in this manual are for reference only, please refer
to the actual product.
⚫Due to the differences of the field environment, the functions
described in this manual might be inconsistent with the actual
situation. Please refer to the actual product.

2. Product Overview
2.1. Product Definition
KC Smart Helmet N901 is a wearable intelligent helmet for the
actual combat needs of epidemic control and control in public places.This
helmet is designed based on KC intelligent metamaterial technology, and
integrates multiple advanced technologies such as infrared thermal
imaging, artificial intelligence, AR (augmented reality) display, big data,
communication sensing, and advanced aerospace technology. It is the first
to implement mobile deployment-based control scenarios. The unaware
and contactless temperature measurement is portable, safe and effective in
epidemic prevention.
Figure 1. Appearance of the Smart Helmet.
2.2. Product Features
KC Smart Helmet N901 exhibits the following characteristics:
⚫Highly integrated, mobile deployment
The helmet integrates a variety of functional modules such as data
processing, communication and AR displays. It does not require external
power supplies, displays, and external black bodies. The helmet is
lightweight, comfortable to wear, easy to deploy, and especially suitable
for individual equipment.

⚫Long temperature measurement distance and high accuracy
The over-temperature alarm distance is up to 7 meters, and the
temperature measurement error is ±0.3℃.
⚫Fast temperature measurement and strong environmental
adaptability
Automatic temperature measurement of multiple targets both indoors
and outdoors.
⚫Powerful AI capabilities
The helmet has a built-in AI system, which can access database of
facial features and vehicle license plates to realize the functions of face
recognition and license plate recognition in mobile scenes. This will fulfill
the management demands in public security and commercial application
scenes.
⚫Ultra-long battery life
Equipped with high-energy density battery and high efficiency energy
system to meet the long-running operation requirements in mobile
scenarios.
⚫AR augmented reality display technology
Adopting leading AR display technology, the helmet is characterized
by large field of view, high resolution, high definition, high contrast, small
blind spot, large-scale eye movement, and natural appearance.
⚫Lightweight
The helmet is made of the advanced composite meta-materials.
Through the modular design and aerospace-level weight reduction design,
while ensuring safety and protection, it achieves high productivity, easy
maintenance, and lightweight goals.
⚫Low radiation
The conformal antenna technology realizes high gain and low
radiation of antenna radiation, and by combining with the electromagnetic
shielding technology, it greatly reduces the radiation to the human body. It
is tested by a third-party authority that, the radiation intensity of the
electronic components of the working smart helmet to the heads is only
1/40 of the national standard, and 1/20 of the radiation intensity of general
cell phone, which ensures human safety in all aspects.
⚫Ergonomic design, comfortable to wear
Design of gravity center balancing, modified Lycra lining, high-
strength nylon strap and safety magnetic buckle, ensure comfort and safety
for all-day wearing.

2.3. Product specification
Basic Information
Apperance
Length×width×height : (293±5)mm * (236±5)mm * (185±5)mm
1080±10g
Weights
lining
L: thickness 3mm M: thickness 5mm S: thickness 7mm
;
;
AR display
Resolution
1280×720
Field of view
Virtual screen
Rated brightness
35°
Equivalent to watching 74-inch TV from 3m away
300nits
Visible light camera
Maximum
Maximum
13 megapixel
F2.0
Field of view
Resolution
78°
1080P@30fps
Data Communication
Wi-Fi
,
Dual Frequency IEEE 802.11 b/g/n 2.4GHz/5GHz
Bluetooth
BT 4.2, backward compatible with 3.0, 2.1, supporting BLE
Electrical Characteristics
Battery capacity
5000mAh
Temperature measurement mode: up to 8 hrs*
QR code mode/License plate recognition mode/Face recognition
mode: 3 hrs
Battery life
Standby time: 24 hrs
Battery voltage
Charging
~
DC3.7 4.2V
DC5.0V ±5%
Fast Charge
Storage
Supporting 2A Fast Charging
-20℃60℃
~
Operating
~
-10℃40℃
Infrared thermal imaging module
Resolution
384×288
33.4°
Field of view

Response wave
Image
8μm/14μm
25 Hz
Temperature
Margin of error
;
Temperature measurement mode: 36℃~42℃thermal imaging
±0.3℃
* Note: In the temperature measurement mode, the battery life as AR display always on
is about 5 hours, and can be extended to 8 hours by turning off the screen.
2.4. Product Composition
KC smart helmet N901 is mainly composed of helmet body, hardware
platform, AR display module, infrared thermal imaging module and battery.

Figure 2. Appearance of the Smart Helmet.
[1]
[2]
[3]
[4]
[5]
[6]
[7]
Visible light camera
Overlay
[12]
[13]
[14]
[15]
[16]
[17]
[18]
The bluetooth key
TYPE-C port
Safty goggles .
AR display module
Strap
Microphone port
SIM card slot
Power indicator
Power on key
Microphone
Strap Buckle
Volume button
Mounts of Thermal imaging
module
[8]
[19]
Headphone port
[9]
Thermal imaging module
[20]
[21]
Battery cover
[10]
[11]
Lining
Battery cover lock
Lining adjustment knob

3. Wear and Adjust
3.1. Wear the Smart Helmet
1) Select appropriate-thickness liner in the helmet according to
your head size.
2) Adjust the tightness of the helmet strap.
3) Put on the smart helmet and fasten the buckle.
4) Turn the head lock knob to an appropriate position.
5) Put on the earphone.
3.2. Retract and Extend the Safety Goggles
Gently lift the safety goggles from both sides to open the goggles;
Gently lift the safety goggles from both sides and then push the
goggles into the helmet to retract the goggles.
3.3. Adjust the AR Glasses.
1) The AR glasses adapt the right monocular only, which is fixed
to the interior of the safety goggles. The position of AR display
screen can be fine-tuned by adjusting the arms of the AR glasses
to ensure that the AR display screen is in complete and clear
vision.
Note: When extending and retracting the safety goggles, be
gentle and avoid the collision of the lens of AR glasses with
other objects (as the space for extending and retracting of the
AR glasses is limited, large-range adjustment of the AR glasses
on the safety goggles should be avoided).
2) If the AR glasses require adjustment within a wide range, the
AR glasses should be adjusted after the helmet is removed. And
after adjustment, the safety goggles should be extended or
retracted for several times to test whether collision occurs.
9

Figure3-The appearance of AR glasses and safety goggles
Figure 4-Retracted State of safety goggles.
10

4. User Guide
4.1. Power On
Press and hold the On/Off button for 3 seconds, the helmet is
power on with the indicator lighting up.
Figure 5-Schematic diagram of power switch position
4.2. Bluetooth Connection
These steps need to be executed only for the first time
connection between the smart phone and the smart helmet;
1) Press and hold Bluetooth button on the left of the helmet
2) Turn on bluetooth on the smart phone
3) Open “KC Smart Helmet”App.
4) Click the icon “ ” in the top right to search the Bluetooth
device nearby, and find the corresponding device number of the
helmet in the equipment list. (The device number of the smart
helmet is located inside the battery compartment cover, which
can be unlocked when the helmet is power down.)
5) On APP, click the Device Number to be paired , and click
“Pair”in the pop-up dialog box. Then enter Parameter Setting
page after successful pairing.
11

Figure 6-bluetooth pairing pop-up dialog box and parameter setting page
6) If the connection failed, please try the following:
A. Inspect the startup state of the helmet and device and
ensure that the Bluetooth is enabled and is not connected to
other Bluetooth device.
B. Press and hold the Bluetooth button on the left of the
helmet, and click “Pair”again.
C. If the problem is still unresolved, please restart the
helmet and “KC Smart Helmet”APP and try it again.
4.3. One-Click Calibration
⚫One-Click calibration for quick setup before helmet use
⚫Temperature measurement can be started 5~10 minutes
after boot when the measurement accuracy stabilizes.
The user can quickly calibrate the thermal imaging module
through the “One-Click Calibration”function.This work should be
carried out with the assistance of a person of normal body
12

temperature.
Step 1: Open “KC Smart Helmet”App and connect the
helmet through bluetooth;
Step 2: The calibration assisting person stands 1 meter in front
of the thermal imager.
Step 3: Adjust the center of the screen to target the ears or
forehead of the assisting person, and click “One-Click
Calibration”. The quick calibration is completed as
“Calibration is complete”prompts on the screen.
Step 4: Click “Save”to save the Calibration parameter
4.4. Manual Calibration
Note:
⚫he thermal imager can be parameterized manually to
obtain higher measurement accuracy;
⚫Temperature measurement can be started 5~10 minutes
after boot when the measurement accuracy stabilizes.
⚫The calibration parameter has a great influence on the
measurement precision, so the calibration parameter
should be reset when the precision has a large error during
the use;
⚫This work should be carried out with the assistance of a
person of normal body temperature.
Step 1: Let the assisting staff stand 1 meter from the thermal
imager and measure his temperature of forehead with the
thermal imager;
Step 2: If the temperature reading is within 36.5~36.7℃, the
calibration parameter needs no further modification.
Otherwise if the reading is out of the range, the calibration
parameter should be adjusted until the measurement error
meets the requirements. The temperature reading will rise as
increasing the calibration parameter and vice versa. The
calibration parameter should be within the range of -3~+3.
Step 3: Let the assisting staff stand 0.5 meter from the thermal
13

imager and measure his temperature with the thermal imager;
If the temperature reading is not greater than 37.2℃, the
calibration completes; otherwise the calibration parameter
should be adjusted accordingly.
Step 4: Click “Save”to save the Calibration parameter
4.5. Selection of Color Palette
Two color palette “Rainbow”and “Iron Gray”are available for
the users to choose in the “Parameter Setting”according to their
preference.
Figure 7-Rainbow mode vs Iron Gray mode
4.6. Working modes
The N901 basic version provides only two working mode of
“single-person temperature measurement mode”and “large-crowd
temperature measurement mode”. While the AI version implements
seven additional modes.The specific working mode can be confirmed
through the "function setting" page in the APP.
14

Figure 8-Selecting page of Working modes
4.6.1. Single-person temperature measurement mode
In this mode, the thermal imaging module will scan the central frame
and display the highest temperature of this area, and the reading will
be displayed on the AR module. Align the central frame with the head
of person to measure the temperature.
15

Figure 9-Single-person temperature measurement mode
The default warning range is 37.3 ° C ~ 42 ° C. When the highest
temperature detected in the center of the screen locates in this range, it
will trigger an audible and visual alarm.
This mode can be used for accurate temperature measurement in
all scenarios, particularly suitable for the fast temperature
measurement outdoors at daytime or in environment with complicated
thermal radiation sources.
Note:The thermal imaging module could not distinguish the properties of the
imaging objects at current version. If temperature of the lamp box, water cup or metal
parts exposed to direct sunlight appear in the screen to be in the warning range, it will
alarm which requires secondary screening on targets.
4.6.2. Large-crowd temperature measurement mode
In large-crowd mode, the thermal imaging module will scan the
entire area of the screen and automatically display the temperature
values within 36℃~42℃.When the thermal imaging module targets
the crowds, the temperature of the forehead, collar, arm, and other
parts exposed in the entire screen will be displayed.
The default warning range is 37.3 ° C ~ 42 ° C. When the highest
temperature detected in the center of the screen locates in this range, it
will trigger an audible and visual alarm.
16

Figure 10-Large-crowd temperature measurement mode
Note: The thermal imaging module could not distinguish the properties of the
imaging objects at current version. If the lamp box, water cup or metal parts exposed
to direct sunlight appear in the screen, the temperature value of these parts may be
displayed and the readings will be affected.Therefore, single-user mode is
recommended for the complicated environment.
4.6.3. QR code & temperature measurement mode
Scan the QR code to acquire the personal information first, and
take a temperature measurement of the person within 3 seconds. The
personal temperature info will be automatically recorded into database
in real time, allowing paperless data logging, safe distance and fast
passing.
17

Figure 11-QR code & temperature measurement mode
4.6.4. QR code recognition mode
Scan the QR code by helmet to automatically record personal
info into the database, allowing paperless data logging.
Figure 12-QR code recognition mode
4.6.5. License plate recognition mode
Recognize the vehicle license plate, identify and alert
18

unregistered vehicles or suspect vehicles recorded in database.(for
mainland China use only.)
Figure 13-License plate recognition mode
1) Importing License plate database
The license plate database should be established before the
license plate recognition function is enabled.The license plate data is
imported as follows:
STEP 1: Turn on the smart helmet, connect the computer and the
smart helmet using the TYPE-C data cable;
STEP 2: Open “Scrcpy”, and project the AR display to the
computer screen;
STEP 3: Double-click the menu bar on the upper right of the
projection screen to pop up the system settings menu.
STEP 4: Select the connection method as“File Transfer”at the
bottom of the system settings menu bar, and the system will exit the
projection mode;
19
Table of contents