7 EN
PORTABLE SLIT LAMP by KEELER
3. CLEANING AND DISINFECTION INSTRUCTIONS
Before any cleaning of the instrument or the base unit, ensure the power
lead is disconnected.
Only manual non-immersion cleaning as described should be used for this instrument. Do not
autoclave or immerse in cleaning fluids. Always disconnect power supply from source before
cleaning.
1. Wipe the external surface with a clean absorbent, non-shedding cloth dampened with
de-ionised water / detergent solution (2% detergent by volume) or water / isopropyl
alcohol solution (70% IPA by volume).Avoid optical surfaces.
2. Ensure that excess solution does not enter the instrument. Use caution to ensure cloth is
not saturated with solution.
3. Surfaces must be carefully hand-dried using a clean non- shedding cloth.
4. Safely dispose of used cleaning materials.
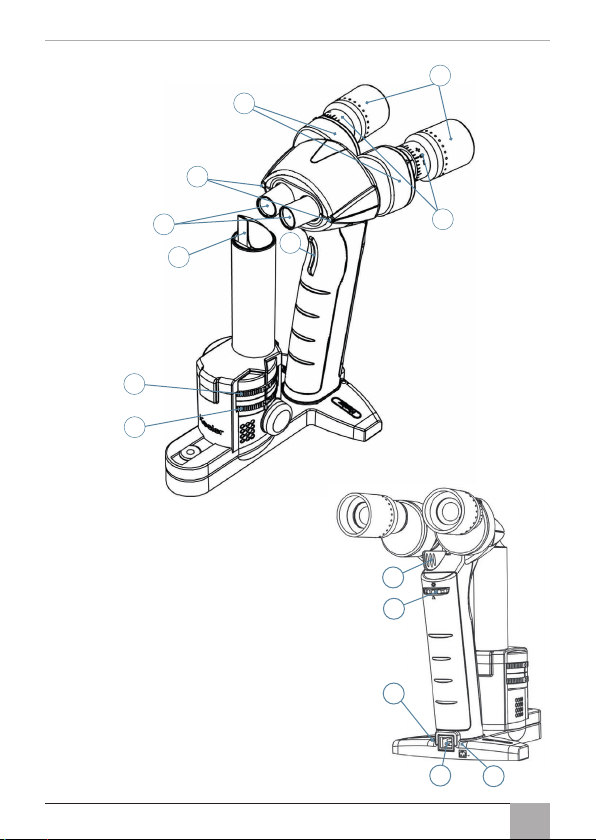
4. NAMES OF CONTROLS AND COMPONENTS
Portable Slit Lamp illumination body and magnification optics
1. Trigger: Click and hold the trigger to turn the lamp illumination on. Double click
(similarly to a computer mouse button) to turn both the illumination lamp and fixation
targets on. Release the trigger to turn off the device.
2. Prism optical body: Projects a thin sheet (slit) of light perpendicular to the prism face.
3. Eyepieces – dioptrical adjustment: Rotate clockwise to achieve a + (plus) setting and
anti-clockwise for a – (minus) setting.
4. Eyepieces – PD adjustment: Rotate the left eyepiece anti-clockwise and the right
eyepiece clockwise to increase the PD value. Rotate the left eyepiece clockwise and the
right eyepiece anti-clockwise to decrease the PD value.
5. Latex free protective sleeves: These sleeves can be folded forwards to better suit
spectacle wearers.
6. Fixation targets: Provides a light source for the patient to focus upon. Double click
(similarly to a computer mouse button) to turn both the illumination lamp and fixation
targets on.
7. Objective lenses: These lenses are flush with the external surface at a magnification of
10x and protrude from the device at a magnification of 16x.
8. Slit wheel: Rotate the slit wheel to select either a slit of 0.15mm (0.15), 0.5mm (0.5),
0.8mm (0.8), 1.6mm (1.6), a circle of 12mm (O), or a square of 1mm ( ) for a/c flare
assessment. (The text in the brackets corresponds to the icons on the slit wheel.)
9. Filter wheel: Rotate the filter wheel to select either a red free (R.F), blue (B.F), neutral
density (N.D) or clear filter (O). (The text in the brackets corresponds to the icons on the
filter wheel.)
3
5
4
6
7
2
1
8
9
10. Magnification change lever (PSL Classic
only): Push this lever to the right to set the
magnification at 10x and to the left to set the
magnification at 16x.
11. Alternative power socket: In addition to
charging through the base charger unit, the
device can also be charged through this
socket.
12. Charging LED: The yellow charging LED is
on continuously during normal charging and
blinks when trickle charging. Trickle charging
can occur at the start of charging a completely
discharged battery or when attempting to
charge a completely charged battery.
13. Battery state LED: The yellow battery state LED
blinks when the battery is almost empty.
14
13
12
11
10