Kegel8 Ultra 20 User manual

Welcome!
Thank you for choosing Kegel8® Ultra 20. This
personal therapeutic device is designed to help
you strengthen your pelvic oor in the comfort of
your own home. Created especially for women,
the Kegel8® Ultra 20 is a safe and eective
neuromuscular stimulator (STIM) that works by
producing electrical pulses that gently stimulate
the muscles and nerve bres in your pelvic area.
What Are the Benets of Having a
Stronger Pelvic Floor?
The pelvic oor is a sling of muscles that run from
your pelvic bone (in the front) to your tailbone (in
the back). Think of these muscles like a hammock
that supports your reproductive organs, bladder
and lower bowels.

Various life circumstances can weaken these
muscles, such as pregnancy, childbirth, excessive
weight gain, surgery, or ageing. By using the
Kegel8® Ultra 20, you
will be eortlessly
guided through a of
series of STIM-induced
pelvic oor (kegel)
exercises that will
assist you in gradually
restrengthening your
pelvic oor
Advice For First Time Users
If this is your rst time using a STIM device, you
may be a bit apprehensive; that’s totally normal.
The Kegel8® Ultra 20 has been designed with the
utmost attention to quality and comfort. Simply
read this handy guide completely and follow the
instructions for proper use, and you will have a
positive experience.
If at any moment during your use of the Kegel8®
Ultra 20 you have a question or concern, we are
happy to assist you. You can reach one of our
advisors by visiting our website www.kegel8.co.uk/
contactus.
Pelvic Floor

Warnings and Safety
Precautions
Before you begin using the Kegel8® Ultra 20, make
sure to completely read the following information
to ensure safe and proper use of your device.
General Warnings
• Use the Kegel8® Ultra 20 only as directed.
• Keep the device out of reach of children.
• Do not immerse this device in water or any other
liquid or expose it to rain or moisture.
• Do not use the Kegel8® Ultra 20 on any part of
your body above your pelvis without guidance
from a qualied physician.
• If you are uncertain about how to properly
use this device, contact one of our dedicated
advisors at the following link: www.kegel8.co.uk/
contactus.
• Only use a 9v battery to power your Kegel8® Ultra
20. Avoid using Ni-cad rechargeable batteries.
• Although this device can be used independently,
it’s advised to use the Kegel8® Ultra 20 under the
supervision of a physiotherapist or continence
advisor if possible.

Hygiene
• Never share probes or electrodes with other
people. These items are for personal use by a
single person only.
• Always clean probes thoroughly aer every use
and store them away dry.
• Before applying electrode pads, make sure
skin is clean and free from any oils, lotions or
moisturisers.

Quick Start Guide
This section of your user manual is meant to be a
go-to reference to help you with setting up your
Kegel8® Ultra 20 device and getting comfortable
with using it. We suggest reading through the
entire manual at least once before moving forward
with the following instructions.
Kegel8® Ultra 20 Checklist
Your package should contain the following items:
• 1 x Kegel8® Ultra 20 device (A)
• 1 x Kegel8® Ultra 20 Probe (B)
• 1 x 9 Volt Battery (C)
• 2 x Kegel8® Ultra 20 Lead Wires (D)
• 4 x Kegel8® Ultra 20 Electrode Pads (E)
• 1 x Kegel8® Ultra 20 User Manual
(A)
(B)
(C)
(D)
(E)

Setting Up and Using Your
Kegel8® Ultra 20
1. Insert the 9 Volt Battery -
Remove the back cover of the
Kegel8® Ultra 20. Take one 9-volt
battery (one has been included
with your device.) Insert the
battery into the device, and replace
the back cover.
2. Prepare Your Probe - Wash
your probe in warm, soapy
water (body safe/intimate soap)
Then rinse and dry thoroughly.
Alternatively, you could clean your
probe with a gentle antibacterial
cleanser like our own Kegel8®
Klean Cleaning Spray.
3. Connect the Probe to the
Kegel8® Ultra 20 Device - Insert the
lead wire into Channel A at the top
le of the Kegel8® Ultra 20 device
and connect your probe to the lead
wire connectors. Turn On Your
Kegel8® Ultra 20 - Press the on/o
button once to turn on your device.

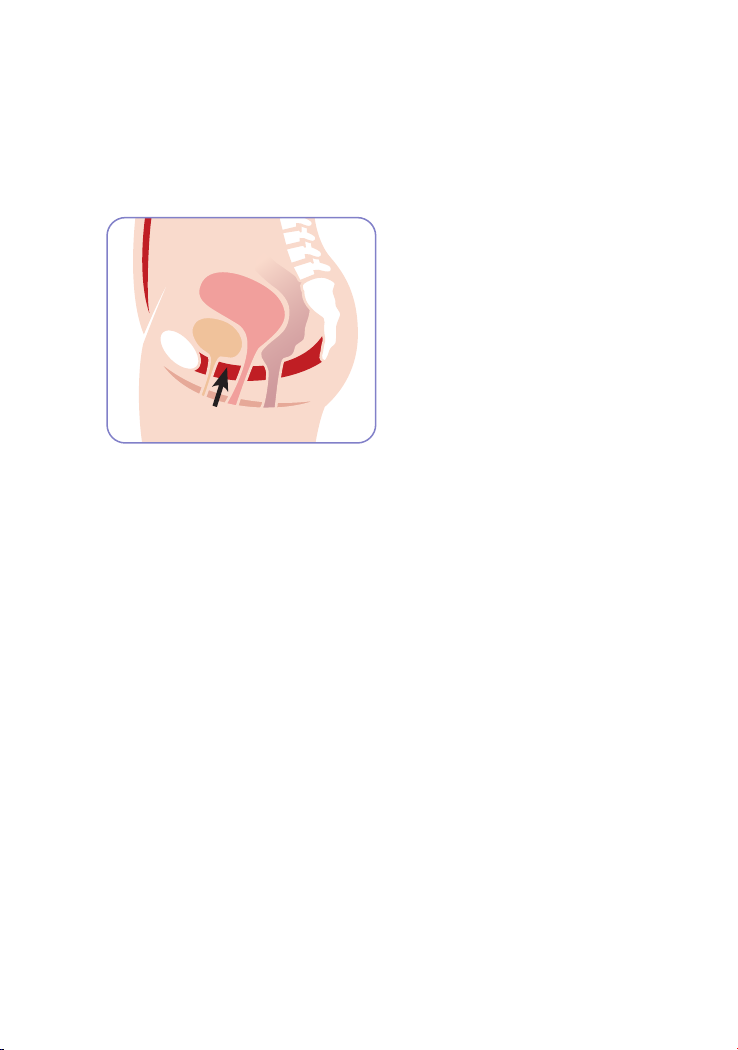
4. Insert Your Probe - Apply
a small amount of Kegel8
Conductivity Gel, on the metal parts
of the probe. Insert the probe into
your vagina, with the metal sides
facing “hip-to-hip”. Avoid placing
the probe too deeply, the tip should
be inserted no further than 2 inches
(5.5 cm) into your vagina.
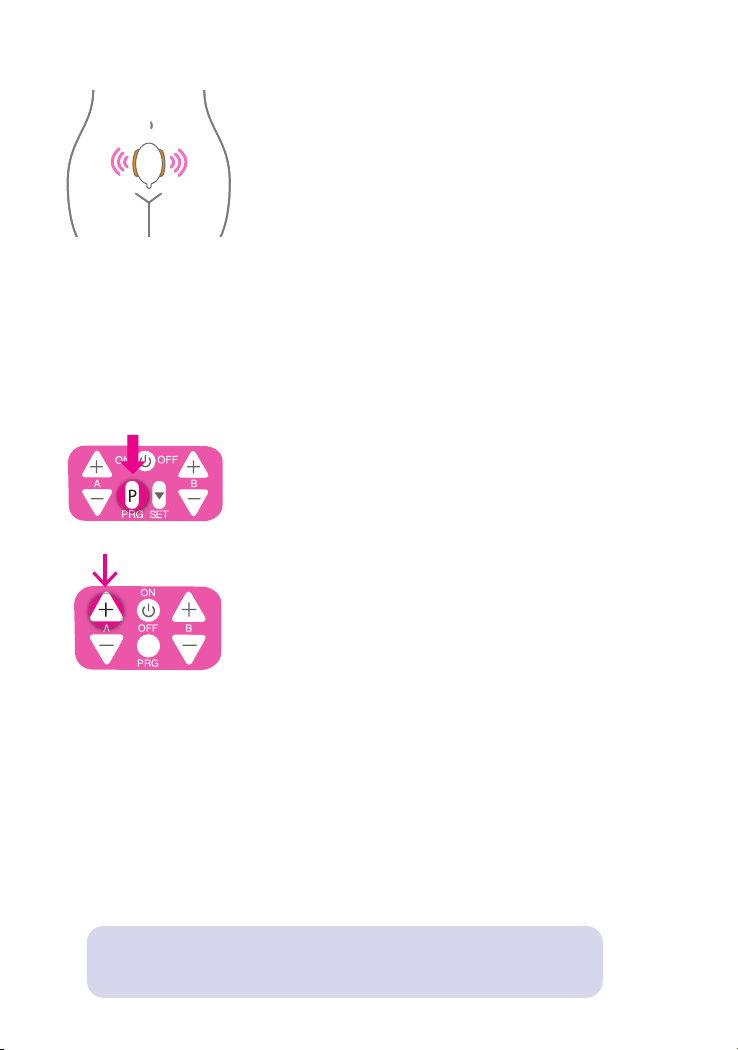
5. Select a Programme - Choose an
exercise programme by pressing the
PRG button until the screen shows
the programme you wish to use.
6. To proceed with a selected
programme, press the A+ button
to increase the current intensity
(displayed as mA = milliamps). If
the sensation is too strong, you
can decrease it by pushing the
A- button. The amount of current
needed to stimulate pelvic oor muscles varies
from person to person. Starting from 0 mAs, you
should increase the mA power to a level where
you can feel the eects of the electrical pulse
without it causing any discomfort.
TIP: To pause a programme, press the P button.
When you’re ready to continue press the + button

For a sensation test or a neuromodulation
programme you only need to feel a strong but
comfortable sensation. For a muscle exercise
programme you can gradually increase until
you feel the muscles contract and relax with the
electrical cycles. The sensation should never be
painful. Some programmes have dierent phases.
So if you feel a decrease in intensity as the phase
changes, just use the + button to increase the mAs
back up to a comfortable level.
TIP: For rst time users, start with P01 - Sensation Test 1.
This will ensure that you are able to feel the current safely.
If you cannot feel the current, perform P01 at 50mA once a
day for 4 weeks before progressing onto P02.
Cleaning and Storage
Aer use, clean your probe with warm water,
optionally spray on an antibacterial spray, and then
wipe dry. With the lead wires still attached, store
your probe with the Kegel8®
Ultra 20 in the convenient
carrying case which came
with your unit.
Cleaning Spray

Using the Electrode Pads
The electrode pads that came
with your device can be used
for a variety of kegel8® Ultra
20 programmes. The diagram
shows options for where you
can place the electrode pads.
When using 2 pads (alone or with an internal
electrode), simply connect a lead wire to a pair of
electrode pads and insert the other end of the lead
wire into Channel B at the top right of your device.
Use Channel B controls to change the intensity of
the current through the pads. If you are using skin
electrodes you will not need to turn up the current
very far to feel a sensation.
When using 4 pads, use 2 lead wires, with one
in Channel A and one in Channel B. Use the
corresponding controls to turn up the intensity of
the current through each pair of pads individually.
They do not have to be the same intensity. Please
do not go above 15mA when using electrode pads.

8. Vaginal Looseness and
Lack of Sensation
Vaginal looseness and lack of vaginal sensation
are usually closely linked. Women don’t have that
many nerve endings inside the vagina. Women
feel “pressure” and “deep touch” more than light
sensations. The sexual pleasure women experience
comes from the rubbing and build-up of friction
against the vaginal walls.
The vaginal walls at the base and the sides are
layered with the pelvic oor muscles. These
muscles need to have good tone and rmness to
8. Vaginal Looseness and Lack of Sensation

make the space feel tight and
close to your partner, for the
pleasure nerve endings to get
activated and for you to be able
to grip your partner (for more
pleasure for both of you).
A STIM device can be used to both exercise the
pelvic oor muscles (to help them grow thicker
and stronger) and bring more blood ow to the
area to improve nerve sensitivity and general
awareness.
In this routine, we alternate between settings,
rst using a programme to make the muscle bres
repeatedly contract and release to encourage the
muscle bres to grow. The machine targets both
the quick and slow muscle bres, just like you need
to do when you practise kegel exercises without a
machine.Join in with some of these contractions
to teach your brain how to work the muscles when
you are not connected.
On another setting there is no contraction of the
muscles, but the stimulation triggers nerve activity
and increased blood ow - this is a good time to
relax and “tune in” to the sensations that you can
receive from the vagina area and become more
body aware again.
8. Vaginal Looseness and Lack of Sensation

8. Vaginal Looseness and Lack of Sensation
Preparation
IMPORTANT: Before proceeding with this
condition exercise, make certain to run built-in
programmes P01 and P02. These are sensitivity
tests to help you determine if it’s safe for you to
move forward with the following exercise. (see
page 19 - 20).
If during the test you notice a problem with
sensation, do not proceed. Instead, arrange a visit
with your doctor or physiotherapist.
• If no problem, proceed to week 1.
• If worried that there is a problem with sensation,
arrange an appointment with your GP or a
specialist physiotherapist
Prog.
No.
Screen
Codes
Programme Name Time
(mins)
Page
P01 RCV1 Sensation Test 1 30 19
P02 RCV2 Sensation Test 2 60 20
TIP: For the rst week of your routine, increase the
mA until you feel a slight tingling sensation. Aer
this, increase your mA’s 1-2 levels every 1-2 weeks.
If it becomes uncomfortable, lower it again.

8. Vaginal Looseness and Lack of Sensation
First Month
Goal: “Find and Feel” your pelvic oor
muscles
Week 1: Use P06
This 20-minute muscle exercise programme
features long recovery rests between muscle
contractions.
• Allow the sensations to come and go in cycles of
stimulation and rest periods. Aim to learn where
your pelvic oor muscles are.
• Get used to nding a comfortable mA setting.
• Use only alternate days as you get used to the
probe.
Week 2: Use P06
If week 1 has been comfortable, use your
stimulation device daily for 6 days, then have a rest
day.
• Take an extra “rest” day if at all uncomfortable or
irritable internally.
• If your internal tissues are tender or easily
irritated, continue an alternate day pattern.
1
2
3
4
1
2
3
4
1
2
3
4

8. Vaginal Looseness and Lack of Sensation
Week 3 - 4: Alternate days with P06 & P19
Now help your brain to copy the machine work
by intermittently “joining in” with some of the
stimulation cycles.
• Try to work your pelvic oor muscles with your
mind, drawing in and up when you feel the
stimulation.
• Don’t worry if you can only join in for the rst few
seconds. Let the machine do the rest of the work.
P19
Relax as the low-frequency stimulation brings
blood ow to the area.
• Take time to notice the sensations sent to your
brain from this area. You may nd that you “get
used” to the sensations aer 5-10 minutes and can
turn the mA up a little higher.
• Aim for a strong but comfortable sensation. This
programme lasts 60 minutes, but just 20 minutes
is adequate to boost blood ow.
1
2
3 4

8. Vaginal Looseness and Lack of Sensation
123 4
1
2
3
4
Second Month
Week 1 - 4: Use P10
This is a little shorter overall programme, but
time to work yourself a little harder in phase 2 by
joining in with the machine more and shorter rests
between contractions to encourage your muscles to
keep growing.
Phase 1: First enjoy 10 minutes of continuous
low-frequency current to improve awareness of
the muscle position, blood ow, nerve sensitivity.
Relax in this phase.
Phase 2: 30 minutes medium frequency current
to stimulate the fast and slow pelvic oor muscle
bres by contracting for 5 seconds then relaxing
for 5 seconds in cycles.
• Join in with some of these contractions, trying to
contract for the full 5 seconds.
• Join in for 1 minute, then let the machine do the
work for 1 minute or count joining in for 6 cycles,
then letting the machine do 6 cycles.
• Use 6 days out of 7 (or alternate days if your
internal tissues are sensitive).

8. Vaginal Looseness and Lack of Sensation
Third month
Goal: Develop more pelvic oor skills
Week 1 - 4: Use P11
This month join in with some of the contractions in
both phases.
Phase 1: Focus on the back area of the pelvic oor
(as if stopping wind). Practise this for 10 minutes.
Phase 2: 30 minutes - When you join in try to use
ALL of the muscle, the back area, the front around
the bladder tube and even the side walls!
P19
Finish your sessions with 10-20 minutes relaxing
with the circulation programme.
123 4
1
2
3
4

8. Vaginal Looseness and Lack of Sensation
Symptom review
Maintenance or seek more help?
How are you getting on? Compare how you feel
now to how you felt in Week 1. Are some problems
and worries gone? What’s still bothering you?
Not making the progress you hoped? Reach out to
one of our advisors by visiting our website:
www.kegel8.co.uk/contactus
Doing well - fantastic - move on to the maintenance
programme!
Maintenance
Maintain your results!
Use P05: Weekly maintenance.
A mix of frequencies to maintain fast and slow
twitch muscle bres.
Phase 1: 15 minutes.
Phase 2: 30 minutes.
Feeling stressed or disconnected?
Choose P19 to relax and refocus on sensations.

Programme Descriptions
Sensitivity Testing
P01 - Sensation Test 1 Use this programme to test
that you can feel the current safely.
Use the + button on the same side as you are plugged
in to the machine to turn up the current (measured
in mA). If you can feel a sensation (usually a warm
tickling) from the internal probe below 50mA
progress to the second sensation test P02.
If you cannot feel a tickling sensation below 50mA
it can be a sign of nerve damage or diculty
conducting messages. This is quite common aer
childbirth or surgery.
Use P01 as your treatment programme, to help the
nerves recover, at 50mA (or less), once a day for 4
weeks before progressing onto P02. If you cannot
feel sensation returning aer 1 month of use please
consult a medical professional for advice.
P02 - Sensation Test 2 This second test introduces
new frequencies. If you can feel a sensation from
the internal probe below 50mA, progress to one of
the Kegel8 treatment programmes (P03-P20).
If you cannot feel a sensation below 50mA it can be

a sign of nerve damage. Use P02 at 50mA once a day
for a further 4 weeks.
If you do not feel sensation returning contact your
doctor or physiotherapist for advice.
Pelvic Floor Exercises
P03 - Pelvic Floor Muscle Exercises 1 is a 45-minute
muscle exercise programme. Use to improve your
awareness of how your muscles contract and relax.
You will feel a short (6 second) muscle contraction
then a long recovery rest before the next muscle
contraction.
P04 - Pelvic Floor Muscle Exercises 2 is a 30-minute
muscle exercise programme similar to P03. Use
to improve your muscle endurance with a longer
contraction time (8 seconds).
P04 changes through 4 phases, moving between
lower and medium frequencies.
P05 - Pelvic Floor Muscle Exercises 3 is a 45-minute
muscle exercise programme ideal for a weekly
maintenance session. The work/rest cycles are
shorter so you will do many contraction cycles. 2
phases of lower and medium frequencies.

Intimate Sensation
P06 - Sensation Improvement is a shorter 20-minute
muscle exercise session of high frequency electrical
current. Use to improve sensory awareness and
create strong pelvic oor muscle contractions.
P07 - Pelvic Floor Muscle Exercises 4 is a long, one-
hour, muscle exercise programme. Use to improve
endurance once muscles are stronger and only if
they do not fatigue easily. You will feel repeated
short muscle contraction cycles (5 seconds contract,
5 seconds relax).
P08 - Sensory Modulation (TENS) is a one-hour
nerve-calming neuromodulation programme to
calm oversensitive nerves. There are 2 phases. The
rst 45-minute phase of low frequency continuous
current, also known as TENS, will improve blood
ow to the pelvic oor muscles and has a soothing
eect on nerves. You can apply this current using
an internal probe or with electrode pads on your
lower back or ankle. You do not need to feel the
muscle contracting, aim to relax completely. If
using the internal probe, you can complete the full
programme by continuing on to phase 2, for 15
minutes of high frequency stimulation in a work/
rest pattern to exercise your pelvic oor muscles.
Other manuals for Ultra 20
1
Table of contents
Popular Personal Care Product manuals by other brands

Delfin
Delfin SkinFibroMeter user manual

EWA Asia
EWA Asia Caldera Hot Stone Heater Instructions for use

Madeli
Madeli Slique IM-ZE2430-00 Specifications, Installation and User’s Guide

ResMed
ResMed Swift LT user guide

Franke
Franke 7612210051746 Mounting instruction and Manual

ProMed
ProMed 5040-SX2 Instruction leaflet