KegLand RAPT Pill User manual

RAPT Pill Hydrometer & Thermometer Quick Start Guide
Page 2of 18 www.KegLand.com.au Last Updated 6/05/2022 16:49 PM
Contents
WARNINGS ...................................................................................................................................3
LED Indicators ...............................................................................................................................5
Registering your Device...............................................................................................................6
1. Sign up for a RAPT account ......................................................................................................6
2. Connect your smart phone or tablet to the RAPT Pills Wi-Fi Network......................................6
3. Open the RAPT Pill Captive Portal ............................................................................................6
4. Connect the RAPT Pill to your home Wi-Fi network .................................................................6
5. Register your RAPT Pill to your account on the RAPT Cloud .....................................................7
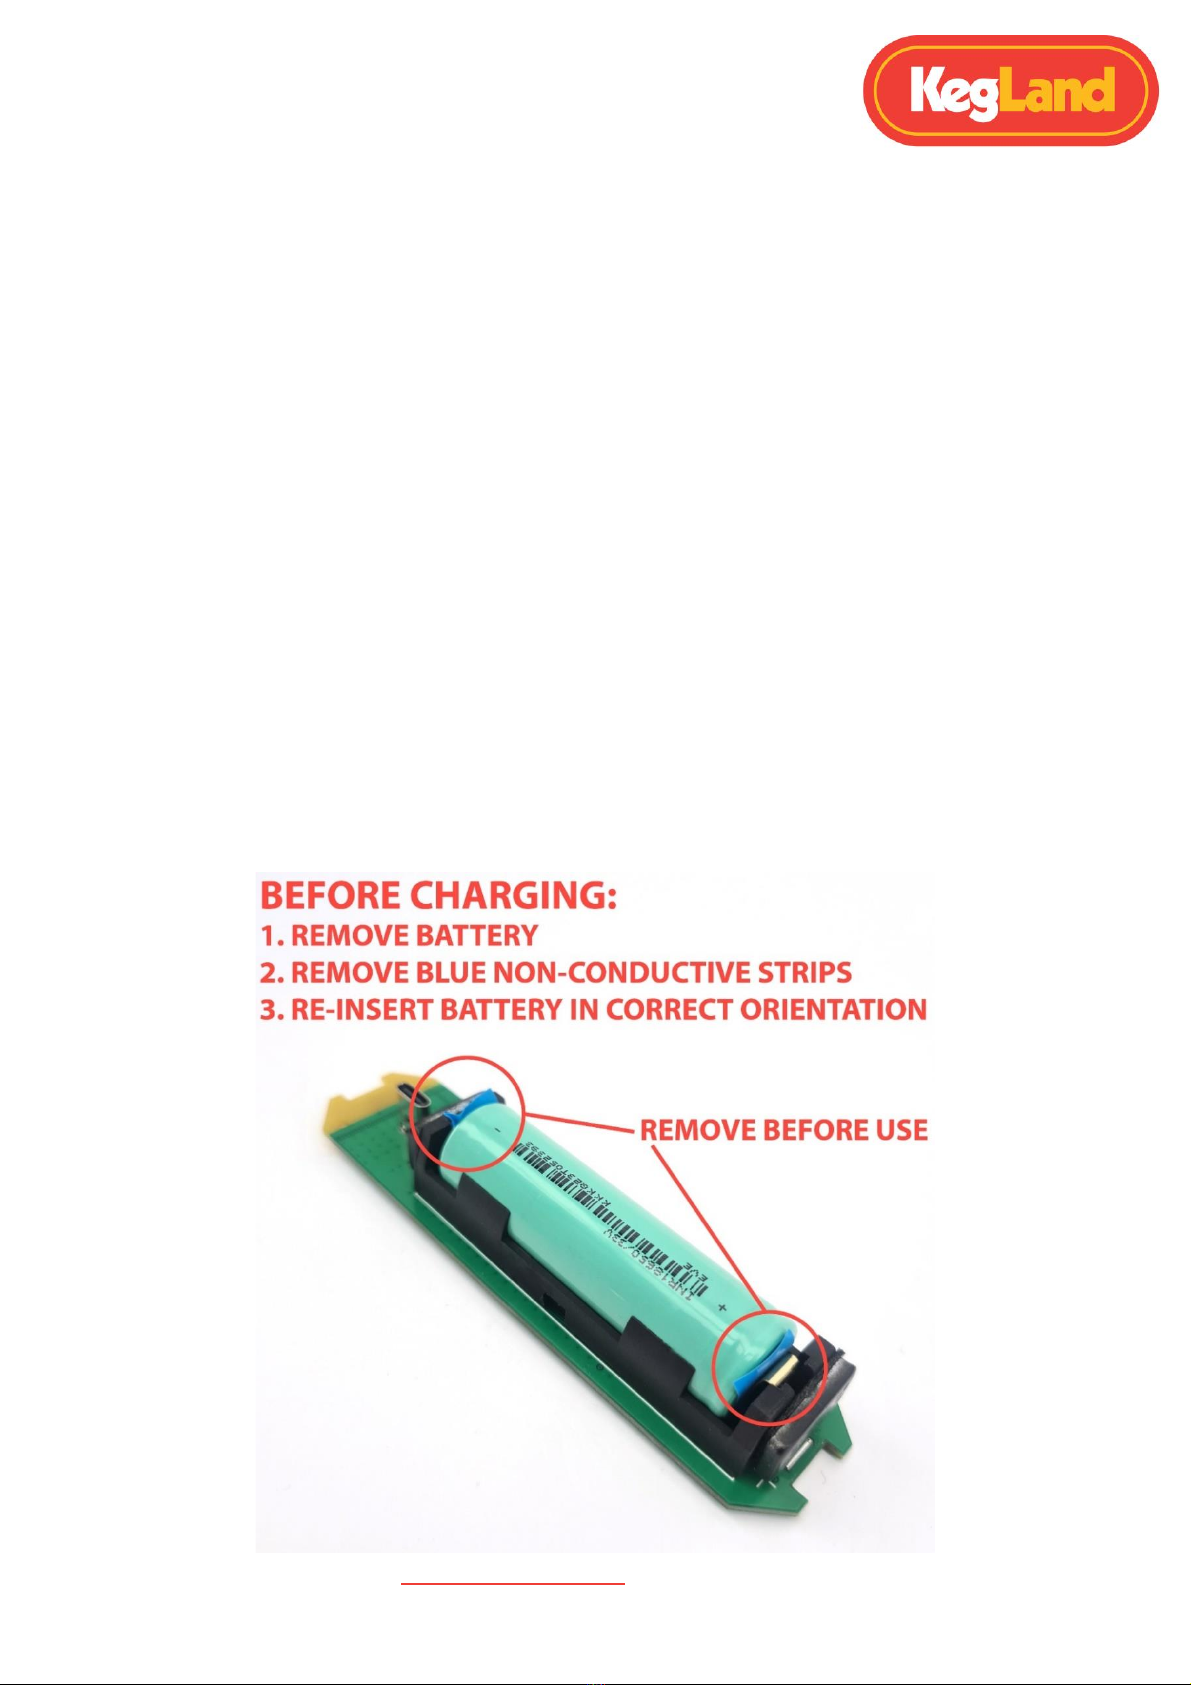
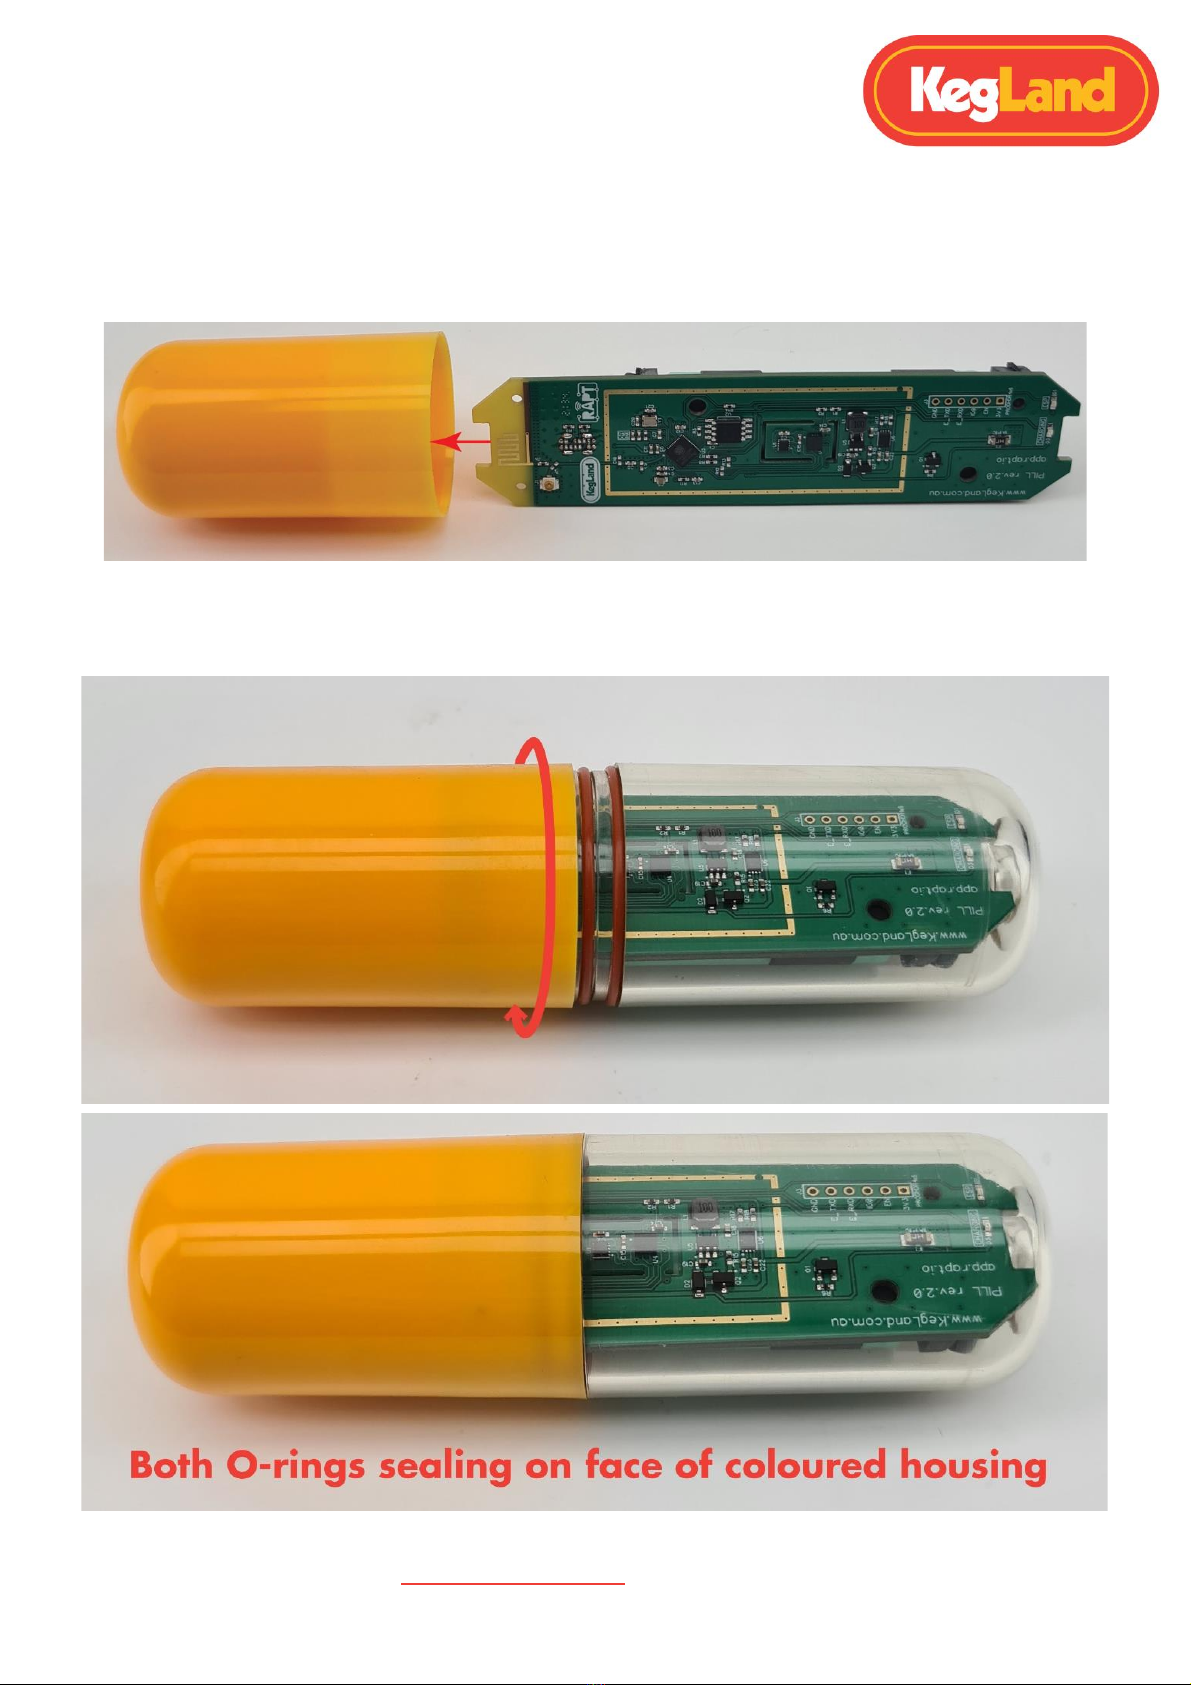
Assembly Instructions...................................................................................................................8
Operation Instructions.................................................................................................................9
Sleep Mode ...................................................................................................................................9
Calibration...................................................................................................................................10
1: Standard Calibration ..............................................................................................................11
2: Advanced Calibration.............................................................................................................11
3: Custom Calibration ................................................................................................................12
Updating Firmware ....................................................................................................................14
Trouble-shooting Registration and Telemetry........................................................................15
Green light is not illuminating when RAPT Pill plugged in to USB-C............................................15
Red (battery) light flashes rapidly when plugged in to USB-C.....................................................15
Lights turn off immediately when disconnected from USB-C .....................................................15
Battery level reads 0%/not displaying in the RAPT Portal...........................................................15
The lights on the Pill stop flashing shortly after it is unplugged..................................................15
There are no lights on the Pill when unplugged .........................................................................15
Cannot access the Pill Captive Portal .........................................................................................15
User code is not appearing on the Pill Captive Portal.................................................................15
No telemetry is being displayed on the RAPT Portal. .................................................................15
The Pill has been sending telemetry but is no longer sending telemetry ...................................17
Warranty (Australia) & Support ................................................................................................18

RAPT Pill Hydrometer & Thermometer Quick Start Guide
Page 3of 18 www.KegLand.com.au Last Updated 6/05/2022 16:49 PM
WARNINGS
•Fully Charge the Li-ion battery after installation before first time use by plugging a USB-C
cable into the USB-C charging port on the circuit board until the RED charging LED turns
off. This allows the device to calibrate and correctly determine the remaining battery
charge.
•Incorrect battery orientation can damage the circuit board.
•Always leak test your RAPT Pill by submerging in water prior to sanitising and dropping in
your fermenter
•Only use KegLand approved cleaners such as StellarOxy and StellarClean and sanitisers
such as StellarSan or Phosphoric Acid.
Battery Installation
The battery will come pre-installed in the RAPT Pill with a non-conductive strip on each terminal to
prevent the device from being activated during transit. Before plugging the device into power, you
will need to remove the battery and remove the two non-conductive strips from the terminals. Then
reinstall the battery making sure you follow the (+) and (-) inscriptions on the battery and battery
housing to ensure you install the battery in the correct orientation.
Important: make sure you install the battery in the correct orientation. Incorrect battery
orientation can result in damage to the circuit board. This will not be covered by warranty.

RAPT Pill Hydrometer & Thermometer Quick Start Guide
Page 4of 18 www.KegLand.com.au Last Updated 6/05/2022 16:49 PM
Only use KegLand approved 18650 rechargeable Lithium-ion batteries (KL26734). If non-approved
batteries are used the device will require calibration.
Once installed ensure your battery has good contact with the terminals. After installing the battery
rotate it slightly within the battery holder to ensure it has good contact.
Important: Once you have installed the Li-ion battery in the correct orientation FULLY charge the
battery before first time use by plugging a USB-C Cable into the USB-C Charging port on the circuit
board. (USB-C cable NOT included). The RED charging LED will turn off when the RAPT PILL is fully
charged and plugged into USB-C.

RAPT Pill Hydrometer & Thermometer Quick Start Guide
Page 5of 18 www.KegLand.com.au Last Updated 6/05/2022 16:49 PM
LED Indicators
The RAPT Pill features two onboard LEDs
CHARGING LED (RED):
•Solid Red when plugged into USB type-C - Charging
•Light Off when plugged into USB type-C –Fully Charged
ESP LED (GREEN):
•Slow Green Flashes –flashes when the captive portal is enabled
and the Pill is searching for a Wi-Fi network. This will happen
when the Pill is plugged in to USB-C the first time
•Medium Green Flashes (roughly 2 per second) –The Pill is connected to Wi-Fi and active
(plugged in via USB-C)
•Fast Green Flashes –Movement detected while active (plugged in via USB-C)
•Solid Green –when the device is awake and submitting telemetry (typically on for 20-30
seconds)

RAPT Pill Hydrometer & Thermometer Quick Start Guide
Page 6of 18 www.KegLand.com.au Last Updated 6/05/2022 16:49 PM
Registering your Device
1. Sign up for a RAPT account
To utilise the Wi-Fi connectivity of the RAPT Pill you will need to sign up for an account on the RAPT
portal. This will allow you to track and monitor your specific gravity and fermentation temperature
in real time.
1. Sign up for an account on the RAPT portal.
2. Once signed up log in to your account on the RAPT portal.
2. Connect your smart phone or tablet to the RAPT Pills Wi-Fi Network
2. Plug your Rapt Pill into a charger or computer with a USB-C cable (not included).
3. On your smart phone or tablet, open your Wi-Fi settings and connect to the "RAPT Pill XXXX"
Wi-Fi network using the password "kegland1".
3. Open the RAPT Pill Captive Portal
1. Once you have connected your smart phone or tablet to your RAPT Pills Wi-Fi network you
will need to open the RAPT Pill Captive Portal.
2. Your smart phone or tablet should provide a prompt to sign into the network of your RAPT
Pill when you connect to its Wi-Fi Network. Clicking on this prompt will open the RAPT Pill
Captive Portal.
If you are not prompted to sign into the network of your RAPT Pill by your smart phone or
tablet then open your Wi-Fi settings and select the “RAPT Pill XXXX” Wi-Fi network again to
open the Pill Captive Portal.
TIP: Once you have opened the RAPT Pill Captive Portal navigate to Diagnostics and write
down the IP (AP). This is the IP address of your RAPT Pill and can be input into your web
browser to quickly connect the RAPT Pill Captive Portal when plugged into power.
Once you have connected to your RAPT Pill’s Wi-Fi network and opened the Pill Captive Portal you
will still need to connect your RAPT Pill to your home Wi-Fi network and register the device to your
RAPT account before the RAPT Pill will send any telemetry.
4. Connect the RAPT Pill to your home Wi-Fi network
1. Select your home Wi-Fi network in the RAPT Pill captive portal, enter your Wi-Fi password
and select Join. This will connect your Pill to your Wi-Fi network.
NOTE: The RAPT Pill cannot connect to 5GHz networks so if you have a dual band router
make sure you are connecting to the 2.4GHz network.
2. Once you have joined, click on the Registration link to see your MAC address and User
Code. Write both of these down or copy them on your device. You will need to enter the
MAC address and User Code to register your Pill on your RAPT account.

RAPT Pill Hydrometer & Thermometer Quick Start Guide
Page 7of 18 www.KegLand.com.au Last Updated 6/05/2022 16:49 PM
5. Register your RAPT Pill to your account on the RAPT Cloud
1. Ensure your RAPT Pill is connected to your Wi-Fi (above). Note –if you click on your Wi-Fi
network, you can note the IP address of the Pill. This can be used to access the Pill AP in a
browser.
2. Ensure you are logged in to the RAPT Portal (https://app.rapt.io) on a second device that is
connected to the same home Wi-Fi network as the Pill you are registering.
3. In the RAPT Portal select Add New Device. Select RAPT Pill (Digital Hydrometer) from the
drop down. Select Next and enter the MAC address and User Code (Validation Code) when
prompted in the required fields, then select Next.
4. Congratulations! Your RAPT Pill is connected to Wi-Fi and registered to your RAPT Portal.

RAPT Pill Hydrometer & Thermometer Quick Start Guide
Page 8of 18 www.KegLand.com.au Last Updated 6/05/2022 16:49 PM
Assembly Instructions
When installing the circuit board into the housing it is important to insert the circuit board in the
correct orientation to ensure the correct weight distribution for accurate readings. The yellow end of
the circuit board should be inserted into the yellow housing as shown below.
Once the circuit board has been inserted into the yellow housing, screw the two housings together
hand-tight until both o-rings are hidden to ensure formation of a hermetic seal.

RAPT Pill Hydrometer & Thermometer Quick Start Guide
Page 9of 18 www.KegLand.com.au Last Updated 6/05/2022 16:49 PM
Operation Instructions
After charging, assembly and device registration your RAPT Pill should be calibrated before use.
Refer to the Calibration section for instructions on how to calibrate your device.
1. Calibrate and then assemble your RAPT Pill. After calibration confirm your RAPT Pill is
correctly sending telemetry to the RAPT Portal by leaving it in a jug of water or sugar
solution for an hour and checking to see if telemetry has been received by the RAPT Portal.
It is best to conduct this test in the position where the Pill will be located during
fermentation such as if you are fermenting in a fermentation chamber place the Pill in a jug
in the fermentation chamber to confirm that telemetry is received and your RAPT Pill has
good signal strength.
2. Once it is confirmed that your RAPT Pill is sending telemetry then sanitise your RAPT Pill with
an approved sanitiser such as StellarSan or Phosphoric Acid which has been correctly diluted
according to the instructions on the sanitiser’s container.
3. Drop your RAPT Pill into your fermenter to monitor the specific gravity and temperature of
your brew in real time.
Sleep Mode
The RAPT Pill will enter sleep mode when the device is in a horizontal orientation. It will
automatically wake up when its orientation is changed indicated by the illumination of a green light
on the circuit board.
When not in use ensure the RAPT Pill is in a horizontal orientation to ensure it remains asleep.

RAPT Pill Hydrometer & Thermometer Quick Start Guide
Page 10 of 18 www.KegLand.com.au Last Updated 6/05/2022 16:49 PM
Calibration
Calibration before first use is strongly encouraged for best results.
1. Plug your Rapt Pill into a charger or computer with a USB-C cable (not included).
2. On your smart phone or tablet, open your Wi-Fi settings and connect to the "RAPT Pill XXX"
access point (AP) using the password "kegland1". You may not need to enter the password if
you have previously connected your device to the Pill’s Wi-Fi.
3. Open the Pill Captive Portal when prompted to sign into the network of your RAPT Pill by
your smart phone or tablet.
If you are not prompted to sign into the network of your RAPT Pill by your smart phone or
tablet then open your Wi-Fi settings and select the “RAPT Pill XXXX” Wi-Fi network again to
open the Pill Captive Portal.
3. Once the RAPT Pill Access Portal is open on your phone or tablet, navigate to the Calibration
tab.
4. Select the desired calibration method (Standard, Advanced or Custom) and follow the
relevant steps.
IMPORTANT: The RAPT Pill is designed to disconnect from the RAPT Portal once the USB-C cable is
unplugged to preserve battery life. Opening the Calibration or Diagnostics screen will keep the Pill
Portal active to allow calibration of the Pill. You will be prompted after to 10 minutes to “Click
Here To Maintain Connection”if the calibration process takes longer than 10 minutes.
Once you have entered a Calibration mode, please assemble your Pill according to the directions so
that it can be removed from the USB and calibrated according to the instructions below.
There are three ways to calibrate your RAPT Pill: Standard Calibration, Advanced Calibration and
Custom Calibration.

RAPT Pill Hydrometer & Thermometer Quick Start Guide
Page 11 of 18 www.KegLand.com.au Last Updated 6/05/2022 16:49 PM
1: Standard Calibration
The Standard calibration mode is recommended for most users.
Standard calibration is the quickest and simplest method of calibration.
1. Fill a container of sufficient volume to hold the RAPT Pill in suspension with a liquid of
known gravity. It is simplest and easiest to use water which has a gravity of 1.000.
2. Once the angle reading has stabilised* enter the gravity (1.000 for water) and press
Calibrate. Wait until the screen indicates that calibration is complete.
Your Pill is now ready to use!
* The angle will never be completely steady, as it is extremely sensitive. Press Calibrate when the
RAPT Pill has stabilised as much as possible.
2: Advanced Calibration
The advanced calibration mode can give greater accuracy across a wider range.
Advanced calibration is also quite quick and easy, and can provide a more accurate result than
Standard Calibration. It is the same procedure as standard calibration, but in addition to water at
1.000, have a solution of a known gravity prepared.
We recommend using a gravity in the range that your fermentation will start –1.040-1.060 for
typical beers, for example.
1. Fill a container of sufficient volume to hold it in suspension with a liquid of known gravity. It
is simplest and easiest to use water which has a gravity of 1.000.
2. Prepare another vessel capable of holding the Pill in suspension with a solution of known
gravity in the range representative of the upper limit of your starting gravities.
3. Place the Pill in the weaker solution. Once the angle reading has stabilised enter the gravity
(1.000 for water) and hit Calibrate. Wait until the screen indicates that calibration is
complete.
4. Place the Pill in the stronger solution. Enter the gravity as determined by a calibrated
hydrometer. Once the angle reading has stabilised press Calibrate. Wait until the screen
indicates that calibration is complete.

RAPT Pill Hydrometer & Thermometer Quick Start Guide
Page 12 of 18 www.KegLand.com.au Last Updated 6/05/2022 16:49 PM
3: Custom Calibration
Warning! Custom Calibration is for advanced users only.
This mode can provide the most accurate readings across a wider range than the other calibration
modes.
Only proceed if you are comfortable with spreadsheets and complex curves. If you are working with
solutions with gravities higher than 1.080, then custom calibration is advised.
For advanced calibration, you will need to take readings at various gravity points roughly 10 gravity
points apart, and make a note of the angle of the Pill at each point. We recommend readings from
1.080 down to 1.000, 10 points apart (so, 1.080, 1.070, 1.060 etc). Note that it does not matter if the
gravity readings are not exactly 10 points apart, as long as the gravity reading is correct. Use of a
hydrometer that is known to be accurate is quite important.
To perform Custom Calibration, it is easiest to start with the strongest solution and dilute to
progressively weaken the solution. It is important to use a calibrated hydrometer to ensure accurate
gravity readings.
1. Place the Pill in the first solution of known gravity. Wait for the angle to stabilise, then make
a note of the angle and the gravity.
2. Repeat this step for solutions of different gravity, making a note of the angle and the gravity
at each step. It is easiest to dilute the starting solution in steps of approximately 10 points.
Finish with a reading in a solution with a gravity of 1.000 (IE water).
Once you have sufficient readings, the angle and the gravity need to be entered on an Excel
spreadsheet (or similar such as Google Sheets) as a graph with gravity on the ‘y’ axis and angle on
the ‘x’ axis. The more readings you take, the more accurate this calibration will be. We recommend a
minimum of 6 samples, with 10 or more providing a greater degree of accuracy.
When you have created the graph, create a polynomial trend line onto the graph with the degree of
the polynomial being at least one less than the number of data points. If the trend line creates an
irregular curve (such as not passing through the data point at 1.000 correctly or not following a
polynomial shape) reduce the number of data points (ensuring that there are still more data points
than the degree of the polynomial) until the curve matches.
With 10 data points, a polynomial degree between 5 and 8 will typically give the best results.

RAPT Pill Hydrometer & Thermometer Quick Start Guide
Page 13 of 18 www.KegLand.com.au Last Updated 6/05/2022 16:49 PM
This is a sample only
Copy the equation of the trend line that is generated once this is done.
Paste this equation into the field provided on the Custom Calibration screen (In Google Sheets, set
your label to Use Equation).
This will look similar to this:
y = 0.0000023109x5- 0.0005741632x4+ 0.0568746764x3- 2.8119846525x2+
71.1087310405x + 265.6578215178
This is a sample only –DO NOT USE THIS EQUATION AS IT WILL NOT BE ACCURATE
Substitute x in this equation with “*angle^” thus:
y = 0.0000023109*angle^5- 0.0005741632*angle^4+ 0.0568746764*angle^3-
2.8119846525*angle^2+ 71.1087310405*angle + 265.6578215178
This is a sample only –DO NOT USE THIS EQUATION AS IT WILL NOT BE ACCURATE
Paste this equation into the field in your Custom Calibration to complete the calibration.
Congratulations! Your Pill is calibrated and ready to go.

RAPT Pill Hydrometer & Thermometer Quick Start Guide
Page 14 of 18 www.KegLand.com.au Last Updated 6/05/2022 16:49 PM
Updating Firmware
Your RAPT Pill will automatically check and install for firmware updates when plugged in to USB
power with a USB-C cable (not supplied).
To check the firmware on your Pill, plug the Pill in with a USB-C cable then open the Pill Access Portal
by connecting to the Access Point on your phone or tablet or through the Pill IP address.
1. Plug your Pill in to USB power with a USB-C cable.
2. Connect to the Pill Access Portal with your phone or tablet or through the Pill IP address.
3. Navigate to the Diagnostics page.
4. Check that your Pill is running the latest firmware.
5. If a firmware update is available, this will be updated automatically when the Pill is plugged
in to USB with a USB-C cable (not supplied).
6. To check and update manually in the event that this is not up to date, press the DO OTA
UPDATE button. Your device will automatically download and update the most current
available firmware.

RAPT Pill Hydrometer & Thermometer Quick Start Guide
Page 15 of 18 www.KegLand.com.au Last Updated 6/05/2022 16:49 PM
Trouble-shooting Registration and Telemetry
Green light is not illuminating when RAPT Pill plugged in to USB-C
This occurs if the battery is below a minimum charge level. Please leave the Pill connected for 30
minutes to gain sufficient charge, then unplug and reconnect.
Red (battery) light flashes rapidly when plugged in to USB-C
Please install the battery or check that it is making good contact with the terminals.
Lights turn off immediately when disconnected from USB-C
Please check the charge level of the battery –it may be insufficient to power the Pill. The battery
may be faulty, or not making good connection to the terminals. A fully charged battery has around
4.2V –this can be tested with a multimeter. If the battery has a good charge level, gently bend the
terminals out in order to ensure there is good contact with the battery.
Battery level reads 0%/not displaying in the RAPT Portal
The battery needs to reach a full charge when installed in the Pill and connected via USB-C. If the Pill
has not determined the fully charged state then it will not display the correct percentage. This will
normally rectify itself after the Pill is used and then fully recharged.
The lights on the Pill stop flashing shortly after it is unplugged
This is normal behaviour. There is an approximately 10 minute timeout after the Pill is unplugged.
There are no lights on the Pill when unplugged
This is normal. The Pill will be ‘asleep; by default and will wake briefly at the set interval to send
telemetry. The green light will flash briefly when this happens.
Cannot access the Pill Captive Portal
This can only be accessed when the Pill is plugged in to USB-C. Access to the portal will cease after
10 minutes and the Pill will enter a sleep state. Unplugging and reconnecting to USB-C will allow it to
be reconnected.
User code is not appearing on the Pill Captive Portal
If the space for the user/validation code on the Pill Captive Portal is blank then make sure that your
RAPT Pill is connected to your home Wi-Fi network (See Determine whether your RAPT Pill is
connected to Wi-Fi below).
No telemetry is being displayed on the RAPT Portal.
The default setting for telemetry is 60 minutes. As a result, you will not see telemetry in the RAPT
Portal right away. Should the telemetry data not appear after 60 has passed you should check the
following:
Determine whether your RAPT Pill is connected to Wi-Fi
If your RAPT Pill is not connected to your home Wi-Fi network it will be unable to send telemetry to
the RAPT Portal.
To check this, plug your RAPT Pill in to power and open the RAPT Pill Captive Portal and Navigate to
Wi-Fi. Check that it shows that the RAPT Pill is connected to your home Wi-Fi network.

RAPT Pill Hydrometer & Thermometer Quick Start Guide
Page 16 of 18 www.KegLand.com.au Last Updated 6/05/2022 16:49 PM
You can also check by navigating to Diagnostics and checking that it shows your networks IP address
next to IP (STA).
To connect your RAPT Pill to your home Wi-Fi network, see Connecting the RAPT Pill to your Home
Wi-Fi Network
Check the signal strength
If your RAPT Pill is connected to your home Wi-Fi network and there is no telemetry being received
check that your RAPT Pill has a good signal strength in the area/vessel/chamber you are fermenting
in.
To check the signal strength, log in to the RAPT Portal and click on the information symbol below
your RAPT Pill on the dashboard.
Signal strength is represented on a scale of 0 to -100dbm
Signal Strength (dBm)
What it means
0 to -30dBm
Maximum signal
-50dBm
Excellent signal
-67dBm
Good, reliable signal
-70dBm
Ok, not a strong signal
-80dBM
Poor, unreliable signal
-90dBM
Unusable
Re-Register Your RAPT Pill
If your RAPT Pill is still not sending telemetry despite being connected to Wi-Fi and with a good,
reliable signal strength then you may need to re-register your RAPT Pill to your account. To re-
register your RAPT Pill do not delete the device from the RAPT Portal, instead follow the steps
below:
1. Connect the Pill via USB-C cable. Open the Pill Captive Portal on your smart phone or tablet.
(See Opening the RAPT Pill Captive Portal).
2. Go to the Registration tab in your Pill Captive Portal.
3. Click the Clear Registration button, and wait a couple of seconds for a new User Code to be
generated.
4. In a separate device, open and sign in to the RAPT Portal (https://app.rapt.io).
5. Click on the Edit button of the RAPT Pill that you wish to re-register.
6. Go to the Troubleshooting tab.
7. Click the Reset Device Authentication button.

RAPT Pill Hydrometer & Thermometer Quick Start Guide
Page 17 of 18 www.KegLand.com.au Last Updated 6/05/2022 16:49 PM
8. When prompted, enter the new user/validation code that was generated and click Save.
Your RAPT Pill should now be registered successfully.
The Pill has been sending telemetry but is no longer sending telemetry
This can occur for a number of reasons.
•Check that the Pill is within range of the Wi-Fi router.
•The battery may have dropped below a safe operating level –the Pill will enter a ‘deep
sleep’ mode in order to protect the battery.
•There may have been an interruption to the network or internet.
•The battery may be slightly loose in the terminals causing an inconsistent power state.
•There may be a Wi-Fi connectivity issue caused by unusual network setups or network
security settings.
•If there is battery and temperature data, but not gravity data, this indicates incorrect
calibration or the current gravity is out of range.
If you are unable to sign up for an account or your RAPT portal displays an error please forward as
many visual pieces of supporting information and a detailed description of the error to

RAPT Pill Hydrometer & Thermometer Quick Start Guide
Page 18 of 18 www.KegLand.com.au Last Updated 6/05/2022 16:49 PM
Warranty (Australia) & Support
Please join the Facebook RAPT Users Group for support on how to use your RAPT Pill &
Thermometer or the RAPT Portal.
If you need hardware support, please contact your nearest distributor.
The RAPT Pill & Thermometer comes with a 12-month warranty when sold in Australia. To lodge a
warranty claim in Australia please forward as many visual pieces of supporting information and a
detailed description of your issue to
If you purchased your unit from an international distributor, you will be required to go through their
warranty claims process.
For a full terms and condition please visit our website here -> Terms & Conditions
Other manuals for RAPT Pill
1
This manual suits for next models
1
Table of contents
Other KegLand Thermometer manuals