Kemot URZ3226 User manual

Proiector
URZ3226 (20W)
URZ3228 (30W)
RO
LED Flutlicht DE
Reektor LED PL
LED oodlight EN


3
Owner’s manual
EN
1) Floodlight body
2) Front Surround
3) Mounting Bracket
4) Wiring Box
5) Fixing Screw & Plastic Wall Plug (Not supplied)
INTRODUCTION
LED FLOODLIGHT 230V-50HZ, IP65, 20W, 30W is designed
for normal use of outdoor or indoor use, which can be used in
gardens, park, lawns.

Owner’s manual
4
EN
Please note to connect xtures, cable H05RN-F 3x1mm2 is
applied. The xtures require power supply 230V, 50HZ and the
power should accord to the loading properly. The light is LED
source inside the xtures.
Application: decorative lighting at gardens, parks, lawns.
Note: Read this entire manual before you start to install the
system.
SAFETY PRECAUTIONS
• Do not install when it is raining.
• Be sure to switch off power source before installing.
• Make sure that the power wiring comes from circuit with a suit-
able fuse or circuit breaker.
• Keep minimum 1m away from the lighted objects for 20W 30W
LED oodlight.
• Keep minimum 30cm away from the ceiling and wall. (g. 1)
Fig. 1

5
Owner’s manual
EN
The unit can be installed only horizontally (see the g. 2).
Fig. 2
IMPORTANT
Some local building codes may require installation of this product
by a qualied electrician.
Check your local codes as they apply to your situation. If the
house wiring is of aluminum, Consult with an electrician about
proper wiring methods.
Before proceeding with the installation, TURN OFF THE POWER
TO THE LIGHTING CIRCUIT AT THE CIRCUIT BREAKER OR
FUSE BOX TO AVOID ELECTRICAL SHOCK.

Owner’s manual
6
EN
CHOOSING A MOUNTING LOCATION
• For outdoor installation, a location under eaves is
Preferable.
• Do not allow sunlight to fall directly on the front of unit.
• Try to avoid pointing the unit at trees or shrubs or
Where the motion of pets may be detected.
• Cables must be connected due to the instructions and the regu-
lations in force. It is recommended that the installation be carried
out by a qualied electrician.
INSTALLATION
To facilitate installation, it is essential to get a drill and a screw-
driver ready. Select a location for the unit based on the coverage
angles shown in (g. 3).
Fig. 3
side view
top view
unit (m)
COVERAGE ANGLES

7
Owner’s manual
EN
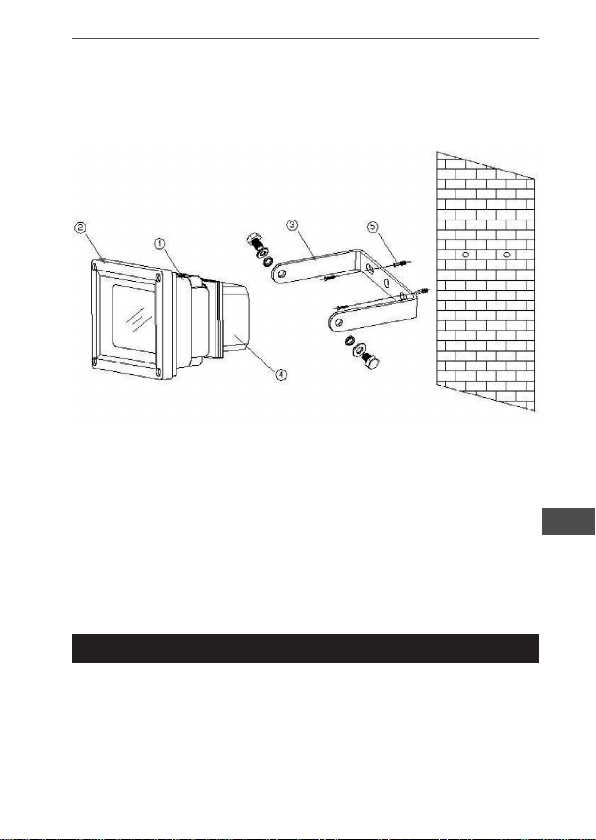
(1) Switch off the power source.
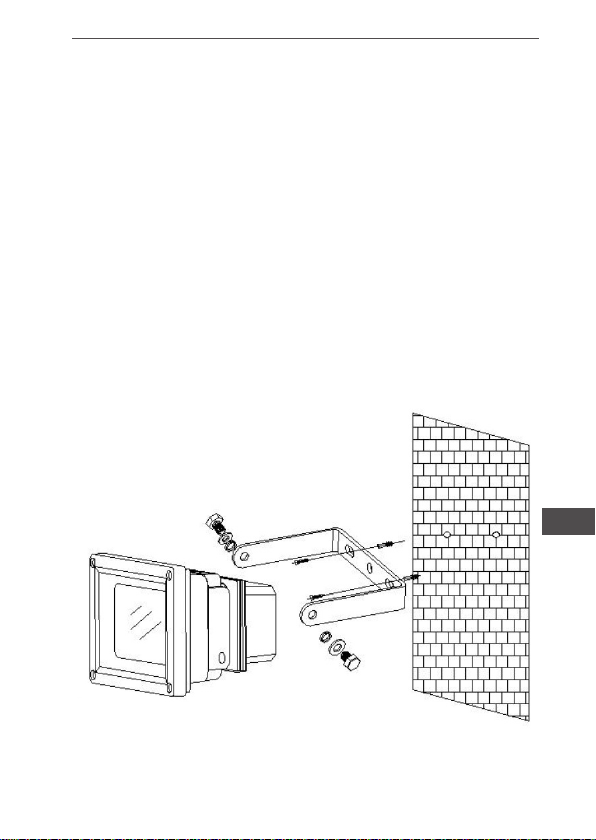
(2) Remove the mounting bracket from the Led oodlight.
Drill the wall and screw the bracket onto the wall using suitable
plastic wall plugs and screws. Check that the bracket is securely
tted on the wall.
Note: Do not at this stage re-attach the oodlight to the bracket.
(3) Connect the power cords:
• green-yellow - grounding
• red - L
• green - N
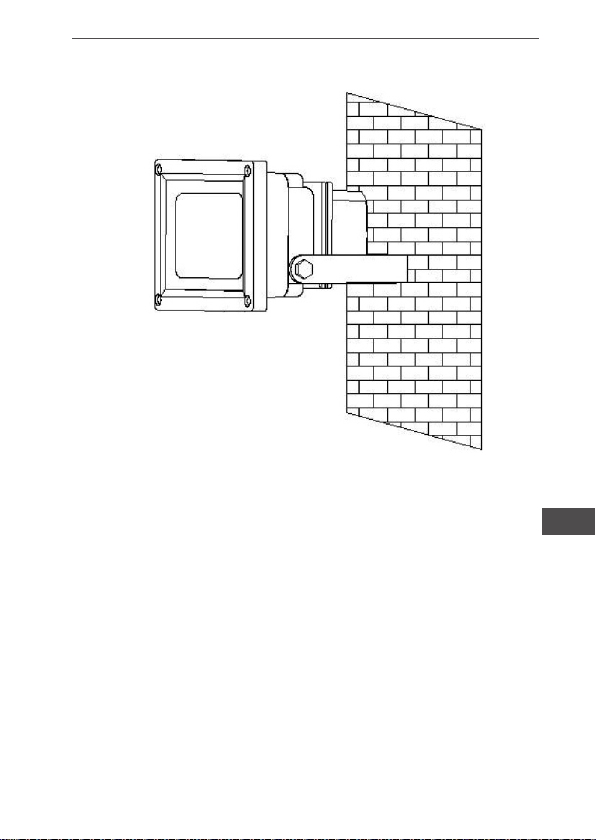
(4) Re-attach the oodlight to the bracket and secure the cable to
the wall using suitable clips. Ensure that the cable is not touching
the body of the oodlight, and that there is sufcient slack in the
cable to allow the oodlight to be tilted and adjusted as required,
which should be done by grasping the metal body of the oodli-
ght, not its rear wiring box (g. 4).
Fig. 4

Owner’s manual
8
EN
Light does not turn on
• Conrm that you have made a correct wiring connection.
• Make sure that led bulb have not burned out.
• Check if the fuse has not burned out.
Light remains on
• Make sure the wiring connection is correct.
Others
• The specication of protective shield shall consult to local servi-
ce agent.
Specications are subject to change without notice.
TROUBLESHOOTING

9
Owner’s manual
EN
SPECIFICATION
Power Requirement AC 220 ~ 240V / 50Hz
Power Cord Requirement H05RN-F, 3G, 1.0mm2
Lighting Power/Luminous Flux 20W/1500Lm, 30W/2250Lm
Work Temperature -400C to 500C
Protection Class Class I
Protection Degree IP65
Average Life 30000hrs
Safety CE

Instrukcja obsługi
10
PL
1) Korpus reektora
2) Obudowa
3) Uchwyt montażowy
4) Puszka przewodów zasilających
5) Śruby i kołki mocujące (nie dołączone do zestawu)
WPROWADZENIE
Dziękujemy za zakup reektora LED. W zależności od zakupio-
nej wersji posiada on moc: 20W, 30W napięcie 230V-50Hz oraz
stopień ochrony urządzenia IP65. Reektor idealnie nadaje się
do użytku wewnętrznego jak i zewnętrznego (oświetlenie domu,
parku, podwórka itp.).

11
Instrukcja obsługi
PL
Urządzenie wymaga zasilania 230V, 50Hz i musi być podłączone
za pomocą kabla o średnicy minimum 3x1mm2 H05RN-F. Źró-
dłem światła jest dioda LED.
Uwaga: Przed instalacją i uruchomieniem urządzenia należy
dokładnie przeczytać niniejszą instrukcję obsługi.
BEZPIECZEŃSTWO
• Nie należy instalować urządzenia podczas opadów deszczu.
• Przed rozpoczęciem instalacji należy upewnić się, że urządze-
nie jest odłączone od źródła prądu.
• Kable zasilające powinny być poprzedzone odpowiednim bez-
piecznikiem lub wyłącznikiem.
• Należy zachować odległość minimum 1m od innych źródeł
światła.
• Należy zachować odległość minimum 30cm od sutu lub ściany
poprzecznej (rys. 1)
Rys. 1

Instrukcja obsługi
12
PL
Urządzenie może być zainstalowane wyłącznie w pozycji pozio-
mej (rys. 2).
Rys. 2
UWAGA
Niektóre lokalne przepisy budowlane mogą wymagać instalacji
tego produktu przez wykwalikowanego elektryka.
Należy również sprawdzić inne lokalne przepisy mogące mieć
zastosowanie podczas instalacji urządzenia.
Przed rozpoczęciem instalacji ODŁĄCZ KABLE ZASILAJĄCE
OD ŹRÓDŁA ZASILANIA ABY UNIKNĄĆ RYZYKA PORAŻENIA
PRĄDEM ELEKTRYCZNYM.

13
Instrukcja obsługi
PL
WYBÓR MIEJSCA INSTALACJI
• Reektor należy przymocować do stabilnej powierzchni.
• Przy instalacji na zewnątrz, preferowane jest miejsce pod zada-
szeniem.
• Należy zabezpieczyć reektor przed bezpośrednim padaniem
promieni słonecznych na przednią część urządzenia.
• Upewnij się, że kable zasilające są poprawnie zabezpieczone.
Instalacje elektryczna powinna być wykonana przez uprawnione-
go elektryka.
INSTALACJA
Do zainstalowania reektora potrzebna będzie wiertarka i śrubo-
kręt. W pierwszej kolejności wybierz miejsce instalacji urządzenia
zgodnie z żądanym polem pokrycia (rys. 3).
Rys. 3
widok z boku
widok z góry
jednostka (m)
OBSZAR POKRYCIA

Instrukcja obsługi
14
PL
(1) Odłącz przewody zasilające od źródła zasilania.
(2) Odczep uchwyt montażowy od reektora.
Przyłóż uchwyt do ściany i zaznacz miejsca wiercenia otworów.
Wywierć otwory i zamocuj uchwyt za pomocą śrub i kołków roz-
porowych (nie dołączone do zestawu). Sprawdź, czy chwyt jest
zamocowany stabilnie.
Uwaga: Nie przymocowuj jeszcze reektora do uchwytu.
(3) Podłącz przewody zasilające:
• żółto-zielony - uziemienie (ochronny)
• czerwony - L (faza)
• zielony - N (neutralny)
(4) Przymocuj reektor do uchwytu i upewnij się, że całość trzyma
się stabilnie (patrz rys. 4).
Fig. 4

15
Instrukcja obsługi
PL
Reektor nie świeci
• Sprawdź czy urządzenie jest podłączone do zasilania (sprawdź
przewody zasilające).
• Sprawdź czy dioda LED nie jest spalona.
• Sprawdź czy bezpiecznik nie jest spalony.
Reektor się nie wyłącza
• Sprawdź czy urządzenie jest podłączone do zasilania (sprawdź
przewody zasilające).
Inne
• Skontaktuj się z serwisem urządzenia.
Specykacja urządzenia może ulec zmianie bez powiadomienia.
ROZWIĄZYWANIE PROBLEMÓW

Instrukcja obsługi
16
PL
SPECYFIKACJA
Zasilanie AC 220 ~ 240V / 50Hz
Przewód zasilający H05RN-F, 3G, 1.0mm2
Moc / Strumień świetlny 20W/1500Lm, 30W/2250Lm
Temperatura pracy -400C ~ 500C
Klasa ochrony Klasa I
Stopień ochrony IP65
Żywotność 30000 godzin
Certykaty CE

17
Manual de utilizare
RO
1) Cadru proiector
2) Cadru frontal
3) Suport de xare
4) Cutie conexiuni
5) Surub de xare & dibluri plastic (nu sunt furnizate impreuna cu
senzorul).
INTRODUCERE
Proiectorul 230V-50Hz, grad protectie IP65, cu putere de 20W,
30W este proiectat pentru utilizare normala in exterior sau interior,
putand utilizat in gradini, parcuri,peluze, etc.

Manual de utilizare
18
RO
Nu uitati sa conectati dispozitivele de xare iar pentru alimentarea
la reteaua de 230V, 50Hz folositi cablu tip H05RN-F 3x1mm².
LED-ul reprezinta sursa de lumina din interiorul dispozitivelor de
xare. Utilizare: lumina decorativa in gradini, parcuri, peluze.
Nota : Cititi intregul manual inainte de a incepe sa instalati
sistemul.
INFORMATII PRIVIND SIGURANTA
• Nu instalati proiectorul pe timp de ploaie.
• Asigurati-va ca ati oprit sursa de alimentare inainte de instalare.
• Vericati cablurile de alimentare care trebuie sa provina de la
circuit cu un disjunctor mic extern nu mai mare de 16A pentru
protectie la scurtcircuit (sau o siguranta potrivita).
• Pastrati o distanta de minim 1m fata de obiectele luminate de
Proiectorul LED de 20W, 30W.
• Pastrati o distanta de minim 30cm fata de plafon si perete. (vezi
g. 1)
Fig. 1

19
Manual de utilizare
RO
• Aparatul poate instalat doar orizontal (vezi g. 2).
Fig. 2
IMPORTANT
Unele reglementari locale necesita ca instalarea acestui produs
sa e facuta de catre un electrician calicat.
Vericati reglementarile locale care s-ar putea potrivi situatiei
dumneavoastra. Daca racordarea casei la retea este de aluminiu,
consultati un electrician in legatura cu metodele potrivite de
montare.
Inainte de a merge mai departe cu instalarea, OPRITI CIR-
CUITUL LUMINII LA DISJUNCTORUL CIRCUITULUI SAU IN
CUTIA CU SIGURANTE PENTRU A EVITA APARITIA UNUI SOC
ELECTRIC.

Manual de utilizare
20
RO
ALEGEREA UNUI LOC DE MONTARE
• Pentru instalare in exterior, proiectorul trebuie amplasat de
preferinta sub stresini.
• Nu permiteti ca razele de soare sa cada direct pe partea din fata
a dispozitivului.
• Incercati sa evitati indreptarea dispozitivului spre copaci sau
arbusti sau spre locurile unde miscarea animalelor de casa poate
detectata.
• Cablurile trebuie conectate conform instructiunilor si reglemen-
tarilor in vigoare. Se recomanda ca instalarea sa e efectuata de
catre un electrician calicat.
INSTALARE
Pentru a facilita instalarea, este esential sa aveti pregatite un
burghiu si o surubelnita. Alegeti o locatie pentru instalarea proiec-
torului in functie de unghiurile de acoperire indicate in g. 3.
Fig. 3
side view
top view
unit (m)
COVERAGE
ANGLES
This manual suits for next models
1
Table of contents
Languages:
Other Kemot Floodlight manuals