Kendrion Classic Line 77600 A00 Series User manual

KENDRION INDUSTRIAL BRAKES
Classic Line
Spring-applied single-disc brake
Operating Instructions 77 600..A00
Types: 77 600..A00 77 600..K00 77 600..K01
77 600..A20

Operating Instructions BA 77 600..A00 // Last updated: 13/03/2020 // Page 2 of 33
Contents
1. General information .............................................................................................................................. 3
1.1 Introduction ............................................................................................................................................ 3
1.2 Standards and directives ....................................................................................................................... 3
1.3 Declaration of Incorporation (in accordance with Annex II, part 1, Section B of Machinery Directive
2006/42/EC)........................................................................................................................................... 3
1.4 Declaration of Conformity ...................................................................................................................... 4
1.5 Manufacturer's liability ........................................................................................................................... 4
1.6 Brake versions ....................................................................................................................................... 4
2. Product description............................................................................................................................... 5
2.1 Operating principle................................................................................................................................. 5
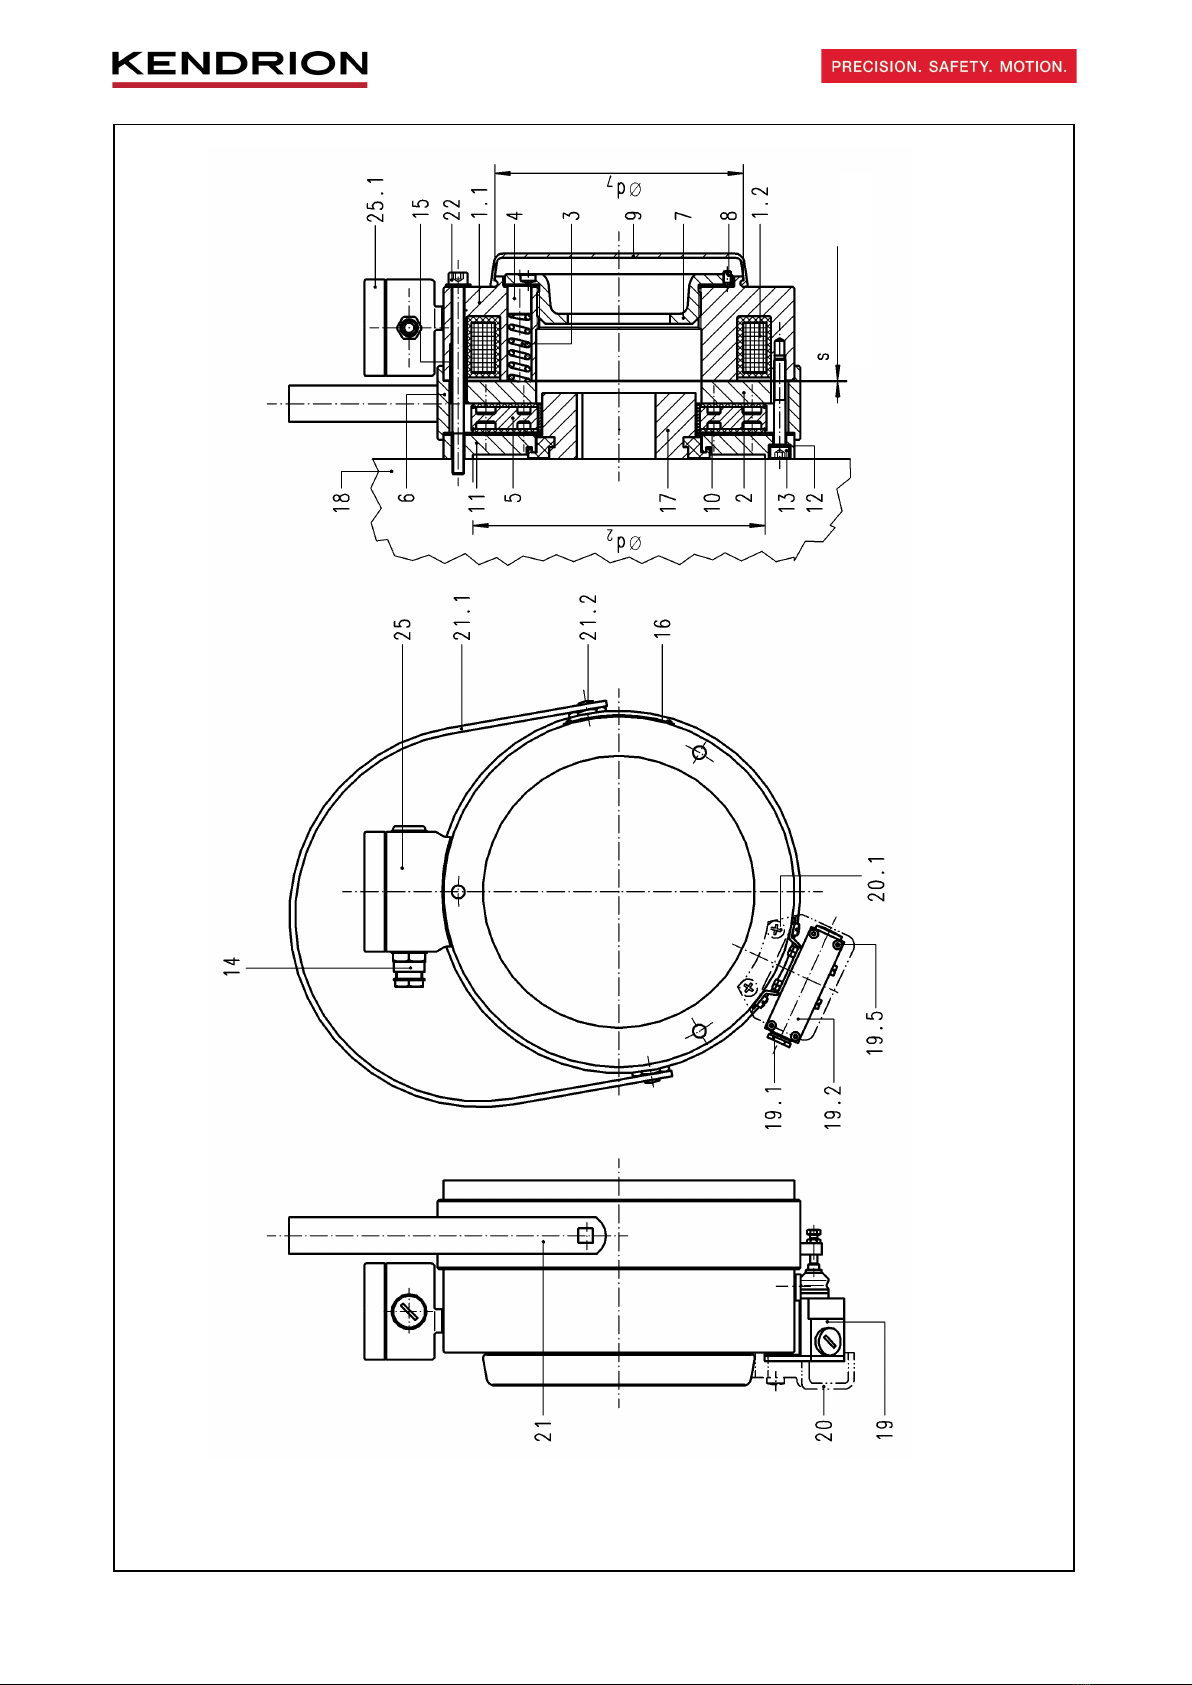
2.2 Design.................................................................................................................................................... 5
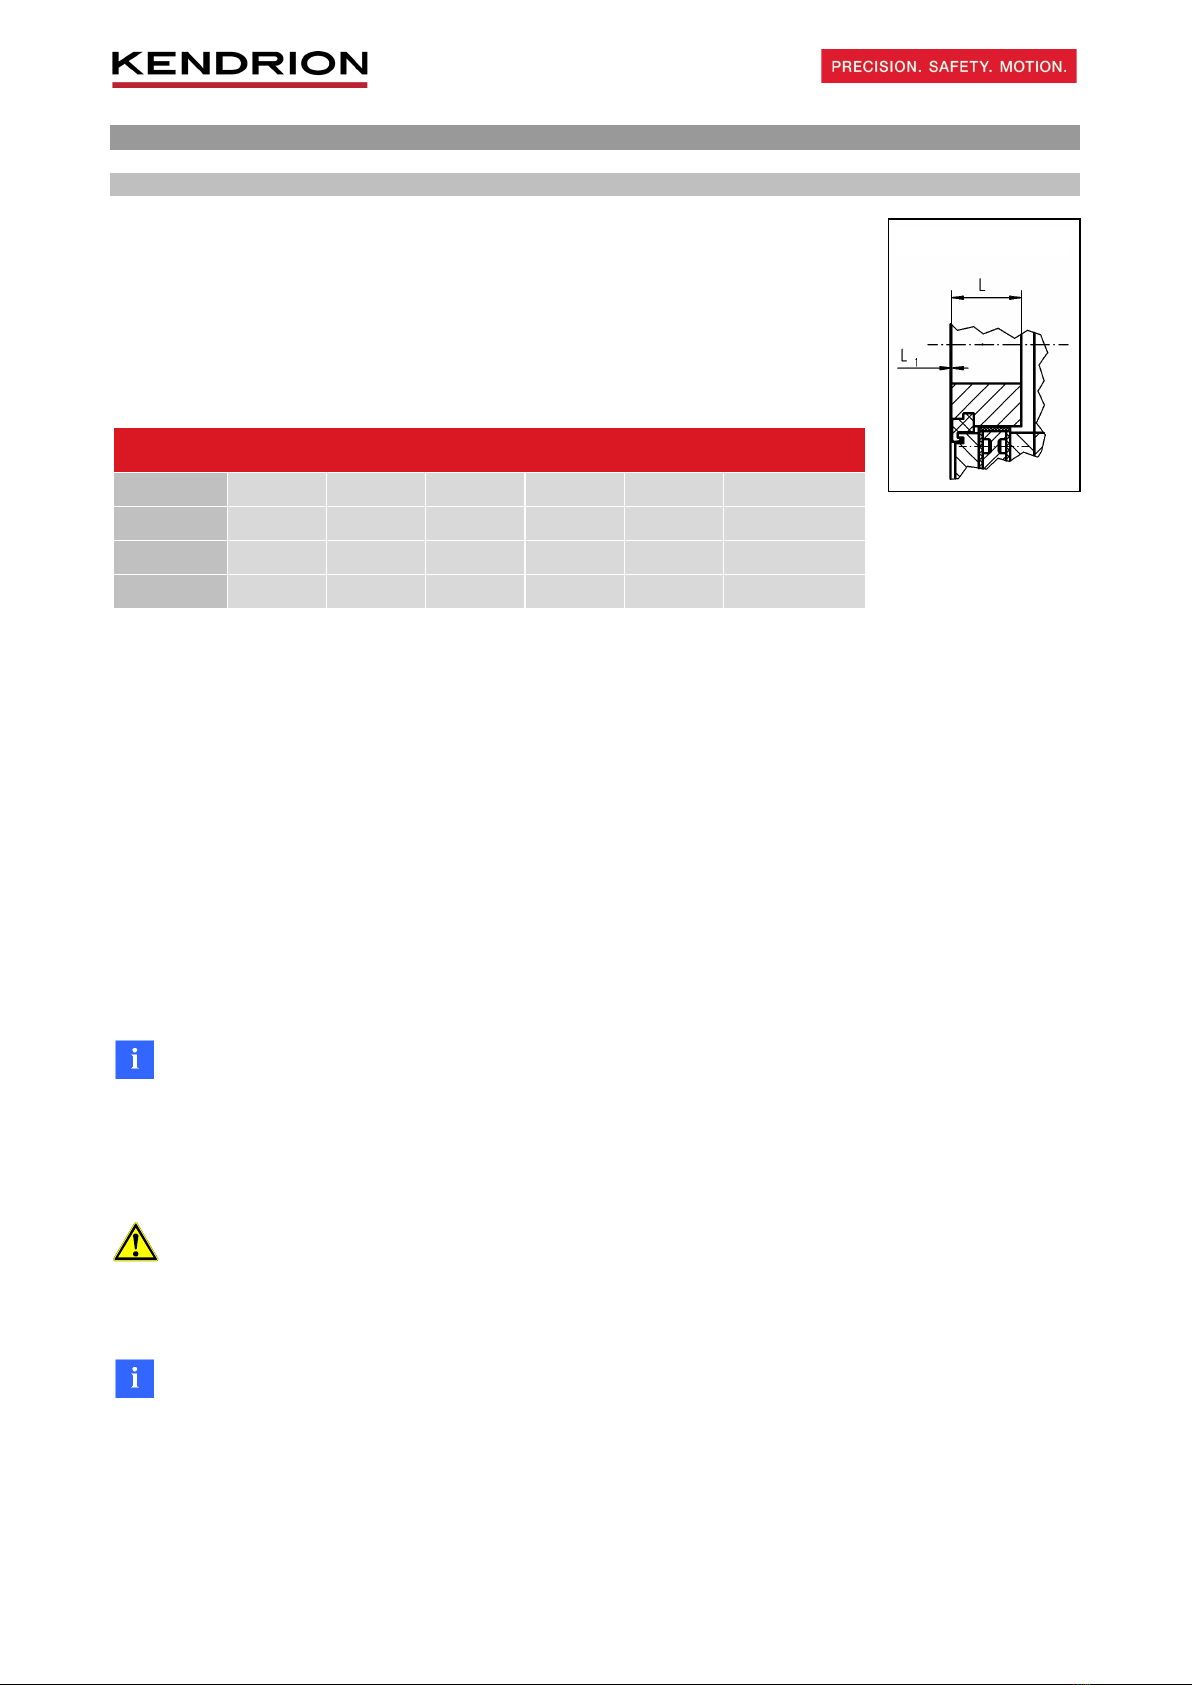
3. Installation.............................................................................................................................................. 8
3.1 Mechanical installation........................................................................................................................... 8
3.2 Installation of accessories...................................................................................................................... 9
3.3 Electrical connection and operation..................................................................................................... 10
3.3.1 DC power supply ............................................................................................................................. 11
3.3.2 AC power supply.............................................................................................................................. 11
3.3.3 Microswitch (19) connection ............................................................................................................ 13
3.4 Electromagnetic compatibility .............................................................................................................. 15
3.5 Set-up and start-up .............................................................................................................................. 18
3.5.1 Functional checks ............................................................................................................................ 18
3.5.2 Manual brake release ...................................................................................................................... 19
3.6 M2rated torque adjustments................................................................................................................ 19
4. Maintenance......................................................................................................................................... 20
4.1 Checks and service ............................................................................................................................. 20
4.2 Microswitch (19) adjustment (only applicable to brakes with microswitch (19)).................................. 21
4.3 Spare parts and accessories ............................................................................................................... 22
5. Condition at delivery........................................................................................................................... 22
6. Emissions............................................................................................................................................. 22
6.1 Noise.................................................................................................................................................... 22
6.2 Heat ..................................................................................................................................................... 23
7. Troubleshooting .................................................................................................................................. 23
8. Safety.................................................................................................................................................... 24
8.1 Intended use ........................................................................................................................................ 24
8.2 General safety information................................................................................................................... 24
8.2.1 Set-up .............................................................................................................................................. 25
8.2.2 Set-up and start-up .......................................................................................................................... 25
8.2.3 Installation........................................................................................................................................ 25
8.2.4 Operation ......................................................................................................................................... 25
8.2.5 Maintenance, repair and replacement ............................................................................................. 26
8.3 Warning symbols ................................................................................................................................. 26
9. Definitions ............................................................................................................................................ 27
10. Technical specifications..................................................................................................................... 29
11. Product number / type number / version number............................................................................ 32
12. Specialist repair shops ....................................................................................................................... 32
13. Revision history................................................................................................................................... 32
Document information:
Issued by: Kendrion (Villingen) GmbH Last updated: 13/03/2020
Replaces document: - Replaces the issue dated: 30/12/2009
Document type:translation of original German operating Document status: released
instructions BA 77 600..A00
Document title: BA 77 600..A00 Englisch

Operating Instructions BA 77 600..A00 // Last updated: 13/03/2020 // Page 3 of 33
1. General information
1.1 Introduction
These Operating Instructions describe the operating principle and features of spring-applied single-disc brake
types 77 600..A00, 77 600..A20, 77 600..K00 and 77 600..K01. The safety information provided in this manual
must be strictly observed during the set-up of the machine (e.g. motor) and during the start-up, operation and
maintenance of the spring-applied brake.
Should any queries arise with respect to torques, torque variations, installation position, wear, wear reserve,
switching work, break-in conditions, release range, ambient conditions and the like, please contact Kendrion
(Villingen) and ask for clarification before starting to use the brake. Spring-applied single-disc brakes are not
ready-to-use devices, but are intended to be incorporated into or assembled with other equipment.
Consequently, they will be referred to as components in the following sections.
1.2 Standards and directives
The state-of-the-art spring-applied brakes have been designed, built and tested in accordance with the
requirements of DIN VDE 0580 concerning electromagnetic devices and components.
Being classified as "electromagnetic components", spring-applied brakes are also subject to the Low Voltage
Directive 2014/35/EU. The user is required to employ suitable switching devices and controls to ensure use of
the brakes in accordance with EMC Directive 2014/30/EU.
1.3 Declaration of Incorporation (in accordance with Annex II, part 1, Section B of Machinery
Directive 2006/42/EC)
We hereby declare that the products below comply with the essential health and safety requirements specified
in Annex I of Machinery Directive 2006/42/EC:
Annex I General Principles and Sections 1.1.2, 1.1.3, 1.1.5, 1.3.2, 1.5.1
The partly completed machinery must not be put into service until the final machinery into which it is to be
incorporated has been declared in conformity with the provisions of Machinery Directive 2006/42/EC. The
relevant technical documentation required for the partly completed machinery has been compiled in
accordance with Annex VII, part B of Machinery Directive 2006/42/EC. The manufacturer undertakes to submit
an electronic copy of the relevant technical documentation compiled for the partly completed machinery if
reasonably requested by national authorities.
Manufacturer: Kendrion (Villingen) GmbH Person authorized Dominik Hettich
Wilhelm-Binder-Str. 4-6 to compile the Kendrion (Villingen) GmbH
78048 Villingen-Schwenningen documentation: Wilhelm-Binder-Str. 4-6
Germany 78048 Villingen-Schwenningen
Germany
Applied harmonized standards and other technical standards and regulations:
EN 60529 Enclosure protection ratings
DIN VDE 0580 Electromagnetic devices and components
Product: Electromagnetically released spring-applied single-disc brake
Types:77 600..A00 77 600..K00
77 600..A20 77 600..K01
The “..“ wildcard stands for the different brake sizes.
Kendrion (Villingen) GmbH Villingen Authorized signatory: .......................................................
13/03/2020 Dominik Hettich
(Head of Development)

Operating Instructions BA 77 600..A00 // Last updated: 13/03/2020 // Page 4 of 33
1.4 Declaration of Conformity
This Declaration of Conformity applies to products that have a CE mark on their rating plate.
We hereby declare that the products below, specifically the product versions brought into circulation, have
been designed and built in accordance with the requirements of Directives 2014/35/EU (Low Voltage Directive)
and 2011/65/EU (RoHS Directive). The products are classified as category 11 equipment subject to Directive
2011/65/EU (RoHS Directive). This declaration will cease to be valid if modifications are made to the product
without prior permission from the manufacturer.
Manufacturer: Kendrion (Villingen) GmbH Person authorized: Dominik Hettich
Wilhelm-Binder-Str. 4-6 Kendrion (Villingen) GmbH
78048 Villingen-Schwenningen Wilhelm-Binder-Str. 4-6
Germany 78048 Villingen-Schwenningen
Germany
Applied harmonized standards and other technical standards and regulations:
EN 60529 Enclosure protection ratings
DIN VDE 0580 Electromagnetic devices and components
Product: Electromagnetically released spring-applied single-disc brake
Types: 77 600..A00 77 600..K00
77 600..A20 77 600..K01
The “..“ wildcard stands for the different brake sizes.
Kendrion (Villingen) GmbH Villingen Authorized signatory: .......................................................
13/03/2020 Dominik Hettich
(Head of Development)
1.5 Manufacturer's liability
The manufacturer will not assume any responsibility for damage caused by failure to use the products in
accordance with their intended use or by failure to observe safety information and other instructions provided
in this manual. The information in this manual was correct and up-to-date before going to print. The information
contained herein shall not entitle users to raise claims with respect to components purchased at an earlier
date.
1.6 Brake versions
Typ Ausführung
77 600..A00 Basic brake component
77 600..A20 Brake component with special friction lining for enhanced switching energy Wmax and reduced rated
torque M2compared to basic brake component 77 600..A00
77 600..K00 Brake component with enhanced corrosion protection
77 600..K01 Brake component with enhanced corrosion protection and halogen-free connection cable
Tab. 4/1: Brake versions of spring-applied single-disc brakes (Classic Line).
The “..“ wildcard stands for the different brake sizes.

Operating Instructions BA 77 600..A00 // Last updated: 13/03/2020 // Page 5 of 33
2. Product description
2.1 Operating principle
The spring-applied single-disc brake is designed to operate dry. The force generated by an electromagnetic
field is utilised to overcome the braking effect produced by the spring force. The spring-applied single-disc
brake engages in unpowered condition and releases when DC voltage is applied. Brakes equipped with a built-
in rectifier (half-wave or bridge rectifier) can be connected directly to an AC power source. The form-fit
connection between the friction disc and hub and the connection of the hub with the machine shaft (e.g. motor
shaft) ensure that the torque generated by the spring-applied single-disc brake (brake torque) is reliably
transmitted to the machine (motor). The brake can also be equipped with an optional hand release to allow the
brake to be released manually.
2.2 Design
The solenoid housing (1.1) of the spring-applied single-disc brake accommodates the firmly fitted field coil
(1.2) with the connecting cable resp. at brakes with a connector box (25) whose connecting terminals are
located in the connector box (25). The solenoid housing (1.1) also includes the compression springs (3) which
press the friction disc (5) over the armature (2) against the friction plate 1) (10) and flange (11) to generate the
braking effect of the spring-applied brake. The air gap 's' is determined by the position of the intermediate ring
(6). The friction disc (5) features a square socket and can be moved on the hub (17) in axial direction. The
customer-specific connecting cable can be fed into the connector box (25) through a cable gland (14) (PG 11).
When DC voltage is applied to the field coil (1.2) of the spring-applied single-disc brake, the spring force is
overcome by the electromagnetic field force. This causes the armature (2) to be released and the braking
effect to be neutralised. The shaft to be braked is not subjected to any axial force by the brake. When using
brakes with hand release (21), openings must be provided in the part enclosing the brake (e.g. fan cover) so
that the hand release lever can be installed. The hand release (21) allows the brake to be released manually
(e.g. in case of power failure). When the brake is equipped with a microswitch (19), the microswitch prevents
any start-up of the machine (e.g. motor) before the brake has been released. Thanks to the centring diameters
on the flange and housing sides (diameters d2and d7), the spring-applied single-disc brake is ideal for
applications with mounted transmitters (e.g. tachometer generators, encoders, etc.) after the cover (9) has
been removed.
1) Size 10 to 16 brakes.

Operating Instructions BA 77 600..A00 // Last updated: 13/03/2020 // Page 6 of 33
Reference sign list to Fig. 6/1:
1.1 Solenoid housing 18 Fixing surface
1.2 Field coil 19 Microswitch
2 Armature 19.1 Cable gland
3 Compression spring 19.2 Microswitch cap
4 Stud 19.3 Locknut
5 Friction disc 19.4 Hexagon head cap screw
6 Intermediate ring 19.5 Machine screw
7 Adjusting ring 20 Protective cover
8 Set screw 20.1 Machine screws for protective cover
9 Cover hood 21 Hand release
10 Friction plate 21.1 Lever
11 Flange 21.2 Cam with threaded bush
12 Sealing ring 22 Fixing screws
13 Machine screw 23 Screw plug
14 Cable gland 25 Connector box
15 Sleeve (only size 24 brakes)s 25.1 Connector box cover
16 Rating plate 25.2 Connecting terminal or rectifier
17 Hub with labyrinth seal 25.3 Machine screw
Table 6/1: Reference sign list for spring-applied single-disc brake

Operating Instructions BA 77 600..A00 // Last updated: 13/03/2020 // Page 7 of 33
Fig. 7/1: Spring-applied single-disc brake 77 600..A..00
Rated air gap

Operating Instructions BA 77 600..A00 // Last updated: 13/03/2020 // Page 8 of 33
3. Installation
3.1 Mechanical installation
The hub (17) must be slipped onto a shaft provided with a feather key to DIN 6885,
sheet 1. The hub must be axially secured (by means of a shaft collar, circlip or the like).
Make sure that the front face of the hub (17) is at the same height as the front face of
the flange (11). The friction disc (5) must be slipped onto the hub (17) with the complete
brake assembly and centred using centring diameter d2(see Fig. 6/1 and Classic Line
specification sheet) of the flange (11). Make sure that the friction disc (5) can be easily
moved along the hub (17).
Size
10
11
13
16
19
24
L [mm] 20,5 20,5 24 26,5 30 45
L1[mm] 0-0.8 0-0.8 0-1 0-1 0-1 0-1.2
MA[Nm] 5.5 5.5 5.5 9.5 9.5 22
MAZ [Nm] 1.5 1.5 3 5 5 11
Table 8/1: Hub dimensions (17); tightening torques of fixing screws (22)
and machine screws (13)
Check that the fixing surface (18) meets the following requirements before installing the brake:
•Axial runout relative to the shaft <0.1mm (measuring radius = reference diameter)
•Surface roughness max. Rz16
•Surface hardness min. 100HB
•Material: steel, aluminium, cast iron – with excellent thermal conductivity
•Absence of oil and grease
•Permitted mismatch of centring diameter (fixing surface (18)) relative to shaft <0.2mm
The spring-applied single-disc brake must be screwed to the fixing surface (18) by tightening the fixing screws
(22) to the MAtightening torques specified in Table 8/1. The factory-adjusted rated air gap 's' cannot be
changed.
Note!
If the friction disc (5) and/or hub (13) are equipped with rubber buffers for noise reduction, the buffers must be
slightly greased before installation to reduce fitting forces during brake mounting. Check that the friction disc
(5) can be easily moved along the hub (13) by hand. The fitted components (especially the friction surfaces)
must be free from grease.
Attention!
The MAtightening torque specified for the fixing screws (22) must be strictly observed. The screws (22) must
be tightened evenly in diametrically opposite sequence.
Note!
The centring diameter d7(see Fig. 6/1) is factory-aligned relative to the centring diameter d2on the flange (11)
with a maximum 0.2mm radial runout. This enables easy attachment of a tachometer generator to the solenoid
housing (1.1).
Hub position

Operating Instructions BA 77 600..A00 // Last updated: 13/03/2020 // Page 9 of 33
3.2 Installation of accessories
Hand release (21):
The two screw plugs (23) fitted opposite each other to the circumference of
the intermediate ring (6) must be screwed out. The cams (21.2) with
threaded bush must be screwed into the bores provided in the screw plugs
(23) making sure that they are in the right position (see figure). Secure the
cams with Loctite 601. The hand release lever (21.1) must be fixed to the
square socket provided in the cams (21.2). The release forces F and the
maximum permitted release forces (actuation forces) Fmax are specified in
Table 7/1.
Note!
Machinery-specific regulations and requirements (e.g. for hoists, cranes and
elevators) must be observed when using brakes with hand release (21).
Size
10
11
13
16
19
24
MAtightening torque of threaded bush [Nm] 20 20 20 26 26 35
Release force F 2) [N] 4 7 20 60 70 110
Max. permitted release force (actuation force) Fmax [N] 11 18 50 150 155 230
Table 9/1: Release force F and maximum permitted release force (actuation force) Fmax of hand release (21);
MAtightening torque of threaded bush of cams (21.2)
Note!
When installing the cams (21.2) make sure that the cam surface points towards the armature (2).
Caution!
The brake torque can be neutralised manually by means of the hand release (21). Consequently, the brake
must be installed in such a way that any unintentional actuation of the hand release (21) is excluded.
Warning!
Check that the mechanical hand release (21) is in a central position (see Fig. 6/1) when not in use. This is
crucial to ensure reliable brake engagement. Otherwise, the full braking effect of the spring-applied single-disc
brake may not be reached. In this case, the machine (e.g. motor) must be stopped immediately and must not
be restarted until correct operation of the hand release (21) and automatic return of the hand release lever in
its central position (see Fig. 6/1) has been ensured.
2) Release force F (approx.) at the highest rated (standard) torque.
Installation of cams
with threaded bush

Operating Instructions BA 77 600..A00 // Last updated: 13/03/2020 // Page 10 of 33
3.3 Electrical connection and operation
The spring-applied single-disc brake must be supplied with
DC voltage. Connection to an AC power source is via a
half-wave, bridge or overexcitation rectifier (25.2). Brakes
with connector box (25) and built-in rectifier (25.2) can be
connected directly to the AC mains. The contact
assignment is shown in Fig. 10/1. Brakes equipped with
connector box (25) and connecting terminal (25.2) resp.
connecting cable must be connected directly to DC
voltage. The customer-specific connecting cable must be
connected to the terminals (25.2) or built-in rectifier (25.2)
by means of a cable gland (14) (PG 11, clamping range 7.5
to 10 mm). Remove the cover (25.1) of the connector box
(25) so that the individual strands of the connecting cable
can be connected to the terminals (25.2) or to the contacts
of the built-in rectifier (25.2).
Brake versions with flying leads or connecting cable do not
have a connector box (25). The wire ends of the flying
leads or cable must be connected directly to the DC power
source.
Rectifier series Rectifier type Rated input voltage range
U1/VAC (40-60 Hz)
Output voltage
U2/VDC
Max. output current
R-load
I/ADC
L-load
I/ADC
32 07.22B.0 half-wave 0-500 (±10%) U1•0.445 1.6 2.0
32 07.23B.0 bridge 0-400 (±10%) U1•0.890 1.6 2.0
32 17350E.. overexcitation
bridge⇒half-wave
48-120 (±10%)
220-415 (±10%)
480-525 (±10%)
U1•0.890 / U1•0.445 2.3 3
32 17.2.B.. overexcitation
bridge⇒half-wave
110-230 (±10%)
220-415 (±10%) U1•0.890 / U1•0.445 1.2
0.8
1.5
1.0
Specific rectifier specification sheets must be observed!
Table 10/1: Recommended rectifiers for single-phase AC voltage supply and for connection via terminal (25.2)
Attention!
When fixing the cover (25.1) to the connector box (25), the MAtightening torques of the machine screws
specified in Table 14/1 must be strictly observed. Damage to the flat seal between the connector box (25) and
cover (25.1) must be avoided.
When using brakes with built-in rectifier (25.2), the supply voltage is rectified by means of a half-wave rectifier
(25.2). The built-in rectifier (25.2) can be wired in such a way that AC side switching (normal coupling time t1)
or DC side switching (short coupling time t1) is possible (see Fig. 10/1). Various Kendrion rectifiers are available
(see Table 8/1, list not exhaustive) for direct brake connection to an AC power source via the built-in connecting
terminal (25.2). Depending on the brake size and torque, voltage ripple due to intermittent power supply may
cause brake humming or incorrect brake operation. Perfect brake operation must be ensured by the user or
system manufacturer by providing suitable electrical controls.
Fig. 10/1:Connector box (25) with terminal
(25.2) or rectifier (25.2)

Operating Instructions BA 77 600..A00 // Last updated: 13/03/2020 // Page 11 of 33
3.3.1 DC power supply
The figure to the right shows the voltage curve after the field coil
(1.2) has been de-energised.
Attention!
The peak voltage UVmax during disconnection without protective
circuit may reach several thousand V in the millisecond region.
This may cause irreversible damage to the field coil (1.2),
switching contacts and electronic components. Sparking will occur
on the switch during disconnection. Consequently, a protective
circuit must be provided to reduce the current during disconnection
and to limit the voltage. The maximum permitted overvoltage
during disconnection is 1500 V. If Kendrion rectifiers are used (see
Table 10/1), the protective circuit required for the built-in electronic
components and field coil (1.2) is included in the rectifier. This
does not apply to the external contacts required for DC side
switching as there would be no galvanic isolation of the external
contact.
Attention!
Sensitive electronic components (e.g. logical components) may also be damaged by the lower voltage.
3.3.2 AC power supply
Direct connection of the spring-applied single-disc brake to an AC power source is only possible if a rectifier is
used. The coupling times vary depending on the switching type (DC side switching or AC side switching).
Half-wave rectification:
In case of half-wave rectification, the U2coil voltage is lower by factor 0.445 than the rectifier input voltage.
Half-wave rectifiers produce voltage with high residual ripple which, depending on the brake size, may slightly
reduce the switching times when compared to bridge rectifiers. Due to the shorter switching times and the
lower coil voltage, half-wave rectifiers are generally preferred to bridge rectifiers. However, brake humming
may occur when small size brakes are used.
U
B
operating voltage (coil voltage)
UVmax disconnection voltage
t
t
M
U
0,9 x M
2
B
U
U
Vmax
t
t
11
1
1
M
Fig. 11/1:Rectifier contact assignment for brakes with built-in rectifier (25.2)
Normal coupling time t
1
:
Shorter coupling time t
1
:
brake coil
In case of DC side switching, AC
side switching is also required.

Operating Instructions BA 77 600..A00 // Last updated: 13/03/2020 // Page 12 of 33
Bridge rectification:
Bridge rectifiers provide voltage with minimum residual ripple. This allows brake humming to be avoided even
if small size brakes are used. In case of bridge rectification, the U2coil voltage is lower by factor 0.89 than the
rectifier input voltage.
AC side switching:
The easiest wiring method is to connect the rectifier in parallel with the brake in the terminal box of the machine
(e.g. motor). It must be considered, however, that the motor may act as a generator after AC voltage has been
removed and thus extend the coupling time significantly (by factor 5 or over). The disconnection times remain
unchanged.
DC side switching:
In case of DC side brake switching, an auxiliary contact is provided on the motor contactor, for example. This
auxiliary contact is designed to interrupt the power supply on the DC side.
Connected in parallel with the machine (e.g. motor) AC side switching
2
2
2
1
1
3
2
Rectifier
Brake field coil
(1.2)
R
ectifier with DC side
disconnection
1
3
DC side switching
-~ ~ +
M
3~
L
1
L
2
L
3
U
-~ ~ +
M
3~
L
1
L
2
L
3
U
-~ ~ +
M
3~
L
1
L
2
L
3
U
Fig. 12/1: Suggested brake connection (circuit diagram, AC or DC side switching and
connected in parallel with the machine (e.g. motor))

Operating Instructions BA 77 600..A00 // Last updated: 13/03/2020 // Page 13 of 33
Attention!
In case of DC side switching, the brake must be provided with a protective circuit to avoid overvoltage.
Additional protective elements (e.g. varistors, spark arresters, etc.) must be installed to avoid damage such as
burns or welded contacts.
Warning!
Work on the brake must only be carried out by suitably qualified personnel. Make sure that no voltage is applied
during brake connection. The specifications on the rating plate and the information provided in the circuit
diagram in the terminal box or in the Operating Instructions must be strictly observed.
Warning!
The brake is a DC operated system. Permanent voltage variations on the power source of the electromagnetic
brake must be limited to +/-10% of the rated voltage.
The following checks must be carried out when connecting the brake:
•Check that the connecting cables are suitable for the intended use and for the voltage and amperage of
the brake.
•Check that the connecting cables are secured with screws, clamps or other suitable fixtures to avoid
interruptions in the power supply.
•Check that the connecting cables are long enough for the intended use and that suitable torsion, strain
and shear relief features as well as bending protections are provided.
•Check that the PE conductor (only for protection class I) is connected to the earthing point.
•Check that no foreign matter, dirt or humidity is trapped inside the terminal box.
•Check that unused cable entries and the terminal box are suitably sealed to ensure compliance with the
protection class requirements to EN 60529.
3.3.3 Microswitch (19) connection
If brakes are equipped with a microswitch (19) to control the release status (released/engaged) of the spring-
applied single-disc brake, the microswitch (19) must be tied into the control circuit of the machine (e.g. motor)
(see suggested brake and microswitch (19) connection in Fig. 12/1). This is to ensure that the microswitch (19)
prevents any start-up of the machine (e.g. motor) before the spring-applied single-disc brake has been
released. If the brake has a protective microswitch cover (20), the cover (20) must be removed to allow the
microswitch connecting cable to be installed. After removal of the cover (20), the microswitch cap (19.2) can
be loosened and taken off. The customer-specific connecting cable for the microswitch (19) can be fed into
the microswitch connector box through the cable gland (19.1) (PG 9). The cable strands must be connected
with the NO (normally open) and C (common) contacts by means of the microswitch connecting terminals.
After completion of connection, the cap (19.2) and protective cover (20) must be reinstalled. The optional
microswitch (19) must be ordered together with the brake as it cannot be retrofitted to the brake at a later date.
The microswitch (19) is factory-adjusted prior to shipment of the spring-applied single-disc brake.
Attention!
When installing the protective cover (20) and cap (19.2) of the microswitch (19) and the cover (25.1) provided
for the connector box (25), the machine screws must be tightened to the MAtightening torques specified in
Table 14/1.

Operating Instructions BA 77 600..A00 // Last updated: 13/03/2020 // Page 14 of 33
Size
10
11
13
16
19
24
MAtightening torque [Nm] of machine screws (20.1) for
protective cover (20) - - - 5 5 5
MAtightening torque [Nm] of machine screws (19.5) for
microswitch cap (19.2) - - 0.75 0.75 0.75 0.75
MAtightening torque [Nm] of machine screws (25.3) for
connector box cover (25.1) 1.6 1.6 1.6 1.6 1.6 1.6
Table 14/1: Tightening torques of machine screws for protective cover (20), microswitch cap (19.2) and
connector box cover (25.1)
Note!
Machinery-specific regulations and requirements (e.g. for hoists, cranes and elevators) must be observed
when using brakes with microswitches (19).
Warning!
The motor circuit must be protected in such a way that no accidental motor start-up can occur when the
microswitch (19) contact closes.
Note!
The suggested wiring of the spring-applied single-disc brake with microswitch (19) shown in Fig. 12/1 is based
on the general recommendations for the connection of electromagnetic components used in electric machinery
(e.g. motors) without load torque impact. When the brake is used for applications during which a load torque
is generated, the system user is responsible to ensure correct and safe wiring of the microswitch (19) and
brake.
Rectifier Microswitch S (19, NO contact)
Brake field coil (1.2) Control relay (contactor) of
microswitch S (19)
Brake control relay (contactor)
1
2
3
4
5
Fig. 14/1: Suggested connection of brake with microswitch (19)
(circuit diagram, AC side switching)
1
2
3
4
5
-~ ~ +
M
3~
L
1
L
2
L
3
N
U

Operating Instructions BA 77 600..A00 // Last updated: 13/03/2020 // Page 15 of 33
3.4 Electromagnetic compatibility
As required by the German Electromagnetic Compatibility Act (EMVG), electromagnetic compatibility is
essential to ensure immunity to external electromagnetic fields and conducted interference. Furthermore, the
emission of electromagnetic fields and line-conducted interference during brake operation must be minimised.
Since the brake features depend on the circuitry and operation, a declaration of conformity with the applicable
EMC standard can only be furnished for the wiring type, but not for a specific brake. The spring-applied single-
disc brakes are designed for industrial applications to which the following EMC standards apply: Generic
Immunity Standard EN 61000-6-2 and Generic Emission Standard EN 61000-6-3 / EN 61000-6-4. Other
applications may be subject to different generic standards which must be considered by the manufacturer of
the overall system. The requirements in terms of electromagnetic compatibility of devices and components are
determined by basic standards derived from the generic standards. Brake wiring recommendations will be
provided in the following sections to ensure compliance with the individual basic standards that are relevant
for industrial brake use and other applications. Please refer to the specification sheets for additional information
on electromagnetic compatibility, especially with respect to the recommended electronic rectifiers specified in
Section 3.3.
Immunity according to EN 61000-4:
EN 61000-4-2 Electrostatic discharge:
The spring-applied single-disc brakes comply at least with severity level 3 without requiring additional
measures. The recommended rectifiers specified in Section 3.3 conform to severity level 3 without additional
measures. When using brakes with built-in rectifier, the rectifier conforms to severity level 3 without requiring
additional measures.
EN 61000-4-3 Electromagnetic fields:
The brakes comply at least with severity level 3 without requiring additional measures. The recommended
rectifiers conform to severity level 3 without additional measures. When using brakes with built-in rectifier, the
rectifier conforms to severity level 3 without requiring additional measures.
EN 61000-4-4 Fast transients (burst):
The brakes comply at least with severity level 3 without requiring additional measures. The recommended
rectifiers conform to severity level 3. When using rectifiers of the 32 17.2.B.. series, which conform to severity
level 3, a temporary slight voltage increase may occur which, however, will not interfere with the rectifier
function. When using brakes with built-in rectifier, the rectifier conforms to severity level 3 without requiring
additional measures.
EN 61000-4-5 Surge:
The brakes comply at least with severity level 3 without requiring additional measures. The recommended
rectifiers conform to severity level 3 without additional measures. When using brakes with built-in rectifier, the
rectifier conforms to severity level 3 without requiring additional measures.
EN 61000-4-9 Pulse magnetic fields, EN 61000-4-10 Damped oscillatory magnetic fields:
Since the operating magnetic fields of the electromagnetic brakes are stronger many times over than
interference fields, the brake function will remain unaffected. The brakes comply at least with severity level 4.
The recommended rectifiers conform to severity level 3 without additional measures. When using brakes with
built-in rectifier, the rectifier conforms to severity level 3 without requiring additional measures.

Operating Instructions BA 77 600..A00 // Last updated: 13/03/2020 // Page 16 of 33
EN 61000-4-11 Voltage dips, short interruptions, and short supply voltage variations:
a) Voltage interruptions:
Brakes that comply with the requirements of DIN VDE 0580 are de-energised after the specified switching
times at the latest. The switching time depends on the control and mains conditions (e.g. generator effect
of running down motors). Voltage interruptions of shorter duration than the response delay specified by
DIN VDE 0580 will not cause any malfunctions. The user must ensure that any damage is avoided (e.g.
motor start-up before the brake has been released caused by phase failure in the case of two-phase
energised motors or by the slipping of an electromagnetically engaged system due to torque drop). The
functional reliability of the electromagnetic brake and its electronic accessories remains unaffected
provided that any damage is avoided.
b) Voltage dips and short supply voltage variations:
Electromagnetically released systems:
Voltage dips and supply voltage variations to below 60% of the rated voltage and lasting longer than the
response delay specified by DIN VDE 0580 may cause the brake to be de-energised temporarily. Damage
as described under a) above must be avoided by the user by taking adequate precautions.
Electromagnetically engaged systems:
Voltage dips and supply voltage variations to below the minimum tolerance threshold will cause torque
reductions. The user is required to take adequate precautions to avoid consequential damage.
Radio interference suppression in accordance with EN 55011:
The brakes and the recommended electronic rectifiers are classified as Group 1 equipment in accordance with
EN 55011. As far as the emissions from this equipment are concerned, one distinguishes between field guided
radiated interference and line-conducted interference.
a) Radiated interference:
When operated with DC voltage or rectified 50/60 Hz AC voltage, all brakes comply with the limit values
applicable to Class B equipment.
b) Conducted interference:
When connected to a DC power source, the
electromagnetic brakes meet the limit values applicable
to Class A equipment. If the brakes are connected to a
50/60 Hz AC power source and equipped with electronic
rectifiers or other electronic controls, interference
suppression measures as shown in Fig. 16/1 must be
taken to ensure compliance with the limit values
applicable to Class A equipment. Interference
suppression capacitors should be used which must be
dimensioned to suit the connection data of the
electromagnetic components and the specific mains
conditions. The recommended rectifiers specified in
Section 3.3 are CE mark certified in accordance with the
EMC Directive. They have built-in interference
suppression components and comply at least with the
requirements of EN 55011 for Class A equipment, unless
otherwise specified in the specification sheet. When
brakes are used with the specified rectifiers or with other types of rectifiers, the recommended values
listed in Table 17/2 should be observed. Interference suppression components should be installed as
close as possible to the consumer. Interference caused during switching operations of the electromagnetic
component is generally attributable to the inductive load. Where necessary, assemblies designed to limit
the disconnection voltage (e.g. anti-parallel diode) or voltage limiting components (e.g. varistors,
suppressor diodes, resistance diodes and the like) can be installed. However, such components will
inevitably change the switching times of the brake and increase the generated noise level. The rectifiers
specified in Section 3.3 are equipped with free-wheel diodes and/or varistors to limit the disconnection
voltage. In case of DC side switching, a varistor rated for the type-specific maximum operating voltage
and connected in parallel with the field coil (1.2) limits the peak voltage to the values specified in
Table 17/2.
Fig. 16/1
R
C
L
U

Operating Instructions BA 77 600..A00 // Last updated: 13/03/2020 // Page 17 of 33
If the brake is used in connection with other electronic accessories, the user is responsible to ensure
compliance with EMC requirements. Compliance with applicable standards concerning the design and
operation of components, sub-assemblies or equipment employed shall not relieve the user and manufacturer
of the overall system from their obligation to furnish proof of conformity of the overall system with such
standards.
Rectifier type
Rated input voltage range
U1/VAC (40-60 Hz)
DC at L-load
(ADC)
Capacitor
(nF(VAC))
Bridge rectifier
32 07.23B.0 up to 400 (+10%) up to 2.0
no additional
interference suppression
measures required
Half-wave rectifier
32 07.22B.0 up to 500 (+10%) up to 2.0
no additional
interference suppression
measures required
Overexcitation rectifier
32 17350E..
48-120 (±10%)
220-415 (±10%)
480-525 (±10%)
up to 3
no additional
interference suppression
measures required
Overexcitation rectifier
32 17.2.B..
110-230
220-415
up to 1.5
up to 1.0
no additional
interference suppression
measures required
Table 17/1
Rectifier input voltage (max.)
(VAC)
Recommended disconnection voltage for DC side switching
(V)
250 700
440 1200
550 1500
Table 17/2

Operating Instructions BA 77 600..A00 // Last updated: 13/03/2020 // Page 18 of 33
3.5 Set-up and start-up
Warning!
The functional check of the brake must not be performed unless the machine (e.g. motor) has been switched
off and secured against accidental or unintentional start-up.
3.5.1 Functional checks
The following checks must be carried out:
Check compliance with the specifications provided on the rating plate with respect to the mounting position
and protection class. After connection of the brake, an operational test must be performed to check that the
friction disc (5) runs smoothly. For this purpose, turn the shaft (while the brake is energised and the machine
(e.g. motor) is unpowered). Install the required guards and protections after completion of installation.
Specifications on the rating plate (subject to order, example type 77 60016A00):
Note: The product number of the brake consists of the type number followed by the version number of
the spring-applied multiple-disc brake, e.g. 77 60016A00-0004.
Warning!
Before starting the machine (e.g. motor) test run without driven components, the feather key (if used) must be
secured in such a way that it cannot be hurled out. The shaft must not be exposed to load torques. Before the
machine (e.g. motor) is re-started, the brake must be de-energised.
Caution!
The brake surface temperature may rise to over 60°C. Heat-sensitive parts such as conventional cables or
electronic components must not be fixed to or be in contact with these surfaces. If necessary, suitable
protections and hand guards must be installed to avoid accidental contact with hot surfaces! If the shaft needs
to be turned during set-up operations while the machine (e.g. motor) is switched off, the brake must be released
electromagnetically or by means of the hand release lever (21).
Caution!
High-voltage tests performed during brake installation within an overall system or during start-up must be
carried out in such a way that damage to the built-in electronic accessories is avoided. The limits for high-
voltage tests and follow-up tests specified by DIN VDE 0580 must be observed.
Production id code
Nominal voltage / Coil voltage
Type number
Production id code
Production date (year and month, 3-digit)
Nominal voltage at AC current connection
CE mark
Voltage frequency
Nominal torque /
Transmissible torque
Offer drawing index
Version number (4-digit)

Operating Instructions BA 77 600..A00 // Last updated: 13/03/2020 // Page 19 of 33
Attention!
Check that the brake has been connected in accordance with the specifications provided on the rating plate
before it is put into operation. Even short-term operation outside the specified supply voltage limits may cause
irreversible damage to the brake or electronic accessories. Such damage may not be apparent immediately.
DC side brake switching without protective circuit as described in Section 3.4 will cause damage to electronic
rectifiers, electronic accessories, switching contacts and to the field coil (1.2).
3.5.2 Manual brake release
The spring-applied single-disc brake can be released "manually" by means of a mechanical hand release (21)
(accessories). In case of failure of the regular power supply, it is also possible to use a commercial UPS (e.g.
UPS battery system) for the electrical release of the brake. For this purpose, the brake user is required to
install a UPS system that complies with the voltage specifications given on the brake rating plate.
Warning!
Manual release (inching mode) of the spring-applied single-disc brake (e.g. for maintenance operations on the
machine (e.g. motor) or in case of failure of the regular power supply and use of a UPS system) must be
performed with extreme caution. If the drive system is unbalanced, the load torque may accelerate the drive.
The brake user is required to take adequate precautions to ensure that no hazardous situations are caused by
the load torque when the brake is released and engaged in inching mode.
3.6 M2rated torque adjustments
The brakes are factory-adjusted to the M2rated torque (as specified in the purchase
order). The M2rated torque is specified on the rating plate (16) of the brake. The
adjusting ring clearance b3is marked on the collar of the brake back near the set screw
(8). It can be changed by tightening or loosening the adjusting ring (7) by means of a
pin spanner. The corresponding changes in the M2rated torque are specified in Table
19/1. The adjusting ring clearance b3must remain within the specified minimum and
maximum values (see Table 19/1).
Size
10
11
13
16
19
24
∆M2/mm [Nm] 3.8 3.3 11.5 9.25 12 49
b3min [mm] 2 3.6 3 4.7 4.5 2.7
b3max[mm] 3.3 6.2 4.7 8.6 11 5.6
Table 19/1: Change in the M2rated torque from 1 mm axial adjustment of the
adjusting ring (7); adjusting ring clearance b3limit values
Attention!
After having tightened or loosened the adjusting ring (7), the ring (7) must be locked with the set screw (8).
The tightening torque to be applied is MA= 3Nm. The adjusting ring (7) must be turned in such a way that the
set screw (8) can be inserted between the studs (4).
Adjusting ring
clearance

Operating Instructions BA 77 600..A00 // Last updated: 13/03/2020 // Page 20 of 33
4. Maintenance
4.1 Checks and service
The spring-applied single-disc brake does not require any particular maintenance except that the air gap 's'
must be measured at regular intervals. After the screw plugs (23) have been removed from the intermediate
ring (6), the air gap 's' (see Table 29/1 for rated air gap specification) between the armature (2) and the friction
disc (5) can be checked by means of a feeler gauge while the brake is energised. When the maximum air gap
smax has been reached (see Table 29/1), the friction disc (5) must be replaced as follows: Loosen the fixing
screws (22) and remove the brake from the hub (17). Remove the cover hood (9) and screw out the adjusting
ring (7) after having loosened the set screw (8). Loosen the machine screws (13) and sealing rings (12), and
remove the flange (11) and friction plate 3) (10) from the intermediate ring (6). Remove the worn friction disc
(5) and replace it by a new one. Before reassembling the brake components, clean all parts (flange (11), friction
plate 3) (10), armature (2) and intermediate ring (6)) with grease-free cleaners. Install the friction plate 3) (10)
in such a way that the convex surface is in contact with the flange (11). Screw the flange (11) with the
intermediate ring (6) to the core element of the spring-applied single-disc brake by means of the machine
screws (13) and sealing rings (12). Screw in the adjusting ring (7) until the b3clearance (marked on the collar
of the brake back) has been reached and secure it with the set screw (8). Install the cover hood (9) as shown
in Fig. 6/1. Install and connect the spring-applied single-disc brake as described in Sections 3.2 and 3.3.
Attention!
When installing the spring-applied single-disc brake, it is crucial that the fixing screws (22) be tightened
applying the MAtightening torque specified in Table 8/1. The machine screws (13) must be tightened to the
MAZ torque specified in Table 8/1. The set screw (8) of the adjusting ring (7) must be tightened to MA= 3Nm.
After the friction disc (5) has been replaced, the air gap 's' must be checked (see Table 29/1 for information on
the rated air gap).
Attention!
After the adjusting ring (7) has been screwed in, the set screw (8) must be located directly beside the marking
of the adjusting ring clearance b3. Check that the set screw is not positioned on a stud (4).
Attention!
Depending on its operating condition, it may no longer be possible to release the spring-applied single-disc
brake when the maximum air gap smax (see "Technical specifications" in Table 29/1) has been exceeded. In
this case, the braking effect cannot be neutralised. This may cause thermal overloading of and irreversible
damage to the brake if the machine (e.g. motor) is started before the brake has been released. Thermal
overloading of the machine (e.g. motor) may occur if the machine (e.g. motor) is not started while the brake is
still engaged.
Caution!
If a hand release lever (21) is fitted to the brake and the maximum air gap smax (see "Technical specifications"
in Table 29/1) has been exceeded, the hand release lever (21) will limit the axial movement of the armature
(2). This will cause the torque to be reduced down to zero. Whenever carrying out maintenance work, check
the degree of wear of the friction disc (5) and the air gap 's' and replace the friction disc (5) well before the
maximum air gap smax (see "Technical specifications" in Table 29/1) is reached.
3) Size 10 to 16 brakes.
This manual suits for next models
5
Table of contents
Other Kendrion Industrial Equipment manuals
Popular Industrial Equipment manuals by other brands

Baby Lock
Baby Lock EMP6 Technical training

Priorclave
Priorclave RSC Installation and operating manual

GPS
GPS iRIB-18 Installation, operation & maintenance manual

WilTec
WilTec 30154 Operation manual

Oneida Air Systems
Oneida Air Systems Deluxe Dust Deputy manual

CNC Router Parts
CNC Router Parts PRO 4824 Series Assembly instructions