Kersten K2100 User manual

Original
operating
instructions
Hydrostatic Two Wheel Tractor
K 2100
Manufactures by
Kersten Arealmaschinen GmbH
Empeler Straße 95
D - 46459 Rees
www.kersten-maschinen.de
Order number: B00007 From machine No.: 50202 Rev.: 01 Version: 12.04.2012
Distributed in UK by
Kersten (UK) Ltd Tel. 0118 986 9253
Progrees House 39 Boulton Road
Reading, RG2 0NH
www.kerstenuk.com - [email protected]

Table of Contents
2
1
LETTER.......................................................................................................................................3
2
ABOUT THESE OPERATING MANUAL ...................................................................................4
2.1
BEFORE COMMISSIONING.........................................................................................................................................4
2.2
NOTES ABOUT THIS MANUAL...................................................................................................................................4
3
SAFETY INSTRUCTIONS FOR HYDROSTATIC SINGLE TOWERS............................................... 5
3.1
INTENDED USE............................................................................................................................................................5
3.2
GENERAL SAFETY AND ACCIDENT PREVENTION RULES .....................................................................................5
3.3
USED PICTOGRAMS...................................................................................................................................................9
3.4
WARNINGS AND SAFETY INSTRUCTIONS FOR FILLED LEAD - ACID BATTERIES............................................ 10
3.5
INSTRUCTIONS FOR USE FOR STARTER BATTERIES......................................................................................... 11
4
DISPOSAL ........................................................................................................................................ 13
5
WARRANTY...................................................................................................................................... 13
6
RECOMMENDATIONS..................................................................................................................... 13
6.1
LUBRICANT.............................................................................................................................................................. 13
6.2
FUELS....................................................................................................................................................................... 13
6.3
MAINTENANCE AND REPAIR.................................................................................................................................. 13
7
THE OPERATION OF THE SELF-OPERATING WORKSTATION................................................. 14
7.1
START THE MOTOR................................................................................................................................................. 14
7.2
DRIVE OFF................................................................................................................................................................14
7.3
STOPPING THE INTERNAL COMBUSTION ENGINE .............................................................................................. 15
7.4
HEIGHT AND TILT ANGLE ADJUSTMENT OF THE HANDWOOD.......................................................................... 15
7.5
SECURING THE MACHINE DURING TRANSPORT................................................................................................. 16
8
MAINTENANCE................................................................................................................................ 17
8.1
GENERAL MAINTENANCE INSTRUCTIONS ........................................................................................................... 17
8.2
DAILY MAINTENANCE.............................................................................................................................................17
8.3
MAINTENANCE AFTER 20 HOURS OF OPERATION OR LONGER SERVICE LIFE............................................... 18
8.4
MAINTENANCE AFTER 100 HOURS OF OPERATION............................................................................................ 18
8.5
STORAGE .................................................................................................................................................................18
9
TECHNICAL SPECIFICATIONS ...................................................................................................... 19
10
WIRING PLAN - SAFETY DEVICE ................................................................................................... 21
11
MALFUNCTION AND THEIR REMEDY........................................................................................... 22
12
EC - DECLARATION OF CONFORMITY......................................................................................... 24

3
Foreword
1 Introduction
Dear Customer,
Thank you for choosing a quality product from Kersten.
This product has been manufactured according to the most up-to-date production methods and
extensive quality assurance measures, because only when you are satisfied with your device, our goal is
reached.
Before using this machine or implement for the first time, please read this manual thoroughly and
thoroughly.
Keep this manual handy. If necessary, you can read important information and instructions.
Have fun with your Kersten device wishes you
Dip.-Ing. (FH) Robert Bosch
Management

4
About this manual
2 About this manual
The machine or implement is subject to technical progress. All information, illustrations and
technical data are up-to-date at the time of publication. Changes in the sense of technical progress
are reserved to the manufacturer at any time.
Therefore, no claims can be derived from the information and illustrations in this booklet.
2.1
Before commissioning
As self-propelled implements and implements can cause serious accidents or hazards if used
improperly, a briefing of competent and authorized persons is mandatory when commissioning
the Kersten implement for the first time.
The best way to familiarize yourself with its basic functions and its handling is to choose a free
and level terrain for your first trip.
•
You reduce the risk of accidents on your part or third parties!
For further information and difficulties of any kind, please contact the dealer, importer or directly
to the manufacturer.
•
Be sure to read the safety instructions on the following pages!
•
Read the operating instructions before commissioning!
•
Pass on all safety instructions to other users!
2.2
Notes on this operating manual
•
Enumerations are marked with eye-catching points.
Example:
•
Text
•
Text
•
Instructions are marked according to the order in which they are to be executed.
Example:
1.
Text
2.
Text

5
Safety instructions
3 Safety instructions for hydrostatic towed tractors
The most important safety instructions in this manual cannot cover all possibilities. It goes without
saying that common sense and caution are factors that are not built into a machine, but must be
brought by the person who uses and maintains the machine
In order to keep the accident risk as low as possible, please observe the following
subchapters.
3.1
Intended use
•
The towing vehicle as well as the devices approved by the manufacturer are suitable for the
respective usual or common use and work in the agriculture and forestry, as for example.
Green area and plant maintenance as well as built for the winter service.
•
Any other use is considered improper use. The manufacturer is not liable for damage resulting
from this, the risk being solely borne by the operator.
•
Proper use also includes compliance with the operating, maintenance and service conditions
specified by the manufacturer.
•
The towing vehicle may only be used, maintained and repaired by persons familiar with it and
aware of the dangers.
•
The relevant accident prevention regulations as well as the other generally recognized safety
and occupational medical regulations must be observed.
•
Unauthorized modifications to the machine lead to the exclusion of liability of the manufacturer
for the resulting damage.
3.2
General safety and accident prevention regulations
3.2.1
Basic rules
•
In addition to the instructions in this operating manual, observe the general valid safety and
accident prevention regulations!
•
The towing vehicle must not be operated by persons under the age of 16, not even under the
supervision of an adult! Children and adolescents should be instructed, not with to play the
device.
•
Only trained personnel or persons may use this machine!
•
When using public traffic routes, observe the relevant regulations!
•
The tiller is not approved for public transport.
•
The clothing of the user should be tight. Avoid loose-fitting clothing and wear sturdy shoes or
safety shoes!
•
Only work in good visibility and light conditions!
•
The attached warning and information signs provide important information for safe operation; the
attention serves your safety!
•
For transport on motor vehicles or trailers outside the area to be machined, the motor must be
switched off!
•
Be careful with rotating tools - safety distance!
•
Be careful with trailing tools. Wait for work on these until they stop completely!
•
There are crushing and shearing points on driven parts!
•
The transport of persons and objects is prohibited!
•
Driving behavior, steering and possibly braking capability as well as tilting behavior are
influenced by mounted or attached devices and load. For this reason, only implements approved
by the manufacturer may be used. The working speed must be adapted to the respective
conditions.

6
Safety instructions
•
Do not make any changes to the engine's upper idle speed. Too high a speed increases the risk of
accidents.
•
Unauthorized conversions that endanger the operational safety of the machine are prohibited!
•
Check the machine for operational safety before each use!
3.2.2
Work and danger area
•
The user is responsible to third parties in the work area!
•
Staying in the danger area of the machine is prohibited!
•
Check the near range before starting up. Pay special attention to children and animals. Ensure
sufficient visibility!
•
Before starting work, remove foreign objects from the surface to be worked. Pay attention to
other foreign objects during work and eliminate them in good time.
•
When working in enclosed areas, the safety distance to the border must be maintained so as not
to damage the tool.
•
When working in the immediate vicinity of public roads and paths, these should not be
approached if possible, because there is a risk of injury to third parties due to flying objects.
•
When working on public roads and squares or in the immediate vicinity, warning and danger
signs should be set up in order to attract the attention of third parties.
3.2.3
Before starting work
•
Before starting work, please familiarize yourself with all the devices and actuators as well as their
function and make sure that all safety devices are properly installed and in the protective position! It's
too late during the work assignment!
•
Above all, learn how to stop the engine quickly and safely in an emergency.
3.2.4
Starting the machine
•
When starting the engine, all drives must be switched off!
•
Do not run the engine indoors!
•
Do not step in front of the single-axle tractor or the implement to start the engine.
•
Do not use jumper fluids when using electric jump start (jumper cable). There is a danger of
explosion!
3.2.5
During operation
•
Never adjust the operating handle while driving - risk of accident!
•
The transport of persons and objects is prohibited!
•
If, for example, the attachment has caught a foreign object and blocked it, stop the engine and clean
the attachment with a suitable tool! Always switch off the engine when handling or cleaning the
implement!
•
Do not leave the operating station until all tools of the attachment have come to a standstill!
•
In the event of damage to the self-propelled implement or attachment, stop the engine immediately
and have the damage repaired.
•
If the steering fails, stop the self-propelled implement immediately and stop the engine. Have the
fault rectified immediately.

7
Safety instructions
•
If there is a risk of slipping on sloping ground, the implement carrier must be secured by an escort
with a rod or a rope. The escort must be located above the vehicle at a sufficient distance from the
work tools! For the helper, it is recommended to wear crampons.
•
If possible, always drive across (horizontally) to the slope!
•
Only drive on rough and dry ground on steep slopes! Moisture and rain increase the risk of slipping
out and slipping.
•
On steep slopes, lattice wheels or sprockets must be used to prevent the tractors from slipping off.
•
In emergency situations, if, for example, the machine slips sideways in the slope, always release the
handles! You as an operator do not manage with their physical strength to prevent the cultivators on
slipping and are otherwise carried away.
3.2.6
Leaving the machine
•
When stopping the machine, close the fuel tap (if present)!
•
By using wheel chocks or, if necessary, by applying the parking brake, secure the machine from
rolling away when leaving the vehicle.
•
Secure the device against unauthorized use!
•
Switch off the engine and, if present, remove the ignition key or the spark plug connector!
•
Never leave the machine unattended while the engine is still in operation!
3.2.7
Coupling and uncoupling attachments
•
Attach and remove attachments only when the engine is off, and the PTO is off.
•
When replacing attachments and their parts, use suitable tools and Wear gloves.
•
When mounting and dismounting, bring the required support equipment into the respective
position and ensure sufficient stability.
•
Secure the rear-mounted tow tractor with an attachment to prevent it from rolling (parking brake,
wheel chocks).
•
When attaching attachments, there is a risk of injury (crushing). Special care is necessary.
•
Attach implements according to regulations and fix in the prescribed places.
3.2.8
Maintenance, cleaning and repair work
•
Do not carry out maintenance and cleaning work on the running engine!
•
Always remove the spark plug connector when working on the engine.
•
If guards and working tools are subject to wear, they must be checked regularly and replaced if
necessary.
•
Damaged cutting tools must be replaced.
•
When replacing cutting tools, use suitable tools and wear protective gloves.

8
Safety instructions
•
Only use original spare parts from the manufacturer, as these comply with the technical requirements
and thus the risk of accidents is minimized!
•
Cleaning with the high-pressure cleaner should be carried out so that the water jet is not held directly
in bearings, turned parts, grease nipples, shaft seals, wheel hubs, etc. After each cleaning with the
high-pressure device, the lubrication points must be re-greased. In the case of infringement, the right
to guarantee expires!
•
Check the moving parts for ease of movement and regrease if necessary!
•
After maintenance and cleaning work, be sure to replace the guards and put them in the protective
position!
•
To avoid the risk of fire, keep the machine clean!
•
Regularly check nuts and bolts for tightness and retighten if necessary.
•
When carrying out maintenance, cleaning and repair work on the lifted device, always make sure that
it is protected by suitable support elements!
•
Before carrying out any repairs, make sure that the hydraulic system is depressurised, because fluids
under pressure can penetrate the skin and cause serious injuries! Therefore
•
See a doctor immediately - danger of infection!
•
Repairs may only be carried out by qualified personnel.
•
When working on the electrical system, always remove the earth strap from the battery!
•
Check the hydraulic hose lines for damage and aging at regular intervals and replace if necessary.
•
When welding the tractor or mounted equipment, disconnect the battery.
•
Repairs such as welding, grinding, drilling, etc. must not be performed on structural and other safety-
related parts such as frames, axles, etc.
3.2.9
Engine, fuel and oil
•
Before refueling, switch off the engine and remove the ignition key (if available)!
•
Do not top up with fuel and do not spill fuel (use a suitable refilling aid). If necessary, take up
spilled fuel immediately.
•
Dispose of oils, fuels and filters separately and properly!
•
When handling fuel, caution is required, increased risk of fire. Never refuel near open flames,
hot engine parts, and sparks when flying. Do not smoke when refueling!
3.2.10
Electrical system and battery
•
When working on the electrical system, always disconnect the battery (negative pole) (if
present).
•
Make sure the connection is correct - first positive pole and then negative pole!
•
Be careful with battery gases - Explosive!
•
Avoid sparks and open flame near batteries.
•
Take care when handling battery acid - corrosive!
•
Always provide the positive pole with the intended cover or terminal protection cap.
•
Caregivers of pacemakers must not touch the live parts of the ignition system while the engine is
running!
9
Safety instructions
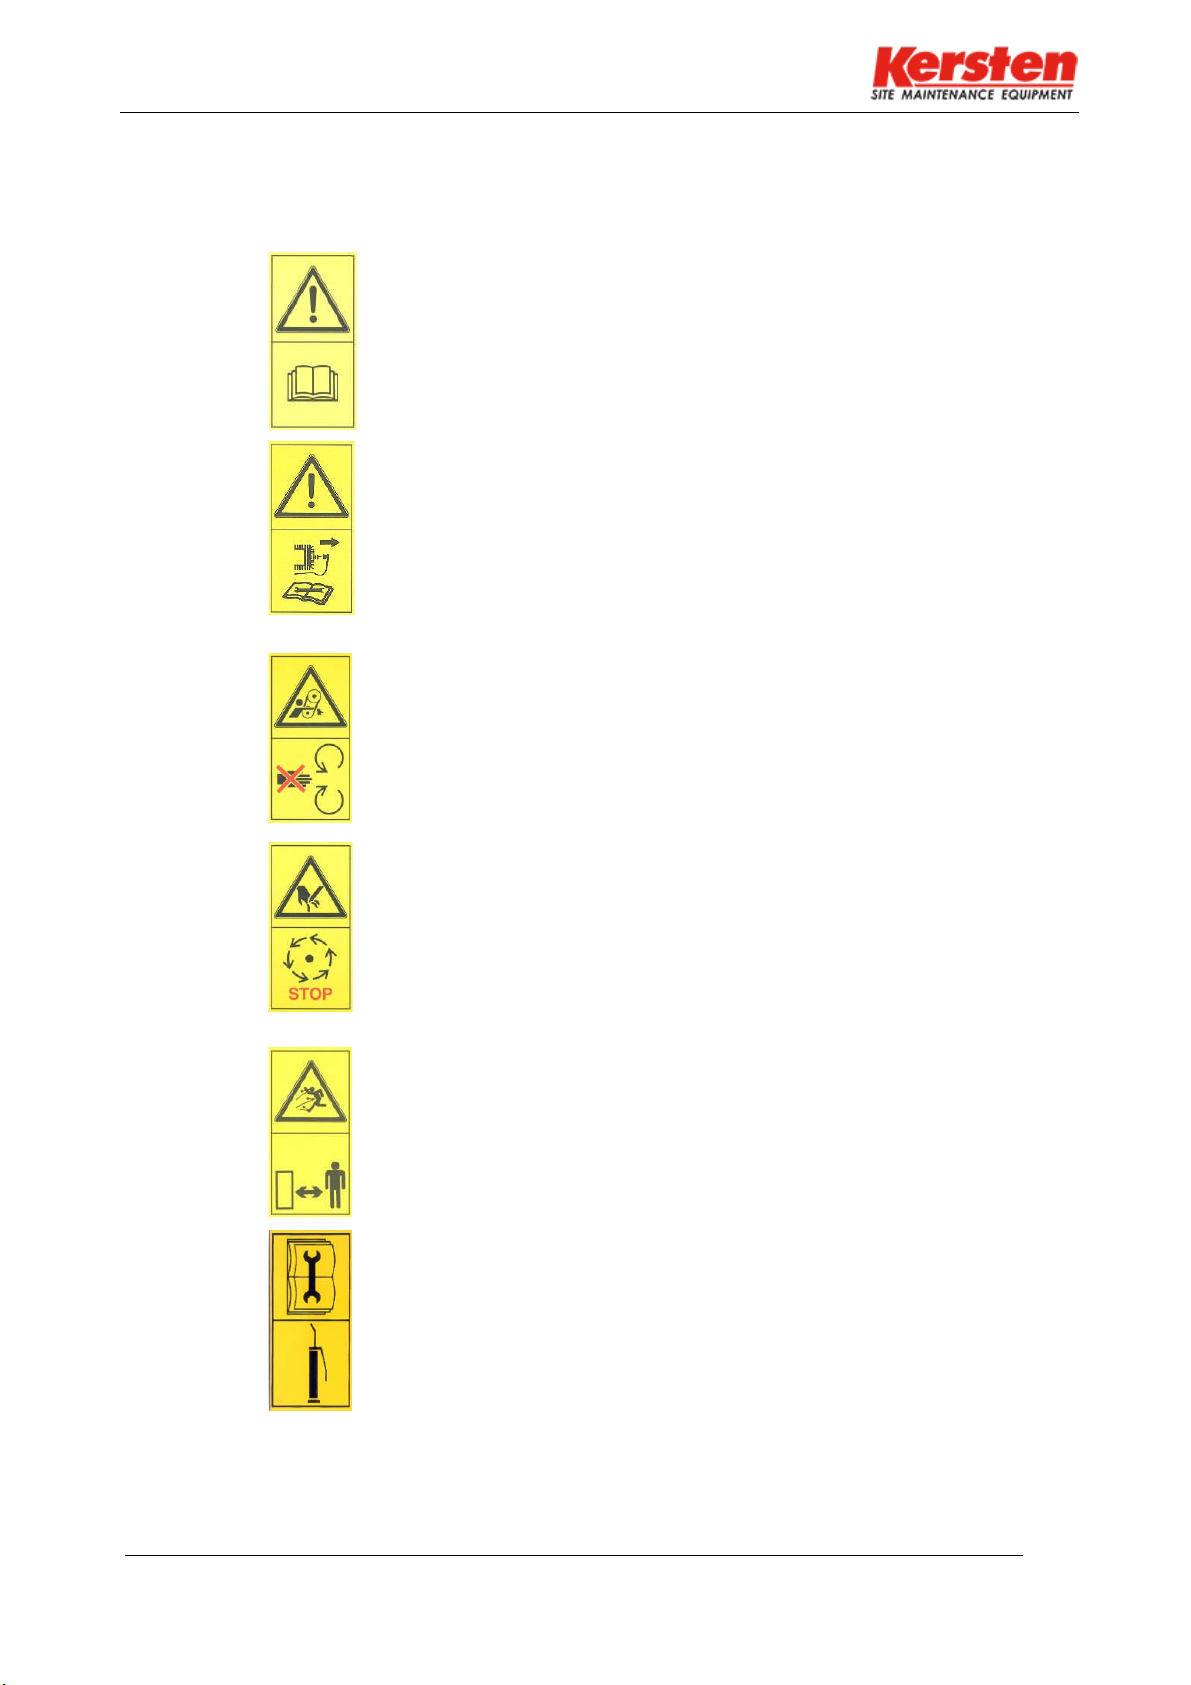
3.3
Pictograms used
Explanation of the pictograms used:
Before commissioning read and observe the
operating instructions and safety instructions.
Switch off the engine and remove the spark plug
connector before carrying out any repair, maintenance
or cleaning work.
Never open or remove protective devices while the
engine is running!
Touch machine parts only when they have come to a
complete stop.
Danger from passing parts while the engine is running -
keep safety distance.
Follow the instructions in the technical manual.
Smudge!

Safety instructions
10
3.4
Warnings and safety instructions for filled lead - acid batteries
•
Follow the instructions on the battery and in the operating instructions.
•
Use eye protection.
•
Keep children away from acid and battery.
Explosion hazard:
•
When charging batteries, a highly explosive bang mixture is produced, so please
note the following:
•
Fire, sparks, open light and smoking prohibited.
•
Avoid sparking when handling cables and electronic devices, as well as through electronic
charging.
•
Avoid short circuit risk of chemical burns:
•
Battery acid is highly corrosive, therefore:
•
Wear protective gloves and eye protection.
•
Do not tip the battery, acid can escape from the degassing openings.
First aid:
•
Acid splash in the eye; immediately rinse with clear water for several minutes.
Then seek medical attention immediately.
•
Acid splashes on the skin or clothing; Immediately neutralize with an acid
converter or soapy water and rinse with plenty of clear water.
•
In case of drunk acid, consult a doctor immediately.
Warnings:
•
Do not expose batteries to direct daylight unprotected.
•
Discharged batteries can freeze, therefore store frost-free.
Disposal
•
Hand over used batteries at a collection point.
•
During transport, the following instructions for use must be observed.
•
Never dispose of old batteries in the household waste.

11
Safety instructions
3.5
Instructions for Use for Starter Batteries
1.
Removal and installation of the battery
•
Before removing the battery, switch off the engine and all power consumers.
•
Avoid short circuits due to tools.
•
When removing, first disconnect the negative pole (-), then the positive pole (+).
•
Clean battery terminals and pole terminals and treat with acid-free grease.
•
Clean the footprint / support before installing the battery.
•
Tighten the battery firmly.
•
When installing, first connect positive pole (+), then negative pole (-).
•
Make sure that the pole terminals are secure.
•
Leave at least one gas outlet unlocked.
•
This also applies to the return transport of used batteries.
2.
External loading
•
Read and follow the operating instructions of the charger manufacturer!
•
Check electrolyte level before charging and level if necessary.
•
Disconnect the battery cable and remove the battery from the vehicle.
•
Ensure good room ventilation.
•
Use only suitable DC chargers.
•
Connect the positive pole (+) of the battery to the plus output of the charger.
Connect negative pole (-) accordingly.
•
Only switch on the charger after the battery has been connected and switch off
the charger after charging.
•
Charging current should be 1/10 Ah of battery capacity.
•
Interrupt the charge if the acid temperature exceeds 55 ˚C.
•
Battery is fully charged if charging voltage does not increase within 2 hours.
3.
Maintenance
•
Keep the battery clean and dry.
•
Do not use any improvers.
•
Do not open the battery.
•
If the starting power is insufficient, recharge the battery.
4.
Start Help
•
Use only standardized jump leads and observe their instructions for use.
•
Use only batteries of the same nominal voltage.
•
Switch off the engine from the helping vehicle.
•
First connect both positive terminals (+) with the red jumper cable. Then connect a pole tongs
to the negative pole (-) of the dispenser battery. Then clamp the second pole on one of the bare
spots of the needy single-axle tractor.
•
Start the helping vehicle, then max. The engine of the auxiliary towing vehicle max. Start 15
seconds.
•
Disconnect the cable in reverse order.

12
Safety instructions
5.
Decommissioning
•
Store the battery in a cool place.
•
When decommissioning, disconnect the negative pole (-).
•
Regularly check the charge status of the battery and recharge if necessary.

13
Disposal and warranty
4 Disposal
The equipment must be disposed of in accordance with local, state, or local regulations.
Depending on the material, you can dispose of the parts as residual waste, special waste or
recycling. The company Kersten Area machines GmbH assumes no disposal.
5 Warranty
The device is accompanied by a sales message, which among other things determines the time for
the start of the warranty period. When selling the device, please complete the sales message
completely and send it back to us within 14 days. If warranty claims are asserted without us having
a sales message, no warranty service will be provided.
Warranty claims should be submitted promptly, but no later than six weeks after the occurrence of
the damage, giving details of the purchase data, otherwise no warranty service will be provided.
Complaints must be confirmed by the company Kersten Area Machines GmbH. Wear parts are
excluded from the warranty. Furthermore, the warranty expires due to improper operation, when
performing no or incorrect maintenance work, when using inadmissible equipment and when using
non-original spare parts.
6 Recommendations
6.1
Lubricants
For engine and gearbox, use the specified lubricants (see under "Technical data").
For "open" lubrication points or nipple points, we recommend using bio lubricant oil or bio lubricant
grease. With the use of bio lubricants, you act ecologically correct, protect the environment and promote
the health of people, animals and plants.
6.2
Fuels
The built-up B & S or Honda engine can be easily operated with commercial unleaded normal and
premium gasoline and leaded premium gasoline.
Do not add oil to the gasoline.
If unleaded petrol is used for the environment, engines that are to be decommissioned for more
than 30 days should be completely drained of fuel in order to avoid resin residues in the carburetor,
fuel filter and tank, or to add a fuel stabilizer to the fuel.
6.3
Maintenance and repair
Your dealer has trained mechanics who perform proper maintenance and repair. You should only
carry out major maintenance work and repairs yourself if you have the appropriate tools and
knowledge of machines and internal combustion engines.
14
Operation of the self-propelled implement
1
Figure 7.1
7 Operation of the self-propelled implement
7.1
Start the engine
•
To start the engine, the drive lever (Fig.7.1, item 5) must be in the recess of the shift gate and
the lever for the PTO (Fig.7.1, item 3) in the "off" position.
If the levers are not in the position described above, the ignition of the engine is
interrupted, and the engine does not start
•
During the starting process, it is forbidden to operate the Deadman switch (Fig.7.1;
•
To start the engine, refer to the respective Honda engine owner's manual.
7.2
Driving off
•
Press the throttle lever (Fig.7.1, item 6) approx.
•
Press the Deadman switch (Fig.7.1, item 1) down and keep it pressed. Likewise, the lower lever
(Fig.7.1; Pos.2), which works as a conventional "clutch" in the car pull and pulled.
•
Make sure that nobody is in front of and behind the machine!
•
For the forward movement push the driving lever (Fig.7.1, Pos.5) upwards and for the reverse
drive the driving lever downwards.
Make sure that the drive lever is always in its end position!
•
After selecting the direction of travel, slowly release the lower lever (Fig.7.1, item 2). The faster
the lever is released, the faster the machine starts to move. To spare the components, a jerky
start should be avoided.
•
If the machine is moving too fast or too slow, it can be changed by pressing the rotary knob
(Fig.7.1;)

15
Operation of the self-propelled implement
The presetting of the speed and the preselection of the direction of travel may only be
carried out when the single-axle system is at a standstill, by operating the lower lever
(Fig.7.1) Respectively!
•
The throttle lever (Fig.7.1, item 6) influences the engine speed and thus also the driving
speed. Always try to drive with the lowest speed required, this protects material and the
environment.
•
The PTO is switched to "on" or "off" with the lever (fig.7.1; pos.3). This lever engages
automatically.
7.3
Parking the internal combustion engine
•
Before switching off the combustion engine, make sure that the drive lever (Fig.7.1, item 5) in
the recess of the shift gate and the lever for the PTO (Fig.7.1, item 3) in the "off" position are
located.
•
Move the throttle lever (Fig.7.1, item 6) to neutral and allow the engine to idle for approximately
one-half minute.
•
Set the engine off switch located on the internal combustion engine to "0".
•
Close the fuel tap
•
Secure the tow tractor against unauthorized use and, if necessary, remove the ignition key.
•
When leaving, secure the device against rolling away, by using wheel chocks or, if necessary,
by applying the parking brake
Tip:
In case of prolonged downtime, do not stop the engine with the engine off switch, but close the
fuel cock and let the engine run until it comes to a standstill by itself. Thus, the carburetor is
empty, and no gumming can occur.
This procedure must not be used in confined spaces, otherwise it exists
Choking hazard. Basically, pay attention to adequate ventilation!
7.4
Height and inclination angle adjustment of the hand rail
•
In order to ensure the operator an ergonomically optimal working height, the height of the
handrails (Fig.7.2, item 1) can be adjusted at two different points.
1
2
1
Illustration 7.3
Illustration 7.2

16
Operation of the self-propelled implement
•
By loosening the upper screws and removing the lower screws (Fig.7.2, Pos.2) left and
right on the handrail, it can be fixed in two other positions. The factory setting is the
middle position.
•
If the height adjustment via the handrail is not sufficient, it is still possible to adjust the
guide bar (Fig.7.3, item 1). This is done by loosening and removing four screws (Fig.7.3;
Pos.2). The guide rail is factory mounted in the two lower holes.
7.5
Securing the machine during transport
•
Pay attention to the trailer load of the towing vehicle and the permissible total weight of the trailer!
•
Suitable loading ramps with sufficient load-bearing capacity must be used for loading the machine.
•
The ramps must be secured against slipping.
•
The machine must be secured against rolling during transport. Push the machine all the way forward
until it is on the front side wall with the attachment. The fastening straps wrap around the holder of the
guide rail.
•
If present, engage the parking brake of the drive wheels.
•
Switch off the engine and close the fuel tap.
•
Before unloading the machine make sure that there is no obstacle immediately before the ramps on
the ground, otherwise there is a risk of collision. When unloading several machines, these are far
enough to drive out of the loading zone.

17
Maintenance
8 Maintenance
8.1
General maintenance instructions
•
Personal injury or damage to the machine may occur. Check all safety-related parts
before every use of the machine.
•
Oil changes must be made according to the recommendations of the respective engine manufacturer.
•
Check the hydraulic connections for leaks before each use. Check the hydraulic connections for leaks
before each use.
•
High pressure leaking fluids (such as hydraulic oil and diesel fuel) can penetrate the skin
and cause serious injury! Therefore, seek medical attention immediately - risk of
infection!
•
The hydraulic system is operated with biodegradable oil.
•
The machine must be regularly serviced.
•
Dispose of oils, fuels and filters separately and properly!
•
When working on the electrical system, disconnect the earth connection from the battery!
•
Repairs, maintenance and cleaning work as well as the elimination of malfunctions must always be
carried out with the drive switched off and the engine stationary. Remove ignition key or spark plug
connector! After carrying out this work, replace all protective devices!
•
If the machine is transported in a different way than with its own drive, this must be done with the
motor switched off!
•
Regularly check nuts and bolts for tightness and retighten if necessary.
•
When carrying out electrical welding work on the tractor and attached equipment, disconnect the
cables at the generator and at the battery!
•
Only use original spare parts from the manufacturer!
•
After the first 5 hours of operation, check all screw and bolt connections.
•
Lubricate or lubricate all moving parts regularly.
•
Check hydraulic connections for the first time after 5 operating hours, retighten if necessary.
Only tightening has no success!
Release a leaking hydraulic fitting first, then move the hose or fitting, and then
retighten the fitting.
8.2
Daily maintenance
•
Before each use, the safety elements and moving parts must be checked for wear.
•
Check the hydraulic oil level before each use. To do this, unscrew the cap from the tank and
visually check whether the oil in the tank easily covers the horizontally arranged plate.
•
Check the oil level and the air filter of the engine for dirt (see operating instructions of the engine
manufacturer).
•
Before and during use, especially during mowing work, constantly check the protective grid for
the intake of cooling air and keep it free of dirt and parts of plants sucked in. In continuous
operation with a clogged cooling system, the engine becomes too hot and can be damaged.
•
Do not spray the engine with water, use a brush or compressed air.
•
Check hydraulic connections and lines.
•
Check the air pressure of the drive wheels.
•
Carry out a test run before each use.
•
Clean the unit after each use.

18
Maintenance
8.3
Maintenance after 20 operating hours or longer downtime
•
At regular intervals and at the beginning and end of the season, the moving parts of the unit
must be greased or oiled.
•
There is a grease nipple below the device receptacle on the basic unit, which it regularly
lubricates.
•
Regularly grease the mounting of the attachment or the pick-up tube of the self-propelled work
machine.
•
Lubricate or lubricate Bowden cables as required
•
Hydraulic oil and filter change for the first time after 20 operating hours, then every 100 operating
hours. Change the hydraulic oil filter at the same time interval as the oil change. (used oil type
see chapter for technical data)
8.4
Maintenance after 100 operating hours
•
Fan housing after every 100 operating hours or min. Take off once a year - preferably before the
season - and clean the cooling fins on the cylinder and cylinder head as well as the baffles,
cooling air strainer and oil cooler necessary for air circulation.
•
Hydraulic oil and filter change for the first time after 20 operating hours, then every 100 operating
hours. Change the hydraulic oil filter at the same time interval as the oil change. (used oil type
see chapter for technical data)
•
Cleaning the spark plug of soot deposits with a wire brush followed by checking the distance
between the electrodes. The electrode distance should be approx. 1 mm. Renew spark plugs
after 200 operating hours.
•
Clean the air filter cartridge at the latest after 100 hours of operation and in very dusty conditions
after a few hours
8.5
Storage
If the machine is not used for a long time, the following measures are recommended:
1.) Perform cleaning
2.) Preserve the motor (observe the instructions of the motor manufacturer)!
•
Completely drain fuel or top up fuel tank, add fuel stabilizer to fuel.
•
Run the engine for approx. 1 minute
•
Add one teaspoonful (approx. 0.03 ltr.) Of engine oil to the spark plug opening and
then slowly crank the engine.
•
Reinstall the spark plug and do not attach the spark plug connector. Pull on the
starter handle until the compression resistance is felt, thus the valves are closed.
•
Every two to three weeks, crank the engine slowly and pull it again until the
compression resistance is felt.
3.) Jack drive wheels
•
Using wooden blocks, jack up the machine so that the drive wheels are not resting
on the ground. Pay attention to stability!
4.) Subordinate the machine
•
To prevent corrosion, protect the machine from weathering. Do not store the
machine in damp rooms, fertilizer storage or stables.
5.) Cover the machine with a cloth or similar.

19
Technical specifications
9 Technical Data
Technical Data
Type
K 2100
engine
Honda gasoline
engine
power
6,6 kW (9 hp)
Max. Torque
19,1 Nm / 2.500 rmp
capacity
270 cc
Upper idle speed
3.400 min-1
spark plug
NGK BPR 6 ES
Engine oil
approx. 0.6 l multi-grade oil
SAE 10W-30 API SJ (or higher) is recommended for general use
fuel
see chapter "Recommendations"
Fuel tank
6 liter
fuel consumption
313 g/kWh
air filter
Dry filter element
starting device
Recoil
E-starting device
12V
12 V 90 AH
battery
Unavailable
Zapf Elle
Hydraulic max. about 14.0 l at 210 bar and 3400 min-1
PTO
about 10 liters
Hydraulic oil tank
Synthetic Ester Bio-hydraulic oil Avia
Syntofluid N68 (recommended)
hydraulic oil
VG 68
Driving speed
forward
0 – 7 km/h (infinitely variable)
Driving speed
backward
0 – 7 km/h (infinitely variable)
-Reserve technical changes! -

Technical specifications
20
Technical Data
Parking brake
optionally mechanically switchable
Handlebar
height adjustable and vibration damped
Steering
Unavailable
Tire pressure at:
Standard values (max tire pressure 2 bar - risk of
explosion) max. 2 bar
4.00 - 8
110 kg (without tires)
Weight of basic unit
4.00-8
Standard
7,5 kg
16x6,5-8
10,2 kg
Weight Tires (set)
685 mm with 4.00-8 tires
Hand arm vibrations
according to DIN EN 12733: 2009
2.5 m / s² left handle with sweeper measured 2.7
m / s² right handle with sweeper measured
Sound power level LWAnach
DIN EN 12733:2009 95,8 dB(A)
Sound pressure level on the ear
82,0 dB(A)
-Reserve technical changes! -
Other manuals for K2100
1
Table of contents
Other Kersten Tractor manuals


Popular Tractor manuals by other brands

International Harvester Company
International Harvester Company International 102 Operator's manual

New Holland
New Holland Boomer 24 Tier 4B Service manual

LS tractor
LS tractor J2020H Operator's manual

Ariens
Ariens 935000 Series owner's manual

Ingersoll
Ingersoll 3118 Operator's manual

Baumalight
Baumalight TR330 Operator's manual


