manuals.online logo
Brands
  1. Home
  2. •
  3. Brands
  4. •
  5. Keter
  6. •
  7. Outdoor Storage
  8. •
  9. Keter MANOR 6x8DD User manual

Keter MANOR 6x8DD User manual

This manual suits for next models

2

Other Keter Outdoor Storage manuals

Keter ARTISAN 97 User manual

Keter

Keter ARTISAN 97 User manual

Keter WOODLAND 30 User manual

Keter

Keter WOODLAND 30 User manual

Keter DUOTECH ARTISAN 97 User manual

Keter

Keter DUOTECH ARTISAN 97 User manual

Keter DUOTECH 1921234 User manual

Keter

Keter DUOTECH 1921234 User manual

Keter FACTOR 4x6 User manual

Keter

Keter FACTOR 4x6 User manual

Keter DARWIN 4x4 User manual

Keter

Keter DARWIN 4x4 User manual

Keter Bellevue User manual

Keter

Keter Bellevue User manual

Keter GRANDE STORE User manual

Keter

Keter GRANDE STORE User manual

Keter FACTOR 8x6 User manual

Keter

Keter FACTOR 8x6 User manual

Keter FACTOR 6x3 User manual

Keter

Keter FACTOR 6x3 User manual

Keter FUSION 757 User manual

Keter

Keter FUSION 757 User manual

Keter DARWIN 6x6W User manual

Keter

Keter DARWIN 6x6W User manual

Keter HORIZON 73 User manual

Keter

Keter HORIZON 73 User manual

Keter NEWTON 759 User manual

Keter

Keter NEWTON 759 User manual

Keter FACTOR 17197897 User manual

Keter

Keter FACTOR 17197897 User manual

Keter DUOTECH OAKLAND 7513 User manual

Keter

Keter DUOTECH OAKLAND 7513 User manual

Keter EVOTECH CORTINA 77 User manual

Keter

Keter EVOTECH CORTINA 77 User manual

Keter FUSION 759 User manual

Keter

Keter FUSION 759 User manual

Keter 380L 100 US GAL User manual

Keter

Keter 380L 100 US GAL User manual

Keter MOBY RECYCLING User manual

Keter

Keter MOBY RECYCLING User manual

Keter STORE-IT-OUT MIDI User manual

Keter

Keter STORE-IT-OUT MIDI User manual

Keter HORIZON 77 User manual

Keter

Keter HORIZON 77 User manual

Keter OutStanding ATLAS 10x8 User manual

Keter

Keter OutStanding ATLAS 10x8 User manual

Keter MANOR 6x5DD User manual

Keter

Keter MANOR 6x5DD User manual

Popular Outdoor Storage manuals by other brands

LIVING AND HOME 0735940285711 user guide

LIVING AND HOME

LIVING AND HOME 0735940285711 user guide

USP DURAMAX 10 Ft x 8 Ft StoreMax Plus owner's manual

USP

USP DURAMAX 10 Ft x 8 Ft StoreMax Plus owner's manual

rollaway container ARPCA24 manual

rollaway container

rollaway container ARPCA24 manual

Duratuf GL105 Assembly instructions

Duratuf

Duratuf GL105 Assembly instructions

Viking SD5300SS Use & installation guide

Viking

Viking SD5300SS Use & installation guide

USP DURAMAX Apex Pro 10.5 Ft x 8 Ft 40116 owner's manual

USP

USP DURAMAX Apex Pro 10.5 Ft x 8 Ft 40116 owner's manual

ModuLaro Lojo WC202200 manual

ModuLaro

ModuLaro Lojo WC202200 manual

Outdoor Life Products FP2030 F Assembly instructions

Outdoor Life Products

Outdoor Life Products FP2030 F Assembly instructions

Royalcraft Faro 295L Storage Box Assembly instructions

Royalcraft

Royalcraft Faro 295L Storage Box Assembly instructions

TYGO Nyland Building Instruction

TYGO

TYGO Nyland Building Instruction

Riverlea Duratuf KIWI KS3 Assembly instructions

Riverlea

Riverlea Duratuf KIWI KS3 Assembly instructions

Rubbermaid 5L45 manual

Rubbermaid

Rubbermaid 5L45 manual

garofalo TUSCANY EVO user manual

garofalo

garofalo TUSCANY EVO user manual

OLT GS84D-FJ-Plywood Assembly manual

OLT

OLT GS84D-FJ-Plywood Assembly manual

Lifetime 6418 owner's manual

Lifetime

Lifetime 6418 owner's manual

Palram CANOPIA RUBICON 6x10 How to assemble

Palram

Palram CANOPIA RUBICON 6x10 How to assemble

Duratuf Havelock Assembly instructions

Duratuf

Duratuf Havelock Assembly instructions

Palram CANOPIA RUBICON 6x5/2x1.5 How to assemble

Palram

Palram CANOPIA RUBICON 6x5/2x1.5 How to assemble

manuals.online logo
manuals.online logoBrands
  • About & Mission
  • Contact us
  • Privacy Policy
  • Terms and Conditions

Copyright 2025 Manuals.Online. All Rights Reserved.

USER MANUAL | MODE D'EMPLOI | MANUAL DEL USUARIO | GEBRAUCHSANLEITUNG |
GEBRUIKSHANDLEIDING | MANUALE PER L’UTENTE | MANUAL DO UTILIZADOR
MANOR 6x8DD
A-1276-9 577718
SKU: 17196659 | 17197129
WARRANTY ACTIVATION Thank you for your purchase of the Keter shed. In order toactivate your warranty,
please logonto our website and fill in the form under warranty activation.
WW W.K E TER.COM
US, Canada :
Tel: 1- (888)-374 - 4262, Fax: 317-575-4502
UK :
Tel: 0121-5060008, Fax:0121-4220808
Spain:
Tlf: +34.949
27
74
21, Fax: +34.949
34
89
76
Other Eu ropean Countries :
Tel: 31-1612-28301, Fax:31-1612-28322
75850_MANUAL_MONTAJE.pdf 1 10/5/19 13:36
SITE PREPARATION | PRÉPARATION DU SITE | PREPARACIÓN DEL LUGAR | VORBEREITUNG DES AUFSTELLUNGSORTES
| VOORBEREIDING VAN HET TERREIN | PREPARAZIONE DEL LUOGO DI MONTAGGIO | PREPARAÇÃODO LOCAL
Level the ground surface | Égalisezla surface du sol | Nivele la superficie del suelo | Ebnen Sie die Bodenoberfläche |
Maak de bodem vlak | Livella la superficie del terreno | Nivele asuperfície do solo
Recommendation: Construct a wooden or concrete base as a foundation| Recommandation: fabriquez une base en bois ou
en béton en guise de fondation| Recomendación: construya una base de madera o de cemento a modo de cimiento|
Empfehlung: Bauen Sie als Fundament eine Grundfläche aus Holz oder Beton | Aanbeveling: maak een houten of betonnen
ondergrond als fundering | Raccomandazione: costruisci una base di legno o di cemento come fondamenta |
Recomendação: Construa uma basedemadeira ou de cimento como fundação
External floor measurements are: | Les measures externes de la étage sont: | Las medidas del suelo externo son: | Die
Außen-Bodenmaße betragen: | De afmetingen van de externe vloer zijn: | Le misure del pavimento esterno sono: | As medidas
externas do chão são:
Option | Opción | optie | opzione | opção AOption | Opción | optie | opzione | opção B
68.9”
175 cm
87.4”
222 cm
2
75850_MANUAL_MONTAJE.pdf 2 10/5/19 13:36
PB
BEFORE STARTING ASSEMBLY | AVANT DE COMMENCER LE MONTAGE | ANTES DE EMPEZAR EL ARMADO | VOR
MONTAGEBEGINN | VOORDAT U BEGINT TE MONTEREN | PRIMA DI INIZIARE IL MONTAGGIO | ANTES DE INICIAR A MONTAGEM
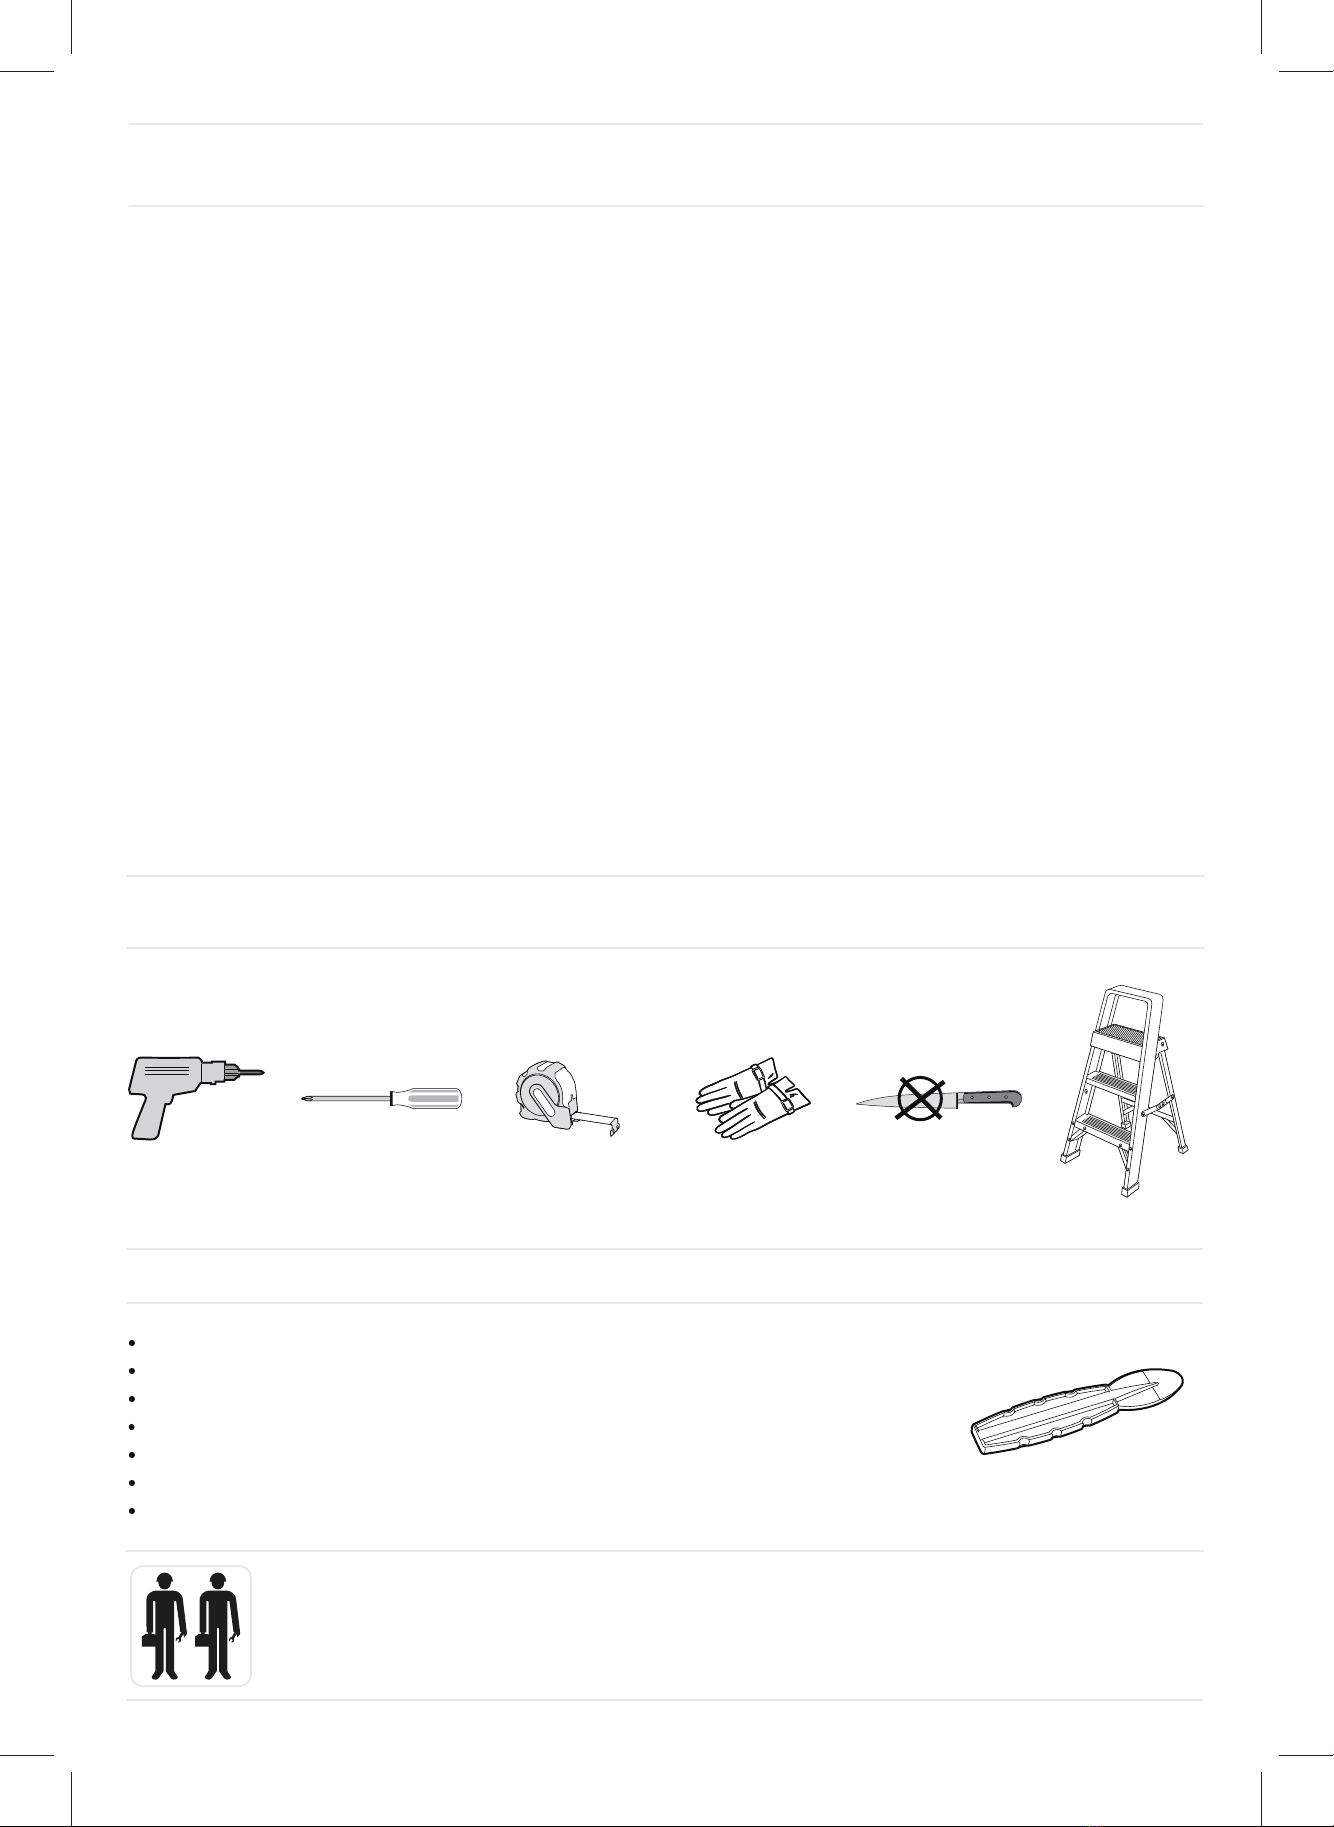
ASSEMBLY REQUIRES TWO PEOPLE | LE MONTAGE DOIT ÊTRE EFFECTUÉ PAR DEUX PERSONNES | SE
NECESITAN DOS PERSONAS PARA ARMARLO | ZWEI PERSONEN ZUR MONTAGE NOTWENDIG | MONTAGE
VEREIST TWEE PERSONEN | MONTAGGIO RICHIEDE DUE PERSONE| A MONTAGEM EXIGE DUAS PESSOAS
REQUIREDTOOLS | OUTILS EXIGÉS | HERRAMIENTAS NECESARIAS | BENÖTIGTE WERKZEUGE | BENODIGD
GEREEDSCHAP | ATTREZZATURA OCCORRENTE | FERRAMENTAS NECESSÁRIAS
spa x1
SPATULA | SPATULE | ESPÁTULA | SPACHTEL |SPATEL | SPATOLA | ESPÃTULA
Use spatula (part “SPA”) for easier insertion of panel into profile.
Utilisez la spatule (partie “SPA”) pour une meilleure insertion du panneau dans le profil.
Utilice una espátula (pieza “SPA”) para una mejor inserción del panel en el perfil.
Benutzen Sie den Spachtel (Bezeichnung„SPA“), um die Platten leichter in die Nut einführen zu können.
Gebruik spatel (onderdeel SPA) voor het gemakkelijk invoeren van het paneel in het profiel.
Utilizzare la spatola (parte SPA) per inserire il pannello più facilmente nel profilo.
Utilize uma espátula (peça “SPA”) para facilitar a inserção do painel no perfil.
Read the care and safety guidelines at the end of this manual | Check to ensure that there are no missing or damaged
parts BEFORE starting or arranging assembly | Review all assembly instructions | Assemble all the parts according to the
directions in this manual. Do not skip any steps.
Lisez les instructions de précaution et de sécurité à la fin de ce manuel | Assurez-vous qu’il n’y a pas de pièces manquantes
ou endommagées AVANT de commencer ou d'organiser l'assemblage | Lisez toutes les instructions de montage |
Assemblez toutes les pièces selon les instructions de ce manuel. Ne sautez aucune étape.
Lea las intrucciones de precauciones y seguridad que están al final de este manual | Asegúrese de que no faltan piezas ni
están dañadas ANTES de comenzar o disponer el montaje | Revise todas las instrucciones de montaje | Monte todas las
piezas según las instrucciones de este manual. No se saltee ningún paso.
Lesen Sie die Sicherheitsrichtlinien am Ende des Benutzerhandbuchs durch | Prüfen Sie bitte VOR dem Zusammenbau,
dass keine Teile beschädigt sind oder fehlen | Gehen Sie noch einmal die komplette Aufbauanleitung durch | Bauen Sie alle
Teile entsprechend der Anleitung in diesem Handbuch zusammen. Lassen Sie dabei keinen Arbeitsschritt aus.
Lees de richtlijnen voor zorg en veiligheid achterin deze handleiding | Controleer dat er geen onderdelen mankeren, of
beschadigd zijn, VOORDAT u met de montage begint | Bekijk alle montagehandleidingen | Monteer alle onderdelen
volgens de aanwijzingen van deze handleiding. Sla geen stappen over.
Leggi le linee guida di assistenza e sicurezza alla fine di questo manuale | Verificare per assicurarsi che non ci siano parti
mancanti o danneggiate PRIMA di iniziare o di disporre il montaggio | Consulta tutte le istruzioni di montaggio | Monta tutti
i componenti secondo le istruzioni contenute in questo manuale. Non saltare nessuna fase.
Leia as diretrizes de cuidados e segurança que constam da parte final deste manual | Verifique para se assegurar de que
não há peças em falta ou danificadas ANTES de começar a preparar a montagem | Reveja todas as instruções de
montagem | Monte todas as peças de acordo com as instruções do manual. Não salte quaisquer passos.
3
75850_MANUAL_MONTAJE.pdf 3 10/5/19 13:36
PB
h1b (x1)
65"
165 cm
s1c (x1)
39.8" x 73.6"
101 x 187 cm
FLOOR PARTS | ÉLÉMENTS DU PLANCHER| PARTES DEL SUELO | BODENTEILE| VLOERONDERDELEN | PARTI DEL
PAVIMENTO | PEÇAS DO CHÃO
SHED PARTS | PIÈCES DE L’ABRI | PARTES DEL COBERTIZO | TEILE DES SCHUPPENS | ONDERDELEN VAN
HET SCHUURTJE | COMPONENTI DEL DEPOSITO ATTREZZI | PEÇAS DO ABRIGO
Remove all parts from the package(s) and spread them out on a clean work surface | Code letters are imprinted on each part for
easy identification | Retirez toutes les pièces du/des paquet(s) et étalez-les sur une surface de travail propre |Des lettres sont
imprimées sur chaque pièce pour une identification facile | Saque todas las piezas del paquete o paquetes y póngalas sobre una
superficie de trabajo limpia |El código de letras está marcado en cada pieza para que sea más fácil identificarla | Nehmen Sie alle
Teile aus der Verpackung und breiten Sie sie auf einer sauberen Arbeitsfläche aus |Auf jedem Teil sind Kennbuchstaben
aufgedruckt, die die Zuordnung der einzelnen Teile erleichtern | Haal alle onderdelen uit het pakket (of uit de pakketten) en leg ze
op een schoon werkoppervlak | Op ieder onderdeel zijn codes aangebracht voor een gemakkelijke identificatie | Rimuovi tutti i
componenti dal pacchetto (i) e spargili su una superficie di lavoro pulita |Le lettere del codice sono state stampate su ciascun
componente per una facile identificazione | Retire todas as peças da embalagem e espalhe-as numa superfície de trabalho limpa
| Existem letras de código impressas em cada peça para fácil identificação
c1g (x2)
85.4"
217 cm
c1a (x1)
64.5”
164 cm t (x2)
f2d (x1)
66.5" x 86.6"
169 x 220 cm
w1c (x3)
39.8" x 73.6"
101 x 187 cm
bd1a (x1)
42.9” x 66.5”
109 x 169 cm
fd2b (x2)
6.7” x 51.5”
17 x 131 cm
c1b (x4)
73.2”
186 cm
fu2a (x1)
v (x2)
lm (x1) rm (x1)
mdt (x2)
bu1a (x1)
h1a (x2)
72.4"
184 cm
WALL PARTS | PIÈCES DU CONTOUR | PARTES DE LAS PAREDES | WANDELEMENTE | MUURONDERDELEN |
PARTI DELLA PARETE | PAINÉIS LATERAIS
msl (x1) msr (x1)
d1b (x1)
52.4"
133 cm
mtm (x1)
53.1”
135 cm
mdfr (x1)
70.4”
179 cm
md (x1)
70.4”
179 cm
4
75850_MANUAL_MONTAJE.pdf 4 10/5/19 13:36
PB
CONSTRUCTION PARTS | PIÈCES DE CONSTRUCTION | PIEZAS PARA EL MONTAJE | BAUTEILE |
CONSTRUCTIEONDERDELEN | PARTI PER LA COSTRUZIONE| PEÇAS DE CONSTRUÇÃO
e1e (x2)
85"
216 cm
e1g (x4)
33"
84 cm
b1a (x1)
90.5"
230 cm
rc (x4)kc (x2)
r1h (x1)
76.7"x91.3"
195 x 232 cm
ROOF PARTS | PIÈCES DU TOIT | PARTES DEL TECHO | DACHELEMENTE | DAKONDERDELEN | PARTI DEL
TETTO | PEÇAS DO TELHADO
o
oo
o
WINDOW PARTS | PIÈCES DE LA FENÊTRE | PARTES DE LA VENTANA | FENSTERELEMENTE|
VENSTERONDERDELEN | PARTI DELLA FINESTRA | PEÇAS DA JANELA
acw (x1)f-in (x1) f-out (x1) pls (x1)
ac (X2)
1"
26 mm
ap (X1)
sh (x1)
DOOR PARTS | PIÈCES DE LA PORTE | TÜRELEMENTE | PARTES DE LA PUERTA | DEURONDERDELEN | PARTI
DELLA PORTA | PEÇAS DAS PORTAS
dc (x5)rdd (x2) ldd (x2)
mbl (x1)mtl (x1)mpn (x2)
dh (x4)smdp (x1)smdl (x1) smdb (x1)
mfr
70.4”
179 cm
m
70.4”
179 cm
mdd (x2)
25.6” x 70.1”
65 x 178 cm
mdl
70.4”
179 cm
mdr
70.4”
179 cm
5
75850_MANUAL_MONTAJE.pdf 5 10/5/19 13:36
PB
Packaging may contain some additional small parts for use as spare parts | L’emballage peut contenir de petites pièces
supplémentaires à utiliser comme pièces de rechange | El envoltorio puede contener algunas piezas pequeñas adicionales
que se pueden utilizar como repuestos | In der Verpackung können kleine Zusatzteile enthalten sein, die als Ersatzteile
genutzt werden können | De verpakking kan een aantal kleine extra onderdelen bevatten, die als reserveonderdeel gebruikt
kunnen worden | La confezione potrebbe contenere piccole parti supplementari da utilizzare come parti di ricambio | A
embalagem pode conter algumas pequenas peças adicionais para utilização como peças de reposição
NOTE: Due to variations in production, the actual assembled size may vary slightly from the specified dimensions.
REMARQUE:
En raison de variantes dans la production, la taille de montage réelle peut différer quelque peu des dimensions indiquées.
NOTA: debido a las variaciones en la producción, el tamaño real al montarlo puede variar ligeramente con respecto a las dimensiones especificadas.
BITTE BEACHTEN: Aufgrund von Abweichungen in der Herstellung kann die tatsächliche Größe leicht von den angegebenen Maßen abweichen.
LET OP:
vanwege afwijkingen in de productie kan de werkelijke afmeting na montage een klein beetje afwijken van de opgegeven afmetingen.
NOTA: a causa di variazioni nella produzione, la dimensione effettiva del prodotto assemblato può variare leggermente dalle dimensioni menzionate.
NOTA: Devido a variações na produção o tamanho real da montagem poderá variar ligeiramente das dimensões especificadas.
S13b (x40) 0.47"/12 mm
1 2 3 4
cm
0.5 1 1.5
inch
Use a powerful e lectric sc rewdri ver. The sc rew should drill itself to a me tal profile.
Utilisez un tournevis é lectrique pui ssant. La vis doit pe rcer el le-même une tablette de mé tal.
Use un de stornillador eléctri co potente. El p ropio tornil lo debería per forar el contorno de me tal.
Verwenden Sie bit te einen leistungsstar ken, e lektrischen Sch raubenziehe r. Die Sch raube soll sich in das
Me tallp rofil hineinsch rauben, ohne vorzubohren.
Gebruik een k rachtige e lectrische sch roevendraaie r. De sch roef moet zichzelf in een me talen profiel boren.
Usa re un cacciavite elettri co con buona potenza. La vi te si fi letterà au tomaticamen te nel p rofilo metalli co.
Utilize uma cha ve de fendas elétri ca potente. O pa rafuso d eve atar rachar-se num contorno de me tal.
123
cm
0.5 1 1.5
inch
S10b (x28) 0.47"/12 mm
1 2 3
cm
0.5 1 1.5
inch
dS2b (x18) 0.39"/10 mm
SCREWS | VIS |TORNILLOS |SCHRAUBEN |SCHROEVEN | VITI | PARAFUSOS
SELF-DRILLING SCREW | VIS AUTO-FOREUSE | TORNILLO DE AUTO-ATORNILLADO | SELBSTBOHRENDE
SCHRAUBE | ZELF TAPPENDE SCHROEF | VITE AUTOFILETTANTE | PARAFUSO AUTORROSCANTE
1 2 3 4 5
cm
0.5 1 1.5 2
inch
S50b (x2) 1.97"/50 mm
Sc15 (x17) 0.63"/16 mm
1 2 3 4
cm
0.5 1 1.5
inch
123 4
cm
0.5 1 1.5
inch
S26b (x144) 1"/26 mm
1 2 3
cm
0.5 1 1.5
inch
S23b(x4) 0.98"/25 mm
6
75850_MANUAL_MONTAJE.pdf 6 10/5/19 13:36
PB
7
75850_MANUAL_MONTAJE.pdf 7 10/5/19 13:36
PB
8
75850_MANUAL_MONTAJE.pdf 8 10/5/19 13:36
PB
9
75850_MANUAL_MONTAJE.pdf 9 10/5/19 13:36
PB
10
75850_MANUAL_MONTAJE.pdf 10 10/5/19 13:36