Kettler MONTANA 07877-000 Installation guide

Der Umwelt zuliebe: wir drucken auf 100% Altpapier!
Montageanleitung für Power Stepper “MONTANA”
Art.-Nr. 07877-000
Abb. ähnlich
PL
I
E
NL
F
GB
D
A B C
94 73 153
cm 110 kg
max.
32
kg
A
C
B

3
gen. Sollte es Anlaß für Beanstandungen geben, wenden Sie sich
bitte an Ihren Fachhändler.
■ Sehen Sie sich die Zeichnungen in Ruhe an, und montieren Sie
das Gerät entsprechend der Bilderfolge. Innerhalb der einzel-
nen Abbildungen ist der Montageablauf durch Großbuchsta-
ben vorgegeben.
■ Die Montage des Gerätes muß sorgfältig und von einer er-
wachsenen Person vorgenommen werden. Nehmen Sie im
Zweifelsfall die Hilfe einer weiteren, technisch begabten Person
in Anspruch.
■ Beachten Sie, dass bei jeder Benutzung von Werkzeug und bei
handwerklichen Tätigkeiten immer eine mögliche Verletzungs-
gefahr besteht. Gehen Sie daher sorgfältig und umsichtig bei
der Montage des Gerätes vor!
■ Sorgen Sie für eine gefahrenfreie Arbeitsumgebung, lassen Sie
z. B. kein Werkzeug umherliegen. Deponieren Sie z. B. Ver-
packungsmaterial so, dass keine Gefahren davon ausgehen
können. Bei Folien/Kunststofftüten für Kinder Erstickungsge-
fahr!
■ Das für einen Montageschritt notwendige Verschraubungsma-
terial ist in der dazugehörigen Bildleiste dargestellt. Setzen Sie
das Verschraubungsmaterial exakt entsprechend der Abbildun-
gen ein. Alles erforderliche Werkzeug finden Sie im Kleinteile-
beutel.
■ Bitte verschrauben Sie zunächst alle Teile lose und kontrollieren
Sie deren richtigen Sitz. Drehen Sie die selbstsichernden Mut-
tern bis zum spürbaren Widerstand zuerst mit der Hand auf,
anschließend ziehen Sie sie gegen den Widerstand (Klemmsi-
cherung) mit einem Schraubenschlüssel richtig fest. Kontrollie-
ren Sie alle Schraubverbindungen nach dem Montageschritt
auf festen Sitz. Achtung: wieder gelöste Sicherheitsmuttern wer-
den unbrauchbar (Zerstörung der Klemmsicherung) und sind
durch Neue zu ersetzen.
■ Aus fertigungstechnischen Gründen behalten wir uns die Vor-
montage von Bauteilen (z.B. Rohrstopfen) vor.
Wichtige Hinweise
D
Assembly Instructions
GB
Before assembling or using the exercise cycle , please read the following instructions carefully. They contain
important information for use and maintenance of the equipment as well as for your personal safety. Keep
these instructions in a safe place for maintenance purposes or for ordering spare parts.
For Your Safety
■ Exercise should be used only for its intended purpose, i.e. for
physical exercise by adult persons.
■ Any other use of the equipment is prohibited and may be dan-
gerous. The manufacturer cannot be held liable for damage or
injury caused by improper use of the equipment.
■ Exercise has been designed in accordance with the latest stan-
dards of safety. Any features which may have been a possible
cause of injury have been avoided or made as safe as possi-
ble.
■ Incorrect repairs and structural modifications (e.g. removal or
replacement of original parts) may endanger the safety of the
user.
■ Damaged components may endanger your safety or reduce the
lifetime of the equipment. For this reason, worn or damaged parts
should be replaced immediately and the equipment taken out of
use until this has been done. Use only original KETTLER spare
parts.
■ If the equipment is in regular use, check all its components
thoroughly every 1 -2 months. Pay particular attention to the
tightness of bolts and nuts.This applies especially to the secu-
ring bolts for saddle and handelbars.
■ To ensure that the safety level is kept to the highest possible
standard, determined by its construction, this product should be
serviced regulary (once a year) by specialist retailers.
■ Instruct persons using the equipment (in particular children) on
possible sources of danger during exercising.
Ersatzteilbestellung
Geben Sie bei Ersatzteilbestellungen bitte die vollständige Arti-
kelnummer, die Ersatzteilnummer, die benötigte Stückzahl und
die Seriennummer des Gerätes (siehe Handhabung) an.
Bestellbeispiel: Art.-Nr. 07877-000 /Ersatzteil-Nr. 70132297 /2
Stück / Serien-Nr: .................... Bewahren Sie die Originalver-
packung des Gerätes gut auf, damit sie später u. U. als Trans-
portverpackung verwendet werden kann.
Wichtig: Zu verschraubende Ersatzteile werden grundsätzlich
ohne Verschraubungsmaterial berechnet und geliefert. Falls Be-
darf an entsprechendem Verschraubungsmaterial besteht, ist die-
ses durch den Zusatz “mit Verschraubungsmaterial” bei der Er-
satzteilbestellung anzugeben.
Entsorgungshinweis
KETTLER-Produkte sind recyclebar. Führen Sie das Gerät am Ende
der Nutzungsdauer einer sachgerechten Entsorgung zu (ortliche
Sammelstelle).
Heinz KETTLER GmbH & Co. KG
Postfach 1020 · D- 59463 Ense-Parsit
http://www.kettler.net
KETTLER Austria GmbH
Ginzkeyplatz 10 · A - 5020 Salzburg
http://www.kettler.at
Trisport AG
Im Bösch 67 · CH-6331 Hünenberg
http://www.kettler.ch
CH
A
D

4
Instructions for Assembly
■ Ensure that you have received all the parts required (see check
list) and that they are undamaged. Should you have any cause
for complaint, please contact your KETTLER dealer.
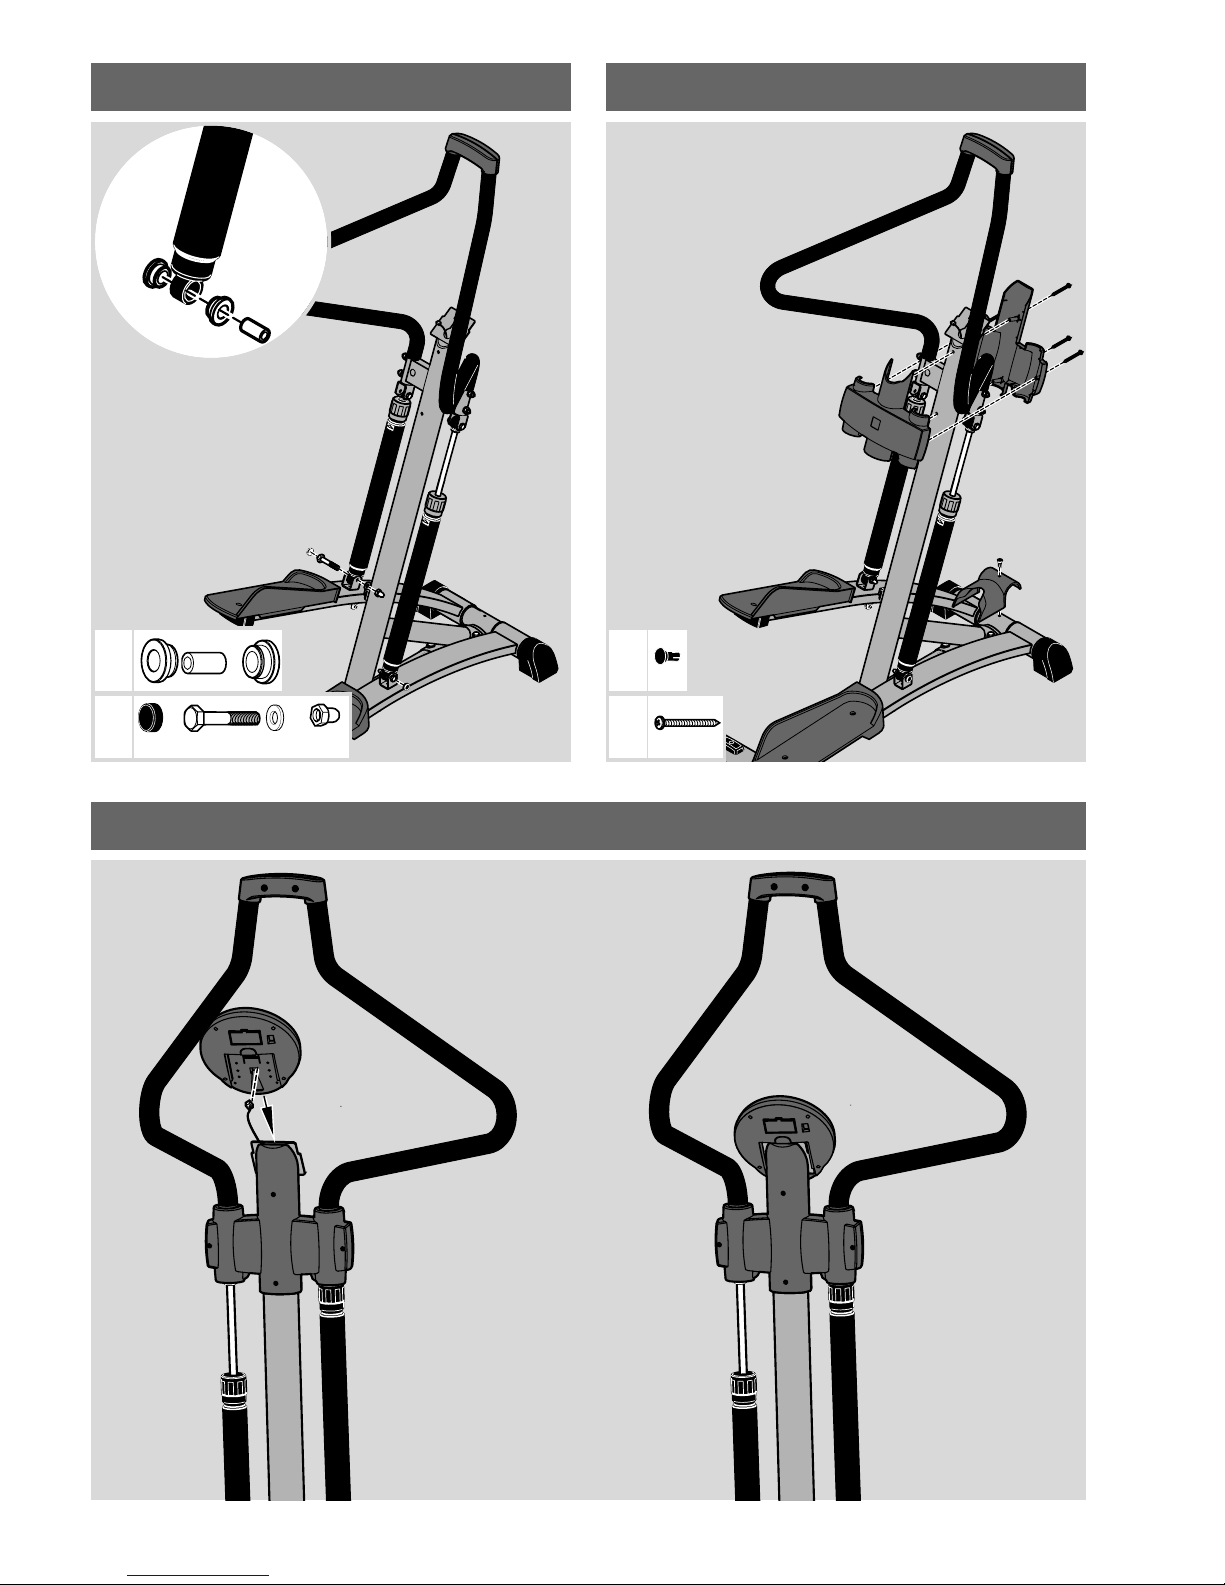
■ Before assembling the equipment, study the drawings carefully
and carry out the operations in the order shown by the dia-
grams. The correct sequence is given in capital letters.
■ The equipment must be assembled with due care by an adult
person. If in doubt call upon the help of a second person, if
possible technically talented.
■ Please note that there is always a danger of injury when wor-
king with tools or doing manual work. Therefore please be ca-
reful when assembling this machine.
■ Ensure that your working area is free of possible sources of
danger, for example don’t leave any tools lying around. Al-
ways dispose packaging material in such a way that it may not
cause any danger. There is always a risk of suffocation if child-
ren play with plastic bags!
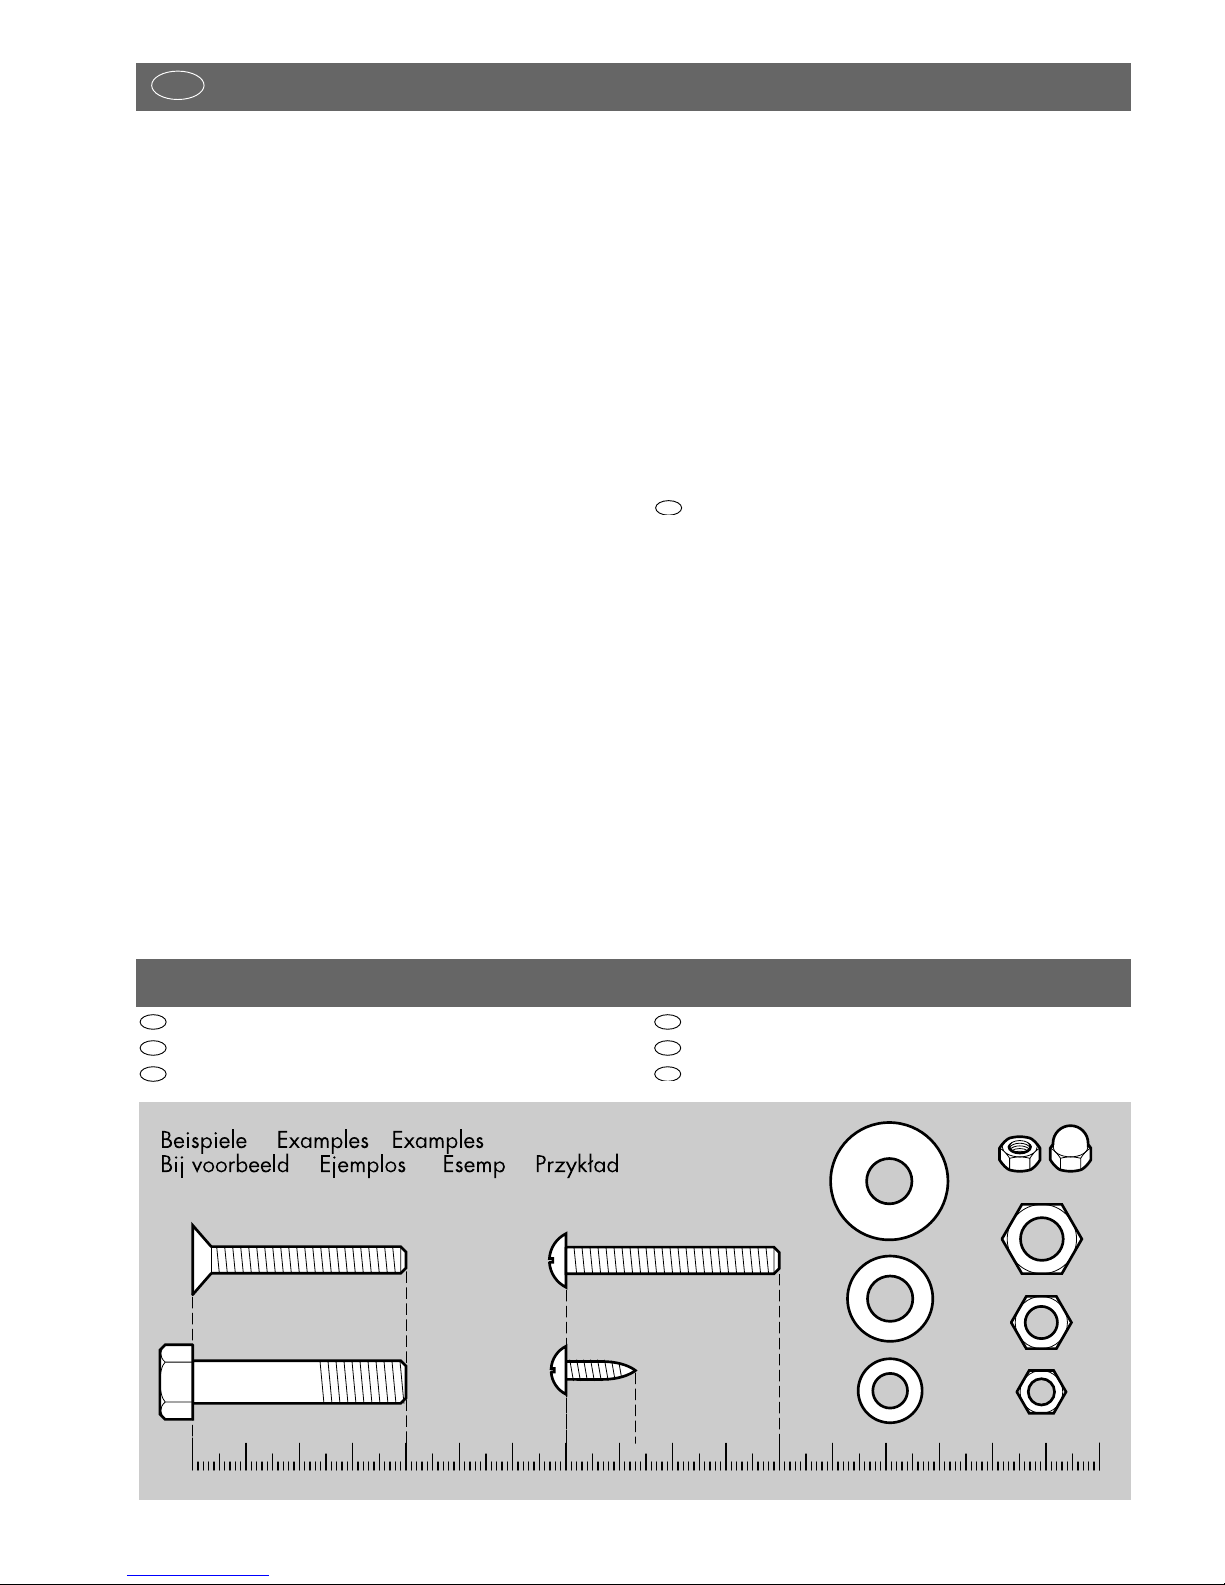
■ The fastening material required for each assembly step is sho-
wn in the diagram inset. Use the fastening material exactly as
instructed. The required tools are supplied with the equipment.
■ Bolt all the parts together loosely at first, and check that they
have been assembled correctly. Tighten the locknuts by hand
until resistance is felt, then use spanner to finally tighten nuts
completely against resistance (locking device). Then check that
all screw connections have been tightened firmly. Attention:
once locknuts have been unscrewed they no longer function
correctly (the locking device is destroyed), and must be repla-
ced.
■ For technical reasons, we reserve the right to carry out preli-
minary assembly work (e.g. addition of tubing plugs).
Handling the equipment
■ Before using the equipment for exercise, check carefully to en-
sure that it has been correctly assembled.
■ Do not set the equipment up in rooms which are frequently used
or close to doors, entries etc.
■ It is not recommended to use or store the apparatus in a damp
room as this may cause it to rust. Please ensure that no part of
the machine comes in contact with liquids (drinks, perspiration
etc.). This may cause corrosion.
■ The machine is designed for use by adults and children should
not be allowed to play with it. Children at play behave unpre-
dictably and dangerous situations may occur for which the ma-
nufacturer cannot be held liable. If, in spite of this, children are
allowed to use the equipment, ensure that they are instructed in
its proper use and supervised accordingly.
■ The exercise cycle complies with the DIN EN 957 - 1/8, class
HB (Homesport). It is therefore unsuitable for therapeutic use.
■ The “Power Stepper” must be set up on an even impact-resistant
base. To absorb the vibrations, lay a straw or rubber mat un-
der the machine.
■ Do not use corrosive or abrasive materials to clean the equip-
ment. Ensure that such materials are not allowed to pollute the
environment.
■ After a longer period of disuse, the hydraulic absorbers may
not achieve their best performance at once. Before beginning
exercising or after a period of disuse, it is recommended to ac-
tivate the absorbers by several pumping movements.
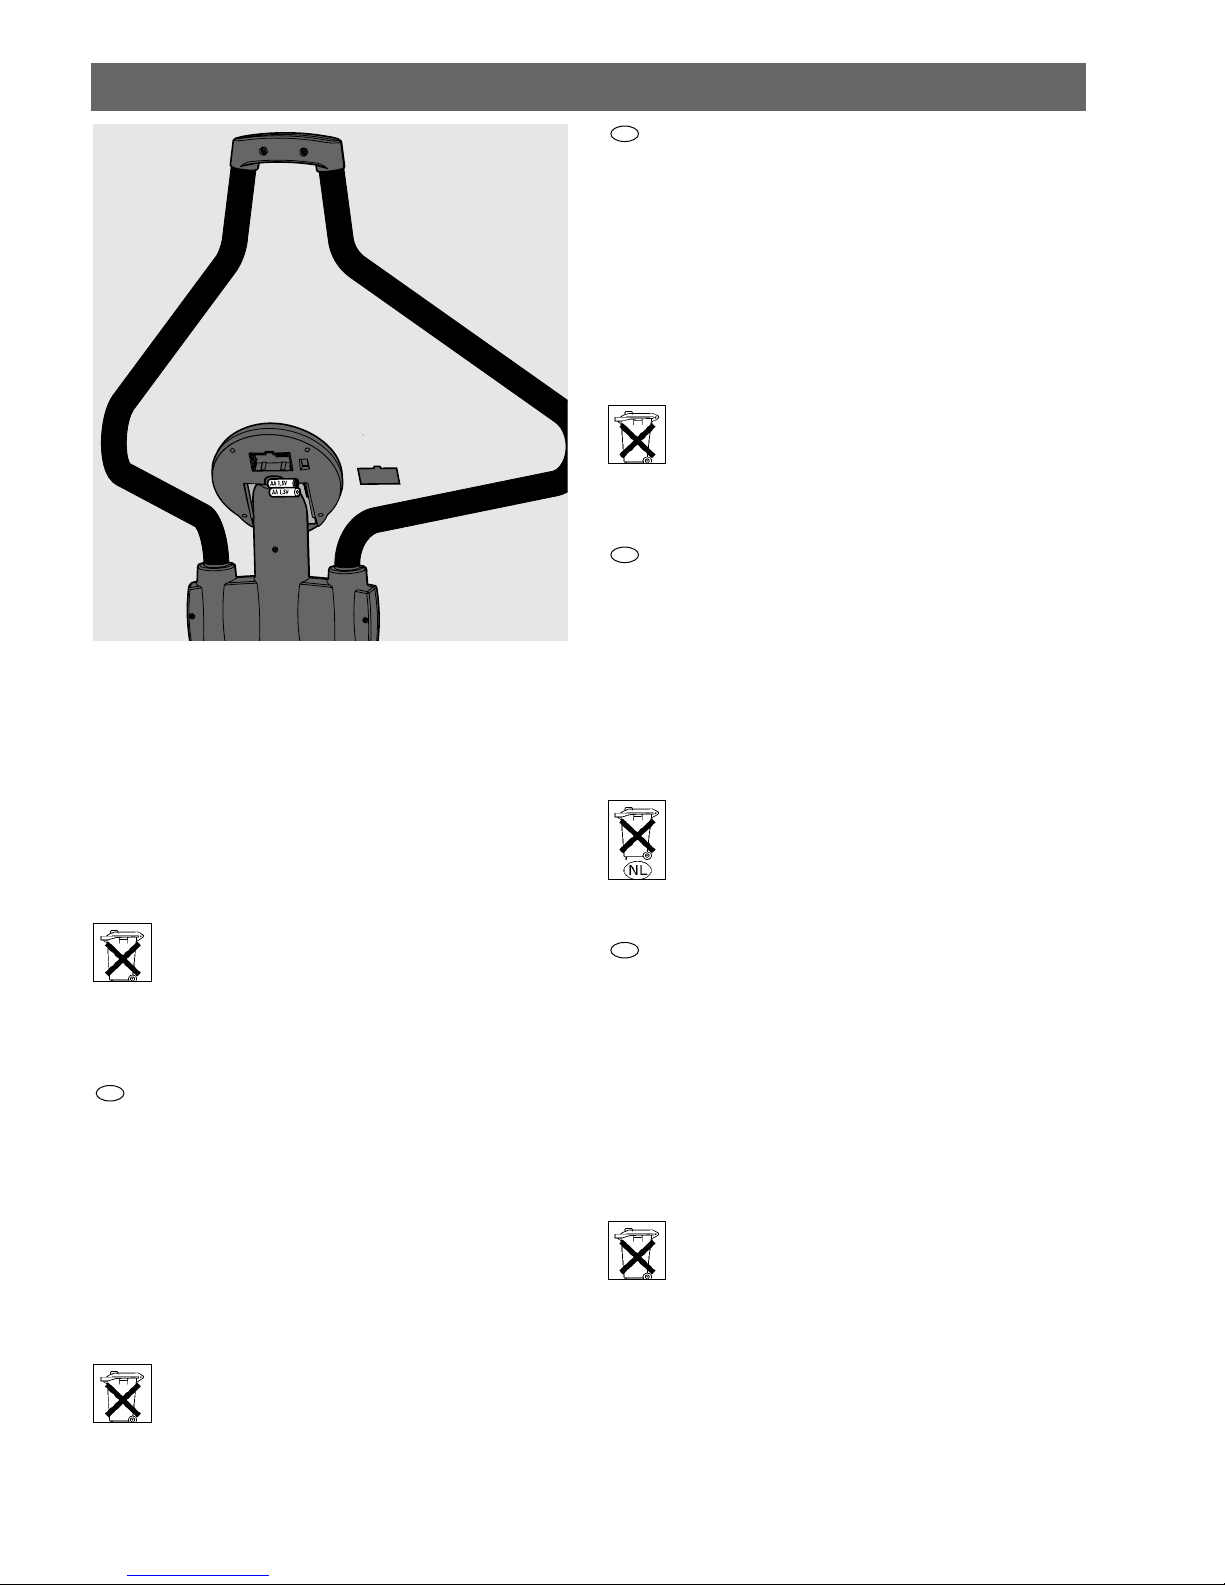
■ To operate correctly, the pulse function requires a minimum vol-
tage of 2,7 volts (only for computers working with batteries).
■ Please ensure that liquids or perspiration never enter the ma-
chine or the electronics.
■ Before use, always check all screws and plug-in connections as
well as respective safety devices fit correctly.
■ Always wear suitable shoes when using.
■ All electric appliances emit electromagnetic radiation when in
operation. Please do not leave especially radiation-intensive
appliances (e.g. mobile telephones) directly next to the cockpit
or the electronic controlsystem as otherwise values displayed
might be distorted (e.g. pulse measurement).
■ When training intensivly shock absorbers may become very
hot. Please avoid contact and do not touch the shock absorbers
after training.
GB
List of spare parts
When ordering spare parts, always state the full article number,
spare-partnumber, the quantity required and the S/N of the pro-
duct (see handling).
Example order: Art. no. 07877-000 / spare-part no.
70132297/ 2 pieces / S/N .................... Please keep original
packaging of this article, so that it may be used for transport at
a later date, if necessary.
Important: spare part prices do not include fastening material; if
fastening material (bolts, nuts, washers etc.) is required, this
should be clearly stated on the order by adding the words „with
fastening material“.
■ Before beginning your program of exercise, consult your doc-
tor to ensure that you are fit enough to use the equipment. Base
your program of exercise on the advice given by your doctor.
Incorrect or excessive exercise may damage your health!
■ Any interference with parts of the product that are not descri-
bed within the manual may cause damage, or endanger the
person using this machine. Extensive repairs must only be car-
ried out by KETTLER service staff or qualified personnel trained
by KETTLER.
■ In case of enquiry, please contact your KETTLER dealer.
■ In choosing the location of the apparatus, ensure a sufficient sa-
fety distance from any obstacles. The apparatus must not be
mounted in the immediate vicinity of main passageways (paths,
doorways, corridors).
■ The product is not suitable for use by persons weighing over
110 kg.

5
GB
Waste Disposal
KETTLER products are recyclable. At the end of its useful life plea-
se dispose of this article correctly and safely (local refuse sites).
KETTLER (GB) Ltd.
Merse Road · North Moons Moat · Redditch, Worcesters-
hire B98 9HL · Great Britain
http://www.kettler.co.uk
KETTLER International Inc.
1355, London Bridge Road · VA 23450 Virginia Beach
http://www.kettlerusa.com
GB
USA
Instructions de montage
F
Lire attentivement les présentes instructions avant le montage et la première utilisation de l'appareil. Elles con-
tiennent des renseignements importants relatifs à la sécurité des personnes ainsi qu'à l'emploi et à l'entreti-
en de la bicyclette d´áppartement . Conserver soigneusement lesdites instructions pour d'éventuels renseig-
nements ainsi que pour effectuer l'entretien de l'appareil ou commander des pièces de rechange.
Pour votre sécurité
■ La bicyclette pour la mise en forme, ne doit être utilisée que
pour les fins auxquelles elle est destinée, c'est-à-dire pour l'en-
traînement des adultes.
■ Tout autre emploi est interdit, voire dangereux. Le fabricant ne
pourra être rendu responsable de dommages causés par l'em-
ploi inadéquat de l'appareil.
■ Vous vous entraînez avec un appareil dont la technique et la
sécurité correspondent aux exigences modernes. Les sources
possibles de danger qui pourraient entraîner des blessures ont
été soit supprimées, soit sécurisées.
■ Les réparations inadéquates et les modifications apportées à la
construction de l'appareil (démontage des pièces d'origine,
montage de pièces non autorisées, etc.) peuvent entraîner des
risques imprévus pour l'utilisateur.
■ Les composants endommagés peuvent affecter votre sécurité et
la durée de vie de l'appareil. On remplacera donc sans tarder
les composants usés ou endommagés et on interdira l'emploi
de l'appareil aussi longtemps qu'ils n'auront pas été rem-
placés. N'utiliser que des pièces de rechange KETTLER d'origi-
ne.
■ En cas d'entraînement régulier et intensif, il y a lieu de con-
trôler, tous les mois ou tous les 2 mois, toutes les pièces de
l'appareil et en particulier les vis et les écrous. Ceci est bien
spécialement le cas pour la fixation de la selle et du guidon.
■ Afin de garantir de sécurité indiqué par le construction à long
terme, l’appareil devrait être contrôlé et révisé réulièrement
(une fois par ans) par un spécialiste (revendeur spécialisé).
■ Attirer l'attention des personnes présentes, surtout des enfants,
sur les dangers qu'ils courent pendant les exercices.
■ Avant de commencer, consulter son médecin traitant pour s'as-
surer que l'entraînement avec l'appareil n'est pas nuisible à la
santé. Son diagnostic devrait servir de base pour la compositi-
on de son programme de travail. Un entraînement exagéré ou
mal organisé peut être nuisible à la santé.
■ Touts manipulation/modification á l’appareil peut provoquer
des dommage ou représenter un danger de la personne. Des
modifications ne peuvent être apportées que par du personnel
qualifié formé par la Ste. KETTLER.
■ On cas de doute, on est prié de s'adresser à son conces-
sionnaire KETTLER.
■ Choisir l'emplacement de l'appareil de manière à assurer un
écart de sécurité suffisant par rapport aux obstacles. Ne pas in-
staller l'appareil à proximité immédiate de points de circulati-
on importants (chemins, portails, passages).
■ Cette article n'est pas approprié à des personnes pesant plus
de 110 kg.
Utilisation
■ Veiller à ce que l'on ne commence pas à s'entraîner avant que
le montage n'ait été effectué complètement et contrôlé.
■ l n'est pas permis de monter l'appareil dans des lieux très fré-
quentés ni dans les environs de passage de la circulation (tels
que portes, passages, etc.)
■ Il n’est pas recommandable d’utiliser cet appareil dans des en-
droits humides, car à la longue, la rouille attaquerait en parti-
culier la surface frottante du volant d’inertie. Veillez à ce qu'au-
cun liquide (boisson, sueur etc.) n'entre en contact avec des par-
ties de l'appareil. Cela pourrait entraîner de la corrosion.
■ L'appareil a été conçu pour l'entraînement des adultes et ne
doit pas servir de jouet aux enfants. On ne doit jamais perdre
de vue que de par leur tempérament et leurs besoins naturels
de jouer, les enfants peuvent être confrontés subitement à des si-
tuations imprévues, lesquelles excluent toute responsabilité de la
part du constructeur de l'appareil. Si, cependant, on autorise les
enfants à se servir de l'appareil, il y a lieu de leur donner tous
les renseignements nécessaires et de les surveiller.
■ La bicyclette d’appartement correspond à la norme DIN EN
957 - 1/8, HB et convient donc pour soins thérapeutiques
■ L'appareil devrait être monté sur un sol plat et ferme. Pour
amortir les chocs poser sous l'appareil soit (un tapis de caout-
chouc, de raphia ou autre semblable).
■ Pour nettoyer et entretenir l'appareil, n'utiliser que des produits
écophiles, à l'exclusion de tout produit agressif ou caustique.
■ Après une plus longue période d 'arrêt de l'equipement, il est
possible que les amortisseurs hydrauliques n'atteignent pas im-

13
PL
■ Materiał montażowy potrzebny do danej operacji montażowej
przedstawiony jest na odpowiedniej ilustracji. Stosuj materiał
montażowy dokładnie według ilustracji. Potrzebne narzędzia
znajdziesz w torebce z drobnymi częściami.
■ Na początku należy poprzykręcać wszystkie części luźno i
sprawdzić ich prawidłowe osadzenie. Nakrętki samozaklesz-
czające dokręć ręcznie do chwili, aż opór stanie się odczu-
walny, a następnie mocno dokręć kluczem przeciwko oporowi
(zabezpieczenie zaciskowe). Po tej fazie montażu skontroluj ws-
zystkie połączenia śrubowe pod względem prawidłowego za-
mocowania. Uwaga: poluzowane ponownie nakrętki samo-
zakleszczające stają się bezużyteczne (następuje zniszczenie
zabezpieczenia zaciskowego) i należy je wymienić na nowe.
■ Ze względów technologicznych zastrzegamy sobie wstępny
montaż niektórych elementów (na przykład zatyczek ruro-
wych).
Zamawianie części zamiennych, strona 19-20
Przy zamawianiu części zamiennych proszę podawać kompletny
numer artykułu, numer części zamiennej i numer serii urządzenia
(zobacs zastosowanie).
Przykład zamówienia: nr artykułu 07877-000 / nr części za-
miennej 70132297 / 2 sztuki / numer serii .................... Pro-
simy zachować oryginalne opakowanie przyrządu, by w przys-
złości móc je wykorzystać, na przykład do transportu.
Uwaga: Przykręcane części zamienne zasadniczo rozlicza i dost-
arcza się bez materiału montażowego. Jeżeli potrzebny jest sto-
sowny materiał montażowy należy przy zamawianiu części za-
miennych zaznaczyć to dopiskiem "z materiałem montażowym".
Wskazówka dotycząca usuwania odpadów
Produkty firmy KETTLER podlegają recyklingowi. Pod koniec okre-
su używalnoścl proszę oddać urządzenie do wlaściwego punktu
usuwania odpadów (lokalny punkt zbiorczy).
KETTLER Polska
Ul. Kossaka 110 ·PL-64-92 Pila
www.kettler.com.pl
PL
0 10 20 30 40 50 60 70 80 90 100 110 120 130 140 150 160 170
M5x40
M8x40
M8
ø22
ø16
ø12
M6
M5
ø3,9x13
M5x40
Messhilfe für Verschraubungsmaterial
Measuring help for screw connections
Gabarit pour système de serrae
Meethlp voor schroefmateraal
NL
F
GB
Ayuda para la medición del material de atornilladura
Misura per materiale di avvitamento
Wzornik do połączeń śrubowych
PL
I
E

14
Checkliste (Packungsinhalt)
Checklist (contents of packaging)
Liste de vérification (contenu de l’emballage)
Checklijst (verpakkingsinhoud)
NL
F
GB
Lista de control (contenido del paquete)
Lista di controllo (contenuto del pacco)
Lista kontrolna (zawartość opakowania)
PL
I
E
1/1
1/1
2
1
1
1/1
1
2
1
1/1
3.9x16 2
M8x50 8
8x250 2
M8x45 4
2
ø8.3x16x2 16
M8 14
SW13 8
M8 2
ø13x2.4x25 4
8
M6x16 2
3.9x25 2
3.9x45 4
1

15
1 2
3 4
8x
M8x50 ø16 M8
2x
M8x250 ø16ø16 M8M8
A
B
A
B
A
2x M6x16
B
2x 3.9x25
A
B
B
2x M8x45 ø16 M8
A
2x ø13x25
6x

16
5 6
7
B
2x M8x45 ø16 M8
B
4x 3.9x45
A
B
A
1x
A
2x ø13x25
A
B
B
A

17
Handhabungshinweise
Handling Utilisation Handleiding Aplicación Utilizzo Zastosowanie
PL
I
E
NL
F
GB
ca.4-5 mm
Typenschild - Seriennummer
Type label - Serial number
Plaque signalétiqu - Numèro de serie
Typeplaatje - Seriennummer
Placa identificativa - Número de serie
Targhetta tecnica - Numero di serie
Tabliczka identifikacyna - Numer serii

18
Batteriewechsel
Changement de piles
Un affichage de l'ordinateur faible ou éteint impose un change-
ment des piles. L'ordinateur est équipé de deux piles. Effectuez le
changement comme suit:
■ Enlevez le couvercle du logement des piles et remplacez-les par
deux piles neuves du type AA 1,5V.
■ Veillez au marquage au fond du logement lors de la mise en
place des piles.
■ En cas de dysfonctionnement après la remise en marche, enle-
vez brièvement les piles et remettez-les ensuite.
Important: Les piles usées sont exclues des dispositions de garan-
tie.
Il est interdit de mettre les piles usées aux ordures mé-
nagères. Merci de contribuer à la protection de l'envi-
ronnement et de rendre les piles usées soit au magasin
soit aux localités de reprise de la commune dans le but
d'éliminer les piles collectées ou de les recycler de ma-
nière non polluante.
Omwesseln van de Batterijen
Een zwakke of gewiste computerweergave maakt een batteri-
jwisseling noodzakelijk. De computer werkt op 2 batterijen. Om-
wisseling van de batterijen gaat als volgt:
■ Verwijder het deksel van het batterijvak en vervang de batteri-
jen door twee nieuwe van het type AA 1,5V.
■ Let bij verwisseling van de batterijen op de tekens in het batte-
rijvak.
■ Komen er na verwisseling nog foutieve functies voor, haalt u
dan de batterijen nog eens uit het vak en duw ze weer terug.
Belangrijk: batterijen vallen niet onder de garantie.
Lege energiecellen mogen niet met het huisvuil mee.
Lever uw bijdrage aan het milieu en lever gebruikte bat-
terijen apart in bij de daarvoor aangewezen depots,
zodat de ingezamelde batterijen daarna naar behoren
vernietigd en milieuvriendelijk gerecycled kunnen wor-
den.
Cambio de la pilas
Una indicación debil o inexistente en el monitor hace necesario
un cambio de pilas. El ordenador dispone de dos pilas. Efectúe
el cambio de pilas de la siguiente forma:
■ Retire la tapa de la caja de pilas y cambie las pilas usadas por
nuevas del tipo AA, 1,5V
■ Al poner las pilas observe la caracterización en el fondo de la
caja de las pilas.
■ Si después de ser puesto de nuevo en funcionamiento se pro-
dujeran errores, desconecte brevemente las pilas y vuelva a
conectarlas.
Importante: Las pilas gastadas no est·n incluidas en la garantÌa.
No se deben echar las baterÌas energeticas gastadas
en la basura domestica. Por favor contribuya usted por
su parte a la protecciun del medio ambiente y deposite
las pilas gastadas en los comercios especializados o en
los puntos de recogida de su localidad, para que se pu-
edan posteriormente eliminar y reciclar debidamente.
E
NL
F
Eine schwache oder erloschene Computeranzeige macht einen
Batteriewechsel erforderlich. Der Computer ist mit zwei Batterien
ausgestattet. Nehmen Sie den Batteriewechsel wie folgt vor:
■ Nehmen Sie den Batteriefachdeckel ab und ersetzen Sie die
Batterien durch zwei neue vom Typ AA 1,5V.
■ Achten Sie beim Einsatz der Batterien auf die Kennzeichnung
im Batteriefachboden.
■ Sollte es nach dem Wiedereinschalten zu Fehlfunktionen kom-
men, klemmen Sie die Batterien noch einmal kurz ab und wie-
der an.
Wichtig: Aufgebrauchte Batterien fallen nicht unter die Garantie-
bestimmungen.
Verbrauchte Energiezellen dürfen nicht mehr in den
Hausmüll.
Bitte leisten Sie Ihren Beitrag zum Umweltschutz und ge-
ben Sie verbrauchte Batterie beim Handel oder bei den
Rücknahmestellen der Kommunen ab, damit die gesam-
melten Batterien anschließend ordnungsgemäß beseitigt
oder umweltverträglich recycelt werden können.
Battery change
A weak or an extinguished computer display makes a battery
change necessary. The computer is equipped with two batteries.
Perform the battery change as described below:
■ Remove the lid of the battery compartment and replace the bat-
teries by two new batteries of type AA 1,5V.
■ When inserting the batteries pay attention to the designation
an the bottom of the battery compartment.
■ Should there be any misoperation after switching on the com-
puter again, shortly disconnect the batteries once again and re-
insert them.
IImportant: The guarantee does not cover worn-out batteries.
You should no longer put used batteries in domestic wa-
ste. Please do your bit for the environment and return
your batteries to the trade or to the local authority pick-
up point so that the collected batteries can be properly
disposed of or recycled in an environment-friendly way.
GB

19
Ersatzteilliste
Batteriewechsel
Cambio delle batteria
Una visualizzazione debole o spenta del computer richiede il
cambio della batteria. Il computer è munito di due batterie. Pro-
cedete al cambio delle batterie nel modo seguente:
■ Togliete il coperchio della batteria e sostituite le batterie con 2
nuove del tipo AA, 1,5V
■ Fate attenzione nel montaggio al contrassegno nel suolo del
vano batteria.
■ Se dopo l'inserimento ci dovessero essere funzioni sbagliate,
staccate di nuovo le batterie per poco e attaccatele di nuovo.
Importante: Le batterie usate non rientrano nelle condizioni di ga-
ranzia.
Le batterie usate non devono essere gettate nella spa-
zzatura.
Vi preghiamo di contribuire alla salvaguardia dell‘am-
biente e di consegnare le batterie usate ai punti pubbli-
ci di raccolta, che provvederanno al loro smaltimento o
a riciclarle senza provocare danni all‘ambiente.
I
Wymiana baterii
Słaby lub gasnący wyświetlacz komputera oznacza konieczność
wymiany baterii. Komputer wyposażony jest w
dwie baterie. Baterie wymienia się w sposób następujący:
■ Zdjąć osłonę baterii i wymienić baterie na dwie nowe typu AA
1,5 V.
■ Wkładając baterie należy przestrzegać oznakowania na dnie
zagłębienia na baterie.
■ Jeżeli po ponownym włączeniu stwierdzi się niewłaściwe
działanie, to baterie należy na chwilę wyjąć i potem ponow-
nie włożyć.
Uwaga: Zużyte baterie nie podlegają pod warunki gwarancyjne.
Zużytych baterii nie wyrzucać do domowych śmieci.
Mając na uwadze ochronę środowiska naturalnego na-
leży baterie oddać w sklepie lub w lokalnym punkcie
zbiórki zużytych baterii. W ten sposób baterie zostaną
prawidłowo usunięte i poddane ekologicznemu recyc-
lingowi.
PL
Montana 07877-000
Pos-
Nr. Bezeichnung Stück Bestell-Nr.
1 Grundgestell 1 94317158
2 Bodenschoner mit Höhenverstellung 2 91170550
3 Auflaufpuffer (2932) 2 70132755
4 Bodenschoner rechts mit Rolle 1 91170316
5 Einsteckteil (2389) 2 70127565
6 Bodenschoner links mir Rolle 1 91170317
7 Verkleinerungsbuchse (2939) 2 70132760
8 Tritt rechts 1 94315205
9 Tritt links 1 94315209
10 Führungsbuchse (2584) 4 70113795
11 Befestigung für Bodenschoner 2 70133320
12 Bodenschoner (2087) 2 70133075
13 Fußtritt rechts (4165) 1 70128736
14 Fußtritt links (4166) 1 70128737
15 Magnethalter 1 70132791
16 Rundblockmagnet o. Abb. 1 67000080
17 Abstandhalter 1 70132792
18 Stoßdämpfer 2 67000040
19 Cockpitverkleidug VT (3923) 1 70132796
20 Cockpitverkleidung HT (3924) 1 70132797
21 Computer ST 2610-9 1 67000793
22 Pulsaufnahme P-03-1 1 67000450
23 Standrohr 1 94315216
24 Befestigungsböckchen 1 70132793
25 Geschwindigkeitsaufnahme 1100 mm 1 67000144
26 Stützbügel links 1 94315218
27 Griffschlauch rot 2 10118098
28 Stützbügel rechts 1 94315222
29 Kleinteilbeutel o. Abb. 1 94380429
30 Halteblech BD1456 2 94315215
31 Verkleidung für Stützbügel UT (2941) 1 70132770
32 Verkleidung für Stützbügel OT (2940) 1 70132765
33 Buchse 8 70126840
34 Verbindungslasche BD 1388 1 97201767
35 Gewindestange M8x250 mm 2 97200651
36 Abdeckkappe (3876) SW13 8 70132297
37 Distanzrohr ø13x2.4x25 mm 4 97200455

20
27
1
2
3
4
5
6
7
10
11
12
8
13
9
14
15
17
18
19
20
21 22
23
24
25
26
28
30
31
32
33
35
34
36
37
Ersatzteilzeichnung
docu 1228e/09.06
Table of contents
Other Kettler Stepper Machine manuals