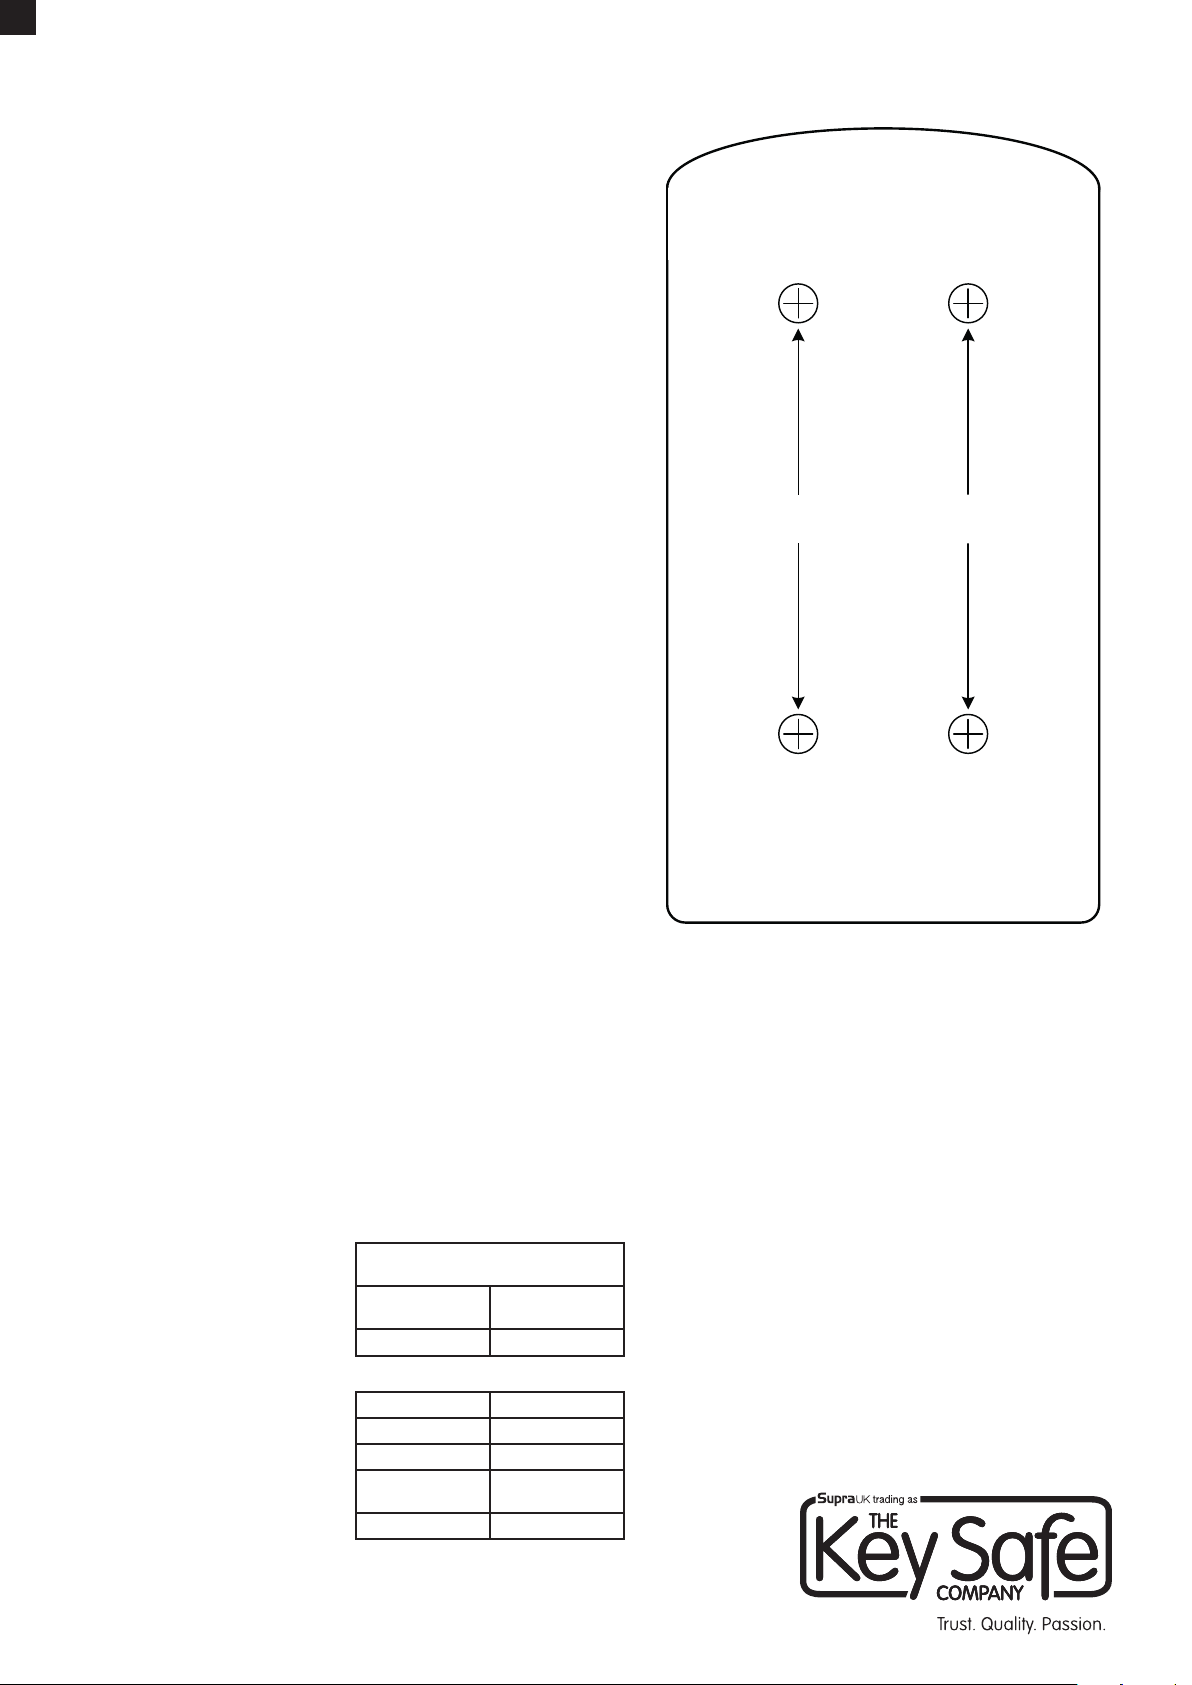
Mounting Template
KeySafe™ Consumer 500
Parts Included
KeySafe Consumer 500, 002049
includes:
Masonry mounting
kit
10102698G1-01
Code change tool
Accessories/Replacement Parts
Item Part #
Weather cover 10102726P1
Code tamper plate 10102703G1
Masonry mounting
kit
10102698G1-01
Key Cover 10102725P1
5mm masonry drill bit
Tools Needed
• Drill
• 5mm masonry drill bit
• Torx T30 screwdriver
KeySafe
TM
Consumer 500 (C500)
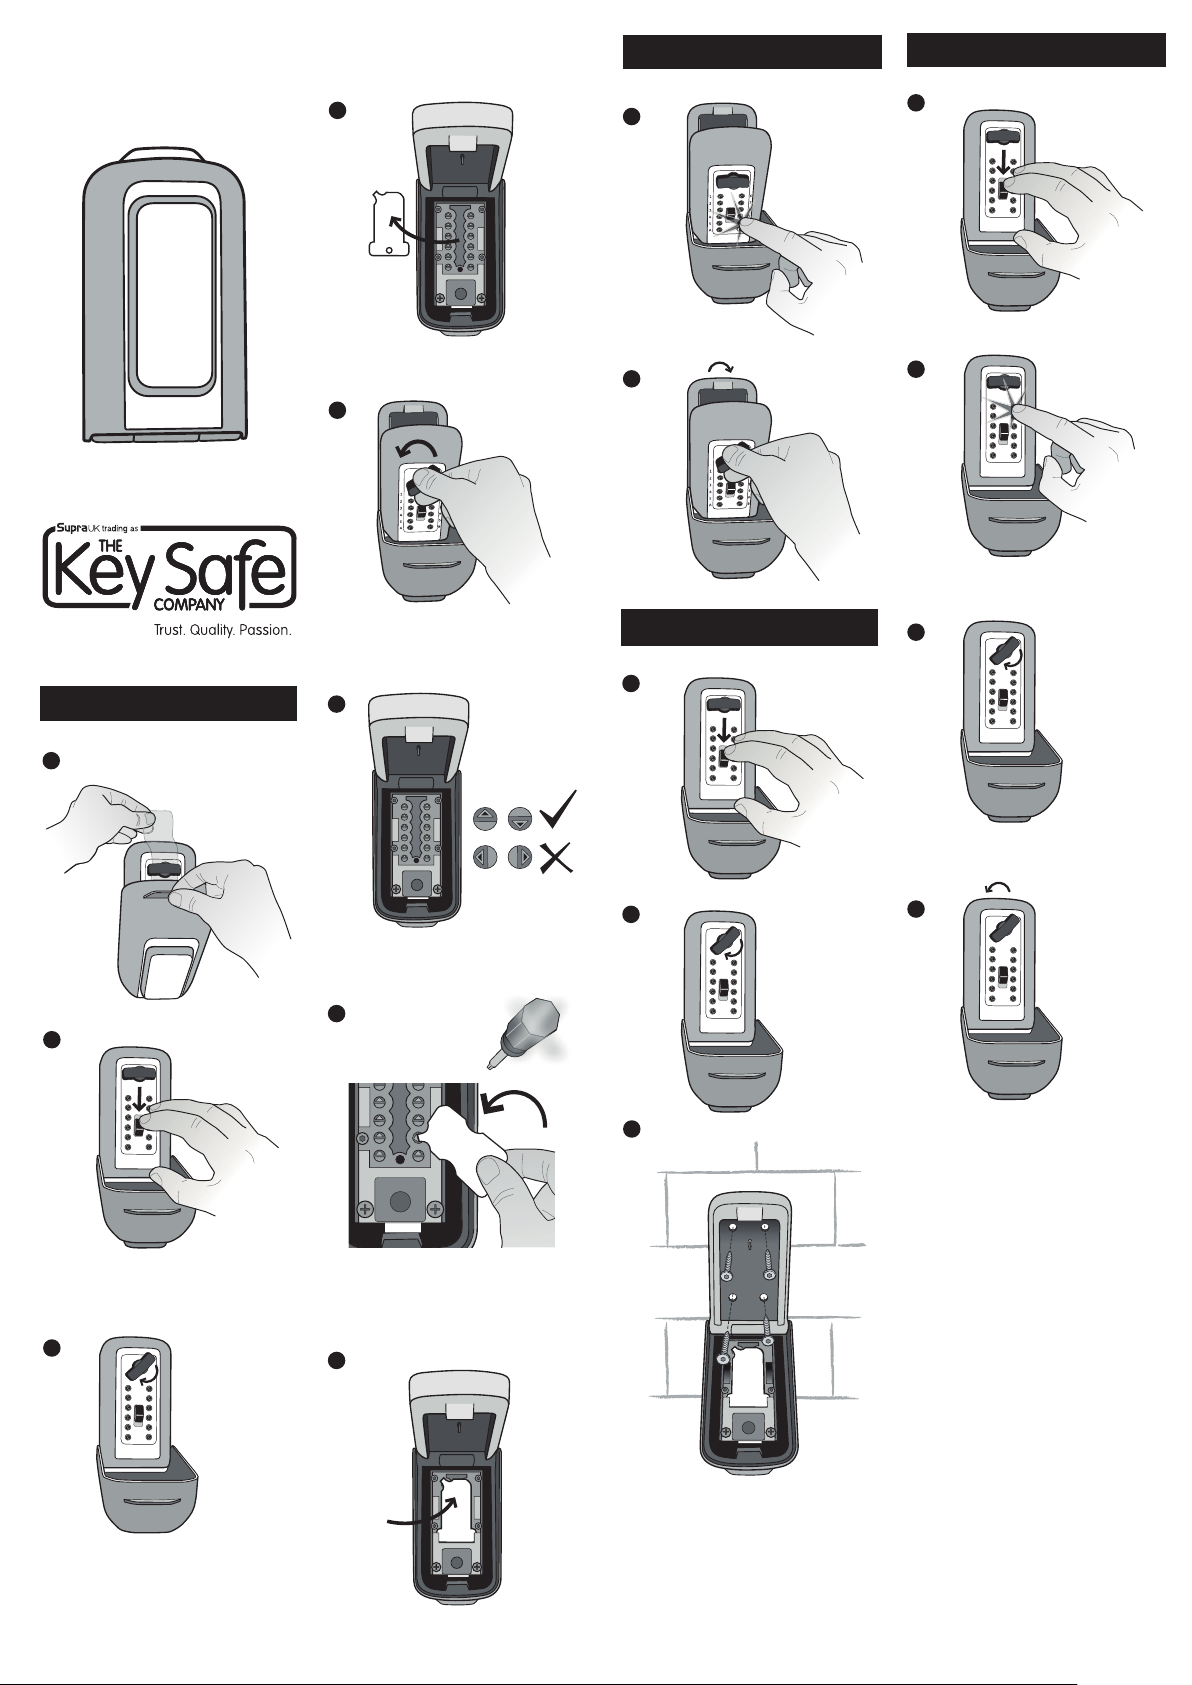
A. Setting your combination
• There is no preset combination code in your C500
KeySafe
• You will need to select your own combination,
ideally featuring between 5 and 7 digits and use a
combination of both numbers and letters
• Each number/letter can only be used once
• Do not use a combination that can be easily
guessed
• There is no override or reset code. Make a note of
your code and store it somewhere safe
1. Hold the clear plastic tab and pull open the black
weather cover. This plastic tab should be discarded
once the C500 is mounted.
2. Press down on the CLEAR button (located in the
centre of the C500) and then release.
3. Turn the OPEN dial clockwise 180° to open the lid.
The word OPEN will now be upside-down.
4. Slide the white plastic instruction card on the lid
towards the hinge of the KeySafe and remove. This
will reveal a red warning sticker. Please read before
removing.
5. Without closing the C500 lid, leaving the KeySafe
open, turn the open dial on the front of the C500
counter clockwise 180°, back to the locked position.
The word OPEN will now be the correct way up.
Confirm that the “GREEN” triangle is visible on the
locking bolt.
6. There are twelve grey buttons on the back of the
lid. Each of these grey buttons corresponds to
the black buttons on the front of the C500. These
buttons each have small arrows in the shape of a
triangle. Arrows pointing away from the hinge are
OFF and are not part of the combination. Arrows
pointing towards the hinge are ON and are part of
the combination.
Important! The locking pin must be in LOCKED
position before the code can be changed.
Forcing the setting buttons when in the DOWN
position may damage the C500 and void
the warranty.
7. Use the white plastic card (code change tool)
provided to set your combination. If you encounter
resistance, stop and check to make sure the locking
bolt is LOCKED and the word OPEN is the correct
way up on the OPEN dial.
Note: Do not use a screwdriver!
To add a number or letter to the code, use the code
change tool to push in the grooved button by the
number/letter you wish to set. Turn 180° until the
button pops back up completely and the arrow
points in the ON direction (towards the hinge). To
remove a number or letter from the code, use the
code change tool to push in the grooved button by
the number/letter you wish to unset. Turn 180° until
the button pops back up completely and the arrow
points in the OFF direction (away from the hinge).
8. Return the red sticker and the white plastic card over
the back of the lid.
B. Testing your combination
1. With the C500 still open, making sure the word
OPEN is the correct way up on the OPEN dial. If it
is not, turn the OPEN dial counter-clockwise until
it is the correct way up. On the front of the C500,
pressing only the buttons in your combination,
press each button in until it clicks. If you press the
wrong button, push down on the clear button and
enter your code again.
2. Turn the OPEN dial clockwise 180° to open. If the
combination is set correctly, the OPEN handle will
turn fully and the locking bolt will retract. If not, push
down the CLEAR button and check to ensure you
have entered the correct code. Refer to section
A. Setting your combination if you continue to
experience difficulty.
C. Mounting your C500 KeySafe
Decide where to install your C500 KeySafe. If possible
we recommend out of line of easy sight for passers-by
and in a position of good light to make it easier for
the user.
• You must use the included size 6x60mm masonry
screws provided and install the Keysafe into
brick or concrete to maintain the LPS 1175
security certification and Police approval.
• When mounting on a rendered wall, the maximum
thickness of the render cannot exceed 10mm.
• Do not mount C500 closer than 6” or 15cm to the
corner of a masonry surface.
• Make sure C500 is mounted flush with the masonry
surface and the masonry screws are only installed
directly into brick. Never install masonry screws into
mortar and minimize all gaps between back of C500
and the masonry surface.
1. Press down on the CLEAR button and enter the
combination you set in Section B.
2. Turn the OPEN dial clockwise 180° to open the lid.
3. Use the mounting template to position the holes
so they are as close to the center of the brick as
possible. Do not install screws into mortar since this
will weaken the mounting.
4. Use the mounting template to drill four mounting
holes using a 5mm masonry drill bit to a depth of at
least 7mm deeper than the length of the screw. To
help guide your drill depth, use a piece of masking
tape to mark the correct length on your drill bit.
5. Clean out any dust and debris from all holes.
6. Position the C500 over the four drilled holes and
drive all four screws directly into the brick. There is
no need to use rawl plugs as each screw cuts its
own thread.
7. Tighten each screw a little at a time rather then one
screw fully to ensure a secure fixing. Tighten until
the screw heads are snug against the back of the
C500. Be careful not to over tighten.
D. Opening and Closing your
C500 KeySafe
1. Press down on the CLEAR button.
2. Enter the combination. If you enter an incorrect
combination, press down on the CLEAR button and
re-enter the combination.
3. Turn the OPEN dial clockwise 180° to open. When
you turn the handle, the combination will clear.
Note: The open dial is designed so it cannot be
forced open. If an incorrect code is entered and
the handle is forced, the handle will unlatch from
the locking mechanism and turn freely without
opening. To reset the handle, turn it all the way
back to the locked position (OPEN is the correct
way up) where it will snap back into place.
4. To relock, close the lid and turn the OPEN dial
counter-clockwise 180° back to the locked position.
Please see pictures (overleaf) and information below for step-by-step instructions. There are also videos
showing you how to set a code and how to install your KeySafeat www.keysafe.co.uk. If you have any
questions or difficulty in setting your code or installing your KeySafe contact The Key Safe Company
on 01905 770333.
Limited Warranty
UTC Fire & Security (“UTCFS“) warrants that this product will be free of defects
in material and workmanship for one year (two years in Europe) from the date
of purchase. This warranty is limited to repair or replacement at UTCFS’ option.
This warranty does not cover forgotten or incorrectly set combinations. Damage
caused by modification, abuse or misuse, wear and tear, improper installation,
application, storage, or fault or negligence of a party other than UTCFS are not
covered. UTCFS will not be responsible for labor costs of removal or reinstallation
of products. The repaired or replaced product is then warranted under the terms
of this limited warranty for the balance of the term of the warranty or for 90 days,
whichever is longer. UTCFS MAKES NO OTHER WARRANTY, EXPRESS OR
IMPLIED, OF MERCHANTABILITY OR FITNESS FOR A PARTICULAR PURPOSE.
IN NO EVENT SHALL UTCFS BE LIABLE FOR LOSS OF USE, LOST PROFITS,
THEFT, PROPERTY DAMAGE, SPECIAL, INCIDENTAL OR CONSEQUENTIAL
DAMAGES. To obtain repair or replacement information under the terms of this
warranty, please contact your local supplier.
www.keysafe.co.uk
01905 770333