Kgl KGL-DDU User manual

1
Sim Racing Dashboard
and KGL-LED
Instructions –Gebruiksaanwijzing –Manuel d’utilisation

2
1. Table of contents –Inhoudstafel –Table des matières
1. Table of contents –Inhoudstafel –Table des matières .................................................................. 2
2. English.............................................................................................................................................. 3
2.1. KGL-DDU.................................................................................................................................. 3
2.1.1. Dashboard Installation .................................................................................................... 3
2.1.1.1. Fanatec ........................................................................................................................ 3
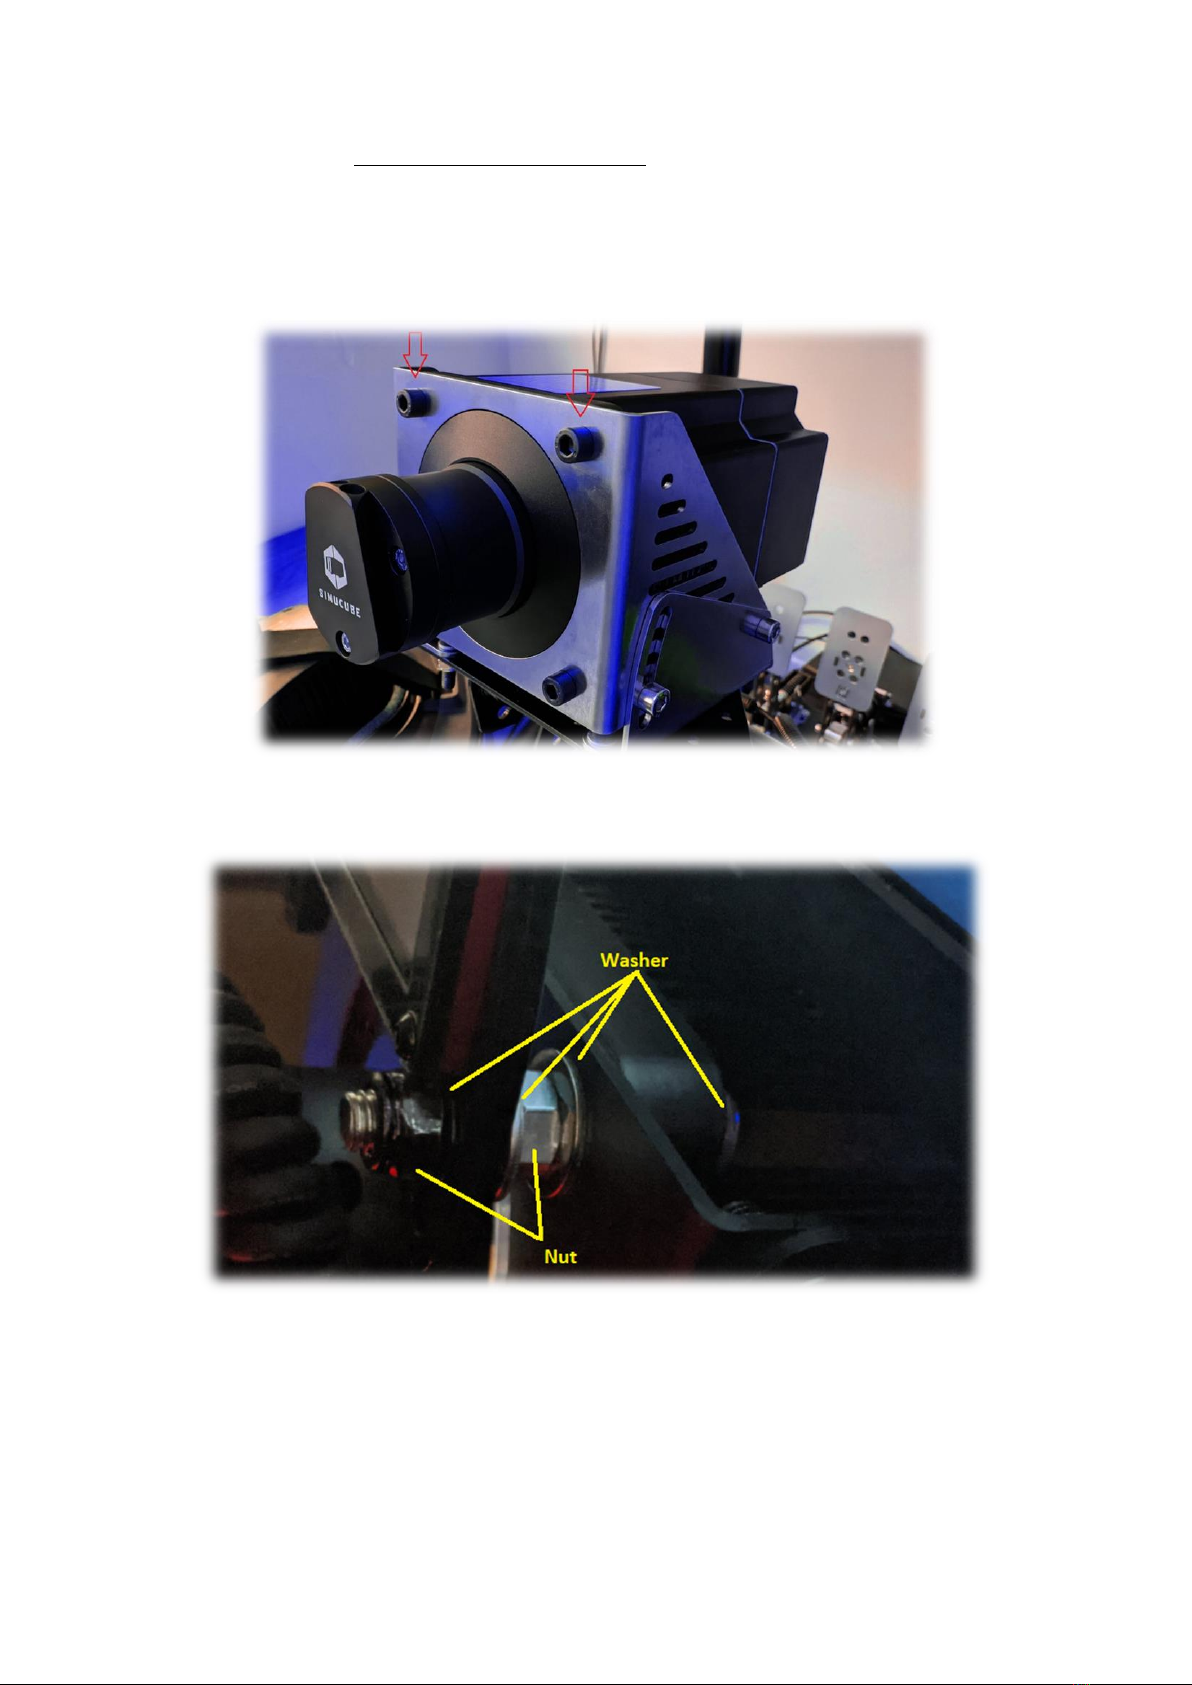
2.1.1.2. Simucube / VRS / Simagic Alpha.................................................................................. 4
2.1.1.3. Simagic M10 ................................................................................................................ 5
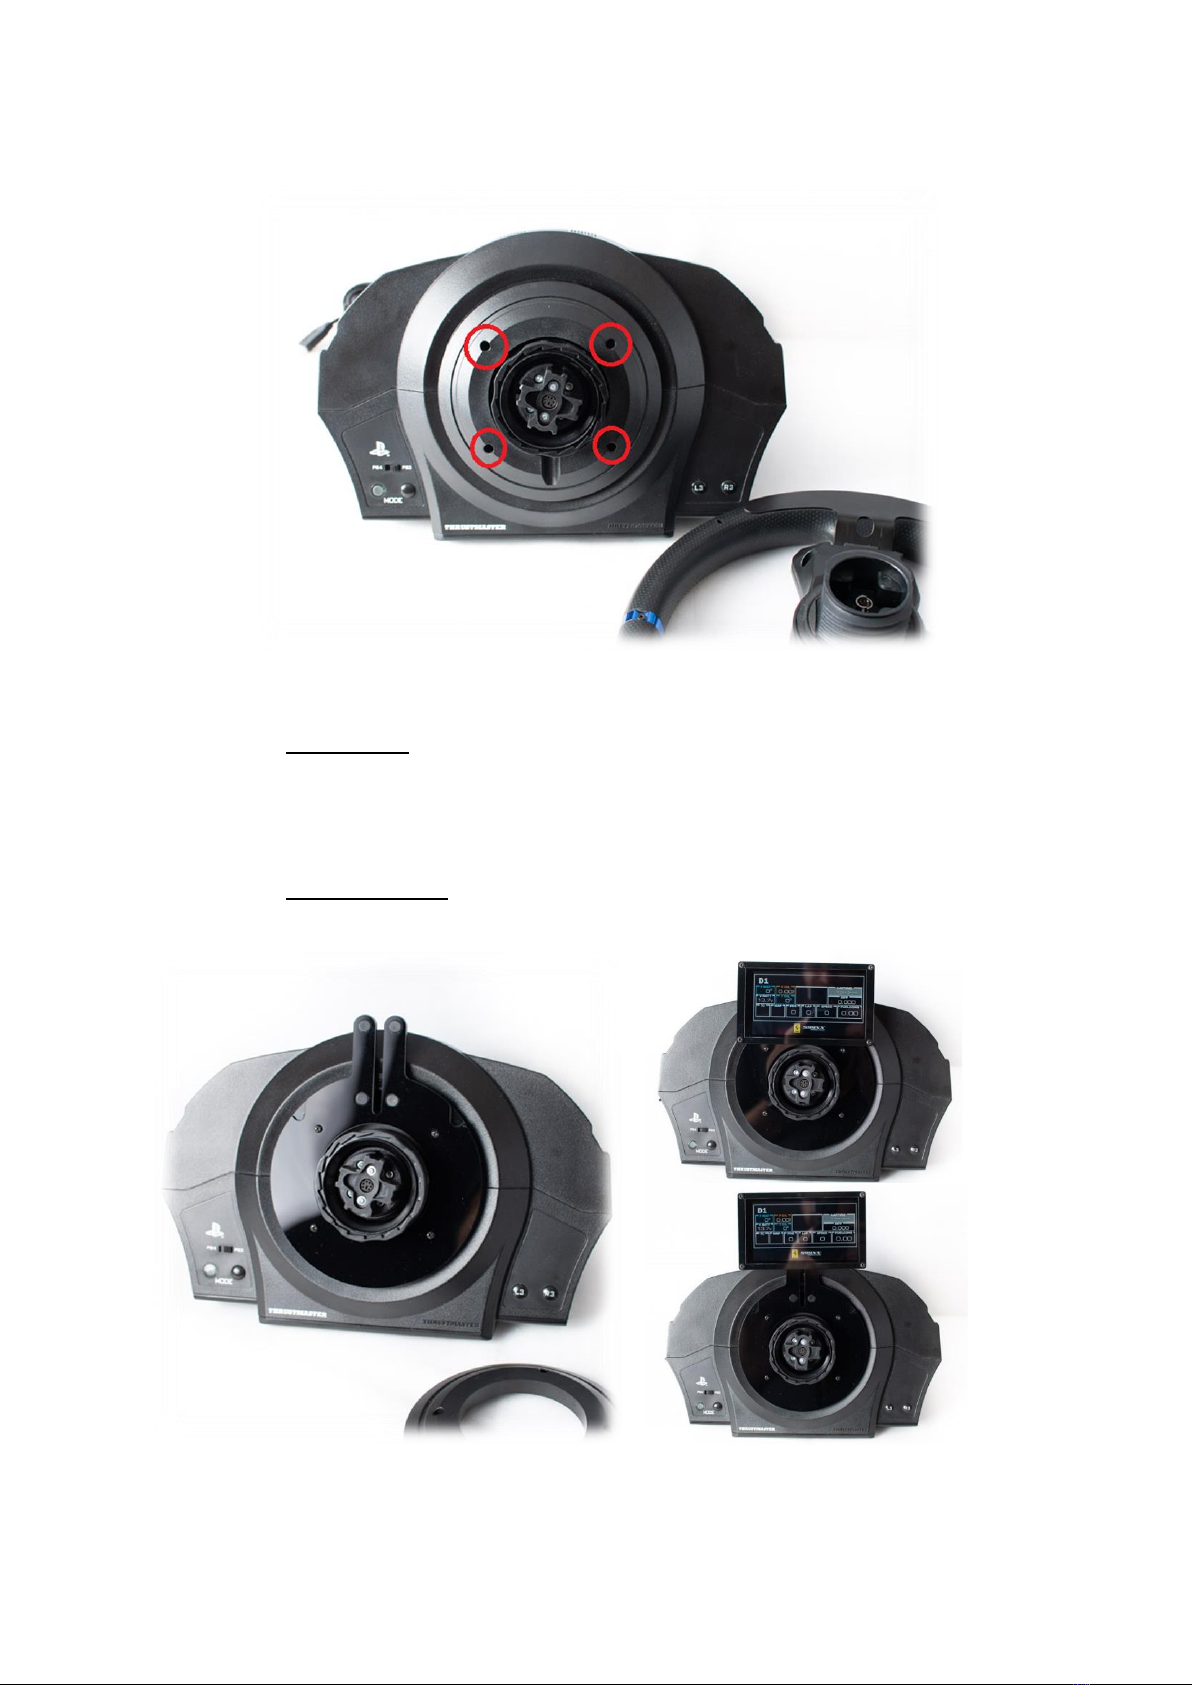
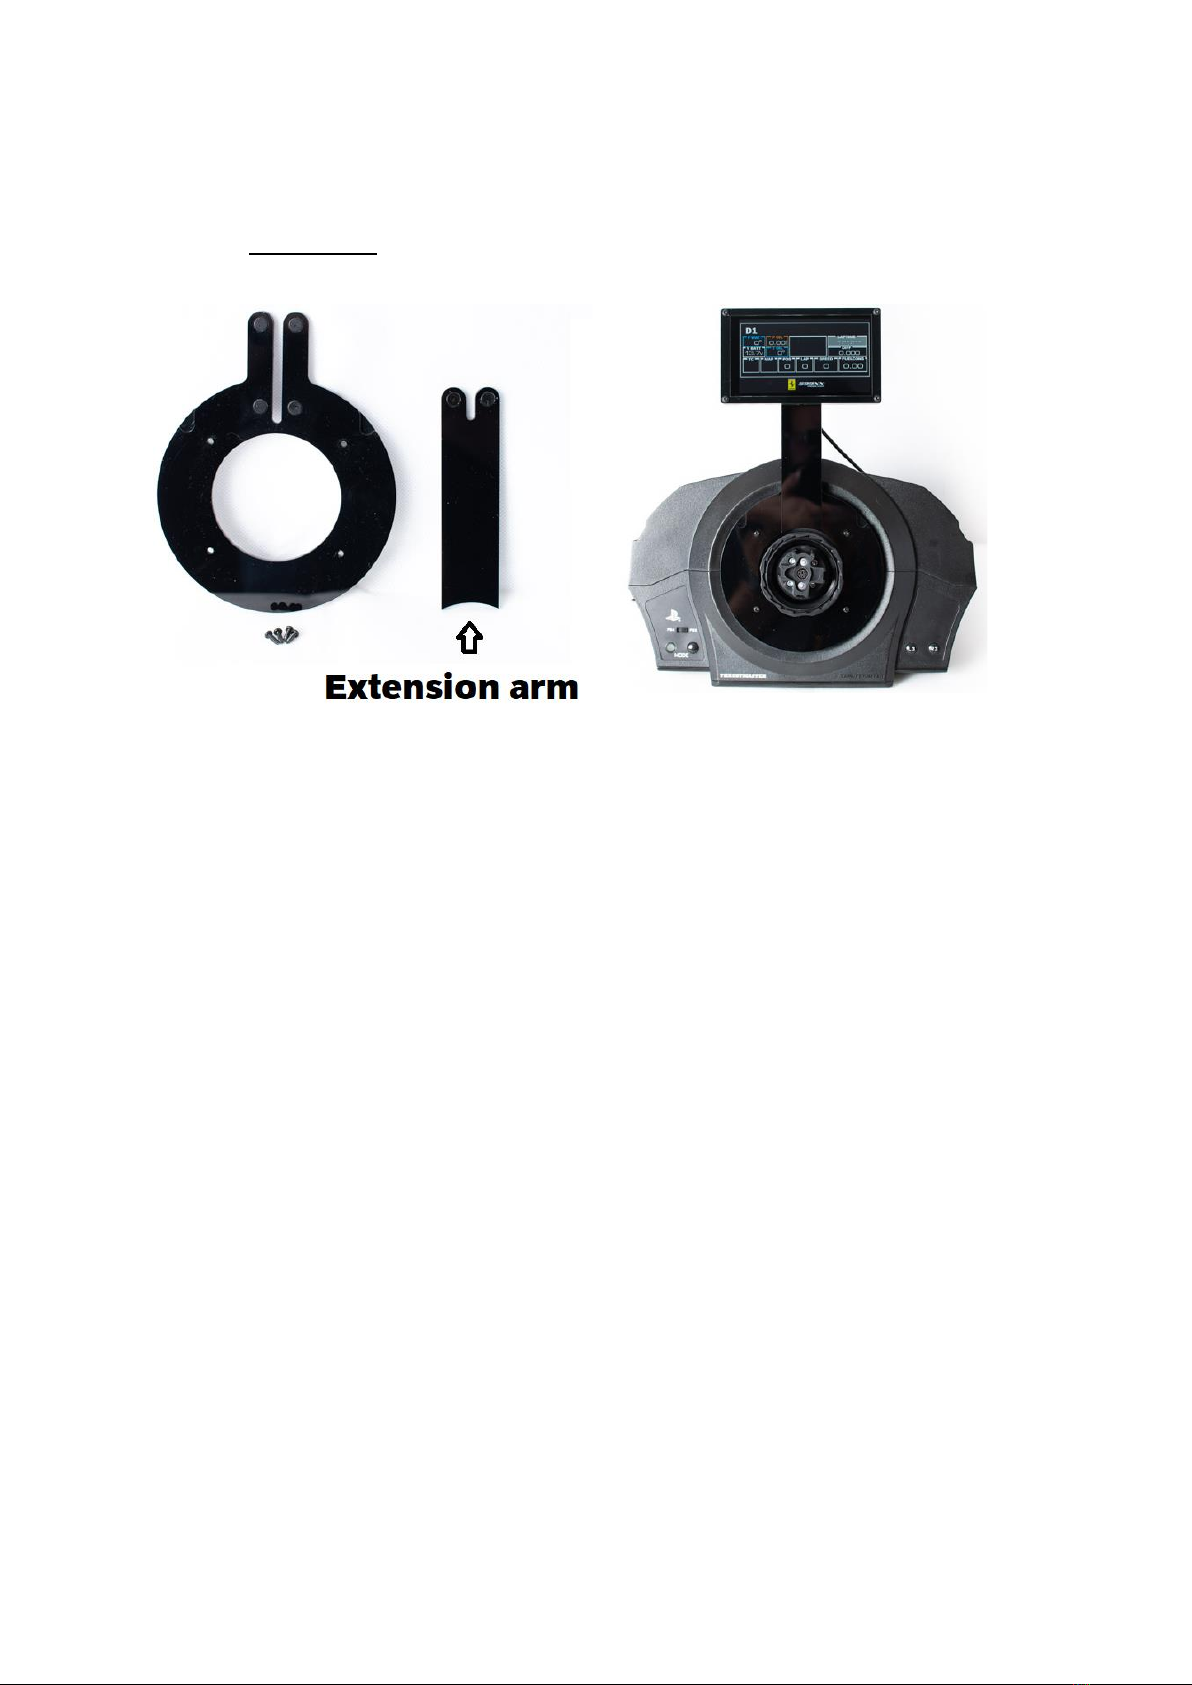
2.1.1.4. Thrustmaster ............................................................................................................... 6
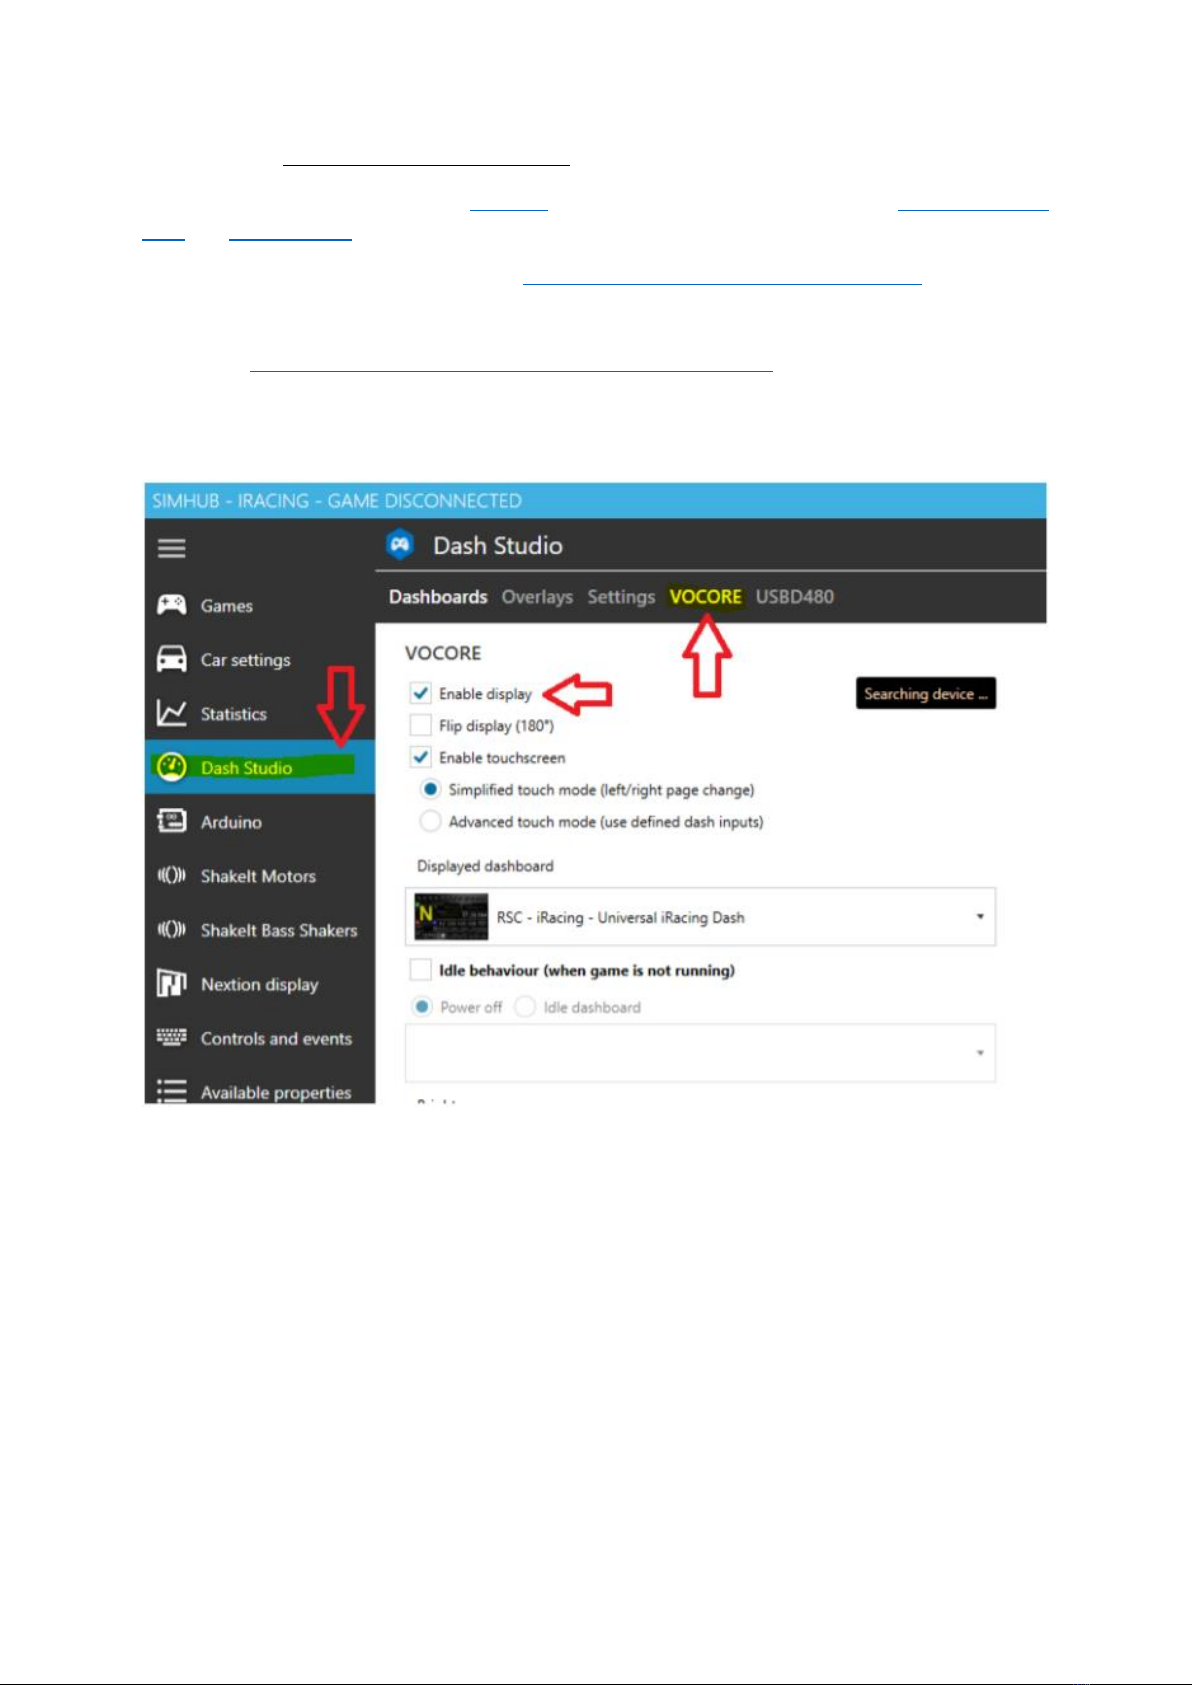
2.1.2. Software Installation and setup ...................................................................................... 9
2.2. KGL-LED (Sold separately) ..................................................................................................... 11
2.2.1. LED-Bar installation ....................................................................................................... 11
2.2.1.1. Installation on KGL-DDU............................................................................................ 11
2.2.1.2. Installation as a standalone unit ............................................................................... 11
2.2.2. Software installation and setup .................................................................................... 12
3. Nederlands .................................................................................................................................... 14
3.1. KGL-DDU................................................................................................................................ 14
3.1.1. Dashboard Installatie..................................................................................................... 14
3.1.1.1. Fanatec ...................................................................................................................... 14
3.1.1.2. Simucube / VRS / Simagic Alpha................................................................................ 15
3.1.1.3. Simagic M10 .............................................................................................................. 16
3.1.1.4. Thrustmaster ............................................................................................................. 17
3.1.2. Software Installatie........................................................................................................ 20
3.2. KGL-LED (Apart verkocht)...................................................................................................... 22
3.2.1. LED-Bar installatie.......................................................................................................... 22
3.2.1.1. Installatie op KGL-DDU.............................................................................................. 22
3.2.1.2. Installatie als “standalone” toestel ........................................................................... 22
3.2.2. Software installatie en instellingen............................................................................... 23
4. Français.......................................................................................................................................... 25
4.1. Installation du tableau de bord............................................................................................. 25
4.1.1. 4.1.1. Fanatec ................................................................................................................ 25
4.1.2. 4.1.2. Simucube / VRS / Simagic Alpha.......................................................................... 26
4.1.3. Simagic M10 .................................................................................................................. 27
4.1.4. Thrustmaster ................................................................................................................. 28
4.2. Installation du logiciel............................................................................................................ 31

3
2. English
2.1. KGL-DDU
2.1.1. Dashboard Installation
To protect the dashboard during production and transport, protection films are left on the product,
both on the screen, but also on the front and back of the device and magnetic mounts (if applicable).
These can easily be removed.
2.1.1.1. Fanatec
1) Attach the screen and frame to the front of the wheelbase with the 2 provided M6 screws,
make sure to use the black washer on the BACK of the frame (between the frame and
wheelbase).

4
2.1.1.2. Simucube / VRS / Simagic Alpha
Remove the 2 top M8 bolts on the front of the wheelbase and re-attach the longer M8 bolts. You can
choose to attach the dashboard to the front or to the back of the wheelbase (see example lower).
Always tighten the base to the mount with a first nut, THEN slide the dashboard on and attach with a
second nut. DO NOT OVERTIGHTEN THIS SECOND NUT!
This is an example of a front mounted dashboard, you can also mount the dashboard to the back
with the same method by putting in the bolt from the front side:

5
2.1.1.3. Simagic M10
Slide the 3D printed brackets into the 2 slots found on the side of the Simagic M10. If necessary, the
width of the assembly can be adjusted by loosening the 6 bolts on the front of the dashboard bracket.

6
2.1.1.4. Thrustmaster
The Thrustmaster mount is compatible with the following models: T150, T150 PRO, TMX, TMX Pro,
T300RS, TS-PC, TS-XW, T-GT II
1) Remove the steering wheel from the base by removing the screw as shown below (you can
also refer to the Thrustmaster owner’s manual for this step):
2) Now the black ring can be rotated to unscrew the wheel from the base:

7
3) Now remove the 4 screws that hold the round cover in place with a Phillips head screwdriver:
4) Attach the KGL Sim Racing mount to the base, using the longer provided screws. The original
ring and screws are no longer needed. This mount has 2 magnetic mounting positions:
•Low position: To be used for round wheels where there is enough gap in the steering
wheel to fully see the dashboard. Note: depending on your wheelbase angle, the 5
inch version of the dashboard might not be fully visible. In that case, if you have an
adjustable wheel base mount, tilt the base backwards until the dashboard is fully
visible, or mount the dashboard in the high position (see step 5).
•Medium position: To be used with formula/open style steering wheels

8
5) Included in the kit is an “extension arm” for when previous 2 positions are not suitable for
your steering wheel. The extension arm can be attached to the fixed mount with the
magnets on the back of the extension. Now you have an extra mounting position:
•High position: Can be used for most steering wheel configurations where the low and
medium position are not suitable:

9
2.1.2. Software Installation and setup
The dashboard is compatible with SimHub Dashboard (recommended), but also Joel Real Timing
(JRT) and Z1 Dashboard. Below we explain how to make the dashboard work with SimHub:
1) Download and install SimHub: https://www.simhubdash.com/download-2/
2) Download and install the VOCORE LCD driver (Not the USBD480 LCD driver!):
https://www.simhubdash.com/devices-driver-installation/
3) Now launch SimHub and go to the "Dash Studio" Tab, next click on "VOCORE" and tick
the box that reads "Enable display"
4) Select any pre-installed dashboard from the dropdown list and start racing!

10
5) You can also create your own dashboard via "Dashboards" and "New dashboard". There
are many tutorials on the internet/youtube you can check out on how to create your
own.
6) We also highly recommend you to check out RomainRob's dashboards to get an idea of
what is possible with SimHub (free download):
https://www.simhubdash.com/community-2/dashboard-
templates/romainrobscollection/

11
2.2. KGL-LED (Sold separately)
2.2.1. LED-Bar installation
To protect the LED-Bar during production and transport, protection films are left on the product, both
on the front as on the back you will find a protection film, as well as on the mount. These can easily be
removed.
2.2.1.1. Installation on KGL-DDU
If you ordered the KGL dashboard in combination with the LED-Bar, the LEDS will come pre-installed
and you can ignore the following steps. If you bought the LED bar separate from the dashboard, you
will find the necessary mount and bolts in the package. Follow the steps below to install it on the KGL-
DDU:
1) Remove the top 2 nuts found on the backside of the dashboard unit
2) Now remove the top 2 bolts from the dashboard
3) Take the 2 longer bolts that are supplied with your LED-Bar and insert them back in the
dashboard, you can now install the magnetic mount on the same bolts. To secure it in place,
use the same 2 nuts you removed in step 1.
4) Now place the LED-Bar on the dashboard, it will snap in place thanks to the magnets
integrated in the mount and LED-bar.
2.2.1.2. Installation as a standalone unit
Coming soon!

12
2.2.2. Software installation and setup
We recommend using SimHub in combination with the LED bar, the same software you can also use
in combination with the KGL-DDU.
1) If you have not already installed SimHub, download and install it via following link:
https://www.simhubdash.com/download-2/
2) Connect the device to the pc and go to “Arduino”followed by clicking on “My hardware”
a. If this is your only Arduino based device, click on the “Single Arduino” button
b. If you have multiple Arduino devices (for example an RGB flag matrix), click on
“Multiple Arduinos”Note: our KGL-DDU is NOT an Arduino device, so when using
in combination with the KGL-DDU and no other Arduino devices, choose for
“Single Arduino”
3) The device should show up in the list as “KGL LED”followed by the serial number, if it
does not show up, try clicking “scan for new devices”
4) Next, click on the tab “RGB Leds”

13
5) You can download one of our LED-profiles from the download section on our website:
https://kglcreationlab.com/downloads/ or if you know how, you can also create your
own profile!
6) Now we are going to load these profiles into SimHub by clicking “Profiles manager”
followed by “Import profile”
7) Browse towards the location where you saved the previously downloaded LED profiles and
click on “Open”. The LED profile should now be imported and you can start using it by
selecting it and clicking on “LOAD”.
8) That’s it, your LED-Bar is now ready to use. You can also create profiles yourself from this
same “RGB Leds” screen and fine-tune the profile to your liking! Have fun!

14
3. Nederlands
3.1. KGL-DDU
3.1.1. Dashboard Installatie
Om het dashboard te beschermen tijdens de productie en transport, zit er een beschermingsfolie op
het scherm, maar ook op het toestel zelf aan de voor en achterkant, alsook op de magnetische beugel
(indien van toepassing). Deze kunnen gemakkelijk verwijderd worden.
3.1.1.1. Fanatec
Bevestig het scherm/beugel aan de voorkant van de wielbasis met de 2 bijgeleverde M6 bouten.
Plaats de 2 zwarte spacers tussen de wielbasis en het frame (zie foto lager).

15
3.1.1.2. Simucube / VRS / Simagic Alpha
Verwijder de 2 bovenste M8 bouten aan de voorkant van de wielbasis en vervang deze met de langere
meegeleverde bouten. Je kan kiezen om het dashboard aan de voorzijde of achterzijde van de wielbasis
te monteren (zie het voorbeeld lager). Plaats altijd EERST een moer om de motor en mount samen te
spannen, dan pas het dashboard en 2de moer. SPAN DEZE 2de MOER NIET TE HARD AAN!
Hieronder is een voorbeeld gegeven van een dashboard gemonteerd aan de voorzijde van de wielbasis.
Deze methode kan ook gebruikt worden om het dashboard aan de achterzijde te monteren door de
bout er langs voor in te draaien:

16
3.1.1.3. Simagic M10
Schuif de 3D geprinte beugels in de sleuven aan de zijkant van de wielbasis. Indien nodig kan de
breedte aangepast worden door het losmaken van de 6 schroeven aan de voorkant van de beugel.

17
3.1.1.4. Thrustmaster
De Thrustmaster beugel is compatibel met volgende modellen: T150, T150 PRO, TMX, TMX Pro,
T300RS, TS-PC, TS-XW, T-GT II
1) Verwijder het stuur van de wielbasis door de schroef te verwijderen zoals hieronder
afgebeeld (voor deze stap kan je ook refereren naar de Thrustmaster handleiding):
2) Nu kan de zwarte ring losgeschroefd worden om het stuur los te maken van de wielbasis:

18
3) Verwijder nu de 4 schroeven (kruis schroevendraaier) waarmee de ronde cover aan de
voorkant van de base vastzit:
4) Plaats nu de KGL Sim Racing beugel aan de voorkant van de base met de 4 bijgeleverde,
langere schroeven. De originele cover en bijbehorende schroeven heb je niet meer nodig.
Deze beugel heeft 2 magnetische bevestigingsposities:
•Lage positie: Te gebruiken voor ronde sturen waar de ruimte in het wiel groot genoeg
is om het dashboard te kunnen zien doorheen deze ruimte. Opmerking: afhankelijk
van de hoek waaronder de wielbasis is bevestigd, kan het zijn dat het 5 inch dashboard
niet volledig zichtbaar is. Indien de wielbasis is gemonteerd op een regelbare beugel,
plaats de wielbasis dan onder een hoek (naar achter kantelen). Indien dit niet mogelijk
is, gebruik dan de hoge positie (zie stap 5)
•Medium positie: Te gebruiken met formula/open stuurtjes

19
5) Inbegrepen in de kit zit een verlengstuk, deze kan gebruikt worden wanneer voorgaande
2 posities niet geschikt zijn voor jouw stuur of situatie. Het verlengstuk kan gemakkelijk op
de bestaande beugel geklikt worden aan de hand van magneten. Wanneer dit verlengstuk
is geplaatst, heb je een extra bevestigingspositie:
•Hoge positie: Kan gebruikt worden voor bijna alle stuur configuraties waarbij de lage
en medium positie niet geschikt zijn:

20
3.1.2. Software Installatie
Het dashboard is compatibel met SimHub Dashboard (aanbevolen), maar ook Joel Real Timing
(JRT) en Z1 Dashboard. Hieronder leggen we uit hoe je het dashboard kan laten werken met SimHub:
1) Download en installeer SimHub: https://www.simhubdash.com/download-2/
2) Download en installeer de VOCORE LCD driver (Niet de USBD480 LCD driver!):
https://www.simhubdash.com/devices-driver-installation/
3) Start SimHub op en ga naar de "Dash Studio" Tab, klik op “VOCORE” en vink “Enable
display” aan.
4) Selecteer een voor-geïnstalleerde dashboard uit de dropdown lijst en start met racen!
This manual suits for next models
1
Table of contents
Languages:
Other Kgl Automobile Accessories manuals
Popular Automobile Accessories manuals by other brands

Gibson
Gibson 69202 instruction manual

Southwing
Southwing SF-505 quick start guide

Whelen Engineering Company
Whelen Engineering Company SA314 installation guide

BMW
BMW 11 12 2 157 664 installation instructions

Stronghold
Stronghold SH5451 Assembly & fitting instructions

Prorack
Prorack K926 Fitting Instructions for Basic Carrier