KHIND VC3668 User manual

model / 型号
VC3668
Wet & Dry Vacuum Cleaner / 干湿两用吸尘机 /
Pembersih Vakum Basah & Kering
Instruction Manual / 说明指示书 / Buku Panduan
P/N: 40-51429-00
Please read this manual carefully before operating this product. Keep this manual handy for further reference.
请在使用此产品前,详读此说明书。并将之收藏以作日后参考。
Sila baca buku panduan ini dengan teliti sebelum menggunakan produk ini. Simpanlah untuk rujukan masa depan.
Important / 重要/Mustahak
This manual is also available online.
www.khind.com.my

Safety Precaution Information
[A] Safety Instruction
1. Read the instruction manual carefully and follow the instruction closely.
2. Use this appliance with specified voltage as stated on the rating label. Before connecting the
appliance to AC mains, made sure the voltage specified corresponds to the AC supply to your house.
3. Do not handle the plug and the appliance with wet hands.
4. Please turn off and unplug the appliance when not in use or before any cleaning and maintenance
work. Make sure the power is off before pulling out the plug.
5. Do not pull, lift, or carry the appliance by its power cord. Do not excessively bend, stretch, twist, haul
and tramp the power cord or place heavy objects on it.
6. If the supply cord is damaged, it must be replaced by the manufacturer, its service agent or similarly
qualified persons in order to avoid a hazard.
7. Use only the accessories parts which are supplied by the manufacturer.
8. With any indication of damage or malfunction, please stop using the appliance immediately to
avoid hazards. Take it to the authorized service center for repair. Do not attempt to repair or change
any parts by yourself.
9. This appliance is intended for household use only, commercial use will void warranty.
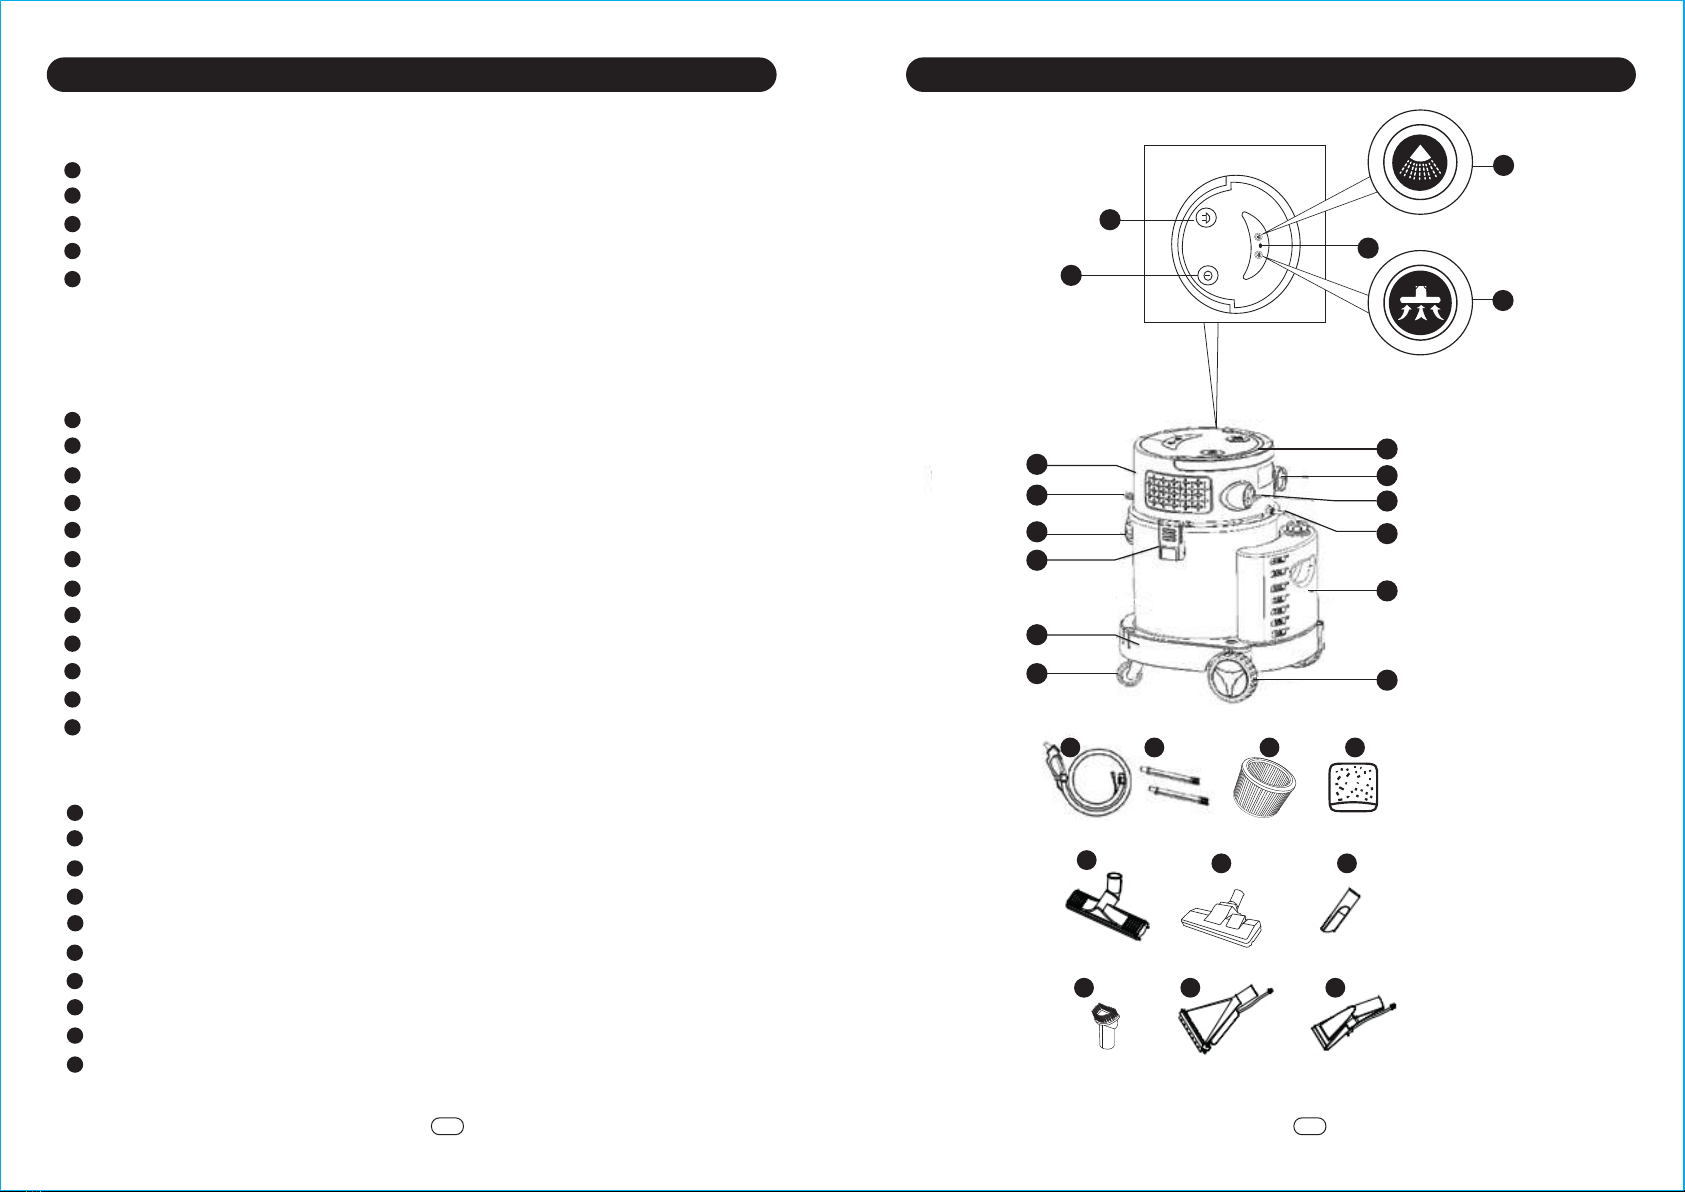
10. Ensure all parts are securely assembled before using the appliance. Refer “Installation”on page 4-5
for guideline.
[B] General Precaution
1. This appliance is not intended for use by persons (including children) with reduced physical,
sensory or mental capabilities, or lack of experience and knowledge, unless they have been given
supervision or instruction concerning use of the appliance by a person responsible for their safety.
Children should be supervised to ensure that they do not play with the appliance.
2. Keep packaging film away from children - risk of suffocation!
3. Do not leave the appliance unattended while it is connected to the main power outlet.
4. Do not expose the appliance under direct sunshine or rain.
5. Risk of Explosion! Do not operate the appliance near a gas stove, kerosene stove, gas cooker, in any
space with an open fire, or in an environment with high temperature.
6. Immediately switch the appliance off or pull the power plug if foam forms or liquids escape!
7. Do not overturn the appliance in case water goes into the motor and damage the motor.
8. Take extra care when cleaning and vacuuming at the staircase area.
[C] Risk of Personal Injury
In order to prevent damage to the product and reduce the risk of fire and personal injury, the following
objects are strictly prohibited from being sucked up :
1. Any large or broken object such as glass.
2. Anything that is burning or smoking such as cigarettes, matches or hot ashes.
3. Liquid spills.
4. Reactive liquids (solvents, corrosives, detergents).
5. Flammable or explosive substances such as alcohol, thinners etc.
6. Pet litter or anything with pet waste attached.
7. Sharp objects such as pins, needles, toothpicks, coins, metals.
8. Chalk, plastics, food wrap, other wrapping films.
9. Long pieces of string and belts.
Suggestion:
In case of long operation, it is recommended that a short interval of rest is taken after every 30minutes
of usage.
1 2
EN EN
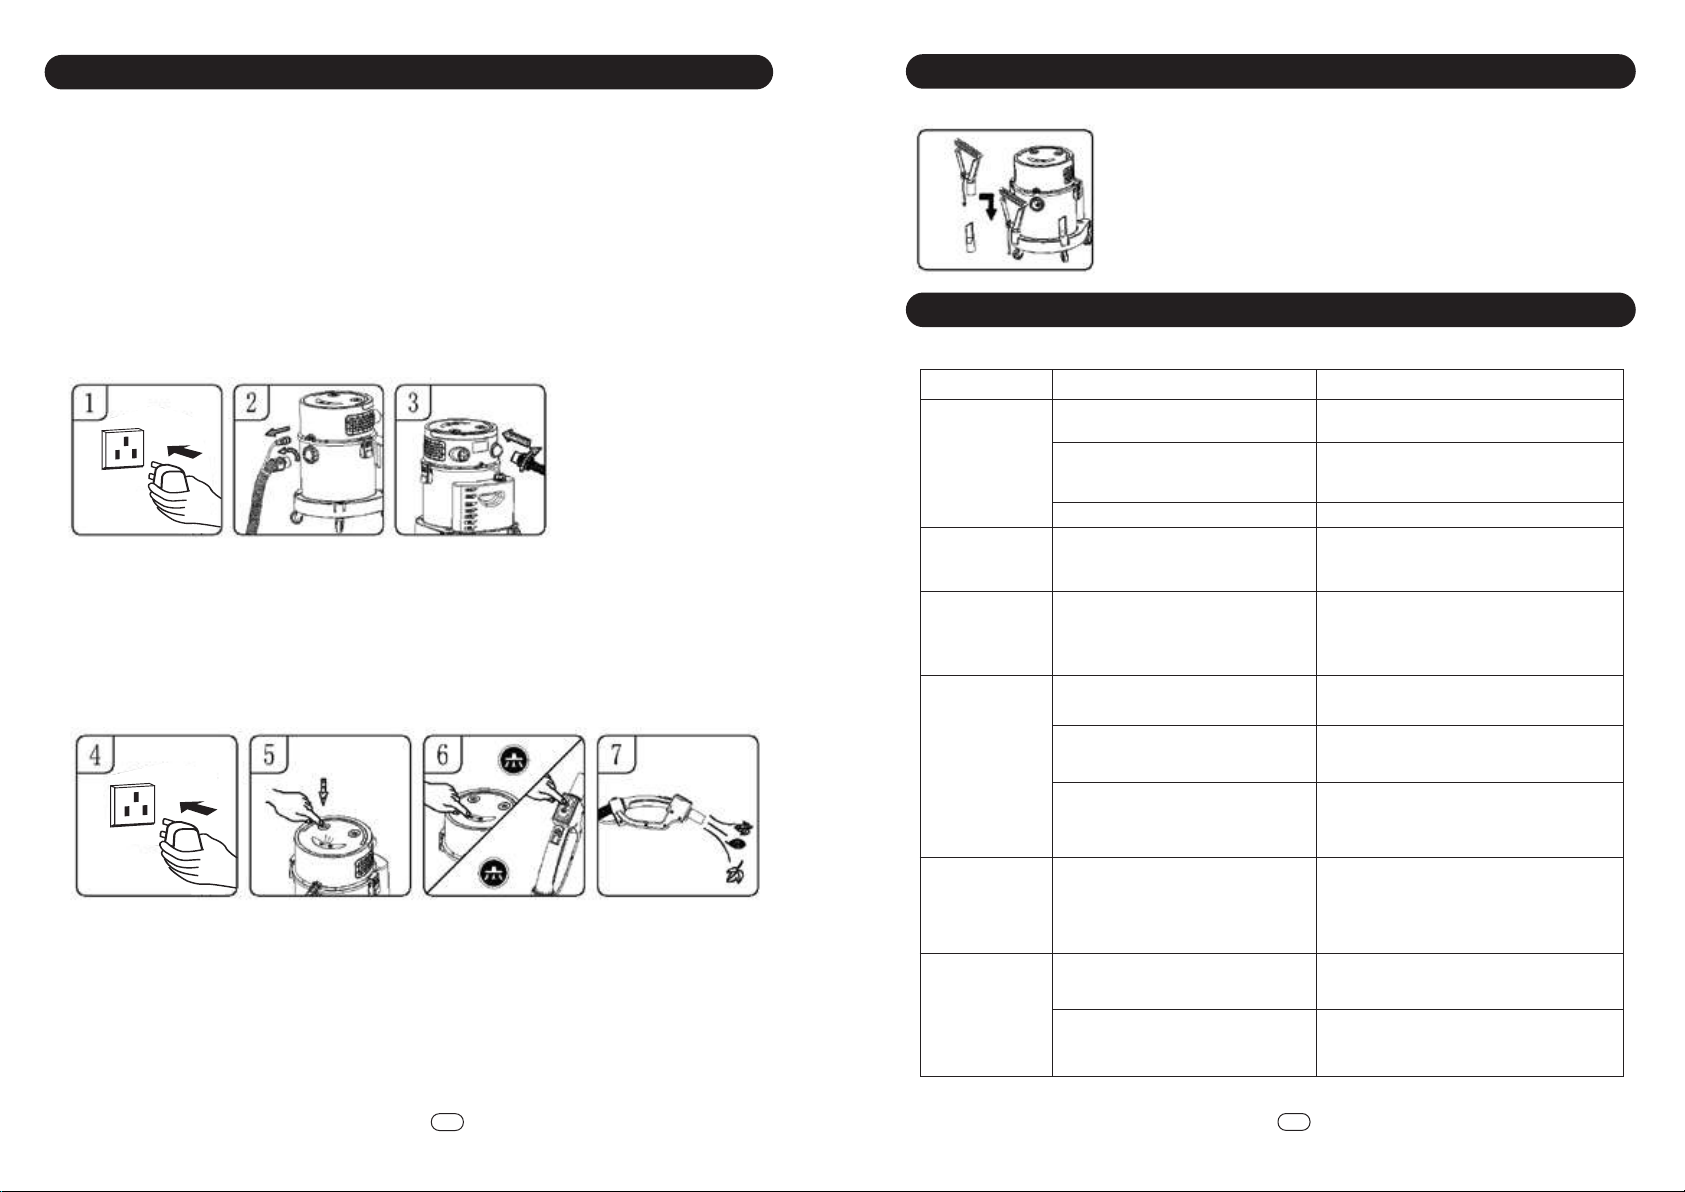
1. Before performing cleaning and maintenance, switch OFF the power and unplug from the main switch.
2. Do not immerse any part of the appliance into the water or other liquids. (except for those parts and
accessories that can be washed with water).
3. Do not use scouring pads, abrasive cleaning agents or corrosive solvent to clean the appliance.
4. Before each use, please clean the vacuum inlet of the dust container, clean out the hair, cotton fiber and
dust. Do not jam the suction of the dust container.
5. After cleaning the barrels, filters and related accessories, check if leaks. After each use, clean the filter
and do not use a wet filter at all times.
6. Check the plug if damage, place the plug.
7. Check whether there is something plug the air intake, if any, please clean.
8. Carefully put the machine, do not beat.
9. Keep the machine dry.
10. If filter covered with dust, wash with cold water, if necessary, may also use neutral detergent cleaning,
do not use corrosive objects to clean. Do not put entire head directly in the water cleaning.
11. Do not let the machine work for a long time, each working time is best in 2 hours, otherwise will reduce
the machine life.
12. After a long time the filter will be covered the dust, suction will be weakened. To avoid the weakening of
suction, always clean the filter.
13. If any abnormal vibration or noise or smell, Must immediately stop using the machine, and maintenance.
4
Cleaning & Maintenance
Filter Cleaning
1. Periodically check the cleaning filter to maintain performance.
2. If the suction very tiny dust, the filter may need more frequent cleaning.
3. Wash filter sponge with cold or warm water without the use of detergent. (Fig 1 Fig 2)
4. Keep the cleaned parts in a wide area to dry, try to keep dry and dry for at least 24 hours. Do not put the
filter in a dishwasher, washing machine, roller dryer, oven, microwave oven, below sun light or open
flame. (Fig 3)
Replace the battery on Remote Control Hose
1. The battery cover can be opened by pressing the fixed in the front of the battery box with a screw driver.
(Fig 1)
2. Take out the old batteries from the battery pack. (Fig 2 )
3. Replace with a new 23A 12V alkaline battery, pay attention to the anode and cathode of the battery when
installing. ( Fig 3)
4. Insert the protruding fixed buckle at the back of the battery cover into the corresponding slot on the
battery box, and press the front end of the battery cover can stick it into the battery case. (Fig4)
WARNING: The remote control hose is only applicable to 23A 12V alkaline battery. Do not use batteries of
other specifications to avoid damaging the remote control hose.

3EN 4EN
Parts Identication Parts Identication
*Pictures are forillustrationpurpose only.
Main Body
Not applicable in model VC3668
Standby Button - Turn on / off standby
Cleaning Button - Turn on / off water spray button
Indicator Light - Indicate standby, function and pairing status
Suction Button:
1st Press - Turn on suction function with high speed as default speed
2nd Press - Switch from high to low speed
3rd Press - Turn off suction function
Top Cover - Contain motor and function buttons
Water Pump Outlet Connector - Connect to remote control hose pipe for cleaning function
Suction Inlet - Connect to remote control hose
Barrel Lock - Secure lock the Top Cover with barrel
Pedestal
Caster Wheel
Handle
Air Outlet
Power Cord - Connect to power socket
Water Pump Inlet Connector - Draw water or detergent from Soap Bucket
Soap Bucket - Storage for water or detergent
Big Wheel
Accessories
Remote Control Hose - Contain Suction and Cleaning Button; and water pipe
Aluminium Extension Tube - Extension tube to change from hand to stand configuration
Cartridge Filter - Protects motor during dry vacuum by filtering dust and debris
Water Sponge - Use to protect motor during wet vacuuming fuctions
Wet Dry Nozzle - Suitable for normal wet vacuuming applications
Carpet Floor Nozzle - Suitable for normal dry vacuuming applications
Crevice Nozzle - Suitable for small gap and edge areas
Round Brush - Suitable for small gap or rail areas
Large Water Spray Head - Suitable for small area and upholstery
Small Water Spray Head - Suitable for small area and upholstery
1
2
3
4
5
6
7
8
9
10
11
12
13
14
15
16
17
18
19
20
21
22
23
24
25
26
27
1
5
2
6
7
8
9
11
3
4
13
14
12
15
16
17
10
Top View
19 20 21
22
18
23 24
26 2725

A] Product Installation
Caution:Make sure that the power cord plug and socket are de-energized when opening or
assembling the vacuum cleaner that you purchased.
1. Make sure the power cord is disconnected from the socket.(Fig 1)
2. Loose Clips.(Fig2)
3. Raise the top cover from the dust barrel. (Fig 3)
4. Take out all the accessories from the dust barrel. (Fig 4)
5. Place the top cover on the dust barrel that already has a filter assembly and lock it with both sides
of the clips. (Fig 5)
6. Align the hose assembly port with the suction inlet and insert it into right and tighten it. (Fig. 6)
6EN
5EN
Installation
Installation
Note: Make sure the remote control pairing is completed before start operating the vacuum for first
time
B] Remote control pairing setting
1. Make sure the power plug is connected to power supply socket.(Fig 1)
2. Press the standby button and the panel's indicator light will be on. (Fig. 2)
3. At the same time press the suction button and cleaning button on the top cover, the indicator light will
be out. (Fig. 3)
4. Press one of the buttons on the remote control hose, the indicator light on the top cover panel will
flashes once to return to normal light, and the remote control pairing setting is complete. (Fig 4)
7. Tighten the lid of the soap bucket to the right while inserting the water pump inlet on the top
cover. (Fig 7)
8. Insert the water inlet pipe into the water inlet of remote control hose and connect the aluminium
extension tube to the remote control hose.. (Fig 8)
9. Connect the two aluminum extension tubes as picture shows. (Fig 9)
10. Connect the aluminium extension tube with the brush that you need. For small and large water spray
head, you have to insert the water outlet pipe into the joint of aluminium extension tube. (Fig. 10)
Specications
*Specications are subject to change without prior notice.
Voltage
Power
Filtration Type
Tank Container Capacity
Power Cord Length
Vacuum Pressure
Noise Level
Net Weight
Product Dimension (LxWxH)
220-240V~ 50/60Hz
1200W
Cartridge Filter
20 L
5 Meter
17 kPa
82 dB
8.1kg
413 x 365 x 506mm 10
or

How to Use
8EN
7EN
WARNING: BE SURE TO READ, UNDERSTAND, AND APPLY INFORMATION, ENTITLED ‘SAFETY PRECAUTION
INFORMATION’. DO NOT VACUUM IN AREAS WITH FLAMMABLE GASES, VAPORS, OR EXPLOSIVE DUSTS IN
THE AIR. FLAMMABLE GASES OR VAPORS INCLUDE BUT ARE NOT LIMITED TO; LIGHTER FLUID, SOLVENT
TYPE CLEANERS, OIL-BASE PAINTS, GASOLINE, ALCOHOL OR AEROSOL SPRAYS. EXPLOSIVE DUSTS
INCLUDE BUT ARE NOT LIMITED TO; COAL, MAGNESIUM, GRAIN OR GUN POWDER. TO REDUCE THE RISK
OF HEALTH HAZARDS FROM VAPORS OR DUST, DO NOT VACUUM TOXIC MATERIALS.
B. Operation when dust barrel is full
1. The dust inside the dust barrel is full. (Fig 1)
2. Press the standby button and the indicator
light goes off. (Fig. 2)
3. Unplug the power cord. (Fig3)
4. Loose clips. (Fig 4)
5. Raise the top cover from the dust barrel.
(Fig 5)
6. Pour out the garbage in the dust bucket.
(Fig 6)
How to Use
A. Operation of vacuuming dust
1. Make sure the power cord is disconnected from the socket(Fig 1)
2. Loose Clips.(Fig 2)
3. Raise the top cover from the dust barrel. (Fig 3)
4. Install Cartridge filter and press tightly on the bottom cap basket. (Fig 4)
5. Place the top cover on a dust barrel, and lock it with both sides of the clips. (Fig5)
6. Align the hose assembly port with the suction inlet port and insert it into right and tighten it. (Fig. 6)
7. Insert the water inlet pipe into the water inlet of remote control hose and connect the aluminium
extension tube to the remote control hose. (Fig 7)
8. You may connect the aluminium extension tube to increase the operation radius. (Fig 8)
9. Connect the aluminium extension tube with the nozzle that you need. (Fig. 9)
10. Insert the power cord. (Fig 10)
11. Press the standby button and the indicator light on the panel will lights up. (Fig. 11)
12. Press the suction button on the top cover panel or remote control hose, then the machine will start to
work. Suction mode is divided into high and low levels, press the suction button to switch from high to
low level and press again to stop working. (Fig. 12)
C. Operation of water cleaning
1. Make sure the power cord is disconnected from the power supply.(Fig1)
2. Cover the bottom cap basket with water sponge and make sure it cover the entire basket. (Fig 2)
3. Place the top cover on the dust barrel and lock it with both side of clips. (Fig 3)
4. Install the required suction accessories on the aluminium extension tube. (Fig 4)

How to Use
5. Insert the power cord. (Fig 5)
6. Press the standby button and the indicator light on the panel will lights up. (Fig. 5)
7. Press the suction button on the top cover panel or remote control hose, then the machine will start to
work. Suction mode is divided into high and low levels, press the suction button to switch from high to
low level and press again to stop working. (Fig. 6 & 7)
8. When the water is absorbed to the maximum capacity, the safety valve operates, the suction will cut off.
(Fig 8)
9. Turn off the power, disconnect the power cord from the socket. (Fig 9)
10. Pour out the water. (Fig 10).
11. To ensure the best result of water absorption, please remove the water sponge and hand-wring- dry
after drainage. (Fig 10) (Fig 10)
12. Wash the water sponge with normal water, hand-wring dry after washing, then it can use again. (Fig 12)
10 EN
9EN
How to use
WARNING:
BE SURE TO READ, UNDERSTAND, AND APPLY INFORMATION, ENTITLED ‘SAFETY PRECAUTION
INFORMATION’. DO NOT VACUUM IN AREAS WITH FLAMMABLE GASES, VAPORS, OR EXPLOSIVE DUSTS
IN THE AIR. FLAMMABLE GASES OR VAPORS INCLUDE BUT ARE NOT LIMITED TO; LIGHTER FLUID,
SOLVENT TYPE CLEANERS, OIL-BASE PAINTS, GASOLINE, ALCOHOL OR AEROSOL SPRAYS. EXPLOSIVE
DUSTS INCLUDE BUT ARE NOT LIMITED TO; COAL, MAGNESIUM, GRAIN OR GUN POWDER. TO REDUCE
THE RISK OF HEALTH HAZARDS FROM VAPORS OR DUST, DO NOT VACUUM TOXIC MATERIALS. 9. Connect the large water spray head or small water spray head with aluminium extension tube, insert
the water inlet pipe into the connector of the aluminium extension tube. (Fig. 9)
10. Insert the power cord. (Fig 10)
11. Press the standby button and the indicator light on the panel will lights up. (Fig. 11)
12. Press the cleaning button on the top cover or remote control hose, the sprinkle head on the large water
spray head starts to spray water. If the suction button is pressed again, the machine will spray water and
absorb the dirty water after cleaning at the same time. After use, press the standby button to turn it off,
then unplug the power plug, empty the sewage in the barrel and clean it for backup. (Fig. 12)
D. Operation of carpet washer cleaning
1. Make sure the power cord is disconnected from the power supply(Fig 1)
2. Cover the bottom cap basket with water sponge and make sure it cover the entire basket. (Fig 2)
3. Place the top cover on the dust barrel and lock it with both side of clips. (Fig 3)
4. Align the hose assembly port with the suction inlet port and insert it into right and tighten it. (Fig. 4)
5. Remove the Soap bucket from the pedestal, then unscrew the lid to the left, and fill it with a clean
mixture mixed in an appropriate proportion (Fig 5)
6. Insert one end of pipe (with elbow) into the water pump inlet joint on the top cover; Place the other
end of inlet pipe with the filter into the soap bucket, then tighten the lid to the right. (Fig 6)
7. Insert the aluminium extension tube into the remote control hose and connect the water inlet pipe into
the connector of the remote control hose. (Fig 7)
8. You may connect the aluminium extension tube to increase the operation radius. (Fig 8)
9
or

How to use
WARNING:
1. When cleaning carpet, please use low foam cleaner and add appropriate anti-foaming agent mix
evenly, otherwise the air outlet will have the possibility of foam eject!
2. It is recommended that users immediately empty the sewage in the vacuum cleaner dust barrel
after using 2 buckets of cleaning fluid each time to prevent the liquid in the dust barrel from being
too high and causing the possibility of foam spraying out from the air outlet
3. In the cleaning mode, when there is no cleaning fluid in the Soap bucket, please add it in time. Do
not idle the water pump to prevent damage to the water pump.
4. When the dust barrel is full or the safety valve is blocked, the sound of the motor will obviously
become louder. At this time, the dust barrel should be shut down and emptied immediately
E. Operation of blower
WARNING: always wear safety googles before using blower
WARNING: keep by standers clear from blowing debris
WARNING: wear a dust mask if blowing creates dust that might be inhaled.
1. Make sure the power cord is disconnected from the power supply(Fig 1)
2. Unscrew the inserted hose assembly from the suction port with a left-hand rotation. (Fig 2)
3. Insert the hose assembly into the air outlet at the back of the head and tighten it with the right hand
rotation. (Fig 3)
12 EN
11 EN
How to use
Troubleshooting
Storage cervice nozzle and multi brush
- Insert the cervice nozzle into the wheel seat.
- Insert the large water spray head into the wheel seat.
WARNING! to reduce the risk of electric shock-unplug before troubleshooting.
Symptom
Vacuum will
not operate
No power supply.
Corrective ActionPossible Causes
Check power supply cord, breakers,
fuses.
Barrel full. Empty barrel.
Faulty power cord. Unplug and check the power cord. If
damaged, have it repaired by a
professional.
No filter is installed, the filter is not
installed in place or the filter is
damaged
Re-install and check whether the filter
is installed in place. Replace the new
filter if any damage is found.
Dust comes out
from motor
cover.
There is a blockage in the nozzle or
hose or the barrel inlet or cartridge
filter blocked by fine dust
Check nozzle, hose and barrel inlets for
blockage. Take off the filter and clean it.
Or install new cartridge filter
Reduced
efficiency and
motor/speed
vibration.
Does not spray
cleaning fluid
Cleaning is not selected Press the cleaning button on the panel
or remote control hose
The pipe line is not properly installed Check whether the water pipe connection
is in place correctly and pay attention to
check whether the water pipe is knotted.
Use up the cleaning fluid in the
soap bucket
Reinsertion the cleaning fluid
High bubble cleaning fluid was used Replace the low-bubble cleaning solution
and add defoaming agent according to
the ratio.
Foam coming
out of the
machine head
unit outlet
The battery in the remote control
hose runs out.
Replace the battery in the remote control
hose
Connection between remote control
hose and vacuum cleaner is
abnormal
Read the remote learning operation as
stated in manual.
Remote control
hose failure
F. Operation of accessories
4. Insert the power cord. (Fig 4)
5. Press the standby button. (Fig. 5)
6. Hold the remote control hose and press suction button, then let the outlet port aimed at the leaves and
so on. (Fig. 6)

13 14
CN CN
清洗和保养
1. 在进行清洁和维护之前,请关闭电源并拔下电源插头。
2. 请勿将设备的任何部分浸入水中或其他液体中。 (除了那些可以用水清洗的部分和配件)。
3. 请勿使用百洁布、研磨性清洁剂或腐蚀性溶剂清洁设备。
4. 每次使用前,请清洁集尘桶的吸尘口,头发,棉花纤维布和灰尘。不要堵塞集尘桶的吸力。
5. 在清洗桶、过滤器及相关配件后,检查是否有泄漏。每次使用后,清洁过滤器,不要使用湿的
过滤器。
6. 检查插头是否损坏,如果损坏,必须更换插头。
7. 检查进气口是否有东西堵塞,如果有,请清洗。
8. 小心放机,不要敲打。
9. 保持机器干燥。
10. 如果过滤器上沾满灰尘,用冷水清洗,必要时也可用中性洗涤剂清洗,不要用腐蚀性物品清洗
。不要将整个头部直接放入水中清洗。
11. 不要让机器长时间工作,每次工作时间最好在2小时之内,否则会降低机器寿命。
12. 时间长了过滤器会被灰尘覆盖,吸力会减弱。为避免吸力减弱,请时常清洁过滤器。
13. 机器如有异常震动、噪音或异味,必须立即停止使用,并进行维修。
过滤器清洁
1. 定期检查过滤器以保持性能。
2. 如果吸入的灰尘非常微小,过滤器可能需要更频繁的清洁。
3. 用冷水或温水清洗过滤海绵,不要使用清洁剂。(图 1 图 2)
4. 将清洗过的零件放在大面积晾干至少24小时,尽量保持干燥。
请勿将过滤器放入洗碗机、洗衣机、滚筒烘干机、烤箱、微波炉,太阳下或明火中。 (图3)
重要事项
[A] 安全措施
1. 请仔细阅读此说明书并遵照指示进行操作。
2. 按照额定值标签上所规定电压使用本产品。在将本产品连接至电源前,请确保屋内的电源
电压符合本产品的规格。
3. 请勿用湿漉漉的手来操作插头和本产品。
4. 不再使用时或进行任何清洁和维护工作前,务必关闭并拔下电源插头。在拔出插头前,确
保已关闭电源。
5. 请勿通过电源线来拉动,提起或携带本产品。不要过度弯曲、拉伸、扭曲、拖拉和拖拽电
源线。不要在电源线上放置重物。
6. 当电源线损坏时,请送往维修中心,所授权的维修中心或拥有同等技术的人士替换。
7. 仅使用厂商所提供的配件。
8. 如有任何损坏或故障迹象,请立即停止使用本产品以避免引起危险事故。请送往到授权的
维修中心进行维修。请勿尝试自行修理或更换任何部件。
9. 本产品仅供家庭式使用。如用作商业用途,保修将失效。
10. 在使用本产品前,请确保所有部件都已牢固组装。
[B] 一般预防措施
1. 此电器不适合这些人士使用;小孩,体力弱及感官,精神上有障礙,缺少经验及知识者;
除非有人监督或指示如何操作,并负责操作人的安全。
小孩需紧密的监督,此电器严禁被小孩当玩具玩。
2. 窒息风险!请确保包装膜远离儿童。
3. 当连接本产品至主电源时,不可无人看管或擅自离开。
4. 请勿将本产品暴露在阳光直射或下雨的环境中。
5. 爆炸风险!请勿将本产品放置在热源电器 (如燃气灶、煤油炉、电炉等) 的附近,或靠近
明火,或高温环境中。
6. 如果有泡沫或液体溢出,请立即关闭本产品和拔下插头!
7. 请勿翻转本产品,以防止水进入马达导致故障。
8. 在清理及吸尘楼梯区域时,需格外小心。
[C] 人身安全措施
为了防止产品损坏,降低火患或危害人身安全的风险,禁止吸尘器吸取以下物品:
1. 任何太大的破碎物体,例如玻璃。
2. 任何燃烧或冒烟物,例如香烟、火柴或热烟蒂。
3. 液体溢出。
4. 活性液体(例如溶剂、腐蚀剂、清洁剂)。
5. 易燃或易爆物质,例如酒精、稀释剂等。
6. 沾有宠物等排泄物的物品。
7. 尖锐的物体,例如玻璃、别针、缝衣针、牙签、金属物体。
8. 粉笔、塑料、保鲜膜、塑料膜。
9. 较长的绳索和皮带。
建议:
如果长时间操作,建议每使用30分钟后休息一小段时间。
更换遥控软管上的电池
1. 用螺丝刀按压固定在电池盒正面的电池盖,即可打开电池盖。(图。1 )
2. 从电池组中取出旧电池。(图2)
3. 更换新的23A 12V碱性电池,安装时注意电池正负极。(图3)
4. 将电池盖背面凸出的固定扣插入电池盒上对应的插槽中,按压电池盖前端即可卡入电池盒。
(图4)
警告:遥控手柄软管仅适用于 23A 12V 碱性电池。请勿使用其他规格的电池,以免损坏遥控软管

俯视图
15 16
CN CN
零件名称 零件名称
*图片仅供参考。
配件
遥控软管 - 包含抽吸和清洁按钮;和水管e
铝制延长管 - 延长管从手型变为立式配置
筒式过滤器 - 通过过滤灰尘和碎屑在干燥真空期间保护电机
水海绵 - 用于在湿吸尘功能期间保护电机
Wet Dry Nozzle - 适用于普通湿吸尘应用
地毯地板刷 - 适用于普通干吸尘应用
缝隙喷嘴 - 适用于小间隙和边缘区域
圆刷 - 适用于小间隙或轨道区域
大喷水头 - 适用于大面积和地毯/地毯
小喷水头 - 适用于小面积和室内装潢
18
19
20
21
22
23
24
25
26
27
主体
不适用于VC3668型
待机开关按钮 - 打开/关闭待机模式
清洁按钮 - 打开/关闭喷水功能
指示灯 - 指示待机、功能和配对状态
吸力按钮:
第一按 - 开启吸尘功能,默认速度为高速
第二次按下 - 从高速切换到低速
第三次按下 - 关闭抽吸功能
顶盖 - 包含电机和功能按钮
水泵出口连接器 - 连接到遥控软管以实现清洁功能
吸入口 - 连接到遥控软管
枪管锁 - 用枪管固定顶盖
基座
脚轮
处理
空气出口 - 吹气功能连接器
电源线 - 连接到电源插座
水泵入口连接器 - 从肥皂桶中抽水或清洁剂
肥皂桶 - 存放水或清洁剂
大轮子
1
2
3
4
5
6
7
8
9
10
11
12
13
14
15
16
17
1
5
2
6
7
8
9
11
3
4
13
14
12
15
16
17
10
19 20 21
22
18
23 24
26 2725

18 CN
17 CN
安装
规格
*规格如有更改,恕不另行通知。
型号
电压
功率
过滤类型
集尘桶容量
电源线长度
真空压力
噪音水平
净重
产品尺寸(LxWxH)
VC3668
220-240V~ 50/60Hz
1200W
过滤器
20L
5m
17kPa
82dB
8.1kg
413 x 365 x 506 mm
A] 品安装
注意:当您打开或组装您购买的真空吸尘器时,请确保电源线插头和插座已断电。
1. 确保电源线从插座上断开。(图。1)
2. 松散夹子。(图2)
3. 从集尘桶上抬起顶盖。(图3)
4. 从尘桶中取出所有配件。(图4)
5. 将顶盖放在已经有过滤器组件的尘桶上,并用夹子的两侧将其锁定。 (图 5)
6. 将软管组件端口与吸入口对齐并将其插入右侧并拧紧。(图 6)
B] 遥控器配对设置
注意:第一次操作吸尘器前,请确保遥控器配对完成
1. 确保已插入电源。(图1)
2. 按下开关,面板指示灯常亮。(图2)
3. 同时按下顶盖上的除尘模式键和清扫模式键,指示灯熄灭。 (图3)
4. 按下遥控器软管上的任一按键,顶盖面板上的指示灯将闪烁一次并恢复常亮,遥控器配对设置完成。
(图4)
7. 在将水泵入口插入顶盖的同时将肥皂桶的盖子向右拧紧。(图 7)
8. 将进水管插入遥控软管的进水口,将铝制延长管连接到遥控软管
9. 如图所示连接两个铝制延长管。 (图 9)
10. 用您需要的刷子连接铝制延长管。对于小型和大型喷水头,您必须将出水管插入铝制延长管的接
头中。(图 10)
安装
10
or

20 CN
19 CN
A. 尘操作
1. 确保电源线从插座上断开。(图1)
2. 松散的夹子。(图2)
3. 从集尘桶上抬起顶盖。(图3)
4. 安装筒式过滤器并紧紧压在底盖篮上。(图4)
12. 按下顶盖面板或遥控软管上的吸尘按钮,机器开始工作。吸风模式分高低档,按吸风键从高到低
切换,再按一下停止工作。 (图 12)
警告:请务必阅读、理解和应用名为“安全预防信息”的信息。请勿在空气中有易燃气体、蒸气或爆
炸性粉尘的区域进行抽真空。易燃气体或蒸气包括但不限于;打火机液体、溶剂型清洁剂、油性涂料
、汽油、酒精或气溶胶喷雾剂。爆炸性粉尘包括但不限于;煤、镁、谷物或火药。为降低蒸气或灰尘
对健康的危害,请勿对有毒材料进行真空处理。
5. 将顶盖放在尘桶上,并用夹子两侧锁定。 (图5)
6. 将软管组件端口与吸入口对齐并将其插入右侧并拧紧。(图 6)
7. 将进水管插入遥控软管的进水口,将铝制延长管连接到遥控软管。(图 7)
8. 可连接铝制延长管,增加作业半径。 (图 8)
9. 用您需要的刷子连接铝制延长管。(图 9)
10. 插入电源线。(图 10)
11. 按待机键,面板指示灯亮。(图 11)
B. 集尘桶满时操作
1. 尘桶内的灰尘已满。(图。1)
2. 按待机键,指示灯熄灭。(图2)
3. 拔下电源线。(图 3)
4. 松散的夹子。 (图4)
5. 从集尘桶上抬起顶盖。(图5)
6. 将集尘桶中的垃圾倒掉。(图6)
C. 水清洗操作
1. 确保电源线与电源断开。(图1)
2. 用海绵水盖住底盖篮,并确保覆盖整个篮子。(图2)
3. 将顶盖放在集尘桶上,并用两侧的夹子锁紧。(图3)
4. 在铝制延长管上安装所需的吸入附件。(图4)
使用方式 使用方式
5. 插入电源线。(图5)
6. 按待机键,面板指示灯亮。(图 5)
7. 按下顶盖面板或遥控软管上的吸尘按钮,机器开始工作。吸风模式分为高低档,按吸风键从高到低
切换,再按一下停止工作。 (图 6 和 7) 8. 当水
被吸收到最大容量时,安全阀动作,吸水将被切断。(图 8)

22 CN
21 CN
9. 关闭电源,从插座上拔下电源线。(图 9)
10. 倒出水。(图 10)
11. 为确保最佳吸水效果,请在排水后取出吸水海绵并用手拧干。(图 10)
12、水海绵用普通水清洗,洗后用手拧干,即可再次使用。(图 12)
警告:
请务必阅读、理解和应用名为“安全预防信息”的信息。请勿在空气中有易燃气体、蒸气或爆炸性粉
尘的区域进行抽真空。易燃气体或蒸气包括但不限于;打火机液体、溶剂型清洁剂、油性涂料、汽油
、酒精或气溶胶喷雾剂。爆炸性粉尘包括但不限于;煤、镁、谷物或火药。为降低蒸气或灰尘对健康
的危害,请勿对有毒材料进行真空处理。
警告:
1. 清洁地毯时,请使用低泡清洁剂并加入适量消泡剂混合均匀,否则出风口有喷出泡沫的可能!
2. 建议用户每次用完2桶清洗液后,立即清空吸尘器集尘桶内的污水,以免集尘桶内液体过高,造
成泡沫从出风口喷出的可能
3. 在清洗模式下,当肥皂桶内没有清洗液时,请及时添加。请勿空转水泵,以免损坏水泵。
4. 当集尘桶装满或安全阀堵塞时,电机的声音会明显变大。此时应立即关闭集尘桶并清空。
9. 将大喷水头或小喷水头与铝制延长管连接,将进水管插入铝制延长管接头。 (图 9
10. 插入电源线。(图 10)
11. 按待机键,面板指示灯亮。(图 11)
12. 按下顶盖或遥控软管上的清洗按钮,大喷水头上的喷头开始喷水。如果再次按下吸水按钮,机器
将同时喷水并吸收清洁后的脏水。使用后按待机键关机,然后拔下电源插头,清空桶内污水,清
洗备用。 (图 12)
5. 从底座上取下肥皂桶,然后拧开左边的盖子,将干净的混合物倒入适当比例的混合液中。(图5)
6. 将管子的一端(带弯头)插入头部的入口接头;将带有过滤器的进水管的另一端放入肥皂桶中,
然后将盖子向右拧紧。(图 6)
7. 将铝制延长管插入遥控软管,将进水管连接到遥控软管接头。(图 7)
8. 可连接铝制延长管,增加作业半径。(图 8)
使用方式 使用方式
D. 洗地毯机清洗的操作
1. 确保电源线与电源断开。(图1)
2. 用海绵水盖住底盖篮,并确保覆盖整个篮子。(图2)
3. 将顶盖放在集尘桶上,并用两侧的夹子锁紧。(图3)
4. 将软管组件端口与吸入口对齐,并将其插入右侧并拧紧。(图4)
9
or

故障排除
存储缝隙喷嘴和多刷
- 将缝隙喷嘴插入轮座
- 将大喷水头插入轮座
警告!降低电击风险 - 拔下插头前故障排除
症状
真空将不工
作。
没有电源。
纠正措施可能的原因
检查电源电源线、断路器、保险丝。
桶已满。 空桶。
电源线故障。 拔下电源线并检查。如果损坏,请让
专业人员修理。
未安装过滤器,过滤器未安装到
位或过滤器损坏。
重新安装并检查过滤器是否安装到位
。如果发现任何损坏,请更换新过滤
器。
灰尘从电机出
来覆盖。
喷嘴或软管或料筒入口或筒式过
滤器被细尘堵塞
检查喷嘴、软管和料筒入口是否堵塞
。取下过滤器并清洁它。或安装新的
筒式过滤器
降低效率和电
机/速度振动。
不喷清洗液。 未选择清洁模式。 按下面板或遥控软管上的清洁模式按
钮。
管道安装不正确使用了高泡清洗液
。
检查水管连接是否正确,注意检查水管
是否打结。
用完肥皂桶中的清洁液。 重新插入清洗液。
使用了高泡清洗液 更换低泡清洗液,按比例加入消泡剂。泡沫从机头单
元出口流出。
遥控软管电池没电了。 更换遥控软管中的电池。
遥控器手柄电池没电了。 阅读手册所述的远程学习操作。
遥控器手柄故
障。
4. 插入电源线。(图4)
5. 按待机按钮。(图 5)
6. 握住遥控软管并按下吸尘按钮,然后让出口对准树叶等。(图 6)
F. 配件操作
E. 鼓风机的操作
警告:在使用鼓风机之前,请务必佩戴安全护目镜。
警告:保持站立者远离吹出的碎片。
警告:如果吹气产生可能被吸入的灰尘,请戴上防尘面具。
1. 确保电源线与电源断开。(图 1)
2. 左旋从吸入口拧下插入的软管组件。(图2)
3. 将软管总成插入头部后部的出风口,并用右手旋转拧紧。(图 3)
使用方式
24 CN
23 CN

25 26
BM BM
Maklumat Langkah-Langkah Keselamatan
[A] Arahan Keselamatan
1. Baca segala arahan dengan teliti sebelum dan semasa menggunakan perkakas dan simpan untuk tujuan
rujukan di masa hadapan.
2. Sebelum menyambungkan perkakas dengan sesalur bekalan kuasa AC rumah anda, pastikan bekalan kuasa
adalah sepadan dengan spesifikasi pada perkakas.
3. Jangan pegang plag dan mengendalikan perkakas dengan tangan basah.
4. Sila matikan dan cabut plag jika perkakas tidak digunakan atau sebelum kerja pembersihan dan
penyelenggaraan dilakukan. Pastikan kuasa dimatikan sebelum menanggalkan plag.
5. Jangan tarik, angkat, atau bawa perkakas dengan talikod. Jangan terlalu membengkok, meregang, memulas,
mengangkut dan menginjak talikod atau meletakkan objek berat di atasnya.
6. Jika talikod telah rosak, ia mesti diganti oleh pengilang, wakil servis atau orang yang berkelayakan untuk
mengelakkan dari sebarang bahaya.
7. Gunakan aksesori-aksesori yang dibekalkan oleh pihak pengilang sahaja.
8. Sila berhenti dari terus menggunakan perkakas jika terdapat sebarang indikasi-indikasi kerosakan pada
perkakas. Hantar ke pusat servis berdekatan untuk tujuan pembaikan. Anda dilarang untuk cuba membaiki
perkakas sendiri.
9. Perkakas ini adalah untuk kegunaan di dalam rumah sahaja, kegunaan komersil akan membatalkan
jaminannya.
10. Pastikan semua bahagian dipasang dengan selamat sebelum menggunakan perkakas.
[B] Langkah-Langkah Am
1. Perkakas ini tidak sesuai untuk digunakan oleh orang ( termasuk kanak-kanak ) yang kelainan upaya dari
segi fizikal, deria dan mental atau orang yang kurang pengalaman dan pengetahuan melainkan mereka ini
diberikan perhatian atau tunjuk ajar berkaitan penggunaan perkakas oleh mereka yang bertanggungjawab
terhadap keselamatan mereka.
Kanak-kanak harus diperhatikan agar mereka tidak bermain dengan perkakas ini.
2. Jauhkan plastik pembungkusan dari kanak-kanak – ia berisiko untuk melemaskan!
3. Jangan tinggalkan perkakas tanpa pengawasan semasa ia disambungkan ke bekalan kuasa utama.
4. Jangan dedahkan perkakas di bawah pancaran cahaya matahari atau hujan.
5. Risiko Ledakan! Jangan kendalikan perkakas berhampiran dapur gas, dapur minyak tanah, periuk gas,
di mana-mana ruang dengan api terbuka, atau kawasan persekitaran dengan suhu yang tinggi.
6. Segera matikan suis perkakas atau tarik plag kuasa jika terdapat buih atau kebocoran cecair pada perkakas.
7. Jangan terbalikkan perkakas sekiranya air masuk ke dalam motor dan merosakkan motor.
8. Berhati-hati ketika membersih dan melakukan kerja-kerja vakum di kawasan tangga.
[C] Risiko Kecederaan
Untuk mengelakkan produk dari mengalami kerosakan dan mengurangkan risiko kebakaran dan kecederaan
peribadi, objek-objek berikut amat dilarang daripada disedut:
1. Sebarang objek yang besar atau pecah seperti kaca.
2. Apa-apa yang membakar atau berasap seperti rokok, mancis, pemetik api atau abu panas.
3. Tumpahan cecair.
4. Cecair reaktif (pelarut, korosi, detergen)
5. Bahan mudah terbakar atau bahan boleh meletup seperti alkohol, tinner dll.
6. Sisa buangan haiwan atau apa-apa yang terlekat dengannya.
7. Objek tajam seperti pin, jarum, syiling, logam.
8. Kapur, plastik, bungkusan makanan, filem pembalut yang lain.
9. Potongan tali yang panjang atau tali pinggang.
Cadangan
Sekiranya perkakas dikendalikan untuk tempoh yang lama, disarankan perkakas diberi selang tempoh rehat
pada setiap 30 minit penggunaan.
1. Sebelum melakukan pembersihan dan penyelenggaraan, matikan kuasa dan cabut plag dari suis utama.
2. Jangan rendam mana-mana bahagian perkakas ke dalam air atau cecair lain. (kecuali bahagian
tersebut dan aksesori yang boleh dicuci dengan air).
3. Jangan gunakan pad penyental, agen pembersih yang melelas atau pelarut menghakis untuk
membersihkan perkakas.
4. Sebelum setiap penggunaan, sila bersihkan salur masuk vakum bekas habuk, bersihkan rambut, kapas
serat dan habuk.
5. Selepas membersihkan tong, penapis dan aksesori yang berkaitan, periksa sama ada bocor. Selepas
setiap penggunaan, bersihkan penapis dan jangan gunakan penapis basah pada setiap masa.
6. Periksa palam jika rosak, letak palam.
7. Periksa sama ada terdapat sesuatu yang menyumbat masuk udara, jika ada, sila bersihkan.
8. Berhati-hati meletakkan mesin, jangan ketuk.
9. Pastikan mesin kering.
10. Jika penapis ditutup dengan habuk, basuh dengan air sejuk, jika perlu, boleh juga menggunakan
pembersihan detergen neutral, jangan gunakan objek menghakis untuk membersihkan. Jangan letakkan
keseluruhan kepala terus ke dalam pembersihan air.
11. Jangan biarkan mesin bekerja untuk masa yang lama, masa terbaik bekerja adlah 2 jam, jika tidak
akan mengurangkan hayat mesin.
12. Selepas masa yang lama penapis akan menutup habuk, sedutan akan menjadi lemah. Untuk
mengelakkan penyedutan menjadi lemah, sentiasa bersihkan penapis.
13. Jika ada getaran yang tidak normal atau bunyi atau bau. Segera berhenti menggunakan mesin, dan
selenggarakan.
Pembersihan Penapis
1. Periksa penapis pembersihan secara berkala untuk mengekalkan prestasi.
2. Jika sedutan habuk sangat kecil, penapis mungkin memerlukan pembersihan yang lebih kerap.
3. Basuh span penapis dengan air sejuk atau suam tanpa menggunakan detergen. (Rajah 1 & Rajah 2)
4. Simpan bahagian yang dibersihkan di kawasan yang luas untuk kering, cuba pastikan kering dan kering
sekurang-kurangnya 24 jam.Jangan letakkan penapis di dalam mesin basuh pinggan mangkuk, mesin
basuh, pengering roller, ketuhar, ketuhar gelombang mikro, di bawah cahaya matahari atau nyalaan
terbuka. (Rajah 3)
Membersih & Menyelenggara
Gantikan bateri pada Hos Kawalan Jauh
1. Penutup bateri boleh dibuka dengan menekan tetap di hadapan kotak bateri dengan pemacu skru. (Rajah1 )
2. Keluarkan bateri lama daripada pek bateri (Rajah 2 )
3.Gantikan dengan bateri beralkali 23A 12V baharu, perhatikan anod dan katod bateri semasa memasang
(Rajah 3)
4. Masukkan gancu tetap yang menonjol di belakang penutup bateri ke dalam slot yang sepadan pada kotak
bateri, dan tekan hujung hadapan penutup bateri boleh melekatkannya ke dalam bekas bateri (Rajah4)
AMARAN: Hos alat kawalan jauh hanya terpakai pada bateri beralkali 23A 12V. Jangan gunakan bateri
dengan spesifikasi lain untuk mengelak kerosakkan hos kawalan jauh.

27 28
BM BM
Pengenalan Bahagian Pengenalan Bahagian
*Gambar adalah untuk tujuan ilustrasi sahaja.
Badan Utama
Tidak berkenaan dalam model VC3668
Butang Suis Tunggu Sedia - Hidupkan / matikan mod siap sedia
Butang Pembersihan - Hidupkan / matikan fungsi semburan air
Lampu Penunjuk - Tunjukkan status siap sedia, fungsi dan berpasangan
Butang Sedutan:
Tekan Pertama - Hidupkan fungsi sedutan dengan kelajuan tinggi sebagai kelajuan lalai
Tekan kedua - Tukar dari kelajuan tinggi ke rendah
Tekan ketiga - Matikan fungsi sedutan"
Penutup Atas - Mengandungi butang motor dan fungsi
Penyambung Outlet Pam Air - Sambung ke paip hos kawalan jauh untuk fungsi pembersihan
Salur Masuk Sedutan - Sambungkan ke hos kawalan jauh
Kunci Tong - Kunci selamatkan Penutup Atas dengan tong
Alas
Roda Caster
Mengendalikan
Saluran Udara - Penyambung fungsi tiupan
Kord Kuasa - Sambungkan ke soket kuasa
Penyambung Masuk Pam Air - Tarik air atau detergen daripada Baldi Sabun
Baldi Sabun - Penyimpanan untuk air atau detergen
Roda Besar
Aksesori
Hos Kawalan Jauh - Mengandungi Butang Penyedutan dan Pembersihan; dan paip air
Tiub Sambungan Aluminium - Tiub sambungan untuk menukar konfigurasi tangan ke dirian
Penapis Kartrij - Melindungi motor semasa vakum kering dengan menapis habuk dan serpihan
Span Air - Digunakan untuk melindungi motor semasa kerja vakum basah
Muncung Kering Basah - Sesuai untuk aplikasi penyedutan basah biasa
Berus Lantai Permaidani - Sesuai untuk aplikasi vakum kering biasa
Nozel Celah - Sesuai untuk kawasan celah kecil dan tepi
Berus Bulat - Sesuai untuk kawasan celah kecil atau rel
Kepala Semburan Air Besar - Sesuai untuk kawasan yang luas dan permaidani / permaidani
Kepala Semburan Air Kecil - Sesuai untuk kawasan kecil dan upholsteri
1
2
3
4
5
6
7
8
9
10
11
12
13
14
15
16
17
18
19
20
21
22
23
24
25
26
27
Pandangan Atas
1
5
2
6
7
8
9
11
3
4
13
14
12
15
16
17
10
19 20 21
22
18
23 24
26 2725

Pemasangan
Pemasangan
[A] Pemasangan Produk
Awas : Pastikan palam dan soket kord kuasa dinyahtenaga apabila anda membuka atau memasang
pembersih vakum yang anda beli.
1. Pastikan kord kuasa diputuskan daripada soket. (Rajah 1)
2. Longgarkan klip.(Rajah 2)
3. Angkat penutup atas dari tong habuk. (Rajah 3)
4. Keluarkan semua aksesori dari tong habuk. (Rajah 4)
5. Letakkan penutup atas pada tong habuk yang sudah mempunyai pemasangan penapis dan kuncikannya
dengan kedua-dua belah klip. (Rajah 5)
6. Jajarkan port pemasangan hos dengan salur masuk sedutan dan masukkan ke kanan dan ketatkannya.
(Rajah 6)
30 BM
29 BM
[B] Tetapan Pasangan Alat Kawalan Jauh
Nota: Pastikan gandingan alat kawalan jauh selesai sebelum mula mengendalikan vakum untuk kali
pertama
1. Memastikan plag ke dalam bekalan kuasa.(Rajah 1)
2. Tekan suis dan lampu penunjuk pada panel sentiasa menyala.(Rajah 2)
3. Pada masa yang sama tekan butang mod penyingkiran habuk dan butang mod pembersihan pada penutup
atas, lampu penunjuk akan padam. (Rajah 3)
4. Tekan salah satu butang pada hos kawalan jauh, lampu penunjuk pada panel penutup atas akan jatuh
sekali dan kembali kepada cahaya biasa, dan tetapan pasangan alat kawalan jauh selesai. (Rajah 4)
7. Ketatkan penutup tong sabun ke kanan sambil memasukkan sambungan salur air masuk pada salur masuk
pam air pada penutup atas. (Rajah 7)
8. Masukkan paip salur masuk air ke dalam salur masuk air hos kawalan jauh dan sambungkan tiub
sambungan aluminium ke hos kawalan jauh. (Rajah 8)
9. Sambungkan dua tiub sambungan aluminium seperti yang ditunjukkan dalam gambar. (Rajah 9)
10. Sambungkan tiub sambungan aluminium dengan berus yang anda perlukan. Untuk kepala semburan air
yang kecil dan besar, anda perlu memasukkan paip keluar air ke dalam sambungan tiub sambungan
aluminium. (Rajah 10)
Spesifikasi
*Spesifikasi tertakluk kepada perubahan tanpa notis terlebih dahulu.
Model
Voltan
Kuasa
Jenis Penapis
Kapasiti Bekas Habuk
Panjang Kord Kuasa
Tekanan Vakum
Tahap Bunyi
Berat Bersih
Dimensi Produk (LxWxH)
VC3668
220-240V~ 50/60Hz
1200 W
Penapis Katrij
20L
5 Meter
17kPa
82dB
8.1kg
413 x 365 x 506 mm 10
or

32 BM
31 BM
C. Operasi Pembersihan Air
1. Pastikan kord kuasa diputuskan daripada bekalan kuasa.(Rajah1)
2. Tutup bakul penutup bawah dengan span air dan pastikan ia menutupi keseluruhan bakul. (Rajah 2)
3. Letakkan penutup atas pada tong habuk dan kuncikannya dengan kedua-dua belah klip. (Rajah 3)
4. Pasang aksesori sedutan yang diperlukan pada tiub sambungan aluminium. (Rajah 4)
Cara Penggunaan Cara Penggunaan
A. Operasi Menyedut Habuk
1. Pastikan kord kuasa diputuskan daripada soket(Rajah 1)
2. Klip Longgar.(Rajah 2)
3. Angkat penutup atas dari tong habuk. (Rajah 3)
4. Pasang penapis katrij dan tekan ketat pada bakul penutup bawah. (Rajah 4)
5. Letakkan penutup atas pada tong habuk dan masukkannya dengan kedua-dua belah klip. (Rajah 5)
6. Jajarkan port pemasangan hos dengan port masuk sedutan dan masukkan ke kanan dan ketatkannya.
(Rajah 6)
7. Masukkan paip salur masuk air ke dalam salur masuk air hos kawalan jauh dan sambungkan tiub
sambungan aluminium ke hos kawalan jauh. (Rajah 7)
8. Anda boleh menyambungkan tiub sambungan aluminium untuk meningkatkan jejari operasi. (Rajah 8)
9. Sambungkan tiub sambungan aluminium dengan muncung yang anda perlukan. (Rajah 9)
10. Masukkan kord kuasa. (Rajah 10)
11. Tekan butang siap sedia dan lampu penunjuk pada panel akan menyala. (Rajah 11)
12. Tekan butang sedutan pada panel penutup atas atau hos kawalan jauh, kemudian mesin akan mula
berfungsi. Mod sedutan dibahagikan kepada tahap tinggi dan rendah, tekan butang sedutan untuk beralih
dari tahap tinggi ke rendah dan tekan sekali lagi untuk berhenti berfungsi. (Rajah 12)
AMARAN: PASTIKAN MEMBACA, MEMAHAMI, DAN MENGGUNAKAN MAKLUMAT,
BERTAJUK ‘MAKLUMAT LANGKAH KESELAMATAN’. JANGAN VACUUM DI TEMPAT YANG
ADA GAS MUDAH TERBAKAR, WAP ATAU HABUK LETUPAN DI UDARA. GAS ATAU WAP
MUDAH TERBAKAR TERMASUK TETAPI TIDAK TERHAD KEPADA; BENDALIR LEBIH
RINGAN, PENCUCI JENIS PELARUT, CAT ASAS MINYAK, PENSOL, ALKOHOL ATAU
SEMBURAN AEROSOL. HABUK LETUPAN TERMASUK TETAPI TIDAK TERHAD KEPADA;
ARANG BARANG, MAGNESIUM, BIJIRAN ATAU BEDAK SENJATA. UNTUK
MENGURANGKAN RISIKO BAHAYA KESIHATAN DARIPADA WAP ATAU DEBU, JANGAN
VACUUM BAHAN TOKSIK.
B. Operasi Apabila Tangki Habuk Penuh
1. Debu di dalam tong habuk penuh.
(Rajah 1)
2. Tekan butang siap sedia dan lampu
penunjuk padam. (Rajah 2)
3. Cabut palam kord kuasa. (Rajah3)
4. Klip longgar. (Rajah 4)
5. Angkat penutup atas dari tong habuk.
(Rajah 5)
6. Tuangkan sampah ke dalam baldi habuk.
(Rajah 6)

5. Masukkan kord kuasa. (Rajah 5)
6. Tekan butang siap sedia dan lampu penunjuk pada panel akan menyala. (Rajah 5)
7. Tekan butang sedutan pada panel penutup atas atau hos kawalan jauh, kemudian mesin akan mula
berfungsi. Mod sedutan dibahagikan kepada tahap tinggi dan rendah, tekan butang sedutan untuk beralih
dari tahap tinggi ke rendah dan tekan sekali lagi untuk berhenti berfungsi. (Rajah 6 & 7)
8. Apabila air diserap ke kapasiti maksimum, injap keselamatan beroperasi, port sedutan akan terputus.
(Rajah 8)
9. Matikan kuasa, cabut kord kuasa daripada soket. (Rajah 9)
10. Tuangkan air. (Rajah 10)
11. Untuk memastikan hasil penyerapan air yang terbaik, sila keluarkan span air dan peras-keringkan tangan
selepas saliran. (Rajah 10)
12. Basuh span air dengan air biasa, perah tangan kering selepas mencuci, kemudian ia boleh digunakan
semula. (Rajah 12)
33 BM
9. Sambungkan kepala semburan air yang besar atau kecil dengan tiub sambungan aluminium, masukkan
paip salur masuk air ke dalam penyambung tiub sambungan aluminium. (Rajah 9)
10. Masukkan kord kuasa. (Rajah 10)
11. Tekan butang siap sedia dan lampu penunjuk pada panel akan menyala. (Rajah 11)
12. Tekan butang pembersihan pada penutup atas atau hos kawalan jauh, kepala taburan pada kepala
semburan air besar mula menyembur air. Jika butang sedutan ditekan semula, mesin akan menyembur air
dan menyerap air kotor selepas pembersihan pada masa yang sama. Selepas digunakan, tekan butang siap
sedia untuk mematikannya, kemudian cabut palam kuasa, kosongkan kumbahan dalam tong dan
bersihkannya untuk sandaran. (Rajah 12)
Cara Penggunaan Cara Penggunaan
AMARAN:
PASTIKAN MEMBACA, MEMAHAMI, DAN MENGGUNAKAN MAKLUMAT, BERTAJUK
‘MAKLUMAT LANGKAH KESELAMATAN’. JANGAN VACUUM DI TEMPAT YANG ADA GAS
MUDAH TERBAKAR, WAP ATAU HABUK LETUPAN DI UDARA. GAS ATAU WAP MUDAH
TERBAKAR TERMASUK TETAPI TIDAK TERHAD KEPADA; BENDALIR LEBIH RINGAN,
PENCUCI JENIS PELARUT, CAT ASAS MINYAK, PENSOL, ALKOHOL ATAU SEMBURAN
AEROSOL. HABUK LETUPAN TERMASUK TETAPI TIDAK TERHAD KEPADA; ARANG
BARANG, MAGNESIUM, BIJIRAN ATAU BEDAK SENJATA. UNTUK MENGURANGKAN
RISIKO BAHAYA KESIHATAN DARIPADA WAP ATAU DEBU, JANGAN VACUUM BAHAN
TOKSIK.
D. Pengendalian pembersihan mesin basuh permaidani
1. Pastikan kord kuasa diputuskan daripada bekalan kuasa(Rajah 1)
2. Tutup bakul penutup bawah dengan span air dan pastikan ia menutupi keseluruhan bakul. (Rajah 2)
3. Letakkan penutup atas pada tong habuk dan kuncikannya dengan kedua-dua belah klip. (Rajah 3)
4. Jajarkan port pemasangan hos dengan port masuk sedutan dan masukkan ke kanan dan ketatkannya.
(Rajah 4)
5. Keluarkan baldi Sabun dari alas, kemudian buka penutup ke kiri, dan isikannya dengan campuran bersih
yang dicampur dalam perkadaran yang sesuai (Rajah 5)
6. Masukkan satu hujung paip (dengan siku) ke dalam sambungan salur masuk pam air pada penutup atas;
Letakkan hujung paip masuk yang satu lagi dengan penapis ke dalam baldi sabun, kemudian ketatkan
penutup ke kanan. (Rajah 6)
7. Masukkan tiub sambungan aluminium ke dalam hos kawalan jauh dan sambungkan paip salur masuk air
ke dalam penyambung hos kawalan jauh. (Rajah 7)
8. Anda boleh menyambungkan tiub sambungan aluminium untuk meningkatkan jejari operasi. (Rajah 8)
34 BM
9
or

AMARAN:
1. Apabila membersihkan permaidani, sila gunakan pembersih buih rendah dan tambah campuran agen
anti-buih yang sesuai, jika tidak, saluran keluar udara akan mempunyai kemungkinan keluar buih!
2. Adalah disyorkan agar pengguna segera mengosongkan kumbahan dalam tong habuk pembersih vakum
selepas menggunakan 2 baldi cecair pembersih setiap kali untuk mengelakkan cecair dalam tong habuk
daripada terlalu tinggi dan menyebabkan kemungkinan buih tersembur keluar dari saluran keluar udara
3. Dalam mod pembersihan, apabila tiada cecair pembersih dalam baldi Sabun, sila tambahkannya tepat
pada masanya. Jangan melahu pam air untuk mengelakkan kerosakan pada pam air.
4. Apabila tong habuk penuh atau injap keselamatan tersumbat, bunyi motor jelas akan menjadi lebih kuat.
Pada masa ini, tong habuk hendaklah ditutup dan dikosongkan serta-merta.
E. Operasi Peniup
1. Pastikan kord kuasa diputuskan daripada bekalan kuasa (Rajah 1)
2. Tanggalkan skru pemasangan hos yang dimasukkan dari port sedutan dengan pusingan ke kiri. (Rajah 2)
3. Masukkan pemasangan hos ke dalam saluran keluar udara di bahagian belakang kepala
dan ketatkannya dengan putaran tangan kanan. (Rajah 3)
AMARAN: sentiasa pakai goggle
keselamatan sebelum menggunakan
blower
AMARAN: jelaskan oleh standers
daripada meniup serpihan
AMARAN: pakai masker debu jika
tiupan menjadi habuk yang mungkin
tersedut.
Cara Penggunaan
Nozel Celah Penyimpanan dan Berus Berbilang
- Masukkan Nozel Celah ke dalam tempat duduk roda
- Masukkan kepala semburan air yang besar ke dalam tempat duduk roda.
35 BM 36 BM
Tidak menyembur
cecair pembersih
Mod pembersihan tidak dipilih Tekan butang mod pembersihan pada
panel atau hos kawalan jauh
Talian paip tidak dipasang dengan
betul
Periksa sama ada sambungan paip air
dipasang dengan betul dan perhatikan
sama ada paip air bersimpul.
Habiskan cecair pembersih dalam
tong sabun
Masukkan semula cecair pembersih
Cecair pembersih gelombang tinggi
telah digunakan
Gantikan larutan pembersih buih rendah
dan tambah agen penyahbuih mengikut
nisbah.
Buih keluar dari
alur keluar unit
kepala mesin
Bateri dalam pemegang hos kawalan
jauh kehabisan.
Gantikan bateri dalam pemegang hos
kawalan jauh
Sambungan antara pemegang hos
kawalan jauh dan pembersih vakum
adalah tidak normal
Baca operasi pembelajaran jarak jauh
seperti yang dinyatakan dalam manual.
Kegagalan
pemegang hos
kawalan jauh
Penyelesaian Masalah
AMARAN! untuk mengurangkan risiko renjakan elektrik cabut plag sebelum penyelesaian masalah.
Simptom
Vakum tidak
akan beroperasi
Tiada bekalan kuasa.
Tindakan pembetulanPunca Kemungkinan
Periksa bekalan kuasa kord, pemutus,
fius.
Bekas penuh. Bekas kosong.
Kord kuasa rosak. Cabut dan periksa kord kuasa. Jika
rosak, baiki oleh pakar.
Tiada penapis dipasang, penapis tidak
dipasang di tempat atau penapis rosak
Pasang semula dan semak sama ada
penapis dipasang di tempatnya. Gantikan
penapis baharu jika terdapat sebarang
kerosakan.
Debu keluar dari
motor penutup.
Terdapat penyumbatan pada
muncung atau hos atau salur masuk
tong atau penapis kartrij yang
disekat oleh habuk halus
Periksa muncung, hos dan salur masuk
tong untuk sekatan. Tanggalkan penapis
dan bersihkannya. Atau pasang penapis
kartrij baharu
Kecekapan
berkurangan dan
getaran
motor/kelajuan.
4. Masukkan kord kuasa. (Rajah 4)
5. Tekan butang siap sedia. (Rajah 5)
6. Pegang hos kawalan jauh dan tekan butang sedutan, kemudian biarkan port alur keluar menghala ke daun
dan seterusnya. (Rajah 6)
F. Operasi Aksesori
Table of contents
Languages:
Other KHIND Vacuum Cleaner manuals