Kia Ceed 2016 User manual

>> OWNER'S MANUAL
QUICK REFERENCE GUIDE

Interior Overview
1
2
3
4
5
6
7
8
8
9
9
a
b
c
c
d
d
e
e
f
g
h
jk
l
a Seat[3]
b Insidedoorhandle[4]
c Powerwindowswitches[4]
d Powerwindowlock
button[4]
e Bonnetreleaselever[4]
f Outsiderearviewmirror
foldingswitch*[4]
g Outsiderearviewmirror
controlswitch[4]
h Headlightlevelingcontrol[4]
i Instrumentpanel
illuminationcontrol[4]
j IdleStopandGo(ISG)OFF
button*[5]
k ActiveECObutton*[5]
l Blindspotdetectionsystem
ON/OFFbutton*[5]
m LDWSON/OFFbutton*[5]
n Heatedsteeringwheel
button*[4]
o Light/Turnsignalcontrol
lever[4]
p Steeringwheel[4]
q Wiperandwashercontrol
lever[4]
r Gearlever[5]
s Tiltandtelescopicsteering
columncontrollever[4]
t Interiorfusebox[7]
*ifequipped
[#]NumberinbracketsindicateschapterinOwner‘sManual
Theillustrationsinthisguidemayvaryfromtheactualvehicle
■ Type B
■ Type A

Instrument Panel Overview / Engine Compartment
1
2
3 4
5
6
7
8
9
9a
b
c
d
e
f
g
h
1
2
34
5
6
7
8
9
a
b
a Instrumentcluster[4]
b Horn[4]
c Audioremotecontrol
buttons[4]
d Cruisecontrol/Speedlimiter
switches*[5]
e Driver’sfrontairbag[3]
f IgnitionswitchorENGINE
START/STOPbutton*[5]
g Hazardwarninglight[4]
h Audiosystem[4]
i Seatwarmer*[3]
j Centraldoorlockswitch[4]
k ESCOFFbutton[5]
l Climatecontrolsystem[4]
m Cigarettelighter[4]
n Aux,USBandiPodport[4]
o Poweroutlet[4]
p Passenger’sfrontairbag[3]
q Glovebox[4]
a Engineoilfillercap[7]
b Brake/clutchfluid
reservoir[7]
c Positivebatteryterminal[7]
d Negativebattery
terminal[7]
e Engineroomfusebox[7]
f Aircleaner[7]
g Radiatorcap[7]
h Enginecoolantreservoir[7]
i Engineoildipstick[7]
j Windshieldwasherfluid
reservoir[7]
k Fuelfilter*[7]

Door locks / Tailgate / Bonnet / Fuel Filler Lid
1
2
1
2
1
2
Operating door locks from
outside the vehicle [4]
Locking doors in case of an
emergency [4]
Child-protector rear door
lock[4]
Opening the tailgate [4] Closing the tailgate [4] Emergency tailgate release [4]
Opening the bonnet [4]
Pullthereleaselevertounlatch
thebonnet.
a Raisethebonnetslightly.
b Pushthesecondarylatch
insideandliftthebonnet.
Releasethesupportrodand
insertitintotheposition
shown.
Opening the fuel filler lid [4]
Pressthecenteredgeofthelid
whenalldoorsareunlocked.
a Fullyopenthelid
b Turncapcounterclockwise
Closing the fuel filler lid
1. Turncapclockwiseuntil
it“clicks”toensureitis
securelyclosed.
2. Closethelidandpressthe
edgeuntilitissecurely
locked.

Windows / Wipers and Washers
1
2
2
3
3
4
4
5
5
5
5
6
6
7
a Driver’sdoorpower
windowswitch
b Frontpassenger’sdoor
powerwindowswitch
c Reardoor(right)power
windowswitch*
d Reardoor(left)power
windowswitch*
e Windowopeningand
closing
f Automaticpowerwindow
up*/down*
g Powerwindowlock
switch*
NOTICE
Incoldandwetclimates,
powerwindowsmaynot
workproperlyduetofreezing
conditions.
Front [4]
Rear* [4]
A: Wiper speed control (front)
2 Highwiperspeed
1 Lowwiperspeed
---
AUTO*
Intermittentwipe
Automaticcontrolwipe
Off
O Singlewipe
B: Intermittent control wipe time adjustment
C: Wash with brief wipes (front)
D: Rear wiper/washer control
Continuouswipe
--- Intermittentwipe
O Off
E: Wash with brief wipes (rear)
Windows [4]

Seat / Air Bag / Child Restraint System
1
2
1
1
2
2
33
3
4
4
5
6
7
89
a
b
c
d
e
f
gg g
h
a Seatadjustment,
forward/backward
b Seatbackrecliner
c Seatadjustment,height
d Lumbarsupport*
e Seatwarmer*
f Walk-inseat(for3door
vehicleonly)
g Headrestadjustment
h Seatadjustment,
forward/backward
i Seatbackrecliner
j Seatadjustment,height*
k Lumbarsupport*
l Seatwarmer*
m Walk-inseat(for3door
vehicleonly)
n Headrestadjustment
o Armrest*
p Headrestadjustment
q Splitfoldingrearseat
Passenger’s front air bag ON/
OFF switch* [3]
Installing a child restraint
system by lap/shoulder
belt [3]
Rearward-facing child
restraint system [3]
Securing with “ISOFIX”
system and “Tether
Anchorage” system* [3]
a ISOFIXAnchorPosition
Indicator
b ISOFIXAnchor
Seat [3]
Securing with “Tether Anchor”
system* [3]
■ Type A
■ Type B

Climate Control System
12
3
45
5
6
1
2
3
4
56
7
8
9
a b b b c d
Automatic climate control system* [4]
a Passenger‘stemperature
control
b Dualtemperaturecontrol
selection
c Fanspeedcontrol(High)
d Fanspeedcontrol(Low)
e Climatecontroldisplay
f Airconditioning
g Airintakecontrol
h Driver‘stemperature
control
i AUTO(automaticcontrol)
j Rearwindowdefroster
k Modeselection
l Frontwindscreen
defroster
m BlowerOFF
Manual climate control system* [4]
a Fanspeedcontrol
b Airconditioning
c Rearwindowdefroster
d Modeselection
e Airintakecontrol
f Temperaturecontrol

Lighting Control / Steering Wheel / Cruise Control System
1
2
3
4
1
2
3
12
Lighting control[4]
a OFF
b Positionlight
c Headlight
d Autolight*
Tilt & telescopic steering[4]
Steeringwheelangle
adjustment:
a Pulldownlockrelease
lever
b Adjustthesteeringwheel
tothedesiredangle
c Heightadjustment
Locksteeringwheelbypulling
uplockreleaselever.
Flex steering* [4]
TheFLEXSTEERSystem
controlssteeringeffort
dependingonthedriver’s
preferenceordriving
conditions.
Youcanchoosebetween
3differentsteeringmodes
bypressingthesteering
modebutton.
Cruise control system* [5]
a Cruiseindicator
b Cruisesetindicator
ActivateCruiseControl
Systembymovingthelever
showndown
Setcruisecontrolspeedby
movingthelevershowndown
toSET-
Toincreasecruisecontrolset
speed
Todecreasecruisecontrolset
speed
Cancelcruisecontrolset
speedbypressingthebutton
shown(CANCEL/O)

Towing / Spare Tyre / Tyre Mobility Kit
1 2 3
12
Spare Tyre, Jack and tools* [7]
Theshowntoolsarestoredin
theluggagecompartment.
Pulluptheluggageboxcover
toreachthisequipment.
a Jackhandle
b Jack
c Wheellugnutwrench
Tyre Mobility Kit* [6]
Pleasereadtheinstructions
beforeusingtheTyreMobility
Kit.
a Compressor
b Sealantbottle
WiththeTyreMobilityKit
youstaymobileevenafter
experiencingatyrepuncture.
Afteryouensurethatthetyre
isproperlysealedyoucandrive
cautiouslyonthetyre(upto
200km(120miles))atamax.
speedof80km/h(50mph)
inordertoreachavehicleor
tyredealertohavethetyre
replaced.
Towing [6]
Whentowingthevehiclein
anemergencywithoutwheel
dollies:
1. Settheignitionswitchin
theACCposition.
2. Placethetransaxleshift
leverinN(Neutral).
3. Releasetheparkingbrake.
Emergency towing
Iftowingisnecessary,itis
recommendedtohaveitdone
byanauthorisedKiadealer
oracommercialtowtruck
service.
Removable towing hook
1. Openthetailgateand
removethetowinghook
fromthetoolcase.Thetool
caseislocatedunderthe
luggagebox.
2. Removetheholecover
pressingthelowerpartof
thecoveronthebumper.
3. Installthetowinghookby
turningitclockwiseuntilit
isfullysecured.
4. Removethetowinghook
andinstallthecoverafter
use.
Front bumper
Rear bumper

The Kia Service App
Engine Oil / Washer Fluid / Additional Info
The Kia Service App – now available for
free on iPhone/iPad and Android
WiththeKiaService,youhave(almost)
allKiadealersinEuropewithinreach*.
Lookingforashowroomorjustaservice,
theappdisplaysalldealersaroundyour
currentlocationonthemap.Withoneclick
youcancalladealer,visittheirwebsiteor
getdirectionstotheshowroom.Greatfor
travelathomeorabroad.
(*)Inselectedmarketsonly
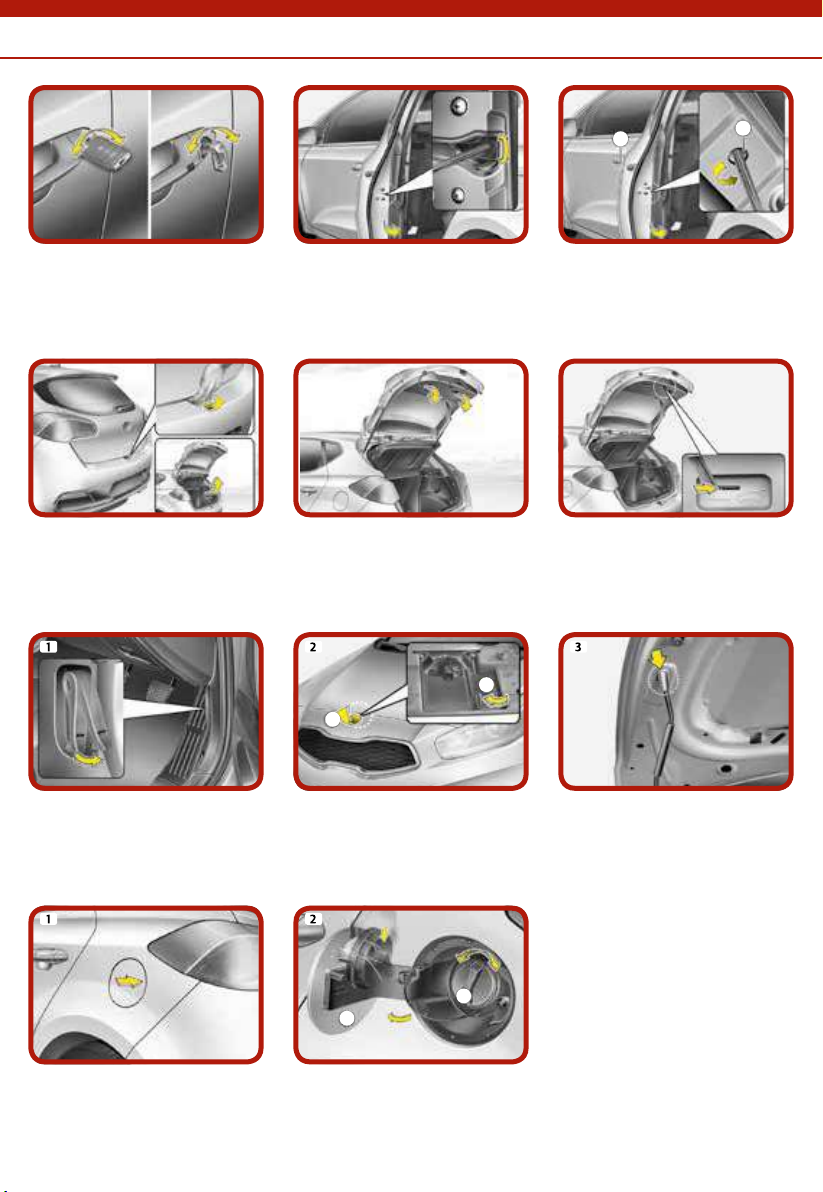
Additional Information
Engine Oil / Washer Fluid / Additional Info
Checking the engine oil level [7]
Warmuptheengineto
operatingtemperatureand
switchoff.Onlevelgroundpull
thedipstickoutandwipeclean
beforereinsertingitfully.Pull
thedipstickoutagainandcheck
thelevel.Itshouldbebetween
FandL.
Refilling engine oil [7]
Useonlythespecifiedengine
oil[8]andrefillusingafunnel
toavoidspillageonengine
components.
Checking the washer fluid
level [7]
Checkthefluidlevelandadd
fluidifnecessary.
TheKia7yearwarranty7-year/100,000Mile
newcarwarranty.ValidinallEUmemberstates(plusNorway,
Switzerland,IcelandandGibraltar),subjecttolocalterms
andconditions.
Copyright © 2016 Kia Motors Europe GmbH, all rights reserved.
16.000195 - QRGJDPE - ENG RHD - UK
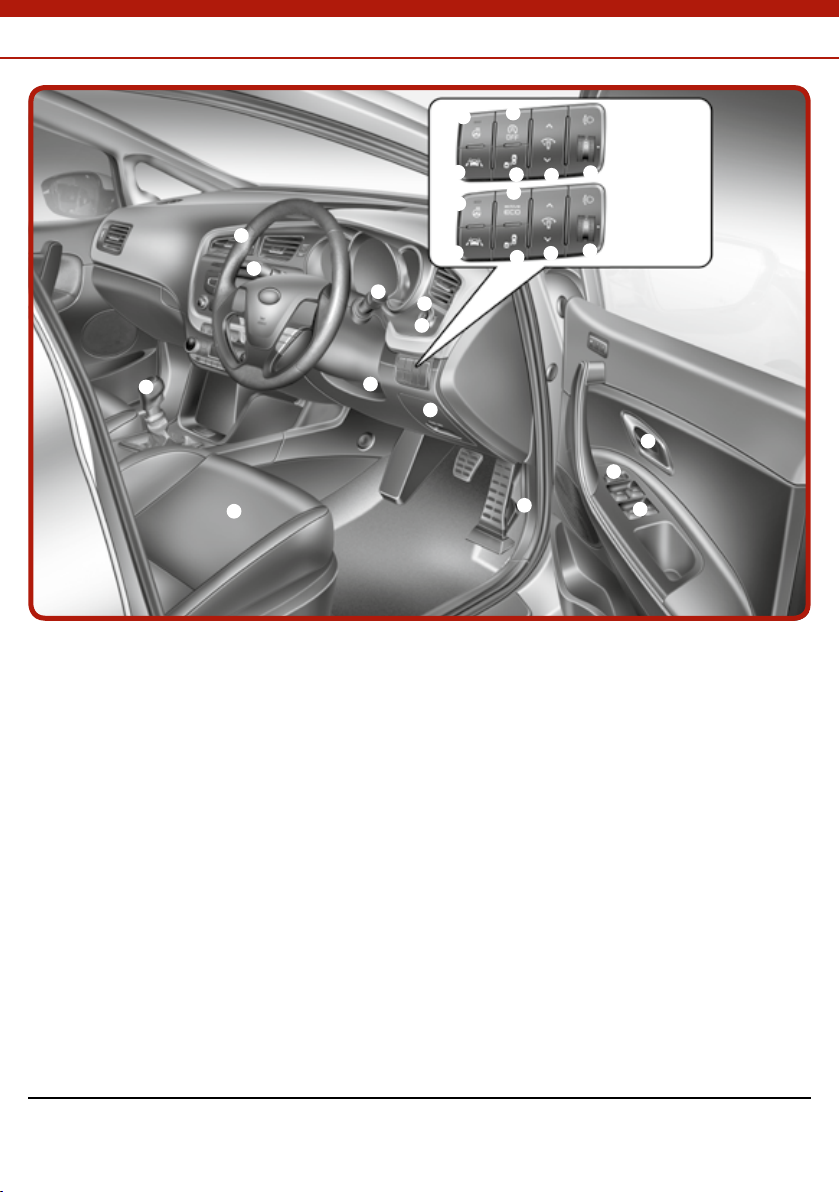
Hill-Start Assist Control (HAC)
Thisisdesignedtoassistwithhill
startsbypreventingthecarrolling
backwardswhendrivingoff.Thesystem
maintainsthebrakingpressureincertain
circumstancesfor2secondsenablingto
pullawaywhenyouareready.
Parking brake (handbrake)
Whenengagingtheparkingbrake,apply
thefootbrakefirstandkeepitdepressed.
Thenensuretheparkingbrakeisproperly
appliedaccordingtothetype.Handtype:
pulltheparkingbrakeleverupasfaras
possible.Foottype:depresstheparking
brakepedaldownasfaraspossible.
Electric(EPB)type:pulluptheEPBswitch
andmakesurethewarninglightcomeson.
We strongly recommend to leave the car
in first or reverse gear or in the ‘P’ (Park)
position on automatics when leaving the car.
Bluetooth®
ManyofourcarshaveBluetooth®
connectivitytoenablethedrivertosafely
enjoytheconvenienceofthemobile
phone.ForBluetooth®compatibilityplease
visittheownerssectiononourwebsite.
Idle Stop & Go (ISG)
Whenenabled,ISGautomaticallystopsthe
car’senginetoreducefuelconsumption
andemissions.TheISGfunctionmaynot
workifthecar’sbatterychargestatus,
ambienttemperatureand/orengine
temperatureistoolow.Airconditioning/
heatercontrolsettingsmayalsoaffect
ISGfunction.
Starting your vehicle with the parking
brake applied:
•ForManualTransaxlevehicles:Makesure
thetransaxleisinNeutralandtheclutch
pedalisfullydepressedbeforestarting
thevehicle.
•ForAutomaticTransaxlevehicles:Make
surethetransaxleisintheP(Park)
positionandthebrakepedalfully
depressedbeforestartingthevehicle.
For full details and instructions on any
item contained in this quick reference
guide, please read the owner’s manual.
Other manuals for Ceed 2016
1
Table of contents
Other Kia Automobile manuals

Kia
Kia OPTIA hybrid 2020 Parts list manual

Kia
Kia K5 2021 Parts list manual

Kia
Kia 2014 Sportage User manual

Kia
Kia Soul 2020 User manual

Kia
Kia Sportage Parts list manual

Kia
Kia Cadenza 2018 Assembly instructions

Kia
Kia RIO 2020 User manual

Kia
Kia 2016 Sedona Parts list manual

Kia
Kia Optima 2017 User manual

Kia
Kia Borrego 2010 User manual

Kia
Kia Soul 2013 User manual

Kia
Kia 2010 CEED User manual

Kia
Kia Cerato User manual

Kia
Kia SOUL 2016 User manual

Kia
Kia K900 2017 Parts list manual

Kia
Kia picanto 2014 User manual

Kia
Kia OPTIMA HYBRID 2018 Parts list manual

Kia
Kia Sorento 2023 User manual

Kia
Kia 2007 Sedona User manual

Kia
Kia CERATO 2018 User manual