Kia Rio 2021 Assembly instructions

VOICE RECOGNITION1AND BLUETOOTH®2
Using Voice Recognition
Improve Bluetooth®Voice Recognition (VR) performance
by making a few simple changes to your phone contacts:
• Use full names (first and last names) vs. short
or single-syllable names (“John Smith” vs. “Dad,”
“Smith Residence” vs. “Home”).
• Avoid using special characters, emojis, and hyphenated
names (@, &, #, /, -, *, +, etc.).
• Avoid using acronyms (“Emergency” vs. “ICE” or “In
Case of Emergency”) or words with all capital letters.
• Spell words completely; system will not recognize
abbreviations (“Doctor Smith” vs. “Dr. Smith”).
• Always wait for the beep before speaking
any commands.
• When using VR to place a call, speak in a natural,
moderate tone, with clear pronunciation. The system
may have trouble recognizing commands if you speak
too softly or too loudly.
• Open windows, weather (wind/rain), or an A/C fan
operating at higher speeds can interfere with VR
accuracy.
• Your VR system may have difficulty understanding
some accents or uncommon names.
• Press the talk button and say “Help” to get a list of
available commands.
Pairing or Connecting Your Phone with Bluetooth®
• Press the Phone hard key (if equipped) or “Call” button
on the steering wheel to begin the pairing process if
no phone has previously been paired.
• During the pairing process, please make sure you
accept all requests for phonebook download and
future auto-connection on your phone.
• To pair a second phone or subsequent phones, reference
the manuals and guides supplied with your Rio as
steps vary by radio.
• If you experience any issues with auto-connection, try
the following:
• Reboot your phone (turn the phone off and then on).
• Update the phone operating system to the most
recently released version.
• Delete the phone from the list of Bluetooth®devices
on the UVO display1and delete UVO from the list of
Bluetooth®devices on your phone, and re-pair.
• Ensure the phone has the Bluetooth®feature
activated.
• If some contacts are not downloading to the display,
check to confirm that the contact has been entered
correctly and that it has been stored under the
categories (HOME, MOBILE, WORK, iPhone®3) that are
supported by the display. Some contact categories
(MAIN, PAGER, OTHER) may not be supported. If the
number of contacts exceeds the maximum number
allowed on the display, contacts will be partially
downloaded. Ensure that only the “phone contact list”
is selected for contact download on your phone (not
social media or email contact lists as these contacts
may not download to the display).
• Phone operating systems change frequently and some
phones may have varying compatibility levels with the
Bluetooth®system. For any questions regarding the
features of your vehicle, please contact your preferred
Kia dealer or contact Kia Consumer Assistance at
1-800-333-4542.
Other Bluetooth®Tips
• Bluetooth®reception is affected by carrier coverage
and is dependent on the phone.
• If streaming audio through Bluetooth®from a device,
ensure the listening volume on the device is turned up.
FEATURE VIDEOS
To view a video on your mobile device, snap this QR Code or visit the listed website:
https://www.youtube.com/KiaFeatureVideos
VEHICLE FEATURE TIPS
Many of the Tips presented below are covered in greater detail in the
Owner’s Manual, Multimedia System Manuals, Features and Functions
Guide, and Quick-Start Guide hangtag supplied with your new vehicle.
2021
SMARTPHONE CONNECTIVITY1
Apple CarPlay®3
Your vehicle offers you effortless command of your compatible iPhone®when you connect through Apple
CarPlay®on your display. This will enable you to make calls, send hands-free texts, access your favorite
music and apps, and get navigation help with Siri®voice control.
To connect Apple CarPlay, visit https://youtu.be/N1FQ1VqDt4A.
Android AutoTM4
Your vehicle allows you to connect to your compatible AndroidTM phone via Android AutoTM on your display.
Through this feature, you can access music, your phone’s dialer, navigation help, and more with an intuitive
interface and voice commands. You can even access your phone through your steering wheel controls.
To connect Android Auto, visit https://youtu.be/QPV7y06-RJ4.

SATELLITE RADIO RECEPTION
Satellite radio reception requires a direct line of sight with the satellite transmitting the radio
signal. Tunnels, bridges, covered parking, mountainous terrain, tall buildings, heavy foliage, and
other obstacles may momentarily interrupt the signal. This is normal operation, and reception
will be restored within a few seconds in an open, unobstructed area.
The signal can become weak in some areas that are not covered by the satellite repeater network.
TRUNK / LIFTGATE OPERATION*
5DR vehicles:
If the liftgate unlock button on the key fob is pressed momentarily when all doors are
locked, the liftgate will unlock. While unlocked, the liftgate on the 5DR vehicles can
be opened by pressing the Liftgate Release button under the handle and pulling the
liftgate up by the handle.
4DR vehicles:
The trunk can only be opened by using the lever inside the vehicle or holding the trunk
button on the key fob. If the trunk button on the key fob is pressed for more than 1
second, the trunk will automatically open.
TILT STEERING WHEEL5
To adjust the Steering Wheel:
• Push down on the Lock-Release Lever A.
• Adjust the Steering Wheel to the desired angle B.
• Pull up the Lock-Release Lever Ato lock the Steering Wheel in place.
LIGHTING STALK OPERATION
AOFF position
BAuto light position
CParking light position
DHeadlight position
The light switch has a Headlight, Auto light and a Parking light position. To operate the
lights, turn the knob at the end of the control lever to one of the above positions.
When the light switch is in the parking light position C, the tail, license, and instrument
panel lights will turn ON.
FRONT AND REAR WINDSHIELD WIPER / WASHER CONTROLS
Reminder: The regular use of the windshield wiper blades will ensure optimal quality and performance.
6-WAY ADJUSTABLE DRIVER’S SEAT6
Pull lever Ato slide seat forward/backward.
Pull/press lever Bup/down one or more times to adjust seat height.
Pull lever Cto adjust seat back recline.
Reminders:
When adjusting seat forward or backward, ensure seat clicks or locks into place before
driving the vehicle.
Please be aware of the distance between the occupant and the airbag when selecting
seat position and operation.
HILL-START ASSIST CONTROL (HAC)7
HAC can help to prevent the vehicle from rolling backward when accelerating from a stop while on a steep incline.
The HAC automatically activates whether the ESC is OFF or ON but does NOT activate when the ESC has malfunctioned.
Reminders:
• The HAC does not operate when the gear shift is in the P (Park) or the N (Neutral) position.
• HAC does not replace the need to apply brakes while the vehicle is stopped on an incline.
• In the event of HAC system malfunction, see an authorized Kia dealer for service.
DRIVER ATTENTION WARNING (DAW)*7
Driver Attention Warning is designed to alert the driver if it detects inattentive driving practices and, in certain situations,
can give a warning signal to take a break from driving. There are three modes:
• Normal Sensitivity: DAW warns the driver of their inattentive driving practices.
• High Sensitivity: DAW warns the driver of their inattentive driving practices faster than Normal mode.
• Off: DAW is deactivated.
If DAW is activated, the DAW information Awill appear on the Instrument Cluster LCD when you select the Driving Assist
menu in User Settings. A message, “Consider taking a break,” Bappears on the LCD and a warning sounds to suggest the
driver to take a break when the driver’s attention level becomes low.
PUSH
PULL
PUSH
PULL
D
C
B
A
HOLD
A
B
C
B
A
Consider taking a break
Attention Level
High
(Type B shown; located on the right side
of the Steering Wheel)
OK
RES+
SET
-
A B
MIST: Single wipe
OFF: Wiper off
INT: Intermittent wipe A
LO: Slow wipe
HI: Fast wipe
HI: Fast wipe
LO: Slow wipe
OFF: Wiper off
PUSH
PULL
PUSH
PULL
Pull to spray and wipe.
(5-door shown)
Push to spray and wipe.
(5-door shown)
Slower
Faster
FRONT CONTROLS REAR CONTROLS (IF EQUIPPED)
A

WINDSHIELD DEFOGGING – MANUAL CLIMATE CONTROL
Windshield fogging is caused by moisture in the air condensing on the cold glass.
To help reduce window fogging:
• Keep the inside of the glass as clean as possible.
• Utilize the Defrost Mode which activates the A/C and opens the Fresh Air Vent A.
• Adjust the Temperature Control to the desired temperature B.
MULTIMEDIA USB PORT, POWER OUTLET, AND USB CHARGER PORT*
Use the multimedia USB port Ato connect USB audio devices and smartphones.
Use the power outlets Bfor mobile phones and other devices designed to operate on a
12V (180W max.) power outlet.
Use the USB charger port Clocated at the rear of the center console to charge devices
using a USB port.
Reminder: If USB ports (power outlets) are inoperable in ACC/ON/Start positions, please
first inspect the Power Outlet 20A fuse. Refer to the vehicle Owner’s Manual for location
(pages 7-63 through 7-71).
INSTRUMENT CLUSTER USER SETTINGS*
To enter the User Settings mode in the LCD Instrument Cluster modes, press the Mode
button Awhen the vehicle is at a standstill, gear shift in Park, and with the ignition ON,
and select User Settings .
You can navigate the selections on the display by toggling the Move button B. Select the
item by pressing the OK (Set/Reset) button C.
User Settings Menu
Driving Assist:*
• Warning Timing*
• Driver Attention Warning*
• Forward Safety*
• Lane Safety*
• Blind-Spot Safety*
• Parking Safety*
Door:*
• Automatically Lock
• Automatically Unlock
• Two Press Unlock*
• Horn Feedback*
Language:
• To select the language
Lights:
• One Touch Turn Signal
• Headlight Delay
• High Beam Assist (HBA)*
Convenience:
• Rear Occupant Alert*
• Wiper/Light Display
• Icy Road Warning*
Reset:
Reset menus in User Settings
Service Interval:
• Enable Service Interval
• Adjust Interval
• Reset
Other Features:
• Fuel Economy Auto Reset
• Speed Unit
• Fuel Economy Unit
• Temperature Unit
• Tire Pressure Unit*
Theme Selection:*
• Select the Theme for the
Instrument Cluster*
AUTOMATIC CLIMATE CONTROL*
AAuto climate control button
BTemperature control knob
CFront windshield defroster
DSystem OFF button
EMode selection control
FRecirculated air button
GFan speed control knob
HAir conditioning ON/OFF button
IRear windshield defroster
Defrost Outside Windshield:
1. Set Temperature to Hot.
2. Press the Front Defrost button.
Defog Inside Windshield:
1. Set Fan Speed to highest position.
2. Set Temperature to highest
position.
3. Press the Front Defrost button.
FRONT REAR
A/C
A/CAUTO
OFF
AUTO +-
888°C
A
B
C I
D E F
H
G
Climate Control Auto Function:
1. Press AUTO to select Full Auto Operation – the Auto setting automatically controls the airflow modes, fan speeds,
air intake, and air conditioning according to the temperature setting selected.
2. Set desired Temperature.
3. Rotate Passenger Temperature knob to select Dual Temperature Control Operation.
Auto Defogging System:
Auto Defogging is designed to reduce the fogging up of the inside of the windshield by automatically sensing the moisture
of the inside of the windshield. The system will automatically change to defrost mode when needed.
Auto Defogging is set ON by default. To cancel Auto Defogging, press the Front Defrost button for three seconds, when
the ignition is on (ADS OFF icon will illuminate). To turn Auto Defogging on again, press the Front Defrost button for
three seconds.
Air Flow Modes
To select Air Flow Modes, press the Mode selection buttons:
Face-Level Bi-Level Floor-Level Floor/Defrost-Level Defrost-Level
Reminders:
Maintaining glass cleanliness is crucial for Climate Control performance, and for preventing a foggy windshield.
Maintaining clean Cabin Air Filter is crucial for Climate System performance. Please refer to Owner’s Manual for normal
scheduled maintenance of 12 months and/or 7,500 miles (Owner’s Manual pages 8-31/32).
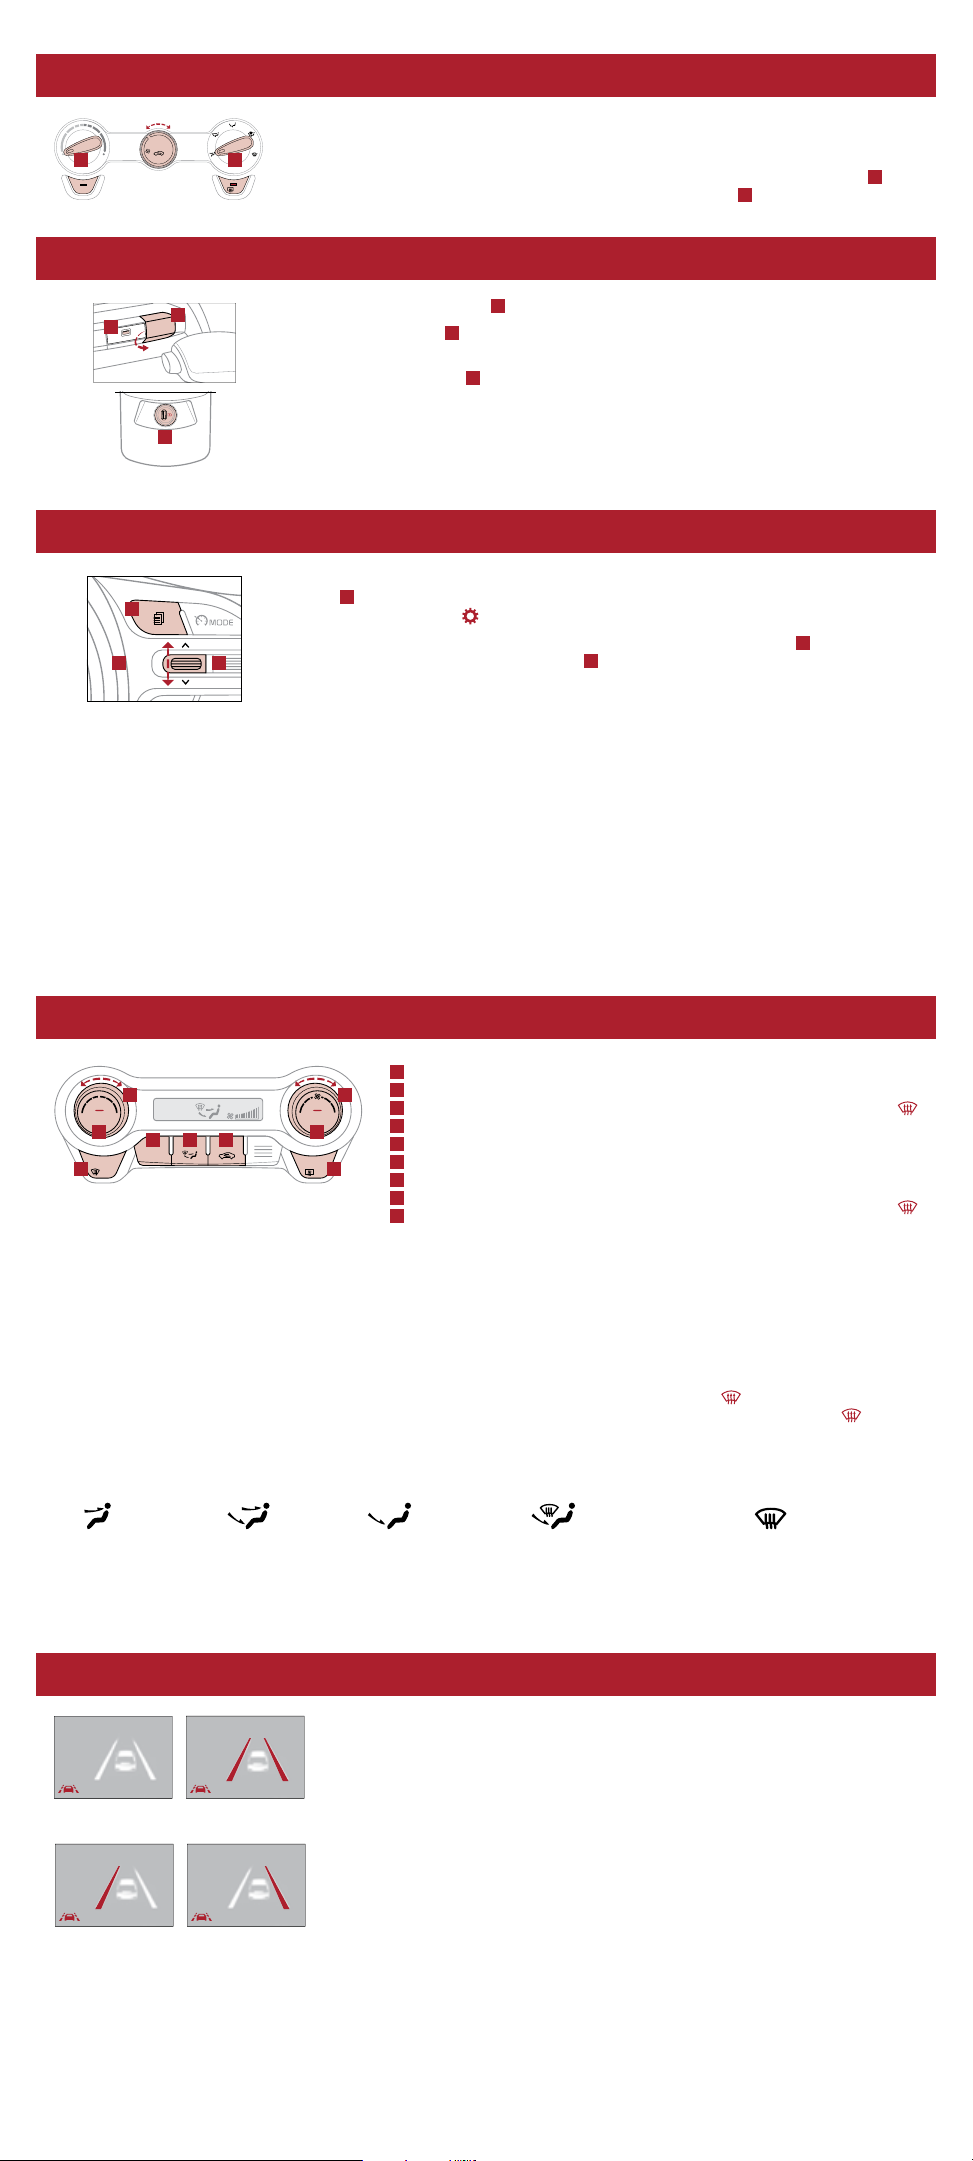
LANE KEEPING ASSIST (LKA)*7
LKA is designed to detect the lane markers on the road with a front view camera
on the windshield, and may assist the driver’s steering to potentially help keep the
vehicle in the lane. When turned on, the instrument cluster indicator will initially
illuminate white. It will remain white when the vehicle is traveling slower than 40 mph
or when the system does not detect the lane markers. When the system detects the
lane markers and can assist the steering, the LKA icon will illuminate green.
If the LKA detects that you are moving outside of your lane, the system may give
an audible warning and display Lane Departure Warning (LDW) on the instrument
cluster. If the vehicle continues to move outside of the lane, LKA may provide steering
inputs, trying to prevent the vehicle from moving outside its lane.
LKA is the operating mode by default when the Lane Safety/LKA button* is
depressed to ON.
There are three available modes:
• Active LKA – Provides more frequent steering inputs than standard LKA.
• LKA – Guides driver to keep vehicle within lanes and provides steering inputs
when vehicle is about to deviate from the lane.
• LDW – Alerts driver when the system detects the vehicle leaving the lane.
In this mode the system will not provide steering inputs.
All systems will operate under the following conditions:
• The vehicle speed exceeds approximately 40 mph.
• LKA recognizes both sides of the lane markers the vehicle is traveling in.
• The vehicle is between the lane markers.
REAR
A/C
MAX
A/C
12
03
4
AB
12V
180W
USB
(Located at rear of Center Console)
A
B
C
Located at rear of Center Console
OK
RES+
SET
-
A
BC
When the front-view camera does not
detect the lane traveling in, the lanes
are not illuminated
When the front-view camera detects
the lane traveling in, both lanes are
illuminated
LANE KEEPING ASSIST LANE KEEPING ASSIST
LANE KEEPING ASSISTLANE KEEPING ASSIST
When the front-view camera detects the vehicle moving outside of the lane traveling
in, a vehicle crossing lane indicator will blink, either on the left or right lane (as shown
in both images above)
When the front-view camera does not
detect the lane traveling in, the lanes
are not illuminated
When the front-view camera detects
the lane traveling in, both lanes are
illuminated
LANE KEEPING ASSIST LANE KEEPING ASSIST
LANE KEEPING ASSISTLANE KEEPING ASSIST
When the front-view camera detects the vehicle moving outside of the lane traveling
in, a vehicle c
rossing lane indicator will blink, either on the left or right lane (as shown
in both images above)

FORWARD COLLISION-AVOIDANCE ASSIST (FCA)*8/ FORWARD COLLISION WARNING (FCW)*7
FCA is designed to detect and monitor a vehicle ahead or detect a pedestrian in the roadway
through front view camera recognition and front radar signals to warn the driver that a
collision is imminent, and if necessary, temporarily apply emergency braking. Initially,
FCA provides FCW when it detects a potential collision with a vehicle, pedestrian, or
cyclist, emitting an audible warning and visual alert on the instrument cluster.
If the system detects that the collision risk has increased, FCA automatically applies the
brakes to reduce your speed, potentially helping to reduce the effects of a possible collision.
The FCA/FCW systems will become active when the:
• Engine Start/Stop button is ON.
• Vehicle is traveling faster than 5 mph.
• Electronic Stability Control (ESC) is ON.
This system is only a supplemental system and is not intended to, nor does it, replace the need for extreme care and
attention from the driver. The sensing range and objects detectable by the sensor are limited. Refer to the Owner’s Manual
for detailed information that may affect performance. Common causes for temporary disabled FCA/FCW operation include:
heavy snow/rain, direct sunlight, heavy fog, and mud/dirt on the front of the vehicle.
AUTOMATIC GEAR SHIFT WITH SPORTMATIC®SHIFTING
P: Park
R: Reverse
N: Neutral
D: Drive
[+]: Manual Mode Upshift
[–]: Manual Mode Downshift
Manual Mode:
To enter Manual mode, move shift lever from Dto left gate A.
To shift while in Manual mode, move shift lever up [+] to upshift or down [–] to downshift.
REAR VIEW MONITOR7
The Rear View Monitor is a supplemental system that displays the view behind the vehicle
through the audio control unit screen while the vehicle is in Reverse.
The Rear View Monitor activates when the:
1. Ignition is ON.
2. Gear Shift Lever is in the R (Reverse) position.
Reminder: Always drive carefully and use caution when backing up. Maintaining the
cleanliness of the camera lens will optimize quality and performance during operation.
FOLDING REAR SEATBACK*8
To Fold:
1. Ensure the rear seat belt is out of way of the Seatback folding area A(4-door model).
Insert the metal seat belt tab into the holder B(5-door model).
2. Adjust the Front Seatback to the upright position, and lower the rear headrest to the
lowest position.
3. Pull on the Rear Seatback lock release lever C, then fold the seat frontward.
To Unfold:
1. Pull the lock release lever C, and lift the Seatback backward until it clicks firmly in place.
2. Return the rear seat belt to the proper position.
Quick Tips:
• It may be necessary to adjust the front seatbacks to fully lower the rear seats.
• Ensure the seat is locked by pressing down on the Seatback and ensuring the red
line is NOT visible on the bottom of the folder lever.
2021 Rio S with Tech Package and 2021 Rio 5-Door with Tech Package shown on cover. Images or graphics are for illustrative purposes only and may not reflect actual
feature or operation. See the Owner’s Manual for more detailed information, limitations, and conditions. *If equipped. 1The driver’s primary responsibility is in the safe and
legal operation of a vehicle, and use of any handheld devices, other equipment or vehicle systems which take the driver’s focus away from the safe operation of a vehicle or
that are not permissible by law should never be used during operation of the vehicle. 2The Bluetooth®word mark and logos are registered trademarks owned by Bluetooth
SIG, Inc. and any use of such marks by Kia is under license. A Bluetooth®enabled cell phone is required to use Bluetooth®Wireless Technology. 3Apple CarPlay, iPhone, and
Siri are registered trademarks of Apple Inc., registered in the U.S. and other countries. 4Android and Android Auto are trademarks of Google LLC. Vehicle user interface is
a product of Google and its terms and privacy statements apply. Requires the Android Auto app on Google Play and an Android compatible smartphone running AndroidTM
5.0 Lollipop or higher. Data plan rates apply. 5Do not attempt to adjust the steering wheel while driving as this may cause you to lose control of the vehicle. 6Do not adjust
the seating position while driving as this may cause you to lose control of the vehicle. 7Driver-assist technologies are not substitutes for safe driving, and may not detect
all objects surrounding vehicle. Always drive safely and use caution. 8All cargo should be evenly distributed, properly secured, and never piled higher than the seatback.
9Kia received the lowest rate of reported problems among mass market brands in the J.D. Power 2015-2020 U.S. Initial Quality Studies of new vehicle owners’ experience
with their own vehicle after 90 days of ownership. Tied in 2020. Visit jdpower.com/awards for more details.
©2021 Kia Motors America, Inc., 111 Peters Canyon Road, Irvine, CA 92606
Collision Warning
Collision Warning
A
A
A
C
B
HIGHEST RANKED MASS MARKET BRAND IN
INITIAL QUALITY, 6 YEARS IN A ROW.
9
®
Other manuals for Rio 2021
1
Table of contents
Other Kia Automobile manuals

Kia
Kia Niro PHEV 2019 User manual

Kia
Kia sedona 2015 Parts list manual

Kia
Kia Stinger Parts list manual

Kia
Kia EV6 User manual

Kia
Kia Soul 2022 User manual

Kia
Kia Cerato 2019 User manual

Kia
Kia Spectra 2003 User manual

Kia
Kia Stinger Assembly instructions

Kia
Kia Cadenza User manual

Kia
Kia Carens 2017 User manual

Kia
Kia 2007 Sedona User manual

Kia
Kia Rio 2017 Parts list manual

Kia
Kia 2014 Optima Hybrid User manual

Kia
Kia Sedona 2005 User manual

Kia
Kia Automobile User manual

Kia
Kia Sportage 2002 User manual

Kia
Kia EV6 2024 User manual

Kia
Kia Niro Plus DE 2022 User manual

Kia
Kia Optima Parts list manual

Kia
Kia Niro 2018 User manual