KiARA SKY BEYOND PRO User manual

USER’S MANUAL
1. Read the instructions carefully before use and keep for
future reference.
2. Always use the correct voltage for the lamp.
3. Do not let any liquids get into the machine to avoid
equipment damage or personal injury.
4. Do not use if the timer is damaged.
5. Switch off the lamp and unplug from power source for
extended periods of non-use.
6. To avoid any personal injury, please don’t use if the AC
connection cable is visibly damaged.
7. To avoid lowering the service life of the lamp, single
continued working time should not exceed 10 minutes.
8. This product emits UV light. Use proper precaution with any
UV product.
9. Ensure the proper disposal process is utilized if you are
disposing the lithium battery.
Warning: Improper battery replacement will increase explosion danger.
CAUTION
2. Once the lamp switch is in the “ON” position the lamp will run off stored battery
power as well as indicate current power levels.
3. We recommend unplugging the adapter once charging is complete.
D11010 S
C. Battery Pack
1. Disconnect the battery pack from the appliance before making any adjustments,
changing accessories, or storing appliance. Such preventive safety measures reduce
the risk of starting the appliance accidentally.
2. When battery pack is not in use, keep it away form other metal objects, like paper
clips, coins, key, nails, screws, or other small metal objects, that can make a connection
from one terminal to another. Shorting the battery terminals together may cause burns
or a re.
3. Used only with the battery pack model Lithium-ion Battery Pack 18650.

A. Operation
LED Light is designed for curing gel polish. This lamp has a specialized
pre-programmed timer to ensure accurate curing. A rechargeable lithium bat-
tery is included in this cordless model.
48W Power (Max) with a service life of 67,000 hours.
1 BEYOND PRO RECHARGEABLE LED LAMP Vol II
(It contains 5200mA 18650 rechargeable lithium battery)
1 DC Adapter (DC15V 3A)
1 User’s Manual
1 Warranty Card
2
1
1- Removable battery.
2- Infrared radiation automatic
induction.
3- Strategically placed LEDs for
efcient curing time. (Prism lighting
for clients visual comfort).
4- Easily sanitizable & removable
stainless steel tray.
5- LCD timer display with battery
power indicator.
6- Power switch: battery or DC
adapter.
7- Built In handle for convenient
mobility.
8- Custom preset cure time 15, 30,
60, & 90 seconds with optional low
heat feature.
4
3
5
67
8
PACKAGE INCLUDES
OPERATION INSTRUCTIONS
PRODUCT DESCRIPTION
FUNCTION DESCRIPTION
2. Touch the 15s timer switch, the timer display will count down and LED Lights will
illuminate. The lights will turn off automatically after the preset time is up. To choose
another time, touch the switch (30s/60s/90s) once, touch again to start count down and
light illumination. The light will turn off automatically. Repeat as necessary to cure gel.
3. This LED Lamp is equipped with an infrared motion sensor to turn the light on and
off. Choose the time desired by one touch of the switch (15s/30s/60s/90s). The default
time is 15s. Slide the hand or foot into the machine, the light will turn on automatically
and the timer will count down for the time selected. The light will turn off automatically at
zero or when the hand or foot is removed.
4. The light will go into sleep mode if there is no activity for 5 minutes. Touch any switch
on the operation panel to resume into normal working mode.
The status of the battery power indicator is as follows:
5. 90s Low Heat Mode:
4 time periods: 15s, 30s, 60s, 90s
Power increase: 8W, 15W, 30W, 48W*90%
The brightness of the LED lamp in each time period is a process of increasing power.
NOTE: A fully charged battery provides approximately 2
hours of continuous use.
Indicator 1 Indicator 2 Indicator 3 Indicator 4 Description
FLASH 25% power
ON 50% power
ON ON 75% power
ON ON ON 90% power
ON ON ON ON Full power
B. How to charge
It’s best to connect the adapter to charge when the battery is lower than 20%, the
battery power indicator will icker. This means a critically low-battery and the lamp will
not work, you must connect adapter to charge.
1. Turn the button on the back of machine to “ | ” position, the switch for the 15s timer
will light up when the machine is in work mode.
Indicator 1 Indicator 2 Indicator 3 Indicator 4 Description
Flash 25% power
ON Flash 50% power
ON ON Flash 75% power
ON ON ON Flash 90% power
ON ON ON ON Full power
1. The LCD screen will not reect timer and power levels in the “OFF” position, but it
will charge.

INSTRUCTIONS D’UTILISATION
1. Lisez attentivement les instructions avant utilisation et
conservez-les pour référence future.
2. Utilisez toujours la tension correcte pour la lampe.
3. Ne laissez aucun liquide pénétrer dans la machine pour éviter
des dommages matériels ou des blessures corporelles.
4. Ne pas utiliser si la minuterie est endommagée.
5. Éteignez la lampe et débranchez-la de la source d’alimentation
pendant de longues périodes de non-utilisation.
6. Pour éviter toute blessure corporelle, ne pas utiliser si le câble
de connexion CA est visiblement endommagé.
7. Pour éviter de réduire la durée de vie de la lampe, le temps de
travail continu ne doit pas dépasser dix minutes.
8. Ce produit émet une lumière UV. Utilisez les précautions
appropriées avec tout produit UV.
9. Assurez-vous que le processus d’élimination approprié est
utilisé si vous jetez la batterie au lithium.
Avertissement: un remplacement incorrect de la batterie augmente le risque
d’explosion.
MISE EN GARDE
1. L’écran LCD ne reètera pas la minuterie et les niveaux de puissance en position «OFF»,
mais il se chargera.
2. Une fois que le commutateur de tour est sur la position «ON», la lampe fonctionnera
hors de la batterie stockée comme nous allons indiquer les niveaux de puissance actuels.
3. Nous vous recommandons de débrancher l’adaptateur une fois la charge terminée.
D11010 S
C. La Batterie
1. Débrancher la batterie de l’équipement avant toute opération Ajuster, remplaacer les
pièces de rechange ou l’équipment de stockage. Ces Precautions Des mesures de sécurité
peuvent réduire le risque de démarrage accidentel de l’équipement.
2. Lorsquer la batterie n’est pas utilisée, gardez - la à l’écart des autres objets métalliques.
Comme des trombones, des pièces de monnaie, des clés, des clous, des bis ou d’autres
petits objets métalliques, Vous pouvez vous connecter d’un terminal à un autre. Court -
circuiter Ensemble, les bornes de batterie peuvent cause des brûlures ou un incendie.
3. À utiliser uniquement avec des batteries, type 18659 Lithium-ion.

fois la durée prédénie écoulée. Pour choisir une autre heure, appuyez une fois sur le
commutateur (30s / 60s / 90s), appuyez à nouveau pour démarrer le compte à rebours et
allumer l’éclairage. La lumière s’éteindra automatiquement. Répétez au besoin pour durcir
le gel.
3. Cette lampe LED est équipée d’un capteur de mouvement infrarouge pour allumer et
éteindre la lumière. Choisissez l’heure souhaitée en appuyant sur le bouton (15 s / 30 s
/ 60 s / 90 s). La durée par défaut est de 15 s. Faites glisser la main ou le pied dans la
machine, la lumière s’allumera automatiquement et la minuterie comptera à rebours pour
le temps sélectionné. La lumière s’éteint automatiquement à zéro ou lorsque la main ou le
pied est retiré.
4. La lumière passera en mode veille s’il n’y a aucune activité pendant 5 minutes. Appuyez
sur n’importe quel interrupteur du panneau de commande pour revenir en mode de
fonctionnement normal.
L’état de l’indicateur d’alimentation de la batterie est le suivant:
5. Mode basse température des années 90:
4 périodes: 15s, 30s, 60s, 90s
Augmentation de puissance: 8W, 15W, 30W, 48W*90%
La luminosité de la lampe LED à chaque période de temps est un
processus d’augmentation de la poudre.
A. Utilisation
La lumière LED est conçue pour durcir le vernis gel. Cette lampe a une minuterie prépro-
grammée spécialisée pour assurer un durcissement précis. Une batterie au lithium recharge-
able est incluse dans ce modèle sans l.
Puissance de 488 W (max.) Avec une durée de vie de 67 000 heures.
REMARQUE: Une batterie complètement chargée offre environ 2 heures
d’utilisation continue.
1 Lampe LED rechargeable Beyond Pro Vol II
(contient une batterie au lithium rechargeable 5200mA 18650)
1 Adaptateur CC
1 Manuel de l’utilisateur
1 Carte de garantie
LE FORFAIT COMPREND
INSTRUCTIONS D’UTILISATION
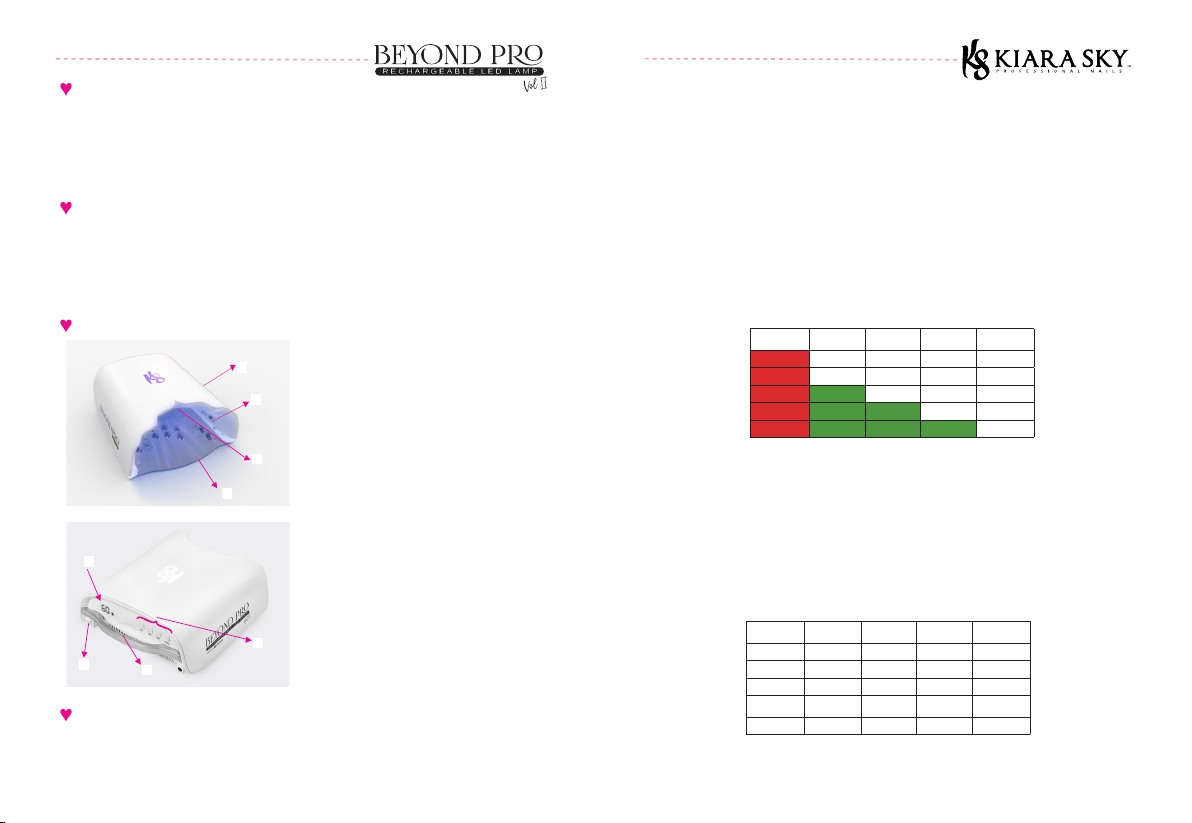
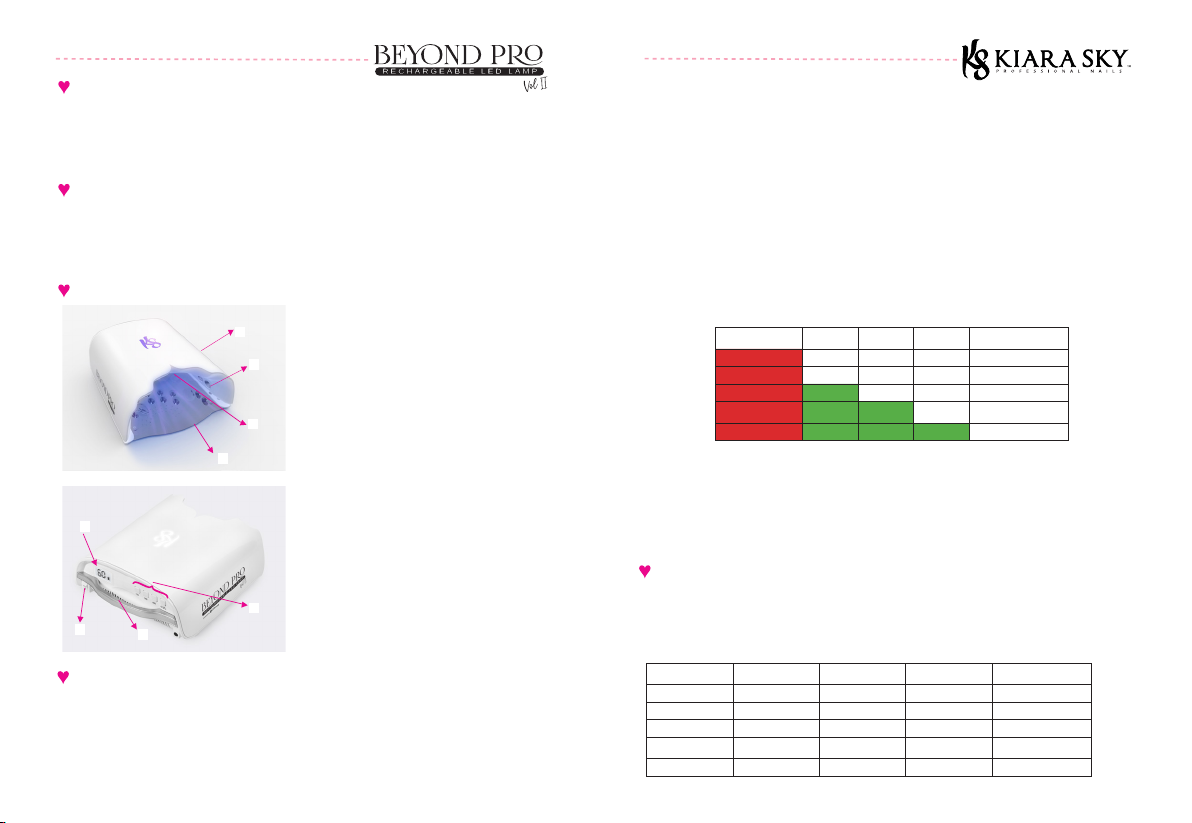
DESCRIPTION DU PRODUIT
Voyant 1 Voyant 2 Voyant 3 Voyant 4 La description
Lumière aveuglante 25% source de courant
SUR 50% source de courant
SUR SUR 75% source de courant
SUR SUR SUR 90% source de courant
SUR SUR SUR SUR Full source de courant
2
1
4
3
5
67
8
DESCRIPTION DE LA FONCTION
1- Batterie amovible.
2- Induction automatique par rayonnement
infrarouge.
3- LED stratégiquement placées pour un
temps de séchage efcace (Prism light
pour le confort visuel des clients)
4- Plateau en acier inoxydable facile à
désinfecter et amovible.
5- Afchage de la minuterie LCD avec
indicateur de charge de la batterie.
6- Interrupteur d’alimentation: batterie ou
adaptateur CC
7- Poignée intégrée pour une mobilité
pratique.
8- Temps de séchage prédéni
personnalisé de 15, 30, 60 et 90 secondes
avec fonction de faible température en
option.
1. Tournez le bouton à l’arrière de la machine sur «| », L’interrupteur de la minuterie 15 s
s’allume lorsque la machine est en mode travail.
2. Appuyez sur l’interrupteur de la minuterie 15 s, l’afchage de la minuterie compte à
rebours et les voyants DEL s’allument. Les lumières s’éteignent automatiquement une
OPERATION INSTRUCTIONS
B. Comment charger
Il est préférable de connecter l’adaptateur pour charger lorsque la batterie est inférieure
à 20%, le voyant d’alimentation de la batterie clignotera. Cela signie une batterie
extrêmement faible et la lampe ne fonctionnera pas, vous devez connecter un adaptateur
pour charger.
Voyant 1 Voyant 2 Voyant 3 Voyant 4 La description
Lumière aveuglante 25% source de courant
SUR Lumière aveuglante 50% source de courant
SUR SUR Lumière aveuglante 75% source de courant
SUR SUR SUR Lumière aveuglante 90% source de courant
SUR SUR SUR SUR Full source de courant
Table of contents
Languages:
Popular Personal Care Product manuals by other brands

REH4MAT
REH4MAT AM-SOB-06 quick start guide

Thulos
Thulos TH-BY19 quick start guide

Stealth Products
Stealth Products Stealth Positioning Foot Support Intended use

bort medical
bort medical active COLOR SPORT quick start guide

Munich Spring
Munich Spring Fit&Fun Premium user manual

AEG
AEG PHE 5671 LS instruction manual