Kickbike Freeride User manual

DearKickbike-owner,
ThankyouforhavingchosentheKickbike-scooter!Itisourownoriginal
Finnishdesign,inventionandabrandnamesince1994.Westillhaveapassion
todevelopbetterproductsforscooterloverssotheworkgoeson.
PleasereadthismanualsothatyoucanenjoyyourKickbikewithoutproblems.
Inthemanualtherearestepbystepinstructionsofhowtofirstassembleyour
Kickbikeandalsohowtoadjustittofityourneeds.Thismanualcoversall
models.Iftherearedifferencesinsomecomponentsitisclearlyshownwhich
modelwetalkabout.
Ifyouhaveanythingtoaskpleasecontactyourdealerorusdirectly.Itisour
prioritythatyouarehappywiththeKickbike-scooter!
Happykicking!
HannuVierikko
“MrKickbike”
Contents
➢Installationandadjustment:
➢handlebars 2
➢mudguards 3
➢wheels 4
➢tires 4
➢brakes 5
➢footboard/frame 6
➢kickstand 7
➢basket 7
➢suspensionfork 7
➢fold&unfoldCliX 8
➢Others:
➢maintenance 9
➢warnings 9
➢warranty 9
➢tips 9
CityG4(QuitesimilartoFreeride,SportG4,CruiseMAX20,RaceMAX20/28)
CrossMAX20D/20HD(QuitesimilartoCrossMAX20V,Cross29er,FATMAX)
Partlist
A. Bell
B. Handlebars
C. Brakelever
D. Handlebarstem
E. Headsetbearing
F. Basket(onlyinCityG4)
G. Headtube
H. Frontbrake
I. Mudguard
J. Frame
K. Drinkingbottlefixingscrews
L. Footboard
M. Heelstopper
N. Rearbrake
O. Quickreleaseskewer
P. Hub
Q. Rearreflector
R. Spoke
S. Rim
T. Tyre
U. Valve
V. Kickstand
W. Remotelockout
X. Brakedisc
Y. (Suspension)fork
Z. Brakecables
Theframenumberiswrittenonthefrontpartoftheheadtube,justbelowtheKickbikefigure.Werecommendedyouwriteithere.
MyKickbikeframenumberis:___________________________________________________
Kickbikeowner’smanual-1

Handlebarinstallation
Freeride(Fig.1),CityG4(Fig.2)
1. Insertstemintoheadtube.
2. Tightenstemboltwitha6mmallenkey.(FreerideFig.1.2,
CityFig.2)
3. Tightenclampbolts.(1.2)Ifyouwantyoucanfirstadjustthe
angleofthehandlebars(Freeride)
Noticethatthe“mininsertion”markhastobeinsidethehead
tube!
SportG4,Cross-models,FATMAX,CruiseMAX20,Race-models,
(Fig.3)
1. Attachhandlebartostem.(3.1)
2. Tightenbolts
3. Loosencapbolt.Takecarethatthefrontforkdoesn’tfall!
4. Liftcapboltandcap(3.2-A)
5. Placestem,stemboltandcap(A)tosteerertubeoffront
fork(3.3)
6. Tightencapbolt.Fingertightnessisenough.
7. Makesurethatthestemisstraightrelativetothefront
wheel.Tightenclampbolts.(3.3)
Kickbikeowner’smanual-2

Installationofthemudguards
Frontmudguard
CityG4,SportG4,FATMAX(Fig.4)
1. Openthemudguardattachmentnutintheforkandplacethe
mudguard
2. Tightenthenut(Use5mmallenkeytopreventboltfrom
turning).(4.1)
3. Attachthemudguardbracketsonbothsidesoftheforkwith
screwsprovided.
CliX,Cross,Freeride,Race:
Aplasticframemudguardisassembled.
Checkthatthefixingstrapsaretight.(Fig.5,A)
Rearmudguard
CliX,CityG4,SportG4,Freeride(Fig.6,positionB,D)
Cross(Fig.6,positionB,C)
RaceMAX20(Fig.6,positionA,D)
CruiseMAX,FATMAX(Fig.6,positionA,C)
1. Attachthefrontpartofthemudguardtothereararchofthefootboard.(Fig.6.1)
2. Attachthemudguardbracketstobothsidesoftherearforkwithscrewsprovided.(Fig.6)
RaceMAX28nomudguardsasstandard(optional,Fig.6,position
C,A).
Kickbikeowner’smanual-3

Installationofthewheels
CliX,Freeride,CityG4,SportG4,CruiseMAX,CrossMAX20V,RaceMAX20(Fig.7and8)
RaceMAX28(Fig.8,skipsteps1,2byopeningswitchFig.11A)
CrossMAX20D,CrossMAX20HD,Cross29er(Fig.8,skipsteps1,2bytakingawayplasticdisccoverFig.7.2)
note:QuickreleaseskewersareofdifferentlengthsinallmodelsexceptCliX,FATMAXandRaceMAX28.Thelongerskewerisfor
thefrontwheel.
note:WheelsaredifferentsizesinallmodelsexceptCliXandRaceMAX28.Biggerwheelisthefrontwheel.
1. Toopenthebrake,squeezethebrakearms…(Fig.7)
2. ...andslidethebrakecableoutofit’sslot.(Fig.7.1)
3. Placethewheel
a. Frontwheel(Fig.8.1)
b. Rearwheel(Fig.8.2)CliX,CityG4,SportG4,
Cross-models,Freeride,FATMAX(positionB)
Race-models,CruiseMAX(positionA)
4. Insertthequickreleaseskewer.Notethepositionand
directionofthesprings.(Fig.8)
5. Tightenthenutofthequickrelease.(Fig.8)
6. Closetheleverofthequickrelease.(Fig.8)Atcorrect
tightnessyouneedbriskforcebutnevertoolstocloseit.
Aligntheleversothatit’snotlikelytocatchyourshoelaces.
7. Squeezebothbrakearms…(Fig.8)
8. …toplacebrakecablebacktoit’sslot.(Fig.8.3)
Inflatethetires
Allmodels(Fig.9)
1. Push/insertthepumponthevalve
2. Turnpump’slockingleverto“up”position
3. Pump
4. Openthelockingleverbeforedetachingthepump
Recommendedairpressures(bar/PSI)
Freeride(3/45),CityG4(4/55),CliX(4/55),SportG4(5/75),Cross(3/45),FAT
MAX(1/15),CruiseMAX20(3/45),Race(6/85).
Note:Kickbikescomewith
Auto/Schrader
valvessoyoucanfilltiresalsoon
gasstations.Ifnecessary,youcanuseinnertubeswithothercommonvalve
types(
Presta/Sclaverand
or
Dunlop
).Adaptpumptothesevalvesby
unscrewingthepumpcapandturningrubbersealandplasticpartaround.
Kickbikeowner’smanual-4

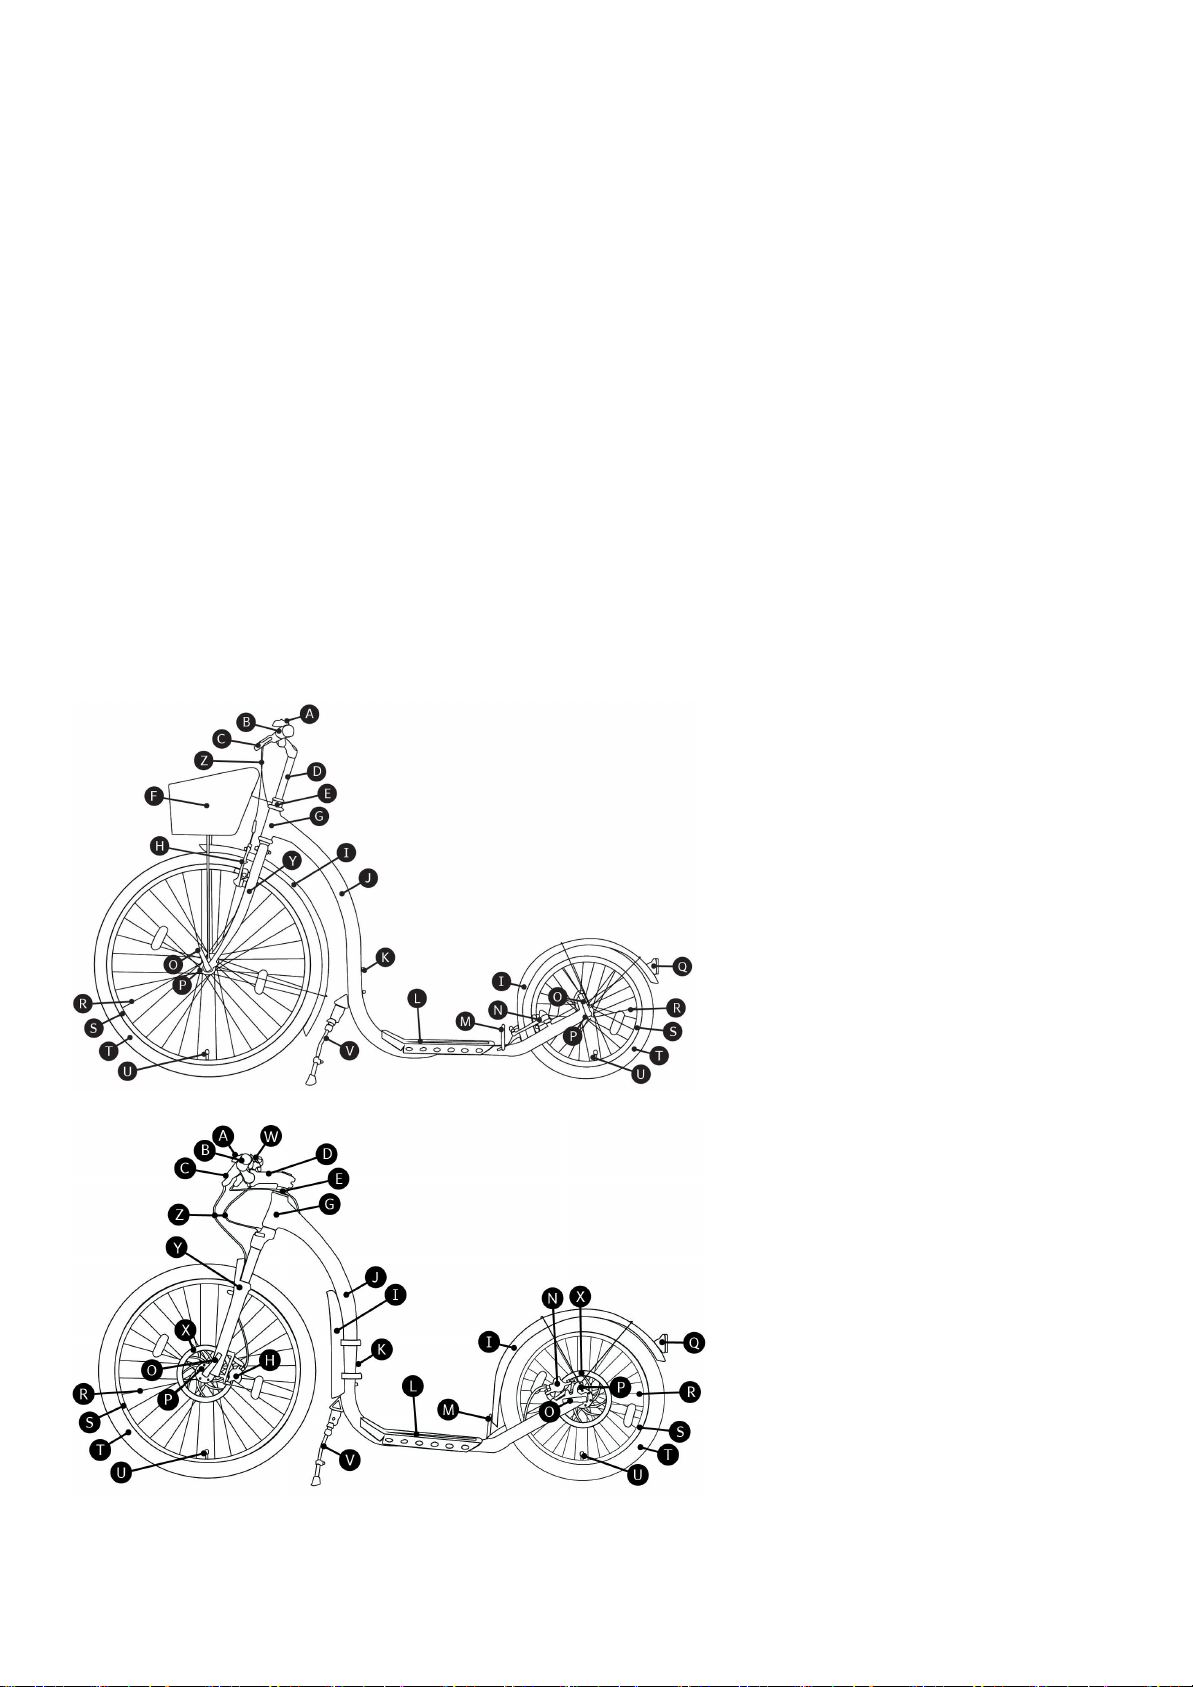
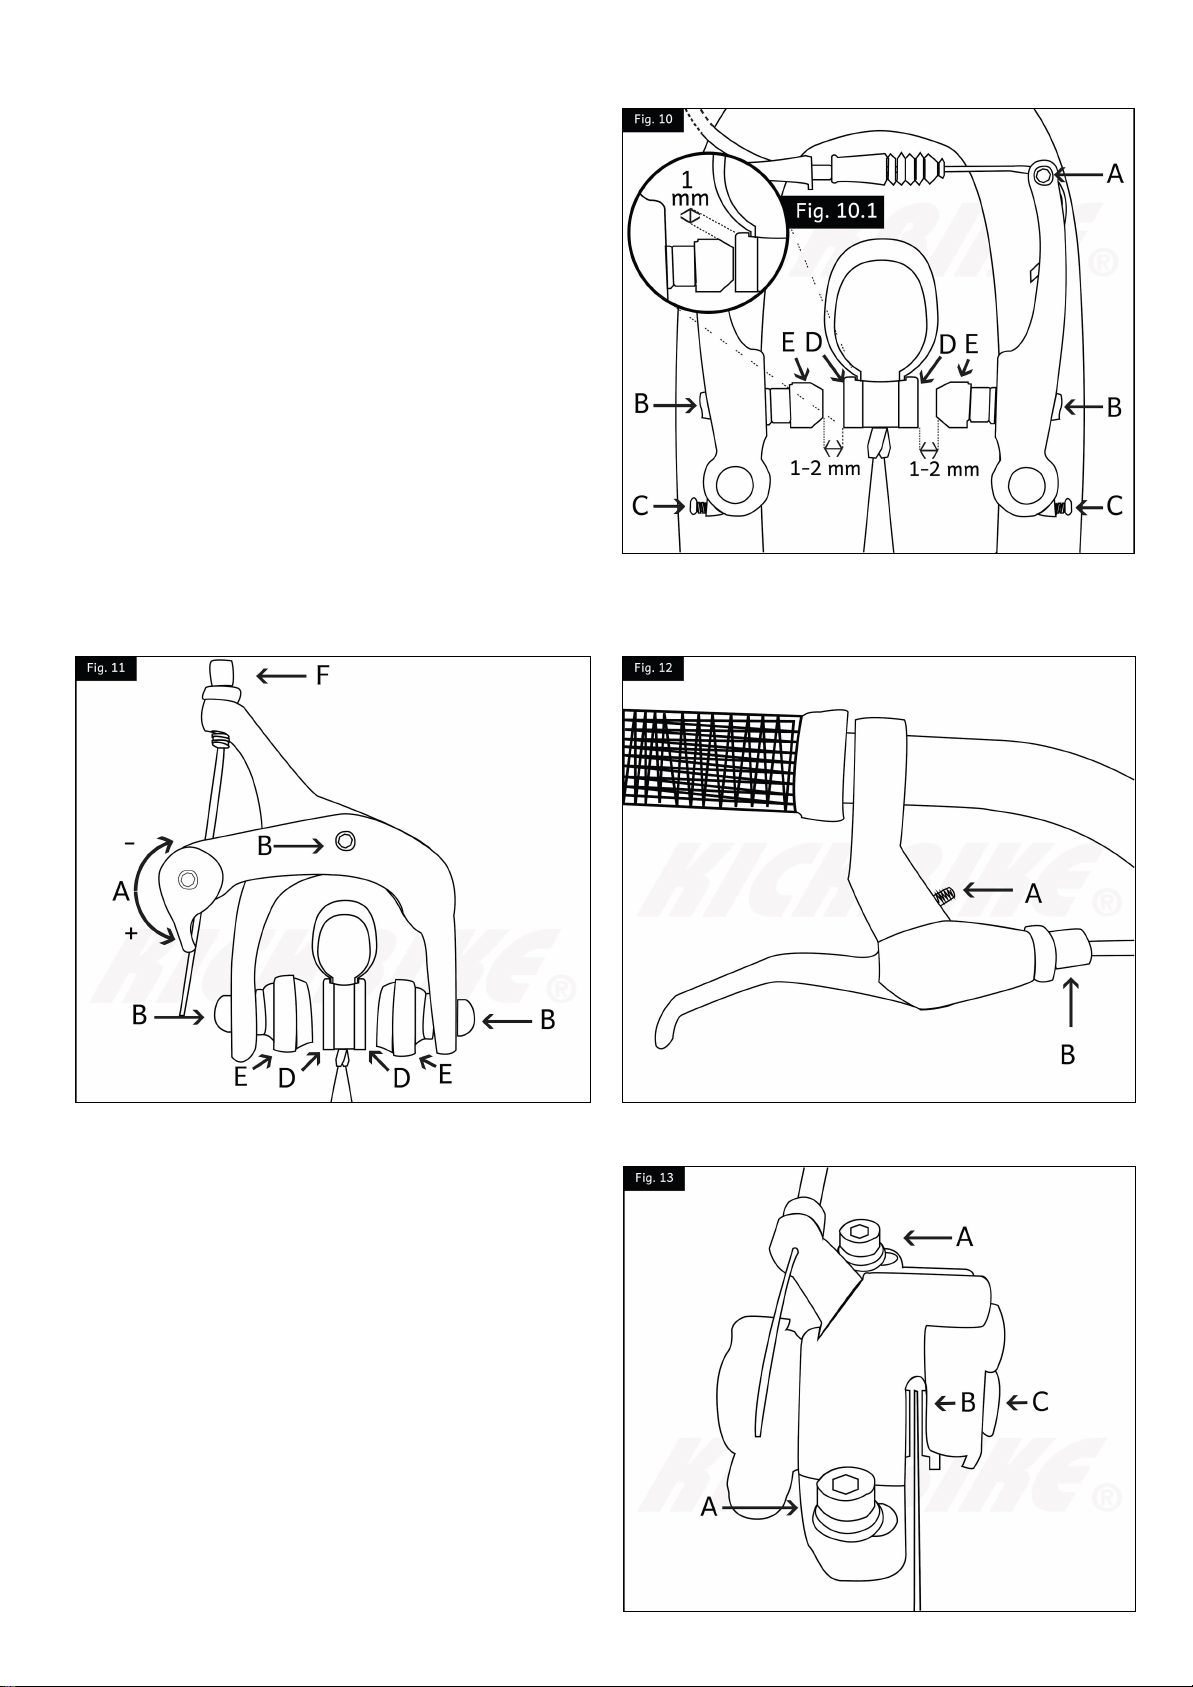
Adjustmentofthebrakes
V-brakes/Caliper-brakes
Freeride,CityG4,CliX,SportG4,CruiseMAX20,CrossMAX20V,
RaceMAX20(Fig.10)
RaceMAX28(Fig.11,skipstep1bycheckingthatswitch(A)is
closed+)
1. Usebolt(A)toroughlyadjustbrakeclearanceifneeded.
2. Usebolts(B)toalignbrakepads(E)withrims(D).
3. Squeezebrakeleverstoverifythatbrakepads(E)contact
therims(D)correctly(seeFig.10.1).
4. Usescrews(C)tocenterthebrake(equalizetheclearance
fromrimtobothbrakepads).InmodelRaceMAX28center
thebrakebymovingwholebrakeframebyhand.
5. Ifyouhavesmallhands,useadjustmentscrew(Fig.12-A)
togetbrakeleversclosertothehandlebar.Usefine
adjustmentscrew(Fig.12-B,Fig11-F)togetbrakepads
closertorimsifneeded.
6. Testthatthebrakeswork.
Discbrakes
CrossMAX20D,CrossMAX20HD,Cross29er(Fig.13)
1. TestifthebrakeisOKbyrotatingthewheel.Ifyouhearthe
disctouchingthebrake,continuetonextsteps.
2. Loosenbolts(Fig.13-A)
3. Loosenadjustmenthexscrew(C)allthewayandcloseit
untilyouhear6clicks(Onlymechanicaldiscbrakesystem)
4. Squeezebrakelevertocenterthebrake.
5. Tightenbolts(A)whileholdingthebrakelever.
6. Loosenadjustmentscrew(C)untilyouhear4clicks(Only
mechanicaldiscbrakesystem)
7. Testagainthatdiscisnottouchingthebrake.
8. Testthatthebrakeswork.
Kickbikeowner’smanual-5

Footboardheightadjustment
AllKickbikemodelshaveanoptiontochooseloworhighride
position.Lowposition(Fig.14A)iseasiertokickasinthehigh
position(Fig.14B)theframehasmoregroundclearancefor
safety.Changingfootboardheightrequiressomeadjustments!
Followinstructionsatthispagetochangetheposition.
DefaultpositioninmodelsRace,Cruiseislow(A)andinCross,
SportG4,CityG4,CliX,Freeride,FATMAXhigh(B)
note:Clixwillstanduprightinfoldedstateonlywhen
footboardisinhighposition.
Changingthefootboardheight
1. Removetherearwheel(inversephasespage4)
2. Changetherearmudguardpositionifneeded.Highposition
(Fig.6,positionB)andlowposition(Fig.6,positionA)
3. InmodelsCrossMAX20D,CrossMAX20HD,Cross29er,
FATMAXadjustthepositionoftherearbrake
3.1. Choosehigh(Fig.16-F)orlowposition(Fig.15-E)
adapteraccordingtoyoursettingandattachittothe
frame(G)withscrews(H)
3.2. Attachbrake(D)totheadapter.Washers(BandC)are
optionalforadjustmentofthebrakeifneeded(Fig.13-
B).
4. Insertthewheel(seepage4)
5. Adjustthebrake(seepage5)
Kickbikeowner’smanual-6

Kickstandadjustment
Freeride,CityG4,SportG4,Cross-models,FATMAX,CruiseMAX
20(Fig.17)
1. Loosentheadjustmentscrew
2. Adjusttheheightofkickstand
3. Tightentheadjustmentscrew
Basketinstallation
CityG4(Fig.18)
1. Placebasketintoit’splace
2. Tightentheboltsofframemount(18.1)
3. Tightentheboltsofforkbracket(18.2)
Suspensionfork
CrossMAX20V,CrossMAX20D,CrossMAX20HD(Fig.19)
Youcanlockthesuspensionforkifneeded.CrossMAX20Vlock
suspensionfromswitch(Fig.19,A)andCrossMAX20D,Cross
MAX20HDfromremoteswitch(Fig.19.1,A)inhandlebar.
Usethesuspensionpreloadadjustmentswitch(B)toadjustthe
suspensionharderorsofter.
Kickbikeowner’smanual-7

Fold&unfoldCliX
CliXfoldsintwosteps.Firstfoldtheframe(fig.17)
1. Loosenthesafetyscrew(fig.17screw1)
2. OpentheCliXframejointlatch.Thiscanbeoperatedwith
foot(handyifit’sdirtyorwet)
3. Foldtheframe.
Thenfoldthehandlebars(fig.18).
1. Pushupthelockbutton(fig.18.1button1)
2. Openthelatchallthewaydown(fig.18.1latch2)
3. Folddownthehandlebars
CarryCliXusingthehandleatthefrontoftheframe.HandleisbalancedsothatCliXwill
stayfoldedbygravitywithoutanylockingmechanisms.Thismakesfoldingand
unfoldingaseasyaspossible.
TounfoldCliX,reversethesesteps.
1. Unfoldthehandlebars.Ensurethatthequickrelease(fig.18.1latch2)isfully
closed.Youshouldheara‘click’whenitlocks.
2. Thenunfoldtheframe(fig.17)andclosetheCliXframejointlatch.Although
CliXisrideablewiththesafetyscrewloose(fig.17.1screw1),werecommend
tighteningitforyoursafety.Alwayscheckthatalljointsaresolidlylocked
beforeridingCliX.
CliXstand
YoucanleantheCliXonawall,fence,treeetc.whenyoulocktheheadsetbyturning
theCliXstandringcounterclockwisetolockedposition(Fig.19).
Kickbikeowner’smanual-8

Maintenance
EventhoughtheKickbikeismostlyamaintenancefreetransportation,itisrecommendedtoperformathoroughinspectionforloose
boltsandspokesafterfirstfewhoursofridingandalsocheckthetirepressuresandtightnessofthescrewsandboltsofyourKickbike
onceinawhile.Alsomakesurethatallthepartsareingoodcondition.WerecommendtotakeyourKickbikeatleastonceinayearto
anexperttogetmaintained.
Warnings
ShoelacesWerecommendthatyoutietheshoelacesshortandtucktheendsunderlacestopreventthemfromcatchingbrakes,quick
releaseleversorotherKickbikepartswhilekicking.
CurbsTheKickbikefootboardislowbecauseitmakeskickingeasier.Itwilltouchhighcurbsandspeedbumps.Ridesafeandslow
initially,togetfamiliartowhatkindofobstaclesarerideable.Ifyouarenotsurewhetherthefootboardwillclearabump,walkitover.
HelmetRemembertoalwaysuseahelmetthatfitsyouwellandisanapprovedbicyclesafetyhelmet.
KeephandsinhandlebarDonotattempttorideonehanded.Useyourleginsteadifyouneedtosignalaturn.
Warranty
Wewanttomakesurethatyouarehappywithourproduct.TheKickbikeWorldwidewarrantyis2yearsfortheframeandoneyearfor
otherparts.Warrantydoesnotincludethenormalwearandtearofbrakepads,brakecablesandtyres.Thewarrantydoesnotcover
problems,whicharecausedbythelackofmaintenancebytheuser,improperusageofotherthanstandardsparepartsforthe
Kickbike,incorrectmethodsofmaintenanceordamageswhicharecausedbynormalusageoftheKickbike.Thewarrantydoesnot
coversmallunnecessarydamageswherethestrengthandusefulnessoftheKickbikeisnotaffected.Thesedamagesincludesuchas
slightunevenpaint/varnish/chromecoveragethatarecausedbythechangingweatheror/andthenormalusageoftheKickbike.The
warrantydoesnotcoverdamagesthathavebeencausedbyimproperusageoftheKickbike,likejumping.
Tips
1. Takelong“kicks”andenjoysmoothrollingoftheKickbike.Itisimportanttostraightenandrelaxthestandinglegafterevery
kick.
2. Switchthekickinglegevery4-10kickssoyoucangoonforever!
3. Kickwithyourtoesonly-heeldoesnottouchtheground.
4. Almostanyoutfitandshoesaregoodbutavoidhighheelsandclothesthatmightcatchmovingpartswhilekicking.Whatis
OKforrunningisOKforkicking.
Seemoretipsandvideosaboutkickingatwww.kickbike.com
Kickbikeowner’smanual-9

Kickbikeowner’smanual-10
This manual suits for next models
10
Table of contents
Other Kickbike Scooter manuals