Kimball & Young 949HW User manual

recommended by the manufacturer.
6. Never operate the furnishing in shower. NOT FOR IN-SHOWER USE.
8. Do not use outdoors.
9. Do not operate where aerosol (spray) products are being used or where oxygen is being administered.
11. This furnishing has an external power supply box (LED Driver) with rating of AC 100-135V, Output 15V, 660mA.
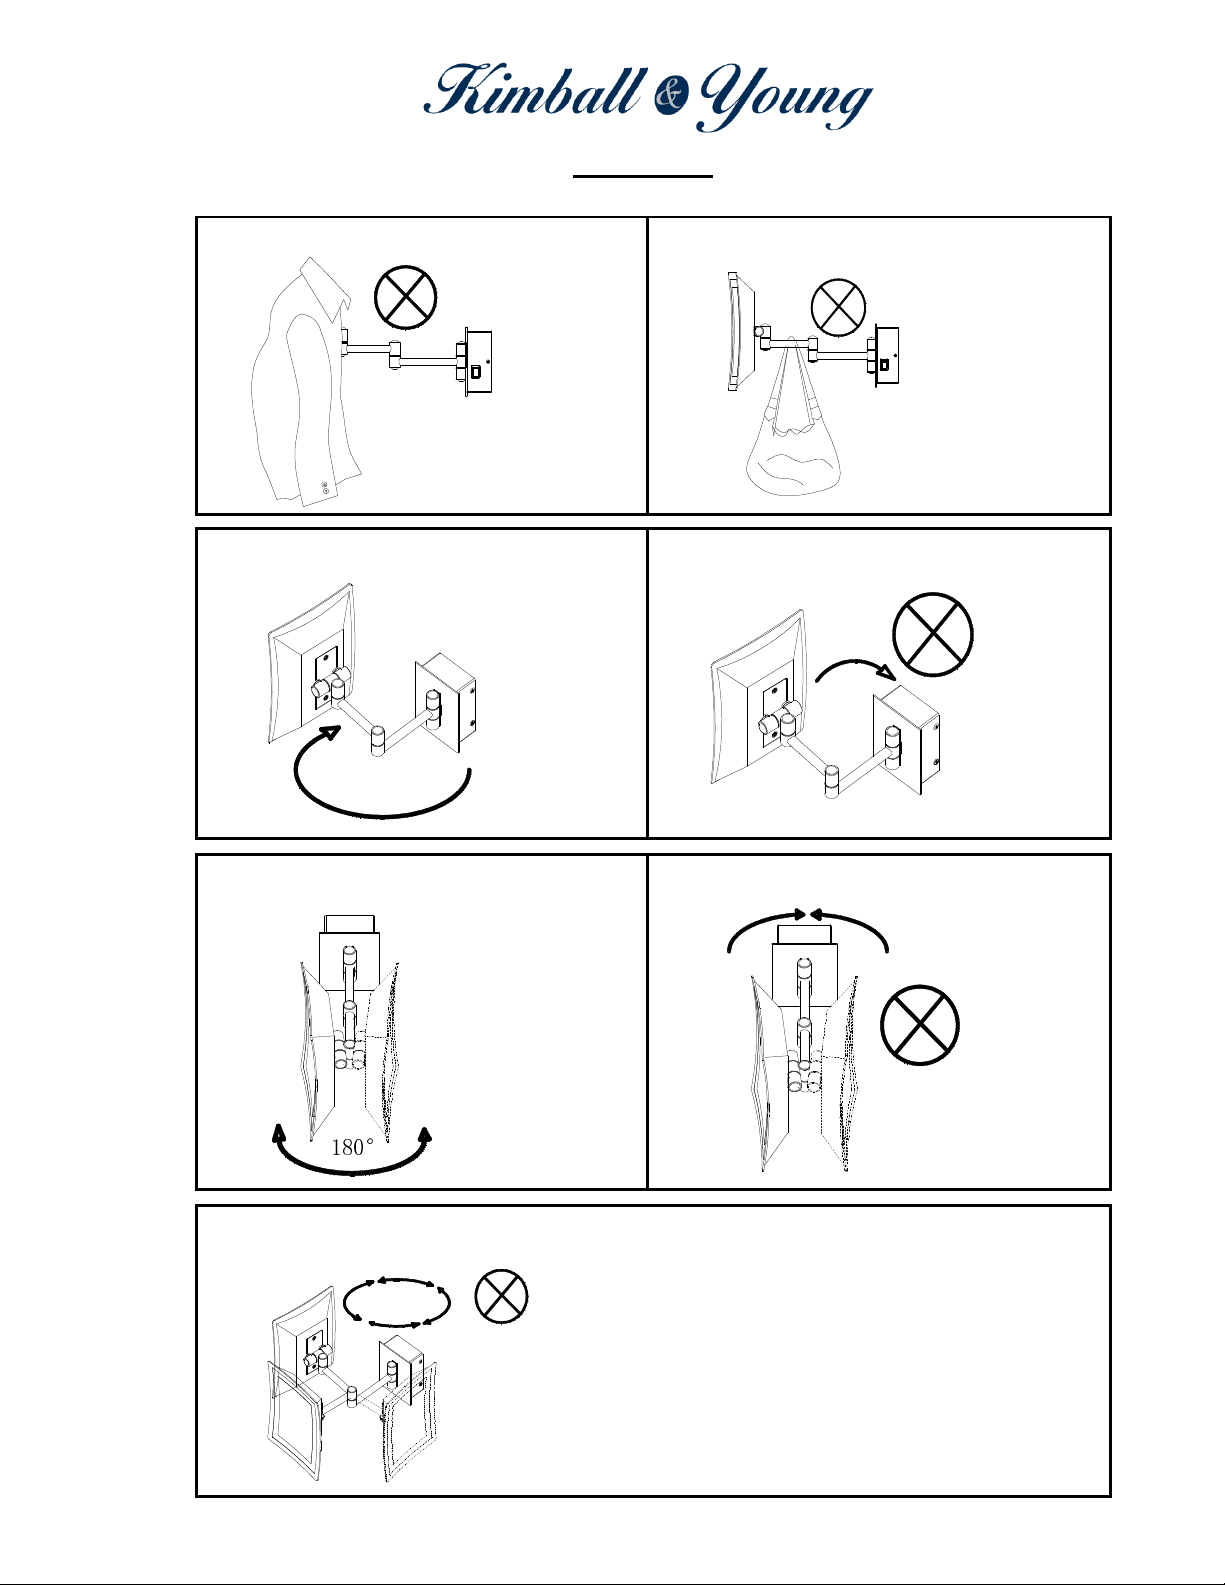
This furnishing's mounting base plate attaches to a single-gang electrical box size 4 H x 2-1/8 W x 1-7/8 to 2-1/16 D inches
12. Risk of Electric Shock. Connect this furnishing to a properly grounded branch circuit.
See grounding instructions below.
13. This furnishing is intended for commercial and residential use only.
CAUTION
Furnishing may get Hot. Keep away from curtains and other combustible materials.
- Do not touch hot lens, guard, or enclosure
Lamp gets HOT quickly!
- Contact only switch when turning on.
- Do not touch the lamp at any time. Use a soft cloth. Oil from skin may damage lamp.
Lighted lamp may become HOT!
- Keep lamp away from materials that may burn.
- Turn off power and allow to cool before replacing lamp.
Do not operate the luminaire with a missing or damaged shield.
Consult a qualified electrician to ensure correct branch circuit conductor.
1. This furnishing does not use lubricants. Servicing is to be performed by an authorized service representative.
2. Use ONLY a soft damp cloth to wipe clean and dry. DO NOT use cleaners or other solutions as it will damage the finish
KIMBALL and YOUNG
Model: 949-xx-x3HW
Manufacturing Date:MMYY
Input AC100~135V, 50/60Hz, Output 15V, 660mA
SUITABLE FOR DRY AND DAMP LOCATIONS
For Commercial and Residential Use Only
1. Always disconnect this furnishing from electrical power before maintenance.
1. Disconnect from grounded branch before putting on or taking off parts.
2. Close supervision is necessary when this furnishing is used by, or near children, invalids, or disabled persons.
WARNING - To reduce the risk of burns, fire, electric shock, or injury to persons:
This product must be connected to a grounded metal, permanent wiring system, or an equipment-grounding conductor must be
run
with the circuit conductors and connected to the equipment-grounding terminal or lead on the product.
USER-MAINTENANCE INSTRUCTIONS
GROUNDING INSTRUCTIONS
10. To disconnect, turn all controls to the off position, then remove fixture from wall and disconnect grounded branch
SAVE THESE INSTRUCTIONS
IMPORTANT SAFETY INSTRUCTIONS
When using an electrical furnishing, basic precautions should always be followed, including the following:
Read all instructions before using this furnishing.
7. Never drop or insert any object into any opening.
DANGER
- To reduce the risk of electric shock.
3. Use this furnishing only for its intended use as described in these instructions. Do not use attachments not
4. Never operate this furnishing if it has a damaged cord or plug, if it is not working properly, if it has been dropped or
damaged, or dropped into water. Return the furnishing to a service center for examination and repair.
5. Keep the electrical wires away from heated surfaces.
6368 Clark Avenue, Dublin, CA 94568
925.245.9220 - fax: 925.245.9203 - 1.800.639.6864

Aptations, Inc. recommends using a qualified electrician for all electrical wiring procedures and installation.
Turn off all electrical power to the installation site. MIRROR IS NOT DESIGNED FOR IN-SHOWER USE.
A standard 120V~ AC single-gang electrical box (size 4 H x 2-1/8 W x 1-7/8 to 2-1/16 D inches) must be installed at
the desired location of the wall before continuing. Location must be dry and accessible for service. Location must be
hardwired to a grounded branch circuit. Installation must include ground wire.
THIS PRODUCT MUST BE INSTALLED IN ACCORDANCE WITH THE APPLICABLE INSTALLATION CODE BY A
PERSON FAMILIAR WITH THE CONSTRUCTION AND OPERATION OF THE PRODUCT AND THE HAZARDS INVOLVED
Installation steps (refer to the pictures, subject to the product)
1. Remove the mounting screws on both sides and top of the mirror's base.
2. Detach mounting base plate from the base carefully to ensure the external power supply box and
ground wires are not pulled during removal.
*Note: External power supply box is fixed wired to mirror per UL standard 1598
3. At wall install site, feed grounded branch electrical wires through pre-installed single-gang electrical box
and reserve convenient length. Connect electrical wires to fixture's external power supply box INPUT wire leads.
*Note: While wiring, do not let mirror fixture hang from connected wires.
Doing so will damage the mirror fixture and void the warranty
External power supply box (LED Driver)
Electrical
Box
LIGHTED WALL MIRROR MOUNTING & WIRING INSTRUCTIONS
For Model: 949HW
~ Please turn to following page for next steps ~
6368 Clark Avenue, Dublin, CA 94568
925.245.9220 - fax: 925.245.9203 - 1.800.639.6864

Installation steps continuation….
4. External power supply box connects to a grounded branch circuit using INPUT wire leads LIVE and NEUTRAL.
From mirror base, connect GROUND wire lead to same branch circuit.
Stow external power supply box in single-gang electrical box.
L LINE
Color Black
GROUND
Color Yellow with Green stripe
N NEUTRAL
Color White
5. Fasten and secure mounting base plate onto the single-gang electrical box in the wall with
two (2) fasteners
No. 6-32 machine screws.
No. 6-32 Machine Screw
Electrical Box Mounting Base Plate
**Note: Sequence of mirror mounting parts with components per UL standard 1598**
6. Install mirror base over the mounting base plate and secure using the three (3) mounting Hex screws.
Restore power to the site and turn mirror fixture on at the power switch behind frame.
Power Supply Electrical Data
Voltage rating: Input: AC100~135V,50-60Hz
Output: DC 15V
Wattage rating: 9.9 W (at Output)
Electric current rating: 660mA
For Model: 949HW
LIGHTED WALL MIRROR MOUNTING & WIRING INSTRUCTIONS
6368 Clark Avenue, Dublin, CA 94568
925.245.9220 - fax: 925.245.9203 - 1.800.639.6864

1.
DO NOT
hang clothes or towels on mirror for drying. 2.
DO NOT
hang any items, such as hangbags on
the extention arms of mirror.
3. The short extention arm can rotate maximum to 4.
DO NOT
push extention arms further once they
270 degree from long extention arm. reach 270 degree.
5. The short extention arm can rotate maximum to 6.
DO NOT
push extention arms further once they
180 degree from long extention arm. reach 180 degree.
7.
DO NOT
rotate mirror or arms rapidly or in great force over 20LBS. Correct rotation should be slow and gentle.
DO NOT
rotate mirror in single direction repeatly for many times.
User Guide
For Model: 949HW
270°
180°
Table of contents
Other Kimball & Young Personal Care Product manuals