Kimball 84-035 Instruction Manual

Operating Instructions Manual
Read through this owner’s manual carefully before using the product. Protect yourself and others by observing all safety
information, warnings, and cautions. Failure to comply with instructions could result in personal injury and/or damage to
product or property. Please retain instructions for future reference.
*(Note: Dynamic Pressure, which is the pressure while the tool is in operation.)
Specifications:
9,50084-035 1000 1/4 90* 5.07
1/2”IMPACT GUN84-035
850

This manual contains information that is very important
to know and understand. This information is provided
for SAFETY and to PREVENT EQUIPMENT
PROBLEMS. To help recognize this information,
observe the following symbols.
Cautionindicates a potentially
hazardous situation which, if not avoided, will
result in death or serious injury.
Warning indicates a potentially
hazardous situation which, if not avoided,could result
in death or serious injury.
Danger indicates and imminently
hazardous situation which, if not avoided, will
result in death or serious injury
Keep away from rotating drive.
Do not wear jewelry or loose
clothing.
Choking can occur if neckwear is not kept away from
the tool and accessories.
Scalping can occur if hair is not kept away from the
tool and accessories.
Avoid direct contact with accessories during use.
Use only proper accessories designed for use with
pneumatic screwdrivers, nut runners, impacts, ratchets,
grinders, drills, and pulse tools.
Always wear impact-resistant eye and face protection
when involved with or near the operation, repair or
maintenance of the tool or changing accessories on
the tool.
Be sure all others in the area are wearing impact-
resistant eye and face protection.
Even small projectiles can injure
eyes and causeblindness.
Slip/Trip/Fall is a major cause of
serious injury or death. Beware of excess hose left
on the walking or work surface.
High sound levels can cause permanent hearing loss.
Maintain a balanced body position and secure footing.
Repetitive work motions, awkward positions and
exposure to vibration can be harmful to hands and
arms.
Operators and maintenance personnel must be
physically able to handle the bulk, weight and power of
this tool.
Designed to operate on 90 PSI, lower pressure (below 90
PSI) will reduce performance of the tool while higher air
pressure (over 90 PSI) raises the performance of the tool
beyond its rated capacity and could cause serious damage to
tool and user.
Always use clean dry air. Excessive
moisture and dirt will greatly reduce the life of any air
motor.
We recommend the installation of an inline filter-regulator-
lubricator as close to the tool as possible.
Supply tool with 90 P.S.I. of clean, dry air. Higher pressure
drastically reduces tool life. However, line pressure should be
increased to compensate for unusually long hoses (over 25ft).
Tools should be run maintaining 90 p.s.i. operating pressure
(Dynamic) while the tool is in use.
Minimum hose size should be 1/4" in diameter with fittings
having the same inner diameters.
Air under pressure can cause severe injury.
Always shut off air supply, drain hose ofair pressure and
disconnect tool from air supply when not in use, before
changing accessories or when making repairs.
Never direct air at yourself or anyone else.
Whenever universal twist couplings are used, lock pins must
be installed.
Water in the airline will cause damage to the tool.
Drain air tank daily. Clean the air inlet filter screen on a
weekly basis. The recommended hook up procedure is
below:
Use an airline lubricator, two drops per minute. If an air line
lubricator cannot be used, add air motor oil to the inlet
once a day, or more frequently for extended use.
(Dynamic Operating Pressure).

www.powertoolrepairohio.com
Power Tool Repair
371 West Ave.
Tallmadge, OH 44278
(330) 630-0022
Air Tool Maintenance and Repair
2) Hammer and Anvil
1) Air Motor Rotor Blades
2) Hammer and Anvil
3) Socket Retainer and O-Ring
This tool contains multiple parts that are “normal wear
items”. These parts can all be serviced/replaced by the
user, or the tool may be sent to the Service Center.
Tools returned to the Service Center for normal wear
parts will incur service charges. Some of the critical
common wear items include:
Manufacturer’s Limited Warranty
This Kimball Midwest product is warranted to be free from
defects in material and workmanship for one year from the
date of purchase. This Warranty applies only to products
purchased new from Kimball Midwest. This Warranty does not
apply to normal wear and tear or to products which have been
abused, misused, modified, or repaired by someone other than
Kimball Midwest’s Authorized Service Center. If this Kimball
Midwest product proves defective in material or workmanship
within one year after purchase, return it to the Kimball Midwest
Authorized Service Center, transportation prepaid, enclosing
your name and address, proof of date of purchase, and a short
description of the defect. Kimball Midwest will, at its option,
repair or replace the defective product free of charge. Repairs
or replacements are warranted as described above for the
remainder of the original warranty period. Kimball Midwest’s
sole liability and your exclusive remedy under this Warranty is
limited to repair or replacement of the defective product.
(There Are No Other Warranties Expressed Or Implied And
Kimball Midwest Shall Not Be Liable For Incidental,
Consequential, Or Special Damages, Or Any Other
Damages, Costs Or Expenses Excepting Only The Cost Or
Expense Of Repair Or Replacement As Described Above.)
Normal wear items are not manufacturer's defects. Some of the
common normal wear items are contained in the following repair
kits: 84-0351, 84-0352 and 84-0353.
Maintenance– Using filtered, compressed air with
either automatic airline lubrication or frequent manual
lubrication will extend the service life of the Air Motor
Rotor Blades.
Maintenance– The rotating action of the Hammer as it
impacts the Anvil allows the tool to apply force to
fasteners. These components are greased from the
factory. However, this grease will gradually lose its
lubricating capability over time, causing metal-on-metal
wear. Use a 4mm hex key to remove the 4 socket head
cap screws to take off the back cover of the tool. Clean
out and replace the old grease with fresh, high-quality
impact grease.
3) Socket Retainer and O-Ring
Maintenance– The Socket Retainer and O-Ring are located
at the very tip of the Anvil (square drive) of the tool. The
Socket Retainer is a round C-clip, and its underlying O-Ring
allows the clip to expand and contract to securely hold impact
sockets and other square drive accessories onto the tool.
They do not require maintenance, but they can become worn
after frequent use.
Repair – When the free speed of the tool becomes
slower, or the tool begins to vent air without rotating, the
Rotor Blades may be worn or contaminated with sludge
and other debris. Use a 4mm hex key to remove the 4
socket head cap screws to take off the back cover of the
tool and inspect the Air Motor Rotor Blades. If the Rotor
Blades do not slide freely in and out of the slots on the
Air Motor Rotor, they should be replaced. The General
Maintenance Kit (84-0351*) contains new Rotor Blades
and several other related common replacement
components. The Rotor Blades can be easily removed
and replaced by hand. Use a high-quality air tool
conditioning oil to clean the Air Motor Rotor when
installing new Rotor Blades.
Repair – When impact sockets and other square drive
accessories can no longer be securely attached to the tool
without easily falling off, it is time to replace the Socket
Retainer and O-Ring. Use a small metal pick to pry off the old
Socket Retainer and the underlying O-Ring. The Anvil Repair
Kit (84-0353*) contains a new Socket Retainer and O-Ring
(along with a replacement Anvil).
Repair – When the tool begins to skip and/or lose
power during use, it is likely that the Hammer and/or
Anvil have become worn. Remove the 4 socket head
cap screws and the back cover to replace and re-grease
the Hammer and Anvil. If the Hammer and Anvil have
been re-greased and the problem persists, these items
should be replaced. These components easily slide out
of the tool by hand. Ideally, the Hammer and Anvil
should be replaced as a set; however, replacing either
one or the other may restore performance to the tool.
The Hammer Repair Kit (84-0352*) contains a new
Hammer and hammer assembly components. The
Anvil Repair Kit (84-0353*) contains a new Anvil.
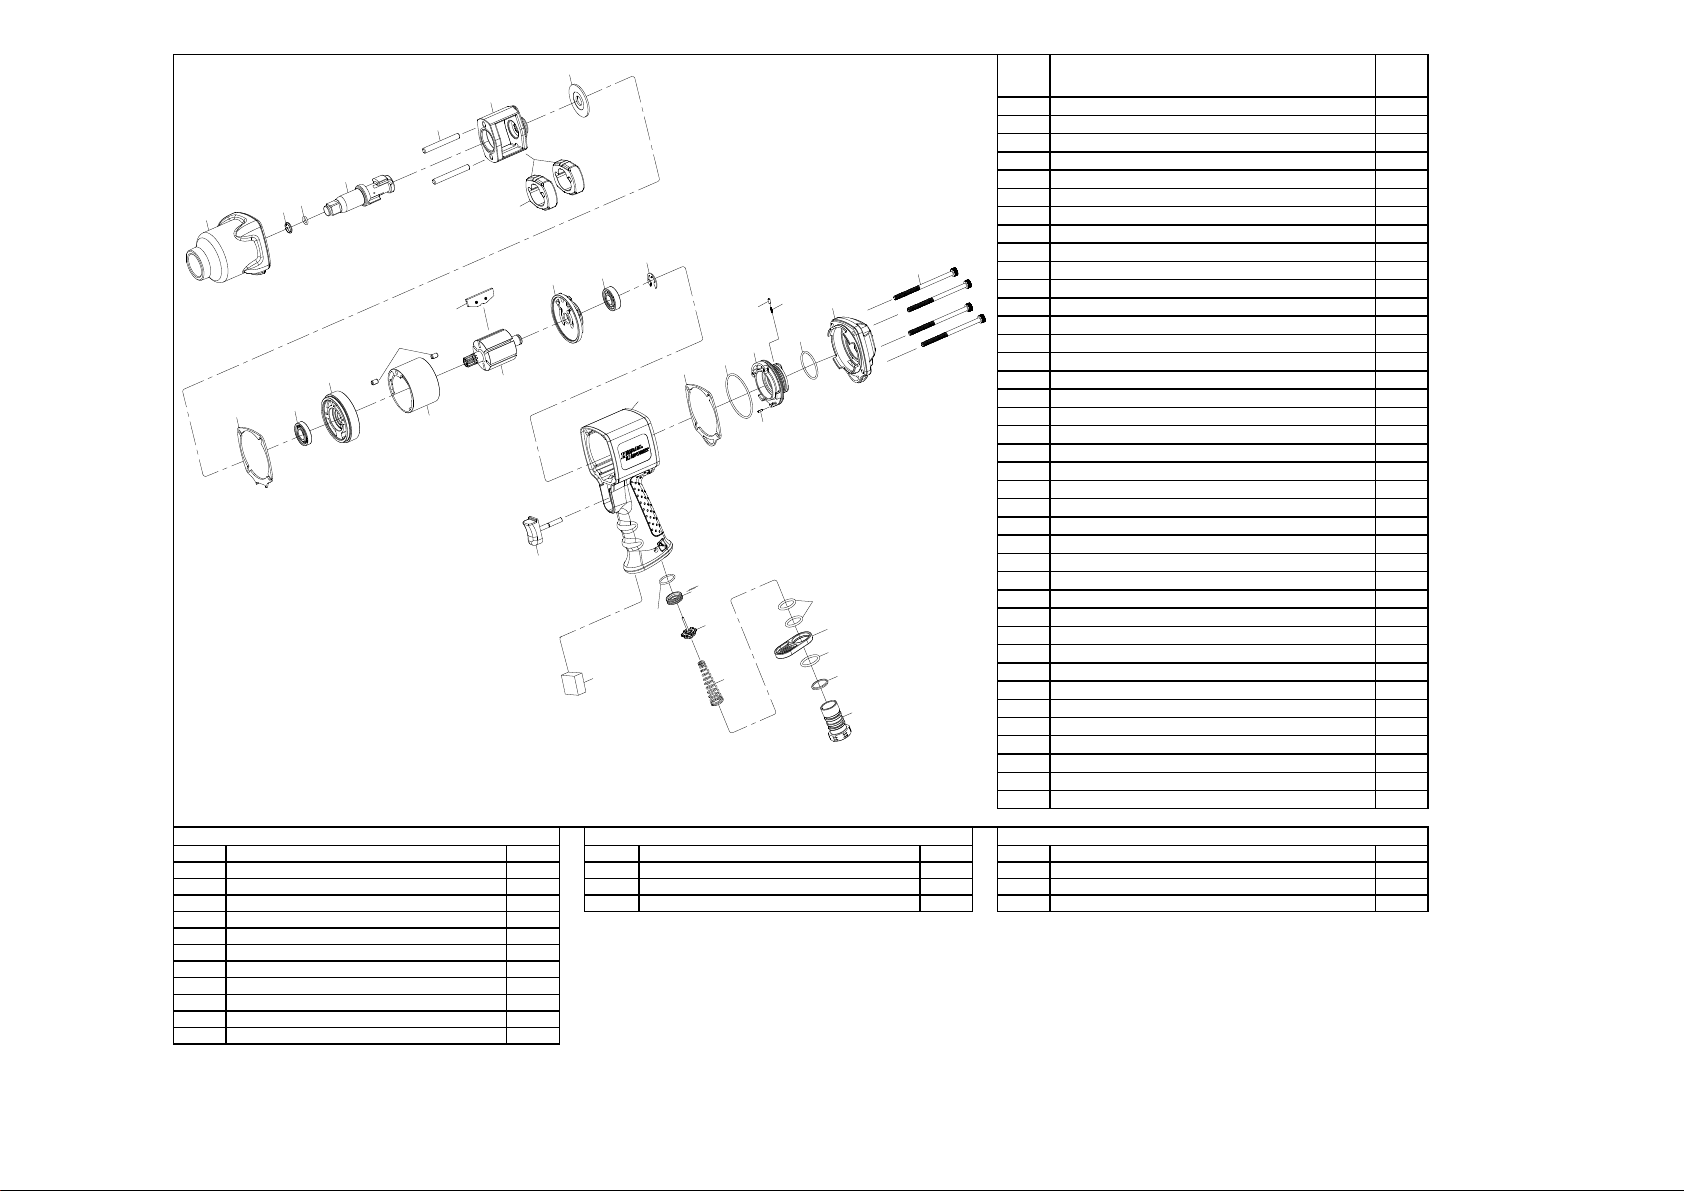
*(Please refer to the Exploded Parts Diagram in this manual
for the complete contents of each repair kit.)

No. Parts Description Q'ty
1 Housing Assembly ( incl. 8.9 ) 1
2 Air Inlet 1
3 O-Ring 1
4 Exhaust Deflector 1
5 O-Ring 2
6
Spring 1
7
Throttle Valve Assembly 1
8
Throttle Valve Seat 1
9
O-Ring 1
14
Gasket 1
15
O-Ring 1
16 Reverse Valve 1
17 Spring Pin 1
18 O-Ring 1
19 Backhead 1
20 Retainer 1
21 Ball Bearing 1
22 Rear End Plate 1
23 Rotor 1
24 Rotor Blade 6
25 Spring Pin 2
26 Cylinder 1
27 Front End Plate 1
28 Ball Bearing 1
29 Gasket 1
30 Washer 1
31 Hammer Frame 1
32 Hammer 2
33 Hammer Pin 2
34 Standard Anvil Assembly 1
35
O-Ring 1
36 Socket Retainer 1
38
Hammer Case Assembly 1
39 Screw 4
40 Pin 1
41 Spring 1
42 Muffler Element 1
43 Spacer 1
44 Trigger Assembly 1
No. Parts Description Q'ty No. Parts Description Q'ty No. Parts Description Q'ty
3 O-Ring 1 31 Hammer Frame 134 Standard Anvil 1
5 O-Ring 2 32 Hammer 135 Socket Retainer 1
6 Spring 1 33 Hammer Pin 236 O-Ring 1
14 Gasket 1
15 O-Ring 1
18 O-Ring 1
24 Rotor Blade 6
25 Spring Pin 2
35 O-Ring 1
36 Socket Retainer 1
41 Spring 1
(NOTE: Items not available in the repair kits can be purchased from the service center.)
84035 1/2"DR. AIR IMPACT GUN
KM No. 840351 General Maintenance Kit
KM No. 840352 Hammer Repair Kit
KM No. 840353 Anvil Repair Kit
14 15 16 18
19
39
20
21
22
27
28
29
38 36 35
34
33
31
30
26
23
24
25
32
17
2
3
4
5
6
7
8
9
42
44
40 41
43
8
8
1
Other Kimball Power Tools manuals
Popular Power Tools manuals by other brands

JAMEC PEM
JAMEC PEM TDR3000 operating instructions

CMT ORANGE TOOLS
CMT ORANGE TOOLS CMT333 instruction manual

Desoutter
Desoutter SLB001-L1000-SWS user manual

SMC Networks
SMC Networks MSQ Series Operation manual

Powerfix Profi
Powerfix Profi 275402 Operation and safety notes

Rock Shox
Rock Shox SUPER DELUXE Service manual