Kinderkraft Huggy User manual

MODEL: HUGGY
Rev. 1.0
HUGGY
CZ NOSÍTKO
DE DIE BABYTRAGE
EN BABY CARRIER
ES PORTADOR DEL BEBÉ
FR LE PORTE-BEBE
HU BABAHORDOZÓ
IT IL MARSUPIO
NL DRAAGZAK
PL NOSIDEŁKO
PT PORTADOR DE BEBÊ
RO MARSUPIU PURTATOR
RU ДЕТСКИЕ ПЕРЕВОЗЧИКА
SK NOSIČ
CZ NÁVOD K OBSLUZE
DE BEDIENUNGSANLEITUNG
EN USER MANUAL
ES MANUAL DEL USUARIO
FR GUIDE D’UTILISATION
HU HASZNÁLATI ÚTMUTATÓ
IT ISTRUZIONI PER UTENTE
NL HANDLEIDING
PL INSTRUKCJA OBSŁUGI
PT MANUAL DE INSTRUÇÕES
RO MANUAL DE UTILIZARE
RU РУКОВОДСТВО ПО
SK NÁVOD NA POUŽITIE

CZ...................................................................................................................10
DE...................................................................................................................12
EN...................................................................................................................16
ES....................................................................................................................19
FR....................................................................................................................23
HU...................................................................................................................26
IT.....................................................................................................................29
NL....................................................................................................................33
PL.....................................................................................................................36
PT.....................................................................................................................39
RO....................................................................................................................42
RU....................................................................................................................45
SK.....................................................................................................................48

1A
1B
2

5
3
4
5
6

6
7
8
9
10

7
11
12
13
14

8
15
16
17
18

9
19
20
21

10
CZ
VÁŽENÝ ZÁKAZNÍKU!
Děkujeme Vám za nákup produktu Kinderkraft.
Tvoříme s ohledem na vaše dítě - vždy se staráme o bezpečnost a kvalitu, čímž zajistíme pohodlí
nejlepšího výběru.
DŮLEŽITÉ! UCHOVEJTE K
POZDĚJŠÍMU POUŽITÍ. PŘED
POUŽITÍM PEČLIVĚ PŘEČTĚTE.
A. Poznámky ohledně bezpečnosti a bezpečnostních prostředků
VAROVÁNÍ!
•Neustále monitorujte své dítě a ujistěte se, že ústa a nos jsou zakryty.
•V případě předčasně narozených, batolat s nízkou hmotností a dětí se zdravotními potíži se
před použitím nosítek kontaktujte s pediatrou.
•Aby nedošlo k udušení, ujistěte se, že dítě neopírá bradu směrem k hrudi, protože to může
ztěžovat jeho dýchání.
•Abyste se vyhnuli pádu, ujistěte se, že dítě je správně zajištěno v nosítkách.
•Kojenci by měli být noseni vpředu, dokud nebudou dostatečně silně ovládat svaly hlavy, krku
a těla, aby mohli samostatně udržovat sedící pozici. Tato nosítka nejsou určeno pro použití v
poloze "tvář ke světu".
•Při používání nosítek se nenahýbejte. Pokud je to nutné, posaďte se.
•Při použití nosítek nikdy nerozepínejte pás před vyjmutím dítěte.
•Nikdy nenechávejte dítě bez dozoru s nosítkem.
Nosítka jsou určena výhradně pro děti od 3 měsíců do 20kg.
Když dítě nemůže držet hlavu, nastavte nosítka tak, aby hlava dítěte byla vysoko na hrudi. Je to
nejbezpečnější místo pro dítě.
Při vaření, uklízení, držení horkých nápojů a dalších činnostech, které vystavují dítě popáleninám
nebo chemikáliím, nikdy nepoužívejte měkká nosítka.
Buďte opatrní při konzumaci horkých nápojů, abyste zabránili spálení dítěte horkou kapalinou,
když je v nosítku.
Nosítko se používá k přepravě pouze jednoho dítěte.
Vaše pohyby, stejně jako pohyby Vašeho dítěte, mohou ovlivnit Vaši rovnováhu. Buďte opatrní,
když se nakloníte dopředu nebo se překlopíte na stranu.
Nosítko se nehodí k používání během sportovních aktivit, mj.: běh, jízda na kole, plavání a jízda na
lyžích.
Nepoužívejte nosítko, pokud byl některý prvek poškozen, roztrhán nebo ztracen.
Neinstalujte příslušenství, náhradní díly a součásti, které nebyly dodány výrobcem.
Uživatelé by měli vědět, že jak se zvyšuje aktivita dítěte, riziko pádu se zvyšuje.
B. Prvky nosítek (obr. 1A, 1B, 2):
a. Bederní pás s nastavitelnou šířkou panelu nosítka
b. Bederní přezka s nastavením pásu

11
c. Ramenní popruhy
d. Přezka spojující ramenní popruhy s nastavením pásu
e. Panel nosítka
f. Nastavitelné boční přezky
g. Popruhy regulující délku ramenních popruhů
h. Kapuce
i. Pouzdra na popruhy
C. Montáž
Výrobek poskytuje nejvhodnější (ergonomickou) polohu dítěte, ve které tvar boků a
nohou připomíná písmeno M. Díky tomu je zachován přirozený stav, ve kterém dítě
je třeba nosit. POZOR! Chcete-li zajistit ergonomickou polohu dítěte, měli byste
umístit nohy tak, aby zadek dítěte byl těsně pod koleny a nohy byly široce rozmístěny
do stran.
1. Nošení vpředu, dítě směrem k rodiči
VÝSTRAHA! Vždy si nasaďte nosítko, než do něj dáte dítě.
Rozepněte přezku (b) na bederním pásu a přezku (d) na ramenních popruzích. Boční spony (f) by
měly být zapnuty (obr. 3). Upravte šířku panelu nošení (e), odepněte pásy na suchý zip na
bederním pásu (a) a posuňte látku doprava nebo doleva, abyste co nejlépe upravili velikost
panelu v závislosti na velikosti vašeho dítěte (obr. 4). Nasaďte bederní pás a zapněte přezku.
Upravte bederní pás a přizpůsobte jej svému pasu (Obr. 5). Ujistěte se, že pás je správně
nainstalován, přitulte dítě na hruď a rozdělte nohy (nohy dítěte by měly viset za popruhem) (obr.
6). VÝSTRAHA! Udržujte dítě dobře při provádění této akce. Držte dítě, zvedněte panel nosítka
tak, aby pokrýval záda dítěte (obr. 7). Podepřením dítěte pravou rukou položte levý ramenní
popruh (C) na levé rameno (obr. 8). Poté vyměňte ruce a opakujte s pravým ramenním popruhem
(c). Pomocí obou paží zajistěte přezku, která spojuje ramenní popruhy (d), a nastavte ji (obr. 9).
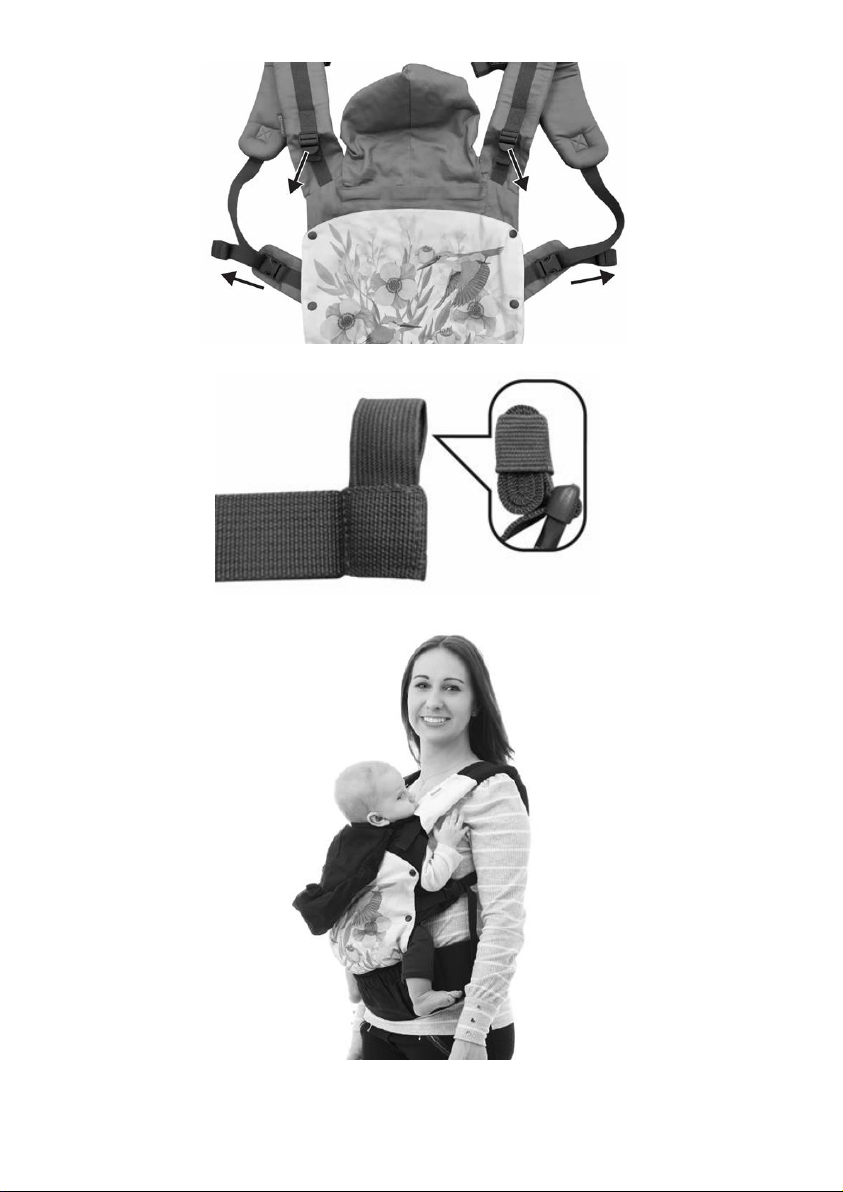
Pokud je to nutné, napněte ramenní popruhy vytažením regulačních pásů (obr. 10). Vytáhněte
popruhy, které nastavují ramenní popruhy pro nošení, dokud není dítě těsně obklopeno
panelem. Dávejte pozor, aby nohy nebyly příliš stisklé.
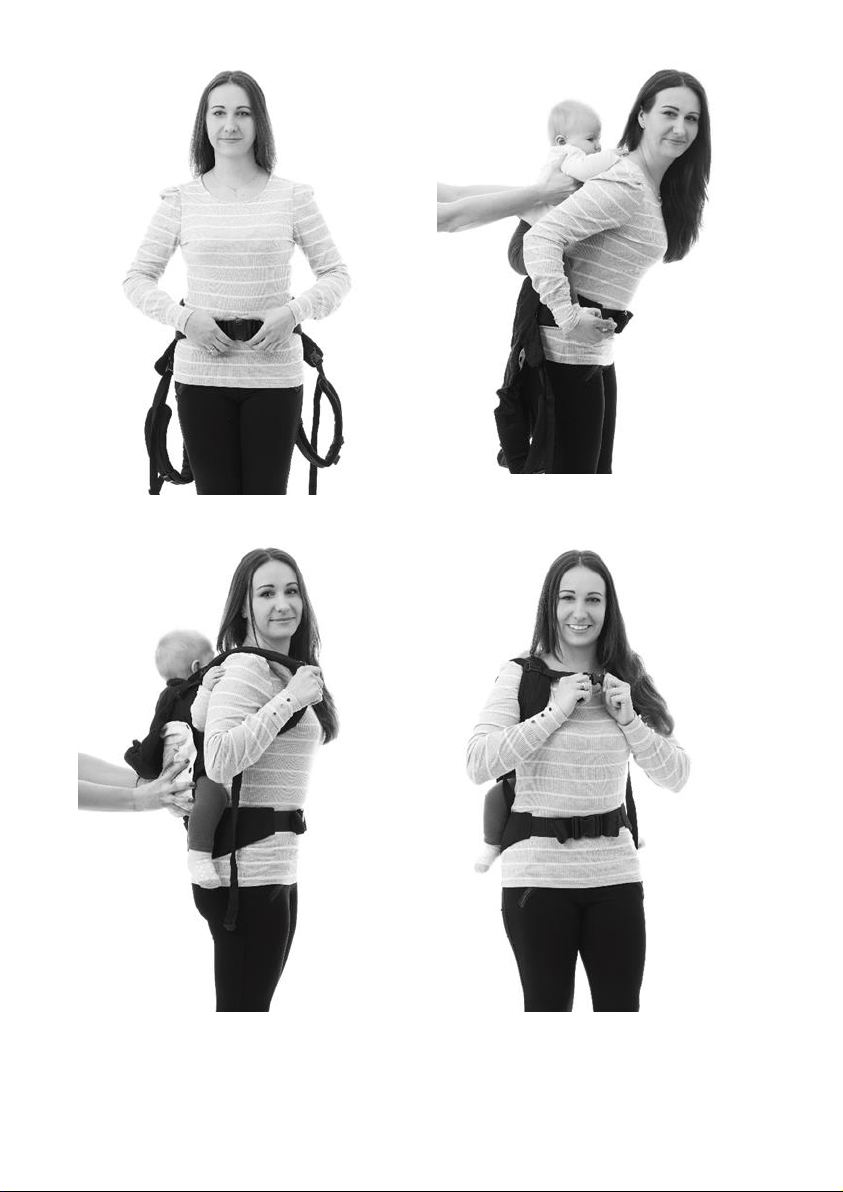
2. Nošení vzadu, dítě směrem k rodiči
VÝSTRAHA! Nenoste na zádech děti mladší 6 měsíců nebo děti, které nemohou sedět samy.
VÝSTRAHA! Pravidelně kontrolujte, zda má dítě bezpečnou a pohodlnou polohu, zejména při
nošení na zádech.
Rozepněte přezku na bederním pásu a přezku na ramenních popruzích. Boční spony by měly být
zapnuty (obr. 3). Nastavte šířku panelu nosítka podle vzoru 4, nasaďte bederní pás a zajistěte
přezku. Upravte bederní pás a přizpůsobte jej svému pasu (Obr. 11). Ujistěte se, že pás je správně
nainstalován, požádejte partnera, aby zvedl dítě a položil ho na Vašich zádech (obr. 12). Nohy
dítěte by se měly otočit kolem pasu. VÝSTRAHA! Během celého procesu umístění dítěte do
nosítka by dítě mělo být dobře drženo Vámi nebo Vaším partnerem. S rukama, které drží dítě,
požádejte partnera, aby zvedl nosítko a zakryl záda dítěte. Poté nasaďte oba ramenní popruhy
(obr. 13). Zajistěte přezku, která spojuje ramenní popruhy a upravte ji (obr. 14). Pokud je to
nutné, napněte ramenní popruhy vytažením regulačních pásů. Dotáhněte popruhy, které
nastavují ramenní popruhy pro nošení, dokud není dítě těsně obklopeno panelem (Obr. 15, 16).
Ujistěte se, že dítě je ve správné poloze. Dávejte pozor, aby nohy nebyly příliš stisklé.

12
3. Další funkce nosítka.
V případě špatného počasí nasaďte dítěti kapuci (h) (Obr. 17). Pro větší pohodlí dítěte v horkých
dnech je možné odstranit vnější materiál připevněný k panelu nosítka na plastových západkách
a schovat do kapsy umístěné v přední části nosítka (obr. 18). Popruhy s přezkami (f) a pásy (g) se
používají k úpravě délky ramenních popruhů (obr. 19). V případě, že jsou regulační pásy příliš
dlouhé, mohou být zavinuty a upevněny gumovými vložkami, které jsou na konci popruhů (obr.
20). K nosítku jsou také přiloženy pouzdra na popruhy(a), které chrání popruhy před kontaktem
se slinami dítěte (obr. 21). Pláště jsou snadno odstranitelné a omyvatelné.
D. Péče a údržba
Pro čištění postupujte podle pokynů uvedených na poutku. Po každém praní je nutné
zkontrolovat pevnost tkaniny a švů. Pravidelně kontrolujte přenos; zkontrolujte, zda nejsou
součásti poškozené. Pokud ano, výrobek by neměl být používán.
Návod k mytí:
Perte při teplotě max. 30 °C, měkký program.
Nebělte
Nesušte v sušičce
Nežehlete
Nečistěte chemicky
E. Skladování
Když není nosítko používáno, uchovávejte mimo dosah dětí.
F. Záruka
A. Záruka se vztahuje na produkty prodávané v těchto zemích: Francie, Španělsko,
Německo, Polsko, Velká Británie, Itálie.
B. V zemích, které nejsou uvedeny výše, záruční podmínky stanoví Prodávající.
DE
SEHR GEEHRTE KUNDIN, SEHR GEEHRTER KUNDE!
Vielen Dank, dass Sie das Produkt Kinderkraft gekauft haben.
Wir kreieren im Hinblick auf Ihr Baby - wir achten stets auf Sicherheit und Qualität und
gewährleisten so den Komfort der besten Wahl.
WICHTIG! BEWAHREN SIE FÜR EINE
SPÄTERE VERWENDUNG AUF. LESEN
SIE VOR DER VERWENDUNG

13
SORGFÄLTIG.
A. Sicherheits- und Vorsichtshinweise
WARNUNGEN!!
•Überwachen Sie Ihr Baby kontinuierlich und stellen Sie sicher, dass Mund und Nase nicht
verdeckt sind.
•Bei Frühgeborenen, Säuglingen mit geringem Gewicht und Kindern mit
Gesundheitsproblemen sollten Sie Ihren Kinderarzt konsultieren, bevor Sie die Babytrage
verwenden.
•Um Ersticken zu vermeiden, achten Sie darauf, dass Ihr Baby sein Kinn nicht gegen seine
Brust lehnt, da dies die Atmung erschweren kann.
•Um einen Sturz zu vermeiden, vergewissern Sie sich, dass Ihr Baby richtig in der Babytrage
gesichert ist.
•Säuglinge sollten so lange vorne getragen werden, bis sie genügend Kontrolle über die Kopf-,
Nacken- und Körpermuskulatur haben, um selbständig eigene Sitzposition halten zu können.
Diese Babytrage ist nicht für die Verwendung in der Position „Vorwärts in die
Welt“ vorgesehen.
•Bücken Sie sich nicht, wenn Sie die Babytrage verwenden. Wenn nötig, hocken Sie sich hin.
•Wenn Sie die Babytrage verwenden, sollten Sie den Hüftgurt nie lösen, bevor Sie Ihr Baby
herausnehmen.
•Lassen Sie Ihr Baby nie unbeaufsichtigt mit der Babytrage zurück.
Die Babytrage ist ausschließlich zum Tragen von Kindern von 3 Monaten bis 20 kg bestimmt.
Wenn das Baby nicht in der Lage ist, seinen eigenen Kopf zu halten, stellen Sie die Babytrage so
ein, dass der Kopf des Babys hoch auf seiner Brust liegt. Dies ist der sicherste Ort für ein Kind.
Benutzen Sie niemals eine Soft Babytrage beim Kochen, Reinigen, Halten von heißen Getränken
und anderen Aktivitäten, bei denen Ihr Baby Verbrennungen oder Chemikalien ausgesetzt ist.
Seien Sie vorsichtig, wenn Sie heiße Getränke trinken, um zu vermeiden, dass sich Ihr Baby mit
heißer Flüssigkeit verbrennt, während es in der Babytrage ist.
Die Babytrage ist für die Beförderung nur eines Kindes ausgelegt.
Ihre Bewegungen, aber auch die Ihres Kindes, können Ihr Gleichgewicht beeinflussen. Seien Sie
vorsichtig, wenn Sie sich nach vorne oder zur Seite lehnen.
Die Babytrage ist nicht geeignet für den Einsatz bei sportlichen Aktivitäten wie Laufen,
Radfahren, Schwimmen und Skifahren. Verwenden Sie die Babytrage nicht, wenn ein Teil davon
beschädigt, gerissen oder verloren gegangen ist.
Montieren Sie kein Zubehör, keine Ersatzteile oder Komponenten, die nicht vom Hersteller
geliefert werden.
Benutzer sollten sich bewusst sein, dass mit zunehmender Aktivität des Kindes das Risiko eines
Sturzes steigt.
B. Komponenten der Babytrage (Abb. 1A, 1B, 2):
a. Hüftgurt mit verstellbarer Breiteneinstellung des Babytragepanels
b. Hüftschnalle mit Gurtverstellung
c. Schultergurte
d. Schultergurtverschluss mit Gurtverstellung
e. Babytragepanel
f. Verstellbare Seitenschnallen

14
g. Gurte zur Anpassung der Länge der Schultergurte
h. Kapuze
i. Gurtehäubchen
C. Montage
Das Produkt bietet die am besten geeignete (ergonomische) Position zum Stützen des
Kindes, wobei die Form der Hüften und Beine dem Buchstaben M ähnelt. Dadurch wird
die natürliche Position, in der das Kind getragen werden sollte, beibehalten.
VORSICHT! Um die ergonomische Position des Kindes zu gewährleisten, sollten die
Beine so positioniert werden, dass der Po des Kindes etwas tiefer als die Knie liegt und
die Beine weit zur Seite ausgestreckt sind.
1. Fronttragen, Baby zum Eltern hin
WARNUNG! Ziehen Sie die Babytrage immer an, bevor Sie Ihr Baby hineinlegen.
Lösen Sie die Schnalle (b) am Hüftgurt und die Verbindungsschnalle (d) an den Schultergurten. Die
seitlichen Klemmen (f) sollten befestigt werden (Abb. 3). Stellen Sie die Breite des Tragepanels (e)
ein, indem Sie die Klettbänder am Hüftgurt (a) entfernen und den Stoff nach rechts oder links
schieben, um die Größe des Panels an Ihr Babys bestmöglich anzupassen (Abb. 4). Legen Sie Ihren
Hüftgurt an und schließen Sie die Schnalle. Stellen Sie den Hüftgurt ein, indem Sie ihn an Ihre Taille
anpassen (Abb. 5). Nachdem Sie sich vergewissert haben, dass der Hüftgurt richtig angelegt ist,
kuscheln Sie Ihr Baby an die Brust und trennen Sie seine Beine (die Beine des Babys sollten hinter
dem Gurt hängen) (Abb. 6). WARNUNG! Halten Sie das Kind dabei gut fest. Während Sie das Baby
halten, heben Sie das Tragepanel an, so dass es den Rücken des Babys bedeckt (Abb. 7). Während
Sie das Baby mit der rechten Hand halten, legen Sie den linken Schultergurt (c) auf Ihre linke
Schulter (Abb. 8). Wechseln Sie dann die Hände und wiederholen Sie die Aktion mit dem rechten
Schultergurt (c). Befestigen Sie mit beiden Händen die Schultergurtschnalle (d) und stellen Sie ihn
ein (Abb. 9). Ziehen Sie die Schultergurte nach Bedarf durch Ziehen an den Verstellriemen fest
(Abb. 10). Ziehen Sie die Verstellbände an den Schultergurten der Babytrage fest, bis das Kind fest
mit dem Panel eingewickelt ist. Achten Sie darauf, dass die Beine nicht zu fest gedrückt sind.
2. Hintentragen, Baby zum Eltern hin
WARNUNG! Tragen Sie auf dem Rücken keine Kinder unter 6 Monaten oder Kinder, die nicht allein
sitzen können.
WARNUNG! Überprüfen Sie regelmäßig, ob das Kind in einer sicheren und bequemen Position ist,
insbesondere wenn es auf dem Rücken getragen wird.
Lösen Sie die Schnalle am Hüftgurt und die Verbindungsschnalle an den Schultergurten. Die
seitlichen Schnallen sollten befestigt werden (Abb.3). Stellen Sie die Breite des Babytragepanels
wie in Abbildung 4 dargestellt ein, legen Sie den Hüftgurt an und befestigen Sie die Schnalle.
Stellen Sie den Hüftgurt ein, indem Sie ihn an Ihre Taille anpassen (Abb. 11). Nachdem Sie sich
vergewissert haben, dass der Hüftgurt richtig angelegt ist, bitten Sie Ihren Partner, Ihr Baby
anzuheben und auf Ihren Rücken zu legen (Abb. 12). Die Beine des Babys sollten sich um die Taille
wickeln. WARNUNG! Während des gesamten Prozesses des Einsetzens des Babys in die Babytrage
sollte das Baby von Ihnen oder Ihrem Partner gut unterstützt werden. Mit den Händen, die das
Baby halten, bitten Sie Ihren Partner, die Babytrage so anzuheben, dass sie den Rücken des Babys
bedeckt. Legen Sie dann beide Schultergurte an (Abb.13). Befestigen Sie die Schnalle, die
Schultergurte verbindet, und stellen Sie sie ein (Abb. 14). Ziehen Sie die Schultergurte nach Bedarf
durch Ziehen an den Verstellriemen fest. Ziehen Sie die Bände der Schultergurte der Babytrage an,

15
bis Ihr Baby fest mit dem Panel eingewickelt ist (Abb. 15,16). Vergewissern Sie sich, dass Ihr Kind
in der richtigen Position ist. Achten Sie darauf, dass die Beine nicht zu fest gedrückt sind.
3. Zusätzliche Funktionen der Babytrage
Bei schlechten Wetterbedingungen setzen Sie dem Kind eine Kapuze (h) (Abb. 17) auf. Für den
Komfort Ihres Babys an heißen Tagen können Sie das Außenmaterial, das an das Panel der
Babytrage mit Kunststoff-Druckknöpfen befestigt ist, entfernen und in der Tasche an der
Vorderseite der Babytrage verstecken (Abb. 18). Die Gurte an Schnallen (f) und Gurte (g) dienen
zur Längenverstellung der Schultergurte (Abb. 19). Wenn die Verstellbände zu lang sind, können
sie aufgerollt und mit Gummibändern, die sich am Ende der Gurte befinden, gesichert werden
(Abb. 20). Die Babytrage wird auch zusammen mit Gurtehäubchen (i) geliefert, um den Kontakt
mit dem Speichel Ihres Babys zu verhindern (Abb. 21). Die Gurtehäubchen lassen sich leicht
entfernen und waschen.
D. Pflege und Wartung
Befolgen Sie zur Reinigung die Anweisungen auf dem Etikett. Prüfen Sie nach jedem Waschen
die Festigkeit des Stoffes und der Nähte. Kontrollieren Sie die Babytrage regelmäßig; prüfen Sie,
dass sie nicht gerissen, beschädigt ist oder ob Bestandteile nicht fehlen. Wenn dies der Fall ist,
sollte das Produkt nicht verwendet werden.
Anweisungen zum Waschen:
Waschen bei max. 30°C, mildes Verfahren
Nicht bleichen
Nicht im Trommeltrockner trocknen
Nicht bügeln
Nicht chemisch reinigen
E. Lagerung
Wenn die Babytrage nicht in Gebrauch ist, sollte sie außerhalb der Reichweite von Kindern
aufbewahrt werden.
F. Garantie
A. Alle Produkte werden durch Kinderkraft mit einer 24 - Monats-Garantie abgedeckt. Die
Dauer der Garantiedeckung beginnt mit dem Tag der Herausgabe des Produkts an den
Käufer.
B. Die Garantie gilt für Produkte, die in diesen Ländern verkauft wurden : Frankreich,
Spanien, Deutschland, Polen, Großbritannien, Italien.
C. In Ländern, die oben nicht genannt sind, bestimmt der Verkäufer die
Garantiebedingungen.
D. Es ist möglich, die Garantie auf 120 Monate (10 Jahre) zu verlängern. Vollständiger
Wortlaut der Bedingungen und das Registrierungsformular zur Garantieverlängerung ist
auf dem WWW.KINDERKRAFT.COM verfügbar.
E. Die Garantie gilt nur in dem Land, in dem der Kauf getätigt wurde.

16
F. Beschwerden sollten über das Formular auf der Website WWW.RMA.KINDERKRAFT.COM
eingereicht werden.
G. Die Garantie gilt nicht:
a. für Ansprüche aus den technischen Parametern des Produktes, solange sie vom
Hersteller in Bedienungsanleitungen oder anderen Dokumenten normativer Natur
entsprechen;
b. Produktfehler, die durch unsachgemäße Wartung oder unsachgemäße Verwendung von
Chemikalien entstehen;
c. Farbwechsel (Verfärbung), wenn Artikel -entgegen den Bedienungsanleitung- dem
direkten Sonnenlicht ausgesetzt werden;
d. Reißen, Abreiben, Bruch im Stoff/Kunststoff, die auf Verschulden des Kunden
zurückzuführen sind;
e. eine Verringerung der Produktqualität durch normalen Verschleiß und natürlichen
Verschleiß von Verbrauchsartikeln;
f. Produkte, die nicht gemäß den Spezifikationen verwendet wurden;
H. Die Garantiezeit für das Zubehör zu dem Gerät läuft über 6 Monate ab dem Datum des
Verkaufs, mit Ausnahme von mechanischen Beschädigungen.
I. Diese Garantiebedingungen sind komplementär in Bezug auf die Befugnisse des Kunden, die
dem Kunden gegen 4KRAFT sp. z oo.zustehen. Die Garantie schließt nicht aus, schränkt nicht
ein oder setzt nicht aus, die Rechte des Kunden gemäß den Bestimmungen für die
Gewährleistung für Mängel an den verkauften Waren.
J. Vollständiger Wortlaut der Garantie ist auf der Website WWW.KINDERKRAFT.COM
verfügbar.
EN
DEAR CUSTOMER!
Thank you for purchasing Kinderkraft product.
We design products with your child in mind –we always provide safety and quality as well as
comfort.
IMPORTANT! KEEP FOR FUTURE
REFERENCE. READ CAREFULLY
BEFORE USE.
A. Safety and precautions
WARNINGS!
•Monitor your child at all times and make sure its mouth and nose are not covered.
•With regard to premature babies, low-weight babies and children with health ailments,
consult your pediatrician before you start using the product.
•In order to avoid suffocation, make sure the child’s chin does not rest on the chest because
it may hinder breathing.
•To avoid falling, make sure the child is properly secured in the sling.
•Babies must be carried at the front until they can control muscles of head, neck and body

17
and therefore keep sitting on their own. This sling is not intended for „forward-facing”
position.
•When you use the sling, do not bend. Crouch, if necessary.
•When you use the sling, never unfasten the hip belt before you take the child out.
•Never leave the child with a sling unattended.
The sling is intended solely for children aged 3 months upwards and whose weight does not
exceed 20 kg.
When the child cannot keep its own head, adjust the sling so that its head is high at the chest. It
is the safest place for the child.
Never use the soft sling when you cook, clean up, carry hot drinks and take other actions which
may expose the child to burning or impact of chemicals.
Be careful when you drink hot drinks, otherwise the hot liquid may hurt the child when in the
sling.
The sling serves to carry one child only.
Your and your child’s movements may affect your balance. Remain careful when you bend
forward or sideways.
The sling must not be used when doing sports, for example running, cycling, swimming and
skiing.
Do not use the sling if any of its components/elements has been damaged, torn or lost.
Do not assemble any accessories, spare parts or components which have not been supplied by
the manufacturer.
Users must be aware that fall risk rises as the child gets more active.
B. Sling components (Fig. 1A, 1B, 2):
a. Hip belt with sling width adjustment
b. Hip buckle with belt adjustment
c. Shoulder belts
d. Shoulder belts buckle with belt adjustment
e. Sling panel
f. Side buckles with adjustment
g. Shoulder belt length adjustment straps
h. Hood
i. Belt covers
C. Assembly
The product assures the most suitable child restraint position in which the shape of
hips and legs resembles M letter. Thanks to this, a natural position in which the child
must be carried is maintained. NOTE! In order to make sure the child’s position is
ergonomic, position child’s legs in a way that its bottom is lower than knees while legs
spread wide to the sides.
1. Carrying in front, child in a parent-forward position
WARNING! Always put the sling on before you place the child in.
Unfasten the buckle (b) at the hip belt and buckle (d) at the shoulder belts. Side buckles (f) should
be secured (Fig. 3). Adjust the width of sling panel (e) by detaching Velcros on the hip belt (a) and

18
sliding the fabric to the right or left so that you can adapt the panel size to your child (Fig. 4). Put
the hip belt on and fasten the buckle. Adjust the hip belt to your waist (Fig. 5). After you have
made sure the hip belt is properly fixed, cuddle the child to your chest and separate its legs (child’s
legs must hang behind the belt) (Fig. 6). WARNING! When you perform this operation, hold the
child firmly. When holding the child, lift the sling panel so that it covers the child’s back (Fig. 7).
Holding the child with your right hand, place the left shoulder belt (c) on the left shoulder (Fig. 8).
Next change hands and do the same with the right shoulder belt (c). Use both hands to fasten the
shoulder belt buckle (d) and adjust it (Fig. 9). Depending on your needs, tighten the shoulder belts
by pulling the adjustment straps (Fig. 10). Pull shoulder belt adjustment straps until the child is
properly wrapped with the panel. Make sure the child’s legs are not extensively squeezed up.
2. Carrying at the back, child in a parent-facing position
WARNING! Do not carry children aged below 0,5 or those who cannot sit on their own on your
back.
WARNING! Regularly make sure the child is safe and feels comfortable, especially when you carry
it on your back.
Detach the buckle at the hip belt and shoulder belt buckle. Side buckles must be secured (Fig. 3).
Adjust the width of the sling panel in accordance with the figure 4, put the hip belt on and fasten
the buckle. Adjust the hip belt to your waist (Fig. 11). After you have made sure the hip belt is
properly fixed, ask your partner to lift the child and place it on your back (Fig. 12). Child’s legs must
wrap around the waist. WARNING! All the time you put the child in the sling, you or your partner
must support the child properly. With hands supporting the child, ask your partner to lift the sling
so that it covers the child’s back. Next put both shoulder belts on (Fig. 13). Fasten the shoulder
belts buckle and adjust it (Fig. 14). Depending on your needs, pull the shoulder belts. To do so, pull
adjustment straps. Pull shoulder belt straps until the child is properly wrapped with the panel (Fig.
15, 16). Make sure the child is in a proper position. Make sure its legs are not extensively squeezed
up.
3. Additional functions of the sling.
In case of unfavorable weather, put the hood on (h) (Fig. 17). To make sure the child is comfortable
on hot days, you can remove the external fabric attached to the sling panel and hide it in the pocket
located at the front of the sling (Fig. 18). The buckle straps (f) and belts (g) are used to adjust the
length of shoulder belts (Fig. 19). When the adjustment straps are too long, you can roll them up
and secure with rubbers located at the end of belts (Fig. 20). The sling is also equipped with belt
covers (i) which secure belts against child’s saliva (Fig. 21). The covers can be easily removed and
washed.
D. Care and maintenance
In order to clean the product, follow the guidelines on the insert. After every washing, check the
resistance of the fabric and seams. Periodically inspect the sling; check it for ripping, damage and
missing components. If this is the case, do not use the product.
How to wash:
Wash at the temperature of max. 30°C, soft mode.
Do not bleach
Do not dry in a tumble dryer

19
Do not iron
Do not dry clean
E. Storage
If the sling is not used, keep it out of reach of children.
F. Warranty
A. All Kinderkraft products are covered by a 24-month warranty. The warranty period begins
on the date of releasing the product to the Buyer.
B. The warranty is valid for products sold in the following countries: France, Spain, Germany,
Poland, United Kingdom, Italy.
C. In countries not listed above warranty terms and conditions are determined by the Seller.
D. It is possible to extend the warranty period to 120 months (10 years). Full text of the terms
and conditions and warranty extension registration form are available at
WWW.KINDERKRAFT.COM
E. The warranty is valid only in the country where the purchase was made.
F. Complaints should be submitted by completing the form available at
WWW.RMA.KINDERKRAFT.COM
G. The warranty shall not cover:
a. claims arising from product specifications, as long as they comply with those specified
by the manufacturer in the instruction manual or other documents of a legislative
nature;
b. product damage caused by improper maintenance or use of inadequate chemicals;
c. colour change (discolouration) when the product has been exposed to direct sunlight
against the instructions provided in the instruction manual;
d. tear, wear, crack of fabric/plastic that is the fault of the Customer;
e. reduction in the quality of the product and consumables due to normal wear and tear;
f. products which have not been used according to specifications;
H. The warranty period for accessories attached to the device is 6 months from the date of
sale, with the exception of mechanical damage.
I. These guarantee terms and conditions are complementary to the Customer's rights in
relation to 4KRAFT sp. z o.o. The warranty shall not exclude, limit or suspend the rights of
the Customer arising from the provisions on the warranty for defects in the goods sold.
J. Full text of Warranty Terms and Conditions is available at WWW.KINDERKRAFT.COM
ES
¡ESTIMADO CLIENTE!
Gracias por comprar un producto Kinderkraft.
Creamos nuestros productos pensando en sus hijos: siempre nos preocupamos por la seguridad
y la calidad,
asegurando así la comodidad de la mejor opción.
¡IMPORTANTE! GUARDAR PARA USO

20
POSTERIOR. LEA CUIDADOSAMENTE
ANTES DE USAR
A. Notas de seguridad y precauciones
¡ADVERTENCIA!:
• Controle a su hijo constantemente y verifique que la boca y la nariz no estén cubiertas.
•Para bebés prematuros, bebés con bajo peso al nacer y niños con problemas de salud,
consulte a un pediatra antes de usar el portabebés.
•Para evitar asfixia, asegúrese de que el niño no descanse la barbilla sobre el pecho, ya que
esto puede dificultar la respiración.
•Para evitar caídas, verifique que el bebé esté bien sujeto en el portabebé.
•Los bebés deben usarse frente a ellos hasta que tengan un control suficiente sobre los
músculos de la cabeza, el cuello y el cuerpo para poder mantener la posición sentada solo.
Este portabebés no está diseñado para usarse en una posición "cara al mundo".
•No se incline cuando use el portabebés. Póngase en cuclillas si es necesario.
•Cuando use el portabebés, nunca afloje el cinturón antes de retirar al niño.
•Nunca deje a su hijo desatendido con un portabebé.
Portabebés solo está destinado al transporte de niños de 3 meses a 20 kg.
Cuando el niño no pueda sostener su propia cabeza, ajuste el portabebé para que la cabeza del
niño quede sobre el pecho. Este es el lugar más seguro para un niño.
Nunca use un portabebés suave al cocinar, limpiar, sostener bebidas calientes y otras actividades
que expongan a su hijo a quemaduras o productos químicos.
Tenga cuidado al tomar bebidas calientes para evitar quemar a su hijo con líquido caliente.
Tenga cuidado al tomar bebidas calientes para evitar quemar a su hijo con líquido caliente
mientras está en el portabebés.
Los portabebés se usan para llevar a un solo niño.
Sus movimientos, como los de su hijo, pueden afectar su equilibrio. Tenga cuidado al inclinarse
hacia adelante o hacia un lado.
Portabebés no es adecuado para actividades deportivas como correr, montar en bicicleta, nadar
y esquiar.
No utilice el portabebés si alguno de sus componentes está dañado, roto o perdido.
No monte accesorios, repuestos o componentes que no hayan sido suministrados por el
fabricante con el portabebés.
Los usuarios deben tener en cuenta que a medida que aumenta la actividad del niño, aumenta
el riesgo de caerse.
B. Elementos del portabebés (Fig. 1A, 1B, 2):
a. Cinturón de ancho ajustable del panel del portabebés
b. Hebilla de cintura con cintura ajustable
c. Correas de hombro
d. Hebilla de conexión de correas de hombro con ajuste de cinturón
e. Painel del portabebés
f. Hebillas laterales ajustables
g. Cinturones que regulan la longitud de las correas de los hombros.

21
h. Capucha
i. Cubiertas de la correa
C. Montaje
El producto proporciona la posición más apropiada (ergonómica) para apoyar al niño,
en la que la forma de las caderas y las piernas se asemeja a la letra M. Esto mantiene
la posición natural en la que el niño debe ser transportado. ¡NOTA! Para garantizar la
posición ergonómica del niño, coloque las piernas de manera que la parte inferior del
niño esté ligeramente más baja que las rodillas y las piernas se extiendan hacia los
lados.
1. Llevar al niño hacia adelante, hacia los padres.
¡ADVERTENCIA! Siempre use el portabebé antes de colocar a su hijo en él.
Afloje la hebilla de la cintura (b) y la hebilla (d) que conecta las Correas de hombro. Las hebillas
laterales (f) deben estar apretadas (Fig. 3). Ajuste el ancho del panel del portabebés (e) aflojando
el velcro del cinturón (a) y moviendo el material hacia la derecha o hacia la izquierda para ajustar
mejor el tamaño del panel al tamaño de su hijo (Fig. 4). Póngase el cinturón y abroche la hebilla.
Ajuste el cinturón para que se ajuste a su cintura (Fig. 5). Después de asegurarse de que el cinturón
de regazo esté correctamente ajustado, sostenga al niño en el pecho y separe las piernas (las
piernas del niño deben estar flojas alrededor del cinturón) (Fig. 6). ADVERTENCIA Al hacer esto,
sostenga al niño con fuerza. Sosteniendo al niño, levante el panel del portabebés para cubrir la
espalda del niño (Fig. 7). Sosteniendo al niño con la mano derecha, coloque el mango izquierdo
(c) en el hombro izquierdo (Fig. 8). Luego cambie de manos y repita con la correa para el hombro
derecho (c). Con ambas manos, abroche la hebilla de conexión Correas de hombro (d) y ajústela
(Fig. 9). Tense las tiras internas según sea necesario tirando de las correas de ajuste (Fig. 10).
Apriete las correas de ajuste en las correas del portabebés hasta que el niño esté bien envuelto
alrededor del panel. Asegúrese de que sus pies no estén demasiado apretados.
2. Llevar al niño de espaldas hacia sus padres.
¡ADVERTENCIA! No transporte niños menores de 6 meses o niños que no puedan sentarse solos.
¡ADVERTENCIA! Verifique regularmente que el niño esté en una posición segura y cómoda,
especialmente cuando se usa en la espalda.
Afloje la hebilla del cinturón y la que conecta Correas de hombro. Las hebillas laterales deben estar
apretadas (Fig. 3). Ajuste el ancho del panel del portabebés, como se muestra en la figura 4.
Póngase el cinturón y abroche la hebilla. Ajuste el cinturón para que se ajuste a su cintura (Fig. 11).
Después de asegurarse de que el cinturón de regazo esté colocado correctamente, pídale a su
compañero que levante al niño y lo coloque boca arriba (Fig. 12). Las piernas del niño deben
envolverse alrededor de la cintura. ¡ADVERTENCIA! Durante todo el proceso de colocar al bebé en
el portabebés, usted o su pareja deben contar con el apoyo adecuado. Con las manos apoyando a
su hijo, pídale a su pareja que levante el portabebé para que cubra la espalda del niño. Luego,
coloque las dos correas para los hombros (Fig. 13). Cierre la hebilla de Correas de hombro y
ajústela (Fig. 14). Apriete las correas de los hombros según sea necesario tirando de las correas de
ajuste. Apriete las correas de la correa para el hombro hasta que el niño esté bien envuelto
alrededor del panel (Fig. 15, 16). Asegúrese de que el niño esté en la posición correcta. Asegúrese
de que sus pies no estén demasiado apretados.
Table of contents
Languages:
Other Kinderkraft Baby Carrier manuals