King Canada 8208K User manual

4-1/2˝ ANGLE DISC GRINDER
INSTRUCTION MANUAL
COPYRIGHT © 2004 ALL RIGHTS RESERVED BY KING CANADA INC.
MODEL: 8208K
IMPORTANT INFORMATION
PROOF OF PURCHASE
Please keep your dated proof of purchase for warranty and servicing purposes.
LIMITED TOOL WARRANTY
KING CANADA makes every effort to ensure that this product meets high quality and
durability standards. KING CANADA warrants to the original retail consumer a 2-year
limited warranty as of the date the product was purchased at retail and that each product
is free from defects in materials. Warranty does not apply to defects due directly or
indirectly to misuse, abuse, negligence or accidents, repairs or alterations and lack of
maintenance. KING CANADA shall in no event be liable for death, injuries to persons or
property or for incidental, special or consequential damages arising from the use of our
products. To take advantage of this warranty, the product or part must be returned for
examination by the retailer. Shipping and handling charges may apply. If a defect is found,
KING CANADA will either repair or replace the product.
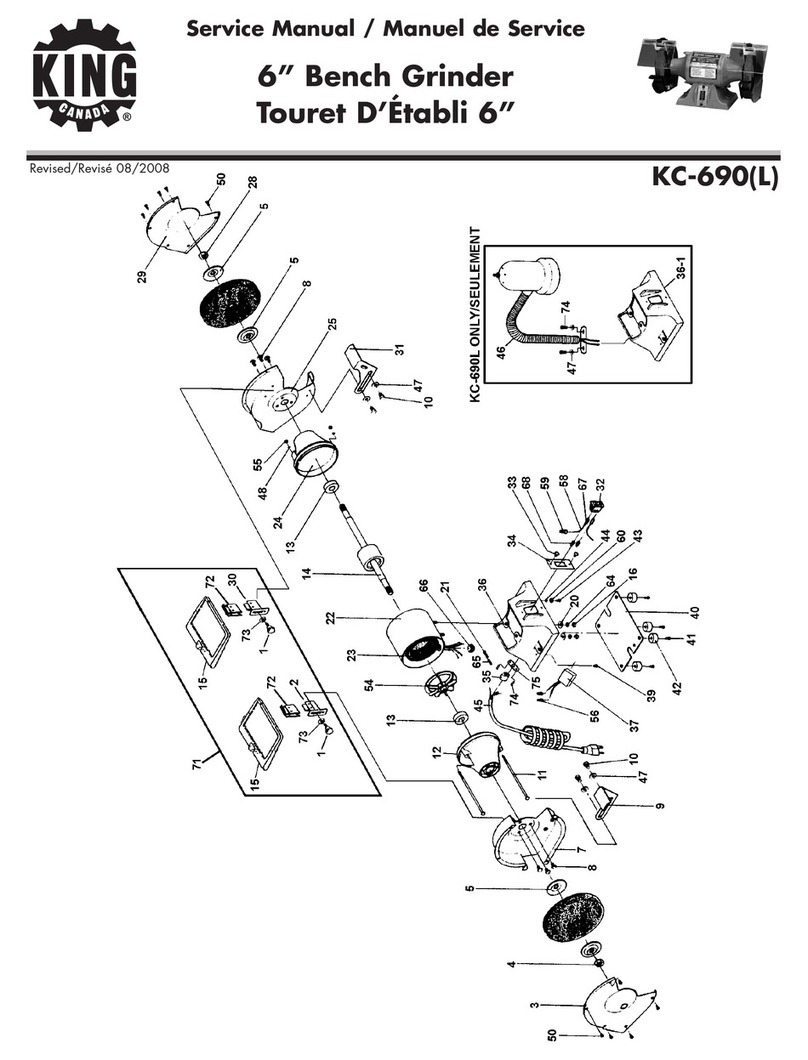
PARTS DIAGRAM & PARTS LISTS
Refer to the Parts section of the King Canada web site for the most updated parts diagram
and parts list.

MODEL 8208K
DIMENSIONS
(GRINDING WHEEL)
VOLTAGE 120V
FREQUENCY (Hz) 60
AMPERAGE
4.3A
SPEED (RPM) 10,000
INSULATION CLASS E
WEIGHT (Kg) 3
4-1/2”
1/4”X7/8”
MAIN TECHNICAL SPECIFICATIONS
OPERATION INSTRUCTIONS
1. Use specified voltage: The tool should not be operated on a
power line which exceeds 10% of the voltage indicated on the
nameplate.
2. Inspect the tool before each use: The grinding wheel must be
inspected cafefully before operating. Do not use the grinding
wheel if there is any breakage or cracks. After assembling the
wheel, run the wheel idle for one minute to see if it is safe to use.
Then check if all the moving parts are running smoothly without
abnormal noise or heavy sparks from the commutator.
3. Avoid overloading the tool: Do not apply too much pressure on
the tool while grinding in a straight or slanted line. If the speed
drops abnormally, the pressure should be decreased
immediately. When the tool stops abruptly or is jammed, cut the
power supply at once.
4. Replace the carbon brushes in time: Worn out brushes should be
replaced (both brushes should be changed at the same time), or
imperfect contact between the brushes and the commutator will
result in ring sparks which will damage the commutator or even
burn the armature.
5. The tool must not be used in the following cases: If there is any
breakage in the insulation of the power cord or the cord guard. If
acrack or imperfect contact of the switch, plug and socket and
faults such as discontinuous running, heavy sparking, etc. should
occur, stop using the tool at once and have it repaired. Do not
use until it is repaired.
6. Always keep the tool clean: The ventilation passage of the tool
should be kept clean and free from obstruction and care should
be taken to prevent iron chips or other foreign matters from
entering passage. Recondition immediately after use to keep the
tool clean and in the best condition.
7. Use the tool with care: Handle the tool with care to avoid being
bumped and prevent the wheel iron from freezing or from
becoming damp.
MAINTENANCE
Grease the tool frequently: Grease can be volatilized and therefore
the grease in the gearbox should be kept clean, replenish or renew
as needed.
Frequent inspection and maintenance: The tool should be
inspected and maintained frequently. Check and make sure the
power cord, internal wires, plug and switch are in good condition.
Make sure the insulation resistance is within normal limits, the
brush holders are not loose and the contact between the brushes
and the commutator are good, and that there is no short-circuit or
breakage of the armature and stator windings. Check the grinding
wheel, bearings and driving parts also.
OPERATION INSTRUCTIONS

Keep every disassembled part and replace parts with the
same ones: While disassembling the tool, care must be taken to
keep disassembled parts including insulating sheets and bushes,
etc. Damaged parts must be replaced with identical ones.
Alternative materials with features not as good as the original ones
or parts not in accordance with the original specifications must not
be used.
Matters needing attention for assembly:
1. Be sure that all the parts are assembled to their original positions
and especially do not leave out any insulation sheets or bushes.
2. Check and see if the direction of rotation of the protruded shaft
corresponds to that marked on the head enclosure (facing the
protruded shaft, you can see it rotating clockwise).
Pay attention to insulation resistance: After having used the tool for
along time or it is used in moist conditions, the tool should be
tested before use for the insulation resistance between the winding
and the casing with a 500V megger. Should the insulation
resistance be less than 7 megger, the winding must be cooled and
dried.
The tool must be well kept: The tool must be kept in an
environment where the air is dry, clean and free from corrosive
vapour and in a place out of the reach of children.
OPERATION INSTRUCTIONS
&MAINTENANCE ACCESSORIES
1. 2 grinding wheels (1/4” & 1/8”)
2. 5 sanding discs
3. 1 Rubber wheel
4. 1 Wire wheel
5. A key to dismantle and fit the grinding wheel
6. 2 position handle
7. Extra set of carbon brushes
SAFETY INSTRUCTIONS
Please read and understand instructions before plugging tool.
1. Keep work area clean: The work area should always be kept in
order and properly lit. It is dangerous to scatter things on the
ground.
2. Proper posture and suitable clothing: Concentrate on your work,
keep your footing and maintain your body balance. Work in
suitable clothing and always wear safety goggles. Do not wear
gloves, loose clothing, neckties or jewelry.
3. Keep unauthorized people away: Except for the people
concerned, keep unauthorized people away.
4. Use specified grinding wheel: The wheel used by the grinder
must be reinforced fibre resin, with a safety linear velocity not
lower than 80 meters per second. If the wheel has been kept for
more than one year, a rotational strength test should be
performed before use.
5. Pay attention to the wheel guard: This wheel guard is an
important part of the tool to ensure safety. Do not operate the tool
when the wheel guard has been dismantled. If a substitute is to
be used, it should be a steel plate or material with equal strength,
whereas brittle materials are strictly prohibited. The opening
angle of the guard should not be more than 180 degrees.
6. Places prohibiting the use of the tool: The tool must not be used
in specific environements such as environements with moisture,
heat, rain or snow or in a place with explosive gas or corrosive
vapours.
ACCESSORIES & SAFETY INSTRUCTIONS

7. Proper use of the plug: Do not change the plug and never insert
naked wires directly into a socket.
8. Proper use of the power cord: The power cord should not be
lengthened or changed. The tool should not be carried by the
power cord. It should not come in contact with any heat source
or oil and should be protected from being scraped, cut or
jammed.
9. Unplugging the tool: The tool should be unplugged after each use
or before servicing (changing parts or wheel). Do not unplug the
tool by pulling on the power cord.
10. Prevent the tool from starting unexpectedly: Before putting the
plug into a socket, make sure the switch is in the OFF position.
When the plug is still connected to the power source, do not
carry the tool with your finger pressing on the trigger of the
switch.
SAFETY INSTRUCTIONS
Faults Causes Solution
1. Motor fails to
run.
2. Motor gives
out an abnormal
sound, will not
start or runs
slowly.
3. Head enclo-
suregets too hot.
1. Power supply broke off or
connections loosened.
2. Switch contact is not good.
3. Windings of armature or
stator burnt out.
4. Stator short-circuited.
1. Switch contactors burnt out.
2. Mechanical obstruction.
3. Too much pressure on tool,
motor is overloading.
4. Armature slightly short-cir-
cuited or opencircuited.
1. Lack of grease in head
enclosure or the grease is
contaminated by dirt.
2. Mashing of the gears too
tight or entrance of foreign
matters.
1. Reconnect or change connec-
tions.
2. Repair or replace switch.
3. Replace the windings.
4. Weld broken leadout or
rewind the winding.
1. Repair or replace the switch.
2. Inspect the mechanical parts.
3. Reduce pressure on tool.
4. Replace or repair the arma-
ture.
1. Add or change grease.
2. Inspect gears or clean off
foreign matters.
TROUBLESHOOTING
Faults Causes Solution
4. Motor runs,
but is not turn-
ing.
5. Casing gets
too hot.
6. Heavy spark-
ing occurs on the
commutator.
1. Gear shaft or woodruff key
is broken.
2. Nut at small bevel gear is
not tightened.
1. Working load is too heavy.
2. Winding got wet.
3. Not properly assembled.
4. Regulated voltage drop.
1. Armature short-circuited or
opencircuited.
2. Surface of commutator is
not clean.
1. Inspect if the gear shaft or
the woodruffkey is broken.
2. Tighten the nut.
1. Reduce pressure on the tool.
2. Dry the motor.
3. Inspect if the armature is
blocked or touches the stator
core.
4. Regulate supply voltage.
1. Repair the armature.
2. Clean off foreign matters and
make the surface of the com-
mutator is clean and smooth.
Table of contents
Other King Canada Grinder manuals

King Canada
King Canada KC-690 User manual

King Canada
King Canada KC-1090 User manual

King Canada
King Canada 8204g User manual

King Canada
King Canada CONNECT 1 8035LK-BC User manual

King Canada
King Canada KC-1090 User manual

King Canada
King Canada KC-690(L) User manual

King Canada
King Canada 8364 User manual

King Canada
King Canada KC-10SG User manual

King Canada
King Canada KC-890 User manual

King Canada
King Canada KC-890 User manual