manuals.online logo
Brands
  1. Home
  2. •
  3. Brands
  4. •
  5. KING
  6. •
  7. Indoor Furnishing
  8. •
  9. KING C1932015 User manual

KING C1932015 User manual

Other KING Indoor Furnishing manuals

KING Aura User manual

KING

KING Aura User manual

KING Nimbus V User manual

KING

KING Nimbus V User manual

KING Reef Pool Float User manual

KING

KING Reef Pool Float User manual

Popular Indoor Furnishing manuals by other brands

Regency LWMS3015 Assembly instructions

Regency

Regency LWMS3015 Assembly instructions

Furniture of America CM7751C Assembly instructions

Furniture of America

Furniture of America CM7751C Assembly instructions

Safavieh Furniture Estella CNS5731 manual

Safavieh Furniture

Safavieh Furniture Estella CNS5731 manual

PLACES OF STYLE Ovalfuss Assembly instruction

PLACES OF STYLE

PLACES OF STYLE Ovalfuss Assembly instruction

Trasman 1138 Bo1 Assembly manual

Trasman

Trasman 1138 Bo1 Assembly manual

Costway JV10856 manual

Costway

Costway JV10856 manual

moss DESIGN Caisson Credenza Assembly instructions

moss DESIGN

moss DESIGN Caisson Credenza Assembly instructions

Aquaglide FULL DECK 15.0 owner's manual

Aquaglide

Aquaglide FULL DECK 15.0 owner's manual

AREBOS AR-HE-SW30 user manual

AREBOS

AREBOS AR-HE-SW30 user manual

Till-Hilft Fulda 87005.330 Assembly instructions

Till-Hilft

Till-Hilft Fulda 87005.330 Assembly instructions

Twoey Outside 2010 quick start guide

Twoey Outside

Twoey Outside 2010 quick start guide

Hettich Easys 200 operating instructions

Hettich

Hettich Easys 200 operating instructions

The bedboss RELAX 404 Series owner's manual

The bedboss

The bedboss RELAX 404 Series owner's manual

Oeseder Möbelindustrie Bern 991 720 Assembly instructions

Oeseder Möbelindustrie

Oeseder Möbelindustrie Bern 991 720 Assembly instructions

Costway HW68469 user manual

Costway

Costway HW68469 user manual

Next ALIX A27743 Assembly instructions

Next

Next ALIX A27743 Assembly instructions

BROSA Hans Assembly guide

BROSA

BROSA Hans Assembly guide

Prodigg MINIKA PBA015T-FUR installation manual

Prodigg

Prodigg MINIKA PBA015T-FUR installation manual

manuals.online logo
manuals.online logoBrands
  • About & Mission
  • Contact us
  • Privacy Policy
  • Terms and Conditions

Copyright 2025 Manuals.Online. All Rights Reserved.

ART NO. C1932015 CANCELLETTO BIMBI WOOD – SAFETY GATE WOOD
PARTI IN DOTAZIONE – COMPONENTS
1X
CANCELLETTO
–
MAIN PART
4X
VITE CON PERNO
–
SPINDLE ROD & NUT
INSTALLAZIONE
–
HOW TO INSTALL
1 - Prima di procedere, verificare c e la larg ezza
della porta sia compresa tra 75 e 82 cm. La
larg ezza ottimale è 75-80
m.
1 - Before install, please check the door width
suitable between 75- 2cm.The best wide range of
usage is 75- 0CM.
2 - Inserire le 4 viti con perno nei 4 angoli del cancelletto, senza
stringerle.
2 - Insert the round spindle rods + nuts inside the four corners of the
gate.
3 - Iniziare a stringere il cancelletto
regolando le 2 viti in basso.
3 - Adjust the bottom nut to tighten the
gate.
4 - Passare poi alle viti in alto,
stringendo entrambi i lati per terminare
il fissaggio.
4 - Adjust the upper nut to tighten the
gate.
5 - Assicurarsi c e in cancelletto sia
fissato e bilanciato correttamente. Il
simbolo verde indica un fissaggio
corretto. Se il simbolo verde non
compare, sistemare il cancelletto fino
alla sua comparsa.
5 - Make sure the gate is well installed
and balanced on the door.
The green symbol on top will show
when the gate is installed correctly. If
not, please screw and tighten the gate.
UTILIZZO
–
HOW TO USE
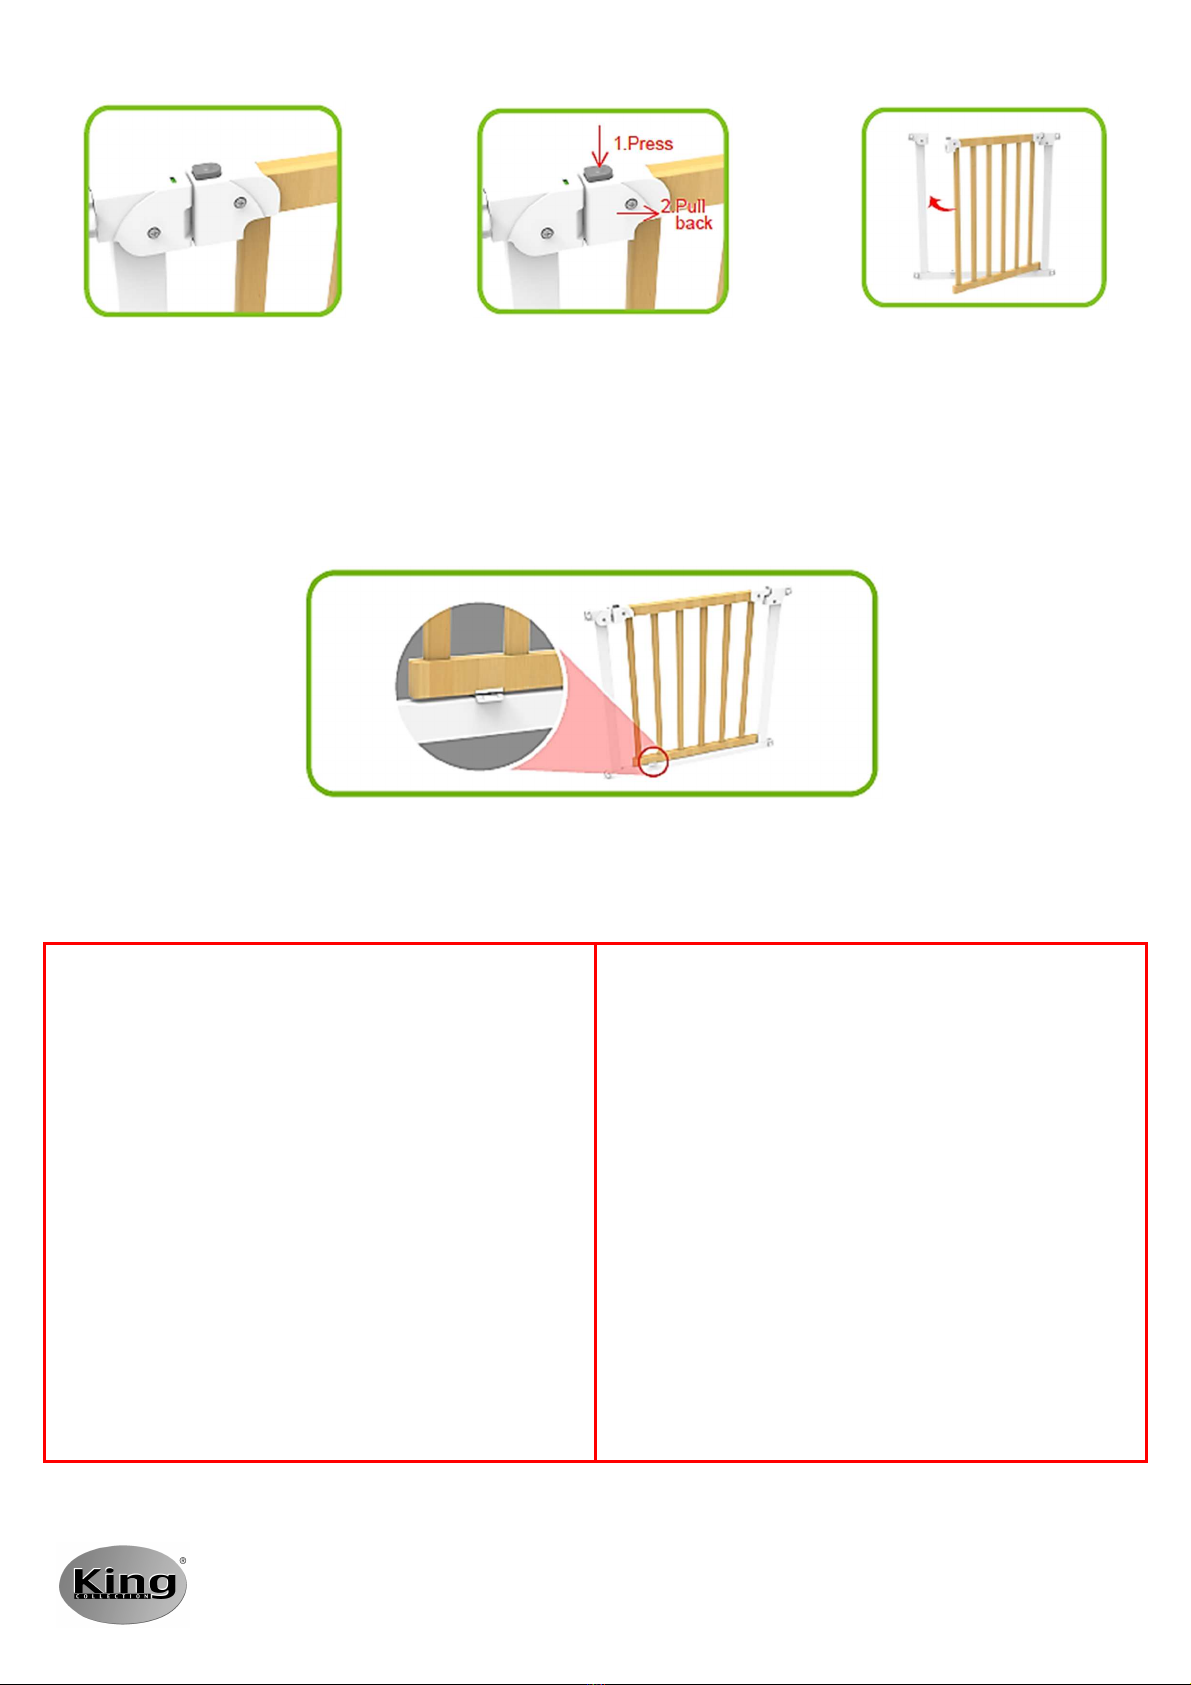
1 - Premere il bottone per visualizzare la linea
rossa.
1 - Push the button to Red alert.
2 - Premere il bottone grigio e, allo
stesso tempo, tirare l’impugnatura del
cancelletto, per aprirlo.
2 - Pus t e top botton and lift up t e
andle grip apart to open t e door.
3 - Spingi la porta per aprirla, poi riportala
nella posizione originale. Il cancelletto si
c iuderà automaticamente.
3 - Pus back t e gate, t en t e gate can
lock automatically.
4 - Il cancelletto è dotato di un doppio sistema di bloccaggio.
4 - Double locking system.
ATTENZIONE!
Non osizionare il cancelletto vicino a fiamme vive o fonti di
calore.
Prima dell’uso assicurarsi che il cancelletto sia osizionato
correttamente e ienamente funzionante.
Questo rodotto costituisce un deterrente, ma la su ervisione
di un adulto non deve mai venire meno.
Non lasciare mai i bambini soli.
Rimuovere il cancelletto quando il bambino im ara ad
utilizzarlo.
Se danneggiato o usurato, non usare il cancelletto, ma
sostituirlo con uno funzionante.
Il rodotto va controllato regolarmente er assicurarne il
corretto funzionamento.
La lastica e le iccole arti ossono costituire ericolo di
soffocamento , tenere lontano dalla ortata dei bambini.
WARNING!
Do not lace the safety gate close to an o en fire or other heat
surce.
Ensure the safety gate is fully erected and all the locking
mechanisms engaged before use.
This roduct is a deterrent but not a substitute for adult
su ervision.
Never leave children unattended.
Discontinue use when child is able to remove it.
If worn or damaged, remove immediately and re lace as
needed.
Check the roduct regularly to ensure safety use.
Plastic bags, oly bags, small arts, etc. can be dangerous. To
avoid danger of suffocation or swallowing, kee them away
from babies and children.
Prodotto importato e distribuito da:
Biacchi Gianfranco s.r.l.
Via Einaudi 1, 26041 -Casalbellotto (CR)
www.biacc i.com