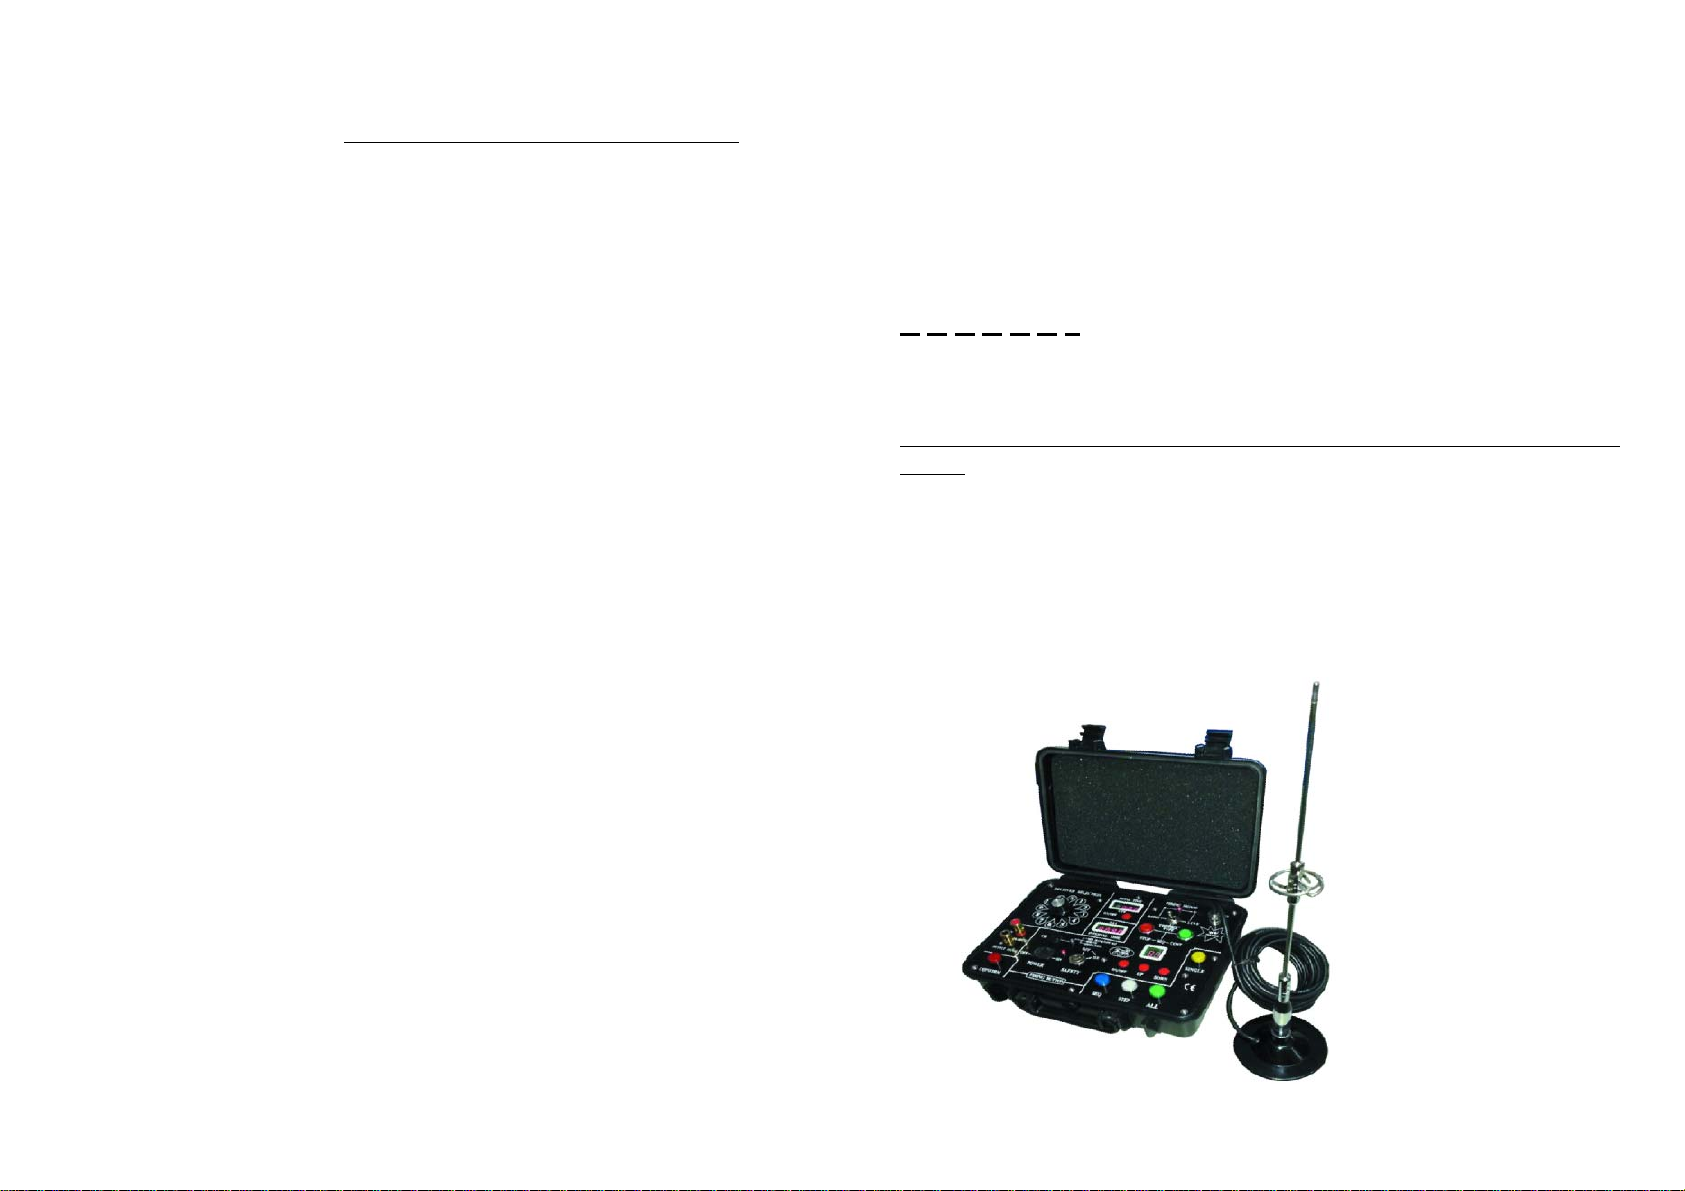
KINGDOM KFE2209/18/2 User manual

Kingdom New Professional Control Desk
KFE2209/18/2
Instruction Manual
Contents
Disclaimer----------------------------------------------------------P2
Warning-------------------------------------------------------------P2
Description---------------------------------------------------------P2
Technical date------------------------------------------------------P2
What is included---------------------------------------------------P3
Charging the system ----------------------------------------------P3
Basic transmitter operation -----------------------------------P3P4
Deprogramming Module and Re-Programming------------P4P5
Advanced transmitter operation-------------------------------P5P6
Optional Upgrade-----------------------------------------------P6P7
Disclaimer:
The manufacturer(s), distributor(s) and / or seller(s) accept no responsibility
whatsoever for any damage, injury or loss, financial or otherwise, resulting directly
or indirectly from the use, misuse, function or malfunction of this device. By
purchasing and using this device you understand and accept this disclaimer.
Warning:
1. Only the person who has fireworks license is allowed to purchase the product, or
the person of whom there isn’t fireworks purchase limit in his/her country or district
is allowed to purchase the products. Kingdom is not with responsibility for any
illegal usage.
2. Safety is the user’s responsibility. All pyrotechnic effect and firework safety
guidelines should be followed completely.
3. You must deprogram the system prior to trying to re-program the module to prevent
accidental code storage thereby creating a secure firing environment
Description:
It is a 12 group professional control desk for controlling our advanced 18cue & 20cue
wireless or wired control firing systems for pyrotechnics and fireworks. This system has
single firing, step firing, all firing and sequence firing functions. It is not only waterproof,
reliable but also expandable which is good for control many firing systems in different
shooting positions.
All of our 18cue and 20cue wireless firing systems are supplied with a handheld
transmitter as standard.. If you demand the increased range, functionality and durability
of the transmitter, then please choose this control desk.
Wired control function can allow people to control the ignition 1000meter away from the
shooting place.
Technical date:
Module Size (cm) 28 x23 x 10 Built-in power (V) 12V2.3Ah Lead Acid Battery
Unit weight (kg) 1.9 Charging power DC 15V-0.5A
Range (meter) 350
Page 1 of 7 Page 2 of 7

What is included:
1 Piece of individual control desk,
2 Pieces of safety keys.
1 Instruction manual.
1 Piece of charger with DC15V 0.5Aoutput power.
Charging the system:
The Battery Status Light will only operate when the unit is switched ON and in Fire mode.
However the system will charge even when switched off.
Battery Status Light Description
RED (flashing) Battery Low.
RED (steady) Battery Charging.
RED / GREEN (flashing) Battery Almost Full.
GREEN (steady) Battery Full.
Lead Acid Batteries naturally discharge over time. To keep the battery in good condition it
is recommended the system is charged every 2-3months. Storing the system in extremely
low or high temperatures will shorten the life of the battery.
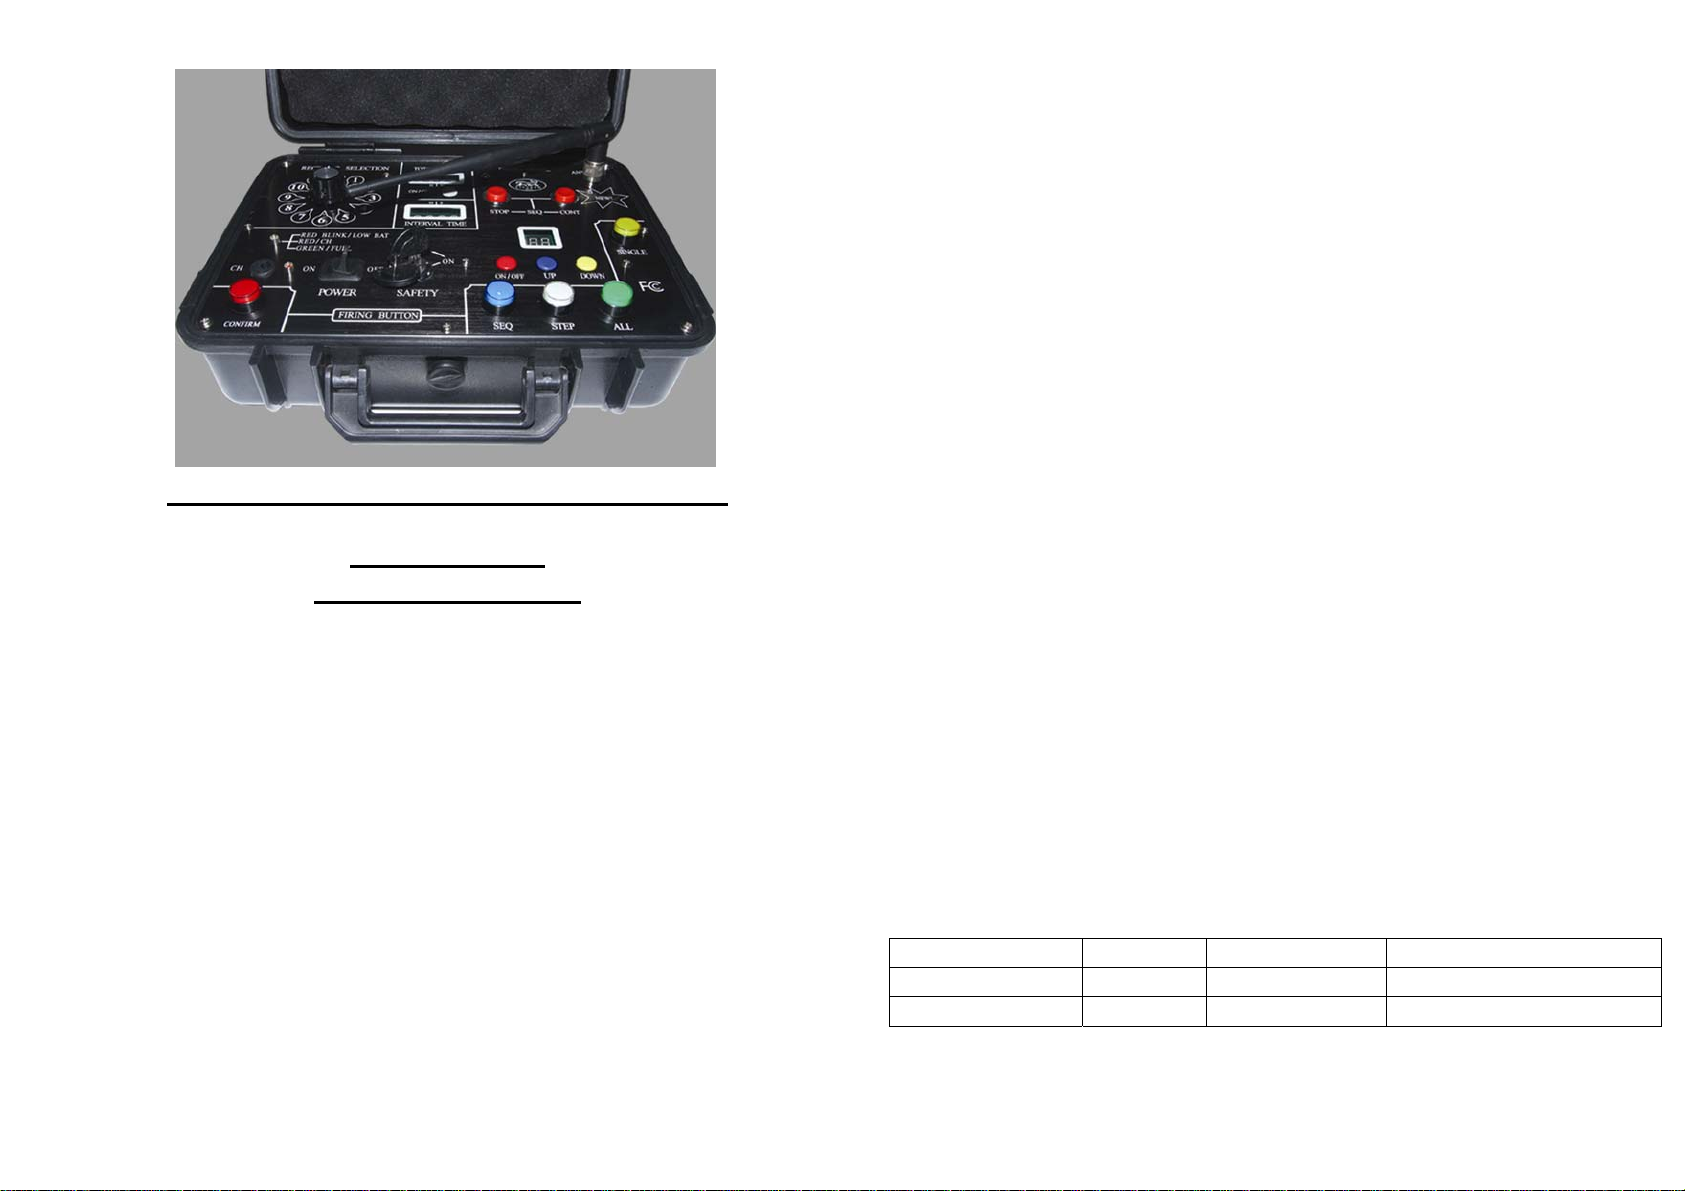
Basic transmitter operation:
Button Description
SINGLE +
CONFIRM Single Fire Mode: 1-20 Fire individual cues.
SEQ + CONFIRM Sequence Fire Mode: Fire the cues in sequence with a set delay
between each cue.
STEP + CONFIRM Step Fire Mode: Fire the cues sequentially with each successive
button press. Holding STEP down continuously will cause multiple
cues to fire.
ALL + CONFIRM All Fire Mode: Fire all the cues.
RECEIVER
SELECTION
DIAL (1-11, S )
TransmitterAddress:
Position 1-11: Select which receiver(s) to control when more than 1
receiver is used.
Position S: To have a sequence firing function roll from 1 receiver to
the next. Each receiver must have an address set up and sequence
time must be same. The receiver must be programmed with the
transmitter RECEIVER SELECTION DIAL in the S position.
CONFIRM This is a safety feature to prevent accidental use.
POWER SWITCH Transmitter power ON/OFF.
SAFETY KEY
SWITCH The SAFETY KEY must be switched to ON for the transmitter
to send a signal.
STOP / CONT Send a signal to stop or continue a sequence.
LED ON/ OFF Switch the Cue Display ON / OFF to save the power.
UP / DOWM Increase / decrease the cue number.
TIME ON / OFF Switch the Total time / Interval time Display ON / OFF.
RADIO CONTROL Switch to the wireless control mode.
LINE CONTROL Switch to the wired control mode.
Deprogramming module and re-programming
Warning: 1. You must deprogram the receiver module prior to trying to re-program it.
2. Never program the receiver when another transmitter is transmitting. This
may cause the receiver to be programmed with wrong transmitter.
To clear the receiver of previously stored transmitters:
1. Put receiver function selection switch to FIRE position.
2. Hold the receiver Program button until the program light goes out.
To program the receiver with a new transmitter (Wireless type ):
1. Put receiver function selection switch to FIRE position,
2. Switch transmitter power ON, turn transmitter safety key to ON and put the control
type switch to RADIO position.
3. Set transmitter receiver selection dial to desired position.
4. Press and hold CONFIRM and SEQ, ALL or STEP so that the transmitter is
continuously transmitting. At the same time press and release the receiver
PROGRAM button immediately. The receiver program light blinks twice to indicate
the receiver has been programmed.
5. Release CONFIRM and SEQ, ALL or SEP buttons so that the transmitter is not
transmitting.
To program the receiver with a new transmitter (Wired type ):
Page 4 of 7
Page 3 of 7

1. Put receiver function selection switch to FIRE position. Connect the control desk
and receiver via 2DB wire(please pay attention to the cathode and anode)
2. Switch transmitter power ON, turn transmitter safety key to ON and put the
control type switch to LINE position.
3. Set transmitter receiver selection dial to desired position.
4. Press and hold CONFIRM and SEQ, ALL or STEP so that the transmitter is
continuously transmitting. At the same time press and release the receiver
PROGRAM button immediately. The receiver program light blinks twice to
indicate the receiver has been programmed.
5. Release CONFIRM and SEQ, ALL or SEP buttons so that the transmitter is not
transmitting.
The receiver has now been programmed with the transmitter. Please see the receiver
instructions for further details.
Advanced transmitter operation:
A receiver can store more than 1 transmitter or be programmed with more than 1 position
on the RECEIVER SELECTION DIAL. This allows some cues on a receiver to be
controlled individually and some cues to be controlled simultaneously with other cues on
other receivers.
EXAMPLE 1:
Use 2 receivers and 1 transmitter.
You want to fire cues 1 – 20 on 2 receivers simultaneously or individually.
Receiver A is programmed with the transmitter RECEIVER SELECTION DIAL in
position 1 and position 3.
Receiver B is programmed with the transmitter RECEIVER SELECTION DIAL in
position 2 and position 3.
With the RECEIVER SELECTION DIAL in position 1, cues will fire on receiverA only.
With the RECEIVER SELECTION DIAL in position 2, cues will fire on receiver B only.
With the RECEIVER SELECTION DIAL in position 3, cues will fire on receiver A and
receiver B simultaneously.
EXAMPLE 2:
You want to have a sequence run across 3 receivers per line (Maximum 16 receivers)
Receiver A is set up with Address 1 and a sequence time delay of 0.1 second. It is
programmed with the RECEIVER SELECTION DIAL in position S.
Receiver B is set up with Address 2 and a sequence time delay of 0.1 second. It is
programmed with the RECEIVER SELECTION DIAL in position S.
Receiver C is set up with Address 3 and a sequence time delay of 0.1 second. It is
programmed with the RECEIVER SELECTION DIAL in position S.
Receiver 16 is set up with Address 16 and a sequence time delay of 0.1 second. It is
programmed with the RECEIVER SELECTION DIAL in position S.
Note: All receivers in a sequencer run must have the same time delay and must set up the
address.
To start the sequencer put the RECEIVER SELECTION DIAL in position S and press
SEQ and CONFIRM buttons together. The sequencer will run at a time delay of
0.1second across ReceiversA, B, C….16 in the order ofAddress 1, 2, 3….16.
Optional upgrade:
1.For more longer range, you can choose the antenna KFE2210.
Page 5 of 7 Page 6 of 7

2. The receivers can be controled by this control desk are as below:
3.How to connect the control desk and KFE2204E module via 2DB wire.
KFE2201C
KFE2209/18/2
KFE2204E
KFE2203E
KFE2204D
KFE2202B
KFE2204
KFE3000
Teleconformity No: 2014RNB048R0
Page 7 of 7
Other KINGDOM Industrial Equipment manuals