manuals.online logo
Brands
  1. Home
  2. •
  3. Brands
  4. •
  5. Kingston Technology
  6. •
  7. Dispenser
  8. •
  9. Kingston Technology SKID-DOO KFC110 User manual

Kingston Technology SKID-DOO KFC110 User manual

KINGSTON®
SKID-DOO
English Deutsch
Dispenser
Instructions
Dispenser
Anleitung
Use the dispenser in such a way that it
sprays into the room and that the spray
does not get directly on (plastic)
surfaces. The composition of the spray
fog can have a detrimental impact on
some types of plastic.
The dispenser has functions for
displaying time and installing the
operating time and spray interval (1 to
60 minutes).
When the dispenser is turned ON, the
LED-light will flash red, then green and
then it sprays once and it activates
working mode.
When the dispenser is turned OFF, all
settings will be saved and the time
Setzen Sie den Dispenser so ein, dass
er in den Raum sprüht und dass das
Spray nicht direkt auf (Kunststoff-
)Oberflächen auftrifft. Die
Zusammensetzung des Sprühnebels
kann eine auflösende Wirkung auf
einige Arten von Kunststoff haben.
Am Dispenser kann die Zeitanzeige
eingestellt werden sowie die
Betriebszeit und das Sprüh-Intervall (1-
60 Minuten).
Wenn der Dispenser auf ‘ON’ gestellt
wird, blinkt das LED-Licht zuerst rot
und dann grün. Schließlich sprüht der
Dispenser einmal. Dann ist er
betriebsbereit
KFC110 KFC100
count continues.
LED-light: In standard working mode
the LED is green. If the light turns red,
an empty-battery-symbol will show, this
means the battery has to be changed. If
the counting of sprays reaches 3000,
the LED will flash 10 times. This means
the refill has to be replaced.
Wenn der Dispenser auf ‘OFF’ gestellt
wird, werden die Einstellungen
gespeichert, und die Uhrzeit funktioniert
weiter.
LED Licht: Wenn der Dispenser in
Betrieb ist, leuchtet das LED-Licht grün.
Wann es rot leuchtet, und das Display
unten links eine leere Batterie anzeigt,
dann die die Batterie ersetzen. Wenn
der Dispenser 3000-mal gesprüht hat,
blinkt das LED Licht 10-mal. Dann die
Füllung ersetzen.
Functions of the buttons Funktionen der Tasten
Press the round button to open the
housing of the dispenser. You’ll see 7
buttons beneath the LCD display.
Auf den runden Knopf drücken, um den
Dispenser zu öffnen. Dann sehen Sie
unter dem Display 7 Tasten.
1. RESET
Clear the memory and reset to original
settings.
1. RESET
Den Speicher löschen und die
ursprünglichen Einstellungen
wiederherstellen.
LED
2. SPRAY
Meant for testing. When pressed the
LED will flash 6 times and then the
dispenser will spray once.
2. SPRAY
Gedacht zum Testen. Wenn die Taste
gedrückt wird, blinkt die LED 6-mal und
dann sprüht der Dispenser einmal.
3. MODE
When pressing this button, the
following settings will show in
sequence:
START – STOP – SPRAY – INTERVAL
– WEEK – HOUR – MIN
3. MODE
Wenn diese Taste mehrmals gedrückt
wird, erscheinen nacheinander die
folgenden Einstellungen:
START – STOP – SPRAY (Sprühen) –
INTERVAL (Intervall)– WEEK (Woche)
– HOUR (Stunde) – MIN (Minute)
4. WEEK
Settings for the current week.
4. WEEK
Einstellen des Wochentags
5. HOUR
Settings for the (current) time: (hour).
5. HOUR
Einstellen der (aktuellen) Zeit/Stunde
6. MIN
Settings for (current) time:(minutes)
6. MIN
Einstellen der (aktuellen) Zeit/Minuten
7. ON/OFF
On / off button
7. ON/OFF
Ein-und Aus-Taste
How to use
Einsatz
ATTENTION: Before installing the
batteries, make sure the refill is in
place.
VORSICHT: Vor der Installation der
Batterien stellen Sie sicher, dass die
Nachfülldose installiert ist.
1. Time setting for starting and
stopping the spray cycle
Press ‘MODE’, until the LCD shows
“START’, press HOUR and MIN for
setting the start time of the dispenser.
Press ‘MODE’ again until the LCD
shows “STOP”, than press HOUR and
MIN for setting the end time of the
dispenser.
1. Zeiteinstellung für den Start und
das Ende des Sprühens
So oft auf ‘MODE’ drücken, bis das
Display ‘START’ anzeigt. Dann ‘HOUR’
und ‘MIN’ drücken, um die Startzeit
einzustellen. Wieder auf ‘MODE’
drücken, bis das Display ‘STOP’
anzeigt. Dann ‘HOUR’ und ‘MIN’
drücken, um einzustellen, wann das
Sprühen beendet wird.
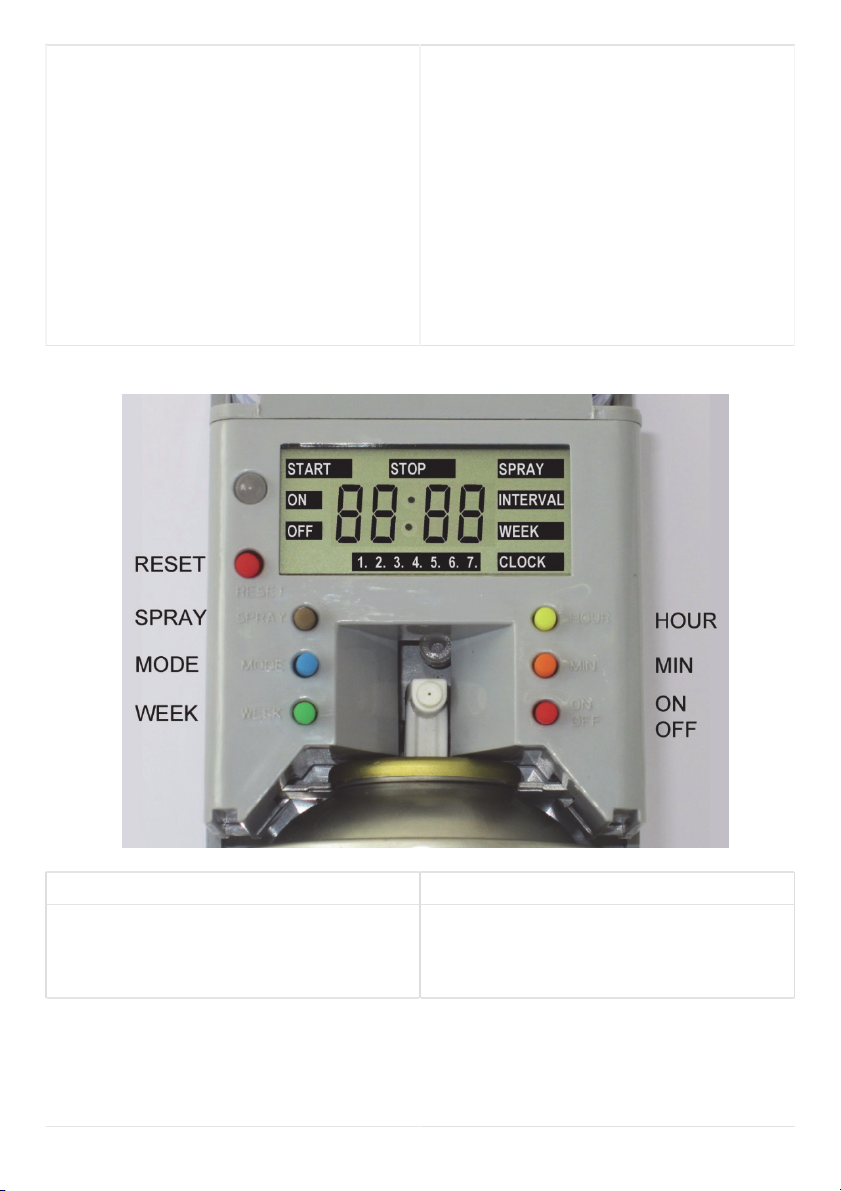
2. Resetting the spray counts
Press ‘MODE’ until the LCD shows
“SPRAY”, here are shown how many
sprays have been used. A new refill
can spray about 3000 times. If the
ON/OFF button is pressed twice, the
number will be reset.
2. Den Sprühzähler zurücksetzen
So oft auf ‘MODE’ drücken, bis das
Display ‘SPRAY’ anzeigt. Hier sehen
Sie, wie oft bereits gesprüht wurde.
Eine Nachfülldose kann etwa 3000-mal
sprühen. Bei zweimaligem Drücken der
‘ON/OFF’-Taste wird die Anzahl der
Sprühvorgänge auf ‘0’ zurückgesetzt.
3. Setting the spray interval
Press ‘MODE’ until the LCD shows
“INTERVAL”, than press “MIN” to set
the interval time (1-60 minutes).
3. Einstellen des Sprüh-Intervalls
So oft auf ‘MODE’ drücken, bis das
Display ‘INTERVAL’ anzeigt. Dann auf
‘MIN’ drücken, um das Intervall
einzustellen (1-60 Minuten).
4. Setting a weekly work mode
Press ‘MODE’ until the LCD shows
“WEEK”, than press “WEEK” to choose
the right setting. There are 3 settings to
choose from:
1. Monday till Friday (1-5)
2. Monday till Saturday (1-6)
3. Monday till Sunday (1-7)
4. Einstellen der Arbeitstage
So oft auf ‘MODE’ drücken, bis das
Display ‘WEEK’ anzeigt. Dann auf
‘WEEK’ drücken, um die gewünschte
Einstellung zu erreichen. Es gibt drei
Einstellungen:
1. Montag bis Freitag (1-5)
2. Montag bis Samstag (1-6)
3. Montag bis Sonntag (1-7)
5. Setting the time
Press ‘MODE’ until the LCD shows
“CLOCK”, than press “HOUR” and
“MIN” to set the time. Then press
“WEEK” to set the day of the week.
‘1‘= Monday; ‘2‘ = Tuesday…
5. Einstellen der Zeit
So oft auf ‘MODE’ drücken, bis das
Display ‘CLOCK’ anzeigt. Dann ‘HOUR’
und ‘MIN’ drücken, um die Zeit
einzustellen. Dann ‘WEEK’ drücken,
um den Tag einzustellen. ‘1‘= Montag;
‘2‘ = Dienstag usw.
Fabdec Ltd, Ellesmere, SY12 9DG, United Kingdom
Fabdec GmbH, 45892 Gelsenkirchen, Deutschland
Tel. +49 (209) 700 900 E-Mail: [email protected]
www.fabdec.com
Produktinformation nur zur Orientierung. Änderungen vorbehalten.
Product information is for general guidance only and may be altered or amended without notice.

Popular Dispenser manuals by other brands

Dolphin DP1900MB quick start guide

Dolphin

Dolphin DP1900MB quick start guide

Curtis CBHT Service manual

Curtis

Curtis CBHT Service manual

Team Kalorik TKG GW 900 operating instructions

Team Kalorik

Team Kalorik TKG GW 900 operating instructions

Hydro AccuMini user manual

Hydro

Hydro AccuMini user manual

U-Line H-2590 manual

U-Line

U-Line H-2590 manual

Franke EXOS ZEXOS600 Installation and operating instructions

Franke

Franke EXOS ZEXOS600 Installation and operating instructions

Graco 15H880 instructions

Graco

Graco 15H880 instructions

JVD Saphir Assembly instructions

JVD

JVD Saphir Assembly instructions

Tork S4 Intuition instruction manual

Tork

Tork S4 Intuition instruction manual

Nordson ASYMTEK Spectrum Series owner's manual

Nordson ASYMTEK

Nordson ASYMTEK Spectrum Series owner's manual

Vestil SW-HAND-BG instruction manual

Vestil

Vestil SW-HAND-BG instruction manual

Jacobs Douwe Egberts Professional Cafitesse Excellence Touch Operator's manual

Jacobs Douwe Egberts Professional

Jacobs Douwe Egberts Professional Cafitesse Excellence Touch Operator's manual

CENTRAL RESTAURANT PRODUCTS CENPRO manual

CENTRAL RESTAURANT PRODUCTS

CENTRAL RESTAURANT PRODUCTS CENPRO manual

Lincoln VSG-KR owner's manual

Lincoln

Lincoln VSG-KR owner's manual

U-Line H-8883 quick start guide

U-Line

U-Line H-8883 quick start guide

U-Line H-1592 quick start guide

U-Line

U-Line H-1592 quick start guide

Diamond SureFlow manual

Diamond

Diamond SureFlow manual

Georgia Pacific SofPull installation instructions

Georgia Pacific

Georgia Pacific SofPull installation instructions

manuals.online logo
manuals.online logoBrands
  • About & Mission
  • Contact us
  • Privacy Policy
  • Terms and Conditions

Copyright 2025 Manuals.Online. All Rights Reserved.