manuals.online logo
Brands
  1. Home
  2. •
  3. Brands
  4. •
  5. KINGZO
  6. •
  7. Industrial Equipment
  8. •
  9. KINGZO GMA120-S-A1 User manual

KINGZO GMA120-S-A1 User manual

GMA120-S-A1
Electric Film Reeler Manual
Version:GMA120-S-A1-45-EN01
Manufacturer : Beijing Fenglong Greenhouse Technology Co., Ltd.
Address : Chinese Academy of Agricultural Sciences,No.12 South Street,
Zhongguancun,Haidian,Beijing 100081 China
ZIP:100081
Tel:+86 10-62149667
Fax:+86 10-82108614
Web:www.bflc.com.cn
CERTIFICATE OF PRODUCT QUALITY
Dear Customer:
Fenglong has obtained ISO 9001 certificates, with inspection,
all the specifications of KINGZO meet the requirements of product’s
standard.
Fenglong solemnly promises to guarantee 3 years for GMA
100-S installed and used in correct way. Free maintenance or
replacement will be given if quality problem happen during
the
warranty periods.
Exception clauses:
1、Operated not as the Product Instruction.
2、Damage caused by improper use, maintenance, improper
care and human factors .
3、Damage or malfunction caused by non - authorized unit or
user to disassemble and maintain.
4、Damage caused by force majeure factors.
5、Other purpose except ventilation and shading.
12
Dear Customers,
We are grateful for your continuous trust and support over the
decades. We will do our best to continue the all-round service
and quality products.
Beijing Fenglong is a high-tech company with high R&D investment,
supplying equipments ranging from modern greenhouses to
livestock houses. Fenglong has been leading the trends of
mecho-electro products in Chinese facility agriculture.
Fenglong established and follows strict quality control and
follow-up systems. Fenglong obtains ISO9001, ISO14001
and OHSA18001 certificates, ensuring all the products are
qualified with possibility to track them down.
7.Packing list
No.
Problem
Analysis
1Motor
doesn’t rotate
No power connection
The left and the right knob
touch the micro switch at the
same time.
2Limit not
accurate
Lock bolts loose
Inner parts damage
3Noise
Incorrect installation
Overload
1.The packing list only contain the standard accessories and
documents, it doesn’t include the other accessories you
choose. If you have ordered other accessories, please check
it when youreceive the order. The production date is on this
packing list.
2.To insure your interest and rights please keep this packing
list for future service.
CONTENTS:
1. Cautions and dangerous-------------------------------- 1
2. Product features and performance data ----------- 2
3. Installation instructions---------------------------------- 6
4. Limit range adjusting ------------------------------------ 9
5. Maintenance --------------------------------------------- 10
6. Common problems and solutions------------------- 10
7. Packing list ------------------------------------------------11
8. Certificate of product quality-------------------------- 12
The products are subject to design and performance
updates, so it might be a little different from this manual
book. But it will not affect your usage;The book is also
subject to modification without further notice. Please read
this book before use.
No
PART NAME
QTY
MARK
1
Electric Film Reeler body
1
2
Coupling
1
3
Suit
1
4
Plugs
1
5
Self-locking nut M8
1
6
Hexagon bolt M8×12
2
7
Hexagon bolt M8×45
1
8
Self-locking nut M6
1
9
Hexagon bolt M6×50
1
10
Hexagon
Socket
Screw
1
11
Wiring Diagram
1
12
Assemble instruction
1
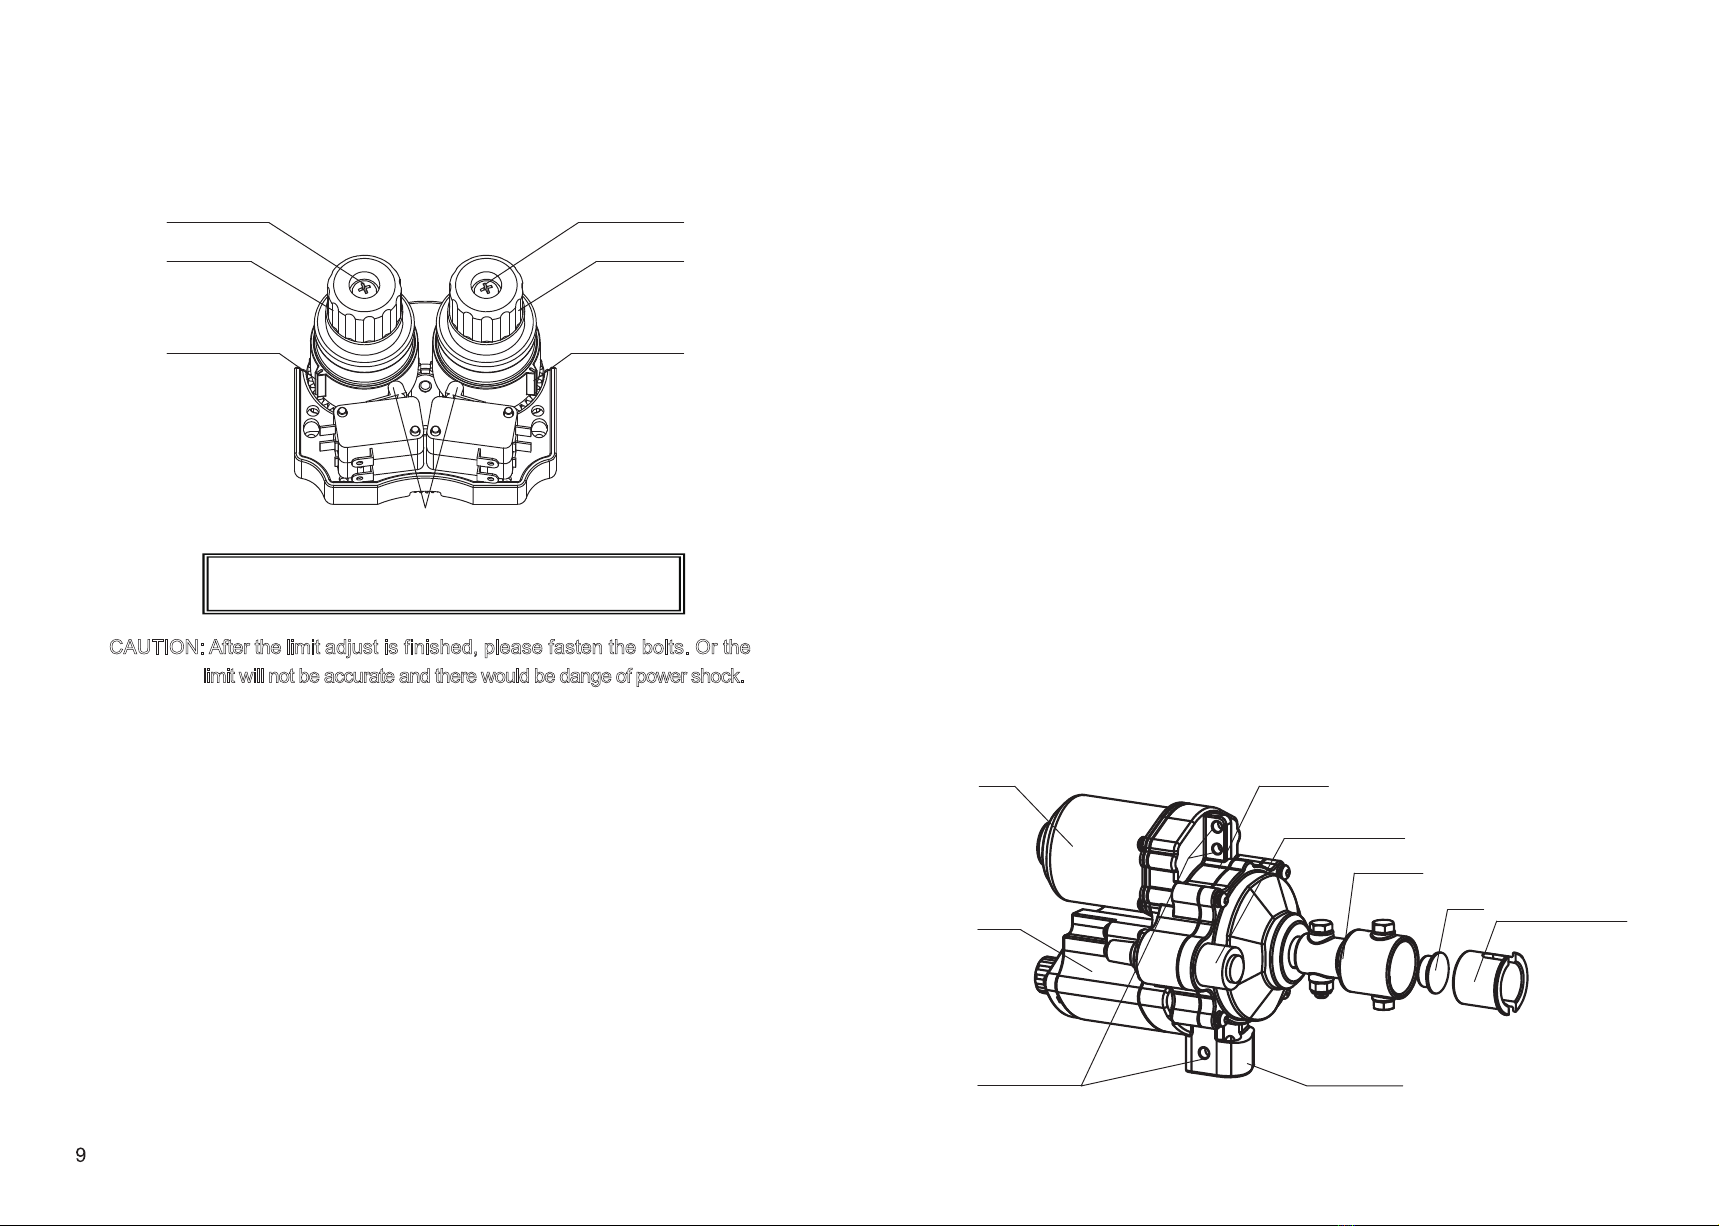
4.2.4 When the motor is rolling up the plastics, the pipe arrives
at the required position, at this time rotate the knob which
controls the rolling status and make the gear pin touch the
micro switch( with click sound), hold on and fasten the lock
bolt by a cross head screw-driver.
4.2.5 When the motor is rolling down the plastics, the pipe arrives
at the required position, at this time rotate the knob which
controls the rolling status and make the gear pin touch the
micro switch( with click sound) , hold on and fasten the lock
bolt by a cross head screw-driver.
4.2.6 The above steps would set up the motor’s limit range. Turn
on the power and check if the range setup is correct. If it is
not correct, please review the manual carefully and do the
setup again.
5. Maintenance
5.1 Check the bolts on each connection regularly. Replace the
bolts which is deformed or snapped.
5.2 No need to refill the gear oil during the life duration of this
product.
5.3 This product could be used for greenhouse rolling ventilation
and curtaining system. For other usage, please consult our
company first.
6. Common problems and solutions
1
1.Cautions and dangerous.
1.1 Proper using and maintenance will help to extend the life
of film reeler. please operate in accordance with this
instruction Manual.
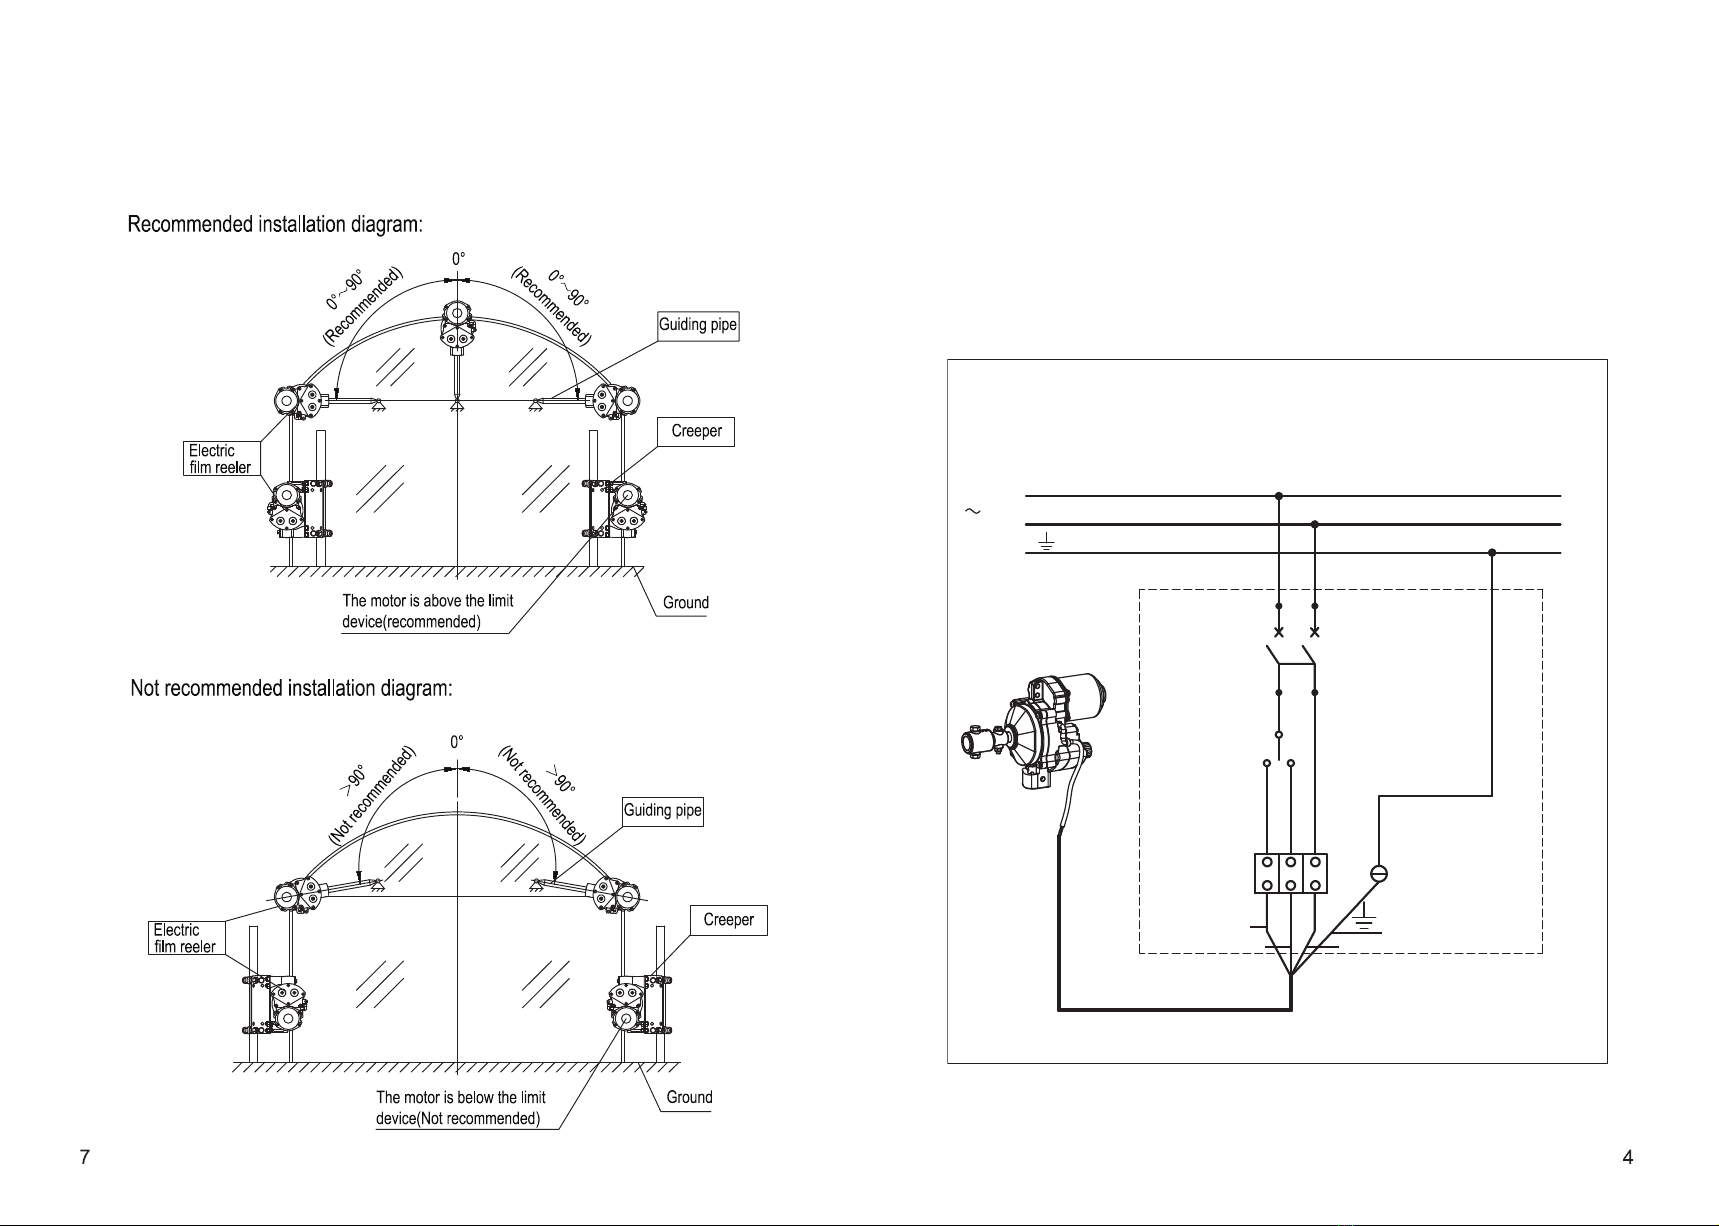
1.2 Input Voltage of this product is AC220V, Please connect the
wire under guidance of the professional.
1.3 Do not use voltage over AC220V, the maximum voltage
fluctuations should not exceed ±10%. The installation must
be equipped with reliable grounding cable, the grounding
cable and the neutral cable are prohibited to have any
connection with each other.
1.4 Please keep the children far away from the working area,in
case of accident or electrocution
1.5 Please off the power before installing and reparing the product,
in case of electrocution.
1.6 Do not put the product in the water or in the wet environment
for a long time,and if you find the water inside the motor,
please stop using it and return it back to our factory for testing.
1.7 Please do not throw, drag and drop the motor, or make other
dangerous actions, to avoid the impact of the product。
1.8 When it is thundering, please turn off the power, in case of
damage caused by lightning.
1.9 The customer should keep the working area clean, clear
the snow, leaves , in case of damage of overloading.
1.10 If the connecting wire need to be lengthened, please make
sure that the connecter is safe and reliable, in case of fire
and dangerous.
4.2 Limit switch adjusting
4.2.1 Loosen the left and right lock bolts by a cross head screw
-driver, at the same make sure the gear pins don’t touch
the micro switch.
4.2.2 Turn on the power, and make the motor run, confirm the
status of the rolling pipe, is it rolling up or rolling down.
4.2.3 When the motor is rolling up the plastics, rotate any of the
knobs slowly, and make the gear pin touch the micro switch
( with click sound) , if the motor stops running, it means this
knob is used for the rolling you need; if the motor doesn’t
stop running, then the other knob is used to control the
required rolling.
4、Limit range adjusting
4.1 Limit illustration
Before limit adjust, please loosen“left or right fasten bolts”
After limit adjust, please fasteb“left or right fasten bolts”
CAUTION: After the limit adjust is finished, please fasten the bolts. Or the
limit will not be accurate and there would be dange of power shock.
2
1.11 Please check the bolt and nuts regularly,in case of looseness
from the motor.
1.12 The electric motor must keep in a direct line with the roll up
tubing,and the bending degree should not too large,or this
will cause the damage of overloading.
1.13 Please note the mounting position of power cord, to prevent
it winding or broken.
1.14 Please do not switch it frequently,so as not to damage the
motor.
1.15 If the user do not operate the motor according to the Manual
and Cautions, Our company will not undertake all the
consequences that arise.
2、Product Features and Performance data
2.1 Product Features
This product is compact in structure, reliable in performance,
convenient in installation and operation, adjustable reversing
switch,with reversing-lock function;
2.2 Outside Drawing
Motor Gear box
Limit
device
Side opening
bracker
Manual
operation part
Top opening
bracker
Coupling Suit(subject to
the diameter of
the pipe used)
Plugs
Left gear pin
Left lock bolt
Left knob
Right gear pin
Right lock bolt
Right knob
Micro switch
3.4.1 Please operate according to the “correct installation”.
3.4.2 Correct installation could guarantee the performance of
the products.
3.4.3 After the installation, the motor should be above the limit
switch at any position of the rolling.
3.4.4 After the installation, the cable should be connect into the
control box, then turn on the power, adjust the limit switch
the proper position, and then fasten the lock bolts.
3.4.5 If there is power failure during the operation of the products,
and you would like to lower down the rolling pipe urgently,
you could hold the pipe first and loosen the connection
between the pipe and the motor, then lower the pipe slowly.
3.5 Installation dimension
Manual operation area
Manual operation illustration
When there is power failure, please take off the cap for the
manual operation, use an electrical drill to operate on the releas
-ing shaft, after the operation, please put the cap on.
3.4 Installation diagram.
guiding pipe diameter should be 27mm. 2.3. Circuit diagram
Distribution principle: AC220V currency supplies power
through the circuit breaker, the commutator switch controls
the operations of opening, closing and stop. When the AC220V
power is connected with open L and N, the winch rotates in
a positive direction. When the AC220V power is connected
with closed L and N, the winch rotates in a reverse direction.
220V Electric film reeler Wiring Diagram 1
QF
Breaker
LN
123
Blue
L
Red
N
Black
PE
Yellow-green
Distribution cabinet
Grounding wire
Live wire L
Neutral wire N
AC220V
(Reversing switch)
Reversing switch
on L
off
220V
Electric
film reeler
3、Installation instructions
3.1 First connect the winch and the rolling pipe with bolts; then fix
the plastics on the pipe with film hoops, please make sure the
pipe are on the same level with the winch. After this work, you
could close or open the plastics.
3.2 The winch can fit 2models of rolling pipes; the outside diameter
is 34mm and 27mm. When you choose 27mm pipe, you need
the suit, when you choose 34mm pipe, there is no need to use
the suit.
3.3 When the product is used on the top of the greenhouse, the
Model
Power
Torque
Current ≤
Voltage
AC220V±20V
Speed 2.5 r/min
Rolling tube
(Roofing/Side)3/4″(OD:Φ27)or 1″(OD:Φ33.5)
Rolling range
(Recommendation)
3/4″Rolling tube
100m(L)×4m(H)
Guide tube
(Roofing)3/4″(OD:Φ27)
Maximum range
(output shaft) 45 Rounds
Protection degree IP55
120W
0.9 A
60N · m
120N · m
120N · m
WARNING:
1. All power distribution devices must be selected and installed
by professionals;
2. In order to use the electricity safely, the terminal box of the
winch should be connected with the grounding cable reliably.
3. After the cables are connected, the water clog in the
terminal box and the lid of the water proof box should be
sealed tightly to prevent rain from entering.
4. It is no problem for 5 pieces of motors in paralleling circuits,
if the paralleling motors is more than 5 pieces,you must use
the Electric Control Board,which can only control the motors
less than 5 pieces.
Counter-clockwise
button
QF
Breaker
LN
Clockwise button Stop button
L
NC
L L
NO
NO
(AC Contactor)
Grounding wire
Live wire L
Neutral wire N
AC220V
Contactor Contactor
220V Electric film reeler Wiring Diagram 2
220V
Electric
film reeler
Distribution cabinet
Blue
L
Red
N
Black
PE
Yellow-green
on L
off
Caution: Contactor model: CJX20901.
If you need change other brand or
model, please refer to professional
personnel for confirming the wiring.
GMA120-S-A1
3.1 r/min

Other KINGZO Industrial Equipment manuals

KINGZO GMD120-S User manual

KINGZO

KINGZO GMD120-S User manual

KINGZO GMD120-D User manual

KINGZO

KINGZO GMD120-D User manual

KINGZO GMD300-S User manual

KINGZO

KINGZO GMD300-S User manual

Popular Industrial Equipment manuals by other brands

Eriez HD36 Installation, operation and maintenance instructions

Eriez

Eriez HD36 Installation, operation and maintenance instructions

PAW HeatBloC K31 - DN 20 Installation and operation instruction

PAW

PAW HeatBloC K31 - DN 20 Installation and operation instruction

Textron GREENLEE SG4 instruction manual

Textron

Textron GREENLEE SG4 instruction manual

Toptech MultiLoad III installation guide

Toptech

Toptech MultiLoad III installation guide

TE Connectivity HVA HD400 Assembly

TE Connectivity

TE Connectivity HVA HD400 Assembly

Carrier 38AUQ16-25 Installation, Start-Up and Service Instructions

Carrier

Carrier 38AUQ16-25 Installation, Start-Up and Service Instructions

Graco RTX 1500 instructions

Graco

Graco RTX 1500 instructions

GSi 1200 installation manual

GSi

GSi 1200 installation manual

ABB HT847357 Operation manual

ABB

ABB HT847357 Operation manual

LGL Ecompact 2 instruction manual

LGL

LGL Ecompact 2 instruction manual

Eaton PKE-XTUACP-36 Instruction leaflet

Eaton

Eaton PKE-XTUACP-36 Instruction leaflet

Siemens 3VA911 0KPIO Series operating instructions

Siemens

Siemens 3VA911 0KPIO Series operating instructions

Spirotech SpiroVent Superior S6 Series user manual

Spirotech

Spirotech SpiroVent Superior S6 Series user manual

Lippert Components Power Gear 82-L0356 owner's manual

Lippert Components

Lippert Components Power Gear 82-L0356 owner's manual

Kval 700-DC Operation and service manual

Kval

Kval 700-DC Operation and service manual

Aerotech ANT130LZS Series Hardware manual

Aerotech

Aerotech ANT130LZS Series Hardware manual

Habasit Rossi MR V Series operating instructions

Habasit

Habasit Rossi MR V Series operating instructions

Tormach MICROARC 4 owner's guide

Tormach

Tormach MICROARC 4 owner's guide

manuals.online logo
manuals.online logoBrands
  • About & Mission
  • Contact us
  • Privacy Policy
  • Terms and Conditions

Copyright 2025 Manuals.Online. All Rights Reserved.