Kirchner und Tochter RA 60 User manual

Version 2.2
Dieselstraße 17 · D-47228 Duisburg
Internet: www.kt-ow.de · e-mail: info@kt-ow.de
A. Kirchner & Tochter GmbH
Fon: +49 2065 9609-0 · Fax: +49 2065 9609-22
Assembly and operating Instructions
Variable Area Flow Meters
RA 60 / FA 60

Version 2.2
Dieselstraße 17 · D-47228 Duisburg
Internet: www.kt-ow.de · e-mail: info@kt-ow.de
A. Kirchner & Tochter GmbH
Fon: +49 2065 9609-0 · Fax: +49 2065 9609-22
-2-
Contents
1 Foreword ................................................................................................................3
2 Safety .....................................................................................................................3
2.1 Symbol and meaning ....................................................................................3
2.2 General safety directions and exemption from liability..................................3
2.3 Intended use .................................................................................................4
2.4 Special safety instructions concerning glass devices ...................................4
2.5 Information for Operator and operating personnel ........................................4
2.6 Regulations and guidelines ...........................................................................4
2.7 Notice as required by the hazardous materials directive ..............................5
3 Transport and storage ............................................................................................5
4 Installation ..............................................................................................................6
4.1 Work preparatory to installation ....................................................................6
4.2 Preparation of the measuring device ............................................................6
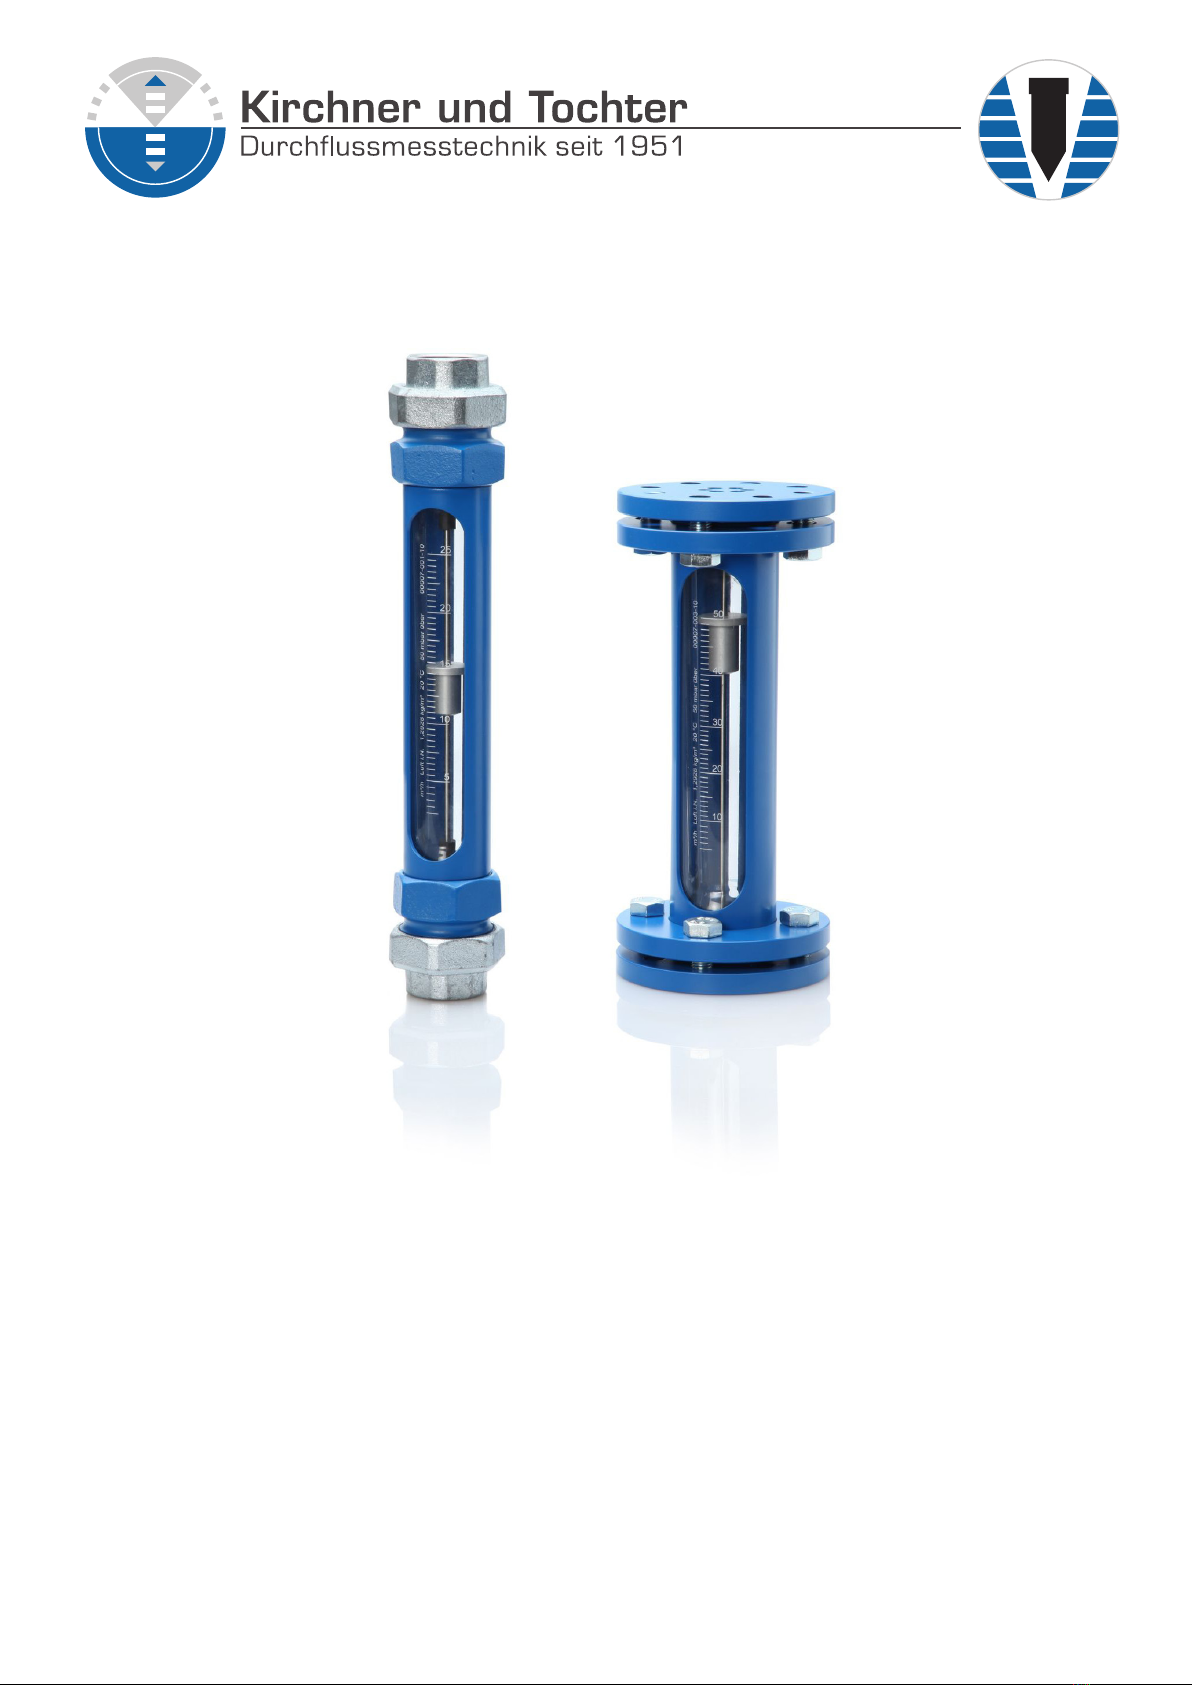
4.3 Installation RA 60 ..........................................................................................7
4.4 Installation FA 60 ..........................................................................................7
5 Start-up...................................................................................................................8
6 Readings in operation.............................................................................................8
7 Limit switches MSK1/MSK12/MSKW .....................................................................9
7.1 Connection of limit switches..........................................................................9
7.2 Setting the limit switches.............................................................................10
8 Linear displacement sensor 4 .. 20 mA/0 ... 10V..................................................11
8.1 Connection of the linear displacement sensor ............................................11
8.2 Adjusting the sensor....................................................................................12
9 Maintenance and cleaning of the ow meter ........................................................13
9.1 Dismantling the glass cone RA 60 ..............................................................13
9.2 Assembling the glass cone RA 60...............................................................14
9.3 Replacement of the glass cone RA 60 ........................................................14
9.4 Dismantling of the glass cone FA 60 ...........................................................15
9.5 Installation of the glass cone FA 60.............................................................15
9.6 Replacement of the glass cone FA 60.........................................................15
9.7 Subsequent installation of a oat catcher protective cap ............................16
10 Service..................................................................................................................18
11 Disposal................................................................................................................18
12 Technical data.......................................................................................................19
12.1 Materials......................................................................................................19
12.2 Measuring ranges .......................................................................................20
12.3 Dimensions .................................................................................................21
12.4 Limit value switches MSK1/MSK12/MSKW ................................................24
12.5 Right angle plug M12 x 1 ............................................................................25
12.6 Linear displacement sensor ........................................................................26
12.7 Low-Voltage Directive .................................................................................27

-3-
Version 2.2
Dieselstraße 17 · D-47228 Duisburg
Internet: www.kt-ow.de · e-mail: info@kt-ow.de
A. Kirchner & Tochter GmbH
Fon: +49 2065 9609-0 · Fax: +49 2065 9609-22
1 Foreword
These Installation and Operating Instructions are applicable to devices of
Series RA 60 and FA 60. Please follow all instructions and information given
for installation, operation, inspection and maintenance. The Instructions form
a component part of the device and should be kept in an appropriate place
accessible to the personnel in the vicinity of the location. Where various plant
components are operated together, the operating instructions pertaining to
the other devices should also be observed.
2 Safety
2.1 Symbol and meaning
2.2 General safety directions and exemption from liability
Safety notice
This symbol is placed against all directions/information relating to
occupational health and safety in these Installation and Operating
Instructions and draws attention to danger to life and limb. Such notices
should be strictly observed.
This document contains basic instructions for the installation, operation,
inspection and maintenance of the variable area ow meter. Non-observance
of these directions can lead to hazardous situations for man and beast and
also to damage to property, for which Kirchner und Tochter disclaims all
liability.
The operator is required to rule out potentially hazardous situations through
voltage and released media energy.

Version 2.2
Dieselstraße 17 · D-47228 Duisburg
Internet: www.kt-ow.de · e-mail: info@kt-ow.de
A. Kirchner & Tochter GmbH
Fon: +49 2065 9609-0 · Fax: +49 2065 9609-22
-4-
2.3 Intended use
The Series RA 60/FA 60 device is a variable area ow meter designed for
liquids and gases and for installation in vertical pipe runs. Installation in the
pipeline should be carried out solely in accordance with these Instructions.
The required version of variable area ow meter should be selected on the
basis of the pipe diameter at the point of use of the device. The limit values
pertaining to the device are given in section 12 and should not be exceeded.
Modications or other alterations to the ow meter may only be carried out
by Kirchner und Tochter. Installation in horizontal pipe runs is possible using
appropriate pipe bends. The direction of ow must always be from bottom to
top. Details of the process product and the operating conditions are marked
on the measuring glass.
2.4 Special safety instructions concerning glass devices
2.5 Information for Operator and operating personnel
2.6 Regulations and guidelines
In addition to the directions given in these Installation and Operating
Instructions, observe the regulations, guidelines and standards, such as
DIN EN and for specic applications, the codes of practice issued by DVGW
(gas and water) and VdS (underwriters) or the equivalent national codes and
applicable national accident prevention regulations.
For safety reasons, we recommend tting a protective shield in front
of the measuring tube when starting up ow meters tted with glass
measuring tubes. The devices should not be operated where there
is a risk of pressure surges (water hammer)!
To avoid glass breakage, all tting work between measuring glass and
heads inside the glass should be carried out by twisting and simultaneously
pressing after having wetted the gaskets.
Authorized installation, operating, inspection and maintenance personnel
should be suitably qualied for the jobs assigned to them and should receive
appropriate training and instruction. All persons charged with assembly,
mounting, operation, inspection and maintenance duties must have read
and understood the operating instructions. Gaskets in contact with the uid
product must be replaced after all maintenance and repair work.

-5-
Version 2.2
Dieselstraße 17 · D-47228 Duisburg
Internet: www.kt-ow.de · e-mail: info@kt-ow.de
A. Kirchner & Tochter GmbH
Fon: +49 2065 9609-0 · Fax: +49 2065 9609-22
2.7 Notice as required by the hazardous materials directive
3 Transport and storage
Always use the original packing for transport, handling and storage. Protect
the device against rough handling, coarse impact, jolts etc.
In accordance with the law concerning handling of waste (critical waste)
and the hazardous materials directive (general duty to protect), we would
point out that all ow meters returned to Kirchner und Tochter for repair
are required to be free from any and all hazardous substances (alkaline
solutions, acids, solvents etc.).
Make sure that devices are thoroughly rinsed out to neutralize
hazardous substances.

Version 2.2
Dieselstraße 17 · D-47228 Duisburg
Internet: www.kt-ow.de · e-mail: info@kt-ow.de
A. Kirchner & Tochter GmbH
Fon: +49 2065 9609-0 · Fax: +49 2065 9609-22
-6-
4 Installation
4.1 Work preparatory to installation
Preparation of the installation point:
● Check the pipe run at the point of installation. Variable area ow meters
are only suitable for vertical installation and an upward ow direction
(from bottom to top). For all other installation situations, appropriate pipe
bends need to be tted in the existing pipeline to ensure upward vertical
ow through the device.
● The region of steady ow should be 4 to 6 x DN upstream and
downstream of the location. Control equipment for gaseous media in
particular should be installed downstream of the ow meter.
● If necessary, support the pipeline on both sides of the ow meter to
prevent vibration from being transferred to the device.
● Before connecting, clean the pipelines leading to the device by blowing
out or ushing.
● Prepare the installation point for the measuring device with appropriate
pipe threads (RA 60) or anges (FA 60) before beginning installation
work. Pay attention to the correct spacing of the sealing faces and to
exact alignment.
● Under no circumstances should the variable area ow meter be used to
draw the pipe ends together (install free of stresses!). Do not over-tighten
the union nuts.
4.2 Preparation of the measuring device
1. Remove the device from the transport packing.
2. Remove the transport protection stoppers from the ends of the device.
3. Pull the oat securing rod out of the device (PVC red or grey).
4. Check that the oat can move freely in the device.
5. Have ready: at gaskets (FA 60) or packing material such as hemp
(RA 60). These are not included with the supply.

-7-
Version 2.2
Dieselstraße 17 · D-47228 Duisburg
Internet: www.kt-ow.de · e-mail: info@kt-ow.de
A. Kirchner & Tochter GmbH
Fon: +49 2065 9609-0 · Fax: +49 2065 9609-22
4.3 Installation RA 60
1. Remove the insert (item 1) and the union
nuts (item 3) from the device.
2. Slip the union nuts over the ends of the
pipeline at the installation point.
3. Screw the inserts using packing material
(e.g. hemp) to the ends of the pipeline.
4. Slide the device together with the at
gaskets (item 2) on both ends into the
installation point.
5. Screw the union nuts (item 3) on to the
device heads (item 4) and tighten them so
that the device is positioned in the pipeline
free of stresses.
4.4 Installation FA 60
1. Slide the device together with the at
gaskets (not included with supply) at both
ends (item 1) into the installation point.
2. Check that the at gaskets are in alignment
and do not project into the pipeline.
3. Fit the bolts and nuts of the anged
connection loosely.
4. Tighten the bolted connection between
customer-supplied ange and item 1 in
diagonally opposite sequence so that
the device is xed free of stresses in the
pipeline.

Version 2.2
Dieselstraße 17 · D-47228 Duisburg
Internet: www.kt-ow.de · e-mail: info@kt-ow.de
A. Kirchner & Tochter GmbH
Fon: +49 2065 9609-0 · Fax: +49 2065 9609-22
-8-
5 Start-up
6 Readings in operation
The ow value is read o from the scale on the glass cone at the top edge of
the oat. The measured-value readings are only correct when the operating
condition at the measuring point (owing medium, operating pressure and
temperature) corresponds to the values marked on the measuring glass. If
operating conditions should dier, the measured value must be corrected
with the aid of the general oat equation.
Information on theoretical basics and an conversion program can be found
on our website: www.kt-ow.de, section physics and calculations.
The device must be properly installed before it is started up.
1. Check all device connections.
2. To set the ow: pressurize the pipelines by slowly opening the shut-o
valves. On liquid service: carefully vent the pipeline.
3. Check the leak-tightness of all components and if necessary, tighten
down threaded joints or screw connections.

-9-
Version 2.2
Dieselstraße 17 · D-47228 Duisburg
Internet: www.kt-ow.de · e-mail: info@kt-ow.de
A. Kirchner & Tochter GmbH
Fon: +49 2065 9609-0 · Fax: +49 2065 9609-22
7 Limit switches MSK1/MSK12/MSKW
The electrical data and limit values must be observed in accordance with
section 12.4.
7.1 Connection of limit switches
4. Connect the cable using the supplied right-angle plug (section 12.5).
The circuit diagram for the limit switches is shown in the
Technical Data (section 12.4).
The ow meter can be equipped with limit switches to provide local indication
with monitoring function.
The limit switches consist of a limit switch (reed switch) that is switched over
by the magnet integrated in the oat.
The limit switch is guided in a guide slot in the protective case and can be
adjusted over the full measuring range. The reed switches have a bistable
characteristic.
Uncontrolled current and voltage peaks can occur in the case of inductive
or capacitive loads, e.g. from contactors or solenoid valves. Such peaks will
also occur, depending on cable geometry, where cables exceed a certain
length.
We therefore recommend using an MSR contact protection relay, which
is additionally available. This will increase the contact rating and prevent
occurrence of inductive and capacitive peaks, thus ensuring long service life
of the contacts.
Electrical connection of the device must be carried out in conformity
with the relevant VDE regulations (or equivalent national standards)
and in accordance with the regulations issued by the local power
supply utility.
1. Disconnect the plant from supply before connecting the limit switch.
2. Provide a protective circuit for the switches in keeping with their capacity.
3. Connect line-side fuse elements matched to consumption.

Version 2.2
Dieselstraße 17 · D-47228 Duisburg
Internet: www.kt-ow.de · e-mail: info@kt-ow.de
A. Kirchner & Tochter GmbH
Fon: +49 2065 9609-0 · Fax: +49 2065 9609-22
-10-
7.2 Setting the limit switches
MSK limit value switch
M12 right angle plug
ow meter
measuring glass
oat
lock nut
sliding block
1. Loosen the lock nut SW13 (M8 x 1) on the neck of the switch .
2. Slide the switch to the ow value required to be monitored.
3. Please make sure the contact never touches the measuring glass
and the clearance between contact and glass is always approx.
1 mm. This clearance can be obtained by turning the contact in the
sliding block .
4. Test the switching characteristic by moving the oat over and beyond
the switching position.
5. Retighten the lock nut . Maximum fastening torque is 2 Nm!

-11-
Version 2.2
Dieselstraße 17 · D-47228 Duisburg
Internet: www.kt-ow.de · e-mail: info@kt-ow.de
A. Kirchner & Tochter GmbH
Fon: +49 2065 9609-0 · Fax: +49 2065 9609-22
8 Linear displacement sensor 4 .. 20 mA/0 ... 10V
8.1 Connection of the linear displacement sensor
The linear displacement sensor, based on the Hall eect, delivers an output
signal proportional to the height setting of the ow meter.
The signal can be displayed in 4 ... 20 mA or 0 ... 10 V and is used for remote
ow rate observation. The sensor is connected via the enclosed M12 x 1 mm
connector.
Please notice, that the sensor has a blind zone in the range of 3.7 mA to
around 4 mA and performs stable operation only after approx. 4 mA.
The electrical connection of the device must be performed according
to the pertinent VDE regulations, as well as the regulations of the
local power company.
1. Disconnect electric power from the system before connecting the sensor.
2. Provide a protective circuit of the sensor corresponding to its output.
3. Connect the protective elements suitable for use upstream.
4. The cable connection is done on the enclosed angle connector. The
circuit diagram for the sensor is in the following illustration:
Type Circuit diagram Pin assignment
3-wire
2-wire

Version 2.2
Dieselstraße 17 · D-47228 Duisburg
Internet: www.kt-ow.de · e-mail: info@kt-ow.de
A. Kirchner & Tochter GmbH
Fon: +49 2065 9609-0 · Fax: +49 2065 9609-22
-12-
8.2 Adjusting the sensor
The linear position sensor is delivered adjusted to the lowest measuring
range point. This corresponds to an output signal of 4 mA.
The remaining measuring range or mA values can be taken from the supplied
protocol.
If you want to move the 4 mA value to another measuring range point, move
the sensor or the 4 mA value to the requested point.
To do this, loosen the two outer nuts with their lock washers. Next loosen the
two stud screws by approximately one turn. Now you can move the sensor to
the desired position and tighten the stud bolts and nuts again.
To record the new mA values, move the oat to the desired scale lines and
note the mA values.

-13-
Version 2.2
Dieselstraße 17 · D-47228 Duisburg
Internet: www.kt-ow.de · e-mail: info@kt-ow.de
A. Kirchner & Tochter GmbH
Fon: +49 2065 9609-0 · Fax: +49 2065 9609-22
9 Maintenance and cleaning of the ow meter
The device is maintenance-free. Should the glass cone become fouled, the
device can be removed from the pipeline as follows.
9.1 Dismantling the glass cone RA 60
1. First dismantle the device by undoing
the screw connections, item 3.
2. Take the device out together with the
gaskets, item 2.
3. Detach upper head, item 4 together
with gasket, item 5 and thrust collar,
item 6 from the device. If the oat is
provided with a guide rod, item 17
remove this completely with the head
but without dismantling it any further.
4. Unscrew the lower head, item 4 and
remove the gasket and thrust collar.
5. On nonguided oats, the oat stops
(receptacles) in the measuring glass
are either helical springs or inserts
made of plastics. Remove these
together with the oat and make a
note of the installation positions and
directions.
6. Press the glass cone to one side out
of the case. Avoid using sharp pointed
tools. Remove the loose rubber ring
from the glass cone.
● The ring remaining on the glass
cone does not need to be removed.
7. Clean the glass cone. Do not use abrasive tools or aggressive cleansing
agents (wire brush, scouring cleaner, alkaline solutions, acids etc.).

Version 2.2
Dieselstraße 17 · D-47228 Duisburg
Internet: www.kt-ow.de · e-mail: info@kt-ow.de
A. Kirchner & Tochter GmbH
Fon: +49 2065 9609-0 · Fax: +49 2065 9609-22
-14-
9.2 Assembling the glass cone RA 60
Reassemble in the reverse order of
dismantling:
1. Be aware of the original direction
of installation and the installation
positions.
● In particular, do not let tools come
into direct contact with the glass
when inserting the glass cone and
jointing the loose rubber ring.
● In this instance, use water as a
lubricant.
2. Inspect all gaskets to see whether
they can still be used, and replace if
necessary.
3. Align the glass cone so that the
markings can be read o through the
cutout in the case.
9.3 Replacement of the glass cone RA 60
Proceed as described in section 9.1. and section 9.2
For devices with glass size 6 and smaller, a support
disk (20) is additionally installed. This is placed under
the sealing ring (7) to prevent it from slipping out. This
also applies to customer modications from glass size
10 to 6 or smaller.

-15-
Version 2.2
Dieselstraße 17 · D-47228 Duisburg
Internet: www.kt-ow.de · e-mail: info@kt-ow.de
A. Kirchner & Tochter GmbH
Fon: +49 2065 9609-0 · Fax: +49 2065 9609-22
9.4 Dismantling of the glass cone FA 60
1. Remove the device together with the
gaskets pertaining to the anged
connections (detach the anged
connections).
2. Dismantle the outer anges, items 1
and 16.
3. On nonguided oats, the oat stops
(receptacles) in the measuring glass are
either helical springs or inserts made of
plastics. Remove these together with the
oat and make a note of the installation
positions and directions.
4. Press the glass cone to one side out
of the case. Avoid using sharp pointed
tools. Remove the loose rubber ring from
the glass cone.
● The ring remaining on the glass cone
does not need to be removed.
5. Clean the glass cone. Do not use
abrasive tools or aggressive cleansing
agents (wire brush, scouring cleaner,
alkaline solutions, acids etc.).
9.5 Installation of the glass cone FA 60
Reassemble in reverse order:
1. Replace the glass cone together with the rubber ring in the case and slip
the loose rubber ring over the glass cone.
● Use water as lubricant (wet rubber ring rst).
2. Align the glass cone so that the inscriptions can be read through the
cutout in the sleeve.
3. Tighten down the bolts of the outer anges (in diagonally opposite
sequence).
9.6 Replacement of the glass cone FA 60
Proceed as described in section 9.3, 9.4 and 9.5.

Version 2.2
Dieselstraße 17 · D-47228 Duisburg
Internet: www.kt-ow.de · e-mail: info@kt-ow.de
A. Kirchner & Tochter GmbH
Fon: +49 2065 9609-0 · Fax: +49 2065 9609-22
-16-
9.7 Subsequent installation of a oat catcher protective cap
Pressure surges in the measuring line can cause damage or destruction of
the oat catch. In order to evenly distribute occurring forces and to prevent
tearing of the elastomer, RA/FA 60/65/77/87 series variable area ow meters
are equipped with a stainless steel oat catch protection cap. In the following
description, the subsequent installation of the protective cap will be
described.
1. Remove the device from the
installation site by unscrewing
the union nuts from the
device heads .
2. Unscrew the upper head
of the device together with
the guide rod of the device
sleeve .
3. Unscrew the M5 lock nut
and pull the guide rod out of
the device head.
4. Unscrew the M5 hex nut
from the guide rod.
5. Insert the catch protection
cap onto the guide rod, with
the large opening pointing
to the oat catch. The catch
protection cap should now
enclose the upper part of the
elastomer catch !

-17-
Version 2.2
Dieselstraße 17 · D-47228 Duisburg
Internet: www.kt-ow.de · e-mail: info@kt-ow.de
A. Kirchner & Tochter GmbH
Fon: +49 2065 9609-0 · Fax: +49 2065 9609-22
6. Tighten the M5 hex nut
slightly.
7. Insert the guide rod back
into the bridge of the upper
head and tighten the M5
locknut .
8. Insert the guide rod with the
upper device head back into
the oat measuring device.
9. Carefully screw the upper
head back onto the device
sleeve and tighten it.
10. Make sure that you insert the
lower end of the guide rod
into the corresponding hole
in the lower device head ,
otherwise the oat will not
move freely.

Version 2.2
Dieselstraße 17 · D-47228 Duisburg
Internet: www.kt-ow.de · e-mail: info@kt-ow.de
A. Kirchner & Tochter GmbH
Fon: +49 2065 9609-0 · Fax: +49 2065 9609-22
-18-
10 Service
11 Disposal
All devices with defects or deciencies should be sent directly to our repair
department. In the service area of the Kirchner und Tochter homepage
(www.kt-ow.de) you will nd the declaration of decontamination as download
and more information about returns.
To avoid risks to our employees and the environment, we can only process
devices, for which we get a declaration of decontamination certifying that
they are safe due to legal regulations. For questions, please contact our
sales department, Tel. +49 2065-96090.
Please help to protect our environment and dispose workpieces in conformity
with current regulations resp. continue using them.

-19-
Version 2.2
Dieselstraße 17 · D-47228 Duisburg
Internet: www.kt-ow.de · e-mail: info@kt-ow.de
A. Kirchner & Tochter GmbH
Fon: +49 2065 9609-0 · Fax: +49 2065 9609-22
12 Technical data
Nominal pressure rating RA 60: PN 10 at 20 °C
FA 60: PN 10 at 20 °C
Max. operating pressure see table measuring ranges (section 12.2)
Thermal endurance 80 °C, optionally 100 °C
max. ambient temperature 90 °C
Turndown ratio 1:10
Accuracy class
Error limit (G)
Linear limit (qG)
VDE/VDI 3513 page 2 (08/2008)
1,6 %
50 %
Connection RA 60
two-part pipe union:
Insert with cylindrical internal
thread to DIN EN 10226-1 (ISO 7-1)
Connection FA 60 ange PN 10 acc. to DIN EN 1092-1,
other connections on request
Corrosion protection Epoxy powder coating,
trafc blue (RAL 5017) glossy
Corrosion class C3
12.1 Materials
Protective sleeve precision steel tube made of P235
Heads RA 60 S355 (size 19), EN-GJL-200 (size 30 – 36),
cast aluminium (from size 43)
Threaded joint malleable cast iron, zinc plated
Flanges FA 60 S355
Measuring glass borosilicate glass
Splinter shield perspex
Gaskets standard: NBR,
optionally FKM, EPDM
Floats
for liquids1)
standard: 1.4571
optionally: PVC, PP, PVDF or PTFE
Floats
for gases1)
standard: Aluminium anodized
optionally: PVC, PP, PTFE, PVDF or 1.4571
with limit value switches1) liquids: 1.4571 with magnetic core
gases: PVC with magnetic core
other materials on request
1) Floats up to size 19 are non guided, oats from size 30 on are guided. Optional size 19 is in guided
version available.

Version 2.2
Dieselstraße 17 · D-47228 Duisburg
Internet: www.kt-ow.de · e-mail: info@kt-ow.de
A. Kirchner & Tochter GmbH
Fon: +49 2065 9609-0 · Fax: +49 2065 9609-22
-20-
12.2 Measuring ranges
Size Measuring range
H2O
Measuring range
Air at STP¹)
Max. oper. press
[bar] at 20 °C
10 0,1 – 1 l/h 0,3 – 3 l/h 10
15 – 150 l/h 0,25 – 2,5 m³/h
19 12 – 120 l/h 0,15 – 1,5 m³/h 10
0,12 – 1,2 m³/h 1,6 – 16 m³/h
30 0,1 – 1 m³/h 1,3 – 13 m³/h 10
0,3 – 3 m³/h 3,6 – 36 m³/h
36 0,4 – 4 m³/h 4 – 40 m³/h 8
0,8 – 8 m³/h 8 – 80 m³/h
43 0,9 – 9 m³/h 5 – 50 m³/h 8
1,6 – 16 m³/h 16 – 160 m³/h
100 1,6 – 16 m³/h 12 – 120 m³/h 6
2 – 20 m³/h 28 – 280 m³/h
110 2,5 – 25 m³/h 14 – 140 m³/h 5
3 – 30 m³/h 44 – 440 m³/h
150 — 30 – 300 m³/h 4
100 – 1000 m³/h
180 — 30 – 300 m³/h 3
150 – 1500 m³/h
1) at STP: at standard conditions (0 °C and 1013 mbar abs.)
Measuring ranges for other substances and operating conditions on request.
Other manuals for RA 60
1
This manual suits for next models
1
Table of contents
Other Kirchner und Tochter Measuring Instrument manuals

Kirchner und Tochter
Kirchner und Tochter RA 65 User manual

Kirchner und Tochter
Kirchner und Tochter RA 60 User manual

Kirchner und Tochter
Kirchner und Tochter KFS Series User manual

Kirchner und Tochter
Kirchner und Tochter RA 77 User manual

Kirchner und Tochter
Kirchner und Tochter RA 65 User manual

Kirchner und Tochter
Kirchner und Tochter KLA User manual

Kirchner und Tochter
Kirchner und Tochter SGK 1-3 User manual

Kirchner und Tochter
Kirchner und Tochter SMB Series User manual