KIRTON DHG Duo 2 Major User manual

DIRECTHEALTHCAREGROUP.COM
Duo 2 Major
User Manual

DIRECTHEALTHCAREGROUP.COM2DIRECTHEALTHCAREGROUP.COM
DUO 2 USER MANUAL
3
1. Introduction to the Duo Chair ....................................4
1.1. Why is There a Need for this Type of Chair? ..................4
2. Warranty Guidelines .................................................5
2.1. Warranty and Liability ................................................5
2.2. Use ........................................................................5
2.3. When the Warranty will not Apply ..............................5
2.4. When the Warrant Does Apply ...................................5
2.5. Statutory Rights .......................................................5
2.6. Warning ..................................................................5
3. Clinical Application ..................................................6
3.1. Intended Use ............................................................6
3.2. Who is the Duo 2 Suitable for? ..................................6
3.3. Who is the Duo 2 not Suitable for? .............................6
4. Product Information .................................................6
4.1. Product Identification ................................................6
4.2. Key Features ...........................................................6
4.3. Key Options .............................................................6
4.3.1. Pressure Management ...........................................6
4.4. Accessories ............................................................7
5. Guideline for Best Practice ......................................7
6. Instructions for Use ..................................................8
6.1. General Operation .....................................................8
6.2. Setting up the Duo 2 for Use .....................................9
6.2.1. Seat Depth Adjustment ..........................................9
6.3. Seat Height Adjustment ..........................................10
6.4. Seat Width Adjustment ...........................................10
6.5. Removing the Seat Module .....................................10
6.6. Arm Height Adjustment ..........................................11
6.7. Removable Arms ....................................................11
6.8. Castors .................................................................11
6.9. Tilt-in-Space .........................................................12
6.9.1. Electric and Regulated Motion Operation ..............12
6.10. Back Angled Recline .............................................13
6.11. Articulating Legrest ...............................................13
6.11.1. Electric and Regulated Motion Operation ............14
6.12. Footrest ...............................................................14
6.12.1. Footrest AngleAdjustment ................................14
6.12.2. Headrest Positioning Adjustment .....................15
6.13. Headrest Angle Adjustment ...................................15
6.14. Headrest Split-Wing Adjustment ............................15
6.15. Back Height Adjustment ........................................16
7. Accessories ............................................................17
7.1. Lateral Support .......................................................17
7.2. Pommel ................................................................17
7.3. Leg Lateral ............................................................17
7.4. Laminated Tray with Straps .....................................18
7.5. Lap-Belt and D-Ring Fixing .....................................18
7.6. Pelvic Positioner .....................................................19
8. Re-Use and Re-Issue .............................................20
8.1. Modularity ..............................................................20
8.1.1. Seat Modules ....................................................20
8.1.2. Back Modules ..................................................20
8.1.3. Arm Modules ...................................................20
8.1.4. Legrest Modules...............................................20
8.2. Disposal of the Chair ..............................................20
9. Care and Maintenance ...........................................21
9.1. Service Life ............................................................21
9.2. Periodic Checks .....................................................21
9.3. Cleaning ...............................................................21
9.3.1. Frame Cleaning ................................................22
9.3.2. Upholstery Cleaning .........................................22
10. Technical Data......................................................23
10.1. Manufacturing Address .........................................23
10.2. Maximum User Weight .........................................23
10.3. Weight and Dimensions of the Chair .......................23
10.4. Product Standards ...............................................24
10.4.1. Flammability Testing .......................................24
10.4.2. Strength, Stability, Durability, Risk and Safety......24
10.4.3. Quality and Environmental ..............................24
11. Customer Support .................................................24
Contents
Important:
Read carefully before use and retain for future reference.
It is the carer/user’s responsibility to ensure they are fully aware of and have understood all the safety and other instructions
contained in these pages before installing or using the chair.

DIRECTHEALTHCAREGROUP.COM4DIRECTHEALTHCAREGROUP.COM
DUO 2 USER MANUAL
5
1. Introduction to the Duo 2 Chair
Thank you for purchasing a Direct Healthcare Group Duo 2 chair.
The purpose of the Duo 2 seating system is to provide the ultimate in positioning and postural management for those who are unable to
maintain their body posture and require extra support.
Designed to easily adjust the tilt-in-space positioning and elevate the legrest as well as providing a pressure management seating
solution, the Duo 2 is multi-adjustable in all its dimensions for each individual user.
1.1. Why is There a Need for this Type of Chair?
The ability of a seated person to function efficiently and perform activities depends on their ability to adopt the appropriate posture. All
activity is posture dependent.
If a person cannot move or has difficulty adjusting their posture, it may be necessary to use seating to try to provide externally what is
limited internally.
The Duo 2 helps fulfil the need to maintain an individual’s seated posture, yet re-orientate and redistribute pressure. This is achieved by
using the tilt-in-space and back angle recline features that are key to the Duo’s 2 functionality.
2. Warranty Guidelines
2.1. Warranty and Liability
Direct Healthcare Group provides a warranty to the buyer that the
goods supplied will be free from defect of workmanship, design or
materials for a period of twelve (12) months from date of delivery.
The Duo 2 chair frame has a ten (10) year warranty, subject to
warranty guidelines 2.3 – 2.4, excluding damage to castors,
upholstery and electrical components. An annual maintenance
service is recommended but not essential.
2.2. Use
a) Each Direct Healthcare Group product is designed to a high
specification for a particular type of use.
b) It is important therefore that the correct product is purchased by
the buyer. If the buyer intends to purchase goods for a non-
approved use he must use his own skill and judgment.
c) No employee or agent of Direct Healthcare Group is authorised
to recommend non-approved uses, and the buyer should not
rely on such recommendations.
d) User instructions should be followed in all respects.
2.3. When the Warranty will not Apply:
a) Use of incorrect cleaning products that may damage the
surface material.
b) Incorrect maintenance not approved by Direct Healthcare Group.
c) Alterations by the buyer to the original goods.
d) Incorrect means of transportation of the goods.
e) Normal wear and tear.
f) Non Approved uses:
• Sitting on the arms of a chair.
• Sitting on the legrest or footrest of a chair.
• Hitting the chair against people and objects such as: walls,
doors, beds, tables, chairs, etc.
• Spilling food, urine, excrement and other matter on the chair
and not cleaning it off within a very short time of spillage
(2 minutes) often causes the chair to smell and become a
health hazard. Also, matter penetrates covering material,
seams and foam.
• Excessive force is often applied to the moving parts of chairs
thereby breaking or bending metal and wood parts.
• Bumping chairs up or down stairs or over obstructions with
a person seated in the chair causes damage to wheels,
framework and upholstery.
2.4. When the Warranty Does Apply:
Direct Healthcare Group will:
a) Rectify the defect
or
b) Where in the opinion of Direct Healthcare Group, rectification is
impossible, the product will be replaced.
2.5. Statutory Rights
Nothing contained in our Terms and Conditions nor in these
guidelines shall affect the statutory rights of the consumer.
2.6. Warning
In this manual, warnings are indicated by symbols. The warning
symbols are accompanied by a heading that indicates the severity
of the danger.
WARNING
Indicates a hazardous situation that could result in
serious injury or death if it is not avoided.
CAUTION
Indicates a hazardous situation that could result in minor
or slight injury if it is not avoided.
IMPORTANT
Indicates a hazardous situation that could result in
damage to property if it is not avoided.

DIRECTHEALTHCAREGROUP.COM6DIRECTHEALTHCAREGROUP.COM
DUO 2 USER MANUAL
7
4.4. Accessories
3.1. Intended Use
The Duo 2 is intended for the following user environments:
• Domestic home use
• Hospital, hospice and care home environments
• For those with or at risk of developing an unconventional
body shape
• For those with postural related problems
3.2. Who is the Duo 2 Suitable for?
The Duo 2 is appropriate for the following users
• Semi-ambulant and non-ambulant users who require assistance
getting in and out of the chair.
• Users requiring advanced postural support when seated.
• Users at low to medium risk of pressure injuries (on chairs fitted
with Reflexion™ seat foam).
• Users at high risk to very high risk or with up to a Grade IV
pressure injury (on chairs fitted with a Dyna-Tek®
®
Intelligent
Air seat) following a clinical assessment.
• Users with mild to severe cognitive impairment.
• For users undergoing rehabilitation, therapy or treatment.
• For users needing postural support when being moved.
3.3. Who is the Duo 2 not Suitable for?
The Duo 2 is not suitable for the following users:
• Fully ambulant users unless fully supervised by a healthcare
professional in a treatment setting and following a clinical
assessment.
4. Product Information
4.1. Product Identification
Each chair has a unique number to enable swift identification.
This number can be found on the side of the base frame of the chair.
• Tilt-in-Space, independent back angle reclines and legrest
elevation controlled through either:
• Electrical and Regulated Motion technology
• Two back style options:
• Waterfall
• Sculpted
• Three pressure relieving seat module options
• Dartex on all user contact surfaces
• Articulating legrest without compromising footboard positioning
• Tool-free, lever and spring-clip adjustments
• Split-wing headrest for support of the head and shoulders
• Adjustable headrest for precise positioning of the head
• Push handle
• Strong, durable 100mm unbraked front and braked rear castors
4.2. Key Features
5. Guidelines for Best Practice
To ensure good practice when considering purchasing a Duo 2 chair and effective use post purchase we advise that the following
guidelines are considered:
• Seek advice and input from a qualified Occupational Therapist, healthcare professional and/or Direct Healthcare Group representative/
retailer at the initial prescription of the chair.
• If unsure when ordering the chair and any accessories contact either the Occupational Therapist involved, your Direct Healthcare Group
representative, retailer or Direct Healthcare Group Customer Care Team on Freephone 0800 043 0881.
• All care-givers that will be supervising the user(s) should be trained in operating the chair to ensure correct positioning of the user
is achieved.
CAUTION
Only use accessories recommended by Direct Healthcare Group with the Duo 2 chair.
Duo 2 Major
Duo Major Leg Laterals
Pommel
Lateral Supports (Pair)
Extra Waterfall Cushion (For Back Heights)
Easicare Medium 4 Point Lap-Belt with Fixings
Easicare Medium 2 Point Lap-Belt with Fixings
Easicare Large 2 Point Lap-Belt with Fixings
Easicare Large 4 Point Lap-Belt with Fixings
Lap-Belt (Requires D-Ring Straps)
Large Pelvic Positioner (Requires D-Ring Straps)
Large Padded Vinyl Pelvic Positioner (Requires D-Ring Straps)
Large Fleecy-Faced Pelvic Positioner (Requires D-Ring Straps)
D-Ring Straps (Long)
Universal Mobile Tray
Annual Maintenance Visit for Duo 2 (Per Chair)
4.3. Key Options
4.3.1. Pressure Management
Pressure management is critical for those who are seated for long periods or for those at risk of tissue damage. The Duo 2 has pressure
relieving foams on all contact surfaces areas of the chair and further options are available for the seat module in accordance with the
occupant’s needs.
If you are unsure about the suitability of your pressure care, please seek advice and input from a qualified Occupational Therapist, Tissue
Viability Nurse, healthcare professional and/or Direct Healthcare Group representative/retailer before purchasing.
3. Clinical Applications

DIRECTHEALTHCAREGROUP.COM8DIRECTHEALTHCAREGROUP.COM
DUO 2 USER MANUAL
9
WARNING
We recommend the use of a power surge protector when using the power pack.
Battery Care
(Electric and Regulated Motion Models)
The battery is charged through the control box using the power pack included with the chair. The power pack should be plugged into a
mains socket and then attached to the control box. The charging port on the control box is on the side of the control box.
We recommend that if the chair is used during the day, the battery should be charged overnight to ensure the battery is topped up
regularly.
The chair can be used whilst the chair is being charged, however, we recommend that this is avoided where possible to ensure the
charger cable does not become a tripping hazard.
IMPORTANT
Never move the chair while the charger is still plugged into the wall socket.
CAUTION:
When the chair is in use, always ensure the user is checked
regularly for safety and is not left unattended for long periods
of time.
WARNING
The Duo 2 is not suitable for use by children. Any children present
in the vicinity of the chair must be always supervised.
CAUTION
Do not sit on the arms of the chair at any time.
The purpose of these user instructions is to ensure the safe operation and maintenance of your Duo 2 chair.
The chair is ready for use once fully installed in the correct position and all carers/users have read and understood the operating
instructions.
Safety warnings are included within these user instructions and it is the operator’s responsibility to ensure these are read
and fully understood.
If you have any questions or concerns, please contact your Direct Healthcare Group representative, retailer or the
Direct Healthcare Group Customer Care Team on Freephone 0800 043 0881.
Please retain these instructions for future reference
Products must never be modified or altered after purchase other
than by Direct Healthcare Group authorised personnel.
It is extremely important that Duo 2 chairs are used appropriately,
if there is any doubt as to the suitability of the product for a user,
professional advice should be sought from a qualified healthcare
professional such as an Occupational Therapist, Physiotherapist,
Tissue Viability Nurse or a moving and handling specialist.
Consideration should be given to matching the basic dimensions
of the chair to the body size of the user to ensure good posture,
support, comfort and safety. Any pressure care, moving and
handling, incontinence or infection control issues should be
considered and appropriate advice taken from qualified healthcare
professionals.
Environmental factors should also be considered and assessed,
and any potential risks or hazards should be identified and taken
into consideration to ensure user safety.
When any chair is specified we recommend that a risk assessment
is conducted to ensure it will be safe and appropriate for the
user(s) of the chair and for all who may find themselves in the
vicinity of the chair. Regular reassessment as to the suitability of
the product for the user is important.
If you wish to discuss safety issues in more detail please telephone
our Customer Care Team on Freephone 0800 043 0881.
6. Instructions for Use
6.1. General Operation
WARNING
Do not push the chair up or down steps
or a steep incline as this could result in
loss of control.
WARNING
Ensure there is nothing present to
obstruct the free movement of the chair
before attempting to use the chair.
6.2. Setting up the Duo 2 for Use
Upon delivery of the chair the wrapping should be removed carefully in order not to damage the upholstery.
The user instructions must be fully read by all involved with using the chair and ensure the chair is set up correctly before use.
It is recommended that the chair is adjusted to accommodate each occupant’s specific requirements in terms of seat length, leg length
and angle, and tilt-in-space.
Begin by sitting the user in the chair, most adjustments can be easily made with the occupant in the chair except for the seat length
which is easier to facilitate when the chair is unoccupied.
IMPORTANT
Do not use sharp scissors or blades to cut the plastic wrapping from the chair as this could accidentally damage the upholstery
Electric and Regulated Motion Model
On receipt of the chair, the battery must be fully charged for 8 hours before use.
IMPORTANT
Do not use sharp scissors or blades to cut the plastic wrapping from the chair as this could accidentally damage the upholstery
6.2.1 Seat Depth Adjustment
The seat depth should be adjusted for each occupant. If the seat depth, from the front of the seat cushion to the backrest of the chair, is
too deep the occupant will slide forward, losing posture and increasing localised pressure, and if it is not deep enough, pressure will be
concentrated on a smaller area of the body and poorly distributed.
If the person is slumped in the chair when being measured it will give an inaccurate seat depth measurement. Correct this position before
measuring provided it is safe to do so.
The chair back or the back of the seat cushion should be the starting point for measuring seat depth. To measure, squat to the person’s
side to avoid stooping and hold the tape measure end against the chair back or the back of the seat cushion and bring the tape forwards
until it is level with the back of the knee. Record the measurement.
If the legrest is regularly used at 90° to the seat then a minimum clearance of 25mm or one inch between the front of the seat cushion
and the calf is desirable when the occupant is seated against the back of the seat.
If the legrest is generally used elevated, then the optimum seat length is when the calf lightly touches the legrest cushion.
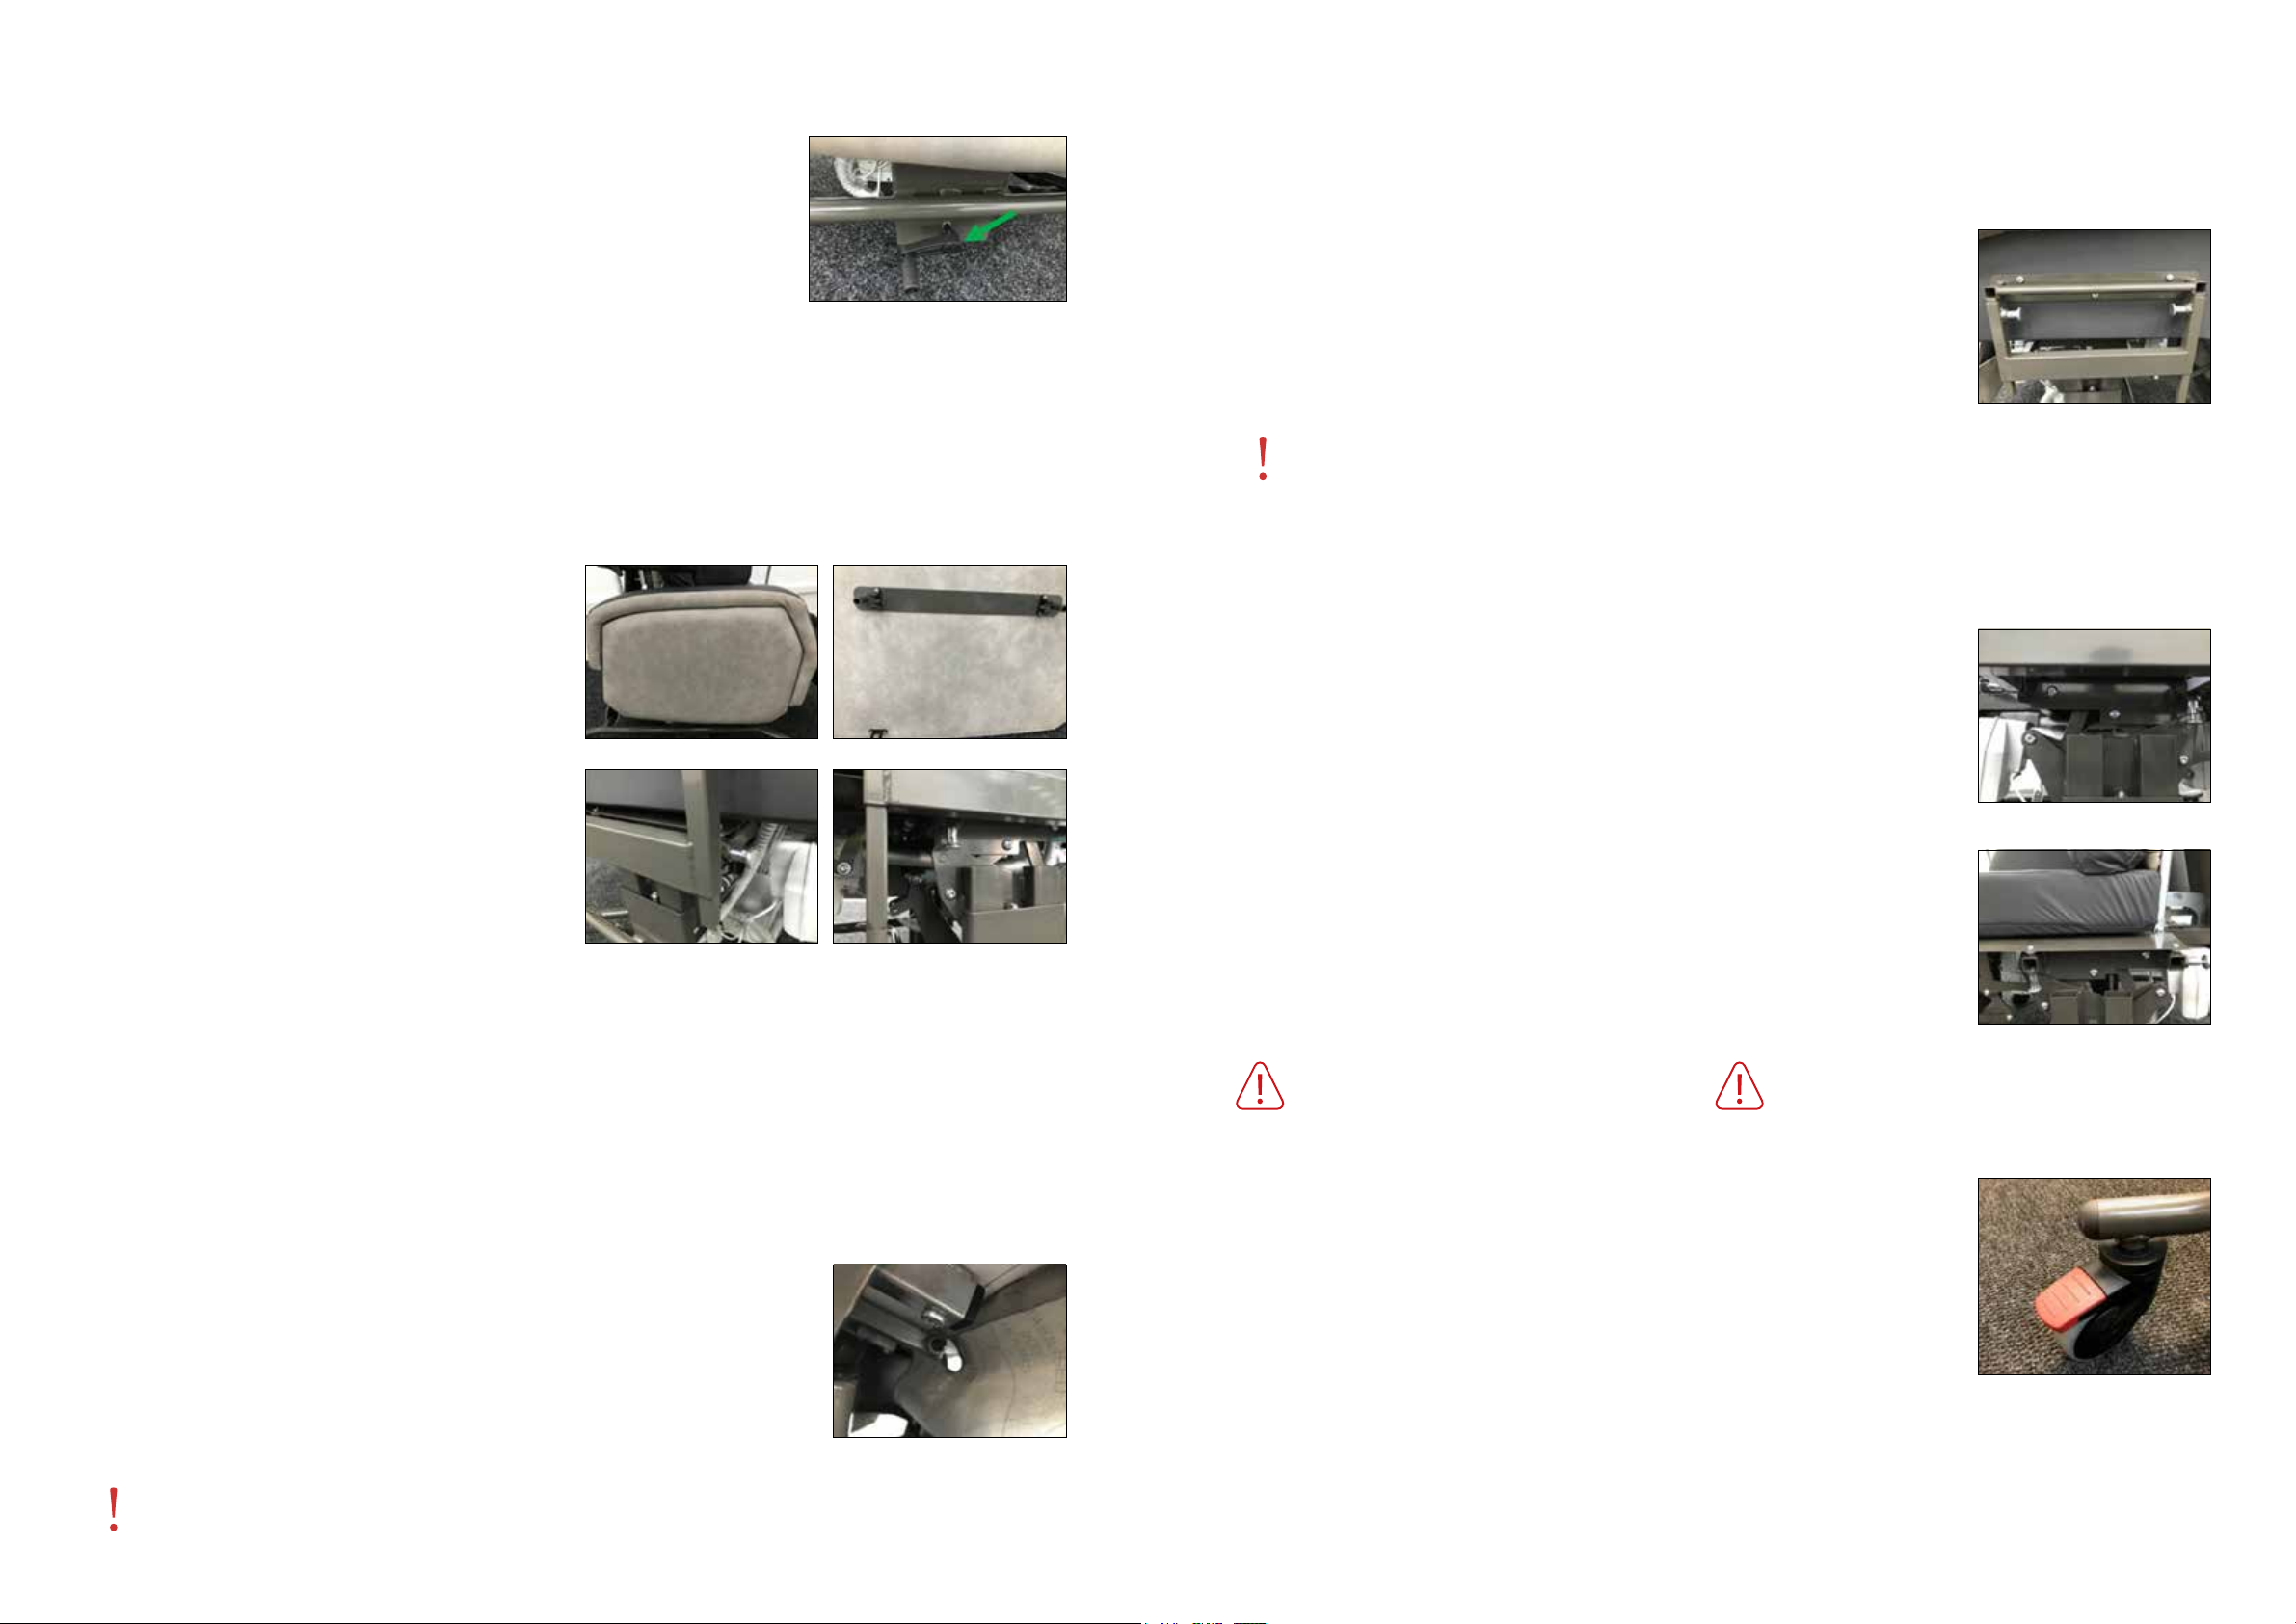
To adjust, locate underneath of the seat module on the right side a spring-loaded snap. Pulling the snap and turning to 90˚ will enable
the seat module to be moved forwards or backwards according to the user’s needs.
Check that the snap spring-loaded is securely in place and the seat module is not
movable.
Position the user in the chair to ensure the seat length is correct. If it needs adjusting
further ensure the chair is unoccupied and repeat the adjustment steps.
IMPORTANT
Only adjust the seat length when the chair is unoccupied.

DIRECTHEALTHCAREGROUP.COM10 DIRECTHEALTHCAREGROUP.COM
DUO 2 USER MANUAL
11
6.3. Seat Height Adjustment
The seat height of the chair can be raised or lowered according to the needs of the user.
On the right hand side of the chair is a retractable handle that facilitates the chair movement.
To raise the chair, turn the handle clockwise until the desired height is reached.
To lower the chair, turn the handle anti-clockwise.
6.4. Seat Width Adjustment
Achieving the correct seat width, the internal width of the seat between the armrests, ensures arms sit comfortably on the armrest and
contributes to pelvic stability and security of the user. If too wide, it can be difficult to hold good posture, if too narrow the occupant may
not be able to sit right back in the chair.
To measure the seat width, seat the occupant in the centre of the chair, measure across the widest area of the bottom/hips and add 5cm
or two inches each side.
To adjust the seat width:
6.6. Arm Height Adjustment
The Duo 2 features independent arm height adjustment to allow the user’s elbow to rest comfortably on the armrest, providing support
without having the shoulders raised or hunched in turn encouraging a better posture.
To adjust the arm height:
• Remove the side arm panel by pulling it away from the chair. It is fitted with plastic clips
for easy removal and fitting.
• Pull and turn at 90˚ the front and back spring-loaded snap.
• Raise or lower the arm to the required setting.
• Secure both the front and back spring-loaded snaps.
IMPORTANT
Do not take the arm above 300mm from the top of the seat module as the arm panel will not fit back into the side of the arm.
• Remove the side arm panel by pulling it away from the chair.
It is fitted with plastic clips for easy removal and fitting.
• Locate and pull the spring-loaded snap at the rear of the under
arm and the spring-loaded snap at the front.
• Pull the two spring-loaded snaps and pull the whole arm assembly either in or out to the required width. Keep the gap between each
arm and the seat the same.
• Ensure that the two spring-loaded snaps are securely in place.
• Repeat on the opposite arm.
• Replace the side arm panel by locating the plastic clips on the metal frame of the chair and pressing until it fixes to the frame.
6.5. Removing the Seat Board
The seat board can be removed completely for replacement or cleaning.
To remove the seat board:
• Locate two screws at the front of the chair that should be removed completely using a screwdriver.
•The seat board can now be removed and replaced as necessary.
IMPORTANT
When replacing the seat board, ensure that the screws are replaced at the front of the seat to avoid the module falling out
of the seat.
6.7. Removable Arms
The side arms of the Duo 2 are detachable for easy side transfer and sling positioning if a
hoist is used.
To remove the side arms:
• Remove the side arm panel by pulling it away from the chair. It is fitted with plastic clips for
easy removal and fitting.
• Locate and pull spring-loaded snap at the rear of the under arm and the spring-loaded
snap at the
front.
• Pull the spring-loaded snaps and pull the whole arm assembly away from the chair.
CAUTION
To ensure user safety, never remove both arms at the
same time.
CAUTION
Never sit on the arms or put under pressure at the front
of the arms.
6.8. Castors
The Duo 2 is fitted as standard with four 100mm/4” castors with two swivel castors at the front and two
locking castors at the rear that will not roll when the braked are activated.
To apply the castor brakes on the rear castors, press down on the red front edge of the ridged pad on
each wheel.
To unlock the brakes on the braked wheels, push down on the raised top of the red ridged pad until it
is level with the rest of the wheel housing.
Unbraked

DIRECTHEALTHCAREGROUP.COM12 DIRECTHEALTHCAREGROUP.COM
DUO 2 USER MANUAL
13
WARNING
Ensure the castor brakes are always applied when the occupant is left unattended
in the chair.
WARNING
Ensure castor brakes are applied when the occupant is being transferred in or out of the
chair to avoid any unexpected movement of the chair.
CAUTION
Ensure there is nothing present to obstruct the free
movement of the chair before releasing the castor
brake and attempting to move the chair.
CAUTION
Always check that the castors are unlocked before moving
the chair.
WARNING
Ensure all four wheels are in contact with the floor
surface before leaving the patient unattended.
WARNING
Ensure the chair is on an even ground before leaving a
patient unattended.
Regulated Motion has been incorporated to create the ultimate pressure management chair.
The eight-buttoned hand controlled is programmed to ensure the Tilt-in-Space has “Regulated Motion”, or the ability to move over a
set range, automatically adjusting the Tilt-in-Space. The pattern of movement is set to repeat to ensure motion over a period within a
specified tilt range.
For operating the functions of the 4 bottom buttons of the hand controller the operator must unlock the buttons by pressing simultaneous
the button “Back up” and “Auto Timed” for 3 seconds. After 30 seconds if no activity with the hand controller, the 4 bottom buttons will be
automatically locked.
Braked
6.9. Tilt-in-Space
What is Tilt-in-Space?
Tilt-in-space is a pivoting system that provides a reclined, resting position enabling the occupant of the chair to be tilted forward or
backwards whilst maintaining posture and pelvic stability.
By keeping the angle between the chair seat and the back at around 110°, the occupant will not slide forwards into an uncomfortable
slumped position. Tilting the chair redistributes the occupant’s weight over a larger contact surface area, making a simple yet effective
way to combat the build-up of pressure.
CAUTION
It is recommended to use a lap belt or pelvic positioner
(optional accessories) with occupants with poor
postural sitting ability.
WARNING
Never leave an occupant with poor postural sitting ability in
a fully upright position without supervision as they may tip
or slide forward into an inappropriate position or out of the
chair completely.
WARNING
Ensure the occupant’s hands are clear from the back
of the chair whilst the chair is being tilted, to avoid any
risk of pinching within the tilt mechanism.
WARNING
Ensure there is nothing present to obstruct the free
movement of the chair (e.g. children, pets or solid
objects) before operating the tilt-in-space.
CAUTION
Ensure any tray used with the chair is removed before
tilting the chair; otherwise, contents of the tray could
spill onto the user.
6.9.1. Electric and Regulated Motion Operation
The electric and regulated motion Duo 2 chairs enable either the carer or the user, where appropriate, to adjust the tilt-in-space facility by
the simple touch of a button.
Simply press and hold the ‘Tilt Down’ button to tilt the chair backwards until the desired position is reached. Release the button.
To bring the chair back up towards an upright position, press and hold the ‘Tilt Up’ button until the desired position is reached. Release
the button.
It is always advisable to adjust the positioning of the legrest once the tilt-in-space positioning has been chosen, to ensure a correct and
comfortable posture.
There are two time modes:
• Auto Timed – The Regulated Motion will operate over an
80 minutes cycle.
• Auto Continuous – The Regulated Motion will continue to
operate until switched off.
As a guide, the Tilt-in-Space cycle tilts the chair approximately
one third of a degree every 30 seconds. Overall, it takes
approximately 20 minutes to complete 15® of movement in one
direction. It can be started from any position from an upright
seated position to 35°.
To start the cycle: Press either the Auto-Timed Tilt-in-Space
button or the Auto-Continuous Tilt-in-Space button.
To stop the cycle: Press any of the four lower buttons on the
remote to take the operation back to manually operating the Tilt-
in-Space via the handset.
Tilt Up
Leg Up
Back Up
Auto Continuous
Leg Down
Tilt Down
Back Down
Auto Timed
6.10. Back Angle Recline
The angle of the back is adjustable in relation to the seat in order to ensure comfort and facilitate correct positioning.
6.11. Articulating Legrest
The articulated legrest can assist with the lymphatic and blood circulation. Lifting and straightening the knees has the effect of allowing
the blood to circulate more freely, reducing the effort required by the heart and arterial systems. Raising the legs can also help alleviate
leg oedema, a build-up of fluid in the legs.
IMPORTANT
Do not sit on the legrest. The legrest is not designed to
support the weight of an adult.
WARNING
When retracting the legrest, ensure the occupant’s legs are
in the middle of the legrest to avoid the risk of trapping the
occupant’s legs or feet between the legrest and chair frame.
WARNING
When retracting the legrest, keep hands clear of the
seat cushion, to avoid any risk of pinching fingers.
WARNING
Ensure nothing is present to obstruct the free movement
of the chair (e.g. children, pets or solid objects) before
operating the articulating legrest.
WARNING
Always ensure the legrest is fully retracted before exiting the
chair.
IMPORTANT
When lowering the legrest, or returning the chair from a tilted to upright position, it is advisable to adjust the footrest to the
shortest position or remove it entirely to prevent damage to the footrest or floor. If left extended, it will fall on the floor when the
chair is tilted forward and could be damaged.

DIRECTHEALTHCAREGROUP.COM14 DIRECTHEALTHCAREGROUP.COM
DUO 2 USER MANUAL
15
WARNING
Ensure the snaps are fully locked and the footrest is secure before leaving the occupier unattended.
6.12. Headrest Positioning Adjustment
The top section of the headrest is designed to adjust forward and backward to facilitate precise positioning of the head to support the user.
To adjust the position of the headrest:
• Remove the two grey clips that hold the top section of the headrest in place.
• Slide the metalwork forwards until it reaches the desired position.
• Replace the two grey clips, ensuring they lock into the framework to lock the headrest in place.
CAUTION
The headrest must always be adjusted by a carer, never by the user of the chair whilst in
the chair.
6.13. Headrest Angle Adjustment
The headrest is able to tilt backwards or forwards to support the user’s head as required.
To adjust the headrest angle:
• Pull out the spring-loaded snap located at the sides of the footrest. Adjust the footrest to select the angle required. Lock the spring-
loaded adjusters to ensure the footrest remains in place.
• The footboard can also be completely folded up towards the legrest to enable exiting the chair without standing on the footboard.
6.11.1. Footrest Height Adjustment
It is important to try to support the whole foot from heel to toe with the thighs evenly distributed on the seat cushion to ensure the
least possible pressure directly behind the knee.
• Raise the legrest to the desired angle (refer to section 6.6)
• The complete footrest height should then be adjusted by releasing two spring-loaded “snaps” which engage in holes in the metalwork of
the legrest.
To raise the legrest, simply press and hold the
‘Leg Up’
button on the handset until the desired height is reached.
To lower the legrest, simply press and hold the
‘Leg Down’
button on the handset until the desired angle is reached.
Lower the legrest before returning the chair to its fully upright position to allow the user to stand up from the chair with ease.
WARNING
Do not stand on the footboard at any time.
CAUTION
The carer should keep hands clear of the footrest
hinge whilst operating the flip-up footrest to avoid risk
of pinching fingers.
A negative legrest can be achieved. Press and hold the
‘Lower Legrest’
button on the handset until the desired negative angle is
reached.
To return the legrest to a neutral position, simply press and hold the
‘Leg Up’
button on the handset until the legrest returns to the
neutral position.
The “snaps” are at the sides of the footrest framework. Reach around the legrest and pull out both
pins® to enable the footrest to be positioned.
• Slide the footrest up or down as required and release the snaps to click into the required hole.
Only when the snaps audibly click into place will the footrest be secure.
To completely remove the footrest from the chair, follow the above instructions and slide the footrest off the legrest frame.
To replace the footrest, slide the footrest back onto the legrest frame and secure the snaps as detailed above.
WARNING
Ensure the snaps are fully locked and the footrest is
secure before leaving the occupier unattended.
6.12.1
Footrest Angle Adjustment
The angle of the footrest can be adjusted to three different settings: -15°, 0° and 25° from horizontal.
To adjust the footrest angle:
• Locate the spring-loaded snap, situated on either side of the footrest.
CAUTION
The carer should keep hands clear of the footrest hinge
whilst operating the flip-up footrest to avoid pinching fingers.
• Using the spring-loaded lever on the left hand side of the back frame, release the locking
mechanism by turning the lever anti-clockwise.
6.14.Headrest Split-Wing Adjustment
The split-wings provide lateral support to the user’s head and shoulders. They can be angled in or out and should be adjusted to provide
support for the user in the centre of the chair.
The articulating joints in the split-wing headrest are an integral part of the Duo 2.
By bending both wings on each side of the Duo 2, the headrest can be set in its desired position. The split-wing headrest will remove in
place via a friction joint.
To tighten the wings, if they become loose:
• Y
ou will need an Allen key and a 13mm adjustable spanner (not supplied).
•
Pull the wing back so that it lies flat.
•
Loosen the cover to expose the friction joint.
• T
ighten by using the Allen key at the top of the joint and the 13mm adjustable spanner
to secure the bolt at the bottom.
•
Refit the cover and adjust to suit.
6.12. Footrest
The height adjustable footrest provides added support and positioning for the feet and is
provided to aid foot-drop and other similar conditions.

DIRECTHEALTHCAREGROUP.COM16 DIRECTHEALTHCAREGROUP.COM
DUO 2 USER MANUAL
17
6.15. Back Height Adjustment
The back height can be adjusted to suit the user as required.
To adjust the height of the back rest:
7. Accessories
7.1. Split Lateral Support
The Duo 2 can be fitted with two lateral supports that operate independently to provide postural support.
To attach or detach the lateral supports:
• Loosen the triangular handle and insert into the horizontal tube at the back of the Duo 2.
• The supports can be moved horizontally across the bar to widen or narrow the support, or vertically to suit the user.
• To adjust the back height, use the spring-loaded snaps located on the metal back frame. When
retracted and turned 90° the snaps will remain in the unlocked position, this will allow the back
height to be adjusted. Slide the upper part of the back up or down until the height required is
achieved and allow both pins to snap back into the required hole.
• Ensure both “snaps” are located correctly before use.
• If the back height is increased, always check that there is enough cushioning when the back angle is reclined. If there is not enough
cushioning, an extra waterfall cushion should be fixed to the zip on the backboard cover.
Extra waterfall cushions can be obtained from Direct Healthcare Group. Please contact your Direct Healthcare Group representative,
distributor or our Customer Service Team on Freephone 0800 043 0881.
• To move vertically, pull the spring-loaded snaps on each split lateral support at the rear of the chair.
Then rise or lower for adjusting the hight of the split lateral support.
• Raise or lower the split lateral support to the required setting and secure.
• To move horizontally, loosen the triangular handle and adjust to preference. When appropriate positioning has been found tighten the
triangular handles to provide stable and secure support.
7.2. Pommel
A pommel can be fitted to the Duo 2 to provide the user with additional postural support and pelvic positioner. The pommel simply slides
on and off from the front of the seat module.
To attach or detach the pommel:
• Firmly take hold of the pommel upholstery and metal work. Pull the pommel until it slides out of the
seat module.
• To fix the pommel in place, take the metal bar of the pommel and align with the fixing point at the
front of the seat module in the centre. Push the pommel into place.
7.3. Leg Laterals
Leg Laterals are one complete unit that slides onto the legrest assembly.
The footrest must be removed before fixing the leg laterals to the legrest assembly. (Refer to 6.13 for instruction).
To fit the Leg Laterals to the legrest frame:
• Locate the snaps on the Leg Lateral unit and pull these out. Align the unit with the legrest assembly and slide the Leg Lateral unit up the
legrest to the desired position.

DIRECTHEALTHCAREGROUP.COM18 DIRECTHEALTHCAREGROUP.COM
DUO 2 USER MANUAL
19
WARNING
The webbing and plastic fittings should be checked at least weekly for any signs
of damage. If damaged, the Lap-Belt should not be used.
WARNING
The occupant is at risk if the Lap-Belt is not properly specified and adjusted to
their particular requirements.
WARNING
Thrusts, spasms and strong movements, as well as the partial loosening of the Lap-Belt,
could cause injury to the occupant.
• Locate the snaps into the correct positioning holes and click the snaps into a firm fixing.
Re-fit the footrest and position at the required height (Refer to 6.13).
7.4. Laminated Tray with Straps
The tray rests across the two armrests of the Duo 2. It is fixed in position by taking the two webbing straps down either side of the chair,
feeding the straps through the buckle and clamping them in place with the flip lock.
To remove the tray, lift the clamp to release the webbing strap and lift the tray away from the chair.
CAUTION
Take care when adjusting positions to avoid trapping or pinching of body parts.
WARNING
Only a trained individual or a responsible person should adjust the product.
WARNING
The occupant should be regularly checked and the Pelvic Positioner adjusted to ensure optimum positioning and safety.
WARNING
Due to the risk of cross infection, this product should not be used by more than one person.
Fitting the Pelvic Positioner to the chair
Ensure the chair is unoccupied before fitting the Pelvic Positioner.
Sit the occupant into the chair with their pelvis firmly back in the seat and their buttocks on the back
edge of the Pelvic Positioner.
Bring the straps over the
occupant’s thigh and through
the buckles on each end of
the Pelvic Positioner, located
between the occupant’s legs.
Pull the straps tight and fasten
down the clips on the buckles.
The fit should be snug – not
too tight and not too loose.
Place the Pelvic Positioner in
the seat of the chair with the
buckles pointing towards the
chair front and the clips on the
buckles facing down.
Feed the lengths of the straps
through the D-rings on either
side of the seat module.
Place the ends of the straps
over the arms of the chair ready
for the occupant to transfer to
the chair.
7.6. Pelvic Positioner
The Pelvic Positioner is used to help position occupants securely in the back of the chair for those with
low muscle tone or control in their pelvis.
WARNING
The tray must be removed before attempting to exit the chair.
7.5 Lap-Belt and D-Ring Fixing
The Lap-Belt helps stabilise the pelvis and position the occupant in the back of the chair to achieve
a good sitting posture and reduce the risk of tissue damage through the effects of shear which can
occur if the occupant has an unstable posture.
When using a Lap-Belt a level of supervision appropriate to the occupants abilities must be applied at
all times.
All Lap-Belts need to be correctly adjusted to adequately support the occupant without restricting
breathing or causing discomfort.
It is essential the Lap-Belt does not fit loosely around the occupant and is not allowed to work loose
over time as this will allow the pelvis to tilt backwards, encouraging the occupant to slide down and
forward in the chair, particularly if in an upright position.
Ideally the D-Ring fixings for the Lap-Belt and the Lap-Belt itself will be fitted at time of manufacture
however; it can be fitted retrospectively by a trained representative (refer to D-Ring fixing).
To use the Lap-Belt effectively, undo the buckle joining the two halves of the strap by depressing
the button on the central console and place the straps over the arms or to the side of the seat before
transferring the occupant into the chair.
When the occupant is seated correctly, bring the two sides of the buckle together and fasten.
To adjust the Lap-Belt, pull on the plastic loop to give firm control but take care not to restrict the
occupant’s movement. The Lap-Belt is designed to pull back over the hips at an angle between
45° and 60°.
This angle helps to maintain a vertical pelvis by simultaneously positioning the hip joint down and back.
D-Ring Fixing
The chair may come pre-fitted with D-Ring straps if ordered at the time of manufacture.
If so, these will normally be visible near the interface between the seat module and the back cushion.
In this case, the Lap-Belt can be fixed to the D-Rings by simply snapping the spring clip on the end of
the Lap-Belt onto the visible D-Ring.
If the chair is not already fitted with D-Rings, these should be attached to a rigid part of the chair’s
metal framework on either side of the seat module so that they can be fed between the seat and arm
modules.
WARNING
If the Lap-Belt is too loose there is a risk of the occupant sliding underneath or into an
inappropriate position. The Lap-Belt should be checked for correct tightness, regularly.
Care should be taken not to over tighten the Lap-Belt in order to reduce the risk of harm
to the occupant.

DIRECTHEALTHCAREGROUP.COM20 DIRECTHEALTHCAREGROUP.COM
DUO 2 USER MANUAL
21
While the Duo 2 chair has been tailored specifically for the planned occupant’s needs at the time of manufacture, with some alterations
and adjustments, the chair can be re-issued and re-used in a multi-user healthcare environment.
Please seek advice from a qualified Occupational Therapist, healthcare professional and/or Direct Healthcare Group representative/
retailer before using the Duo 2 chair with another user for whom the chair was not originally specified.
8. Re-Use and Re-Issue
WARNING
Consideration to cross infection risks must be given
when reusing or reissuing chairs.
CAUTION
If using the Duo 2 chair in a multi-user environment
conducting an inside risk assessment is recommended.
8.1. Modularity
The Duo 2 chair has a durable frame with modular back, arm, seat and legrest components. These components can be purchased
separately as required, whether to replace a worn module or to re-issue to another user.
Contact the Direct Healthcare Group Customer Care Team on Freephone 0800 043 0881 or your local retailer for current pricing and
availability.
8.1.1. Seat Modules
The seat module dimensions are set at the time of manufacture. The Duo 2 seat modules are available in the following seat widths:
Major – 400mm, 450mm, 500mm and 550mm special size.
The seat modules are also available with three levels of pressure relief:
• Reflexion
™
foam seat cushion (for those at low to medium risk of pressure injuries).
• Dyna-Flex seat cushion.
• Dyna-Tek®
®
Intelligent Air seat cushion (for those at very high risk or up to a grade IV pressure injury).
If an alternative size of seat module is required from the original specification, please contact Direct Healthcare Group Customer
Care Team on Freephone 0800 043 0881 or your local retailer as this will affect the back, arm and legrest modules of the chair.
A visit from a Direct Healthcare Group trained engineer will be required to fit the replacement seat module.
8.1.2. Back Modules
A replacement back module can be purchased for the Duo 2 chair, please contact the Direct Healthcare Group Customer Care Team on
Freephone 0800 043 0881 for further information or your local retailer.
A visit from a Direct Healthcare Group trained engineer will be required to fit the replacement back module.
8.1.3. Arm Modules
Replacement arm modules can be purchased for the Duo chair, please contact Direct Healthcare Group Customer Care Team on
Freephone 0800 043 0881 or your local retailer for further information.
8.1.4. Legrest Modules
A replacement legrest cushion can be purchased for the Duo chair. Please contact Direct Healthcare Group Customer Care Team on
Freephone 0800 043 0881 or your local retailer for further information.
8.2. Disposal of the chair
The Duo 2 chair consists of mostly metal, plastic, wood, foam and fabric components. Disposal of each individual
material must be carried out in line with the environmental and disposal regulations in the relevant country, and may only
take place after the chair has been dismantled fully.
9. Care and Maintenance
Every time the chair is used, check for signs of damage or excessive wear and tear.
If the chair displays signs of excessive wear and tear take out of service immediately and contact Direct Healthcare Group Customer
Care Team on Freephone 0800 043 0881, or your local retailer, for advice about repair and refurbishment.
WARNING
Failure to repair damage or wear and tear could put the occupant at risk of injury.
9.1. Service Life
The service life of the chair in normal daily use is 10 years. The framework, excluding castors and consumables, is warranted for
10 years. Upholstery and other consumables which are warranted for 12 months, such as castors, upholstery and electrical
components, may need to be replaced within this time frame.
It is recommended that a trained service technician inspect the chair every year, to ensure safe operation of the product (refer to 2.
Warranty Guidelines).
WARNING
If the chair develops a fault, STOP using the chair, and contact Direct Healthcare Group Customer Care Team on
Freephone 0800 043 0881 or your local retailer for further advice.
9.2. Periodic Checks
The chair should be checked every time it is used for signs of damage or excessive wear and tear to ensure safe and reliable
operation.
Monthly checks should include, but are not limited to:
•
Any damage to the cables or adjustment levers.
•
Any loose or detached parts.
•
Check castors for damage and a build-up of fluff and dirt particles.
•
Any damage to the fabric of the chair including any soiling of the fabrics.
If any damage is present, STOP using the chair, and contact Direct Healthcare Group Customer Care Team on
Freephone 0800 043 0881 or your local retailer for further advice on repair and refurbishment.
9.3. Cleaning
The chair should be kept clean to preserve the life and appearance of the chair.
Regular cleaning is essential to minimise risk of cross infection between users and carers particularly in a multi-user healthcare
environment.
WARNING
Check the chair for correct functioning after cleaning.
WARNING
Regular cleaning is essential to minimise the risk of infection transmission between users and carers.
IMPORTANT
To reduce the risk of infection transmission to the carer, always use protective gloves when decontaminating
and cleaning the chair.

DIRECTHEALTHCAREGROUP.COM22 DIRECTHEALTHCAREGROUP.COM
DUO 2 USER MANUAL
23
9.3.1. Frame Cleaning
The metal framework of the chair can be cleaned with a mild detergent and a soft cloth.
IMPORTANT
Cleaning with scouring pads is not recommended.
9.3.2. Upholstery Cleaning
IMPORTANT
To reduce the risk of infection transmission to the carer, always use protective gloves when decontaminating
and cleaning the chair.
Cadet, Venture, Berkshire and Brookland Vinyl Cleaning Instructions (External surfaces)
These vinyls have high scratch resistance and a colour solid to the base cloth.
Anti-Microbial and Anti-Fungal Protection. Tested to AATCC147.
•
Clean and care for the fabric on a regular basis and it will maintain its condition and appearance.
Most stains can be removed by wiping clean.
•
The new generation of microfibre cleaning cloths are extremely effective with or without soap for general care and maintenance.
•
Wipe clean regularly with a damp cloth to remove dust particles and light soiling.
•
Remove spillages promptly (within 15 minutes) with an absorbent dry cloth.
•
For heavier soiling, use a soft brush with care to avoid abrasive damage to surface and tepid soapy water (non-alkaline).
Rinse clean with clear water. Dry with an absorbent cloth.
•
Bodily fluids should be removed promptly (within 15 minutes) with cold water and then cleaned as above.
•
Extreme soiling/infection control use a 5% sodium hypochlorite (bleach) solution.
•
Do not machine wash or dry clean.
•
Do not use polish or solvents.
Enduratex© Vinyl Cleaning Instructions (External Surfaces)
Enduratex© contact materials are protected by Produratect-C© lacquer coating and are resistant to every day wear and contact with
mild acids, alkali, drinks, household stains.
•
Use warm soapy water and/or Haz-tab or Clor-clean solution and a household cloth.
•
Rub evenly in the direction of the grain of the material.
•
Rinse with clean water afterwards.
•
Can also be steam cleaned.
DO NOT USE bleaches, solvents, abrasives, wax polishes or aerosol sprays.
Dartex Cleaning Instructions (User Contact Surfaces)
General Guidance
•
Attention must be paid to the properties of any other materials, which may be combined with Dartex Coatings fabrics in the final
article (e.g. dimensional stability, colour fastness, washing instructions).
•
Some surface wrinkling may result from cleaning procedures. This has no adverse effect on the fabric’s properties.
•
Abrasive cleaning agents should not be used.
Washing and Disinfection
•
Superficial dirt on the coating may be removed by wiping with a soft cloth moistened with water containing a neutral detergent.
More persistent contamination may be treated by wiping with alcohols or turpentine substitute, followed by hot water and
detergent.
•
Cleaning and disinfection in situ may be carried out on the coating with hand hot water and a neutral detergent or with a sodium
hypochlorite solution (0.1% or 1000 parts per million available chlorine).
•
Proprietary disinfectants may be used provided manufacturer’s instructions are followed.
•
All cleaning agents, and disinfectants, must be thoroughly rinsed off and the item dried before storage. Failure to do this may
result in the accumulation of reagent that could damage the polyurethane coating, react with the chair frame, or negate the
biocompatibility results of the Dartex fabric.
Drying
•
It is essential that articles be thoroughly dried after all cleaning procedures and before storage.
Storage
•
Store in a cool, dry area. Avoid excessive pressure and contact with non-colourfast materials.
10. Technical Data
10.1. Manufacturing Address
Direct Healthcare Group
Withey Court, Western Industrial Estate, Caerphilly, UK, CF83 1BF
Telephone: +44 (0) 800 043 0881
Email: [email protected]
10.2. Maximum User Weight
Maximum user weight limit: Duo 2 Major 110kg/20 stone.
Please adhere to the user weight limit for the Duo 2 chair and note your warranty will be void and user safety may be compromised
should the weight limit be exceeded.
10.3. Weight and Dimensions of the Chair
Item Weight (kg) Dimensions (mm)
Duo 2 Major Electric and Regulated Motion 80kg 1350L x 680-830W x 1250-1520H
Cardboard Box 7kg 1000 x 800 x 1300
Pallet 10kg 1000 x 800 x 150

DIRECTHEALTHCAREGROUP.COM24 DIRECTHEALTHCAREGROUP.COM
DUO 2 USER MANUAL
25
11. Customer Support
Should you have any concerns or are experiencing any problems regarding the set up or maintenance of your Duo 2 chair
please contact our Customer Care Team on Freephone 0800 043 0881.
10.4. Product Standards
MHRA Registration CA000105
10.4.1. Flammability Testing
BS 7176:2007+A1:2011
BS EN 1021-1:2014
BS EN 1021-2:2014
BS 5852:2006
(Specification for resistance to ignition of upholstered furniture for non-domestic seating by
testing composites).
(Furniture. Assessment of the ignitability of upholstered furniture. Ignition source smouldering
cigarette).
(Furniture. Assessment of the ignitability of upholstered furniture. Ignition source match flame
equivalent).
(Methods of test for assessment of the ignitability of upholsteredseating by smouldering and
flaming ignition sources).
10.4.2. Strength, Stability, Durability, Risk and Safety
(Domestic furniture. Seating. Determination of stability).
BS EN 1022:2005
BS 8474:2013 (Furniture. Strength, durability and safety. Requirements for non-domestic seating).
BS EN ISO 14971:2012 (Medical devices. Application of risk management to medical devices).
10.4.3. Quality and Environmental

DIRECTHEALTHCAREGROUP.COM26 DIRECTHEALTHCAREGROUP.COM
DUO 2 USER MANUAL
27

C27769
DIRECTHEALTHCAREGROUP.COM
LIT-00152 Issue 1
Date: April 2022
Direct Healthcare Group Ltd
Withey Court, Western Industrial Estate
Caerphilly, United Kingdom
CF83 1BF
T: +44 (0) 800 043 0881
F: +44 (0) 845 459 9832
PRESSURE ULCER PREVENTION
SAFE MOVING & HANDLING
SPECIALIST THERAPIES
BATHROOM SAFETY
RENTAL & SERVICE SOLUTIONS
EU Authorised Representative,
Importer and Distributor:
Direct Healthcare Group Sverige AB,
Torshamnsgatan 35, SE-164 40,
Kista, Sweden
T: +46 (0) 8 557 62 200
Australian Sponsor:
Direct Healthcare Group Pty Ltd.,
68 Howe Street, Osborne Park,
Western Australia 6017
T: +61 (0) 423 852810
EC REP
Table of contents