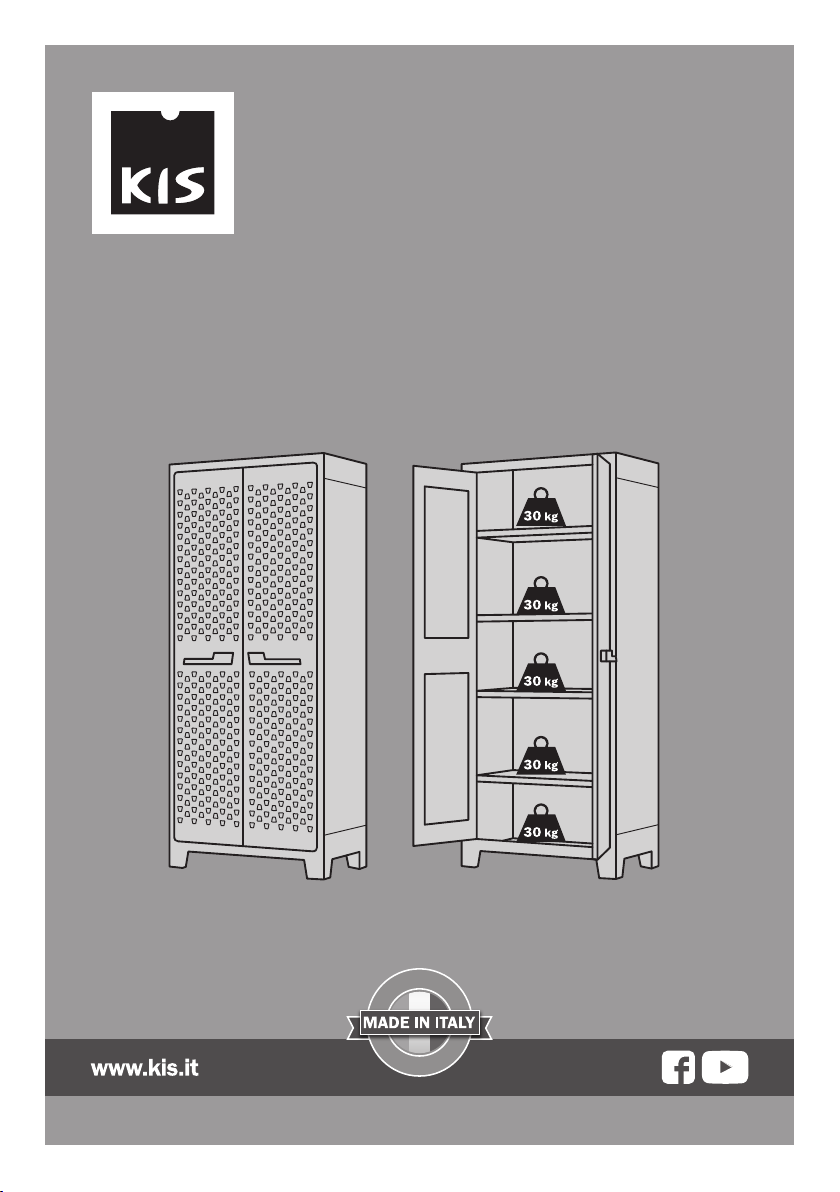
Kis MOBY 9760100 User manual

290578_Rev.02_07/17
*Distribuiti uniformemente - Equally distribuited - Gleichmässig verteilt - Distribué uniformement - Uniformemente distribuido - Op gelijkmatige wijze ver-
deeld - Ağırlık eşit olarak dağıtılmalıdır - Κατανεμημένο ομοιόμορφα - Равномерно распределеная - Distribuite în mod egal - Rovnoměrně rozložené
- Jednolicie rozłożone obciążenie
K
I
S
D
E
S
I
G
N
•
O
R
I
G
I
N
A
L
•
MOBY
9760100
cm 80x44x182 h
IT - Istruzioni per il montaggio
GB - Assembly instruction
DE - Montageanleitungen
FR - Instructions pour le montage
ES - Istrucciòn para el montaje
NL - Instructies voor de montage
TR - Montaj talimatları
GR - Οδηγίες συναρμολόγησης
RU - Инструкции за монтаж
RO - Instructiuni de montaj
CZ - Návod na montáž
PL - Instrukcja montażu

2
D E
A
D
B
E
C
Leggere attentamente il manuale d’uso prima d’iniziare l’assemblaggio. Manuale originale redatto in lingua italiana. Read these
instructions carefully before beginning assembly. The original manual is in Italian. Bitte lesen Sie vor dem Zusammenbau die
Bedienungsanleitung sorgfältig durch. Die Original-Bedienungsanleitung ist in italienischer Sprache abgefasst. Lire attentivement
la notice avant de commencer l’assemblage. Traduction de la notice originale rédigée en italien. Lea detenidamente el manual de
uso antes de empezar el montaje. El manual original está redactado en italiano. Lees aandachtig de handleiding door alvorens
met de montage te beginnen. Oorspronkelijke handleiding opgesteld in de Italiaanse taal. Montaja başlamadan önce kullanım
kılavuzunu dikkatle okuyun. Orijinal kılavuz İtalyanca olarak hazırlanmıştır. Διαβάστε με προσοχή τις οδηγίες χρήσης πριν αρχίσετε
τη συναρμολόγηση. Οι αυθεντικές οδηγίες έχουν συγγραφεί στα Ιταλικά. До того, как начать сборку внимательно прочитайте руководство.
Оригинальное руководство выпущено на итальянском языке. Citiţi cu atenţie manualul de utilizare înainte de a începe asamblarea.
Manual original redactat în limba italiană. Před započetím montáže si pozorně přečtěte návod k použití. Původní originál byl
vyhotoven v italském jazyce. Należy uważnie przeczytać instrukcję obsługi przed rozpoczęciem montażu. Oryginalna instrukcja
zredagowana została w języku włoskim. Ler com atenção o manual de uso antes de começar a montagem. Manual original
redigido no idioma italiano.
Prima di iniziare l’assemblaggio, rimuovere tutti i pezzi dall’imballaggio e raggrupparli seguendo le indicazioni di pag. 4 e 5.
Before beginning assembly, remove all pieces from the packaging and group them according to the indications on pages 4 and 5.
Nehmen Sie vor dem Zusammenbau alle Teile aus der Verpackung und fassen Sie sie, anhand der Angaben auf den Seiten 4 und
5, in Gruppen zusammen. Avant de commencer l’assemblage retirer tous les emballages et les regrouper comme indiqué pages
4 et 5. Antes de empezar el montaje, saque todas las piezas del embalaje. Agrúpelas según las indicaciones de las páginas 4 y
5. Verwijder alle onderdelen uit de verpakking alvorens met de montage te beginnen en groepeer ze volgens de aanwijzingen op
pag. 4 en 5. Montaja başlamadan önce tüm ambalaj parçalarını çıkarın, 4 ve 5. sayfalardaki talimatları izleyerek gruplandırın.
Πριν αρχίσετε τη συναρμολόγηση αφαιρέστε όλα κομμάτια από τη συσκευασία και συγκεντρώστε τα ακολουθώντας τις οδηγίες των σελ. 4 και 5.
До того, как начать сборку освободите все детали от упаковки и объедините ее в группы, как показано на стр. 4 и 5. Înainte de a
începe asamblarea scoateţi toate pisele din ambalaj şi grupaţi-le urmând indicaţiile de la pag. 4 şi 5. Před započetím montáže
odstraňte všechny obalové materiály a rozdělte je dle instrukcí na str. 4 a 5. Przed rozpoczęciem montażu, usunąć wszystkie
części opakowania i posegregować je zgodnie ze wskazówkami ze str. 4 i 5. Antes de começar a montagem, tirar todas as peças
da embalagem e reuni-las seguindo as indicações da pág. 4 e 5.

3
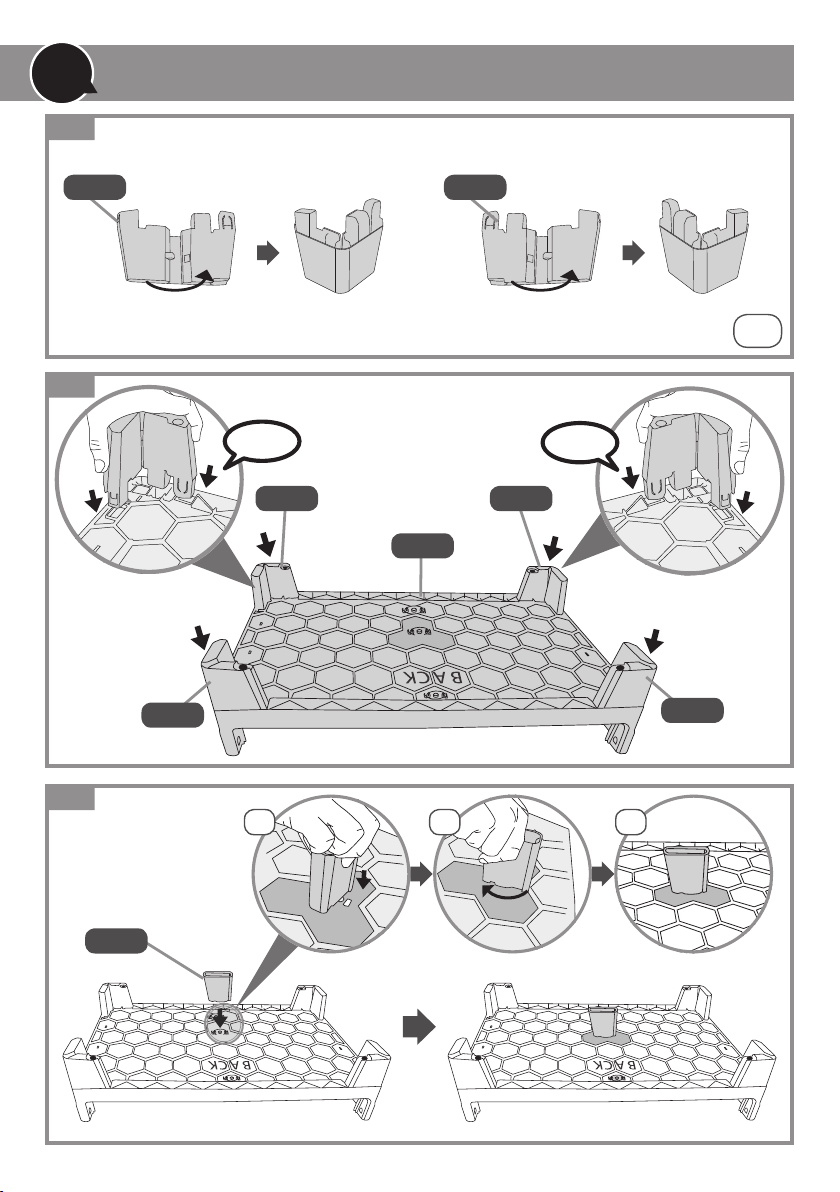
Il montaggio richiede i seguenti utensili (non inclusi): Assembly requires use of the following tools (not included): Für die
Montage sind die folgenden Werkzeuge erforderlich (nicht im Lieferumfang enthalten): Le montage requiert les outils suivants
(non inclus):El montaje requiere las siguientes herramientas (no incluidas): El montaje requiere las siguientes herramientas (no
incluidas): Voor de montage zijn de volgende gereedschappen nodig (niet bijgeleverd): Montaj için aşağıdaki aletler gereklidir
(dahil değil): Η συναρμολόγηση απαιτεί τη χρήση των παρακάτω εργαλείων (δεν περιλαμβάνονται). Для монтажа требуются
следующие инструменты (не включены в поставку): Для монтажа требуются следующие инструменты (не включены в поставку): Pentru
montare este nevoie de următoarele ustensile (neincluse în dotare): K montáži je potřeba toto nářadí (není součástí dodávky).
Montaż wymaga następujących narzędzi (niezawartych w dostawie): Para a montagem são necessárias as ferramentas a seguir
(não incluídas):
In caso di pezzi mancanti o danneggiati all’interno del cartone, rivolgersi al proprio punto vendita presentando la prova di
acquisto. Indicare inoltre la sigla dei pezzi mancanti o danneggiati utilizzando l’elenco di pag. 4 e 5. If there are pieces missing or
damaged, contact your local dealer presenting proof of purchase. Indicate the code of the missing or damaged pieces, referring to
the list on pages 4 and 5. Falls Teile fehlen oder beschädigte Teile im Karton enthalten sind, wenden Sie sich bitte unter Vorlage
des Kaufbelegs an Ihre Verkaufsstelle. Geben Sie bitte auch, anhand des Verzeichnisses auf den Seiten 4 und 5, die Art-Nr. der
fehlenden bzw. beschädigten Teile an. En cas de pièces manquantes ou endommagées dans le carton s’adresser au point de
vente en présentant une preuve d’achat. Indiquer en outre le sigle des pièces manquantes ou endommagées selon la liste pages 4
et 5. Si faltan piezas o encuentra piezas estropeadas dentro del cartón, póngase en contacto con el punto de venta y presente el
recibo de compra. Debe indicar también la sigla de las piezas no presentes o estropeadas. Para ello utilice la lista de las páginas 4 y
5. Als stukken mochten ontbreken of binnen de verpakking beschadigd mochten zijn, dient u zich tot het verkooppunt te wenden
en het aankoopbewijs te tonen. Geef bovendien de code van de ontbrekende of beschadigde stukken aan met behulp van de lijst op
pag. 4 en 5. Σε περίπτωση που λείπουν κομμάτια ή έχουν πάθει ζημιά στο εσωτερικό του χαρτοκιβωτίου, απευθυνθείτε στο κατάστημα πώλησης
επιδεικνύοντας την απόδειξη αγοράς. Αναφέρετε επίσης τον κωδικό των κομματιών που λείπουν ή έχουν πάθει ζημιά χρησιμοποιώντας τη λίστα των σελ.
4 και 5. В случае, если обнаружена нехватка или внутри коробки повреждены детали, обратитесь к продавцу, предоставив ему документы,
подтверждающие покупку. Кроме этого, укажите код недостающих или поврежденных компонентов в соответствии с кодами, указанными на
стр. 4 и 5. În cazul pieselor lipsă sau deteriorate din interiorul cutiei, adresaţi-vă magazinului de unde l-aţi cumpărat, prezentând
bonul fiscal. Indicaţi deasemeni sigla pieselor lipsă sau deteriorate utilizând lista de la pag. 4 şi 5. V případě chybějících nebo
poškozených dílů uvnitř kartónu se obraťte přímo na prodejní místo, kde předložíte kupní doklad. Kromě toho si pomocí seznamu na
str. 4 a 5 vyhledejte značku chybějících nebo poškozených dílů. W przypadku brakujących lub zniszczonych części, należy zwrócić
się do punktu sprzedaży, przedstawiając dowód sprzedaży. Należy ponadto podać symbol brakujących lub zniszczonych części,
korzystając w tym celu z listy na stronach 4 i 5. No caso de peças faltantes ou danificadas dentro da caixa, contatar o próprio
ponto de venda apresentando o comprovante de compra. Indicar também a sigla das peças que faltam ou danificadas utilizando
a lista da pág. 4 e 5.
MADE IN ITALY
ABM Italia SpA - Via Ing. G. Taliercio 2 - 31024 Ormelle (TV) - I - Tel. +39 0422 745900 - Fax +39 0422 745929 - abminfo@keter.com

BACK
BACK
1x C1
1x C2
1x C4
2x C7 2x C8
1x C3
1x C5
4
1x C10
1x C11
4x B1
1x
2x
1x A7
1x A1
2x A3
1x A4
2x A2
1x A5
1x A6
2x
2x B2 2x B4
1x B3
6x [4,5X25]
A B C

BACK
BACK
5
2x D1 2x D2
1x D3
1x D5 1x D6
1x D4
1x D7
2x D21
2x D23
1x D8
6x4x 1x
10x [4,5X25]
2x
2x
4x
4x E1
E3E2
D20
D22
D E

6
A2
A3
A1
A4
A2
A3
A2
A3
1 2 3
x2
01
02
03
click click
A

7
04
05
06 A6 A5
1 2
A7
BACK
BACK
click click

INSIDE
8
B1
B1 B1
B3
BACK
x2
07
09
10 11
08
B

INSIDE
INSIDE
INSIDE
INSIDE
12 13
9
B1 B1
B1
INSIDE
x2
14
16
15
17
B3
B4
B2 B2
B4

BACK
BACK
INSIDE
INSIDE
BACK
INSIDE
10
BACK
BACK
BACK
x6
C1
C4
C2
C7
C11
C7
C10
C8
C8
C5
C3
BACK
1 2 3
click
click click
click
click
18
19
20 21
C
4,5X25 x 6

UP UP
UP UP
UP UP
UP UP
UP UP
11
x3 x3
D8 D6
D3 D4
D7 D5
D8 D6
D2
D1
D3 D4
D2 D1
D7 D5
22
23
D
clickclick

UP UP
12
x3 x3
x3
x3 x3
x3
2
1
2
1
3 3
UP UP
24
4,5X25 x 6

13
UP
x4
25

14
26
D20
D23
D22
D21

4,2X22 x 4
15
27

E2
E2
E1
x2
x2
click
1 2
1 2 3
28
29
30
x4
x4
x4
16
E
BACK

BACK
BACK
BACK
BACK
E3
E3
click
1 2
1 2 3
31
x4
17
32
x4
x4
BACK
BACK
1
2

18
Per garantire maggiore stabilità dell’armadio su superfici irregolari, utilizzare le viti di regolazione poste sotto i piedi anteriori. For
optimum stability on uneven surfaces, regulate the cupboard using the screws under the front feet. Um dem Schrank auf unebenen
Flächen mehr Stabilität zu verleihen, verwenden Sie bitte die Stellschrauben unter den vorderen Füßen. Pour garantir une meilleure
stabilité de l’armoire sur des surfaces irrégulières, utiliser les vis de réglage placées sous les pieds avant. Utilice los tornillos de
regulación (situados bajo los pies delanteros) para asegurar una mayor estabilidad del armario. Gebruik de stelschroeven onder de
voorpoten om een betere stabiliteit van de kast op onregelmatige vloeren te verzekeren. Dolabın düzgün olmayan yüzeyler üzerinde
daha sağlam bir şekilde durmasını sağlamak için ön ayakların altındaki ayar vidalarını kullanın. Για να εξασφαλίσετε τη μεγαλύτερη
σταθερότητα της ντουλάπας πάνω σε ανώμαλες επιφάνειες, χρησιμοποιήστε τις βίδες ρύθμισης που βρίσκονται κάτω από τα μπροστινά πόδια. Для того,
чтобы обеспечить наибольшую устойчивость шкафа на неровной поверхности, воспользуйтесь регулировочными винтами, расположенными под
передними ножками. Pentru a garanta o stabilitate mai mare a dulapului pe suprafeţele neregulate, utilizaţi şuruburile de reglare
aflate sub picioarele din faţă. Abyste zajistili co největší stabilitu skříně na nerovném povrchu, použijte regulační šrouby umístěné
pod předními nožičkami. Aby zagwarantować większą stabilność szafy, w przypadku nieregularnego podłoża, należy użyć śrub
regulacyjnych, znajdujących się pod przednimi nóżkami. Para garantir maior estabilidade do armário sobre superfícies irregulares,
utilize os parafusos de regulação situados em baixo dos pés dianteiros.

19
Fissare l’armadio a muro (viti e tasselli non inclusi). Scegliere il tassello in base alla superficie di appoggio. Fasten the cupboard
to the wall (screws and anchors not included). Choose the anchor according to the surface. Befestigen Sie den Schrank an der Wand
(Schrauben und Dübel sind nicht im Lieferumfang enthalten). Den Dübel je nach Stellfläche wählen. Fixer l’armoire au mur (vis et
chevilles non incluses). Choisir la cheville en fonction de la surface d’appui. Fije el armario en la pared (la dotación no incluye tornillos
y tacos). Elija el taco en función de la superficie de apoyo. Bevestig de kast aan de muur (schroeven en pluggen niet bijgeleverd). Kies
de plug aan de hand van het steunoppervlak. Dolabı duvara sabitleyin (vidalar ve dübeller dahil değil). Destek yüzeyine göre dübel
seçin. Στερεώστε την ντουλάπα στον τοίχο (βίδες και ούπα δεν περιλαμβάνονται). Επιλέξτε το ούπα ανάλογα με την επιφάνεια στήριξης. Закрепите
шкаф на стене (шурупы и дюбели не включены в поставку). Возьмите дюбель, пригодный для материала поверхности, у которой ставится шкаф.
Fixaţi dulapul la perete (şuruburi şi dibluri neincluse în dotare). Alegeţi diblul în funcţie de suprafaţa pe care urmează să se fixeze.
Připevněte skříň ke zdi (šrouby a hmoždinky nejsou součástí dodávky). Zvolte hmoždinku podle povrchu podkladu. Przymocować
szafę do muru (śruby i kołki nie są zawarte w dostawie). Dobrać kołek w zależności od powierzchni oparcia. Fixe o armário na parede
(parafusos e buchas não incluídos). Escolher a bucha conforme a superfície de apoio.

20
Il periodo di garanzia inizia a partire dalla data di acquisto,
quindi vi preghiamo di conservare una prova di acquisto con
data.
Validità di garanzia: 2 anni a partire dalla data di acquisto.
Danni causati da utilizzo non corretto, uso inappropriato, uso
di forza, negligenza o montaggio non seguito in conformità
con il manuale d’istruzioni provocano la decadenza della
garanzia del Produttore.
Danni provocati da errate condizioni di stoccaggio del
prodotto o da errate condizioni di stoccaggio dei materiali
all’interno del prodotto che ne deformino la struttura stessa,
provocano la decadenza della garanzia del Produttore.
Il produttore non è responsabile per danni causati agli
oggetti riposti all’interno del prodotto.
Si consiglia di posizionare il prodotto su una superficie piana.
Non adatto per la conservazione di prodotti soggetti ad
usura dovuta a variazioni della temperatura ambientale.
Non conservare all’interno del prodotto oggetti caldi quali,
ad esempio, lampade per saldature, ferri da stiro, ecc.
Non adatto per la conservazione di sostanze infiammabili o
corrosive.
Non adatto per conservare alimenti.
Non incidere o perforare il prodotto.
Si raccomanda di chiudere e bloccare le porte con un
lucchetto (non incluso). La presenza del lucchetto può
aiutare a prevenire eventuali danni provocati dal vento.
Temperatura di esercizio: da -5°C a +40°C.
Lavare il prodotto con una soluzione detergente non
aggressiva, per non provocare danni alle superfici plastiche.
Non utilizzare spazzole dure o detergenti abrasivi.
Il prodotto non è un giocattolo: tenere lontano dalla portata
dei bambini. Attenzione: rischio soffocamento.
Non rinchiudere animali all’interno del prodotto.
Al termine dell’installazione, smaltire l’imballaggio secondo
la normativa vigente.
A fine vita del prodotto: smaltire il prodotto secondo la
normativa vigente.
Conservare il manuale d’uso
The guarantee period begins on the date of purchase. You
should therefore keep proof of purchase indicating the date.
Guarantee validity: two years from date of purchase.
Damage caused by incorrect or inappropriate use, use of
force, negligence or assembly other than as described in
these instructions invalidates the manufacturer’s guarantee.
Damage caused by incorrect storage of the product, or of the
materials contained in the product, resulting in warping of
the structure invalidates the manufacturer’s guarantee.
The manufacturer is not responsible for damage caused by
objects placed in the product.
The product should be positioned on a flat surface.
Not suitable for storing products subject to damage caused
by variations in ambient temperature.
Do not store hot objects in the product, such as welding
lamps, irons, etc.
Not suitable for storing flammable or corrosive substances.
Not suitable for storing foods.
Do not cut or perforate the product.
You are recommended to close and lock the doors with a
padlock (not included).
A padlock can help prevent possible wind damage.
Working temperature: from -5°C to +40°C.
Wash the product with mild detergent to avoid damaging
the plastic surfaces. Do not use stiff brushes or abrasive
detergents.
The product is not a toy. Keep out of reach of children.
Important: danger of suffocation.
Do not shut animals inside the product.
After installation, dispose of the packaging in accordance
with current legislation.
At the end of its useful life, dispose of the product in
accordance with current legislation.
Keep the instructions
Die Garantiezeit beginnt ab dem Kaufdatum, heben Sie daher
bitte einen Kaufbeleg mit Datumsangabe auf.
Garantielaufzeit: 2 Jahre ab Kaufdatum.
Schäden durch falschen oder unsachgemäßen Gebrauch,
Gewaltanwendung, Fahrlässigkeit oder Montage entgegen
den Angaben im Benutzerhandbuch führen zum Erlöschen
der Herstellergarantie.
Schäden durch falsche Lagerbedingungen des Produkts
oder durch falsche Lagerbedingungen der Materialien im
Produkt, die den Korpus verformen, führen zum Erlöschen
der Herstellergarantie.
Der Hersteller haftet nicht für Schäden an Gegenständen,
die im Produkt aufbewahrt werden.
Es wird empfohlen, das Produkt auf einer ebenen Fläche
aufzustellen.
Nicht geeignet für die Aufbewahrung von Produkten, die bei
Änderung der Raumtemperatur verschleißen.
Bewahren Sie im Produkt keine heißen Gegenstände, wie
beispielsweise Lötlampen, Bügeleisen, usw. auf.
Nicht geeignet für die Aufbewahrung von brennbaren oder
korrosiven Stoffen.
Nicht geeignet für die Aufbewahrung von Lebensmitteln.
Das Produkt nicht einschneiden oder durchstoßen.
Es wird geraten, die Türen zu schließen und mit einem
Vorhängeschloss zu verriegeln (nicht im Lieferumfang
enthalten).
Mit dem Vorhängeschloss können durch Wind verursachte
Schäden verhindert werden.
Betriebstemperatur: -5°C bis +40°C.
Waschen Sie das Produkt mit einer nicht aggressiven
Reinigungslösung, um die Kunststoffoberfläche nicht zu
beschädigen. Verwenden Sie keine harten Bürsten oder
scheuernden Reinigungsmittel.
Das Produkt ist kein Spielzeug: halten Sie es fern von
Kindern. Achtung: Erstickungsgefahr.
Schließen Sie keine Tiere im Produkt ein.
Entsorgen Sie die Verpackung nach der Montage
vorschriftsmäßig.
Am Lebensende des Produkts: entsorgen Sie das Produkt
vorschriftsmäßig.
Die Bedienungsanleitung sorgfältig aufbewahren.
AVVERTENZE
WARNINGS
HINWEISE
Table of contents
Popular Outdoor Furnishing manuals by other brands

Sunnydaze Decor
Sunnydaze Decor XCA-139 Assembly instructions

Safavieh
Safavieh PAT6738 Assembly instructions

Playcore
Playcore Swing-N-Slide SideWinderSlide quick guide

Belson Outdoors
Belson Outdoors CBPB-6A1B-BK instruction sheet

LL Bean
LL Bean All Weather Glider Assembly instructions

Garden Wood Furniture
Garden Wood Furniture Somerset Glider 44 961KFSIc Assembly instructions

Costway
Costway OP3588 user manual

real living
real living OAKMONT 5PC ALL WEATHER WICKER SET Assembly instruction

BENITO
BENITO Urban Far Flex H411 Anchoring instructions

BENITO
BENITO Urban Argo PA693GR Anchoring instructions

BENITO
BENITO Urban Leman UM397SE Anchoring instructions

Outsunny
Outsunny INeda013V05 US CA Assembly and instruction manual