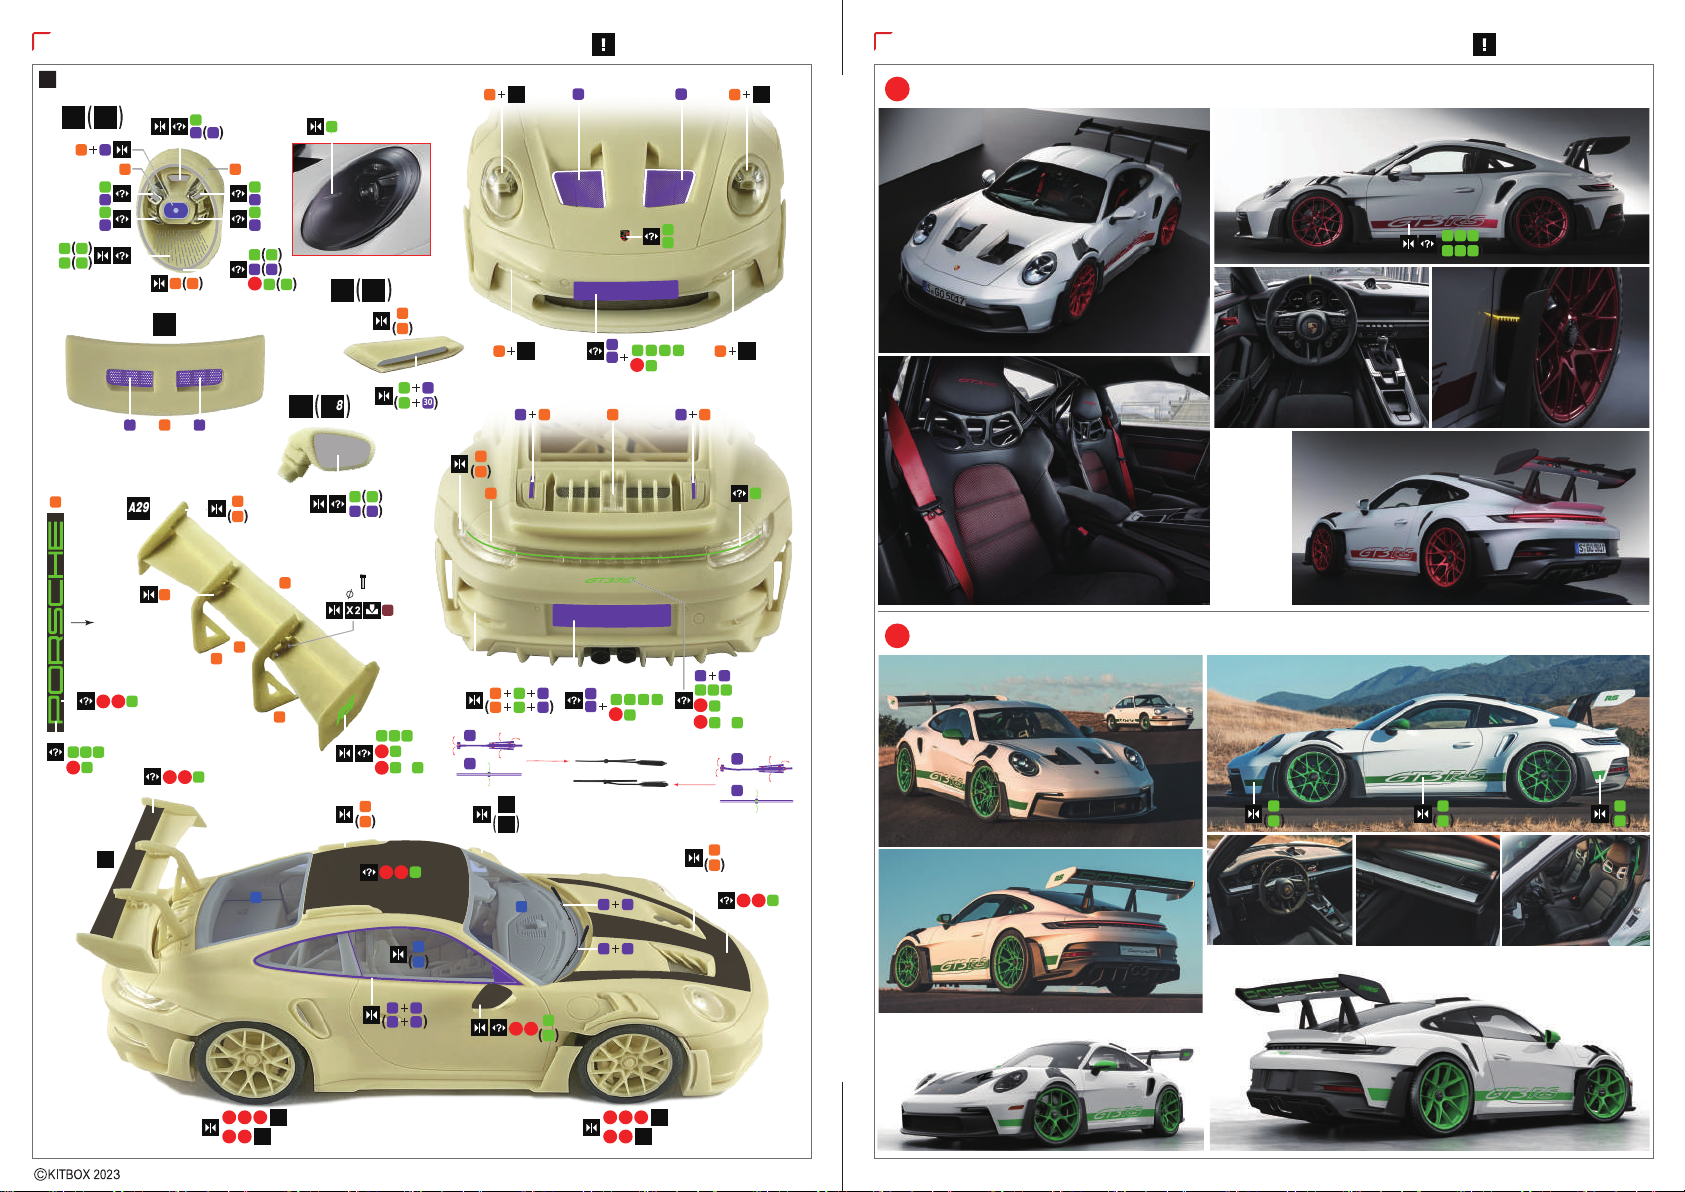
1/24 整车拼装系列 — 保时捷911 GT3RS(992.1)
标准版
魏斯阿赫选装版
1/24 Full Detail Kit Series — Porsche 911 GT3RS (992.1)
STANDARD EDITION
WEISSACH PACKAGE EDITION
KB08-04
PZY-003
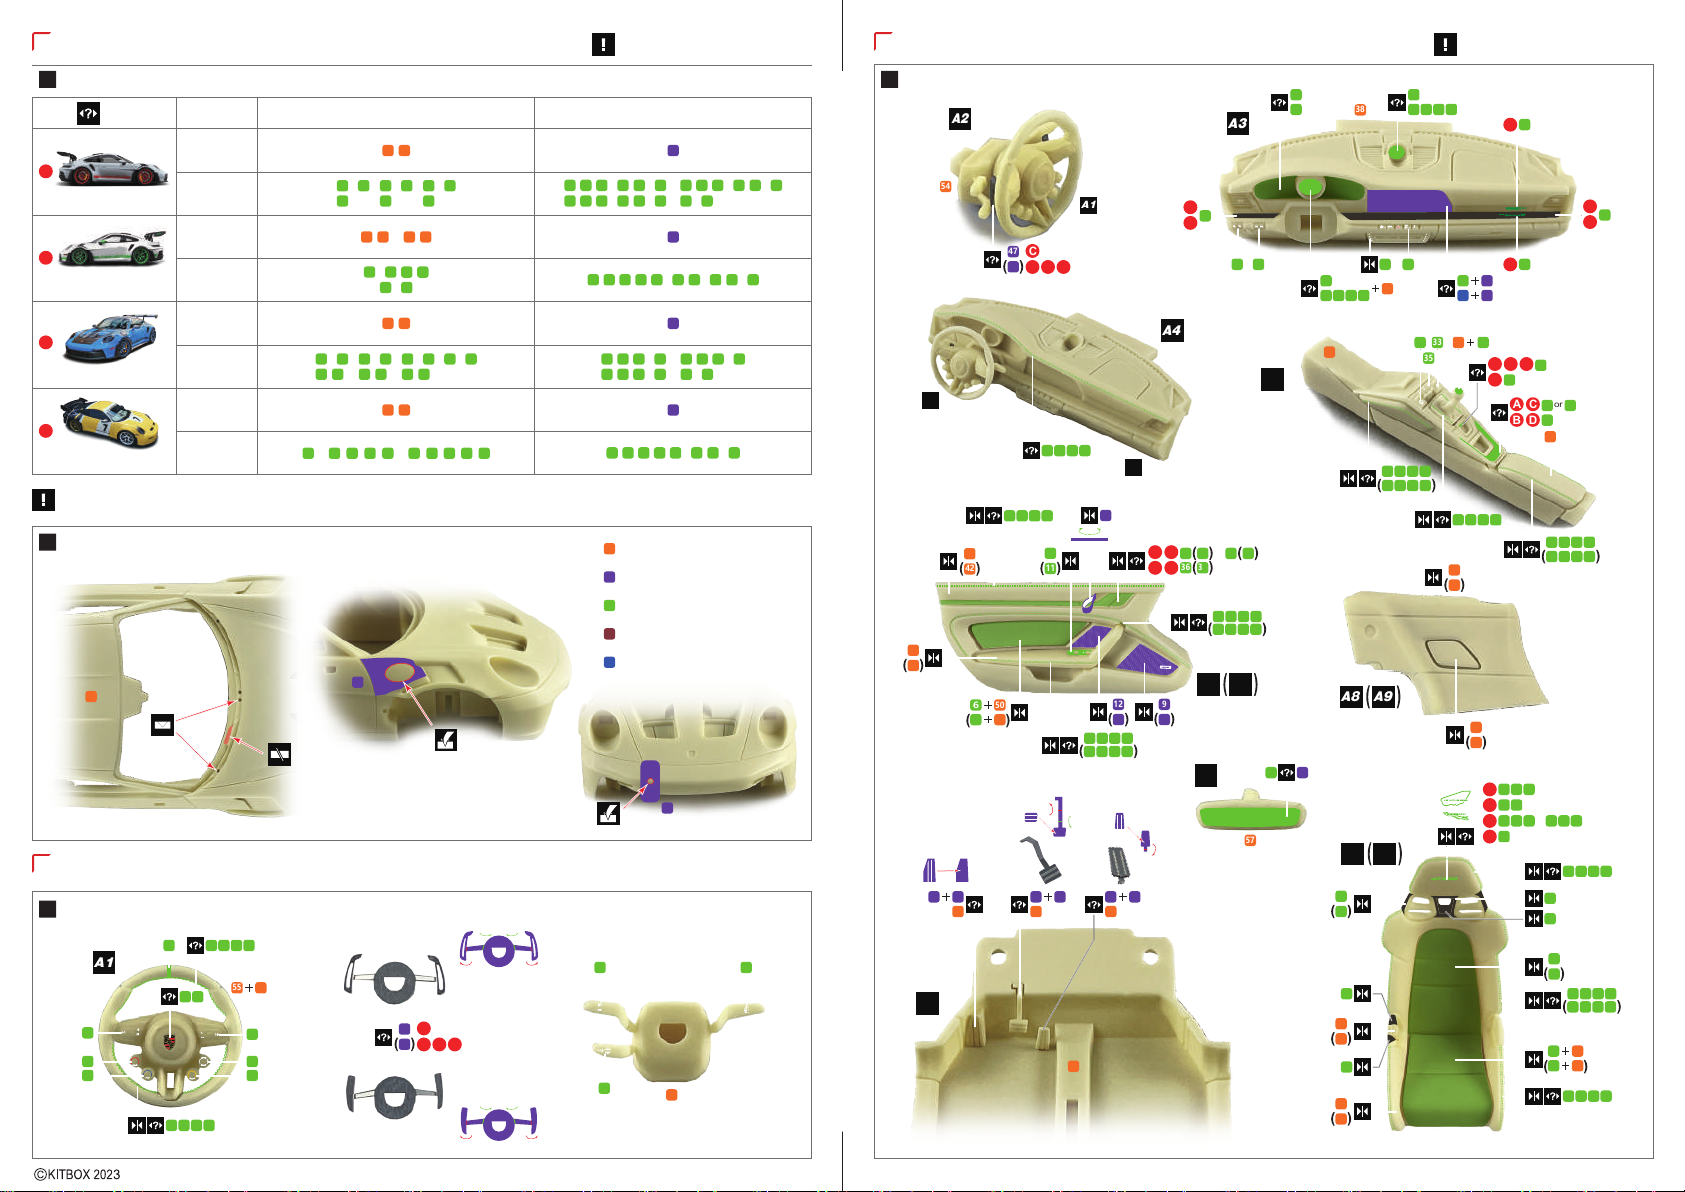
零件清单/Parts List
1. Please try test fit carefully between every parts before applying adhesives.
2. Metal parts may be slightly out of shape when first taken out of the box. You can restore the shape by carefully
bending the part, but take caution as overexerting the part will cause it to damage.
3. You can change the shape of resin parts by applying heat (eg.using a hair dryer). But please be careful of
damaging the parts.
4. Please be ware that some parts may have to be altered by cutting before the can be fit together.
5. After the parting lines and gates have been removed from all parts, please apply under coating (eg.
primer surfacer) before painting.
6. Please clean all resin parts (eg. applying netural detergent) before color painting.
7. Please use super glue or epoxy resin when building this kit.
8. Please carefully keep decals and metal stickers in dry and cool condition, avoid exporsure to direct sunlight
and do not bend.
9. Choking hazard and sharp parts warning! Please keep this kit and parts away from reach of children.
制作前请仔细阅读以下内容
READ CAREFULLY BEFORE START
1. 使用粘接剂前请务必进行各零件间的假组合;
2. 金属零件可能有轻微变形现象,使用前请小心进行矫正,用力过度或操作不当会导致零件损毁;
3. 可以使用热矫正的方法(如吹风机)处理树脂零件变形的情况,但请务必小心操作以避免零件损坏;
4. 某些零件使用前需要进行水口切除等修整操作;
5. 去除所有零件上的分模线及水口后,请在开始上色前使用专用的水补土喷涂打底;
6. 请使用中性洗涤剂清洗全部树脂零件以增强油漆附著力和上色效果;
7. 请使用快乾胶水及环氧树脂(AB胶水)来组合粘接各零件(请另行购买);
8. 水贴纸及金属贴纸请于避光凉爽乾燥处进行保存,切勿弯折;
9. 当心窒息危险及锋利零件,请务必将套件及零件保存在孩童触及不到的地方。
1. 请沿着贴纸外轮廓,用剪刀或者笔刀小心裁切
Cut out the decal into the desired shape by
scissors and cutter.
2. 请将贴纸用水浸湿10~30秒左右
Dip the decal into water for 10 to 30 seconds.
3. 请将贴纸置于准备粘贴的位置,用镊子将图案
从衬纸上小心剥离,一边调整其位置,一边用
软布将多余水分擦拭掉
Put the decal on desired place and slide it
gently from its backing sheet by tweezers.
Adjust the decal position and dry excess
water with a soft cloth.
水贴使用说明
HOW TO APPLY DECALS
零件清单/Parts List
图例说明/Symbols Explanation
树脂零件/Resin Parts
蚀刻零件/PE Parts 预裁切窗片/Pre-cut Window Sheets
金属零件及其它/Metal Parts & Others
水贴 & 金属水贴
/Decals & Metal Stickers
涂装说明/Painting Instructions
1
2
4
5
6
7
3
8910
11 12
13 14
15 16
2019
18
21 22
23 24
25 26
27
28
29
30 31 32 33
35 36
38
40
41
37
42
39
44
43
45 46 47
48
49 50 51 52 53
54 55
56
57 58
59 60 61
62 63 64
65 66
67 68
69 70
71
72 73
76
77
78 79
80 81
82 83
85 86
88 89 92 93
94 95
90 91
87
84
74 75
软胶轮胎 /
Rubber Tires
透明零件 /
Clear Parts
镀铬零件 /
Chromed Parts
A1
C
D1
追加刻线
Carve Lines
选择零件 制作 组 以相同方式制作另一侧
Make Choice
钻孔
Drill a Hole
填平孔洞
Fill a Hole
开始制作前请根据清单清点零件以确认套件是否完整
Please check the kit content according to the following PARTS LIST before start.
开始制作前请根据零件清单清点确认套件是否完整
Please confirm the kit content according to the following PARTS LIST before start.
请勿将水性涂料(Acrylic Paint)与油性硝基涂料(Lacquer Paint)混合使用;
推荐使用TAMIYA(田宫)及GUNZE SANGYO (GSI CREOS,郡士)出品的水性或硝基系列模型专用涂料;
请另行购买所需涂料及上色喷涂工具,具体使用方法请参考各产品说明书;
车体及内饰涂装请根据实车资料及个人喜好进行搭配。
Please don’t mix ACRYLIC PAINT with LACQUER PAINT.
The acrylic paint & lacquer paint series from TAMIYA & GUNZE SANGYO (GSI CREOS) are highly recommanded.
Please purchase the paints and tools separately.For the use of them in detials, please refer to the instructions of each products.
Please decide the exterior and interior colors according to photos of the real car or your personal preference.
切除
Cut & Remove
已完成的装配体
Finished Assemblies
D2 D3 D4
AX
17
34
5
1
2
3
4
A2
B