Kitchener 8 User manual

#8 STAINLESS STEEL ELECTRIC MEAT GRINDER
OWNER’S MANUAL
ITEM# 337989

2 of 8
Thank you very much for choosing a Kitchener™ product! For future reference, please complete the
owner’s record below:
Model: _______________ Purchase Date: _______________
Save the receipt, warranty and these instructions. It is important that you read the entire manual to
become familiar with this product before you begin using it.
This machine is designed for certain applications only. The distributor strongly recommends this
machine is not modified and/or used for any application other than that for which it was designed. If you
have any questions relative to a particular application, DO NOT use the machine until you have first
contacted the distributor to determine if it can or should be performed on the product.
For technical questions and replacement parts, please call 1-800-222-5381.
TECHNICAL SPECIFICATIONS
HP
0.35 HP
Volts
120V
Watts
250W
Neck
#8
Overall Dimensions (L x W x H)
19.3in. x 8.3in. x 13.6in. (490 x 212 x 345 mm)
Capacity Per Hour
264 lbs. (Pork) / 198 lbs. (Beef)
Motor Speed - No Load
240 RPM
Hopper Size
Elliptic 11.8in. x 7.9in. x 4.3in. (300 x 200 x 109 mm)
Inlet Diameter
2in. (51mm)
Outlet Diameter
2.4in. (62mm)
Plate Diameter
2.4in. (62mm)
Size of Plate Holes
3/16in. (4.5mm), 3/8in. (10mm)
Stuffing Tubes Included
3/8in. (10mm), 3/4in. (20mm), 1-1/4in. (30mm)
Discharge Pan Dimensions (L x W x H)
9.4in. x 8.7in. x 1.6in. (240 x 220 x 42 mm)
GENERAL SAFETY RULES
WARNING: Read and understand all instructions. Failure to follow all instructions listed
below may result in electric shock, fire and/or serious injury.
WARNING: The warnings, cautions, and instructions discussed in this instruction
manual cannot cover all possible conditions or situations that could occur. It must be understood
by the operator that common sense and caution are factors which cannot be built into this product, but
must be supplied by the operator.

3 of 8
SAVE THESE INSTRUCTIONS
WARNING: YOUR SAFETY IS THE MOST IMPORTANT ISSUE WHEN USING ANY
ELECTICAL PRODUCT. BASIC SAFETY PRECAUTIONS MUST ALWAYS BE FOLLOWED!
•ALWAYS disconnect unit from power source before servicing unit.
•NEVER use this appliance outdoors or in a wet or damp environment. Never allow power cord to be
exposed to water or any other liquid. Electrical shock may cause serious injury or even death.
•ALWAYS check grinder for any damaged parts prior to using, including power cord.
•NEVER modify power cord or plug in any way. ALWAYS use the proper outlet with a 3 prong
grounded line.
•ALWAYS make sure the power switch is in the off position before plugging in or removing the unit’s
power cord. NEVER use the cord to remove the plug from the outlet.
•NEVER use the appliance in an area where the cord is exposed to possible entanglement.
ALWAYS protect the cord from being snagged as this could cause the appliance to be turned over.
•NEVER attempt to operate this appliance while under the influence of alcohol, drugs or medications.
•NEVER leave your appliance unattended. ALWAYS turn off the power switch and disconnect the
unit from the power source before leaving the work area.
•ALWAYS keep children and inexperienced users a safe distance away from this appliance.
Children and inexperienced users should never be allowed to operate this unit.
•Trim all excess tendons, cartilage, cords, blood clots and remove meat from bones.
•NEVER leave this appliance unattended while it is in operation or while connected to a power source,
which would allow anyone unqualified to turn on this unit.
•ALWAYS make certain the appliance is seated firmly on a level, stable surface.
•NEVER operate this appliance without animal meat in the unit. Severe damage can occur if unit is
run for any length of time without product in the unit.
•ALWAYS tie back loose hair and clothing before attempting to operate this appliance and roll back
any long sleeves you may be wearing.
•ALWAYS remove any rings, watches, bracelets or other jewelry before attempting to operate this
appliance. Not doing so could cause serious injury and damage the unit.
•ALWAYS wear eye protection (safety goggles) when operating this appliance.
•
WARNING: NEVER use fingers to push meat into hopper intake. Doing so could result in
loss of appendages and serious injury. Always use food plunger.
WARNING: NEVER use hands or fingers to pull or scrape meat away from the grinding
plate outlet. Doing so could result in loss of appendages and serious injury.
•NEVER extend your reach or reach over any object to feed the grinder. Keep a stable balance and
firm footing at all times.

4 of 8
•NEVER insert any foreign object into this appliance. Always use the accessories that were provided
with your unit.
•ALWAYS turn off and disconnect the appliance if it becomes jammed. Wait until the unit has come to
a complete stop before attempting to remove any jammed matter.
•NEVER force this appliance to operate beyond its designed rate. Trying to push the unit will only
result in problems. Practice safety and allow the unit to work properly.
•NEVER attempt to grind bones, cartilage or tendons. Make sure all metal matter (bullets, shot, etc.)
have been removed from all meat.
•ALWAYS allow all moving parts to come to a complete stop before using the reverse mode.
Reverse mode is designed to run for only a few seconds. Prolonged usage will result in damage to
the unit’s motor. Hitting the reverse mode while the unit is still running will also damage the motor.
•NEVER attempt to remove or attach the hopper tray, grinder head, locking cap or other accessories
while the appliance is in operation or plugged into the power outlet.
ASSEMBLY AND OPERATION INSTRUCTIONS
Before Use:
Disassemble the grinder head and wash each part thoroughly in warm soapy water, removing all
food-grade packing grease and oil from the surfaces. Dry all parts before re-assembly.
Keep packing material for future storage of grinder and grinder parts.
Assembly Instructions:
Insert grinder head into gear housing; be sure that the hopper tray throat is facing upward. Holding
grinder head with one hand, place locking knob into the hole on the side of Motor housing and
tighten it clockwise (See Fig 1).
Insert auger into the grinder head. You may need to turn the auger to align it with the drive shaft of
the motor (See Fig 2).
Place cutting knife blade onto Feed Screw shaft of the auger with the Flat edge of blade facing the
front (See Fig 3).
If blade is not seated properly, meat will not be ground.
Place desired grinding plate next to Cutting Blade. The notch in the plate should align with the
protrusion on the grinder head (See Fig 4).
Firmly screw ring cap onto grinder head. Do not over tighten (See Fig 5).
Insert the Hopper meat tray onto the throat of the head (See Fig 6).
Grinding Instructions:

5 of 8
For best results, trim all excess tendons, cartilage, cords and blood clots and remove meat from
bones.
Optimal results occur when meat is chilled to 32-34°F before grinding.
Cut meat into pieces that will easily fit in throat of grinder head. (Approximately 1in. squares.)
Place cubed meat into tray. Be sure not to over fill the tray. Make sure the throat opening of the tray
remains clear and open.
Place a dish, bowl or tray under grinder head to catch ground meat.
Switch grinder to on position. Carefully begin to feed meat down the throat. Use plunger to push
meat. DO NOT use fingers or utensils other than the plunger provided; bodily injury may occur
and you could damage your grinder.
If Jamming Occurs or Performance Slows:
WARNING: Shut grinder off immediately and remove power cord from outlet.
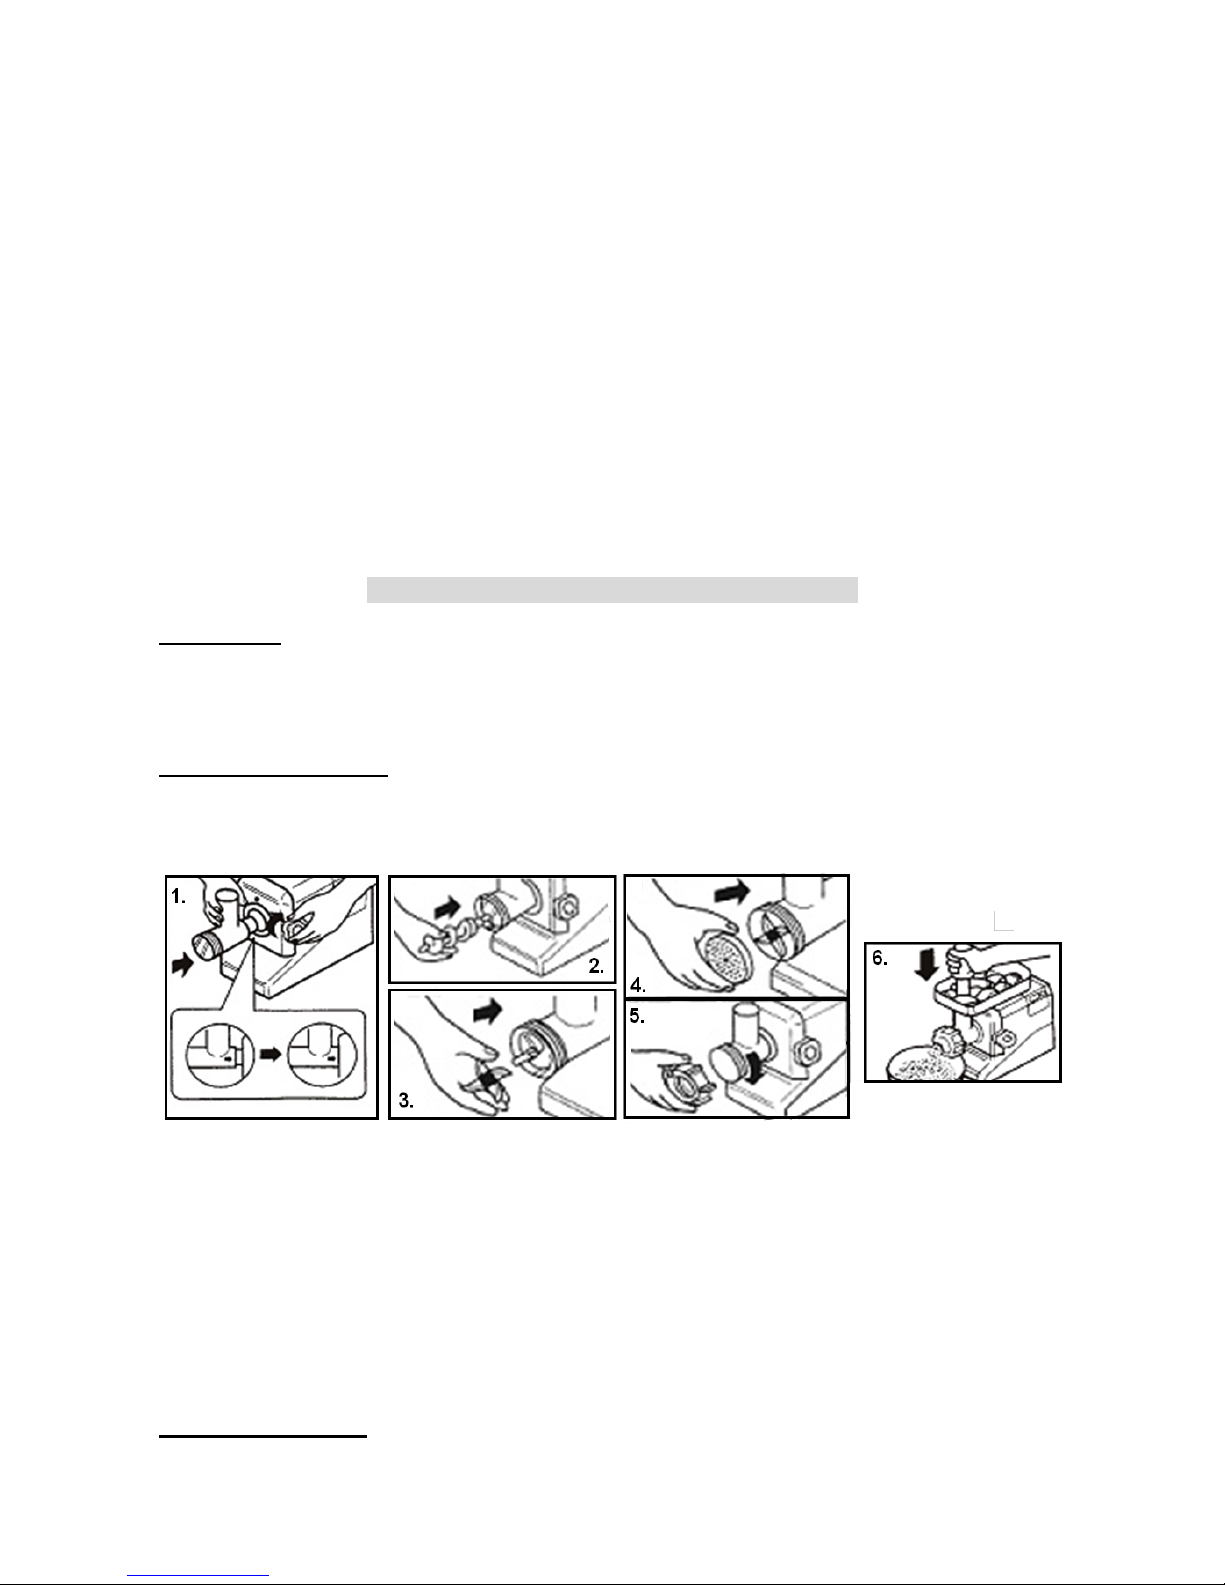
Carefully remove Grinder head ring cap, grinder plate and cutting blade.
Carefully clean grinder plate holes thoroughly and remove any tendons from around cutting blade.
Replace cutting blade, grinder plate and screw ring cap back onto grinder head.
Continue grinding
Repeat steps as necessary to enhance grinder performance.
Grinders Reverse Function:
Switch off the machine.
Switch CIRCUIT BREAKER to reset.
Press OFF/REVERSE to clear any materials that are jamming the machine.
Reverse operation will continue for as long as OFF/REVERSE is pressed.
*Extended use of Reverse is not recommended and will cause damage to motor.
If performance remains slow or there is still a jam go to steps under “If jamming occurs or
Performance slows” above and repeat as needed.
Sausage Stuffing Directions:
Properly prepare casings as directed on casing packaging. Place artificial or natural intestines onto
sausage funnel.
Load hopper with prepared meat and feed meat into grinder head opening before operating unit.
Do not operate grinder without meat in grinder head. Damage to auger and/or motor can occur.
Plug in and turn switch to on position when ready to start.
Hold the casing on the sausage tube in one hand and slowly let the meat output pull the casing from
the tube. Fill casing as desired by holding casing back on tube.
Twist or tie the sausage into links as desired. Tie end of casing into a knot.
It is recommended that 2 people perform sausage stuffing.
Add small amounts of water to your ground meat when stuffing sausage to improve output of meat
through sausage stuffing tube.
After use:
Unplug and disassemble all parts and wash thoroughly in soapy water.
NOTE: Do not place parts in a dishwasher; wash all parts by hand
You must remove all foreign material from all appliance parts. (Grinding stale bread may help
remove food residue.)
Dry all surfaces.

6 of 8
Do not use bleach or chlorine-based chemicals to clean. Discoloration of plastic parts can occur.
Wipe down all non stainless steel parts with a food grade spray. Alternatively, wipe down with a
salad oil to keep from rusting.
Do not immerse motor housing in water. Damage to motor can occur. Wipe with damp cloth to clean.
TROUBLE HOOTING
PROBLEMS
SOLUTIONS
Grinder has no power
Check power to outlet. Make sure unit is securely plugged
into outlet
Grinder has no power, but outlet does
First, check and reset circuit breaker. Problem may be
with switch or power cord. Contact customer service.
Grinder hums or runs in only one direction
Grinder has switch or internal problem. Try resetting
circuit breaker. Contact customer service.
Grinder hums or labors to operate
Possible cold gear grease problem. Move grinder to
warmer area. If this does not work contact customer
service.
Grinder runs slowly and erratically
Possible cold gear grease problem. Move grinder to
warmer area. If this does not work contact customer
service.
Meat is backing up at the back of the
grinder
Auger is not able to handle large portions of meat. Cut
meat into smaller pieces so auger can work properly.
Meat is only turning around the auger and
compressing against the head
Meat is too warm. Cool meat to a temperature around 40°.
Meat does not flow through grinder
Make sure grinder head is properly assembled. Check
sharpness of knife blade.
Meat is backing up at head and will not
flow
Meat may be snagging on the auger or other parts.
Lubricate internal parts with food-grade silicone spray.

7 of 8
PARTS DIAGRAM
PARTS LIST
Part No.
Description
Qty.
Part No.
Description
Qty.
1
Motor Assembly
1 each
21
Gasket
1 each
2
Motor Cover
1 each
22
Hex Screw
4 each
3
Meat tray
1 each
23
Hex Nut
4 each
4
Meat Stomper
1 each
24
Flat washer
4 each
5
Grinder Head
1 each
25
Elastic washer
4 each
6
End Nut
1 each
26
Cable Box
1 each
7
Stuffing tubes
3 each
27
Support Base
1 each
8(a)
Plate - coarse
1 each
28
S/S Cross Screw
4 each
8(b)
Plate - fine
1 each
29
Foot
4 each
9
Blade
1 each
30
Cable clip
1 each
10
Stud
1 each
31
Cable
1 each
11
Auger
1 each
32
Waterproof switch
1 each
12
Auger Bushing
1 each
33
Hex Screw
4 each
13,14,15,16,17,19
Gear Assembly
1 each
34
Star Handle
1 each
18
Front panel of gear box
1 each
35
Receiving meat tray
1 each
20
Back Panel of Gear Box
1 each
For technical questions and replacement parts, please call 1-800-222-5381.

8 of 8
WARRANTY
One-Year Limited Warranty
Distributed by
Northern Tool + Equipment Co., Inc.
Burnsville, MN 55306-6936
Made in China.
Other manuals for 8
1
Table of contents
Other Kitchener Meat Grinder manuals