Klarfit Companion Chaser User manual

10036064
Companion Chaser
Fahrradanhänger
Bicycle Trailer
Remorque de vélo
Remolque de bicicleta
Rimorchio da bici


3
DE
English 11
Español 19
Français 27
Italiano 35
Sehr geehrter Kunde,
wir gratulieren Ihnen zum Erwerb Ihres Gerätes. Lesen
Sie die folgenden Hinweise sorgfältig durch und befolgen
Sie diese, um möglichen Schäden vorzubeugen. Für
Schäden, die durch Missachtung der Hinweise und
unsachgemäßen Gebrauch entstehen, übernehmen wir
keine Haftung. Scannen Sie den folgenden QR-Code,
um Zugriff auf die aktuellste Bedienungsanleitung und
weitere Informationen rund um das Produkt zu erhalten.
INHALTSVERZEICHNIS
Sicherheitshinweise 4
Geräteübersicht 4
Einzelteile 5
Zusammenbau 6
Hinweis zum mitgeliefernten Schnellspanner 9
Wichtige Hinweise zur Befestigung und Benutzung 10
TECHNISCHE DATEN
Artikelnummer 10036064
Maximales Beladungsgewicht 30 kg
Hinweis: Der Fahrradmitnehmer kann an Fahrräder mit einer Reifengröße
von 20“ bis 28“ gekoppelt werden.
HERSTELLER
Chal-Tec GmbH, Wallstraße 16, 10179 Berlin, Deutschland.

4
DE
SICHERHEITSHINWEISE
• Der Anhänger sollte nicht mit mehr als 30 kg beladen werden.
• Der Anhänger darf nicht benutzt werden, um Personen damit zu
befördern.
• FührenSiekeinetechnischenModikationenamGerätdurch.Dieskann
zu Gefahren im Straßenverkehr führen und die Herstellergarantie erlischt.
• Nutzen Sie den Anhänger nicht auf steinigem, unebenem Gelände und in
gefährlichen Verkehrssituationen.
• Das ziehende Fahrrad muss in einwandfreiem Zustand sein. Die Bremsen
sollten perfekt funktionieren. Mit Anhänger (und Beladung) verlängert
sich Ihr Bremsweg.
• Fahren Sie mit dem Anhänger nicht schneller als 40 km/h.
• Der Anhänger darf nicht mit einer mit einer Maschine verbunden werden,
die mit einem Antriebssystem ausgestattet ist. Der Anhänger darf nur
durch direkt angewandte, menschlichen Kraft bewegt werden.
• Der Anhänger darf nicht durch motorisierte Fahrzeuge bewegt werden.
Dies gilt auch für Fahrräder mit Elektroantrieb oder Fahrräder mit
elektromotorischem Hilfsantrieb.
GERÄTEÜBERSICHT
Zusammengebauter Anhänger

5
DE
EINZELTEILE
1Anhängerkarosserie 5Rad
2Vordere Gabel 6Radgabel
3Langer Schnellspanner 7Sicherheitsgurt
4Radschnellspanner 8Schutzblech

6
DE
ZUSAMMENBAU
1
Montieren Sie die Radgabel an der Karosserie des Anhängers wie in den Bildern und Schritten
beschrieben. Stellen Sie sicher, dass die Radgabel fest und sicher montiert ist.

7
DE
2
Montieren Sie das Schutzblech gemäß den Bildern und Schritten.

8
DE
3
Stecken Sie die Radgabel auf die Radachse und montieren Sie dann das Rad mit dem
Radschnellspanner. Stellen Sie sicher, dass das Rad fest und sicher montiert ist.
4
Setzen Sie die Vordergabelachse zwischen die Karosserie des Anhängers und die
Montagehalterung. Stellen Sie sicher, dass die Löcher übereinstimmen, setzen Sie die
Montagestange ein und verriegeln Sie sie unten mit dem Drehknopf. Vergewissern Sie sich, dass
die Vordergabel fest und sicher an der Karosserie des Anhängers montiert ist.

9
DE
5
Montieren Sie den langen Schnellspanner am Hinterrad des Fahrrads und vergewissern
Sie sich, dass er fest und sicher verriegelt ist. Setzen Sie den montierten Anhänger auf den
Schnellspanner und verriegeln Sie ihn dann gemäß den obigen Bildern und Schritten. Drücken
Sie auf das Sicherheitsschloss und bewegen Sie es entlang des Pfeilzeichens, um den Anhänger
zu verriegeln. Vergewissern Sie sich, dass er fest und sicher verriegelt ist.
HINWEIS ZUM MITGELIEFERNTEN
SCHNELLSPANNER
Der mitgelieferte lange Schnellspanner passt auf alle
Fahrräder mit Schnellspannsystem am Hinterrad.
Für Fahrräder mit Vollachse wird ein Adapter (siehe
Foto) benötigt. Der Adapter ist nicht im Lieferumfang
enthalten, sondern muss im Fahrradfachhandel
erworben werden.

10
DE
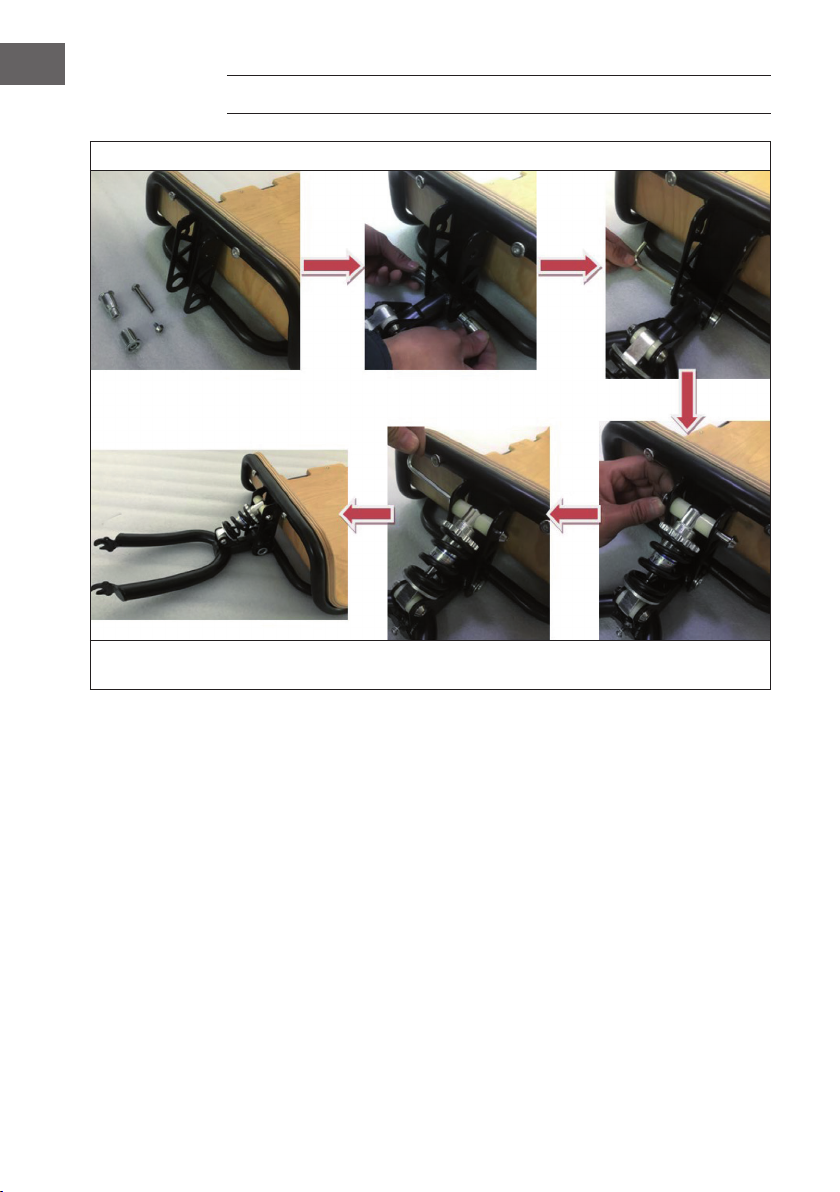
WICHTIGE HINWEISE ZUR BEFESTIGUNG UND
BENUTZUNG
Hinweis: Die Verbindung zwischen Fahrrad und Anhänger ist der
wichtigste Schritt im Montageprozess. Vergewissern Sie sich, dass
der Anhänger sicher mit dem Fahrrad verbunden ist. Wenn sich die
Anhängerkupplung nicht sicher an Ihrem Fahrrad befestigen oder anziehen
lässt, verwenden Sie sie nicht. Wenden Sie sich an Ihren Fahrradhändler,
um Hilfe bei der korrekten Installation zu erhalten.
• Überprüfen Sie den Zustand von Fahrrad und Anhänger vor jedem
Gebrauch.
• Fahren Sie immer defensiv. Während der Nutzung müssen Sie die örtlichen
Verkehrsvorschriften beachten.
• Mit Anhänger benötigen Sie einen zusätzlichen Bremsweg.
• Üben Sie mit Ihrem Anhänger vor dem Gebrauch, bis Sie mit ihm vertraut
sind.
• Stellen Sie sicher, dass Ihre Ladung vor der Fahrt gesichert ist.
Überschreiten Sie nicht das maximale Beladungsgewicht.
• Achten Sie darauf, dass Sie ein geeignetes Fahrrad verwenden. Fragen Sie
im Zweifelsfall Ihren lokalen Fahrradhändler oder Ihren Hersteller.
• Überprüfen Sie nach dem Zusammenbau und vor der Fahrt, ob die
Anhängevorrichtung vollständig eingerastet ist.
• Überprüfen Sie regelmäßig den Reifendruck.
• Verwenden Sie den Anhänger nach Möglichkeit nur auf glatten Straßen.
Vermeiden Sie Bordsteine, Schlaglöcher oder unebenen Untergrund.
• Wenn Sie bergab oder um eine Kurve fahren, müssen Sie langsamer
fahren.

11
EN
Dear Customer,
Congratulations on purchasing this device. Please read
the following instructions carefully and follow them to
prevent possible damages. We assume no liability for
damage caused by disregard of the instructions and
improper use. Scan the QR code to get access to the
latest user manual and more product information.
CONTENT
Safety Instructions 12
Equipment Overview 12
Individual parts 13
Assembly 14
Note on the supplied Quick Release 17
Important Notes on Fastening and Use 18
TECHNICAL DATA
Item number 10036064
Maximum load weight 30 kg
Note: The bicycle carrier can be coupled to bicycles with a tire size from 20“
to 28“.
PRODUCER
Chal-Tec GmbH, Wallstraße 16, 10179 Berlin, Germany.

12
EN
SAFETY INSTRUCTIONS
• The trailer should not be loaded with more than 30 kg.
• The trailer must not be used to transport people with it.
• Donotmakeanytechnicalmodicationstothedevice.Thiscanleadto
dangersinroadtrafcandthemanufacturer‘swarrantywillbevoided.
• Donotusethetraileronstony,uneventerrainandindangeroustrafc
situations.
• The towing bicycle must be in perfect condition. The brakes should work
perfectly. With trailer (and load) your braking distance will increase.
• Do not drive faster than 40 km/h with the trailer.
• The trailer must not be connected to a machine equipped with a drive
system. The trailer may only be moved by directly applied human power.
• The trailer must not be moved by motorized vehicles. This also applies to
bicycles with electric drive or bicycles with auxiliary electric motor drive.
EQUIPMENT OVERVIEW
Assembled trailer

13
EN
INDIVIDUAL PARTS
1Trailer body 5Wheel
2Front fork 6Wheel fork
3Long quick release 7Safety belt
4Wheel quick release 8Mudguard

14
EN
ASSEMBLY
1
Mount the wheel fork to the body of the trailer as described in the pictures and steps. Make sure
thatthewheelforkismountedrmlyandsecurely.

15
EN
2
Mount the mudguard according to the pictures and steps.

16
EN
3
Place the wheel fork on the wheel axle and then mount the wheel with the wheel quick release.
Makesurethatthewheelismountedrmlyandsecurely.
4
Place the front fork axle between the body of the trailer and the mounting bracket. Make sure
that the holes match, insert the mounting bar and lock it at the bottom with the knob. Make sure
thatthefrontforkisrmlyandsecurelymountedtothebodyofthetrailer.

17
EN
5
Mount the long quick release on the rear wheel of the bicycle and make sure it is locked tightly
and securely. Place the mounted trailer on the quick release, and then lock it according to the
above pictures and steps. Press the safety lock and move it along the arrow sign to lock the
trailer. Make sure it is locked tightly and securely.
NOTE ON THE SUPPLIED QUICK RELEASE
Thesuppliedlongquickreleasetsallbikeswith
quick release system on the rear wheel. For bikes
with solid axle an adapter (see photo) is needed. The
adapter is not included, but must be purchased at a
bicycle shop.

18
EN
IMPORTANT NOTES ON FASTENING AND USE
Note: The connection between bicycle and trailer is the most important
step in the assembly process. Make sure that the trailer is securely
attached to the bicycle. If the trailer hitch cannot be securely attached or
tightened to your bicycle, do not use it. Contact your bicycle dealer for help
with correct installation.
• Check the condition of the bicycle and trailer before each use.
• Alwaysridedefensively.Duringuse,observelocaltrafcregulations.
• If you have a trailer, you will need additional stopping distance.
• Practice your trailer before use until you are familiar with it.
• Make sure that your load is secured before driving. Do not exceed the
maximum load weight.
• Make sure that you use a suitable bicycle. If in doubt, consult your local
bicycle dealer or manufacturer.
• After assembly and before riding, check that the hitch is fully engaged.
• Check the tyre pressure regularly.
• If possible, use the trailer only on slippery roads. Avoid kerbs, potholes or
uneven surfaces.
• If you drive downhill or around a bend, you must drive slower.

19
ES
Estimado cliente:
Le felicitamos por la adquisición de este producto. Lea
atentamente el siguiente manual y siga cuidadosamente
las instrucciones de uso con el n de evitar posibles
daños. La empresa no se responsabiliza de los daños
ocasionadosporunusoindebidodelproductooporhaber
desatendido las indicaciones de seguridad. Escanee el
código QR para obtener acceso al manual de usuario más
reciente y otra información sobre el producto.
ÍNDICE DE CONTENIDOS
Instrucciones de seguridad 20
Descripción del producto 20
Piezas 21
Montaje 22
Nota sobre el cierre de liberación rápida incluido 25
Instrucciones importantes para el montaje y el uso 26
DATOS TÉCNICOS
Número de artículo 10036064
Carga máxima 30 kg
Nota: El remolque para bicicletas puede acoplarse a bicicletas con un
tamaño de neumático de 20“ a 28“.
FABRICANTE
Chal-Tec GmbH, Wallstraße 16, 10179 Berlin, Alemania.

20
ES
INSTRUCCIONES DE SEGURIDAD
• El remolque no debe cargarse con más de 30 kg.
• El remolque no debe utilizarse para el transporte de personas.
• Norealiceningunamodicacióntécnicaenelaparato.Estopuede
provocarpeligroseneltrácorodadoylagarantíadelfabricantequedará
invalidada.
• No utilice el remolque en terrenos pedregosos e irregulares ni en
situacionesdetrácopeligroso.
• La bicicleta del remolque debe estar en perfecto estado. Los frenos deben
funcionar perfectamente. Con un remolque (y carga) su distancia de
frenado aumenta.
• No circule a más de 40 km/h con el remolque.
• El remolque no debe estar conectado a una máquina. El remolque sólo
debe ser movido con la aplicación directa de la fuerza humana.
• El remolque no debe ser movido por vehículos motorizados. Esto también
se aplica a las bicicletas con accionamiento eléctrico o a las bicicletas con
accionamiento auxiliar de motor eléctrico.
DESCRIPCIÓN DEL PRODUCTO
Remolque montado
Other manuals for Companion Chaser
1
This manual suits for next models
1
Table of contents
Languages:
Other Klarfit Bicycle Accessories manuals